Processes
Process is specific use of suggested procedure in company. By creating process real run of suggested step sequence is initiated. Steps are in process created the way it's suggested in process chart. Dedicated users fulfill tasks entered in steps, specific values are added to individual Variables and Products.
Book of Processes
The Book of Processes contains the list of all processes that were created by the users.
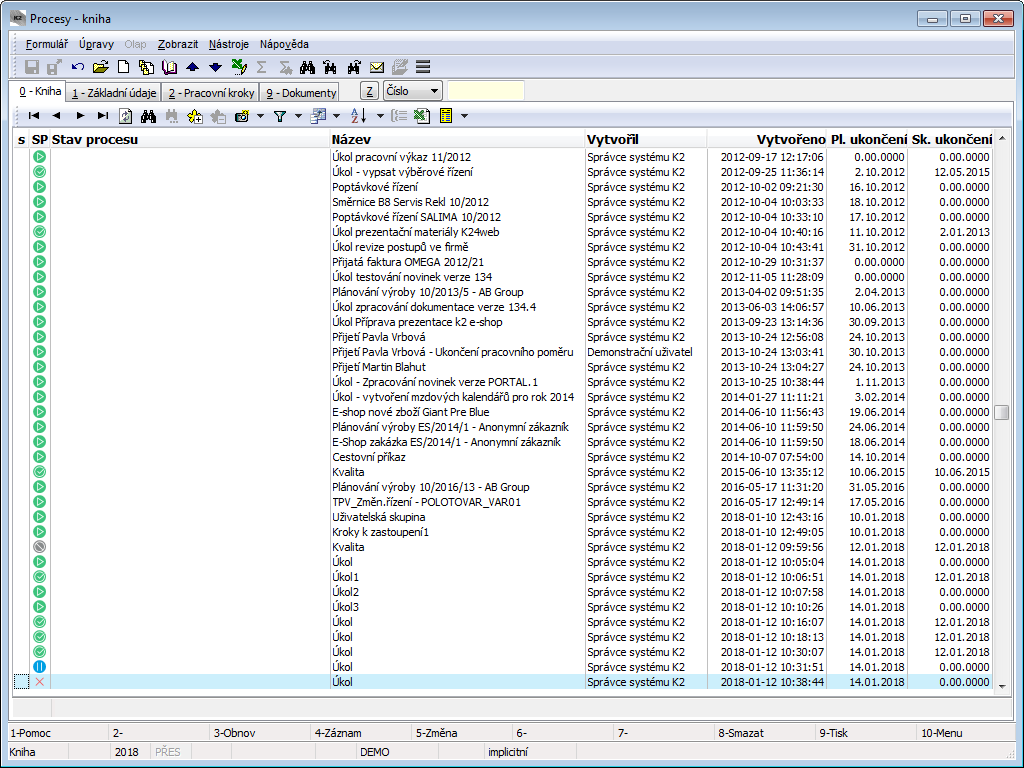
Picture: Processes - book
Description of columns:
s |
The following icon |
SP |
Icons in this field show current status of the process. - the process is running,
Column with the Process status icons can be added to page 0 of each K2 document (Received Invoice, Dispatch Form, ...). Icons will show if document on page 9 contains process and in what status the process is. If document would be included in more processes, icons on page 0 of this document will be displayed with following priority.
|
Status |
The status of the process. This shows current status of the process, (for settings see Versioned Procedures book - Events, Parameters, parameter ProcStatus). |
Name |
The name of procedure |
Created by |
The name of the user who created the record. |
Created on |
Date and time of creation of the task. |
Scheduled End |
Scheduled date when the process should end. |
Actual End |
The date when the process was actually ended (by creating the End step) or when the step was cancelled. |
Keys Description:
F5 |
Change process. Only a user with the Workflow - Processes - Change Process right can change a process. |
F8 |
Delete process. Only a user with the Workflow - Processes - Administration right can delete a process. |
Alt+F8 |
Chart of process. Using these keys, the user can display the chart of this process. For detailed description, see the Browse Worksteps - Process Chartbook. |
Ctrl+F8 |
Cancel process. The cancellation of processes is enabled for users with the Workflow - Processes - Administrationright, or if they have the Workflow - Procesess -Cancel Process right and are also specified as the Responsible Role, which is selected on the first page of the Versioned Procedures book,
|
Creating a Process
A process can be created by pressing the Ins key. A Procedures - Book will appear, where we can choose the header of the versioned procedure according to which the process should run. All procedures headers, containing version of the procedure from which a process can be created, are displayed on this form.
A process can only be created from a process that meets the following conditions:
- the procedure must be in the Approved status and must be currently valid,
- user who wishes to create a process must be included in role set in the Right to Launch tab (Versioned Procedures - page 1book).
Note: A user with the ‘Workflow - Procedure - Debugging’ right can create a process even from a procedure in the debugging state. You can create processes from a procedure in the debugging and also make changes to it. This status is used when user designs new procedure and needs to so-called ‘fine-tune’ it at process (i.e. to test particular example whether it works correctly, or to fix any detected defects).
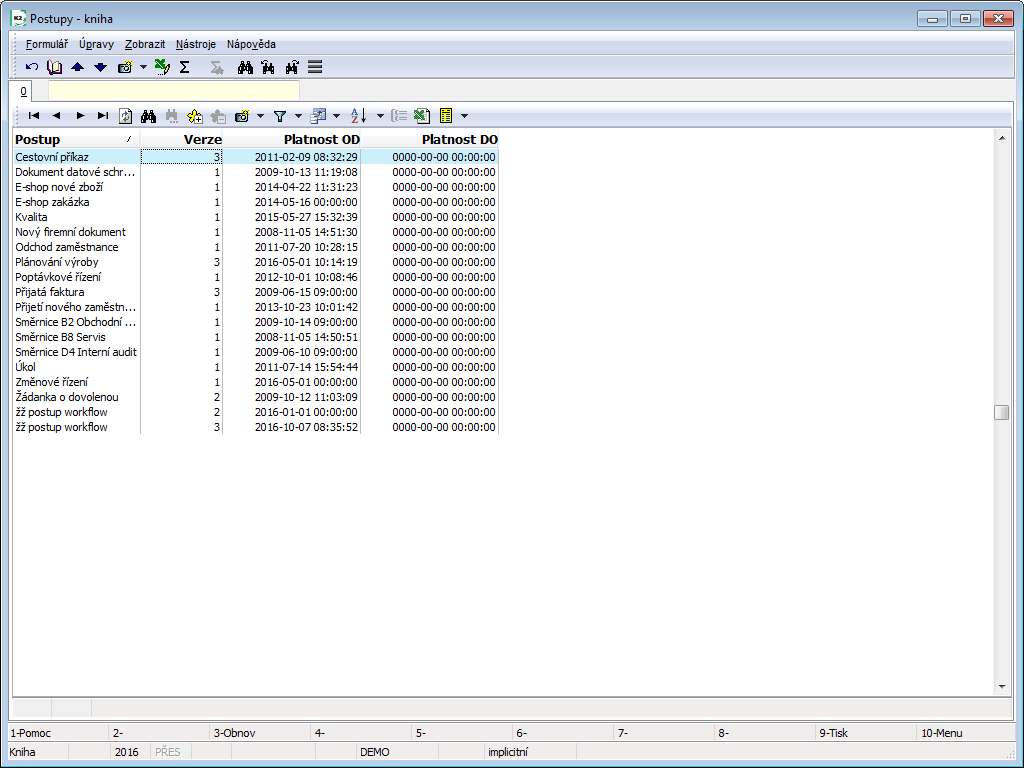
Picture: Procedures - Book - a list of procedure headers according to which the process can be created
Description of columns:
Process |
The language name of the procedure header. |
Version |
Serial number of the version which will be used for the process. |
Valid from |
The date from which the version of the procedure is valid. |
Valid to |
The date until which the version of the procedure is valid. If the date is zero, the version is valid indefinitely. |
Processes - Basic Info (page 1)
Basic information about process are displayed on page 1 of Processes book, information about Monitoring persons, Participants of the process, Variables and Products of the process are displayed in tabs.
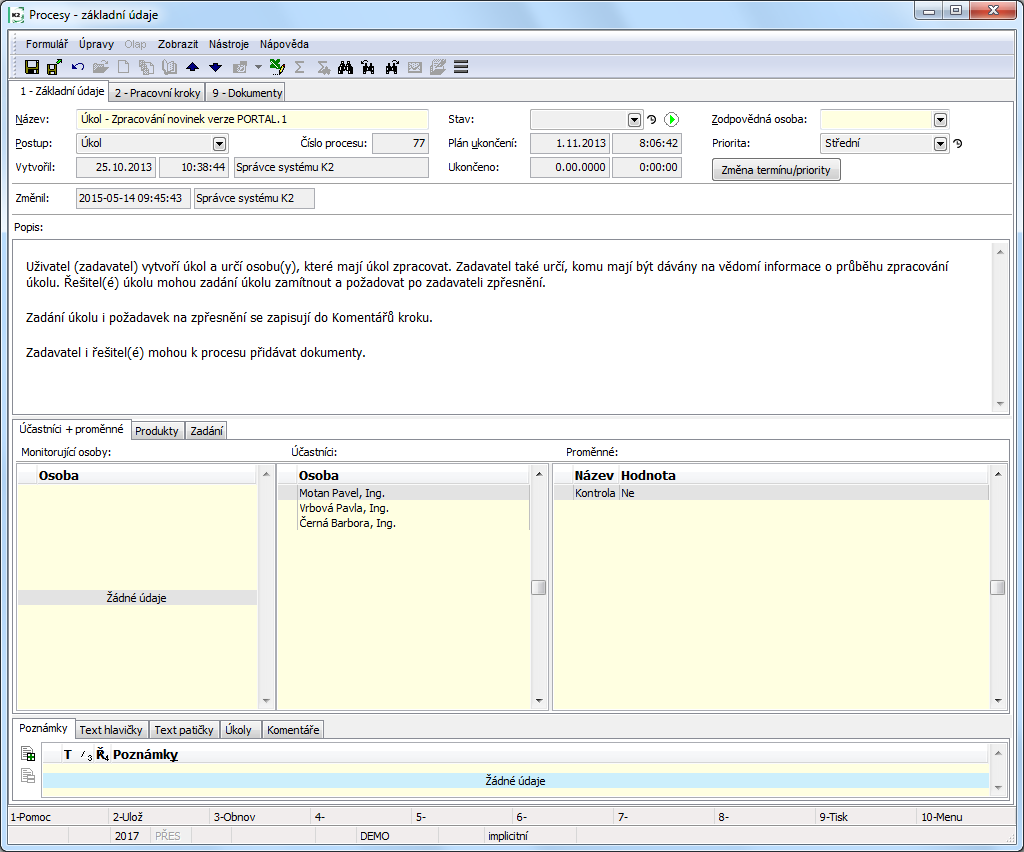
Picture: Form Processes - Basic Info (page 1) - tab Participants + Variables
Description of Fields:
Name |
Name of the name of the process (this field can be edited). |
Process |
Name of procedure header from which the process is created. |
Process No. |
Unique process number created by the system. |
Created by |
Date and time of process creation and user which created the process. |
Changed by |
Date and the time of last process change and an user which has made this change. |
Status |
Process status set on page 2 of Versioned Procedures book, in Events tab with parameter "ProcStatus”. |
Planned end date |
Date and time for when the process end is scheduled (this can be edited). |
Ended |
Real process end, date and time when step type End was created, or date and time when process was cancelled. |
Responsible person |
This person is responsible for process; person is chosen from list of contact persons included in roles and set in Responsibility tab on page 1 of Versioned Procedure. This field may or may not be filled (according to set up in procedure). |
Priority |
Process priority, set for process in Versioned Procedures book, on page 2, in Properties tab, or possibly changed for specific process with button Change of Priority/Time. |
Change priority/time |
Button to change time conditions for steps and also to change priority of this specific process or steps in this process. Values are predefined here according to values set in procedure. |
Description |
Description of process set in procedure in Versioned Procedures book, on page 2 in Description tab. |
Monitoring persons
In left part of the form monitoring persons are displayed, these were set in Procedure from which process was created. More contact persons to monitor specific process can be added with Ins key.
Process participants
In the middle part of the form all participants are displayed, i.e. step approvers for this process. Also user which created the process is included here. More process participants can be added with Ins key and by choosing the user from Contact Persons book, process participants can be deleted with Del key.
Process variables
In right part of the form are displayed Process Variables, which are used in the process. In individual columns are displayed variable Identificator (its abbreviation), Name of variable and its current Value in the process.
Form to enter value of the variable is displayed after double-clicking with left mouse button on variable. Setting of individual values of variables is saved to so called History of field values. Therefore we know who, when and how changed the value of variable.
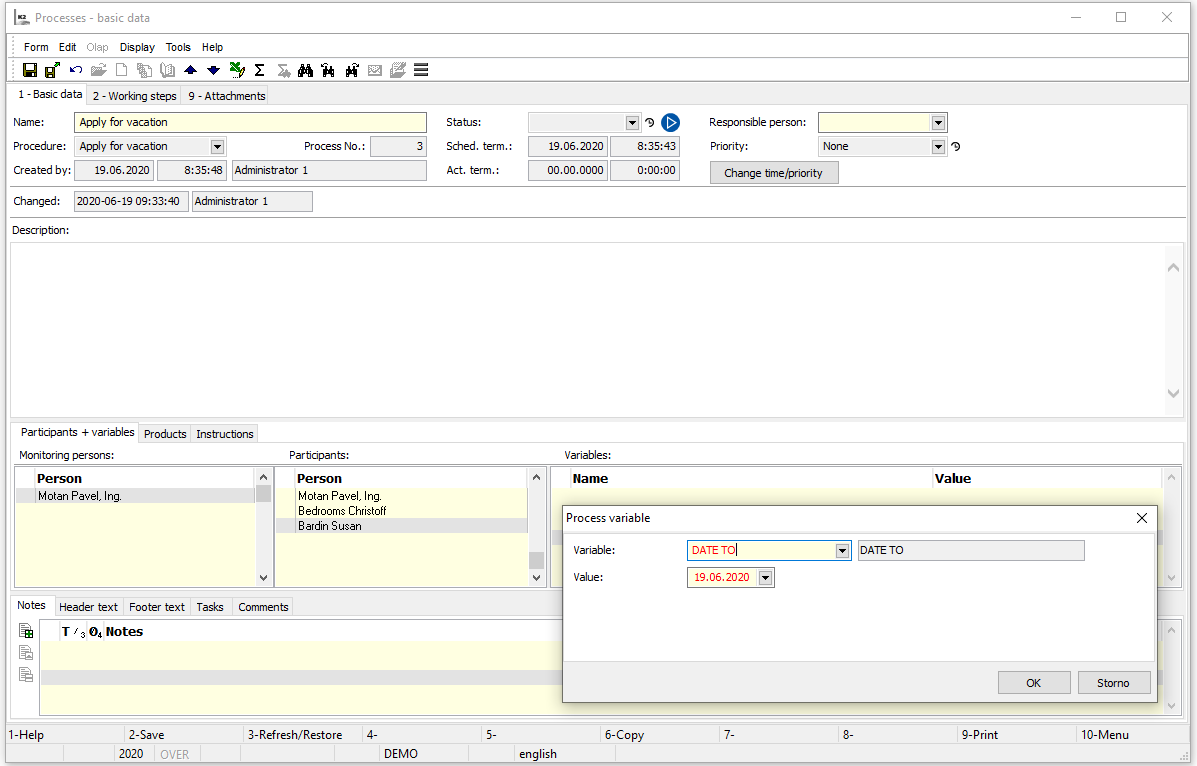
Picture: Form Processes - page 1 - tab Participants and Variables
In Products tab specific products can be entered to process with Ins key. After pressing the button Products book is displayed with list of Workflow Products headers which can be entered to the process.
After choosing preferred Workflow Product list of specific products related to given product type will appear (e.g. Received Invoices book), where we can assign specific product (particular received invoice) to the process. This process will then be shown on page 9 of this specific product book as a new item in field Classified Processes.
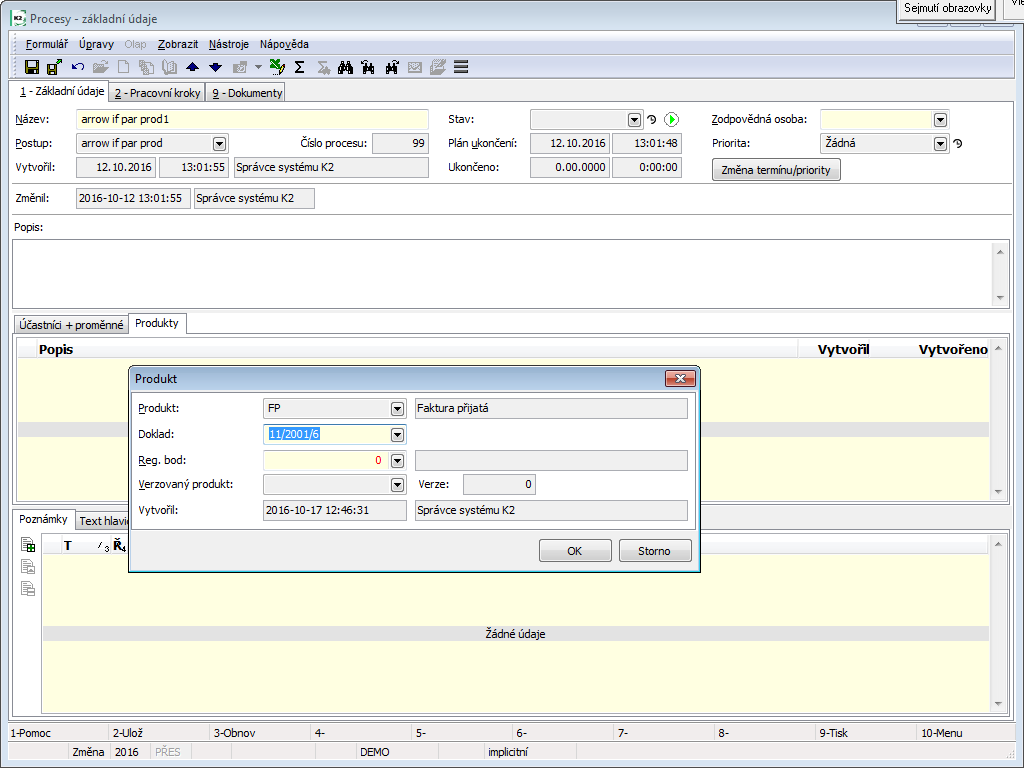
Picture: Form Processes - page 1 - tab Products
Entry of registered product point
By double-clicking with left mouse button on added product form Product is displayed, where we can add Registered point (see Workflow Products - page 1, - Registered Points). In this form we can also change the product.
Assignment tab is displayed if in Procedure option Display Assignment is checked. This tab contains:
- Text tab - to describe process entry,
- History tab - to display history of entry changes.

Picture: Assignment - Text tab

Picture: Assignment - History tab
This button enables the authorized user to change the pre-defined values from the step of the Priority and Time for Filling the Task fields.
User who can make this change:
- The person who creates the process,
- the Responsible Person for the process,
- a user with the Workflow - Processes - Administration right.
Change Process Priority
When pressing this button, a form with a process chart and fields for changing the times for completing/priorities is displayed.
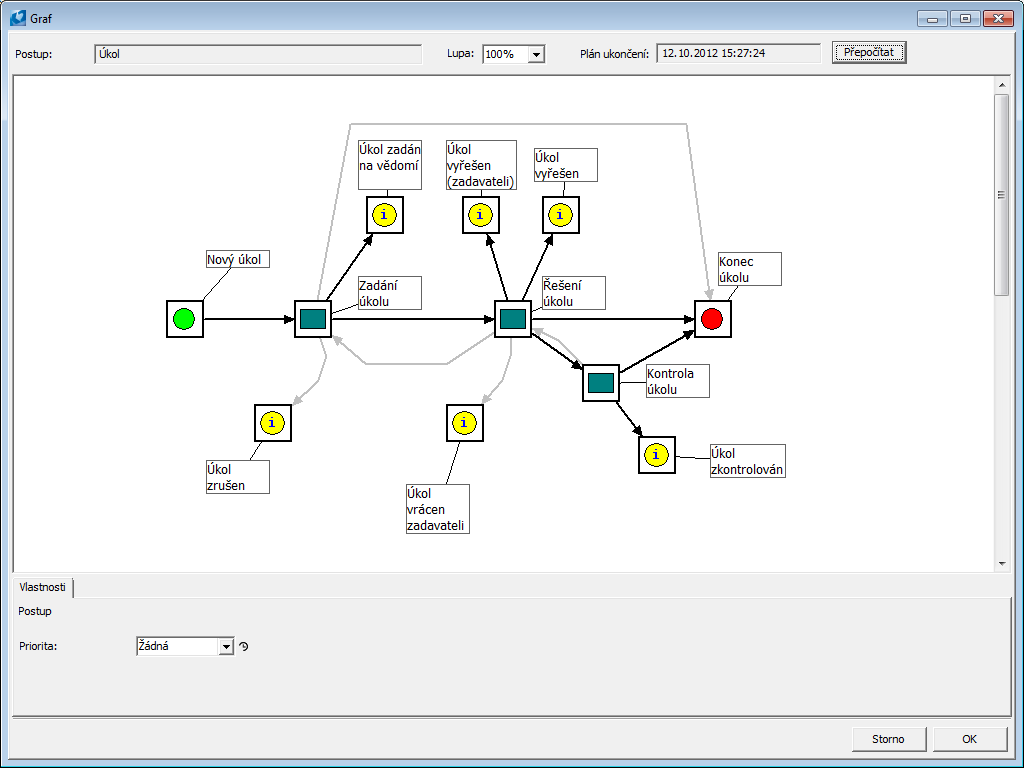
Picture: Change Process Priority
If we do not mark any step, we set the priority to the whole process. After changing the priority, the system will ask whether we wish to change the priority of all steps of the process. If we enter ‘Yes’, the priority will be changed for all steps of the process. If we enter ‘No’, the original priority for all the steps will remain.
We might wish to change the priority of a process/steps when we need to e.g. solve an important task or when we receive an important contract from a company with a high priority for us.
The changes made here will be written in the so-called ‘Field History’ - a form which will appear after clicking on the icon next to the field. The information such as the original value, the new value, who and when changed the value will be written here.
Change Priority / Time for Filling the Steps
After marking the step we can change its Priority and Time for Filling the Task. If we change Time to complete step and hit Recalculate button, so called "Longest path through process” will be recalculated, steps and arrows will be coloured in green.
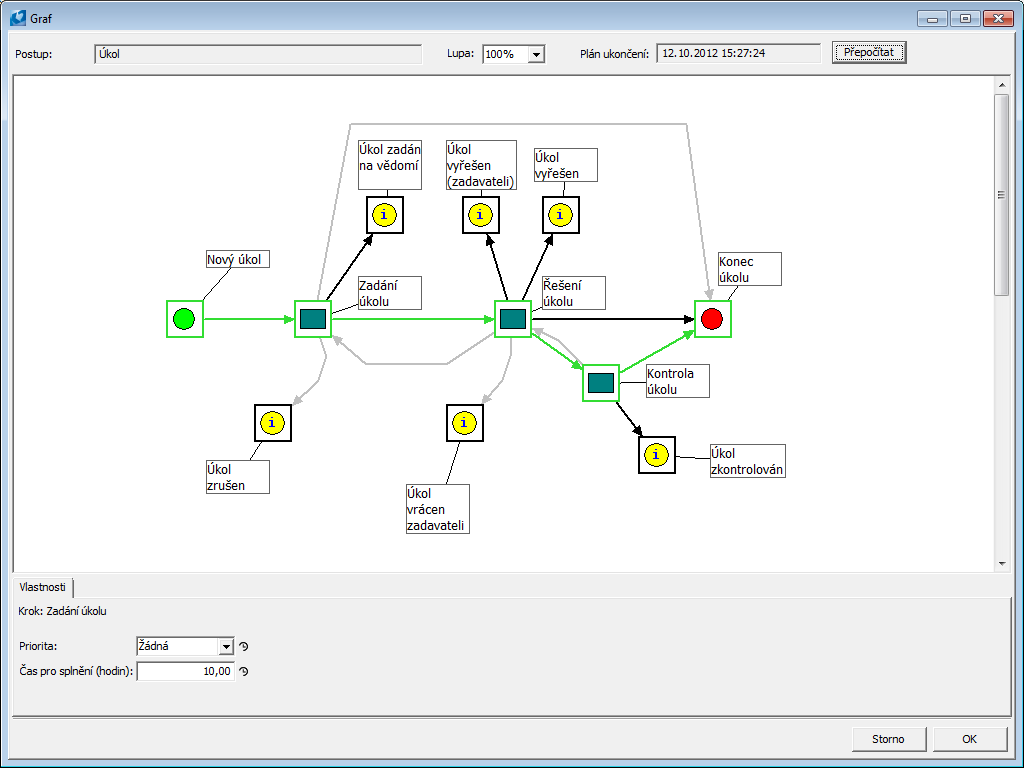
Picture: Change of priority and time to complete process steps, "Longest path through process” displayed after hitting Recalculate button
This function can be useful if we know that certain task must be completed earlier - we can reduce time to complete step. Or vice versa, we know that certain task is too complicated and user will need more time to work on it - we can extend time to complete step.
History of field changes is recorded in Field history. We can see who, when made the change as well as to which value.
Priority icons description:
|
Lowest priority. |
|
Low priority. |
|
Medium priority. |
|
High priority. |
|
Top priority. |
Note: User can in Work Steps book sort the records according to priority so that steps with highest priority are in the book on the top of the steps list.
Processes - Work Steps (page 2)
Page 2 of Processes book contains basic information about process. In items Users Steps (i.e. Work Steps of this process) are displayed, which have been processed already, and newly created step which awaits processing. In tabs are information about step Comment and Statuses of the step, according to which step we have highlighted in field Users Steps.
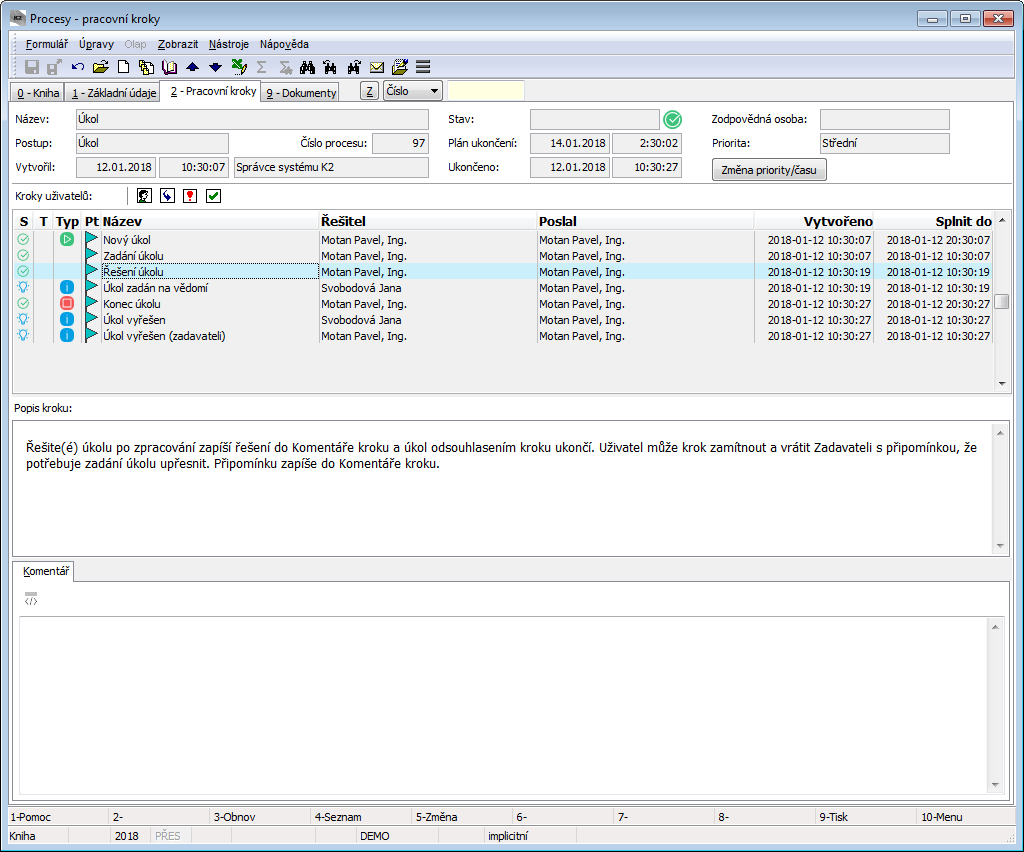
Picture: Form Processes - Work Steps - page 2
Users Steps
This part of the form contains icons of all operations which can be done with step, finished process steps and newly created step, icons description as well as its key shortcuts - see Work Step, Description of icons and key shortcuts for Work Step form operations.
Columns description of field Users Steps:
S |
Icon of Step Status is displayed here (see Work Steps - book Columns description - Column S), according to current status of the step. |
|
T |
If the icon |
|
K |
Type of step: |
|
|
|
- Start step is created. |
|
|
- step type End is created. |
|
|
- Cognizance step is created. |
|
|
- Checkpoint step is created. |
|
If there is no icon, it is a different step than Start, End, On consciousness, checkpoint, i.e. normal process step. |
|
Pt |
Priority of Step is displayed here (for description see Work Steps - book). |
|
TO |
Red dot icon is displayed here if user is in delay with step approval. (If value in field Deadline is earlier than current date). |
|
Name |
Name of step, comment, document or product is displayed. |
|
Owner |
Step owner (person who should process or who already processed the step). |
|
Sent by |
Owner of previous step who sent the step to current owner. |
|
Created on |
Date and time of step creation. |
|
Deadline |
Date and time till when user should process (approve, reject) the step are displayed here. |
|
Step description:
In field Step Description is displayed description of step which we have highlighted in Users Steps field. Step description entered in second page of Versioned procedures book, tab Description is displayed.
Comment tab
Comment Text which is highlighted in field Users Steps (see picture above) is displayed in tab Comment.
Key shortcut description in browse mode:
Ctrl+F3 |
Forward - currently highlighted step can be forwarded to another user. List of users to which we can forward the step (defined by Group of approvers in step) is displayed. Users are not allowed to forward steps to themselves. Exception has only user with Administrator right in workflow module. He/she is able to forward any step to himself/herself even if he/she is not assignee. |
Ctrl+F4 |
Deputize - currently highlighted step can be taken over by another user for solution, i.e. original assignee can be deputized. |
Ctrl+F6 |
Redefine - this function is initiated in case there are conditions set up in procedure which don’t allow to create following steps in process. Function is used to make adjustments in versioned procedure draft. Button should be pressed after process step is highlighted. Please use this function carefully. In case changes in approved procedure are needed, it’s recommended to create new procedure version where the changes can be made. Current process which doesn't run the way it should can be cancelled. When new procedure version is approved new process can be created which will run already according to the new procedure version. |
Ctrl+F8 |
Cancel - process can be cancelled. |
Shift+F8 |
Variables - when pressing this button Set up of variable values form is displayed where Process variables appear with their current values provided they haven’t been marked as Internal in Variables tab of Versioned procedures book. |
Alt+F2 |
Read - to read highlighted step. |
Alt+F3 |
Accept - to accept highlighted step |
Alt+F5 |
Reject - to reject highlighted step |
Alt+F6 |
Approve - to approve highlighted step. |
F7 |
Comment - to enter comment to step or process. |
Alt+F8 |
Chart - to display process chart |
Step Statuses are displayed in Statuses tab. History of step operations is displayed for step which is currently highlighted in field Users Steps.
See Work Steps book - tab Step for detailed description of Statuses.
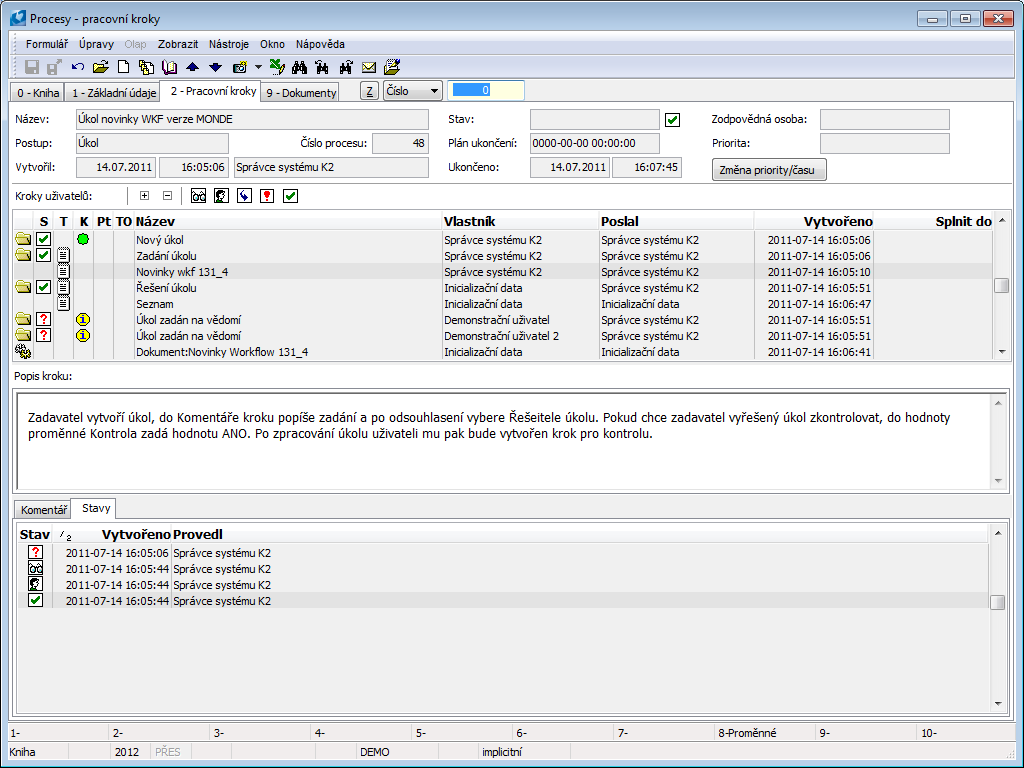
Picture: Form Processes - Work Steps - page 2- Statuses tab
Reports above Processes
Process No.: WKF004 |
Report ID: SWKF001 |
File: WProc_HodnUzv.AM |
Report description: Report displays list of contact persons with processes where they as assignees are in so called delay, i.e. those which are late with Process step based on specified Evaluation inVersioned Procedure. At assignees are displayed Processes with Steps which are in delay, Action which is being monitored, Due Date by when action should have been completed and Delay (time which has already passed since Due Date). Column Plan shows how many days user had to complete the step. |
||
Address in the tree: [Work Office] [WorkFlow] [Workflow Administration] [Processes] |
||
Reports parameters:
ActualUser - No Yes - only delay of current person is displayed; No - delay of all persons is displayed. |
AMName - List of processes with steps in delay Entered text displays in the header of report. |
History - No Yes - also steps, which were in delay but now are ended, are displayed. |
Uzv Contact person, whose delay we want to display, is being chosen here. In parameter ActualUser No must be entered. |
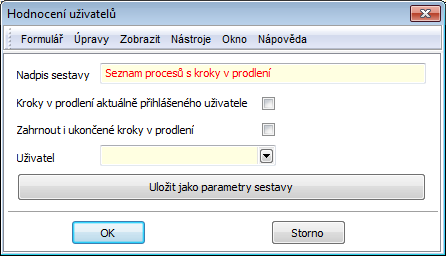
Picture: Form Evaluation of users to submit entry conditions of the report.
Form Fields' Description:
Report Title |
This text displays in the report title. |
Steps in delay of currently logged user. |
By checking this box incomplete steps in delay of currently logged user are displayed. |
Include also ended steps in Delay |
By checking this box also steps in delay which are already completed are displayed. |
Person |
Contact person, whose steps in delay we want to display, is being chosen here. If field Steps in delay of currently logged user is checked then this field has priority and steps in delay of currently logged user are displayed. Steps in delay of currently logged user. |
Save as report parameters |
Pressing this button saves the entered parameters as the default report parameters and before they will be pre-filled in individual fields each time the report is run. |
Process No.: WKF004 |
Report ID: SWKF004 |
File: WProc_Protok.AM |
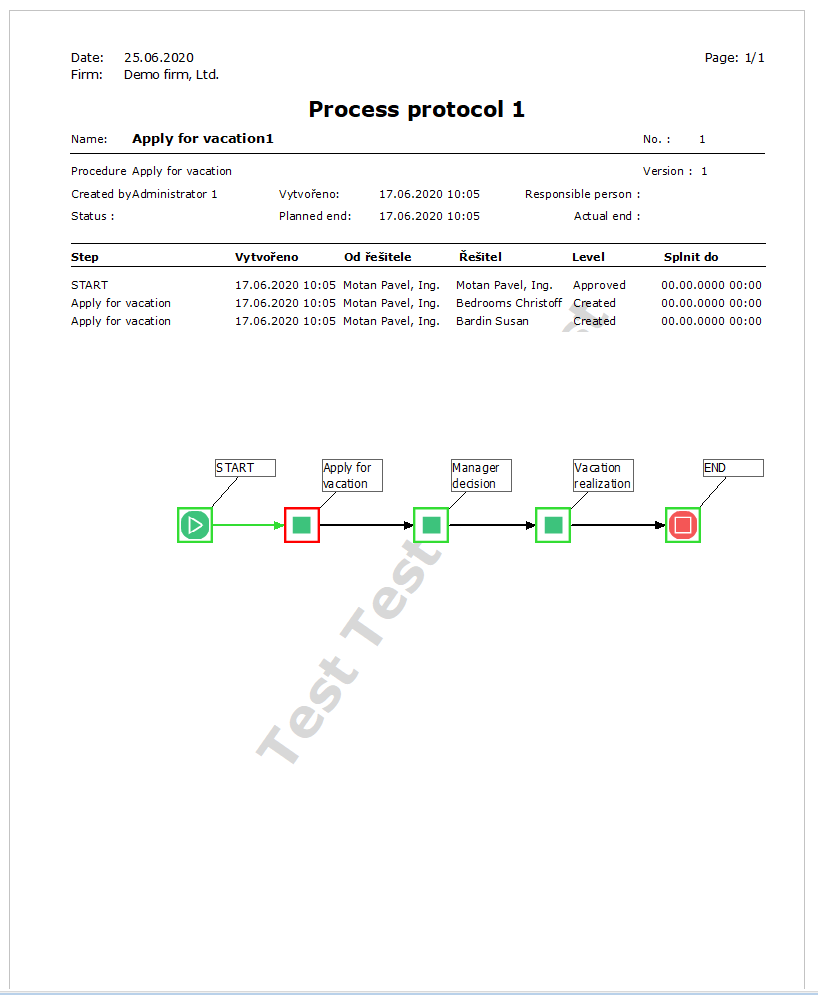
Report description: Process Log report displays information about Process and Process Steps chronology. All process steps which were created and final Statutes of these steps are here. In the Name of report is text Process Log with Process No. under which the process is saved in the system. Chart is also displayed in the report, completed steps are framed in green colour, steps still pending action are framed in red. Process steps which are not framed have not yet been created. |
||
Address in the tree: [Work Office] [WorkFlow] [Workflow Administration] [Processes] |
||
Reports parameters:
NameAsTitle - No Yes - name of the process displays in the name of report. |
ShowGraph- Yes Yes - the procedure chart is displayed |
Process No.: WKF004 |
Report ID: SWKF006 |
File: WStandardsList.AM |
|
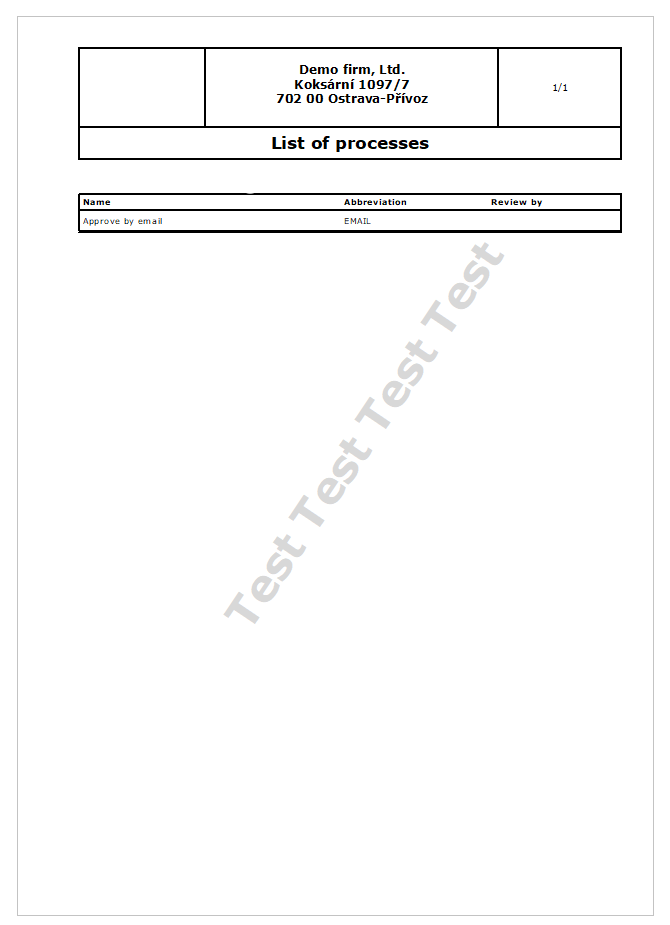
Report description: Report displays list of headings of versioned procedures, for which confirmed and currently valid procedure version exists. Process can be created from these procedures. User which reviewed the version of procedure is displayed in the column Owner. |
|||
Address in the tree: |
|||
Reports parameters:
DifDirective - No Yes - divides headings of procedures to “Guidelines - controlled documentation” and “Operating procedures” based on if they have chosen option Guidelines on the page 1 of Versioned Procedures book. No - headings of procedures are all displayed under one title List of Processes. |
LogoPictureHeader - Header.wmf The file name for displaying the header. |
LogoPictureFSmall- Logo.bmp The file name for displaying the logo. |
Sensitive - The level of sensitivity (the text which will be displayed in the header). |
Process No.: WKF004 |
Report ID: SWKF014 |
File: AverageResponsetiTimeUsers.am |
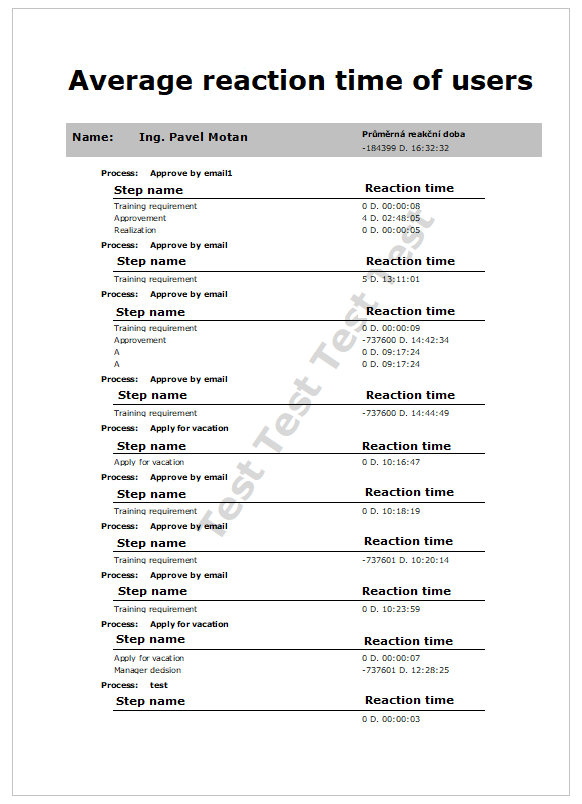
Report description: Report Average reaction time of users in procedure calculates average user's reaction time in procedure step. This means time from step creation for user till step completion by the user (till approval, rejection, forwarding), grouped according to versioned procedures' headers. Form, where we can choose contact person of which reaction time we want to see, is displayed when the report is initiated. If the person is not chosen reaction time of all users is displayed. In this form we can specify if we also want to see users’ steps. |
||
Address in the tree: |
||
Reports parameters:
Users - Contact person whose delay we want to display. |
ShowSteps - Yes Yes - persons with steps and delay time in each step are displayed. No - steps are not displayed. |
Process No.: WKF004 |
Report ID: SWKF015 |
File: AverageResponsetiTimeProcedure.am |
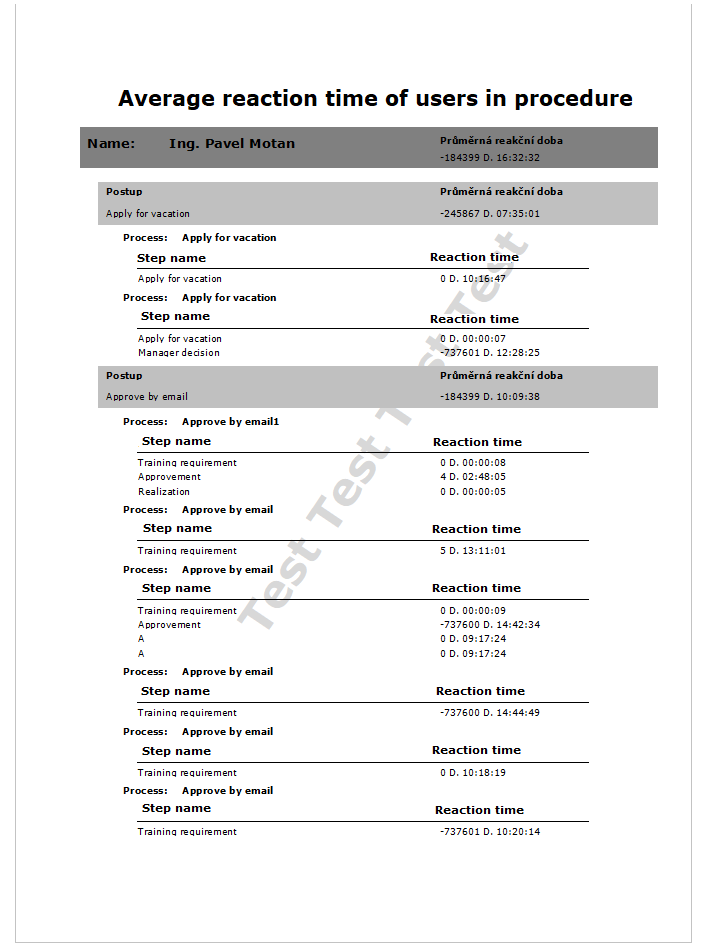
Report description: Report Average reaction time of users in procedure calculates average user's reaction time in procedure step. This means time from step creation for user till step completion by the user (till approval, rejection, forwarding), grouped according to versioned procedures' headers. Form, where we can choose contact person of which reaction time we want to see, is displayed when the report is initiated. If the person is not chosen reaction time of all users is displayed. In this form we can specify if we also want to see users’ steps. |
||
Address in the tree: |
||
Reports parameters:
Users - Person ID from Contact Persons book whose delay we want to display. |
ShowSteps - Yes Yes - persons with steps and delay time in each step are displayed. No - steps are not displayed. |
Scheduled task - New process
In tree structure menu Administrator/System/Scheduled task administration is possible to automatically set launching of new process, either once or in regular intervals.
After choosing item Workflow/New Process user enters procedure abbreviation from which the process should launch. Procedure launched by this scheduled task must not request at its creation any user input (entry of variable values, definition of approvers for next step...).