|
|
|
The Mail module is used to define the mailbox and its correct settings. Also an internal mailbox is available here for user. User can open the Mail in the tree menu of Marketing module too.
|
|
|
Mail book
Mail Mail in the K2 IS enables communication among users like passing tasks and, simultaneously, communication with other entities out of K2 IS. It is Internal and also external post. The internal messages are not forwarded through any mail server or service, and therefore they are delivered within the net immediately. When sending and receiving external messages, it is necessary to define new mailbox and execute its correct setting. Through the mail, user can send and receive messages including attachments, information on planned meetings etc.
First starting of Mail module, the programme automatically creates two mailboxes for every user, One own internal mailbox with name which is identical with the K2 IS login name of the user. Second mailbox which enables the user to send messages from K2 IS by own mail client. But no messages can be received into this mailbox, because it is not set to receive the mails. Both of these mailboxes are without password and it is possible to change their's setting. The user should not delete these defined mailboxes. In case of deletion the mailboxes are refreshed after running the mail in the K2 IS. Above Mail book and also above every message is available for user F9 for report submitting.
The mail book is divided into two parts. In the left part there are 3 tabs. These are Folders, Address book and Users. On Folders tab there is a Tree menu where all defined mailboxes are displayed. The Address book tab contains the list of all electronic addresses in the K2. Here can be defined: Partners, Contact persons, or Suppliers/Customers. If e. g. the contact person has defined several electronic addresses, they will be mentioned more times in this list. Simultaneously the Partner or Supplier/Customer. On the third tab - Users there is list of all users of the K2. Double clicking on mouse button or by Enter key on electronic addresses, the form for creating a message with pre-filled address will display.
In the right part of the book there are available two tabs. On the Messages tab there are displayed contents of individual folders of the tree menu that means list of messages. In the book there can be displayed list of mailboxes with the list of their's folders and received or sent messages assorted into the one selected folder. The next tab is the Calendar.
Standardly are in IS K2 preset folders:
- Inbox – contains the incoming messages sent to user by the other users.
- Outbox – contains the outcoming messages sent by user to the other users.
- Deleted Items – contains the messages removed from the other folders. If user want to delete the messages from the mailbox completely, click on the Delete button (or press Del key). Thus the message will be deleted also from this folder.
- Undesired (Spam) – contains messages defined as undesired mail.
- Drafts – contains the messages that user has not finished and sent yet but saved them (it means user is going to edit the message further before its sending).
In the brackets behind every folders there is stated the current number of messages that are assorted into the folder. If the folder contains a message that have not been read yet, 2 numbers will be stated in the brackets, separated by commas. The first number shows the total amount of messages in the folder, the second number show the number of messages that have not been read yet.
Within the created mailboxes the user can created his/her personal folders. User can add a new folder to the list by clicking of the right mouse button on the folder that he/she wants the new folder to be classified in. The menu of possibilities will display. After selecting Add, a New Folder form appears. Fill field for a new folder name and after confirmation the folder is created. It is possible to add the new personal folders only as the inferior, to the predefined folders.
User can make changes (as e.g. rename, delete, change or transfer the folder) at his/her own added folders only. The messages Transfer between individual folders can be made by the mouse. finding a required message and by dragging with the pressed left mouse button transfer it into an other folder. Transfer can be done only in one system folder. To delete the folder press Del key or the right mouse button on a selected folder and Delete option. Simultaneously you can rename the folders. Select the Rename option by pressing the right mouse button after display the menu.
The user creates a new message by the Compose button. The form, that enables to create a new message eventually to attach an attachment to this message, will display.
Press the Send button to send the message. The message is sent as a copy to every entered recipient (including the attachments) and it is saved into his/her Inbox folder. The original message is moved into the Outbox folder of the user.

Picture: Mail book
Buttons Description:
|
Receive - run the receiving messages by pressing this button. |
|
Reply - by pressing this button create a new message in which will be automatically pre-filled on the 1st: page in the field:
Send a created answer by pressing the Send button (see the description of the 1st. page chapter). |
|
Reply all - the process is the same as in case of the Reply button. Only in the To field there will be stated all users to who the original message has been sent including the sender of an original message. |
|
Forward - again there is the same process as in case of Reply.case of the Reply. However by pressing this button, the To field stays not filled. |
|
Copy - the cursor is positioned on a message that user wants to create a copy from and to sent it. |
|
Edit - the message that user can edit and save or sent after is opened by this button. |
|
Delete - if the cursor is positioned on a message that user wants to delete from the folder, press the button and the message will be moved into the Deleted messages folder (see the description of Delete folder). |
|
Update - it enables to update the mailbox or a message. |
|
Setting - after pressing the button, a form will be displayed in which user sets all mailboxes to which user wants to receive messages and send. User can set here also the interface for the Mail book. |
|
Preview – displays the body of the message which the cursor is set on in the bottom part of the Mail book. |
|
Find Message (Ctrl+F) – clicking on this button, user activates the Search in Mail form that can be used for setting of the searching conditions for the specific messages.
Picture: The Find message form |
|
|
|
|
|
|
|
|
|
|
|
After pressing OK button (or Enter key), a form with the Search Results is displayed, where the messages containing the searched text are displayed. If there is no message corresponding to the set conditions, the window is empty. |
|
User can close the form by pressing of the Cancel button or Esc key. Note: If user closes the Search in Mail form in which the Searched Text field is filled-in and opens it again, the original searched text remains pasted in this field. |
|
Archive - Mail Archiving. The button is displayed to the users who are authorized in Maintenance. After running, the form in which is possible to set the parameters of archiving is displayed. As a default it is set to save on a disk and to delete from the database all messages that are older than 60 days. In the set directory is created the MailArchive subdirectory and there are saved their messages by the numbers of users. |
|
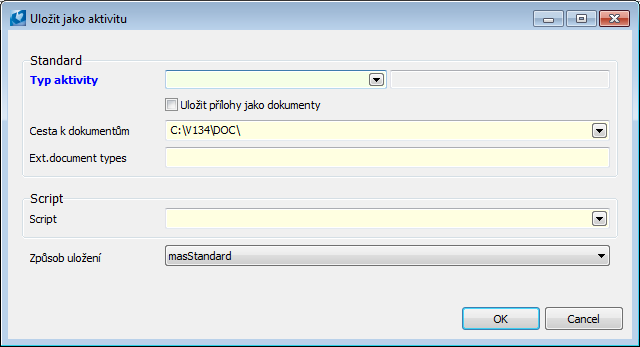
Activity - by pressing this button user opens the Save as activity form. This form enables the user to create an activity.
Picture: The Save as activity form
|

Note: User can sort the messages by pressing the left mouse button in the header of the Sent column (or Received). Direction of the arrow on the right in the column header indicates whether the messages are sorted by date of sending ascending (last sent/received message is in last place) or descending (last sent/received message in the first place).
|
|
|
Message
It is possible to display every message in folders in detail by Enter key, eventually by double click on the mouse button. The form with all the necessities will be displayed. It is the same form by which is possible to create a new mail.

Picture: Mail - report in progress
In the upper part of this form there is mentioned who is the sender of this mail. The field Subject is used to define the subject of the mail. The subject of the mail is mentioned in the upper blue bar too. In the middle part of the form there are 3 tabs. The Whom tab is used to define Mail's Recipient. The validity of the address is controlled by program. More address can be mentioned here, in this case it is necessary to separate them by semicolon. For Copy and Hidden Copy here are available Copy and Blind copy tabs.
The lower part of the form is used for working with own mail text.
The functions on this form are the same as in the Post book. The user inserts the attachments to a mail in progress by the Insert button. User can also use Ctrl + C and Ctrl + V keys for this purpose. If the already created message contains all the requisites, user can send it to the recipient using the Send button. The Cancel button closes a created or opened mail. The Answer, Answer to all or Forward options can be used for creation of the answers to the recipients. The Activity button enables to create an activity to a mail.
In the case that user does not create a new mail but has displayed an existing one, the buttons with arrows are available in the upper bar too. By these buttons it is possible to approach next mails and to browse them.
Attention: Use the Shift+Enter keys for ending of a row when writing a mail! The Enter key creates a paragraph in a mail.
|
|
|
Calendar
All messages of the folder are displayed on the Calendar tab. The messages in the calendar are identical with the content of messages in individual folders and they are displayed in the calendar always in an appropriate day. Message can be open from the calender by the same way as from the folder.
User can insert events and reminders to the calendar with the same way as the messages.
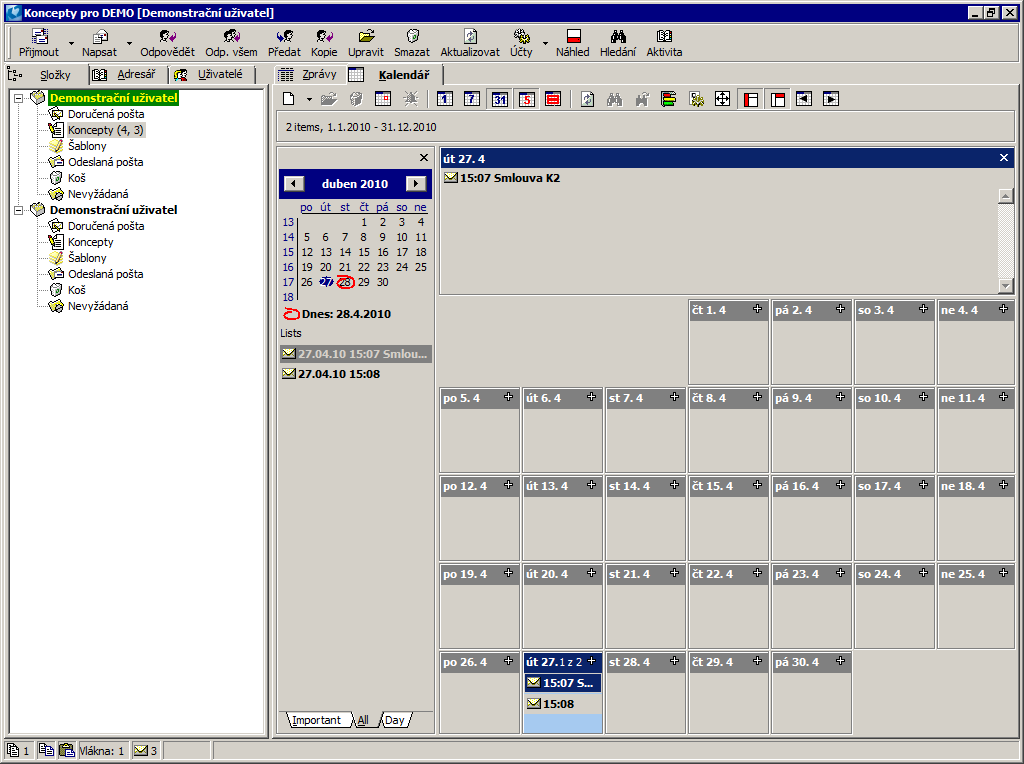
Picture: Mail book – 2nd page
Buttons Description:
|
Create a new item of calendar. It can be replaced by Insert key. |
|
The button for opening calendar item and its possible editing. The item of calender can be opened by pressing Enter key too. |
|
Delete an item of calendar. User can use the Del key too. |
|
The button for adding of a new event into the calendar. The Event form will display. Fill the Subject, Text, Start and End of an event In this form. Eventually user can check the Whole day option which determines that the event will take the whole day. Further the user can set the event as the Important one and set the Reminder of an event. |
|
Insert a reminder of an event. This button displays the Reminder of event form. Here user can set the time of reminder before the start of an event and the way of reminding. The user can select whether Display message, Play sound, Run application, Run script or Send e-mail. |
|
Switch the range of calendar display to day. It can be replaced by Ctrl+D keys. |
|
Switch the range of calendar display to week. It can be replaced by Ctrl+T keys. |
|
Switch the range of calendar display to month. It can be replaced by Ctrl+M keys. |
|
Display or hide Saturdays and Sundays. It can be replaced by Shift+Ctrl+W keys. |
|
Combine Saturdays and Sundays to one cell. |
|
Reload the content of calendar. |
|
Search the record according to the text. It can be replaced by Ctrl+F keys. |
|
Search another occurrence. |
|
Arrange the items of calendar according to time without overlap. It can be replaced by Ctrl+U keys. |
|
Calendar setting. By a form it is possible to set the Start and End date of calendar eventually colours in the calendar. |
|
Switch calendar to the whole screen. It can be replaced by F11 key. |
|
Display or hide the control panel. It can be replaced by Shift+Ctrl+P keys. |
|
Display or hide the details panel. It can be replaced by Shift+Ctrl+B keys. |
|
|
|
Mailbox setting
It is necessary to set the mailbox to work correctly. Mailboxes are set in the form that user can open by the Accounts button, that is placed in the upper bar of the Mail module in the K2 IS. The form contains several tabs on that it is possible to set the requirements. In the left part of the form there is the list of all defined accounts. In the right part there are available the tabs with the appropriate fields for own setting the account.
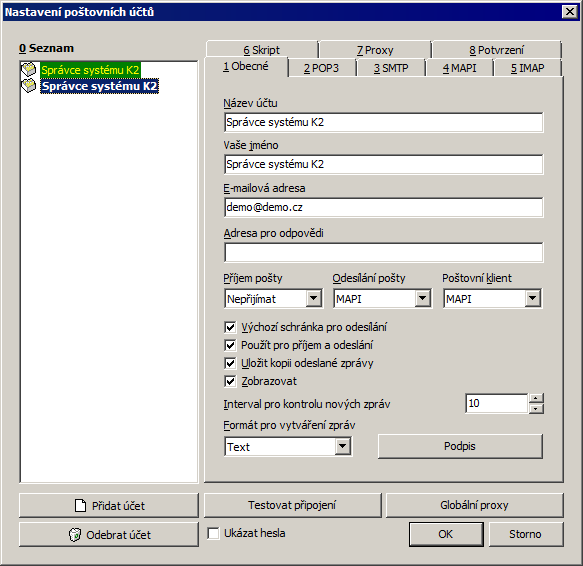
Picture: The Setting the mail accounts form
Fields Description:
Name of Account |
The field for a random account name. |
Your name |
The name that is used when sending the messages from this account. |
The field for defining an email address. |
|
Address for replying |
Address to send the reply. The empty value here means to reply to the identical address. |
Receiving mail |
The field is used to define the way how the user receives the mail on this account. The user selects here the appropriate protocol. |
Mail sending |
The field to select the way of sending messages from this account. The user selects here the appropriate protocol. |
Mail client |
Selection the mail client to edit messages. |
Default mailbox for sending |
This option can be checked only for a single mailbox out of all defined. It is necessary to set the flag at the mailbox that the user uses to send the emails from a script e. g. Export to email. |
Use for receiving and sending |
If the user wants to receive the emails into his/her mailbox too, the option has to be checked. |
Save copy of sent message |
If the field is checked, the copy of sent mail is saved into the Outbox folder. |
Display |
The mailbox with this setting is displayed in the list of all accounts in the Mail book. |
Hidden copy to himself/herself |
If this box is checked, the sender's address is always automatically added to the blind copy of the email sent through this mailbox. The user can be informed about all sent emails. |
Period to control new messages |
Period to control new messages. It is stated in minutes. |
The format to create messages |
A default format of text to create new messages. |
Signature |
This button displays a form in which user can define signatures. |
Add account |
The button for adding of a new account into the K2. |
Test connection |
The button to test the mailbox setting. The message about connection displays. |
Global proxy |
The form to set the Global proxy displays after pressing the button. |
Remove account |
User can use this button to remove an already defined mailbox. |
Show passwords |
In case of checking this option all passwords display on this form. Otherwise the passwords are displayed as the asterisks. |
On the Confirm tab the user can set a requirement to confirm about reading the email. The recipient can fill this requirement but he/she does not have to.
The setting the mail account depends on usage of it. Apart from setting up mail servers, it is necessary for the operator to focus on setting up primarily:
- The operating system on which the K2 runs.
- The version of a default mail client (Outlook 2003, Outlook 2007, Thunderbird, K2 embedded client, etc.).
- The database over that the K2 IS runs (Oracle, MS SQL).
Two mailboxes are available for every user after log into the K2 IS. There are one internal to send messages among the K2 users and one external where user can change the setting, but it is not possible to delete it. Further the user can create a random quantity of mailboxes and accounts.
The SSL support is possible to use in case off embedded client.
Mailbox setting for sending
1st Variant.
Mail receiving: Deny, Mail sending: Mapi, Mail client: Mapi.
There is no need to change anything with this setting. The basic functions for sending emails including sending from the script are supported. In this case, when sending emails from a script, there may be problems with some combinations of the selected database and the mail client. Because of this it is not recommended the combination of Oracle database and Outlook and Thunderbird mail client. Further it is not recommended to use this setting at Windows 7. This operating system does not support the "Simple MAPI". This setting is not suitable for Outlook 2010 too. Outlook 2010.
2nd variant.
Mail receiving: Deny, Mail sending: SMTP, Mail client: Outlook.
This option is recommended for combination with Oracle database and the Outlook mail client.
3rd variant.
If no default mail client is installed and the operator wants to use report exports to email and edit these emails before sending them, it can use the embedded mail client.
Mail receiving: Deny, Mail sending: SMTP, Mail client: Embedded.
Setting the mail box for receiving the mails into the K2
Setting the mail box for receiving differs only in selection of protocol for mails receiving. This must be selected in the Mail receiving field. It should be noted that with the selection of the protocol for receiving mail, it is also necessary to set it in more detail on its tab on the Setting mail accounts form (such as the "POP3" page 2, the "SMTP" protocol, page 3).
|
|
|