|
|
|
Sale Methodologies
|
|
|
Sale of articles in the store
To facilitate the creation of documents in the K2 IS, Sale of articles in the store (Prodejka2_Hlavni.pas) tool (script) can be used in the case of retail selling.
|
|
|
Preparation Before Running the Script
The tool (script) for retail selling works especially over the Sales Order module, but it can be also be set eg. as a button on the desktop.
Before running the script, it is necessary to set the following:
- Create a Customer card in theSuppl./Cust. code list (it is enough to fill in the obligatory fields). Use the Number for filling in the parameter of the Customer script. For this customer, the Sale documents (sales orders, invoices out, release notes) will be issued for an anonymous customer in retail selling, if another customer will not be selected.
- Properly set the script parameters, as described in the Selling in Shop Script Parameters chapter, according to your own needs.
- If you want to pay in a foreign currency, it is necessary to set a fixed exchange rate to this currency. This settings is done via an individual script 'Retail Sale - Rates' (Prodejka2_Kurzy.PAS). Here you set the cash register for which the rate is valid, and the date from which it is valid.
- The user who will work with the script should have set the right to exceeded credit (for cases where at the time of making the business case, the credit is already exceeded and therefore the credit would be exceeded by confirmation of the Invoice when paying in cash).
- The user has to set the Price Group on Item From Header user parameter so that the prices of every new item would be loaded correctly.
- If we wish to communicate with payment terminals, it is necessary to configure the settings according to the function no. 785 "TCP/IP Payment Terminal Configuration". Assigned to a standard Retail Sale via the PlatbaKartouTcpIp parameter. You may set the global IP address of the terminal or assign one terminal to each physical computer. The functions 'payment, cashback, return', and 'balance' are available.
|
|
|
The Parameters of the "Selling in Shop" Script
After running the script, a list of all existing Sales Order in the book set by the parameter will appear. If there is no existing confirmed Invoice on a Sales Order, it is possible to further edit the Sales Order - add or remove items. However, a Retail Sale is not designated to edit business transactions created in other way - this may cause a loss of information such as the method of transport, etc.
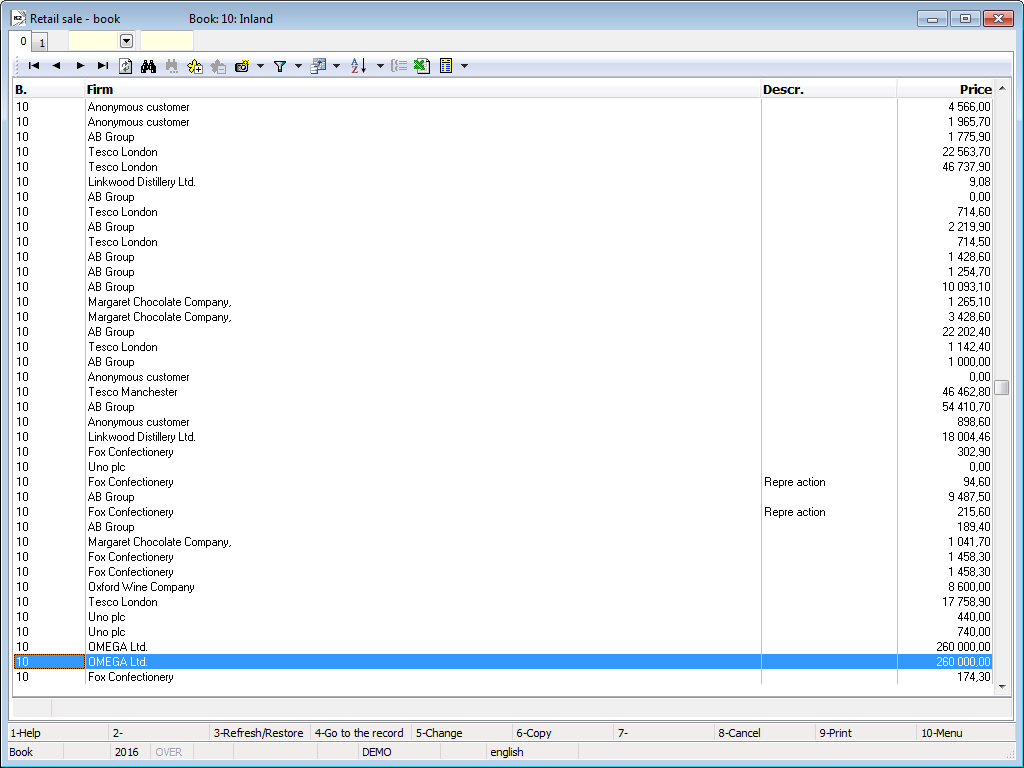
Picture: Retail Sale - Book
We create a new business transaction with the Ins key.
|
|
|
The main form will be displayed after pressing the Ins key: Retail Sale - Basic Data.
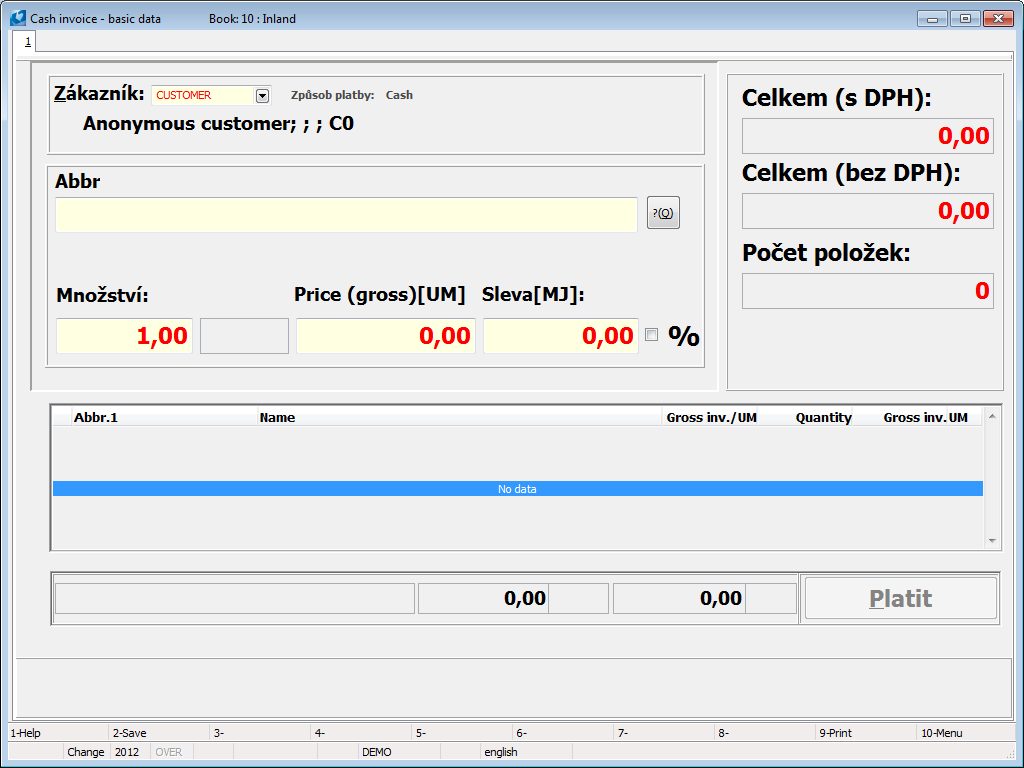
Picture: New Sales Order Created by Retail Sale
A Customer card that is set by the Customer parameter is automatically inserted into the Sales order. The Payment method and the value of this field from the selected card is further displayed next to this field. The displayed text serves only for orientation, whether you can only invoice the sold goods to this customer or the customer has to pay on the spot. This control will be described in detail in the description of the Payment form. If the selected customer has already exceeded the allowed credit, this information will appear at the top of this form. After the eventual selection of a customer, you can start to enter the items. Enter the Article Abbreviation / EAN into the Abbreviation / EAN field (in dependence on the VyhledavatZkratku parameter). If the article was not recognized, the book of Article or a message saying that the article was not found will be displayed depending on the ZobrazovatLookUp (DisplayLookUp) parameter. After successfully entering the article, a selling price (reflecting the price group and the other elements of pricing), the unit related to the loaded bar code, or a default Sale unit will be automatically loaded. If none of these units is set on the card, the basic stock unit is loaded. Fill in the other fields (Quantity, Price, Discount/UM). After confirmation of the value in the Discount field, an item is created. It will be displayed below in the list of items and the form is ready to enter other items. The field after which the item is finished and a new item is entering, can be set by the PosledniPole (LastField) parameter. You can thus continue in entering other items.
The summing data per document, i.e. the Total Incl. VAT, Total Excl. VAT and the Number of Items, are displayed in the left part of the form.
If the entered article is not in stock, there is a red frame around the Quantity field. In this case, not a Release Note, but a Reserving Card will be created (if the NevytvaretRezList parameter does not prohibit it). If the selling price is not defined on the Article card or if the price is zero, there is a frame around the Price/UM field.
Picture: Credit exceeded, not in stock, zero price
In the list of items, it is possible to choose the current item depending on the settings of the ZmenaPolozky parameter, and display a standard Sale Item form, in which it is possible to change the required values in dependence on the user rights by double click or by the Enter key. The basic information about the item marked by the light indicator can also be seen under the list of items. If the light indicator is not active, (e.g. if you are entering a new item at the moment), the information about the last entered item is displayed here.
If at least one item exists in a processed Sales Order, the button Pay becomes active. Via this button, you can finish the entering of items and move to conclusion or payment of a Sales Order.
|
|
|
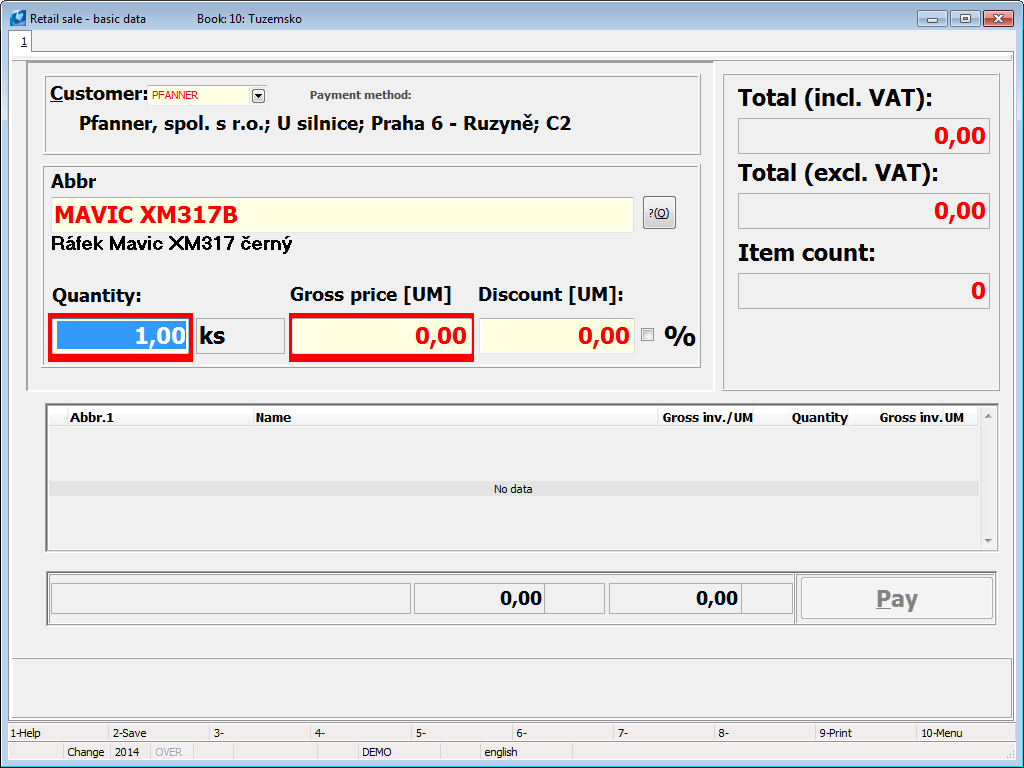
Pressing the 'Pay' button on an unfinished Sales Order may complete the Sales Order, and it can be paid via the Payment form.
If you want to invoice the Sales Order, and the customer will pay for it later (e.g. via a bank transfer), select the Payment Method - Invoice option in the lower right part of the form, which is possible if the following conditions are met:
- The customer has a Payment Method set on their card, which is included in the list stated by the PlatbaFakturovat (PaymentInvoice) parameter.
- The customer has not exceeded their credit limit (visible in the main form Retail Sale - Basic Data) and this Sales Order will not exceed the credit as well.
Picture: Retail Sale - later payment via e.g. a bank transfer
In the case of invoicing, the Paid field is not being filled in, a receipt may not be printed out; you can only print the Invoice.
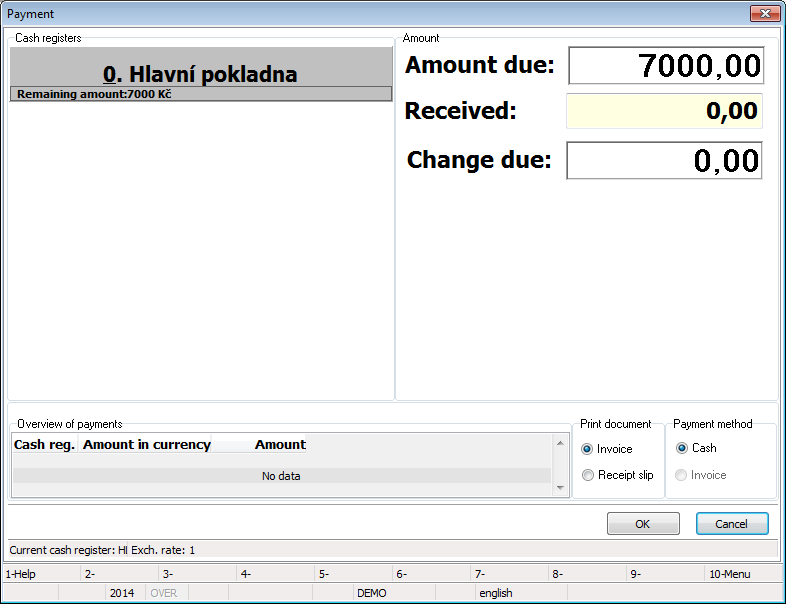
If you wish to get paid for the Sales Order immediately, choose the In Cash payment method in the lower right part of the form. This option is always available.
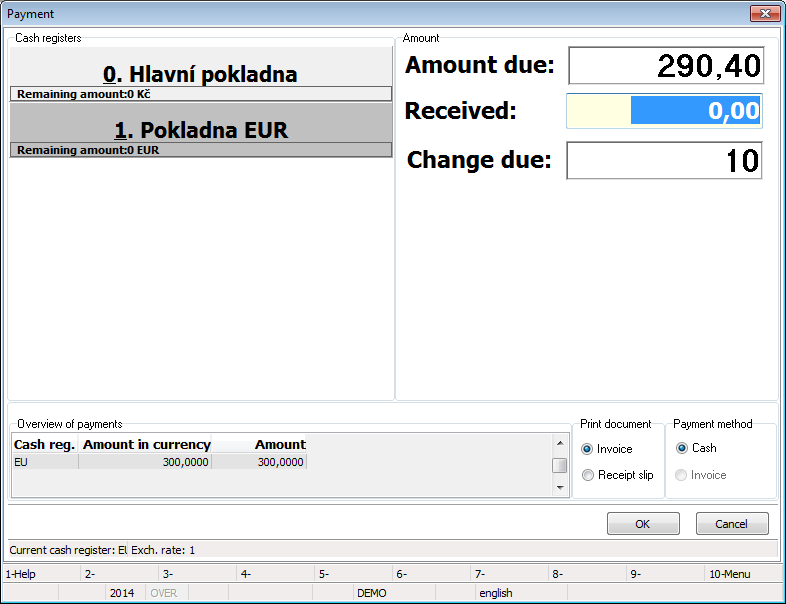
Picture: Retail Sale - Payment In Cash
In such case, a list of available cash registers will appear in the left part according to the settings of parameters Pokladna1 - 7 (CashRegister1 - 7). In the picture, a default value is kept in the Pokladna1 (CashRegister1) parameter, the Pokladna2 (CashRegister2) parameter is set to the 'SP' value (i.e. cheque value). One of the buttons is always highlighted (darker colour), the entered payment will be paid by this cash register. Every time you newly open this form, the cash register set in the VychoziPokladna (DefaultCashRegister) parameter will be highlighted. In the picture, a cheque cash register is set by default (i.e. the value of the parameter = '1').
The amount that is to be paid by the given cash register is displayed inside the button. If this concerned e.g. a cash register for a foreign currency, the amount in this currency would be visible here. The amount stated in the button is also affected by the rounding according to the settings in the Payment Method described in the Rounding of Domestic Invoices Depending on The Payment Method chapter, which is set to the given cash register by the ZpusobPlatbyPokladna1 - 7 (PaymentMethodCashRegister1 - 7) parameters. If this is not set, the rounding from Client Parameters will be applied, while the Payment Method from the last entered payment will be utilized in the document.
In the right part, the total amount of the document is displayed in the Price to Pay field. Write the accepted value, which will be calculated into the highlighted cash register, into the Paid field. You can combine the cash registers. Once the sum of entered payments is higher than the total price, the difference that is to be returned to the customer will appear in the Return field.
If we leave '0' in the Paid field (just like in the picture) and press Ctrl+Enter, F11, or click on the OK button, the exact amount that is to be paid will be automatically paid/paid off by the set cash register. The script will behave similarly in the situation where we are to return the amount to a customer - the returned amount will be automatically subtracted from the default cash register. In such case, the payment method set by the PlatbaHotove (PaymentInCash) parameter will be set into the document.
An overview of entered payments is displayed in the lower left part of the form. You can also see there the amount and the cash register by which the payment has been made. Other entered payments are added into the same cash register.
|
|
|
Calculation VAT From Above Method in the K2 IS
The VAT law enables to calculate the tax amount from below in a way that the tax amount will be set by a percentage from the price without the tax. The price with tax is then the sum of those two amounts. It is also possible to calculate the tax from above in a way that the total price with the tax is multiplied by a four-figure coefficient. The rounded tax calculated this way will be subtracted from the total price, and the price without tax will be calculated by this difference.
In this chapter we will show you how to set and use the VAT from above in the K2 IS.
This methodology is used in Sale only. Using it brings the following restrictions:
- it is not possible to edit the price without the tax and to enter an absolute discount (only the percentage one) on the doc. item with the flag of VAT from above,
- it is not possible to edit the tax summary manually.
You can activate the VAT Calculation From Above option in the Books of Sale and edit it on Sale documents. The following applies:
- The flag is set by the Books of Sale when you create a Sales Order, a free Invoice Out, or an Advance Received.
- If you create an Invoice Out or an Advance Received to a Sales Order, the flag settings is taken from the Sales Order.
- The Net price will be added, the Gross one does not change upon turning on/off the checkbox on the form.
|
|
|
Settings in Books of Sale
Check the VAT calculation from above flag in the Books of Sale. This flag is set into all the periods of the same book automatically and his value is copied into all newly created superior or free documents of sale.
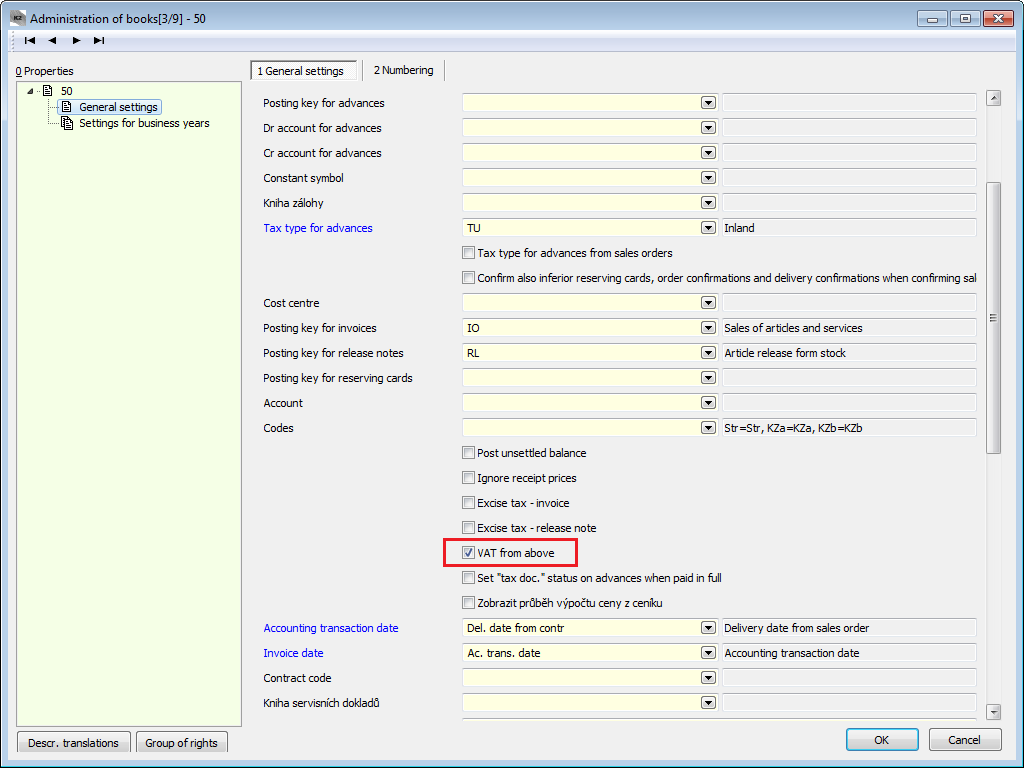
Picture: Settings of VAT from above calculation
|
|
|
Settings of Rounding in the Administration of Own Companies
In the Rounding tab in the Administration of Own Companies, perform the rounding for this method of calculation in the Gross row of the Invoice (for the VAT calculation from above).
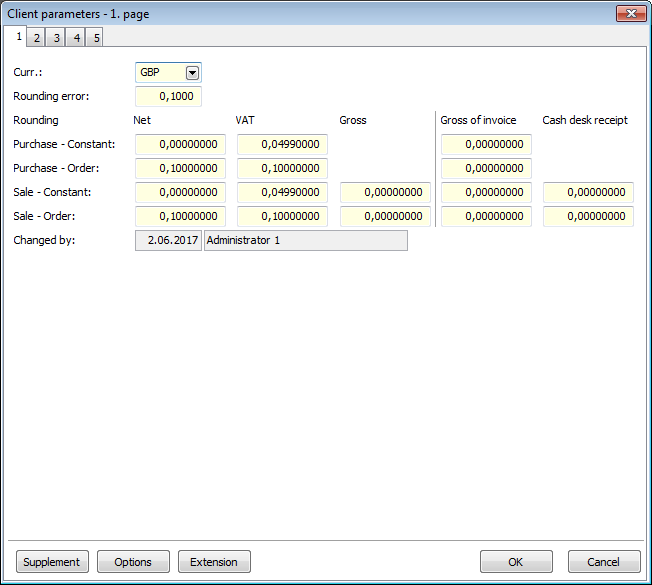
Picture: Settings of Rounding in the Administration of own companies in the Client Parameters
The settings define how to round the price with taxes in particular rows of tax summary. The rounding of the VAT amounts in the VAT column will also be useful. If you usually have multiple tax types on one document, it is better to opt for more specific rounding, as this settings affect each line. If you choose the whole GBP, the rounding differences can be almost 1,50 GBP compared to the sum of particular items in a document with more than three tax types.
|
|
|
Constant Settings for VAT Rates
In order to use this methodology, one must enter constants according to which the tax is to be calculated. The constants - or more accurately their decimal places - are given by the law. They can be set in the VAT Rates code list.
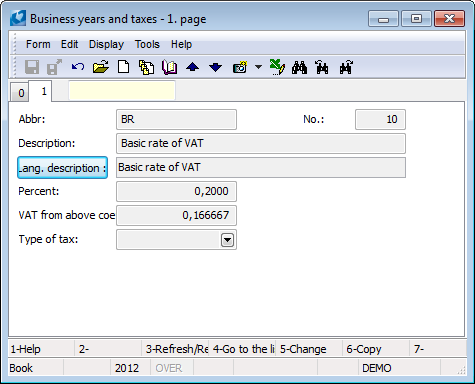
Picture: Settings of coefficient for the VAT from above calculation
|
|
|
Instalment Selling, Suspensions
Instalment invoices and suspensions are issued if we agreed with the customer about the suspension of payments.
Example: We have concluded the contract for a delivery of articles worth of10,077.30GBP (incl. VAT) with the customer. After performance of the subject matter of a contract, the customer has to pay 7,674.89GBP. The amount of 2,402.41GBP will be paid by the customer later in the five equal monthly instalments.
K2 IS Settings:
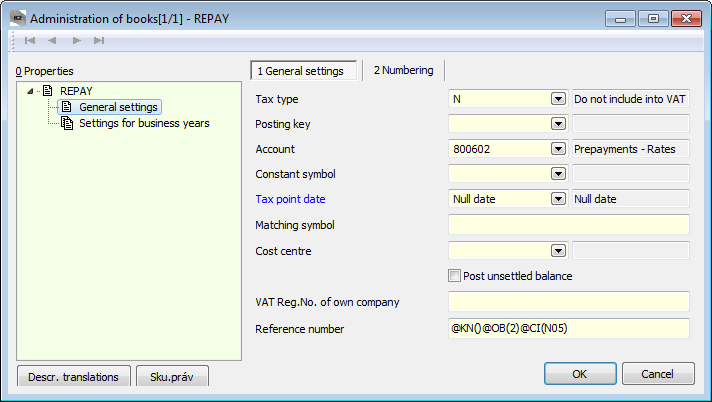
- The instalments will be registered by using Other Receivables documents - create a separate Book of Other Receivables, where set:
- Tax type = "N" (Not in declaration of taxes),
- the Posting Key field stays empty (instalments are not booked),
- Account = an account for deferred payments 311_2,
- Tax Point Date = "Null date",
- Reference Number field will be empty.
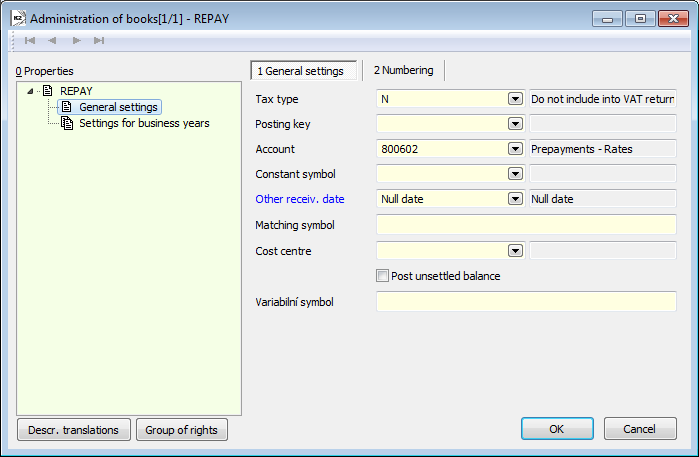
Picture: General settings of Books of Other Receivables determined for the register of instalments
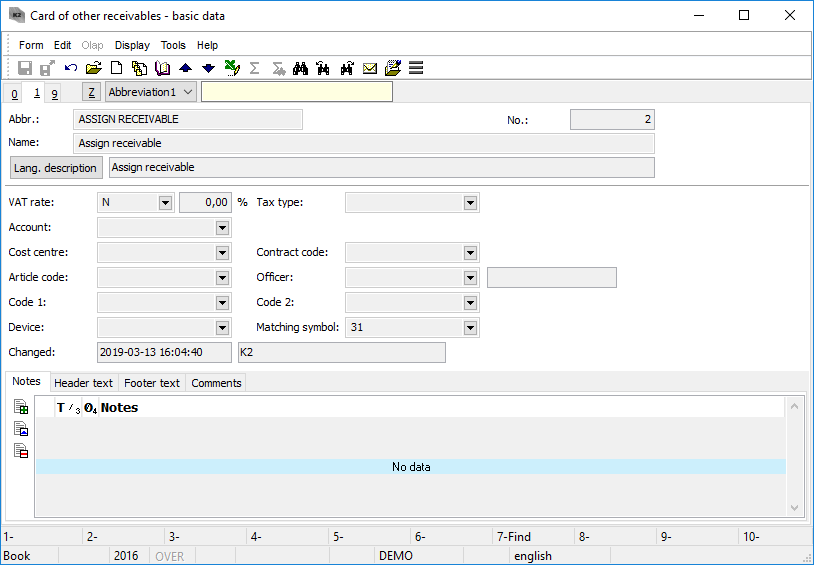
- Then you can create the Other Receivables card for instalments. Open the Cards of Other Receivables in the Sale / Other Receivables tree menu. Create a new card and enter there an Abbreviation, Name, VAT Rate = "N" (0 %).
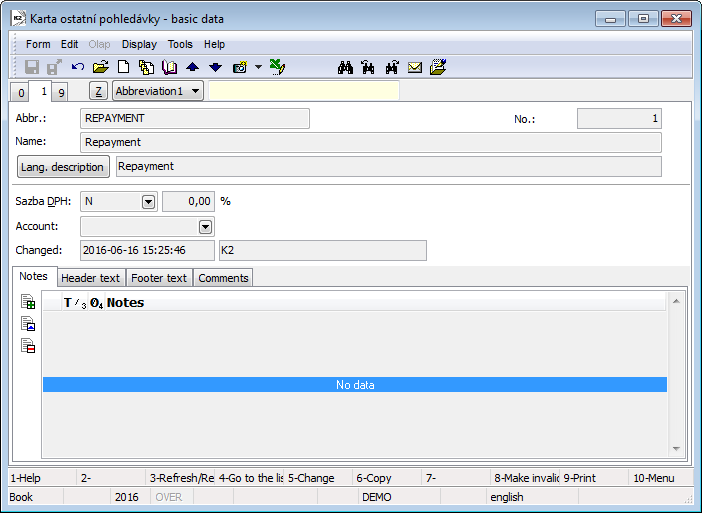
Picture: Cards of Other Receivables - Instalment
- Create a separate Book of Internal Documents, in which the payments of instalments will be registered. In the Book of Internal Documents, set:
- Posting key = "O",
- Debit Account = an account for deferred payments in the Sale (311_2),
- Credit Account = an account for deferred payments in the Purchase (321_2),
- Add the Create Other Receivable / Liability from Invoice script into F9 or in the user toolbar and set these parameters:
- Book = Book abbr. of other receivables for instalments,
- Card = Card abbr. of other receivables created for instalments.
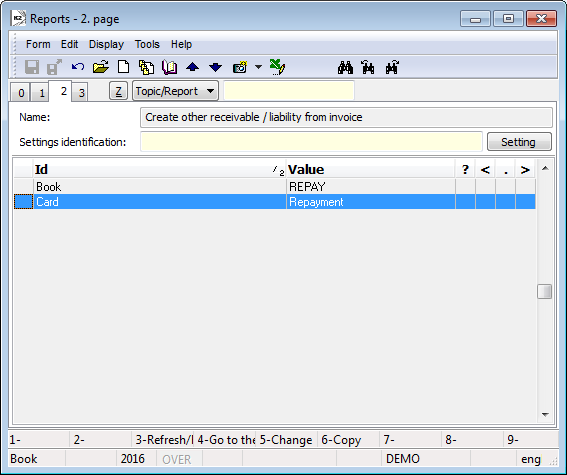
Picture: Setting of Create Other Receivable / Liability from Invoice script parameters
Process:
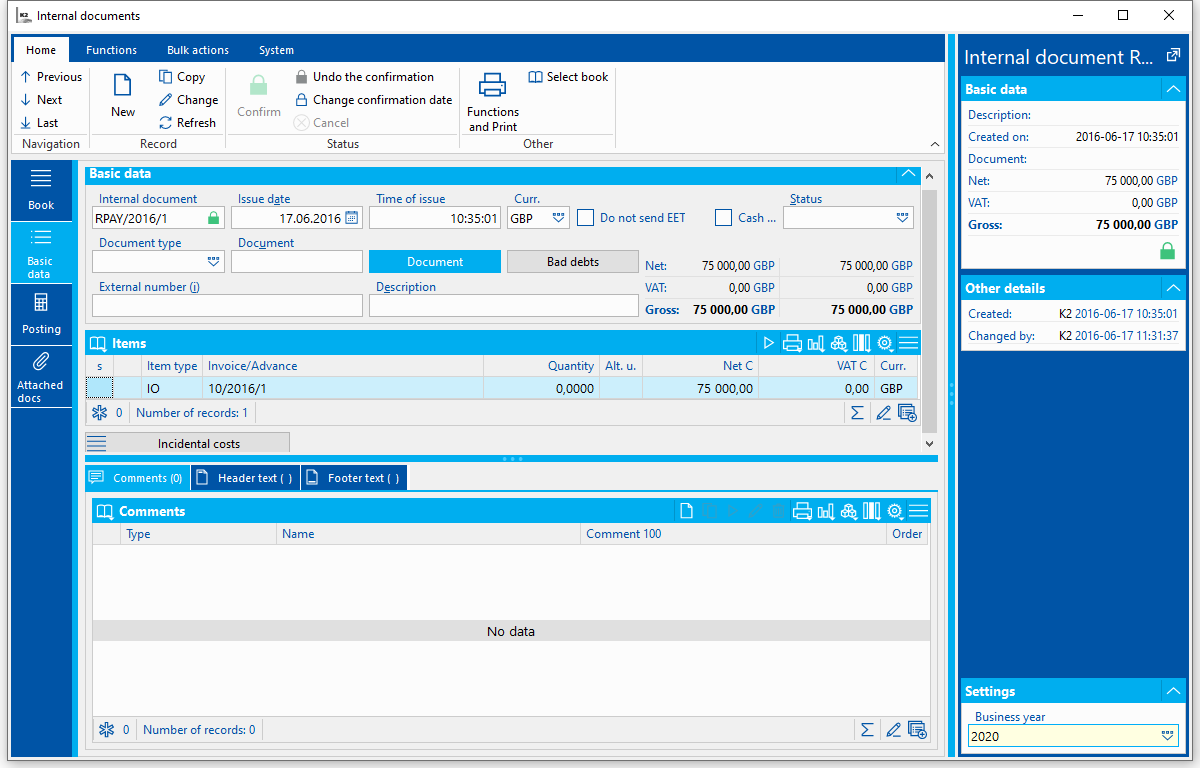
- In the Sale module, create a Sales Order, in which the subject of agreement will be specified. Issue an invoice for the articles after the fulfilment of the subject of agreement, then confirm the invoice.

Picture: Invoices Out - 2nd page
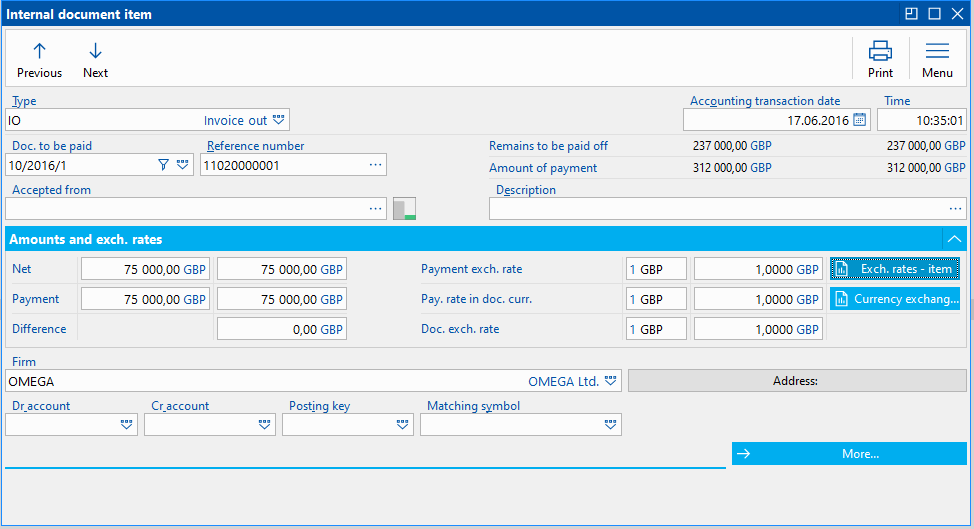
- This invoice will be partially paid by the internal document - in the amount of the deferred payments (75,000.00GBP): Run the Automatic payment by internal document on the 6th page by using the Shift+F3 key combination. In the input form, select a Book of Internal Documents and enter the Amount.
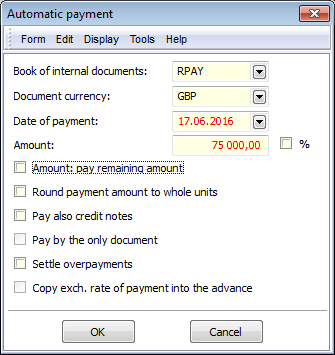
Picture: The form for the Automatic Payment by Internal Document function
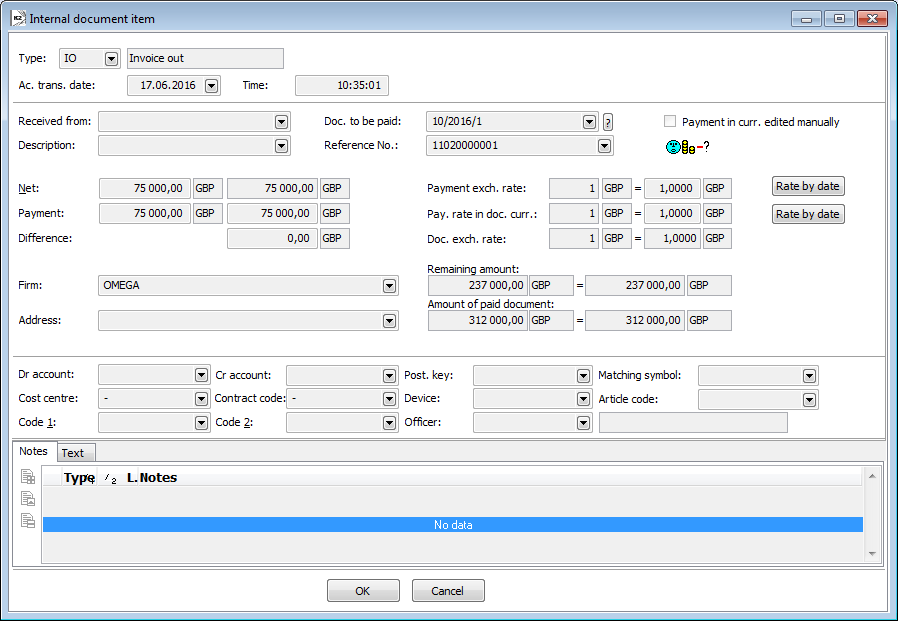
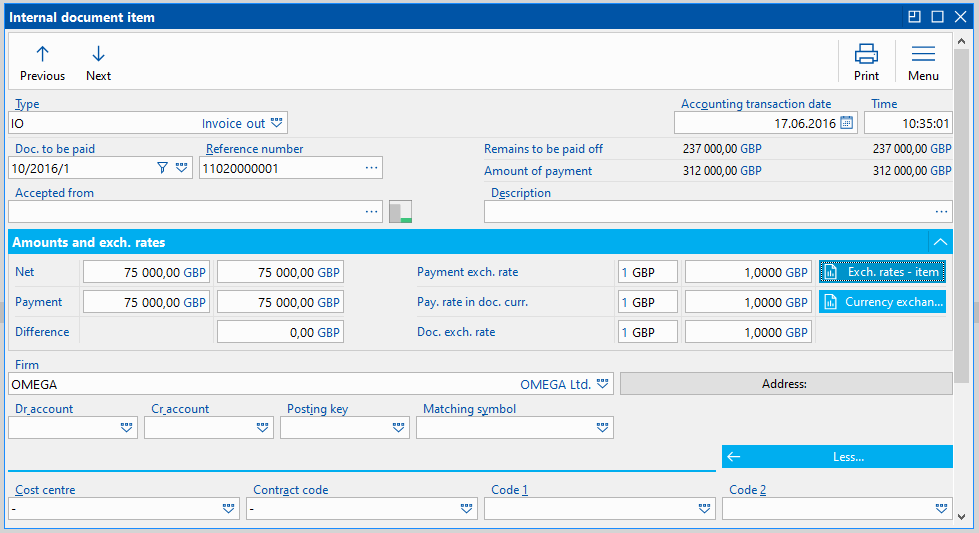
Picture: Internal Document - item
- Then add the Payment parameter (Payments) with the value "1" on the Invoice Out report. (This parameter changes the "Paid" text to the "Deffered payments" text.) Print the invoice for the articles.
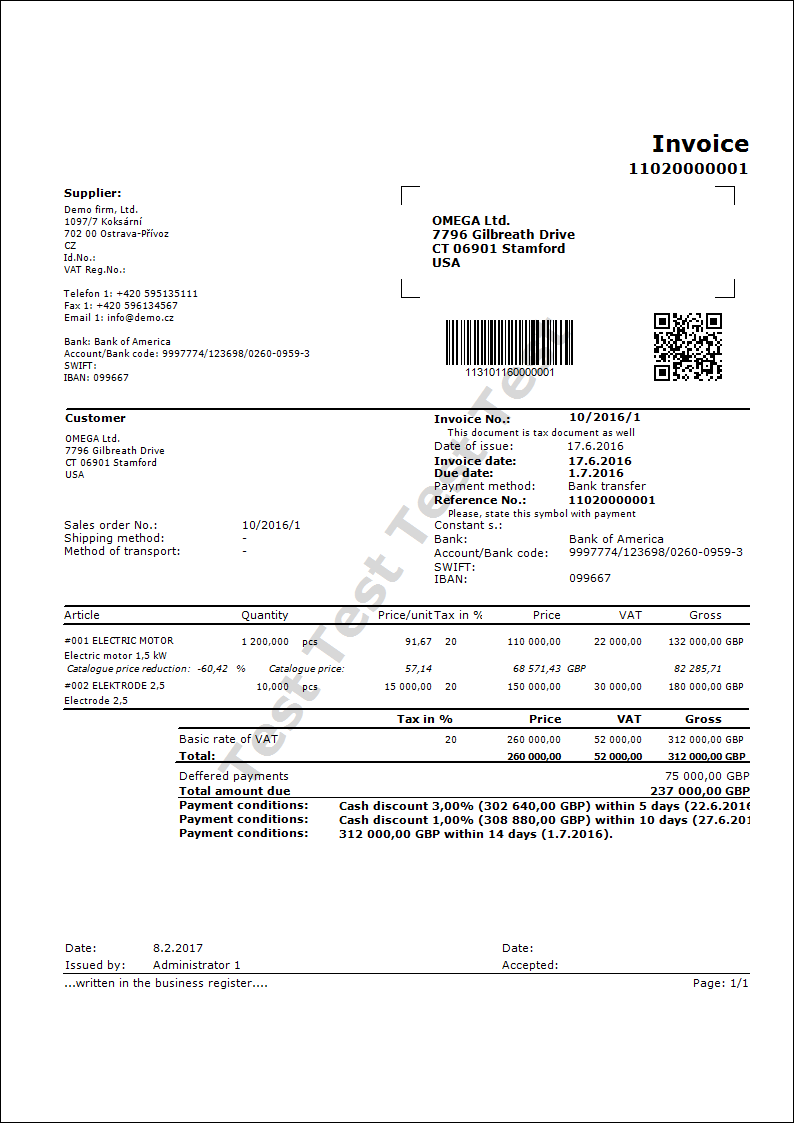
Picture: Invoice Out report with the parameter Payment = "1"
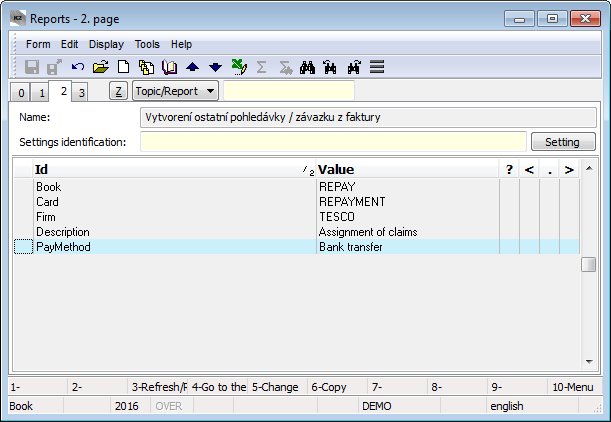
- Run the Create Other Receivable / Liability from Invoice script on Invoice Out. In the initial form of function, just enter:
- Acc. Trans. Date of the first instalment,
- Due Date of the first instalment,
- Amount of the first instalment ("15,000").
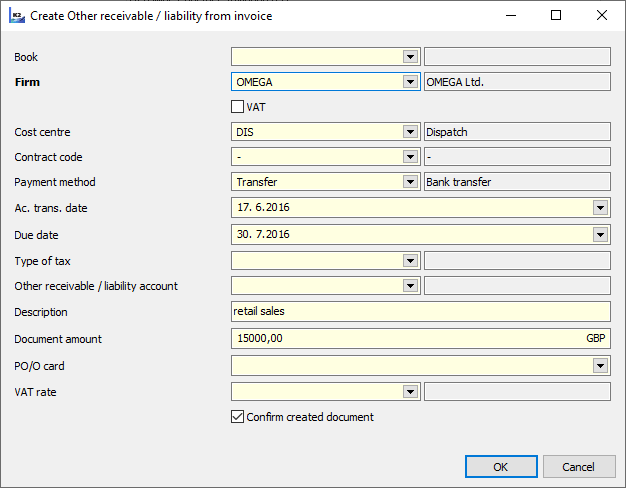
Picture: Initial form of the Create Other Receivable / Liability from Invoice script
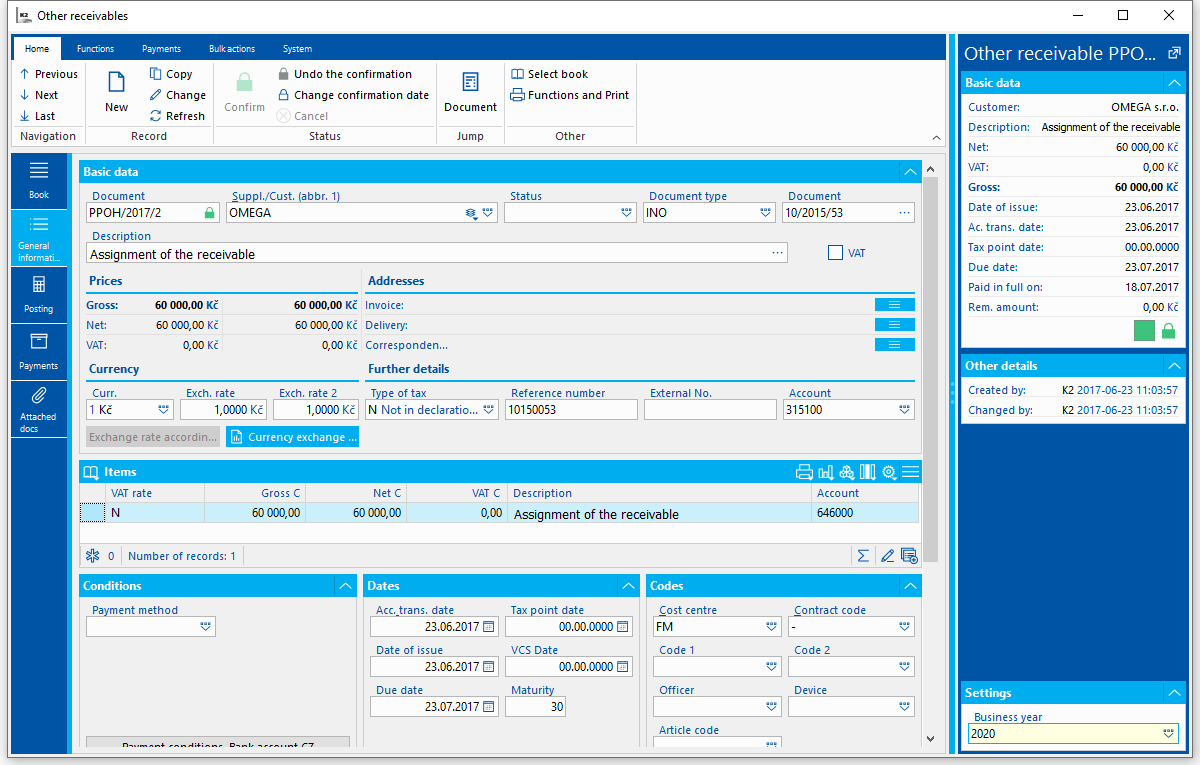
- After you approve the form, the document will be created in the Book of Other Receivables, the link for the Invoice Out is in the receivable header in the Document field.
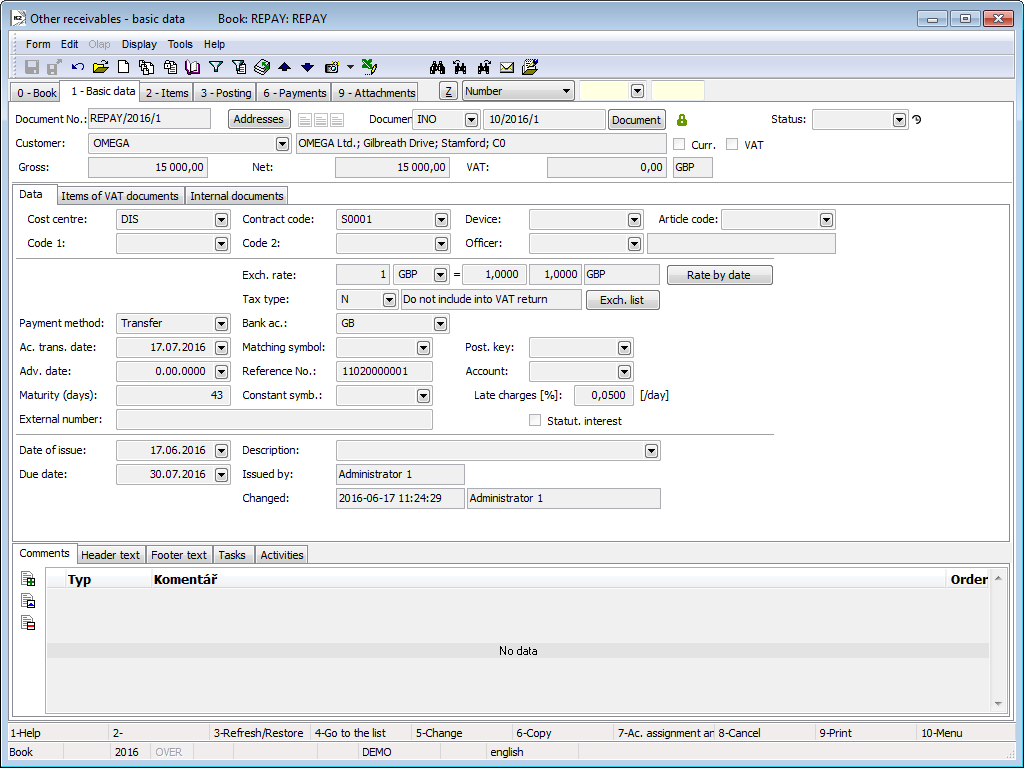
Picture: Other Receivable - 1st deferred payment
- On the Other Receivable - 1st instalment - run the function for creating repeated documents by using the Shift+F4 keys. In the initial form of function, just enter:
- check the Monthly recurrence,
- check the Number of New Documents and set the value to "4",
- check Confirm Documents.

Picture: Initial form of the Create Repeated Documents function
- After you agreed with the form, the Other Receivable document will be created. A customer pays off the instalments according to the instalment plan. Payments are matched with the Other Receivable documents - Deffered payments.
Posting:
For posting, use the following accounts:
311_1 |
- |
Customers |
311__2 |
- |
Deferred payments |
Invoice for the articles |
311__1/604 |
8,328.34 GBP |
|
311__1/343 |
1,748.95 GBP |
Payment by internal document - Deferred payments |
311__2/311__1 |
2,402.41 GBP |
Payment of Invoice for the articles |
221/311__1 |
7,674.89 GBP |
Other Receivables - Deferred payments |
does not post |
5 x 15,000 CZK |
Payments of deferred payments |
221/311__2 |
5 x 15,000 CZK |
We proceed in a similar way when deffering payments due to suspensions. Only when printing the invoice for the articles, the Payment parameter (Payments) should be set to thevalue "2". (This parameter changes the text "Paid" to text "Suspensions".)
|
|
|
Create other receivable from an invoice
Process No.: ZAK019, FIN016 |
Id. Script number: FZAK019 |
File: FA_CreateOtherRelation.PAS |
Script description: Run the script on the Invoice in. After you run it, the form, where the Firm, Cost centre, Contract code, Payment method and Description fields will be set by the invoice. Enter the book where the receivable should be created, the dates, Net amount, VAT rates or a card of other receivables, or eventually additional data. After you agreed with the form, the Other Receivable document will be created. If the Tax type and the account are not entered, the setting will be filled by the book, where the document should be created. The Invoice date should be filled depending on the Invoice date parameter, which is set in the book. |
||
Address in the tree: [Sale][Other receivables] |
||
Script parameters:
Account- Other receivable / liability account. |
Amount - 0 Doc. Net amount. |
AmountFromInvoice - No Yes - the amount is set by the Net Invoice amount. |
Bank - bank code of the Invoice In Bank code of other liability. |
BankAccount - - bank code of the invoice in Bank code of other liability. |
Book- The abbreviation of the Other receivables / liabilities books. |
Card- The abbreviation of the Other receivables / liabilities cards. |
Confirm- Yes - confirms the already created document. |
ContractCode- contract code from an invoice Abbreviation of contract code. |
CostCentre- cost centre from an invoice Abbreviation of cost centre. |
Description- description from an invoice Document description. |
Firm- firm from an invoice Document company. |
InvoiceDate - current date Accounting transaction date. |
MaturityDate - current date The due date of document. |
NoInteractive - No Yes - the input form will not be displayed. |
PayMethod- payment method from an invoice Document description. |
RateOfVat- Abbreviation of VAT rate for a doc. item. |
TypeOfTax- Doc. Tax type. |
VAT- No Yes - checks the VAT flag in a doc. header. |
|
|
|
Cession of Receivables
In this chapter, cession of receivables from the original creditor (cedent) to a new creditor (cessionary) is described.
|
|
|
K2 IS Settings
K2 IS Settings - Cedent:
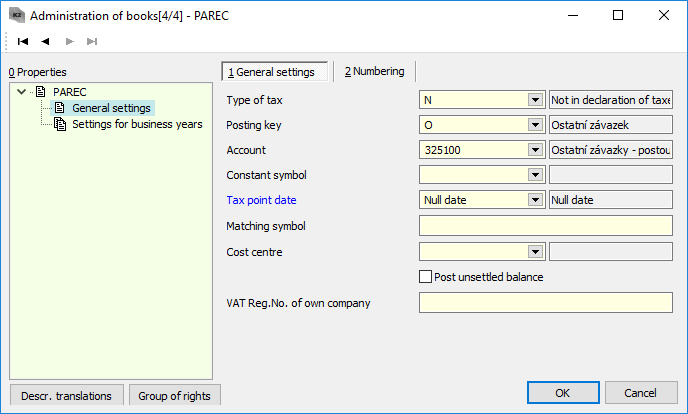
- Record the ceded receivables by means of Other Receivables documents in the K2 IS. Register documents in the book, where the docs. are posted by "O" posting key. If you create a separate book for ceded receivables called Book of Other Receivables, just set:
- Tax Type = "N" (not included to tax return),
- Posting Key = "O",
- Account = the account for other receivables (ceded receivables) "315xxx",
- Tax point date = "Null date".
- the Reference Number field will be empty.
Picture: General settings of Books of Other Receivables, intended for the record of other receivables
- You can then create the Other Receivables card for ceded receivables. Open the Cards of Other Receivables in the Sale / Other Receivables tree menu. Create a new card, where you enter:
- Abbreviation,
- Name,
- VAT rate = "N" (0%),
- Account - "646xxx" (analytical account for profit from the receivable sale).
Picture: Cards of Other receivables - ceded receivable
- If you often cede receivables, you can set a script which helps you to create other receivable from an Invoice (so you do not need to create other receivables manually) - add the Create Other Receivable / Liability From Invoice script into the user toolbar or into F9 and set the parameters:
- Book = Book abbr. of other receivables for other receiv.,
- Card = Card abbr. of other receivables created for ceded receiv.,
- Firm = Company abbr., you want to sell the receivable.
If you do not have the individual book for ceded receivables, set also the parameters:
- Account = the account for ceded receivables,
- TypeOfTax = "N".
If you need, you can set other parameters as Description, Payment method ...
Picture: Setting of Create Other Receivable / Liability From Invoice script parameters
K2 IS Settings - Cessionary:
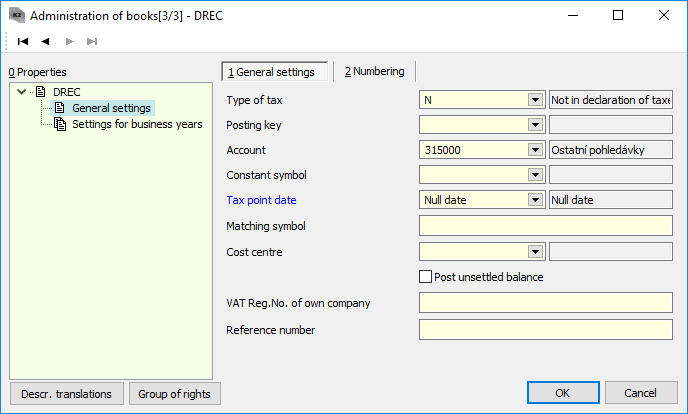
- Register the purchase of ceded receivable from a cedent by means of documents of Other Liabilities. Create an individual Book of Other Liabilities, where you can set:
- Tax Type = "N" (not included to tax return),
- Posting Key = "O",
- Account = the account for other liabilities "325xxx",
- Tax point date = "Null date".
Picture: General settings of Books of Other Liabilities, intended for the record of purchased ceded receivables
- You can then create the Other Liabilities card to purchase the ceded receivables. Open the Cards of Other Liabilities in the Sale / Other Liabilities tree menu. Create a new card, where you enter:
- Abbreviation,
- Name,
- VAT rate = "N" (0%),
- Account - "315xxx" (analytical account for the records of receivables towards the debtor).
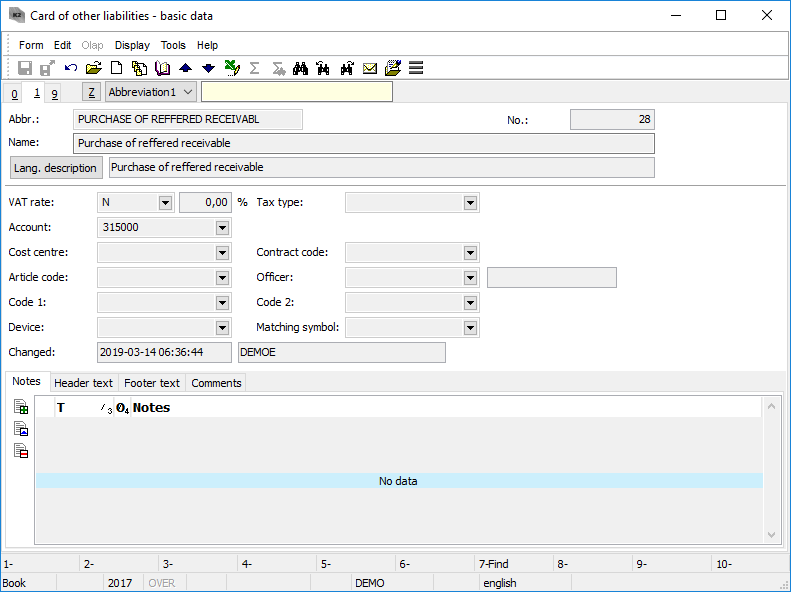
Picture: Cards of Other Liabilities - the purchase of a ceded receivable
- Record the receivables to the debtor by via documents of Other Receivables. Record the documents in the book where the docs. are not posted. If you create a separate Book of Other Receivables, just set:
- Tax Type = "N" (not included to tax return),
- Posting key field = will be empty,
- Account = the account for other receivables towards debtor "315xxx",
- Tax point date = "Null date".
- the Reference Number field will be empty.
Picture: General settings of Books of Other Receivables, intended for the record of other receivables towards the debtor
- You can then create the card of Other Receivables. Open the Cards of Other Receivables in the Sale / Other Receivables tree menu. Create a new card, where you enter:
- Abbreviation,
- Name,
- VAT rate = "N" (0%).
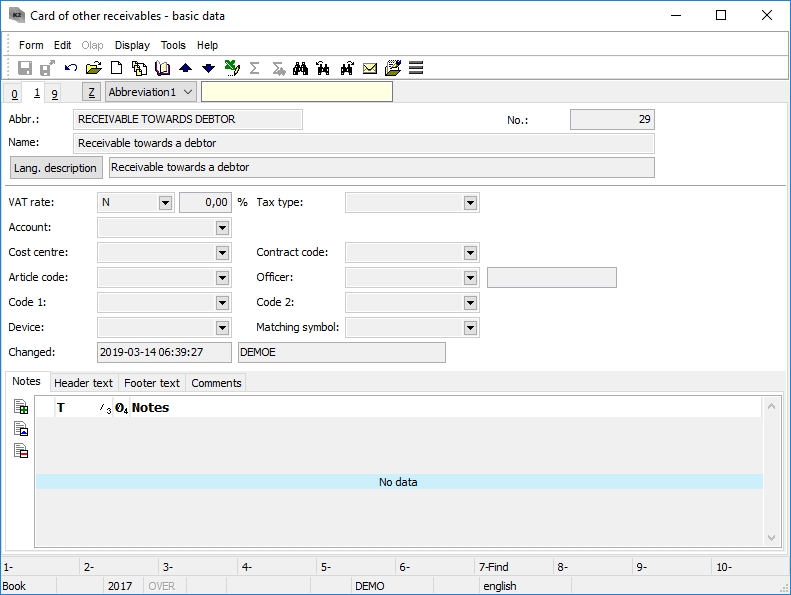
Picture: Card of Other Receivables - a receivable towards the debtor
|
|
|
Refer a receivable, for which no corrective item has been created
Example 1: The creditor (cedent) records his own receivable (Invoice Out) with the nominal value of 100,000 GBP. There is no corrective item created for the receivable. Creditor sells the receivable for 85,000 GBP. The assignee collects 95,000 GBP for the receivable.
A. Assignor
Solution:
1. Pay the original receivable for 100,000 GBP with an internal document. Enter the payment via two items - first item will be the amount for which you sell the receivable (receivable depreciation will be posted - tax cost), second one for the rest (receivable depreciation will be posted - no tax cost).
2. Create an other receivable towards the cessionary for 85,000 GBP.
3. Match the incoming payment from the cessionary (85,000 GBP) to other receivable.
Process:
1. Create an internal document (in the book where you set the posting key "O" - General type), by which you pay the origin receivable.
- Insert the first item, where you enter:
- Type = "IO",
- in the Paid Document field, select an appropriate Invoice Out,
- in the Net field, change the amount to "85,000" (the amount for which we sell the receivable),
- In the Dr Account field, enter the analytical account for receivable depreciation - tax cost (546_1).
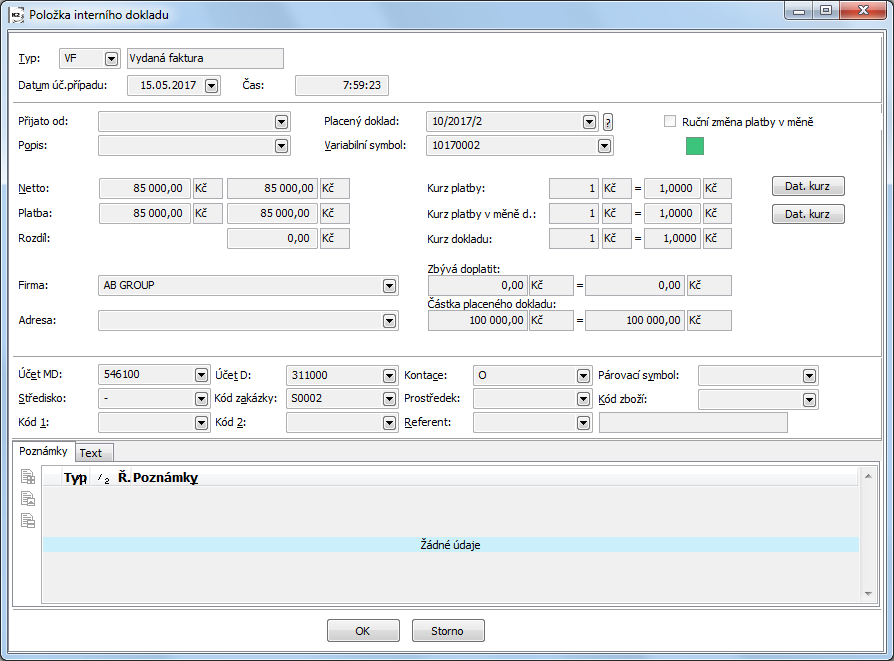
Picture: 1st item of internal document - the payment of Invoice Out in the amount for which you sell the receivable
- Insert the second item, where you enter:
- Type = "IO",
- in the Paid Document field, select an appropriate Invoice Out,
- the amount of "15,000" will be in Net field,
- In Dr Account field, enter analytical account for receivable depreciation - no tax cost (546_9)
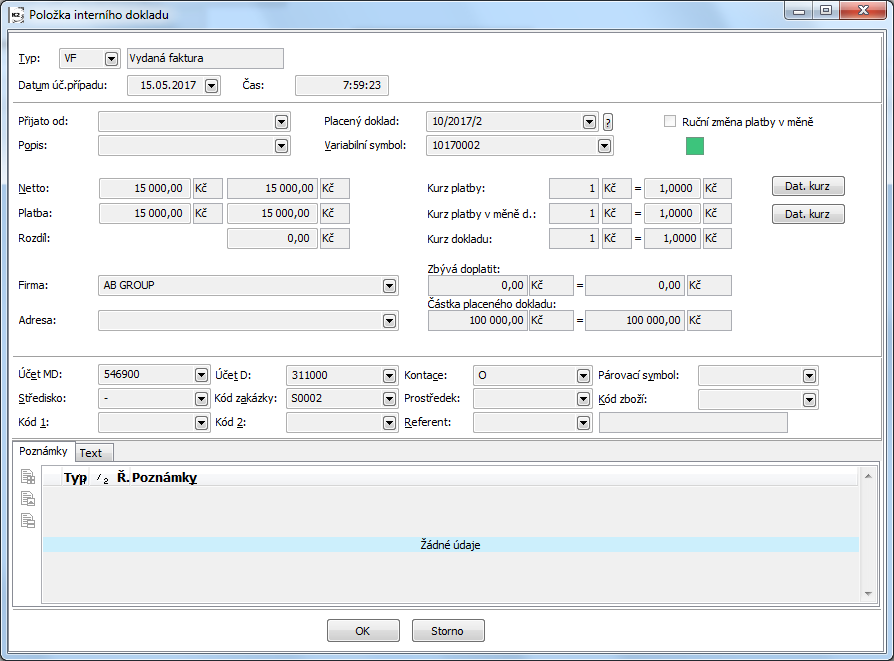
Picture: 2nd item of internal document - the payment of Invoice Out - remaining amount
- Confirm and post the internal document.
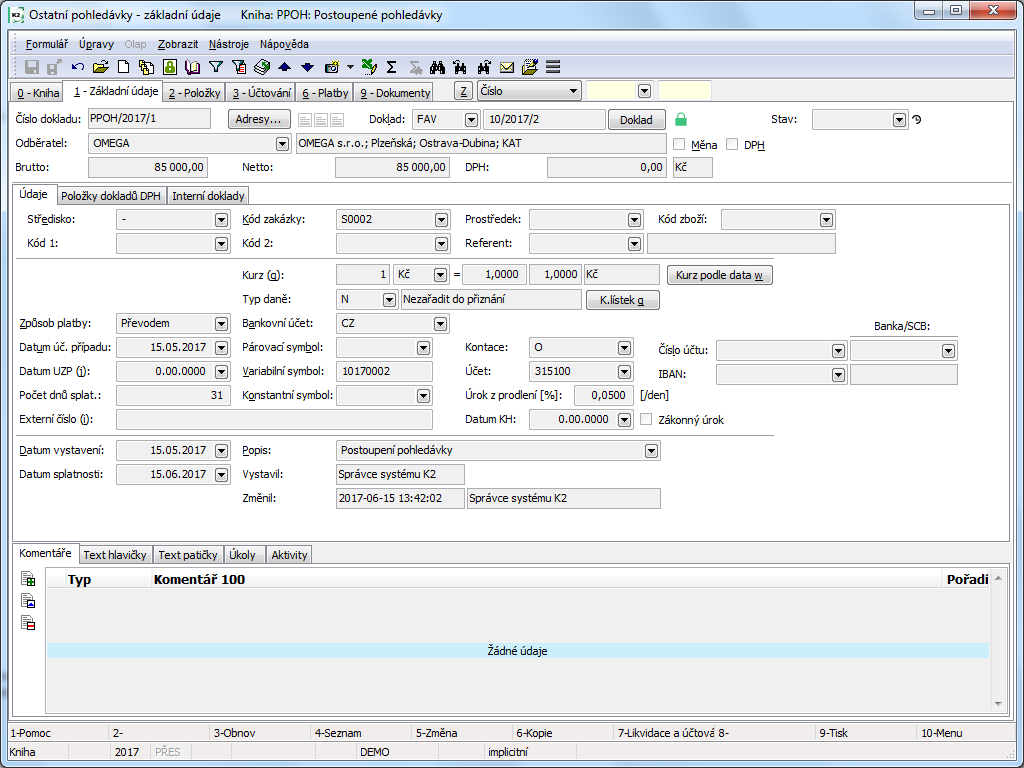
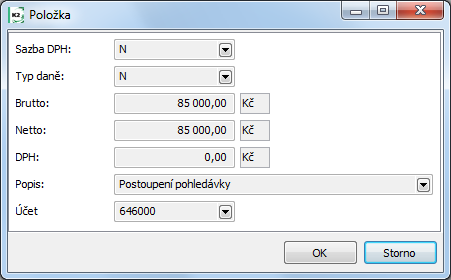
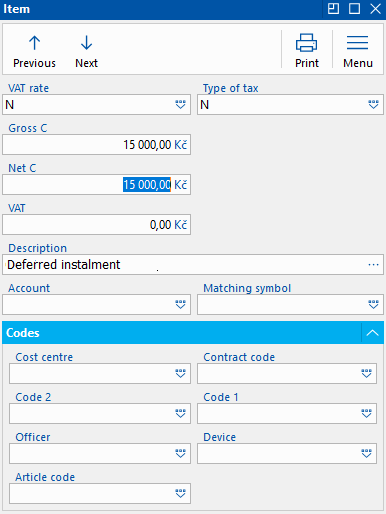
2. Create an other receivable towards the cessionary. The document can be created in the Book of Other Receivables, or manually by the script from the Invoice Out. Procedure of creating from an Invoice:
- Run the Create Other Receivable / Liability from Invoice script on the Invoice (parameter settings are stated in the previous chapter). In the initial form of the function, just enter:
- Acc. Trans. Date,
- Maturity Date,
- Amount ("85,000").

Picture: The initial form of the Create Other Receivable / Liability from Invoice script
- After you approve the form, the document will be created in the Book of Other Receivables; the link for the Invoice Out is in the receivable header in the Document field. Post the other receivable.
Picture: Other Receivable - Basic data
Picture: Other Receivable - Item
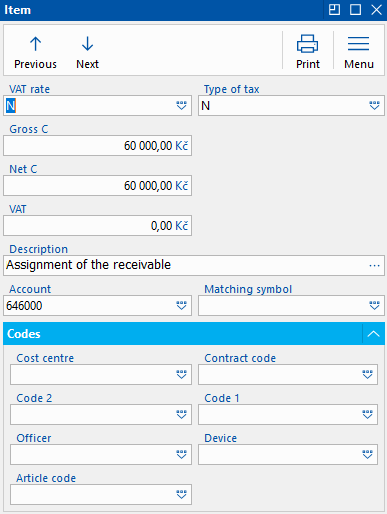
3. Match the incoming payment from assignee to other receivable.
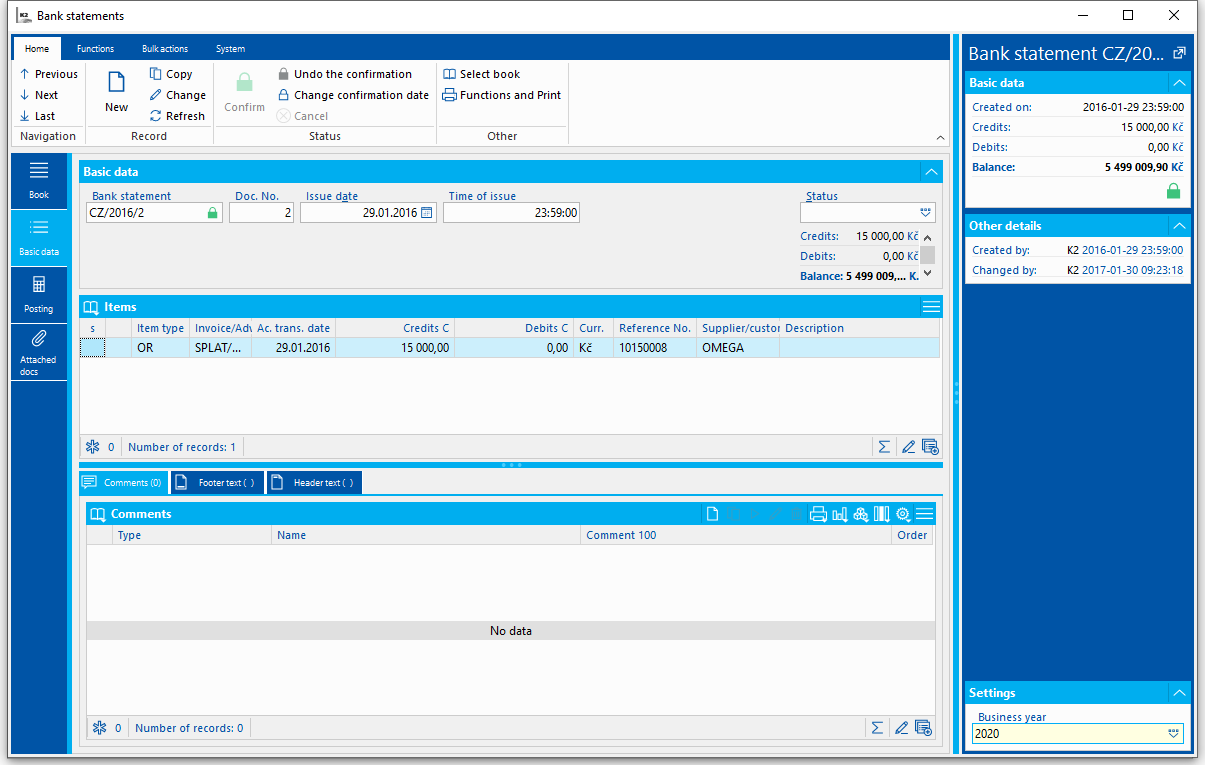
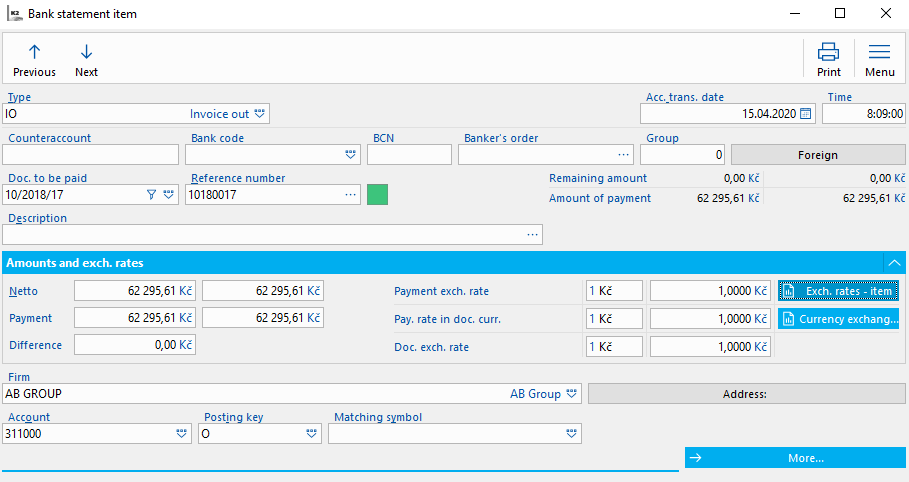
Picture: Bank Statement item - accepting a payment from the cessionary
Posting - assignor:
|
Debit Side Account |
Credit Side Account |
Amount |
Initial balance - receivable |
311 |
- |
100,000 GBP |
Receivable depreciation - tax cost (1st item of internal doc.) |
546_1 |
311 |
85,000 GBP |
Receivable depreciation - no tax cost (2nd item of internal doc.) |
546_9 |
311 |
15,000 GBP |
Income from the sale (other receivable) |
315 |
646 |
85,000 GBP |
Receipt of the payment |
221 |
315 |
85,000 GBP |
B. Cessionary
Solution:
1. Record an other receivable for 85,000 GBP towards the cedent.
2. Create an other receivable for 85,000 GBP towards the debtor (doc will not be posted).
3. Match the payment for 85,000 GBP sent to the cedent to the other receivable.
4. Divide the incoming payment from the debtor (95,000 GBP) into two items: Match the payment for 85,000 GBP to the other receivable, and enter the remaining amount (10,000 GBP) as income (post as earnings).
Process:
1. Go to the Book of Other Receivables created for purchasing ceded receivables, create a new document, and insert the card of Other Liability (created for purchasing the ceded receivable) into the item. Post the item.
Picture: Other Liability - Basic data
Picture: Other Liability - Item
2. Create a new document in the Book of Other Receivables, which has been created to record the receivables towards the debtor, and insert the card of Other Receivable, which has been created for receivables towards the debtor, into the item.

Picture: Other Receivable (towards debtor) - Basic data
Picture: Other Receivable - Item
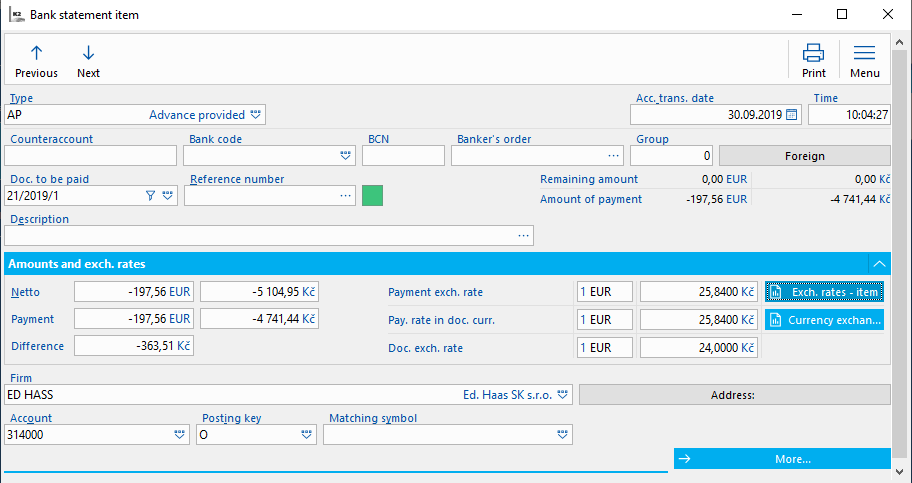
3. Match payment for 85,000 GBP with other receivable.
Picture: Bank statement item - payment to cedent
4. Divide the incoming payment from the debtor (95,000 GBP) into two items:
- The first one will be in the amount for which you have bought the receivable (85,000 GBP); match it to the other receivable (towards the debtor).
Picture: Bank statement item - a payment from the debtor matched to an other receivable
- Second item will be for the remaining amount 10,000 GBP (income is posted):
- Type = "I",
- Net = "10,000",
- Account = "648xxx",
- You can enter the Name.
Picture: Bank statement item - incomes from the sale of receivables
Posting - cessionary:
|
Debit Side Account |
Credit Side Account |
Amount |
Purchase of receivable (other liability) |
315 |
325 |
85,000 GBP |
Payment to the cedent |
325 |
221 |
85,000 GBP |
Payment received from the debtor (in the amount of purchase of the receivable) |
221 |
315 |
85,000 GBP |
Payment received from the debtor (remaining amount) |
221 |
648 |
10,000 GBP |
|
|
|
Refer a receivable, for which a corrective item has been created
Example 2: The creditor (cedent) records his own receivable (Invoice Out) with the nominal value of 100,000 GBP. The receivable is more than 18 months past due, and corrective item has been created for 50%. Creditor sells the receivable for 60,000 GBP. The cessionary collects 70,000 GBP for the receivable.
A. Assignor
Solution:
1. Pay the original receivable for 100,000 GBP with an internal document. Enter the payment by one item, which is posted as the receivable depreciation - tax cost (tax cost is the receivable value up to the amount of income resulting from its ceding and increased by creating a credit note).
2. Create other receivable for 60,000 GBP towards the cessionary.
3. Cancel the credit note to the Invoice Out (by internal doc.).
4. Match the incoming payment from the cessionary to the other receivable.
Process:
1. Create an internal document (in the book where you set the posting key "O" - General type), by which you pay the origin receivable.
- Insert one item, where you enter:
- Type = "IO",
- in the Paid Document field, select an appropriate Invoice Out,
- the amount of "100,000" will be in Net field,
- In the Dr Account field, enter the analytical account for receivable depreciation - tax cost (546_1)
- Confirm and post the internal document.
2. Create an other receivable towards the cessionary. The document can be created in the Book of Other Receivables, or manually by the script from the Invoice Out. Procedure of creating from an Invoice:
- Run the Create Other Receivable / Liability from Invoice script on the Invoice Out. In the initial form of the function, just enter:
- Acc. Trans. Date,
- Maturity Date,
- Amount ("60000").
- After you approve the form, the document will be created in the Book of Other Receivables; the link for the Invoice Out is in the receivable header in the Document field. Post the other receivable.
3. In the book of internal documents (in the book, where is the posting key "O" - General type), create the document, with which you can cancel the credit note:
- Insert a link to the Invoice Out, which the cancellation of the credit note relates to, to a header in the Document field (internal document will be displayed on the Invoice, in the Internal Documents folder):
- Select "IO" - Invoice Out in the Document field,
- press the Document button, and choose the appropriate Invoice.

Picture: Internal document - basic data
- Insert one item, where you enter:
- Type = "IO",
- Amount = "1",
- Net = "50,000",
- you can enter Name (or select a card of internal documents from a code list), Reference Number, Firm,
- Tax = "N",
- Debit Side Account = "391xxxx",
- Credit Side Account = 558xxx.
Picture: Internal document (cancel corrective items) - Item
- Confirm and post the internal document.
4. Match the incoming payment from assignee to other receivable.
Posting - assignor:
|
Debit Side Account |
Credit Side Account |
Amount |
Initial balance - receivable |
311 |
- |
100,000 GBP |
Initial balance - corrective item |
- |
391 |
50,000 GBP |
Receivable depreciation - tax cost (internal doc.) |
546_1 |
311 |
100,000 GBP |
Income from the sale (other receivable) |
315 |
646 |
60,000 GBP |
Cancel corrective items (internal doc.) |
391 |
558 |
50,000 GBP |
Receipt of the payment |
221 |
315 |
60,000 GBP |
B. Cessionary
Solution:
1. Register other liability for 60,000 GBP to the cedent.
2. Create other receivable for 60,000 GBP to the debtor (the document will not be posted).
3. Create corrective item for 50% of acquisition, i.e. 30,000 GBP (by internal doc.).
4. Match the payment for 60,000 GBP sent to the cedent to the other liability.
5. Divide the incoming payment from the debtor (70,000 GBP) into two items: Match the payment for 85,000 GBP to the other receivable, and enter the remaining amount (10,000 GBP) as income (post as earnings).
6. Cancel the corrective item for 30,000GBP for the Invoice Out (by internal doc.).
Process:
1. Go to the Book of Other Receivables created for purchasing ceded receivables, create a new document, and insert the card of Other Liability (created for purchasing the ceded receivable) into the item. Post the item.
2. Create a new document in the Book of Other Receivables, which has been created to record the receivables towards the debtor, and insert the card of Other Receivable, which has been created for receivables towards the debtor, into the item.
3. In the book of internal documents (in the book, where is the posting key "O" - General type), create an internal document for the corrective item:
- Insert a link to the other receivable (towards the debtor) to which you create a corrective item into a header in the Document field (internal document will be displayed on the other receivable in the Internal Documents folder):
- Select "OR" - Other Receivable in the Document field,
- press the Document button, and choose the appropriate document.
Picture: Internal document - basic data
- Insert one item, where you enter:
- Type = "IO",
- Amount = "1",
- Net = "30,000",
- you can enter Name (or select a card of internal documents from a code list), Reference Number, Firm,
- Tax = "N",
- Debit Side Account = "558xxxx",
- Credit Side Account = 391xxx.
Picture: Internal document (create corrective items) - Item
4. Match the payment for 60,000 GBP with the other liability.
5. Divide the incoming payment from the debtor (70,000 GBP) into two items:
- The first one will be in amount, for which you have bought the receivable (60,000 GBP) and match it to other receivable (towards debtor).
- Second item will be for the remaining amount 10,000 GBP (income is posted):
- Type = "I",
- Net = "10,000",
- Account = "648xxx",
- You can enter the Name.
6. Create an internal doc., by which you can cancel corrective item for 30,000 GBP. Follow the point 3, just change the accounts (DR Account = "391xxx", Cr Account = "558xxx")
Posting - cessionary:
|
Debit Side Account |
Credit Side Account |
Amount |
Purchase of receivable (other liability) |
315 |
325 |
60,000 GBP |
Corrective items (internal doc.) |
558 |
391 |
30,000 GBP |
Payment to the cedent |
325 |
221 |
60,000 GBP |
Payment received from the debtor (in the amount of purchase of the receivable) |
221 |
315 |
60,000 GBP |
Payment received from the debtor (remaining amount) |
221 |
648 |
10,000 GBP |
Cancel corrective items (internal doc.) |
391 |
558 |
30,000 GBP |
|
|
|
Commission
Commissions enable the K2 IS users to keep information about their business activity based on trading via Sales representatives. One may assign Sales representatives to individual customers and define the percentage of the representatives' commission. The commission percentage belongs to the given representative if a business deal is made. It is also possible to display invoices with commissions during a defined period, or to view selected Sales representatives, including the amount of their financial reward.
|
|
|
Commission - Example
The example described in the following chapters demonstrates the individual stages of processing commissions. The first step is to select the commissions on a Customer card. The second part describes a variant, in which we pay the commission after issuing an Invoice regardless of the Invoice amount and of whether the Invoice is paid by the customer. The other variant is related to paying out commissions based on the amount paid for the Invoice. This option is described in the following chapter. A detailed explanation of the 'Commission Processing' form and the option to print the 'Overview of Acknowledged Commissions' is stated at the end of the example.
|
|
|
Example: Assign a Sales representative P003 (MSc John Smith) to the customer Demo Ltd.. Z This representative can claim 5% out of each deal.
Procedure:
- On the selected Customer card, run the Commission function (the Enter the Commission Percentage script - PROVIZEPROC.PAS), which will create a note of the 'PP' type for the given customer. Define the data about commissions into the form.
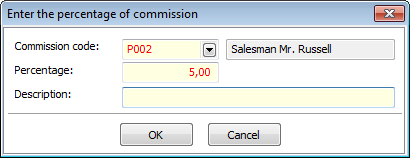
Picture: Inserting the percentage of a commission
Field description:
Commission Code |
Select a Sales representative from the list, who will be in charge of the given customer. You may also click on the field and create a new Sales representative with the Ins key. |
Commission Percentage |
The amount of commission in Percentage. |
Commission Description |
A brief description of the commission. |
- After pressing the OK button, a note of the 'PP' type will be inserted into the notes on the Customer card.
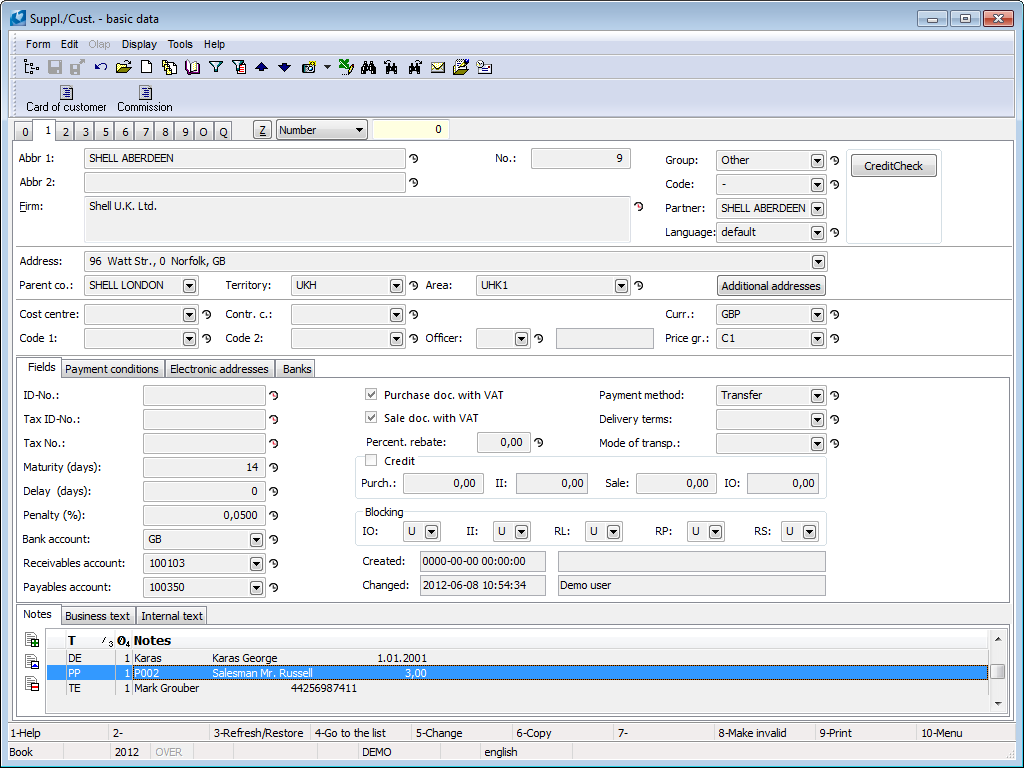
Picture Inserting the 'PP' type of note
Note: If you wish to transfer the entry access right to the note as well, save the group's ID (the value of the Cis field) into the parameter of the above-mentioned script. The script with the parameter set this way may be activated only by those with the entry access right.
- In the Sales module,we will issue an order worth 100,000 CZK. After saving the Sales Order, a note for the commission will be inserted to the 1st page.
- Issue an Invoice to the customer. After saving the Invoice with F2 or confirming it, a note from the Sales Order will be pasted to the created Invoice.
- The´Invoices with Commission Filter (FILTRPROVIZE.PAS) function activated over the book of Invoice Out serves to filter invoices with commissions according to the user-selected period. After checking the Commission Code field, you can specify a Sales representative whom the Invoices will relate to. Not checking the field will result in inserting the Invoices related to all Sales representatives into container.
Picture: The open form of the function Filter of Invoices with Commission
- After pressing the OK button and switching into the Container mode, the Invoices with commissions will be displayed.
- We can display the respective Invoices by running the List of Invoices Out by Commission report. The Commission column will show the amount belonging to a given Sales representative from the particular Invoices. In our case, it is June 5. 100/000 CZK.
Note: Commissions are always copied from the preceding step. If there is no note stated there, this step is skipped. I.e. if there is no note of the 'PP' type on the Invoice, the note will be loaded automatically from the Sales Order when activating the 'Commission' function. If it is not even there, it will be pasted from the customer. If the commission is not entered at the customer as well, a blank form will open.
Note: 2: If there are more notes of the 'PP' type existing, only the 1st found one will be processed in the documents.
Excluding commission from some sales item:
If we enter a note with the commission code '-’ and some rate (0%) in the Articles or sales item tab, the turnover of these articles will count towards the entered percentage (0%). This includes situations of e.g. transport fees, Advances, etc., for which you do not add a commission to Sales representatives.
Suggestion for user adjustment:
On the Article tab, we can enter a note with the commission code of various representatives, or we can add a note of the given representative to the sales item, but with a different rate than the one in the header. In this case, the given item will calculate with the other entered rate. This allows you to influence various rates of commissions for various kinds of assortment, even when related to various Sales representatives. However, this variant is not set by default.
Picture: The List of Invoices Issued by Commission report
|
|
|
Example: Claims for commissions are evaluated once per month. Mr Smith can claim a commission for an issued Invoice for the Demo Ltd. company in the amount of 5% from 100,000 CZK. You want to note down into the system that the commission has been acknowledged in April 2007 in full amount (i.e. 5,500 CZK).
Procedure:
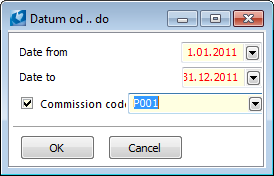
At the end of the month, run the Acknowledge Commissions function. Fill in the period which the Invoice must belong to into the initial form, so that the Invoice may be evaluated. E.g. if your internal methodology defines that the commission will not be acknowledged if the Invoice is older than a year, limit the selection of Invoices in this form.
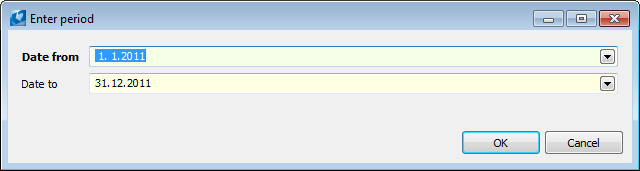
Picture: Selecting a time interval for evaluation
After selecting the time interval, a form will appear, into which all the confirmed Invoices whose invoice date falls into the interval will load (in the case of evaluating regardless of the payment).
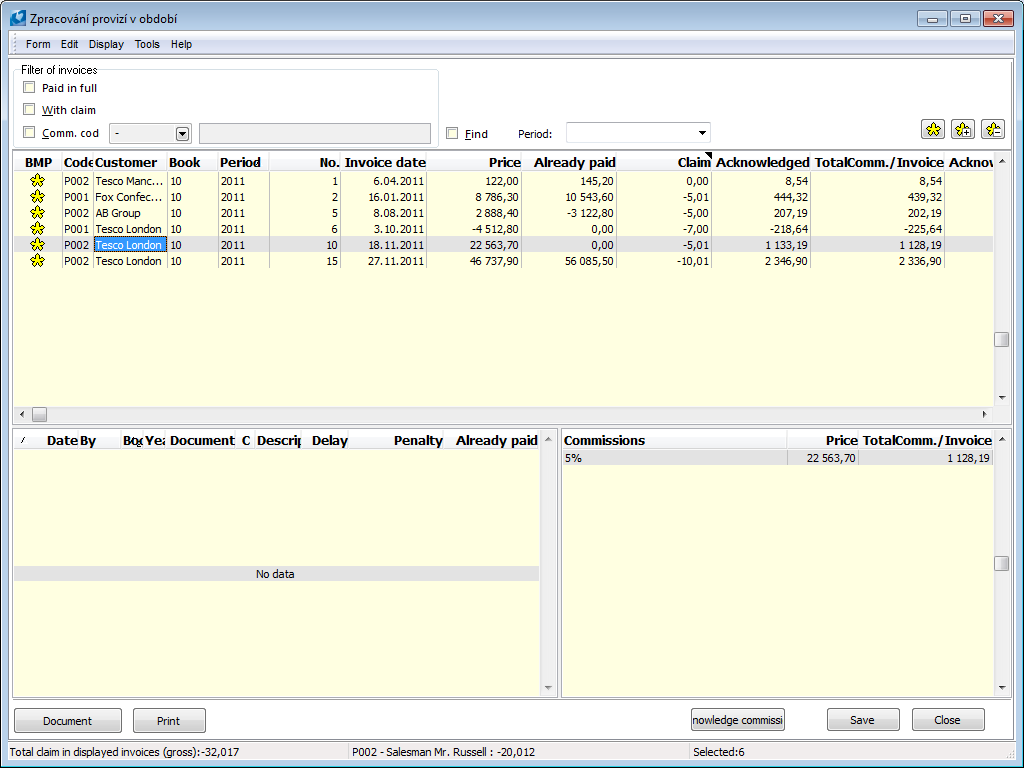
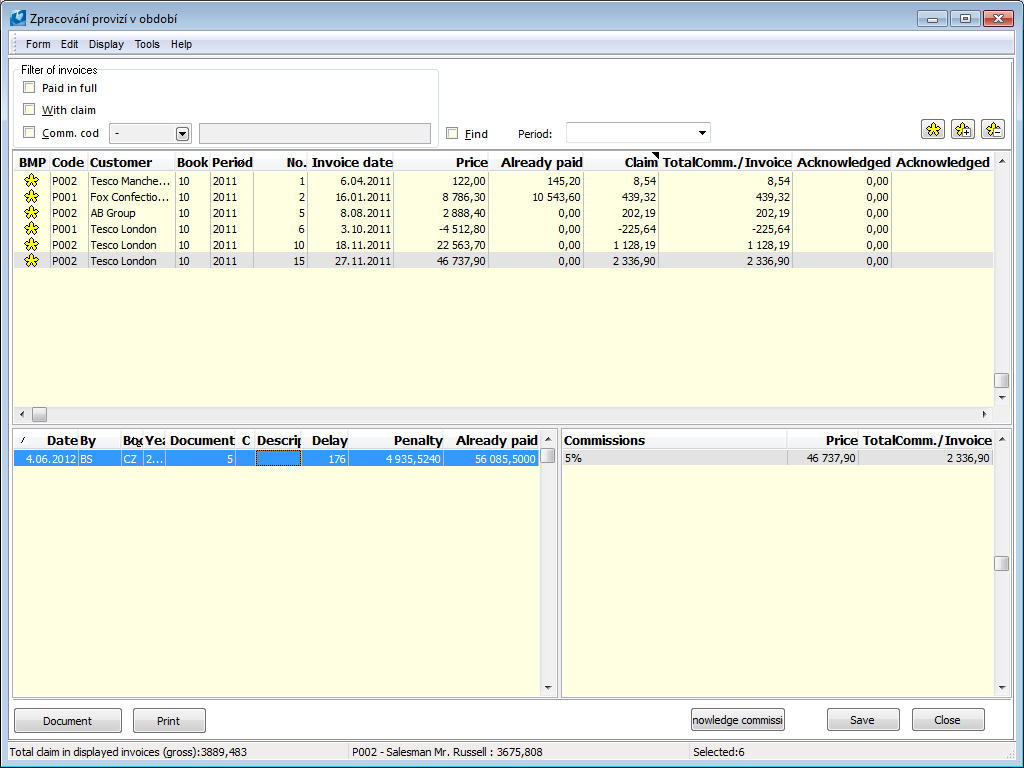
Picture: The Acknowledge Commissions form
In the upper part of the form, you can see an overview of Invoices corresponding to the initial conditions and selected crosses. Only the marked Invoices will be accepted. To indicate the invoices, use the buttons on the right.
The lower left part shows payments relevant to the Invoice on which the light indicator is situated in the upper part; an overview of the total commission amount stated to the same Invoice is situated on the right.
The Document button will show a preview of the Invoice which the light indicator is situated on. The Print button will print the Acknowledged Commissions report (its closer description is provided below). The Acknowledge Commissions button will prepare the notes of the 'PU’ type for saving. These notes contain information about the acknowledged amount of the commission, and the date and period to which the commission has been acknowledged. At the same time, it will edit the values in the upper part of the form according to the acknowledged commissions. The Save button will save all the above-mentioned notes in the K2 IS. If you are not satisfied with the result of the acknowledgement, you can close the form with the Close button without saving the changes. The notes is listed in IS K2, and everything will be restored to the previous state when restarting.
The total of all commissions on displayed selected Invoices may be seen in the last row, i.e. if we had now acknowledged the commissions, how many of them would actually be acknowledged. The other information displays the same information only for the Sales representative from the Invoice on which the light indicator is positioned. The last field shows information about the number of marked Invoices.
Description of selected fields and columns of the upper part of the form:
Paid |
Shows only at a fully paid Invoice. You may pre-set the cross with the chbPaidInFull parameter. |
With Claim |
Only the invoices with claims in absolute value higher than the value of the MinClaim parameter (0,499999 by default) will be displayed. You may pre-set with Claim cross with the chbWithClaim parameter. |
Commission Code |
Checking the cross gives you access to the option of choosing one commission code. After choosing the code, only the Invoices relevant to the particular Sales representative will show. You may pre-set the cross with the chbCommissionCode parameter. |
Search |
Checking this field enables you to search and display already acknowledged commissions. Choose a period from business years to which the commissions are to be acknowledged. After you make your choice, only the Invoices to which a commission of any amount has been acknowledged in the selected period will appear. |
Net (Gross) |
The Net (Gross) of an Invoice. The display of columns depends on whether the commission is calculated from the Invoice's Net or Gross, which is set by the Gross parameter. |
Paid |
The amount paid for the Invoice. |
Claim |
A calculated value according to the settings of the function parameters. You may edit it manually by pressing Enter, entering the requested value, and confirm it with Enter again. |
Acknowledged |
How much has been acknowledged for a given Invoice in previous commissions (eventually after or before saving). |
Acknowledged in period |
How many commissions were recognized for a given invoice in the period for which the search is switched on. If the search is not checked, this column always remains null. |
Total Comm./Invoice |
Shows the maximum value that is to be paid in commissions for the Invoice. The claim is always calculated as Total Commission - Acknowledged. |
|
|
|
Example: Claims for commissions are evaluated once per month. You have issued a new Sales Order (and an Invoice) for the Demo company in the Net amount of 100,000 GBP, from which the amount of 70,000 GBP (83,300 GBP) has already been paid off by the company Mr Smith may claim 70 % of his total commission for this Invoice. During the evaluation, we acknowledge him 3,500 GBP and, at the same time, it will become clear that the representative will get 1,500 GBP more for this Invoice after the customer has paid off the Invoice.
Procedure:
Issue a new Sales Order and an Invoice for the amount of 100,000 GBP for the Demo company. A note of the 'PP’ type, the003 Sales representative, and the commission rate of 5% will be pasted into the Invoice from the previous settings . As the next step, add the Acknowledge Commissions script with the Payments parameter set to Yes into the tree or the F9 menu. Run the script. An initial window will open, where you can select the interval from which the Invoices are to be evaluated. If Payments parameter is active, all confirmed Invoices with the 'PP’ type of note, of which at least one payment has been processed in the selected interval, will be displayed. You can limit the selecting of Invoices via the crosses in the upper part of the form. These crosses, along with other buttons, are described above.
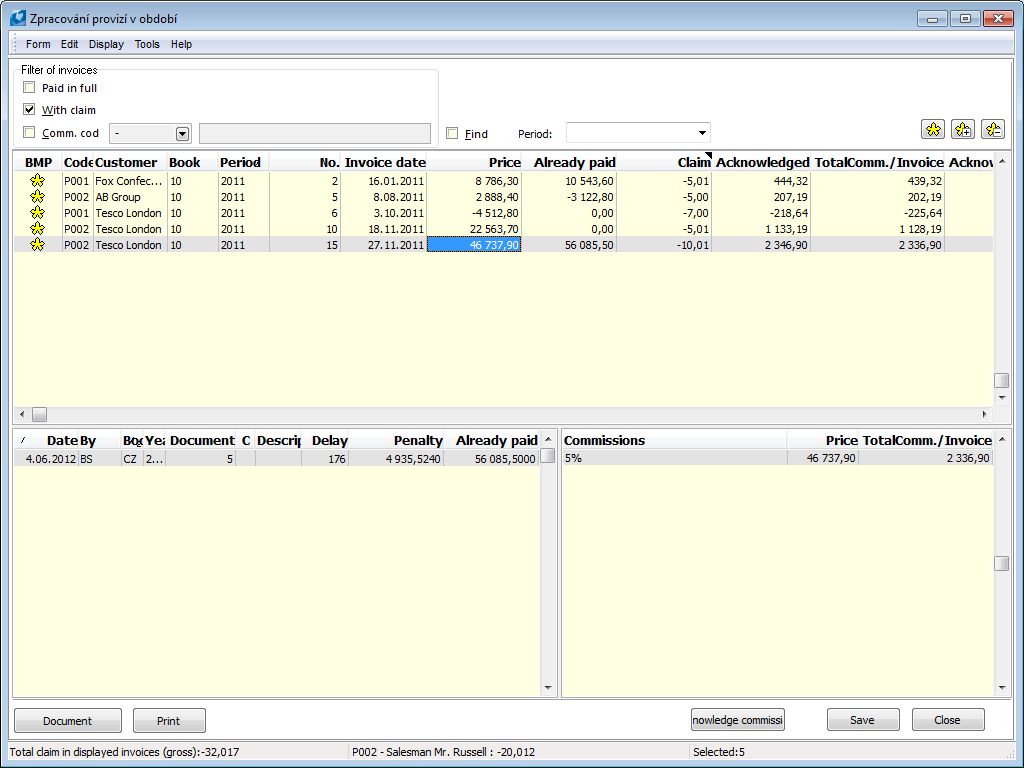
Picture: Invoices corresponding to the conditions set for acknowledging commissions
Enter the period for which the commissions are processed into the Period field. In our case, it is June 2007. If a part of these commissions had already been processed before, you can select the name of the period and choose from the offered code list. We will leave marked all invoices for which we want to acknowledge the commission. The amount of the commission may also be edited manually by moving the cursor to the value, pressing Enter, entering the requested value, and confirming again with Enter. In order for the changes to be processed, press the Acknowledge Commission button. A message informing about the number of acknowledged commissions will appear. You Could see in the picture, that we want to see only the Invoices with a non-null claim (respectively a claim lower than the value of the MinClaim parameter) (checked the WithClaim cross), and so all of the marked Invoices disappeared after the acknowledgment. They will reappear again along with other Invoices that meet the initial conditions after cancelling the cross.
Attention: Notes about an acknowledged commission ('PU') will be created after pressing the Save button. If you close the form without saving, all progress will be lost!
|
|
|
Example: We want to see an overview of all invoices for which we have recognized a commission for the period of June 2007. You also want to print a document for the particular Sales representatives, based on which they can invoice the claimed commission.
Procedure:
In order to process commissions in a specific period, you need to print an overview of how much in total and to which representatives you are going to pay in commissions. Run the Commission Recognition script, leaving the full display interval in the introductory form. Check the Search cross and choose the requested period In our case, it is June 2007. All invoices for which a commission has been recognized in the selected period are displayed. In such case, the information about the amount of acknowledged commission in the period will appear in the Acknowledged in Period column. This amount may differ from the summation amount of Acknowledged, because a part of the commission for a specific Invoice may had already been acknowledged before, or outside the searched period.
Picture: Found Invoices processed in the period of June 2007
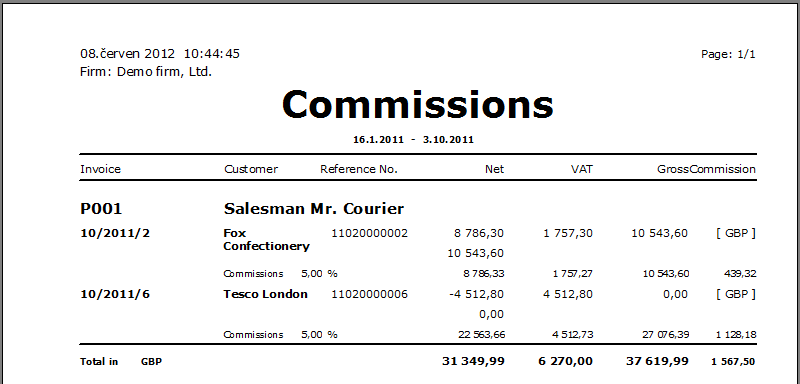
This overview may be printed out with the Print button. This report may be run from the script only and only after saving all changes.
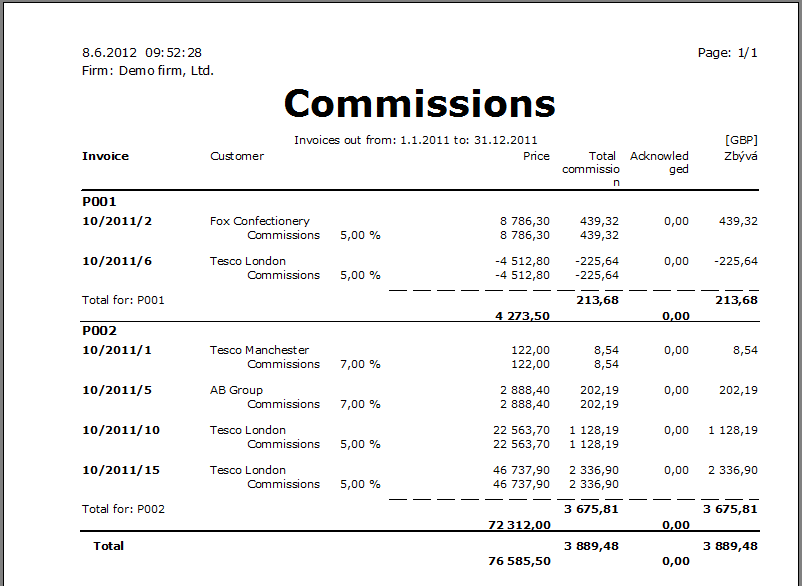
Picture: The Commissions for Period report
If you want to print the overview for only one Sales representative, check the Commission Code cross before running the report and select the requested representative.
If you run the sa report (by the same button) when the search is not checked, the report (after saving again) will print out the form contents, i.e. the Invoices that are currently displayed.
|
|
|
Technical solution
List of files:
|
||
|
RF_Provize.pas |
The script is called by the registered functions through the RF_K2STD script, which uses the U_RF_K2 unit. In the unit, the calling is defined as follows:
It is necessary to permit the registered script in the administration of registered scripts. |
|
Provize_main.pas |
The Acknowledge Commissions script determined for the processing of commissions. |
|
Provize_form.pas |
The auxiliary script to the Provize_main.pas script. |
|
ProvizeProc.pas |
Script for inserting a note of the 'PP' type on a Customer card (number of the form of the note = 01006). |
|
FiltrProvize.pas |
Script for filtering of Invoices Out with the note of the 'PP’ type. |
|
U_provize_konst, U_provize_období |
Auxiliary units to the Provize_main.pas script. |
|
||
|
||
|
VF_Provize.am |
The List of Invoices by Commission print report. |
|
F_Provize.am |
The Acknowledged Commissions print report executable only with the button from the Acknowledge Commissions script. |
|
||
|
||
|
DateOdDoKod.txt |
Form to the FiltrProvize.pas script. |
|
FProvize.txt |
Form to the ProvizeProc.pas script. |
|
Provize_form.dfm |
Form to the Provize_Main.pas script. |