|
|
|
Partners
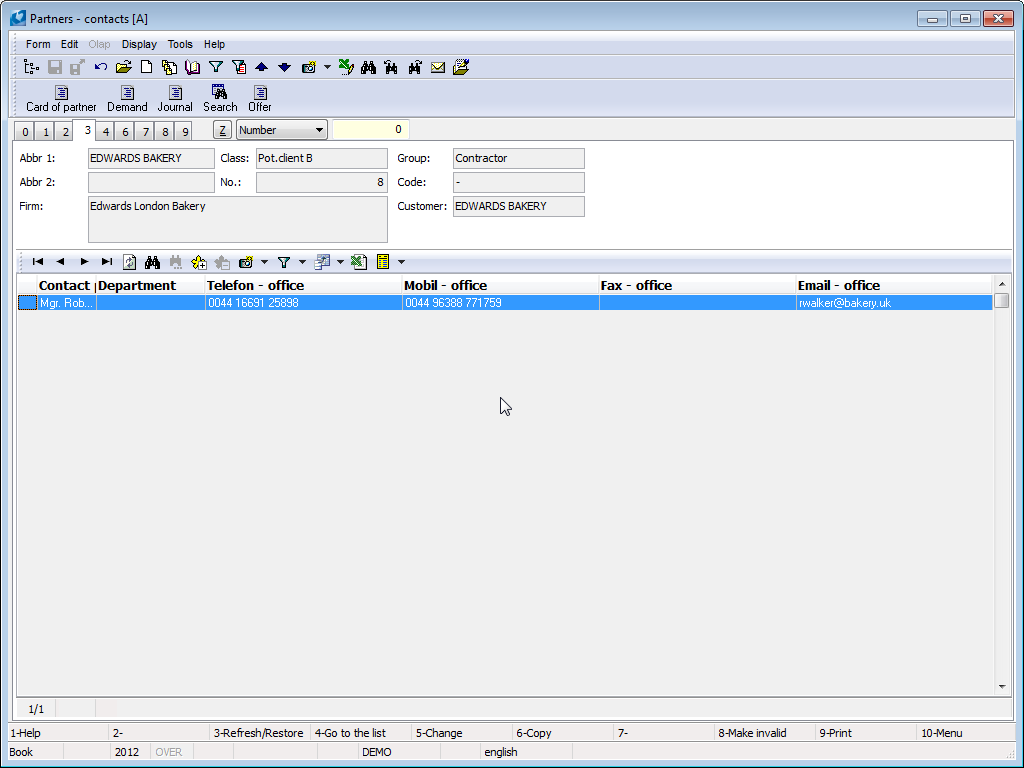
The book of Partners is used for the recording of the partner’s contract process. It contains all necessary information about the partners and partners’ firms. Herein it is possible to write in not only the current partners, but potential customers, competitors, dealers and legitimate partners – cooperating firms too.
The difference between the partner and customer consists in the fact that on the partner's card the communication activities and its contact persons are administered, while the financial information is administered on the card of the same customer in the Cust./Suppl. book. A new partner becomes the customer after the business documents issue. It has to be written in the book of Suppliers/Customers as the customer. However, this card does not have to be created manually. Across- connecting link can be used instead (see the field Bound with Customer on the 1st page of Partner card). On the other hand every customer does not have to be administered in the database of partners simultaneously. System does not enables to set a new customer without partner and it always creates it automatically. In this case, not only the financial information is missing but also the other ones that are registered on the partner's card (e.g. contact persons, activities, sorting criteria, tasks related to this customer, marketing evaluations and others).
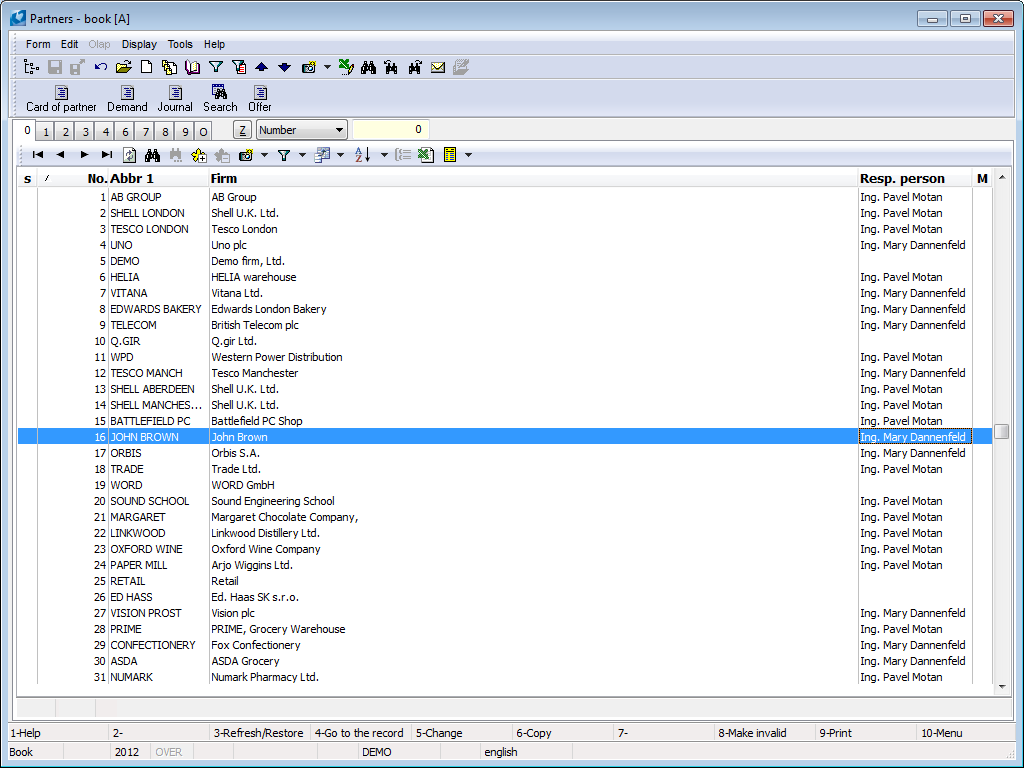
Picture: Partners book
Mass Transferof partners already entered in Suppl./Cust database is done as follows:
- We use filter to select partners we want to export to Suppl./Cust. database.
- Press F9 key to activate the form for reports where you can insert the Partner - Customer script and press Enter key to start the data export.
The users without access to the Partners module can search and verify the availability of partners in the database be means of the “Marketing – Search Partner” report (see the subchapter Search Partner).
|
|
|
Partner card
|
|
|
Basic Data (page 1)
The items on the 1st page are used for the user quick orientation about the basic information of the selected partner. A new partner card can be standardly inserted by Ins key. It is not possible to delete a partner card from the database. We can only change the customer data on the partner card if there is no link to the customer. If the partner has a relation to the customer and the commercial documents has not been issued on this customer, you can change his/her data, but on the Customer/Supplier card.
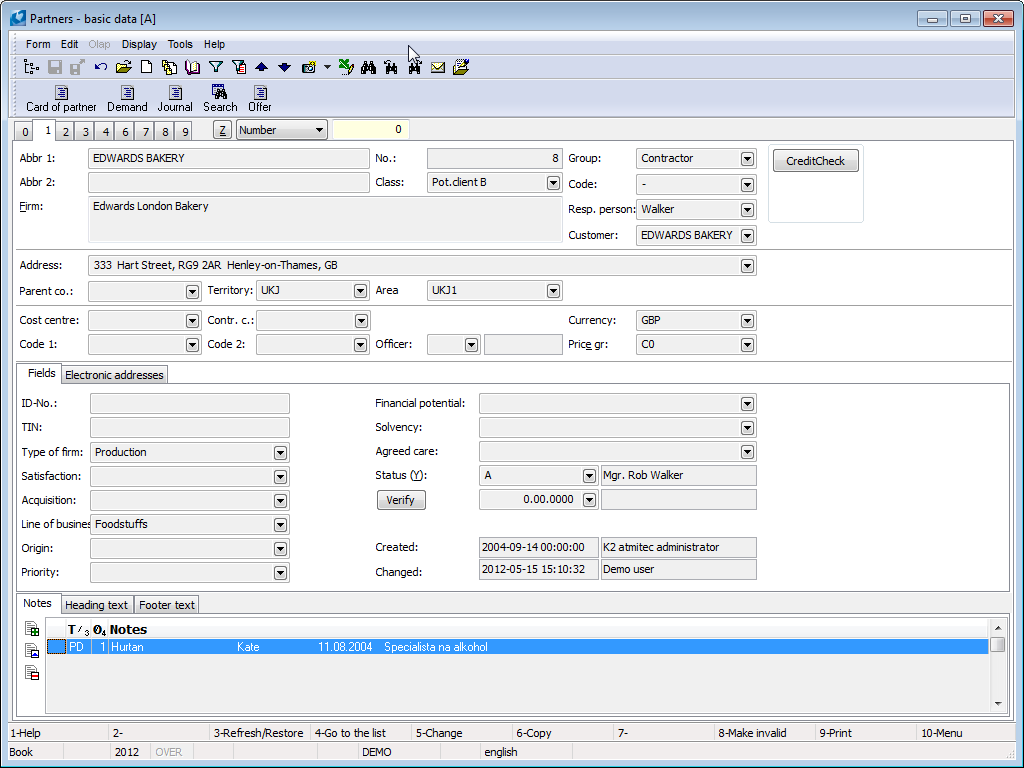
Picture: Partners - 1st Page chapter).
Description of Fields:
Abbr 1, 2 |
One from the possibilities for sorting and easier searching in the book. If you want to submit different codes for the only partner, you have to set a new card with the different Abbr 1 (e.g. RENA1 with SW code and RENA2 with HW code). The Abbr 1 is an obligatory item; the Abbr 2 is a discretionary item. |
||||
Firm |
The complete name of the firm (according to the Business Register). The ARES button is by the field Firm . When you create a new customer and fill in at least a part of the name in the Firm field (the whole word must be entered) and then pressing the ARES button, you can see the possible company names from the ARES database and the user can select a specific record (without filling in the full name of the company). After record is selected information import from ARES is done. There is an ISDS (Data Box Information System) button Comment: button is available only in general user interface. Button initiates ISDS function and looks up company in database to fill in company name, address and data box identification to Suppl./Cust. card. Updated records are saved in fields’ history with current date. Detailed description - see ISDS chapter in Marketing part. Button only appears in case it’s allowed inISDS Parameters. |
||||
Class |
The given partner classification according to the set criteria (e.g. Competitor, Client, Partner etc.). Note: It has to be filled in. |
||||
No. |
The ordinal number of the defined partner within. K2 It is created automatically when first save of a Partner card. |
||||
Group |
You can select it from the same code list as in Suppl./Cust. book A group is a random number or text. You can divide the Partners database according to a group, e. g. to a supplier, to a customer etc. Obligatory detail. |
||||
Code |
With codes you can divide the Partners database to the smaller units, e. g. a customers group you can divide to retail and wholesale etc. If you doesn't want to use this division, you will fill dash. Obligatory detail. Example: When setting up Partners into the database using the Group field to distinguish between small, large and medium firms. By the Code field you can filter e. g. all small firms with the "Ltd.", "Inc." code, "natural persons", etc. |
||||
Responsible person |
The name of the employee who is responsible for the given firm or the authorised partner's person who is mandatory to deal with our firm. Note: With filling this field in we will be redirected to the book of Contact Persons, it means that the employee name has to be submitted to the book of Contact Persons. |
||||
Customer |
The field represents the relation between Partner and Customer. If the partner is not linked with the customer, it is possible to display the Suppl./Cust book by means of this field and to search the customer (if he/she exists in the database already) and to assort the customer to a partner. |
||||
|
Use the Ctrl + Z (z) keys to quickly switch between the two books partner to customer) and Ctrl + P (from customer to partner). If you are in the Partners book, the program will run the control of Suppl./Cust. database by pressing Ctrl+Z keys. It the relation will not be found, the query will display if you want to save the customer to this partner. |
||||
|
It is not possible to cancel the relation between customer and partner. |
||||
|
Note: If the partner is tied to the customer, it is possible to switch with the keys Ctrl + Shift + Enter from the 1 st page of the Purchase / Sales documents to the 1st page of the partner card (see chapter Common elements of purchase and sale - Basic data). |
||||
|
The Partner card is always created to every customer. Partner field is mandatory field in Customer card. If you want to create a customer card to every partner card automatically, check the Auto linkage Partner -> Customer field in the Client parameter. If the parameter is checked and the customer is created automatically with the creation of partner, the Bank has to be set in the Client parameter. The Bank account field is obligatory in the Suppl./Cust card and when automatically customer creation it will be filled with the value that is set in the Client parameter. |
||||
|
If we implement this setting during the operation of IS K2, it is necessary to first "compare" the database using a special script (in report book) Partner - Customer. |
||||
New customer |
This button is visible when creation of a new record in the Partners book and in the Change mode of a partner that is not linked with a customer yet. After pressing of this button a creation of a new customer will be offered. Card created by Suppl./Cust. opens on page 1 in Change mode. After that it is possible to enter the required fields and to save the customer. |
||||
Status |
Partner status. Field can be filled with value from user-defined code list. Field is important especially for linking documents to Workflow processes. |
||||
CreditCheck |
The button for activation of an individual rating of the firm by the CreditCheck service. After executing of the rating the "semaphore" will display here that show us the result of this rating. For the further information about this function see the CreditCheck chapter. |
||||
ISIR CreditCheck |
Button for customer assessment by using ISIR service. The further description of this function is stated in the ISIR CreditCzech system in K2 IS chapter. |
||||
Octopus |
Button to start the analysis of the customer's system Octopus. For detailed information about this function please refer to Octopus chapter. |
||||
Verify VAT No. |
Button for verify the validity of the tax identification number (VAT Reg.No) allocated for the purposes of VAT in a member state of the EU. After verification, these information will be get into the button:
The service settings is executed in the tree menu Finance/Basic data/Configuration of the Verification of VAT number service - VIES. The further description in the Verification of VAT number by VIES system chapter. |
||||
Address |
The field for defining of a whole address. |
||||
Parent co. |
You can use it for defining of a superior supplier/customer e. g. if you supply the articles to a customer who represents a branch, a warehouse, a shop, ..., and who belongs to a customer with a different registered office. Superior supplier/customer will be automatically entered to the sale documents as a Addressee. It deals with a common field with the linked customer and if the partner is linked with a customer, it is possible to edit this field only from his/her card. |
||||
Territory |
The field can serve for evaluating of suppliers/customers, eventually partners. By pressing Ins or F6 key you can insert a new Territory. |
||||
Area |
The field can serve for evaluating of suppliers/customers, eventually partners. You can use the code list for dividing of a larger area (e. g. you can divide an area according to the territories). By pressing Ins or F6 key you can insert a new area. If the partner is linked with a customer, it is possible to edit this field only from the customer card. |
||||
Cost Centre |
A cost centre of a firm. After selecting of a supplier/customer it will be copied in the purchase/sale documents. |
||||
Contract code |
If the partner is linked with the customer, program automatically inserts the contract code from Suppl./Cust. database. |
||||
Device |
Reference to Device book. |
||||
Code1, Code 2 |
Possibility of setting any code. It serves for user identification. |
||||
Officer |
It allows to assign responsible person (link to Officers book). If Partner has linked Customer, it's only possible to adjust data from there. Then it’s also copied to created superior or open documents. |
||||
Currency |
The currency in which payments will be implemented. |
||||
Price gr. |
The price group to which the supplier is classified. |
||||
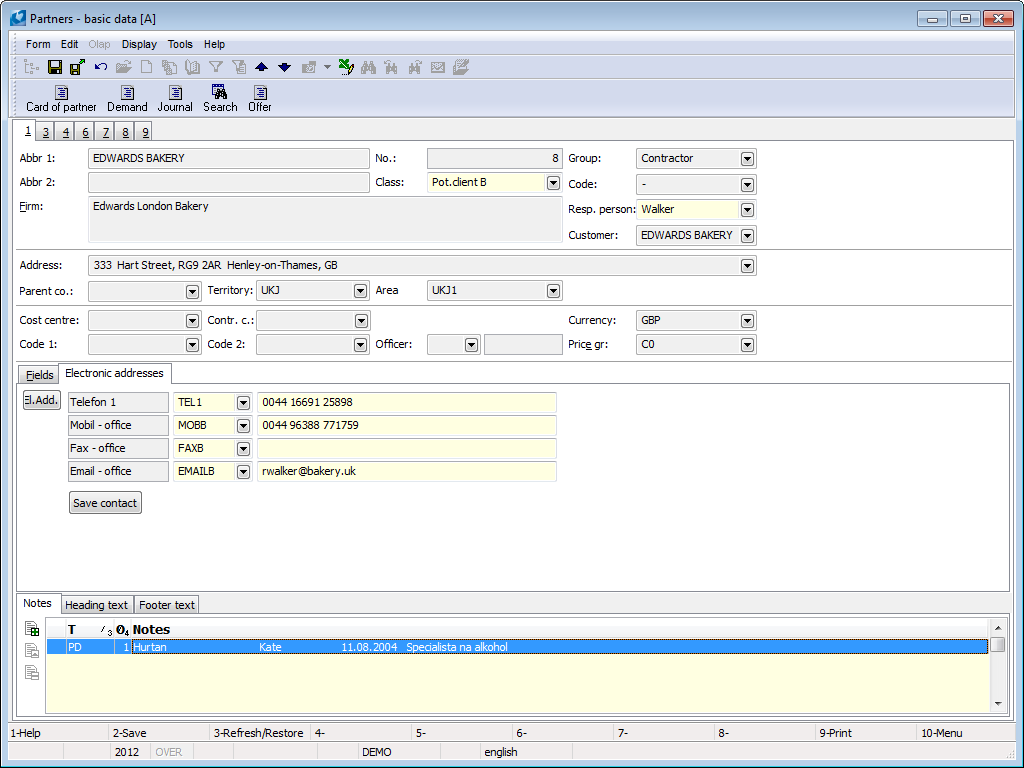
Electronic addresses |
The tab for displaying of the electronic addresses of a partner. |
||||
Fields |
The fields for entering of the electronic addresses will display according to the predefined 4 type of electronic addresses in four rows. Setting of these 4 types: see the Electronic addresses presets, the User parameters book - 4th page (tab Marketing). Save contact - the electronic addresses of the partner are saved as a contact into the Outlook application by this button. If it is installed a different application that is associated with the „*.vcf“ file type, the contact will be saved here. |
||||
Ell. add. |
By pressing of this button all electronic addresses of a partner will display. Note: Way of control is described on the 1st page of Partner card in the Electronic addresses item part. |
||||
Fields |
Tab for displaying of the common fields. |
||||
Marketing Classification |
Marketing Classification is used to classify partner. We can activate appropriate form in tab in Change mode with Ins key. When changing Marketing Classification via mass action (menu Form/Mass Actions/Change of Items) current valid Marketing Classification and Marketing Classification valid in future change or remove at option Change or Remove. |
||||
Comp. tax reg. no. |
Identification number of an organization. |
||||
|
Before launching it’s necessary that user gets familiar with rules for using this service (see Ministry of Finance website or ARES chapter in Marketing part). If conditions are violated (especially in regards to number of requests (one request = one record inPartners book), service can be blocked for the user! The button activates the function ARES for filling the company data according to ARES database. According to Comp. Reg. No. company in database will be searched and company name and address will be filled in the Partners card. Updated records are saved in fields’ history with current date. Detailed description - see ARES chapter in Marketing part. Button is not displayed if this is set in Parameters of ARES service. |
||||
VAT number |
Tax identification number. |
||||
Tax No. |
Tax No. is used only in some countries (not in Czech Republic). |
||||
Satisfaction |
This field can be understood as the satisfaction from the view of the user or as a satisfaction of the partner with the user (it depends of an internal methodology of a firm). Note: Every contact person has the same code list to express satisfaction as a partner. On the 1 st page of the partner card, satisfaction is understood as the satisfaction of the whole company, while on the 1st page of the contact person's card, the subjective satisfaction of the person is expressed. |
||||
Line of business |
A category in that the partner actives (e. g. transport, pharmaceuticals, food, etc.). |
||||
Origin |
The field is used for saving information about how we acquired the company contact (e. g. exhibition, recommendation, etc.). It deals with evaluation, which type of promotion brings the greatest benefit. |
||||
Priority |
The field is used as a quick support or decision, to whom to pay pressed for time. In the partner card there is showed the priority of the partner. Note: If the partner is tied to the customer, it is possible to switch with the keys Ctrl + Shift + Enter from the 1. page of the Purchase / Sales documents to the 1st side of the partner card (see chapter Common elements of purchase and sale - Basic data). the partner expresses in this field how high a priority this partner has. In the Contact person card this field determines priority of a concrete person in a communication process with a company. |
||||
Financial Potential |
It reflects the subjective view of the supposed acquisition from the business from the appropriate partner for the certain period. |
||||
Solvency |
In the table defined e. g. the payment morale of a partner (rating of a company). |
||||
Agreed Care |
Contractual guarantee of agreed care (e. g. premium service conditions, speed or priority lump fee, etc.). |
||||
Verify |
The Verify button runs automatically web pages of the Commercial Register, where it is immediately possible to verify correctness of record of name of a company. After leaving of the web page the query will display on a correctness about writing verification:
If this field is not defined, it is possible to block the creation of a supplier or customer from the Partner card. |
||||
Limited usage |
If this box is checked usage of personal data of this partner is limited. Field is linked to Customer module. It can be changed only if customer doesn’t exist for the partner. |
||||
Individual person |
Flag indicates that the partner is individual person. Field is linked to Customer module. It can be changed only if customer doesn’t exist for the partner. |
||||
Branches |
List of Supplier/Customer branches from Branches book. The button is available only in Universal forms. |
 next to the
 Note: When setting up of a new partner card all information are not available. Individual fields are filled continuously or they will not be filled. It is recommended to define the fields that it is not necessary to fill in advance too.
Note: If the customer/supplier exists to a partner, any fields on the 1st page are changeable only from Suppl./Cust. card. (with all effects of the change).
In this page, like in Other module IS K2 it is possible with Notes. Closer description of work with notes is stated in Basic Code Lists and Supporting Modules K2 – Notes chapter We can possibly use Header Text or Footer Text. Further there are also Comments and Address Keys tabs available. Address Keys tab is used to work with discount coupons. In Change mode, you can assign address keys to customer or delete existing ones. By pressing Ins you get to the Address Keys list. Here you can create additional keys, edit existing, confirm or undoconfirm records. If partner is assigned to the Address key then he/she appears on the 1st page of the given key in the list of customers. Adding of address key is also reflected in Address Keys tab at customer.
|
|
|
After pressing the EA button on the Electronic addresses (H) tab in the Partner tab, the electronic address book entries are displayed, ie all electronic addresses of the given partner. Items are distinguished by address type, and there can be only one item of a given type per partner. By pressing the left mouse button on the column header, it is possible to sort the displayed items in ascending or descending order according to the selected criteria (e-mail address, address type). The button Fields (H) is used to redisplay fields with predefined types of electronic addresses.
Picture: Partners - 1st page - display of electronic address book items
It is possible to enter telephone (fax, ...) numbers on the Partner tab also in the display of electronic addresses. In the Change, set the cursor to the Electronic Addresses section, and after pressing the Ins key, the form for entering a new item will be called up. Here we fill in the required data (Address type, Electronic address) and save it with the F2 key. In Partner Change, you can also use the Del key to delete an item and the Enter key to display the item.

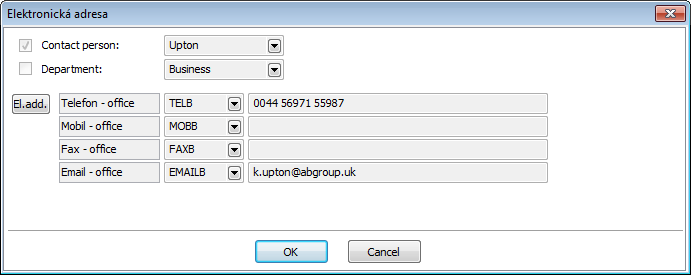
Picture: The Electronic address form
Description of Fields:
Address type |
Address type -selection from code list |
Electronic address |
Phone number, fax number, e-mail address,.. |
Note: The control description applies to the 1st and 3rd. page of the Partner card, further for 1. page of the Contact persons card and for 1. page of the card Suppl./Cust.
|
|
|
List of activities (2nd page)
On the 2 nd Page, all activities that are linked with a partner or his/her contact person are displayed in a selected structure Here are displayed all activities that relate with this partner, with his/her contact person and the activities too that link concrete offers with this partner and the concrete campaigns that this partner was apart of. The Tasks tab is also available here to link a partner with tasks.
This page is available only in Browse mode. With the Ctrl + F6 key it is possible to create a new but subordinate activity in the Browse, the activity on which the ruler stands, i.e. logically and chronologically related to the original activity. For adding activities, the activity will be displayed according to the defined sorting, not necessary in the tree of activities. The icon of Folder comes into existence at the activity that has at least one inferior activity.
The activity can both be displayed and edited on this page. By pressing Ctrl+Shift+Enter keys in Browse mode a selected activity on that the light indicator is positioned will be opened and by pressing F5 key you access to the Change mode in that you can adjust an activity. The once entered activities cannot be deleted.
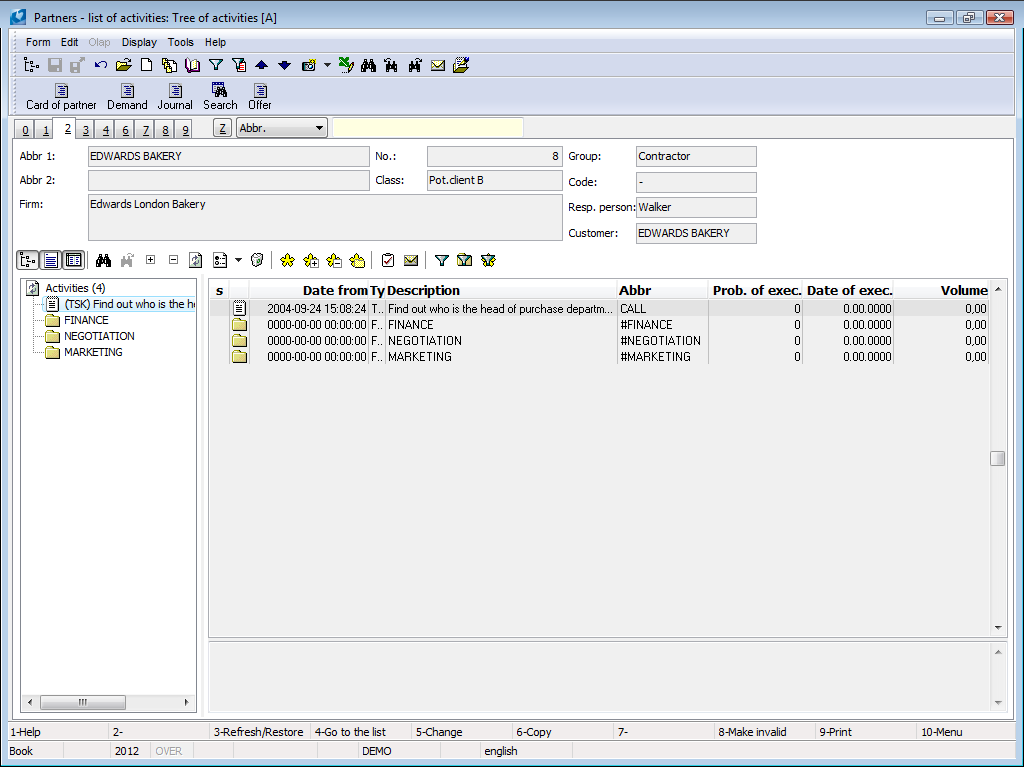
Picture: Partners - 2 nd page - Sorting according to the Tree of activities
Icons description:
Display options
|
Display tree - activating of this button (switches) the activities in the tree structure will be displayed in the left part of the screen. By deactivation of this button the activities from the right part will be displayed on the whole desktop (see the picture). The activities that are red checked by icon have on the 1 St page checked field Monitor (see the Activities chapter). |
|
Display view - by turning on (pushing) this button (switch), a comment from the 8th side of the activity will be displayed in the lower right part of the screen. (Only if the user is authorized to browse the 8thpage of the activities.) If the switches is deactivated the comment is not displayed. |
|
Display grid - by turning on (pushing) this button (switch), the activities of the given partner will be displayed in the window (gray window in the right part of the screen (in case of displaying the activity tree)). By deactivation of this button the comments of the activities will be displayed in the window. (Only if the user is authorized to browse the 8th page of activities. If the right is blocked, the window is empty.) |
|
Expand all nodes - open simultaneously all folders (nodes) by pressing Ctrl+grey plus keys. |
|
Collapse all nodes - close simultaneously all folders (nodes) by pressing Ctrl+grey minus keys. |
Search
|
Find text - pressing of this button (or by pressing Ctrl+F keys). The form is displayed for searching. Text is searched for those fields that are marked. |
|
Find next... - by pressing of this button the program search for the next activity, in ,that is in its description the text entered in the form for searching (see the previous icon). |
Marking
|
Selected: number of records - by pressing of this button, mark the activity on that the light indicator is already positioned, if you want to execute the change in bulk on the selected activities. Note: If we let the mouse cursor on this icon for a moment, the current number of marked records is also displayed icon next to the function name. By pressing of the button on a selected activity, the asterisks is deleted and this activity will not be marked yet. |
|
Select all - mark all activities of the partner by this button. |
|
Cancel selection - this button will cancel selection of selected activities. |
|
Select all in folder - this button mark all activities of the partner from the place on that the light indicator is positioned (only with inone folder). |
Other
|
Load current data - with this button the program loads the current status of activities (ie if another user adds a new activity to the currently monitored partner, this change will not take effect until the status is updated with this button, without having to "leave" the card. |
|
|
By pressing this button (or by Shift+F10 keys), you can display the list of possibilities for sorting of activities in folders by various criteria: |
|
|
Group by opportunities |
The folders is formed by this activity that links the opportunity with partners. If more activities link the same opportunity with the same partner (appointment, visit, phone), these activities of this partner are in the same folder. |
|
Tree of activities |
The folder is created by the activity that is a superior activity to the others. |
|
Group by campaigns |
The folders is formed by this activity that links the campaign with partners. |
|
Group by cont. pers. |
Each partner's contact person is a separate folder. If given contact person is no longer contact person for given partner (page 3 of Partners) then in front of their name (x) appears. |
|
Group by partners |
It is used for displaying of all activities that link a concrete opportunity with all partners. If Union according to partners is selected in Contact persons, then if given contact person is no longer partner displayed in activity tree, (x) will appear in front of the partner. |
|
Group by resp. pers. |
It is used for sorting by contact persons that are on the activity stated as responsible persons. |
|
Without group |
Activities will not sorted by any criteria. Activities without grouping are created by Shift+F6 keys. Then these will have grouping only if the Contact person, Campaign, Opportunity, Responsible person field is filled or manually the Superior activity field will be filled. |
|
|
Note: This displaying is used mainly for displaying by a selected column. It is possible to sort activities ascending or descending in the window by pressing the mouse button on the heading of a selected column (the bar in that the column name is defined). However sorting by a selected column is executed only in the activities on the same levels, that means in one folder. For sorting in all folders simultaneously it is necessary to use "Without group" display. |
|
Group by documents |
The folders in the tree are created by types of documents (sales order, invoice out, task, etc.) that are set on the 9th page of the activity. Under every nod (document type (e.g. "Invoice in")) the concrete documents are displayed as inferior folders and the individual entered activities are given into these folders (any documents can contain more activities). If the activity has not assorted a concrete document on its page (and the document has not assorted the activity on its 9th page), the activities will be displayed under the "Without document" folder. If the activity is assorted to the 9th page of several documents (and otherwise the same activity is assorted to the several documents), this activity will be displayed in the tree under every of these documents. |
|
Group by type |
Activities are sorted into the folders according to the type that is defined in this field (see the Activities chapter). |
|
Group by years |
By this sorting the program displays activities of a selected partner into the folders by individual years (that means. all activities that are created in one year will be assorted into the folder of this year). |
|
Note: If you want to display activities by a selected sorting, you do not have to create individual folders for this sorting (e. g. by years or opportunities). The program will create them automatically. |
|
|
Example: You want to display activities grouped by years. Folders with the name of„2001“, „2002“, „2003“ etc. will be displayed as nodes. Program automatically assign individual activities into these folders by the date of theirs acceptance into the program. |
|
|
Recommendations: For better systematic creation of activities and their clarity is recommended to create the so called global folders, which are activities that have:
|
|
|
If you create a real activity with a concrete partner, it is always created as an inferior activity of one from a global folders (by the purpose). E. g. all activities of all departments of a firm related to the open item list will be in the Finance folder. Create the activity with the Ctrl + F6 keys with a cursor on the global Finance folder. If the number of activities increases during the years, it is suitable to set a main global folder eg. NEGOTIATION and to nark other subfolders by year, eg. Finance2002, Finance 2003 etc., and then to save the activities into these folders according to the date of record creation by the Ctrl+F6 keys. |
|
|
Hide activity - by pressing the icon you can check the Hide field on the 1st page of the activity. By this the marking of activity will be changed to the icon that is identical to this button. The change comes out after reloading of a current state by the Load current data button. To this time, the activities that are indicated as hidden, are always visible on that page. Hidden activities are visible in all sorting apart from the Tree of activities, in that all inferior activities will be hidden automatically. (It is possible to display hidden activities on the base of the right that is defined in the User parameters, see the description of the Hide field on the 1st page in the Activities chapter). |
|
|
New task - with this button (or the Shift + F7 keys) we bind a new task with the activity we are currently standing on (in a tree or in a window). The task will be saved into the main folder of user. |
|
|
New email - display he form for setting of a new email in the K2 IS by this button. |
|
|
Set the filter to date and type - the form for filtering of activities according to the date or Type of activities is displayed by this button (or by Alt+F10 keys). |
|
|
Note: On the 1 st page of the activity,there is the From and To. The activities will be filtered according to this how these two fields are defined. The first "line" of the Activity Filtering form is used to define the period from - to, but the program will verify for this range only those records with the From field filled in (on the 1st page of the activity). Conditions in the second row Date to between are used for selection of activities that relate to a defined range in the To field on the 1st page of the activity. |
|
|
In a window the right part of the screen, only the filtering activities are displayed, but in the left part Of the screen the activities that do not satisfy the filtering conditions are displayed with the crossed out icon in the tree. These crossed activities has to be displayed to be remained the activity structure in terms of logical and chronological continuity. E. g. the activity that is inferior to some others activities, satisfies filtering conditions, but some theirs superior do not satisfy. |
|
|
Change folders display style - by pressing this button all sub-branch of activities from the node on which stands the ruler will be displayed (unpack activities only of one component). |
|
|
'Marked records only' filter - this button displays all marked activities in the right window of the desktop. |
|
|
|
|
Example 1:
The chief executive wants to know who traders and how often they communicate in any way with a particular partner:
Conditions of functionality evaluation:
- All traders has to be set in the Users book.
- All traders has to be set in Contact persons book
- On the 1 st page,the User field (it deals with which user) has to be filled on a Contact person card of every trader.
All these conditions have to be satisfied simultaneously.
Process:
- Open the 2 nd page of the card of a concrete partner.
- Set by the buttons Display tree and the Display grid and select the Group by resp. person in the options of sorting.
- Select the period (or type of activity) by the Set the filter to date and type button
In the window the activities will be displayed according to the filtering conditions (in the tree menu the others are displayed with the crossed icon).
Example 2:
The chief executive wants to find out what the traders did last month:
Conditions of functionality evaluation:
Conditions are the same as in Example 1:
Process:
- Select the Group by partners displaying on the Contact person card of an analysed trader.
- Select the period by the Set the filter to date and type button
In the window (sorted by partners) the activities will be displayed according to the filtering conditions (in the tree menu the others are displayed with the crossed icon).
|
|
|
The tasks related to this partner are arranged on the Tasks tab. You can create, assign existing, delete, confirm or cancel individual tasks.
|
The form for creating a new task will be displayed. |
|
The Tasks book from that you can assign already crated task to a document displays. |
|
You can change data in task that is indicated. |
|
You can delete an indicated task. It is not possible to delete a confirmed task. |
|
You can confirm an indicated task. |
Only unconfirmed task can be assigned to the partners by this way. Each task can be linked with one document in the K2 IS only. However it is possible to link up one document with more tasks. Exceptions are Contact persons and Partners, which can be linked to task independently of document choice.
|
|
|
Contacts - (3rd page)
On the 3 rd page there are registered the fundamental information of a selected partner and all contact persons, eventually Departments that belongs to the company. Fill the field in the upper part when setting up of a new partner.
Picture: Partners - 3 nd Page chapter).
Contact persons:
In the lower part of the Partner card there are displayed all contact persons that are linked with partner and all departments of the partner.
It is possible to add a new contact person or a department to the partner by pressing Ins key in Change mode. The Electronic address form will display.
Picture: The Electronic address form
Select by means of Contact person and Department checking fields, if you want to add the contact person or department to the partner. The Contact person book will display by pressing the Insert person button. Here you can select the contact person that is already inserted in the K2 IS, but e. g. it is not linked with any partner. After pressing Enter key over a contact person the contact person will be entered to the Partner card. When entering of a department it is necessary to display the Department book by means of lookup and to search it here.
In the Electronic address form here are displayed electronic address of contact person or department too. It is possible not only to display these electronic addresses, but newly also to set them. Here is available to display the electronic addresses by theirs predefined types. Setting of these 4 types: see the Electronic addresses presets, the User parameters book - 4th page (tab Marketing).
In the Electronic address form there is possible to display all electronic addresses of the contact person or the department too. Way of control is described on the 1st page of Partner card in the Electronic addresses item part.
The further possibility how to add a new contact person to a partner is by means of the Ctrl+F6 function. If you want want to add anew contact person to a partner, set the cursor into the part of the screen and press the Ctrl+F6 keys in the Change or Browse mode. After pressing of the keys a new contact person card in that the data about partner will be pre-filled will display. After setting of data and saving of changes a new contact person will be entered on the partner card. If you want to cancel the link between a contact person and a partner, set the light indicator on a contact person that you want to delete and press Del key in Change mode.
If you want to sort contact persons on the Partner card, press the left mouse button on the column heading whose data you are interested in. A small triangle that indicates sorting of data ascending or descending is displayed in the heading of this column. By the second pressing of the left mouse button on the heading of this column the sorting will be changed to the reverse order.
|
|
|
User's code lists (4th page)
This page is used to enter more detailed information about the company. Filling of these fields is optional.
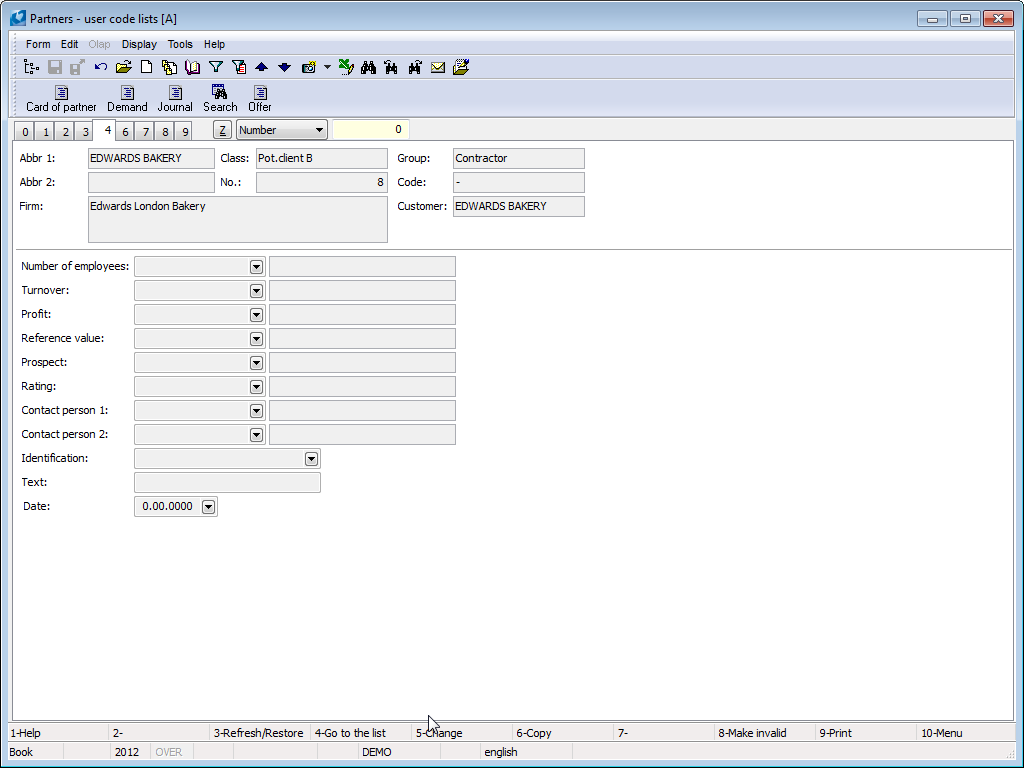
Picture: Partners - 4 nd Page chapter).
Selected fields description:
Number of Employees |
Field can be filled with value from user-defined code list. |
Turnover |
Field can be filled with value from user-defined code list. |
Profit |
Field can be filled with value from user-defined code list. |
Reference Value |
The evaluation criteria in accordance with the code list that has been defined by the user. |
Prospect |
The evaluation criteria in accordance with the code list that has been defined by the user. |
Evaluation |
Evaluation according to user-defined code list. |
Contact person 1 |
Link with Contact persons book |
Contact person 2 |
Link with Contact persons book |
Marking |
Field can be filled with value from user-defined code list. E.g. business administration. |
Text |
Text field with maximum 30 characters. |
Date |
E.g. the date of the information update on this page. |
The fields on this page are intended for the evaluation of the suitable sets of information from Partner card.
|
|
|
Calendar (7th page)
All activities dealing with a certain partner or their contact person are displayed on the 7th page of the calendar. Activities in Calendar are identical with The 2nd page of the List of activities card and connects not only partners and contact persons, but also activities related to a specific opportunity with this partner and the specific campaign of which this partner was a part.
New activities can also be inserted on this page by means of Shift+F6 keys. This activity can be created both as new and as inferior.
The activity can both be displayed and edited on this page. Open the selected activity by means of Enter key and by F5 key open Change mode where you can edit the activity. The once entered activities cannot be deleted.
Events and remarks can be inserted in the calendar just like the activities.
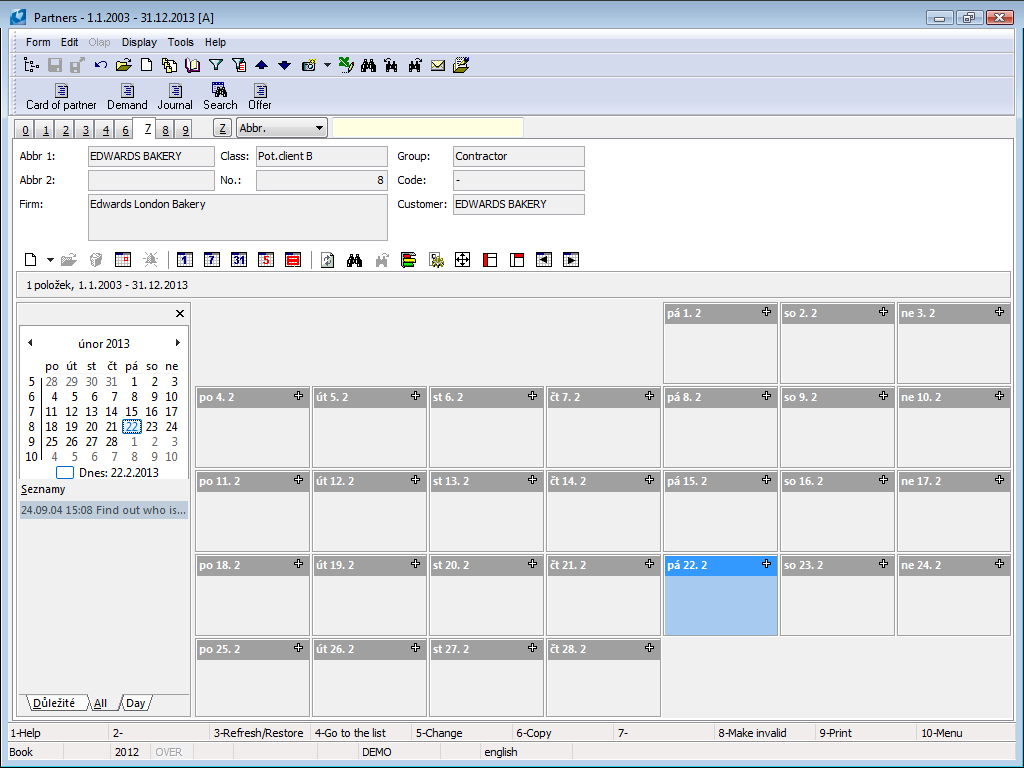
Picture: Partners book – 7th page
Buttons' Description:
|
Create a new item of calendar. Upon creation, select whether you want to create an item of calendar – activity or event. New items can only be inserted in the Change mode. It can be replaced by Insert key. |
|
Change an item of calendar. It can be replaced by Enter key. |
|
Delete an item of calendar. |
|
Insert event. |
|
Insert a reminder of an event. |
|
Switch the range of calendar display to day. It can be replaced by Ctrl+D keys. |
|
Switch the range of calendar display to week. It can be replaced by Ctrl+T keys. |
|
Switch the range of calendar display to month. It can be replaced by Ctrl+M keys. |
|
Display or hide Saturdays and Sundays. It can be replaced by Shift+Ctrl+W keys. |
|
Combine Saturdays and Sundays to one cell. |
|
Reload the content of calendar. |
|
Search the record according to the text. It can be replaced by Ctrl+F keys. |
|
Search another occurrence. |
|
Arrange the items of calendar according to time without overlap. It can be replaced by Ctrl+U keys. |
|
Calendar setting. |
|
Switch calendar to the whole screen. It can be replaced by F11 key. |
|
Display or hide the control panel. It can be replaced by Shift+Ctrl+P keys. |
|
Display or hide the details panel. It can be replaced by Shift+Ctrl+B keys. |
|
|
|
Documents (page 9)
It is possible to add documents, processes or external documents on this page (see the Basic Code Lists and Supporting Modules K2 – 9th. Page chapter).
|
|
|
Working with partners
The evidence of current or potential partners is very important for the right function of marketing. There are several ways how the user can create the database of partners in the K2 IS. Simultaneously as in other modules it is possible to create a partner in the book manually. The partner is automatically created to ever customer. If company wants to always create customer to partner, they must have in Client Parameters Automatic link Partner -> Customer parameters checked. If this parameter is checked and customer is created automatically, Bankhas to be set in the Client parameter. Reason is that Bank account field is mandatory in Suppl./Cust. card and when creating a new customer, program will fill in value set in Bankfield in Client parameters.
Of course, the customer can use the marketing later, in the course of functioning in the K2 IS. Then it is necessary to settle the Customers and Partners database. This is possible by means of the Partner - Customer script (ExportPartBaz.PAS). It is possible to create the link customers according the partners by this script.
Import of partners is the further possibility how to insert the Partners to the K2 IS. You can import the Partners from the „*.xls“ file. This is enabled by the Import of partners function (ImPart.pas), where Excel fields with their values will be linked with the fields in the K2 IS by means of the form and the partners will be saved to the K2 IS.
The partner is not always the customer automatically. A new partner becomes the customer after the business documents issue. It is obligatory to create the partners to the customers. The valuable marketing information are available for the user. The Partners database is very important with respect to monitor and to register all communication with a customer (partner). This is executed by means of Activities, the list of these activities is on the 2nd page of the Partner card. Further here are mentioned contact persons of partner, various sorting or tasks that are related to a concrete partner. It is possible to evaluate all these information and activities by means of reports that are available here.
|
|
|
Journal of partner
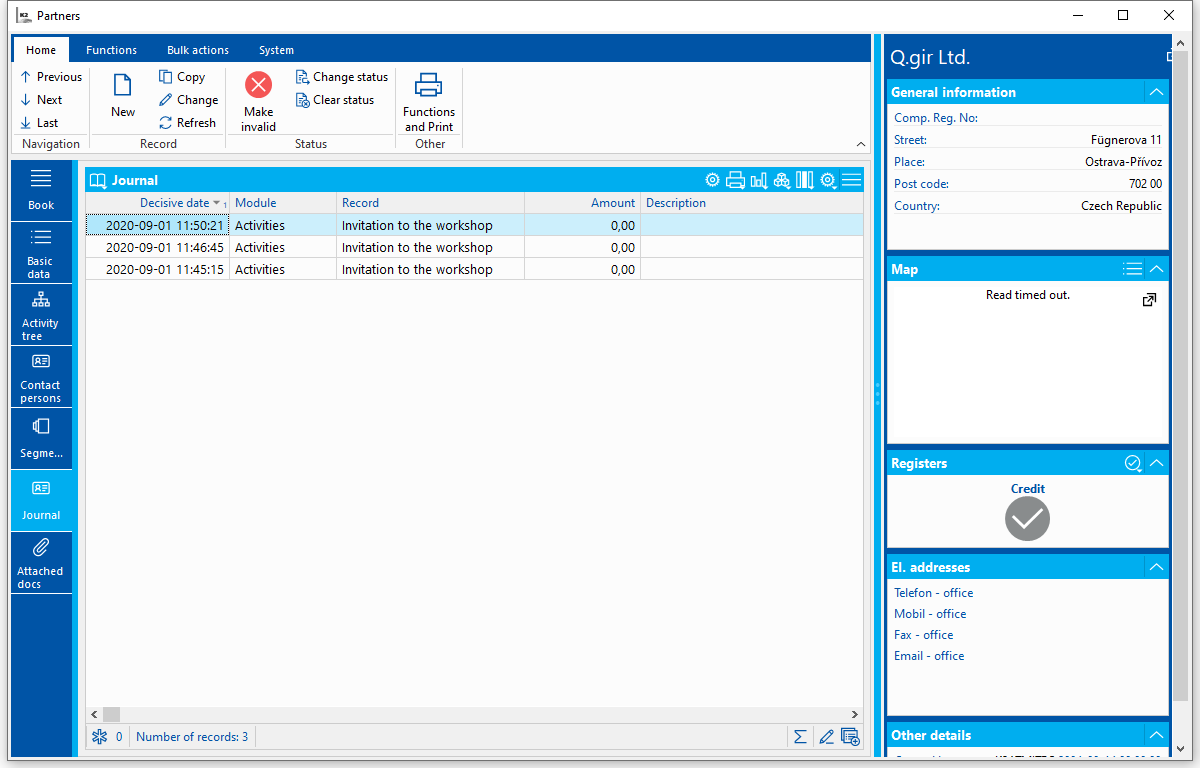
Journal tab is available only in general forms. It displays all activity related to the partner. In Partner Journal settings function (for client) monitored documents can be set and we can choose what information will display in Description column and what price will appear in Amount column. In this tab over partner’s card we can initiate Partner Journal Settings function (settings icon in upper blue bar), where we can set the date that decides. Activity older that decisive date will not display. User can only set selected document types. Note: Implicitly only those document types will be offered that are set in Partner Journal Settings function (for client).
Picture: Journal tab
|
|
|
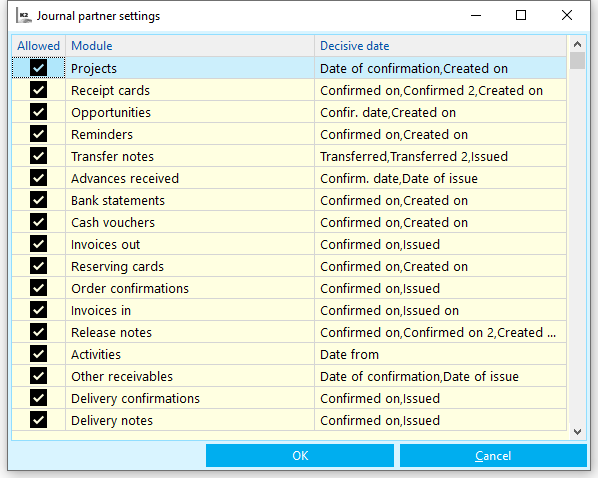
In Partner Journal Settings function by checking field in Allowed column we can define monitored documents which will appear in Journal tab in Partners module. If some documents will not be checked then they’ll not be offered in Partner Journal Settings function, which is available in Journal tab and in which user can further set up selected documents.
Picture: Partner Journal Settings
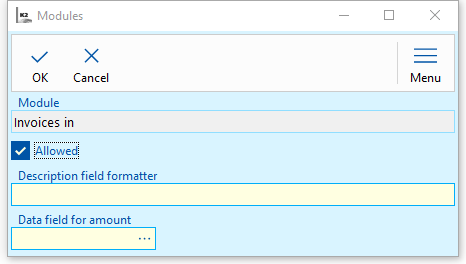
For each document we can define what will appear in Description column in Journal tab at given module and what data field should be represented by Amount field. For Description column random text can be defined and name of data field should be written into curly brackets. If we want to see Variable Symbol: text and its value in Issued invoices in Journal tab then in field we need to define text “Variable symbol: {RefNo}", where RefNo represents field name for variable symbol. In Data Field for Amount field we can then choose what price we want to monitor for given document.
Picture: Set up of columns Description and Amount
|
|
|
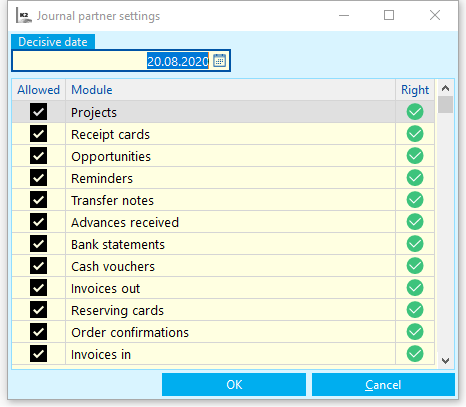
User can set up view of Partner activities in Journal tab. Partner Journal Settings form will display after hitting set up button in blue bar. User can set up decisive date to limit Journal entry. Activities older than decisive date will then not display. It’s possible to limit also displayed document types. This can be done by un-ticking in Allowed column.
Picture: Partner Journal Settings in Journal tab
|
|
|
Reports over the Partners
|
|
|
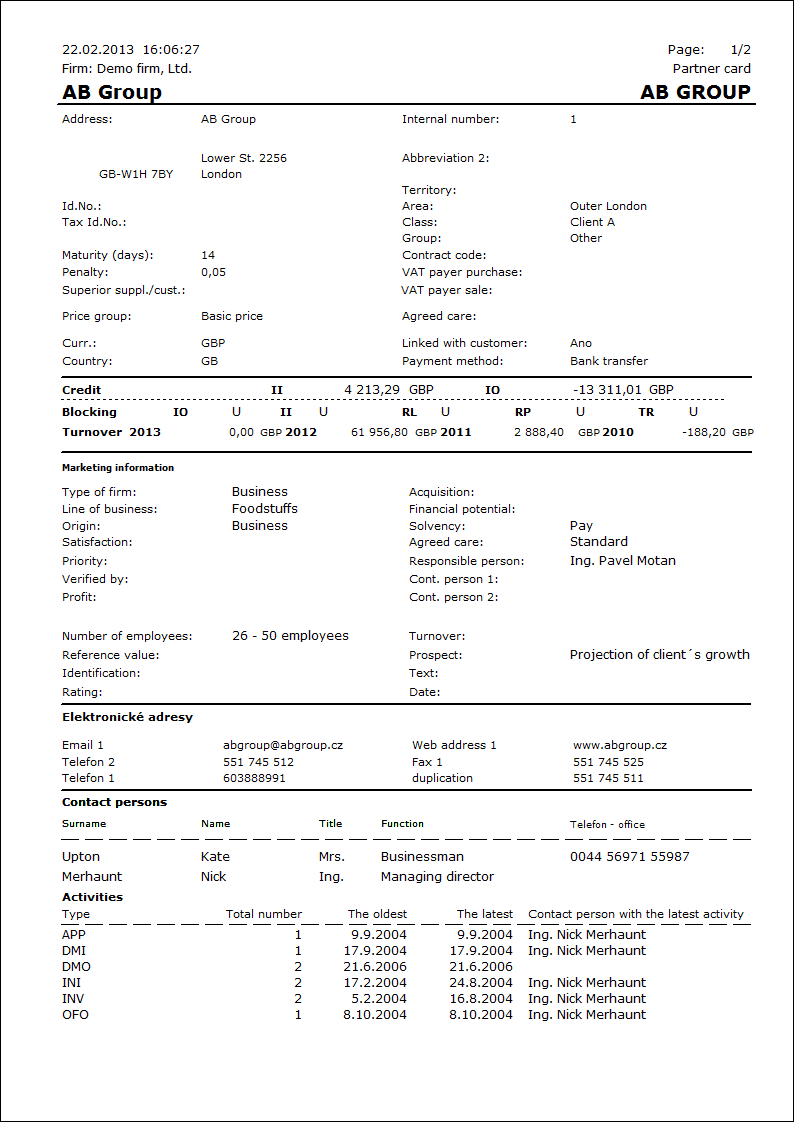
Partner card
Process No.: CIS002 |
Report ID: SCRM001 |
File: PART_KARTA.AM |
Report description: This reports displays the basic information form the Partner card. The marketing information about a concrete Partner and the list of activities are displayed too. |
||
Address in the tree: [Marketing - CRM ] [Partners ] [Printing of records - lists] |
||
Reports parameters:
Without parameters.
|
|
|
|
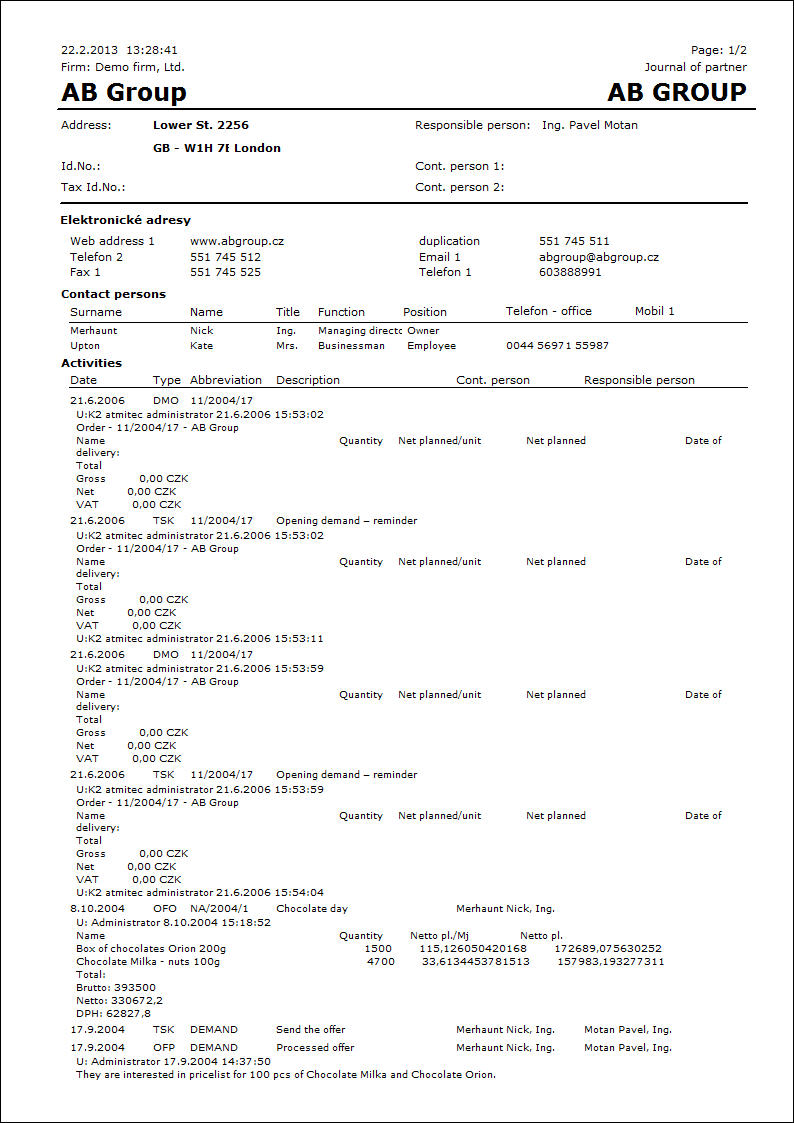
Journal of partner
Process No.: CIS002 |
Report ID: SCRM002 |
File: PART_DENIK.AM |
Report description: Journal of partner displays the basic information about partner and his/her contact persons. The list of activities of this partner including comments of these activities is stated in this report too. It is possible to influence the display of comments by a report's parameter. It is possible to set the way of sorting of activities according to the date, type, contact person or responsible person in the initial form. |
||
Address in the tree: [Marketing - CRM ] [Partners ] [Printing of records - lists] |
||
Reports parameters:
IgnoreSelectionItem - Yes Yes - the selected items are ignored. |
NoOfCommentaries - 10 Number of comments. The parameter defines at how many activities will be displayed the comment. |
ShowCommentaries - Yes Yes - the comment is displayed. |
|
|
|
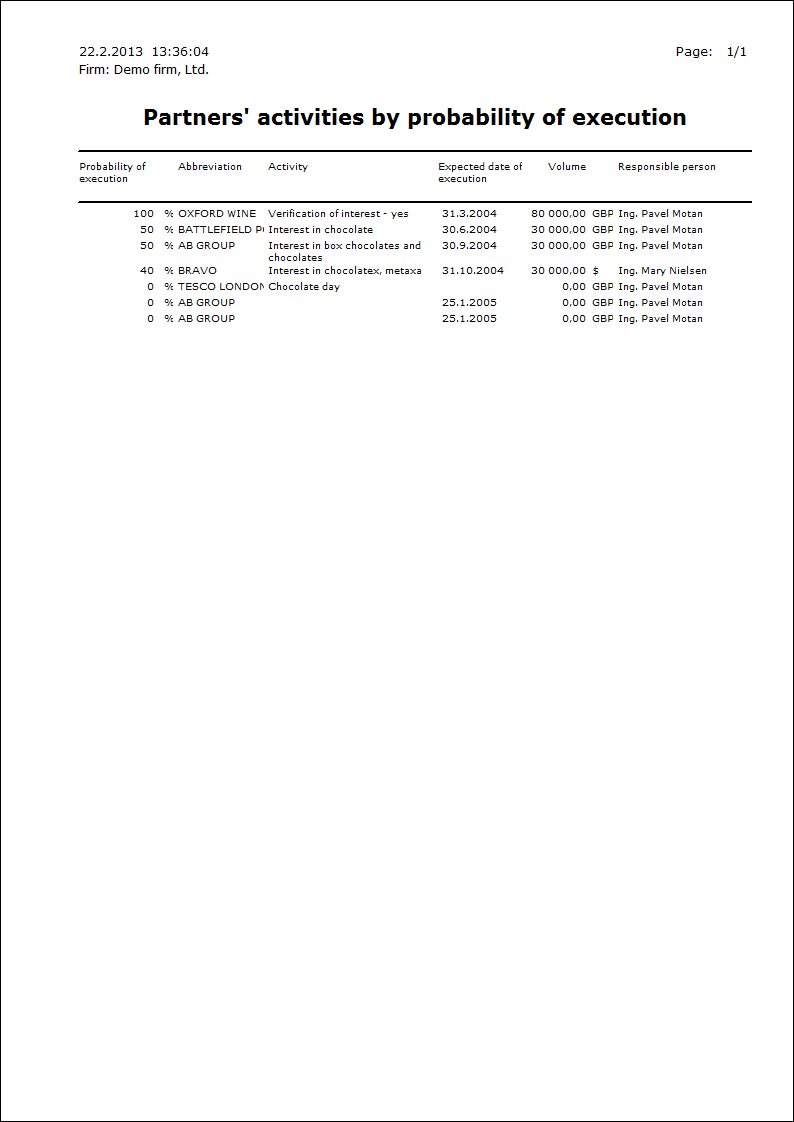
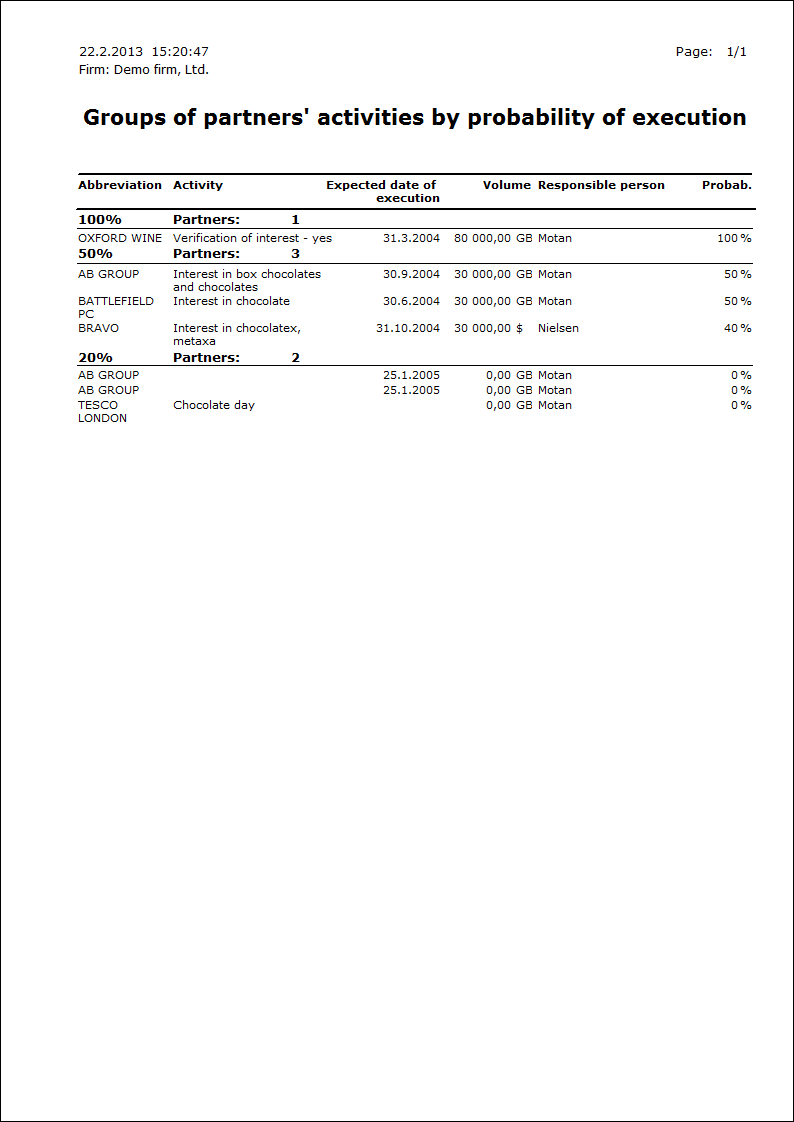
Activities of partners by prob. of execution
Process No.: CIS002 |
Report ID: SCRM003 |
File: PART_SEZ10 AM |
Report description: The report displays activities of partners sorted by probability of execution. It displays only the monitored activities. |
||
Address in the tree: [Marketing - CRM ] [Partners ] [Printing of records - lists] |
||
Reports parameters:
Percentage of prob. of execution Limit for print of activities. Only activities that have higher percentage of probability of execution than is stated in this parameter will be displayed in this report. |
|
|
|
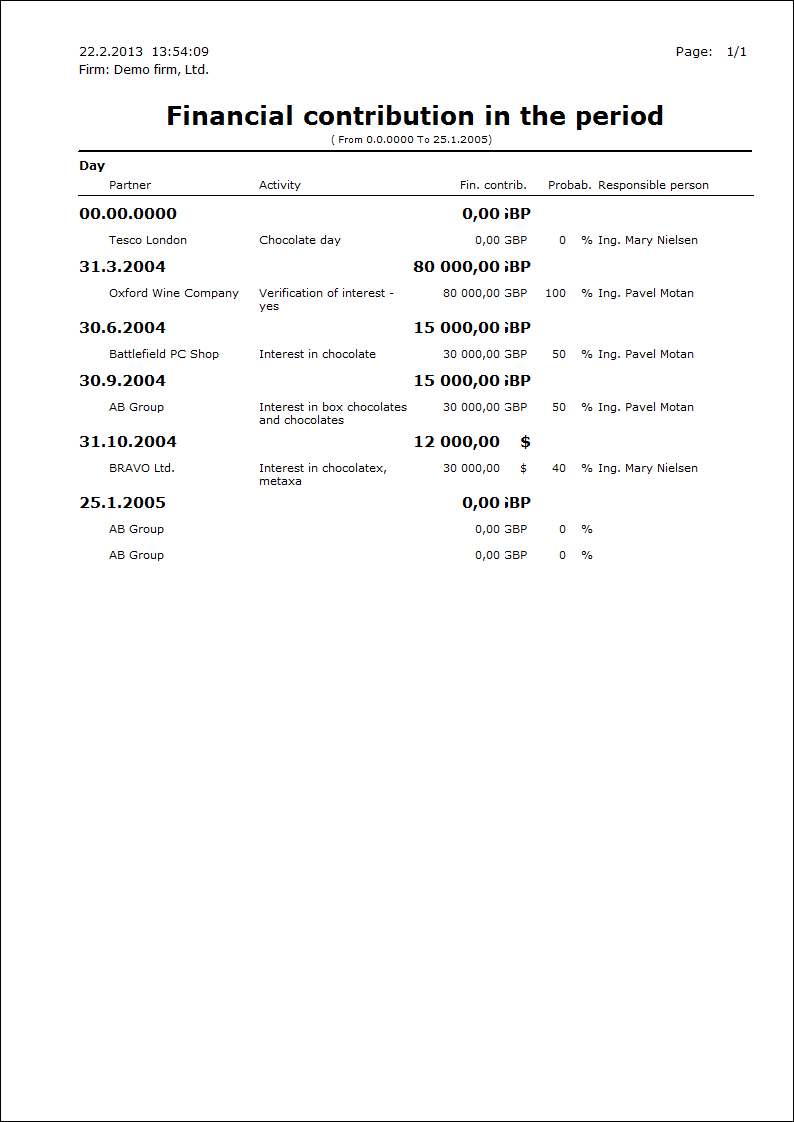
Financial income in the period
Process No.: CIS002 |
Report ID: SCRM004 |
File: PART_SEZ04 AM |
Report description: The report displays the data about financial income from the activity in the period. In the report is mentioned volume of the activity, amount that is recalculated by percentage of probability of realization of the activity. It is possible to print further information about concrete activities by settings the Detail report's parameter. There are stated only monitored activities in the report. |
||
Address in the tree: [Marketing - CRM] [Marketing evaluation] |
||
Reports parameters:
Detail - No Yes - there are displayed the details of activities. |
|
|
|
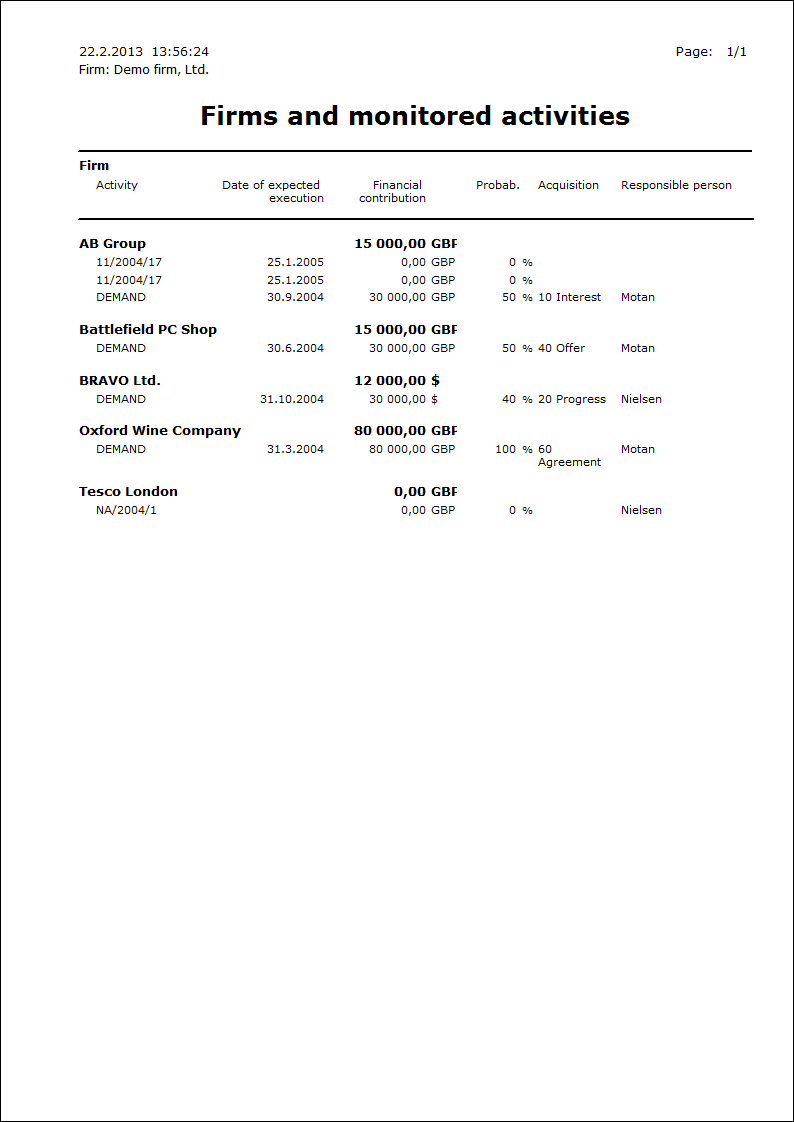
Firms and monitored activities
Process No.: CIS002 |
Report ID: SCRM005 |
File: PART_SEZ05 AM |
Report description: The list of monitored activities of firms. In the report is mentioned volume of the activity, amount that is recalculated by percentage of probability of realization of the activity. |
||
Address in the tree: [Marketing - CRM ] [Partners ] [Printing of records - lists] |
||
Reports parameters:
Without parameters.
|
|
|
|
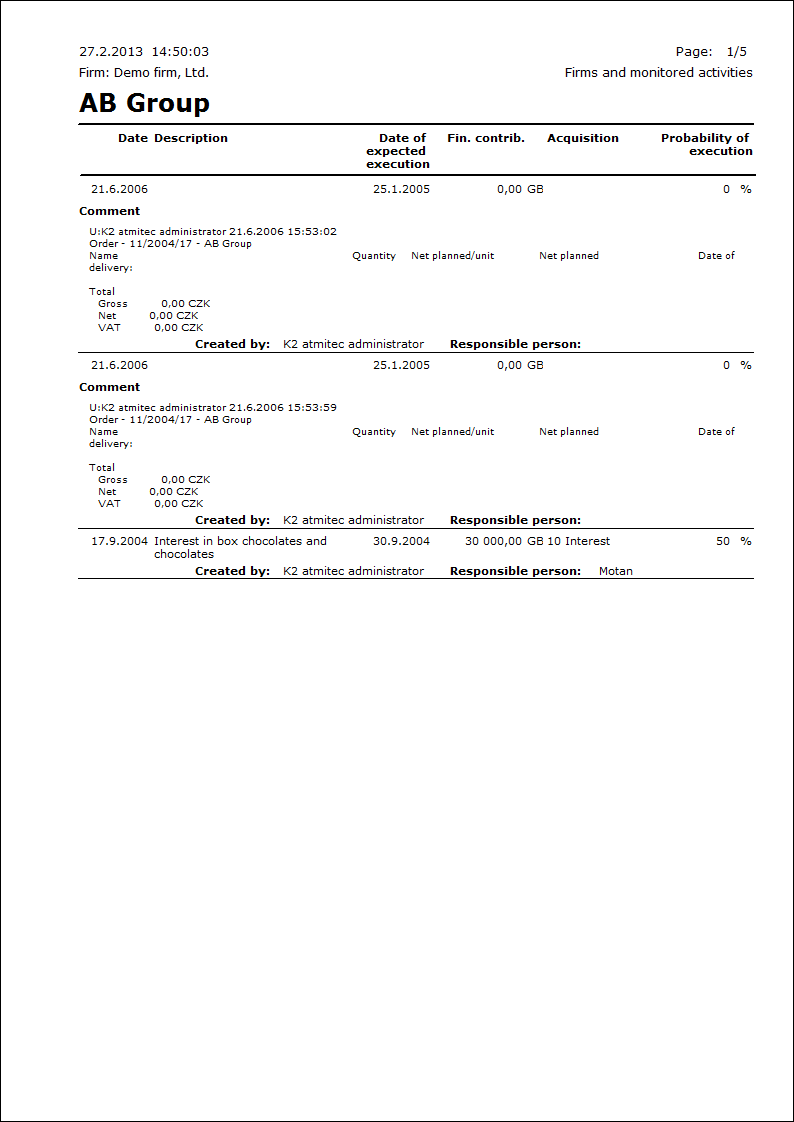
Firms and monitored activities 1
Process No.: CIS002 |
Report ID: SCRM006 |
File: PART_SEZ09 AM |
Report description: The report displays monitored activities of firms with description of an activity and its comment. It is possible to hide the comment of activity by a report's parameter. Every firm is printed on a new page in this report. |
||
Address in the tree: [Marketing - CRM ] [Partners ] [Printing of records - lists] |
||
Reports parameters:
Comment- Yes Yes - the comments are displayed at individual activities. |
|
|
|
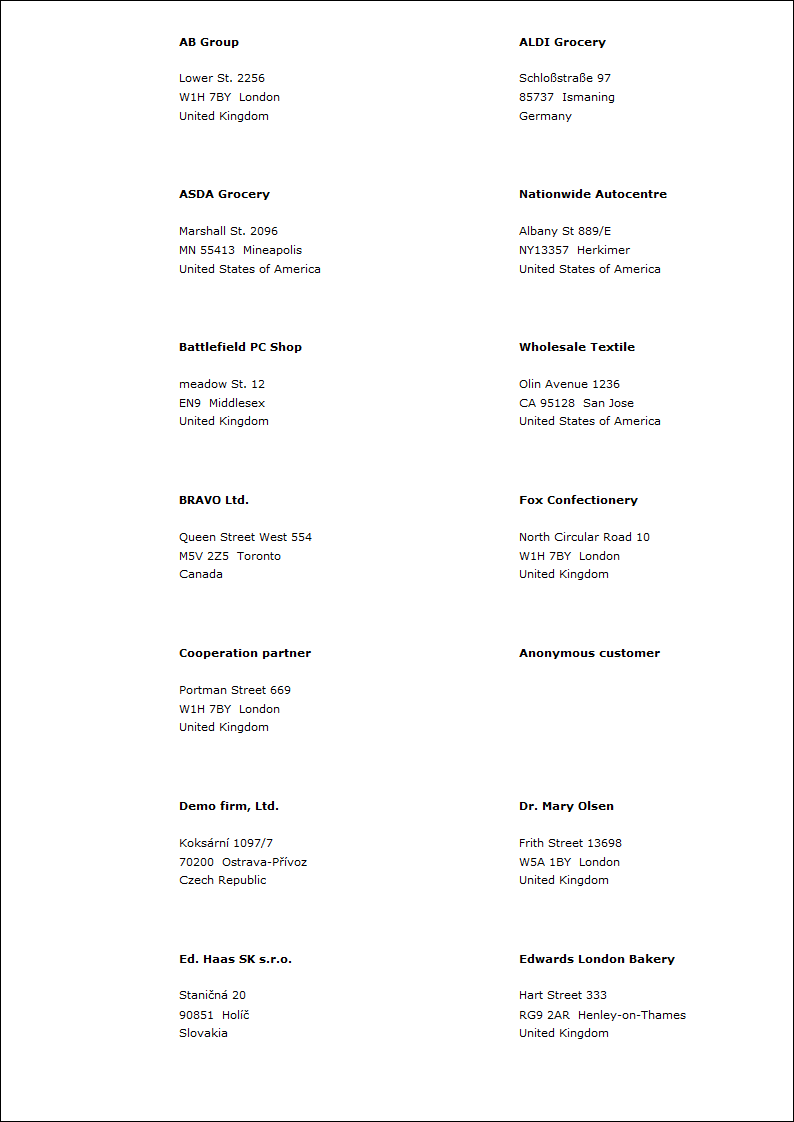
Envelops - Partner without Person
Process No.: CIS002 |
Report ID: SCRM007 |
File: PART_OBALKY.AM |
Report description: Print of envelops with initials (address) of a partner. It is possible to set the distance from the left edge (Width) and the distance from the top edge (Height) parametrically. |
||
Address in the tree: [Marketing - CRM ] [Partners ] [Printing of records - lists] |
||
Reports parameters:
Height - 5 The distance from the upper edge in cm. |
Width - 8 The distance from the left edge in cm. |

|
|
|
Partners - self/stick labels 14pcs/A4
Process No.: CIS002 |
Report ID: SCRM008 |
File: PART_SEZ11 AM |
Report description: Print of initials (address) of partners on self/stick labels. It is possible to set the height of individual labels by the "Height" parameter. |
||
Address in the tree: [Marketing - CRM ] [Partners ] [Printing of records - lists] |
||
Reports parameters:
Height - 41.2 Settings of height of a label (in millimetres). |
|
|
|
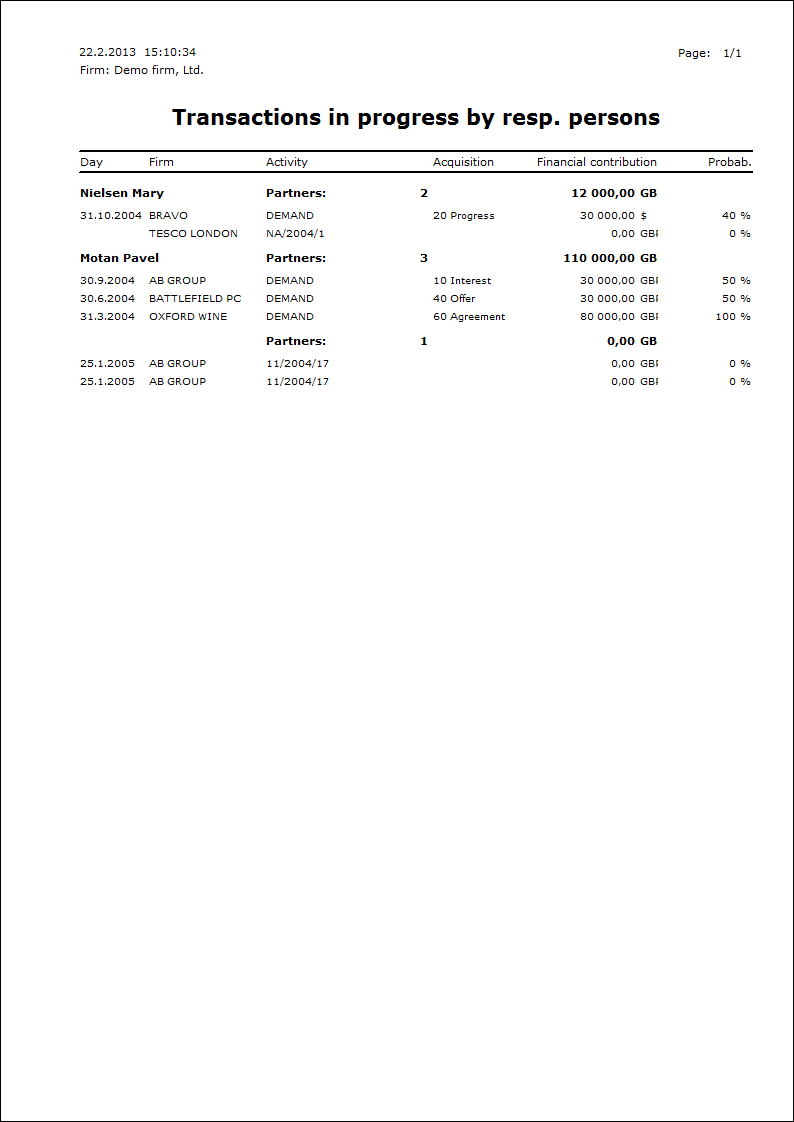
Transactions in progress by responsible person
Process No.: CIS002 |
Report ID: SCRM009 |
File: PART_SEZ06 AM |
Report description: The report displays the list of transactions in progress (monitored activities) grouped by responsible person. It is possible to limit the number of records in the report by the "Probability of execution" and "Date of execution To" parameters. It is possible to define here the height of probability from that the activities should be displayed and the date of execution till that the activities should be displayed. |
||
Address in the tree: [Marketing - CRM] [Marketing evaluation] |
||
Reports parameters:
Date of execution To - 31.12.2050 The parameter defines the date of execution till that the items have been printed. |
Probability of execution - 0 The parameter defines the percentage of probability over that the items have been displayed. |
|
|
|
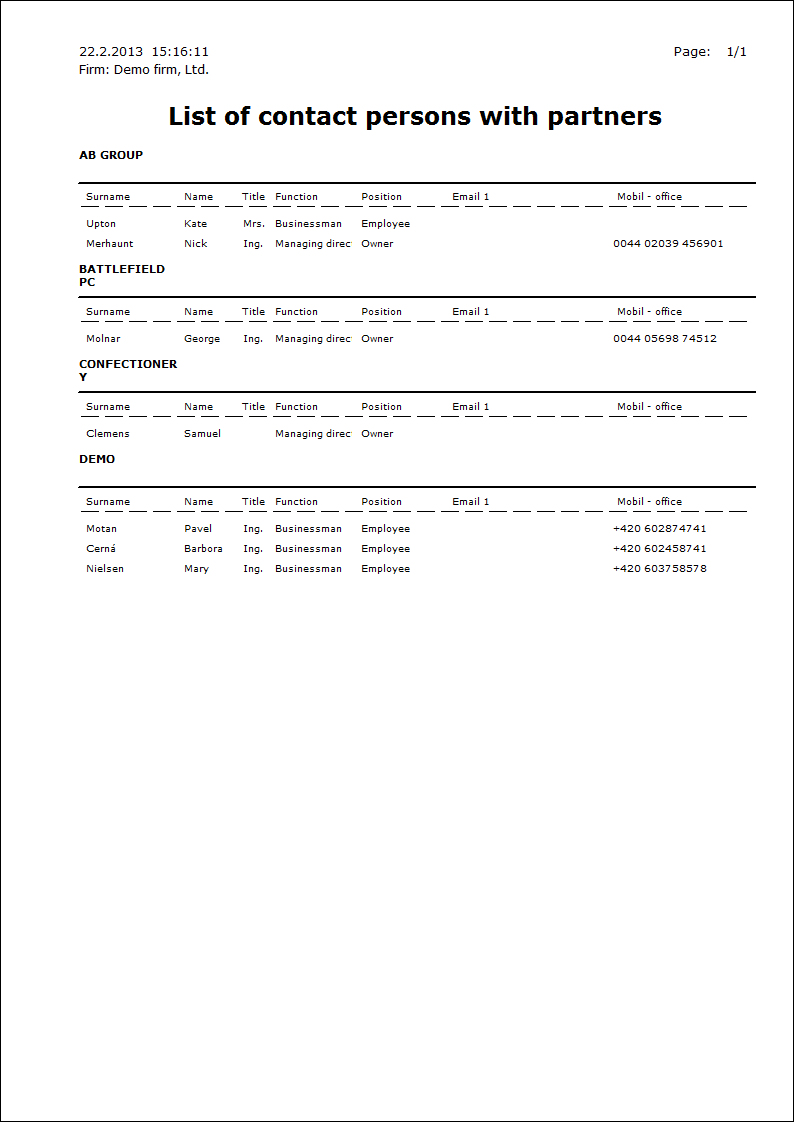
List of contact persons with partners
Process No.: CIS002 |
Report ID: SCRM010 |
File: PART_SEZ13 AM |
Report description: It deals with the list of contact persons for individual partners with the basic contact information (mobile phone, email, position, function, name). |
||
Address in the tree: [Marketing - CRM ] [Contact Persons] [Printing of records - lists] |
||
Reports parameters:
Without parameters.
|
|
|
|
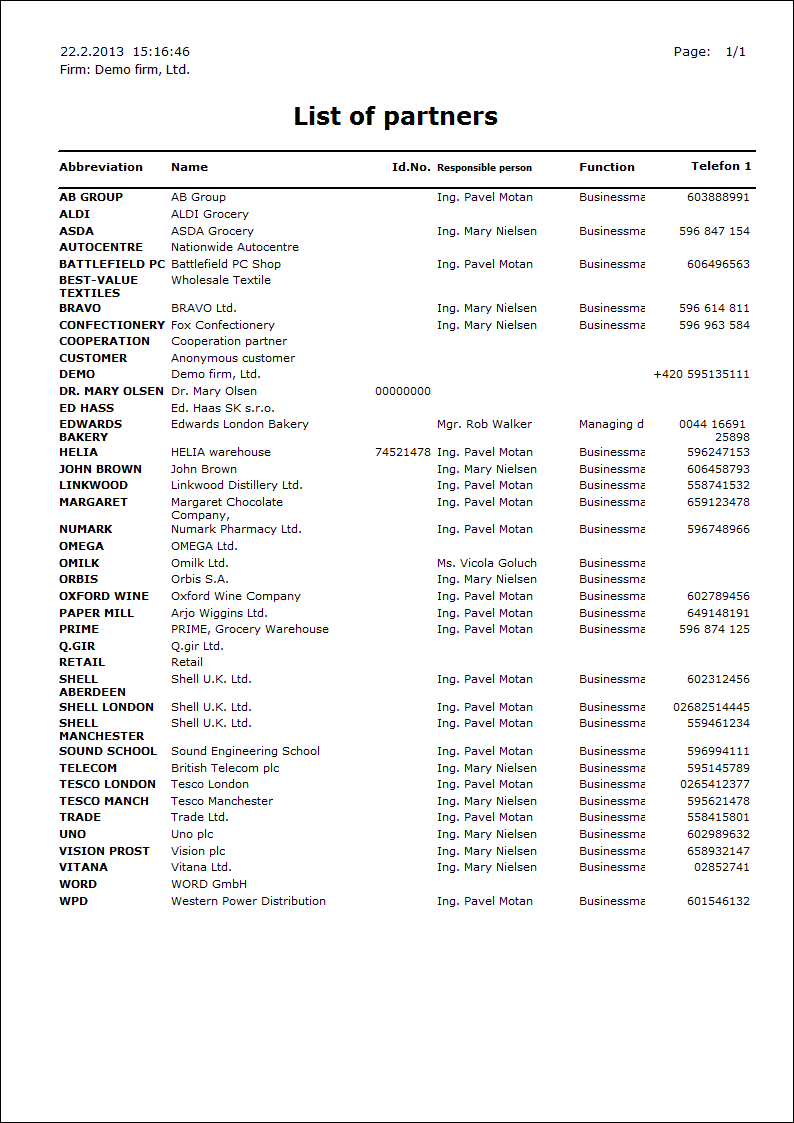
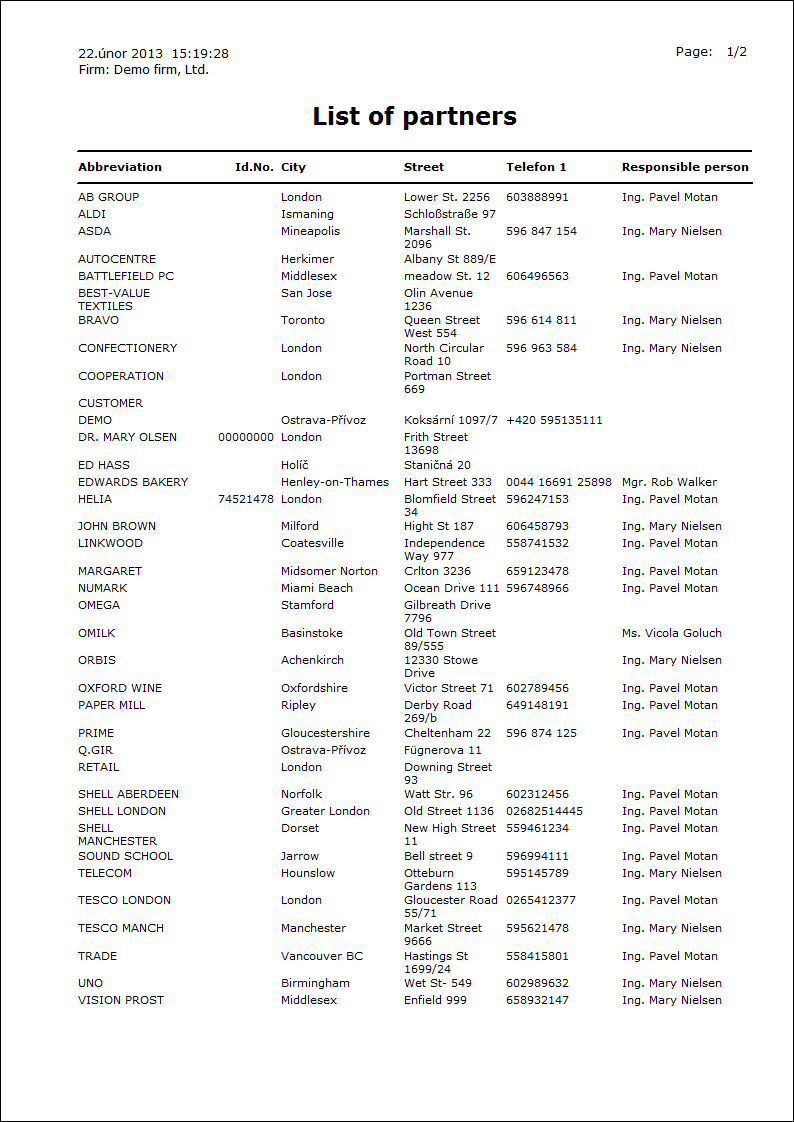
List of partners and responsible persons
Process No.: CIS002 |
Report ID: SCRM011 |
File: PART_SEZ08 AM |
Report description: List of partners with a responsible person. |
||
Address in the tree: [Marketing - CRM ] [Partners ] [Printing of records - lists] |
||
Reports parameters:
Without parameters.
|
|
|
|
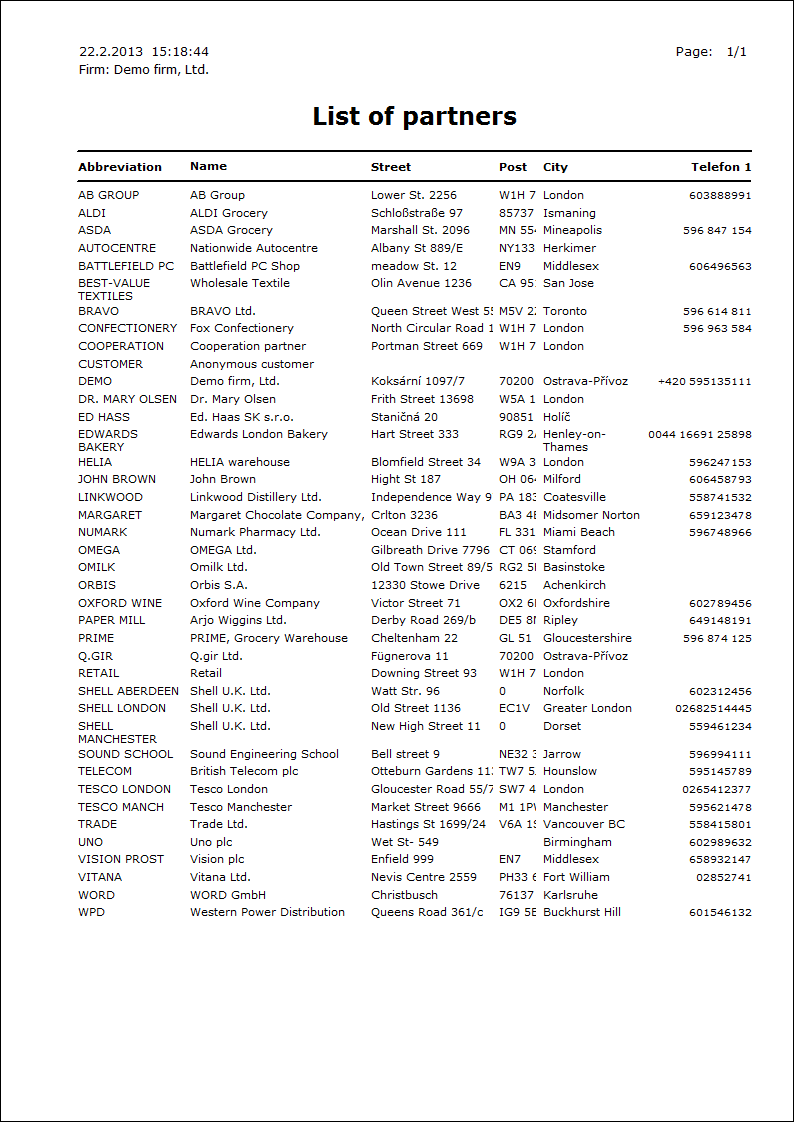
List of partners by abbr
Process No.: CIS002 |
Report ID: SCRM012 |
File: PART_SEZ07 AM |
Report description: List of partners sorted by abbreviation. |
||
Address in the tree: [Marketing - CRM ] [Partners ] [Printing of records - lists] |
||
Reports parameters:
Without parameters.
|
|
|
|
List of partners by abbr. with resp. pers.
Process No.: CIS002 |
Report ID: SCRM013 |
File: PART_SEZ01 AM |
Report description: The list of partners that is sorted by abbreviation with the name of a responsible person. |
||
Address in the tree: [Marketing - CRM ] [Partners ] [Printing of records - lists] |
||
Reports parameters:
Without parameters.
|
|
|
|
Groups of activities of partners by prob. of real.
Process No.: CIS002 |
Report ID: SCRM014 |
File: PART_SEZ12 AM |
Report description: The report displays group of activities of partners sorted by probability of execution. Also the responsible person of partner is displayed in the report. It is possible to limit the quantity of printed records by the "Percentage of prob. of execution " parameter. It is possible to set here the value of probability of execution when the activity is displayed in the report. |
||
Address in the tree: [Marketing - CRM ] [Partners ] [Printing of records - lists] |
||
Reports parameters:
Percentage of prob. of execution The parameter indicates over how many percent of Probability of execution the activity will be printed. |
|
|
|
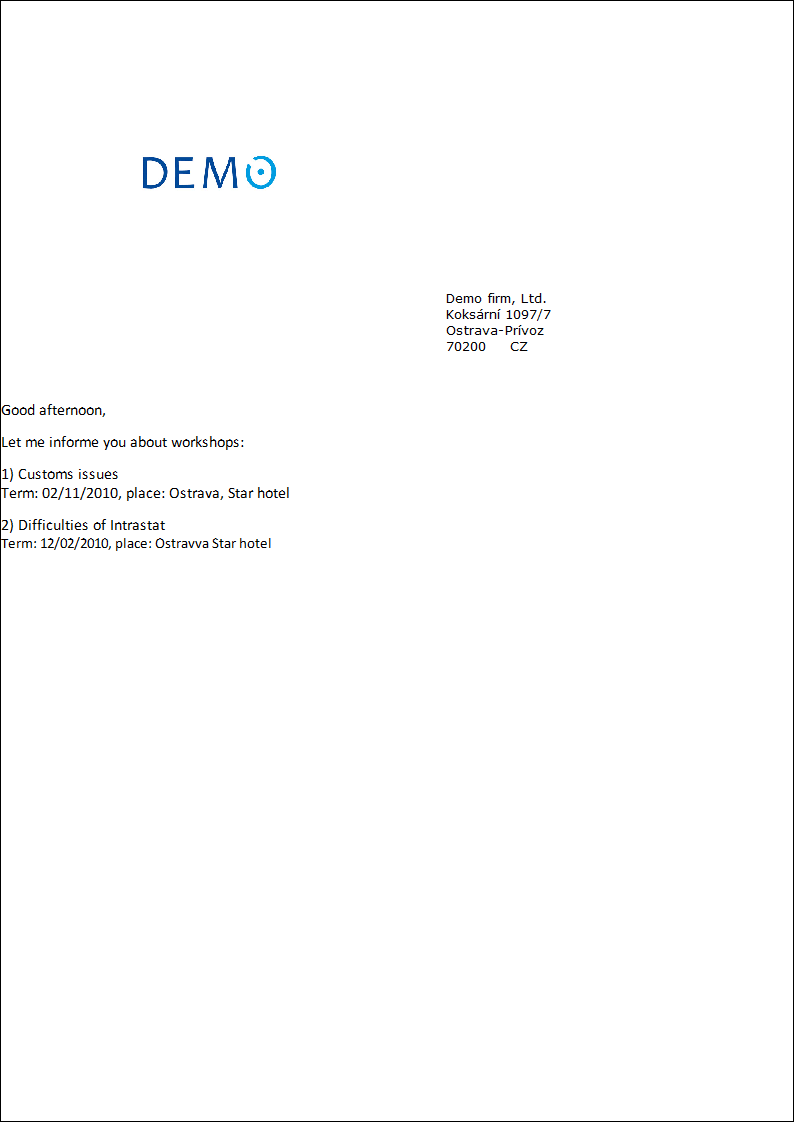
Sending of letters in bulk
Process No.: CRM009 |
Report ID: SCRM039 |
File: SEND_LETTER.AM |
Report description: Sending of letters in bulk. The report is activated from the "Send_Letter.pas" script by pressing the View button. |
||
Address in the tree: |
||
Reports parameters:
Without parameters.
|
|
|
|
Scripts, functions
|
|
|
Import of partners
Process No.: CRM009 |
Script ID number: FCRM025 |
File: ImPart.PAS |
Script description: Script for import of Partners from the "*.xls" file |
||
Address in the tree: [Marketing - CRM] [Partners] |
||
Script parameters:
FindPartBy - 0 0 - the script searches the partners by the abbreviation 1, eventually by the abbreviation 2; 1 - the scripts searches the partners only by the abbreviation 1; 2 - the script searches the partners only by the abbreviation 2; 3 - the scripts searches the partners only by the name; 4 - the script searches the partners only by the ID-No. |
XMLFile - ImportPart.xml The parameter for definition of the name of "*.xml" file in that the current setting and linking of fields is saved. |
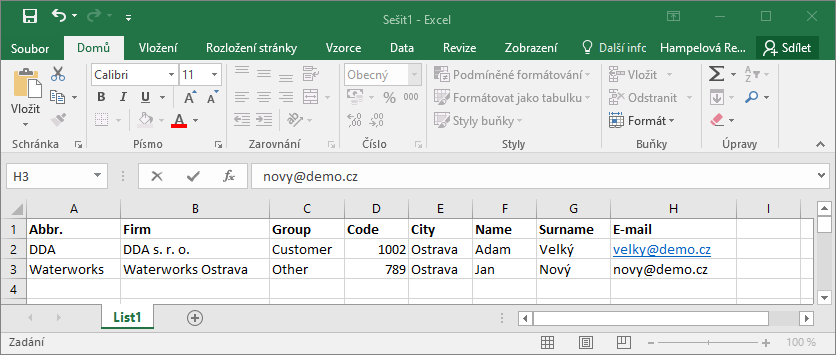
it is possible to import the partners into the K2 IS from the "*.xls" file by means of this script and to simplify the introducing them into the system. Together with partners it’s possible to import also their electronic addresses.
When preparing file suitable for import it’s necessary to ensure that heading with columns’ description is shown only in row 1 an down data which will be imported only in row 2 and further.
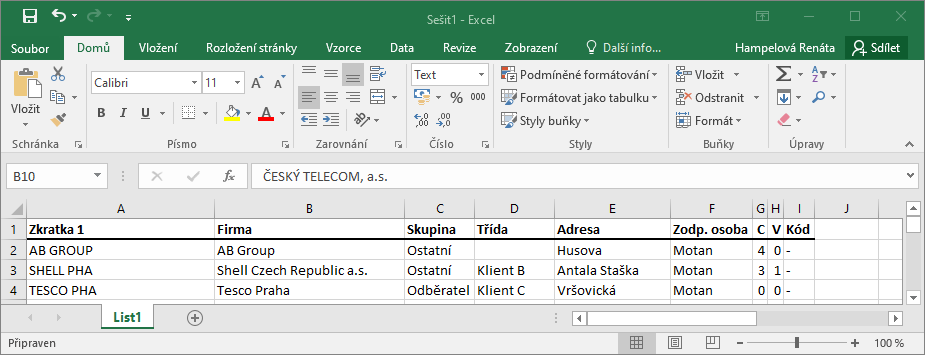
Picture: Example of Input file
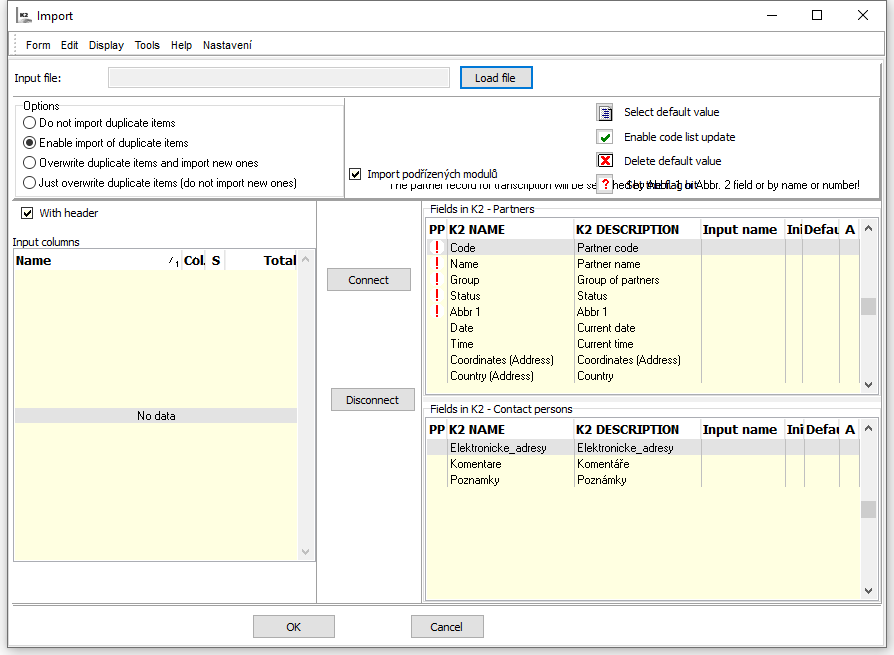
After running of the script you need to load ready "*.xls" file to the Input file field. Use the Load file button for that.
Import settings
Options |
Option to set import permit of duplicate or no-duplicate items. |
Do not import duplicate items |
Firms are only imported whose firm name is not in the K2 database. |
Allow import of duplicate items |
All records are imported regardless of conformity of firm names in the database. |
Overwrite the duplicate and import new item |
All records are imported. Records of the firms that are in the database will be changed. The others will be inserted as the new ones. |
Overwrite duplicate items only (do not import the new ones) |
Only duplicate items will be imported, ie. those records that are already in the database K2. |
Import of submodules |
It is set including the import of submodules as the default. If the field is checked, it is possible to import inferior modules, that means electronical addresses and notes. |

Picture: Load input file of import
In the Input columns part the 1strow of imported file will be displayed by the selection and loading of an input file. Option With header means that the data will be imported from the row No.2, otherwise from the row No.1.
Fields assigning
- Select the Name in Input field part.
- Select the Field in the part Fields in K2 - Partners.
- Press the Join button.
In the columns Input name and Input column in the part Fields of data module names of assigned columns from K2 imported file display and at the same time number of assignment loads in the part Input columns.
In case of disconnection of the fields you can only select the Field in the part Field K2 -Partners/Contact persons and press the button Disconnect.
Mandatory fields - The flag![]() in the PP column indicates the mandatory fields in K2, to which it is necessary to assign columns from the input file and enter def. value.
in the PP column indicates the mandatory fields in K2, to which it is necessary to assign columns from the input file and enter def. value.
Def. value ![]()
- By the selection or entering of the default value it is possible to import the stated default value to the database without a column wouldn't be assigned from a "*.xls" file.
- In case when column from Input file and at the same time default value will be assigned, then default value will be imported only if empty value will appear in the input file.
- Default value must be filled in Obligatory fields and fields which refer to code lists and its update isn't allowed, see below.
- You can insert a default value by icon in the upper part of the form or by Shift+Enter keys on a record.
Update of code lists ![]()
- The flag
 in column A means that fields that are linked to code lists can be enabled to update these code lists during import. In
  case that the update of a code list will allow, the flag will be in the column A
 - In this case that the update of a code list will not allow, a default value has to be entered that will be imported if the assigned column of an input file will contain an empty value or a value that is not in a code list.
- You can allow the update by an icon In the upper part of the form or by Shift+Enter keys on a record.
Picture: Assorted file of import
Flags configuration form ![]()
- For some fields of Partners module the flags are only set in the K2 IS.
- The form will be opened over the Flags field, that means when linking of fields of the K2 that are represented in the K2 only by a checking field and by a column of an input file.
- This form is used for data conversion. In the input file that is assorted to the above mentioned type of field there has to be written only two values.
It deals with this fields:
- Purchase doc. with VAT
- Sale doc. with VAT
- Article records
Example:
Picture: Input file
Input file with marked column that has to be assorted tot he field that shows if the partner is or is not the VAT payer.
Picture: Setting of flags
After assigning the input file column, the form, in which the values ??are entered from the input file, displays.
You can display the form on the record again and change the value throw the icon ![]() In the upper part of the form or by pressing Enter key.
In the upper part of the form or by pressing Enter key.
Save setting - In the menu you can save or delete a form setting.
|
|
|
Creating activity of partners
Process No.: CRM009 |
Script ID number: FCRM017 |
File: PART_AKT.PAS |
Script description: This script enables to create activities for selected partners by an easy form. |
||
Address in the tree: [Marketing - CRM] [Partners] |
||
Script parameters:
Document - No Forcing execution of the script on one record. |
Cam_Activity - 0 Presets campaign of an activity. |
COM_Activity Presets comment of an activity. |
Opp_Activity - 0 Presets opportunity of an activity. |
Desc_Activity Presets description of an activity. |
Entry access right - Yes To ignore records for which the user has no rights. |
Table - No Forcing execution of the script on a table (over all contact persons). |
Type_Activity Presets type of an activity. |
Abbr_Activity Presets the abbreviation of an activity. |
Abbr_Tabs Presets the abbreviation of an activity. |
After running of the script the Activity parameters user's form will display in that you can fill any fields. These These values will be filled to the new created activities after confirmation. It deals with these fields: Activity type, Abbreviation, Description, Place in folder, Campaign, Opportunity, Date, Time, Responsible person, Comment. Values in these fields can be pre-filled after running this function. This can be done by means of script parameters. The function enables to move the new activities to the folders. It is necessary to select a concrete folder in the Place to folder field.
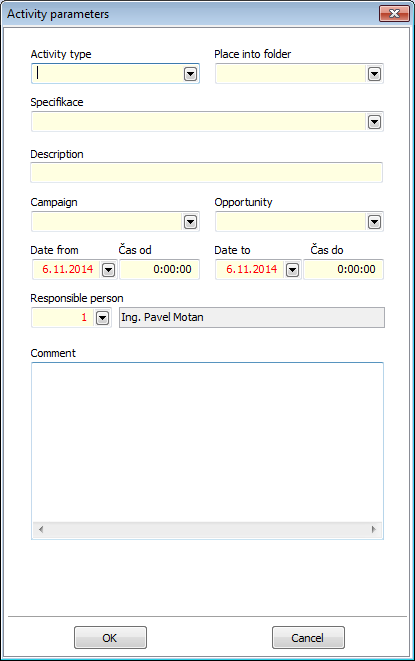
Picture: Activity parameters form
|
|
|
Creating of letters in bulk
Process No.: CRM009 |
Script ID number: FCRM029 |
File: Send_Letter.pas |
Script description: Script enables the creation of letters in bulk, printing of this letters, activity and records creation in the Sent letter post book. |
||
Address in the tree: [Marketing - CRM] [Partners] [Correspondence in bulk] [Marketing - CRM] [Contact persons] [Correspondence in bulk] |
||
Script parameters:
AddrType - FIR Address type to load from contact persons. |
AddrType - OV Parameter for option of a book in that the envelopes of sent letter post will be created. |
ConnectedTo9Side - Yes Yes - a created letter will be linked as an attachment to the 9th page of the envelop of the sent letter post. |
KindOfShipment - 2000000235 It is possible to select the kind of mail by this parameter. The entered value will be filled into the created envelope of sent letter post. |
LogoPictureFooter - Footer.wmf The name of logo of a company for footer of a letter. |
LogoPictureHeader - Header.wmf The name of logo of a company for heading of a letter. |
ShowLogoFooter - Yes Yes - it displays the logo in footer of a letter. |
ShowLogoHeader - Yes Yes - it displays the logo in heading of a letter. |
TypeOfAddress - 2 Type of address of a customer. The address from a selected type will be filled to a letter, eventually to a created record of sent letter post. 1 - invoice address, 2 - delivery address, 4 - correspond address. |
TypeOfShipment - 108 A parameter for option of the type of mail. The entered value will be filled into the created envelope of sent letter post. |
ReportName Parameter for printing of a special report. This special report can be saved in the Special directory or in DB repository. |
By means of this script it is possible to create letters in bulk for Partners, Contact persons and Suppl./Cust. It is also possible to create activities and corresponding records to individual letters in book Sent letter post. This script can be run over the whatever mentioned books. This function is assorted to the tree menu of Marketing module too. After activating of the script the user's form that has several tabs will display.
The title page of the form 0 - Addressee
This page is used for selection of an addressee for created letters.
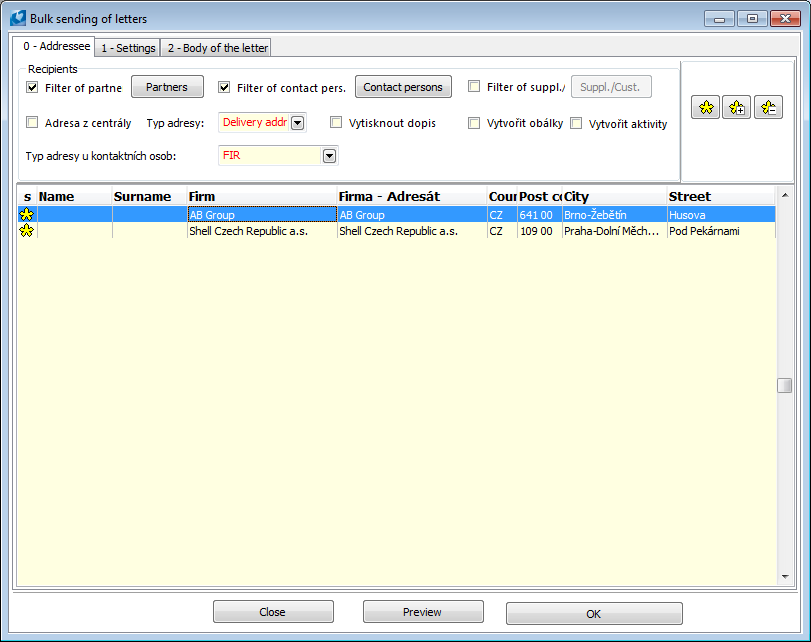
Picture: The Bulk sending of letters form - Addresses page
Load of recipients into the form is done by checking Filter of partners, Filter of contact pers., Filter of Suppl./Cust. fields. Firms or persons from containers of these modules are loaded to the form after fields are checked. All records will be automatically marked by asterisks after loading. The selection is possible to correct by means of the standard icons with asterisks eventually by the Shift+Enter keys. The letters will be created only for selected addressee. The Partners, Contact persons, and Suppl./Cust. buttons are used to switch to the appropriate book. Buttons are accessible always when field to enter addressee from appropriate container is checked.
Fields Description
Address of parent company |
If the field is checked, the script creates a letter, eventually the document of sent letter post to the parent company of a customer (the address from parent company is entered into the Addressee field). |
Address type |
The field for selection of address type of a customer (partner). Invoiced, Delivery or Correspond address will be entered to a created letter, eventually to the document of sent letter post, if it is set on the Customer card. |
Print letter |
Only if the field is checked, individual letters will be printed, after setting required parameters and pressing OK button. |
Create envelopes |
If the Create Envelopes box is checked, pressing the OK button will create records for each marked recipient in the book Send letter post. In the form a new Envelope tab will display. In the tab you can define the values that will be filled to the created envelopes of sent letter post. |
Create activities |
Script enables to create activities to individual letter for selected addressee. After checking of this field in the form the Activity tab will display where you can set next data about activity. |
Address type of the contact persons |
If the letters are created to contact persons, it is possible to define the type of theirs addresses in this field. These addresses are entered to a created letter, eventually to the envelope of sent letter post. |
View |
The button to display of view of unfinished letters. |
Page 1 - Setting
Here it is possible to select the texts that will be displayed in the heading and footer of the letter. Further it is possible to set letter sign, eventually address and title (subject of the letter).
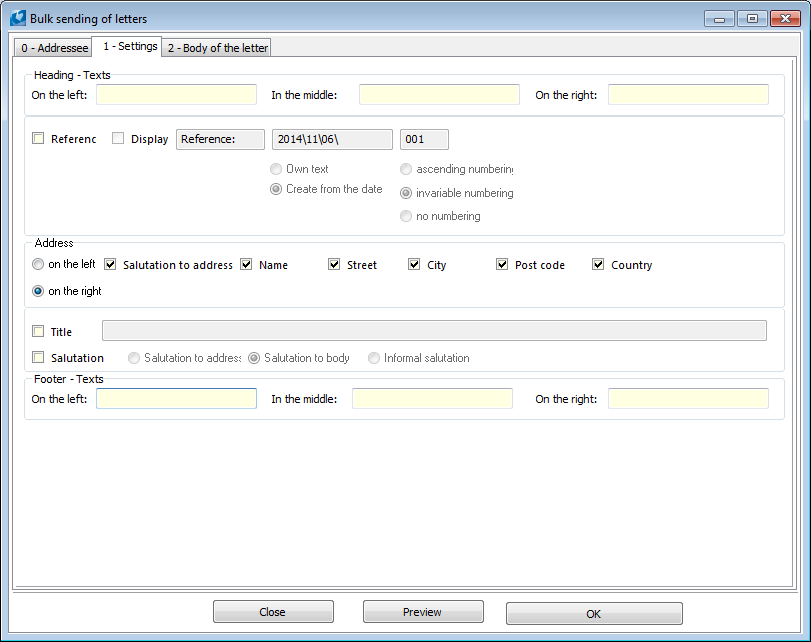
Picture: The Bulk sending of letters form - Setting page
In the upper part of the form there are fields that the user can use for setting of a text on the left, in the middle or on the right in the letter heading. It is possible to set the sign of a letter under heading in this form. After checking of the Sign field, the next field of the form will be accessible. These fields simplify creation of a letter sign. By these fields and flags it is possible to define if to create the sign from a current date or to enter own text in the letter. Further it is possible to set the numbering of letter sign and to define if to display the own text Sign.
Further it is possible to set the address of a letter on the tab of the form. By checking of the filed the user can define the location of address (on the left of right side). By checking of these fields it is possible to suppress or display individual part of an address including salutation. It deals with Name, Address, City, Post code and Country. Salutation in letter address is loaded only at contact persons from OS type note with number 1. Notes with salutation can be inserted to contact person manually, or in bulk via Insertion of salutation to contact persons script (Kos_DoplOsl1).
The Title field is used for displaying of a text as a title of the letter. If Salutation field is checked, text with salutation will display under the title (only at letters which addressee is also contact person). It is possible to select the Salutation into the address (the OS note type with the 1 number), Salutation into the description (the OS note type with the number 2) or Informal salutation (the OS note type with the number 3).
The last possibility on this page of the form is the footer text of a letter. 3 fields in the lower part of the for are used for this purposes (where the footer text will be located).
Page 2 - Text of letter
The letter is created here. You can format this text, save supplements or unfinished letters for later usage. Here you can insert the pictures too. However the limitation is that the letter should be no longer than one A4 page. It is not possible to display and print the longer text. The entered text will be filled into the item (letter) of a created envelope of sent letter post.
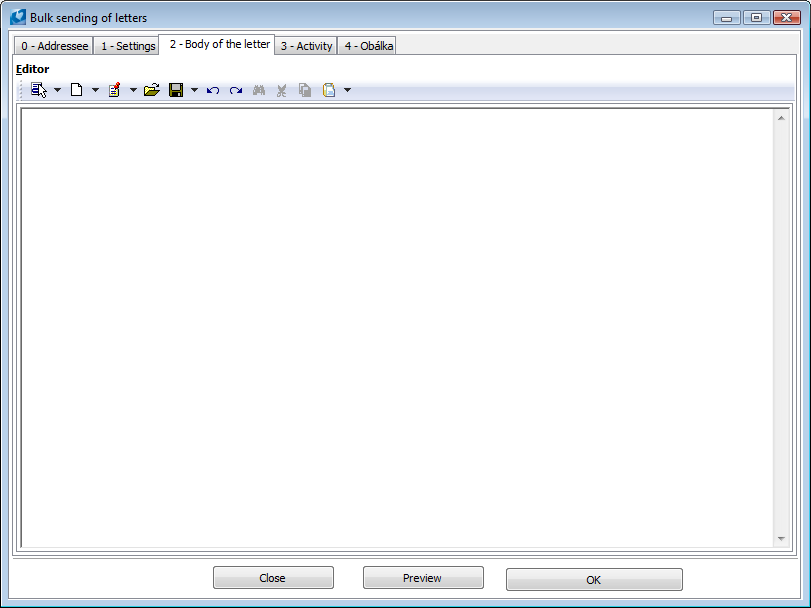
Picture: The Bulk sending of letters form - Text of letter page
Page 3 - Activities
This page of the Bulk sending of letters form is used for pre-definition of fields for creation of activities. This tab will be displayed after checking of the Create activities field on the page 0 - Addressee page of the Bulk sending of letters form.
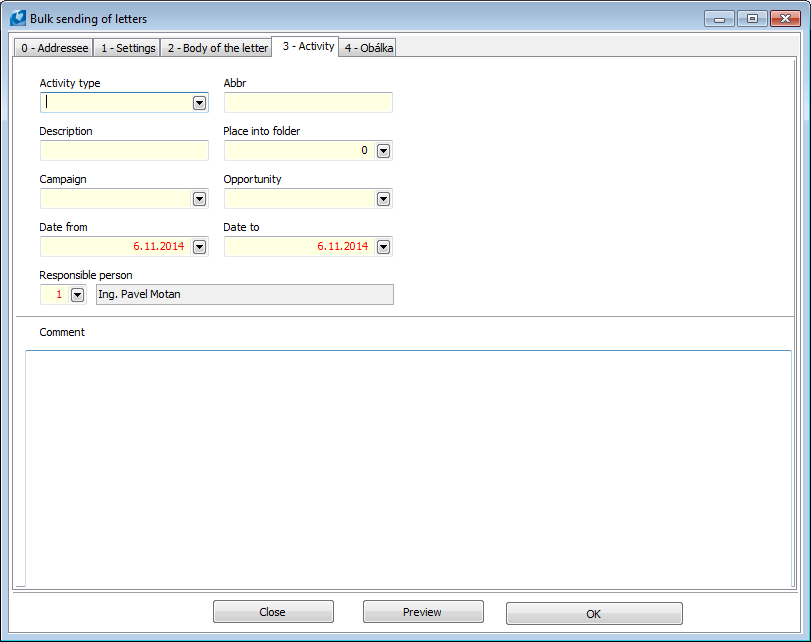
Picture: The Bulk sending of letters form - Activity page
Into the field on this page of the form user can enter the values and these will be entered into the new created activities. It deals with It deals with these fields: Activity type, Abbreviation, Description, Place in folder, Campaign, Opportunity, Date, Time, Responsible person, Comment.
Page 4 - Envelope
This tab will only display if Create envelopes field is checked on page. 0 - Addressee page).
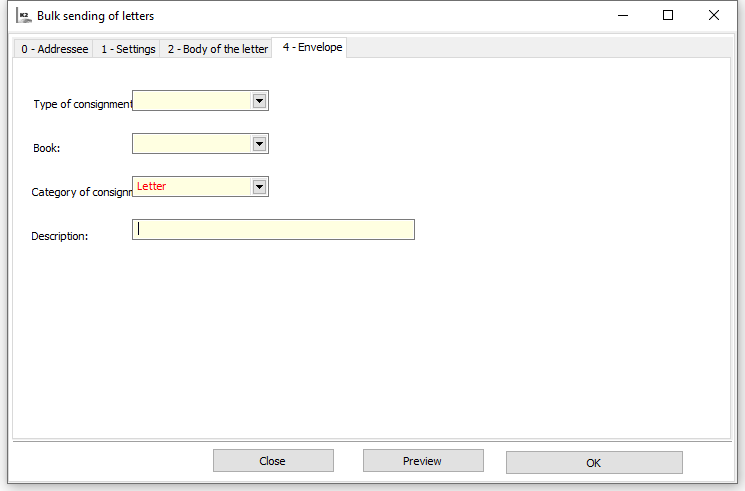
Picture: The Bulk sending of letters form - Envelope page
4 - Envelope page of the Bulk sending of letters form is used for pre-definition of some fields of a created document of sent letter post. It deals with the Mail type, mail kind, and Description. Further it is possible to choose the book in that the envelopes of sent letter post will be created.
When all required fields are filled in tabs we can create report view with individual letters with View button. These letters can be printed and when we return we can also change predefined texts and settings of heading, footer etc. User can then close the form with Close button without saving of changes or creation of documents.
User can execute printing of letters including creation of activities that the letter was processed and creation of envelopes of sent letter post, by pressing OK button.
|
|
|
Bulk sending of emails
Process No.: CRM009 |
Script ID number: FCRM026 |
File: SEND_MAIL.PAS |
Script description: Script enables to send emails in bulk from Partners, Contact persons and Suppl./Cust containers. |
||
Address in the tree: [Marketing - CRM] [Partners] [Correspondence in bulk] [Marketing - CRM] [Contact persons] [Correspondence in bulk] [Sale/Processing of sale orders] [Basic data] [Customers] [Function of customers] [Purchase/Supply] [Basic data] [Suppliers] [Function of suppliers] |
||
Script parameters:
Activity_Abbr |
Activity_Campaign - 0 A campaign of activity. Value is pre-filled in form field. |
Activity_Descr Activity description. Value is pre-filled in form field. |
Activity_Offer Opportunity of activity. Value is pre-filled in form field. |
Activity_RespPers - 0 A responsible person of an activity. Value is pre-filled in form field. |
Activity_Specifitacion - 0 Activity specification |
Activity_Type A type of an activity. Value is pre-filled in form field. |
CreateAct - No The parameter defines if to create activities to the sent emails. If the parameter is set on Yes, the Create activities flag will be checked automatically. |
DateFrom - 693594.0 Date from. Value is pre-filled in form field. |
DateTo - 693594.0 Date to. Value is pre-filled in form field. |
DetailProt - No If the parameter is set on Yes, the Detailed protocol flag will be checked automatically. |
EditMail - No In case that the parameter is set on YES, the Edit email field will check automatically. |
FilterContactPers - No Parameter to pre-set Contact Persons Container option. |
FilterCustom - No Parameter to pre-set Suppl/Cust Container option. |
FilterPart - No Parameter to pre-set Partners Container option. |
CheckPermission - No It is possible to define parametrically whether to check the sending permission. |
LogoPictureHeader - Header.wmf The name of logo of a company for footer of an email. |
LogoPictureFooter - Footer.wmf Name of company logo for email header. |
ShowLogoFooter - No Yes - logo will be displayed in e-mail footer. |
ShowLogoHeader - No Yes - logo will be displayed in e-mail header. |
SplitFor - 10 The parameter defines the maximal number of addresses in email. The value is pre-filled into the field in the Split for field. |
Subject Parameter for presetting subject of email. Text from field can be pre-filled here via [NameField] definition. |
TypeOfEmailAddr - EMAIL1 Parameter for type of address, where the emails should be sent. |
Message Parameter to define email text. It’s possible to add text of %AppendixAbbreviation% or text from [NameField]. More text can be entered before or after the fields. |
By means of this script it is possible to create emails in bulk for Partners, Contact persons and Suppl./Cust. This script can be run over the whatever mentioned books. This function is assorted to the Tree Module Menu of Marketing Before using the script, you need to have to set up a mailbox and the default account for sending correctly. After activating of the script the user's form that has 2 eventually 3 pages will display.
The initial 0th page - Addresses
On this tab there is possible to select addressees to whom the created emails will be delivered.
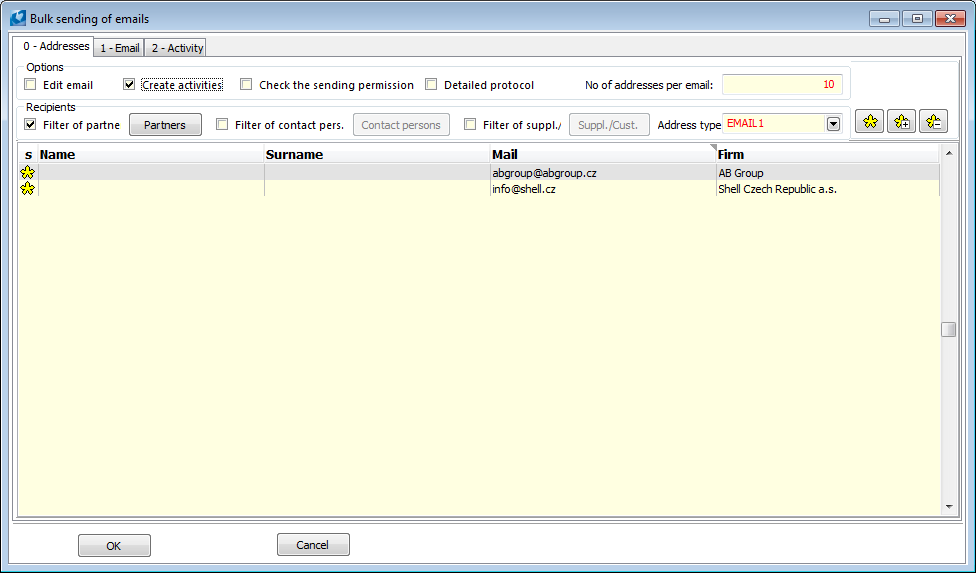
Picture: The Bulk sending of emails form - Addresses page
Recipients i.e. Partners, Contact persons or Suppl./Cust are loaded from containers by checking fields on this page of the form. If any of the Filter of partners, Filter of cont. persons or Filter of Suppl./Cust. fields is checked, firms eventually contact persons will be loaded from filters of these modules. All records will be automatically marked by asterisks after loading. The selection is possible to correct by means of the standard icons with asterisks eventually by the Shift+Enter keys.
Description of Fields:
Edit email |
If the field is checked, the email is displayed just before sending to a recipient. |
Create activities |
By checking this option it is enabled to create activities to Partners or Contact persons. After checking the 2nd page gets accessible. There is possible to set the basic data about activity. |
Detailed protocol |
It provides information not only about number of sent emails and created activities but also information about that what information was sent and to which emails were sent and to whom the activities were created. |
Split for |
The value that is set here defines maximal number of addresses in one email (that means, if the number is 10 and address for sending is 100, only 10 emails will be sent). |
Address type |
Select the type of address, where the emails should be sent. It deals with the type of an electronic address that is saved on the card of an addressee. |
Addresses on that the emails will be sent will be displayed at individual addressees in the Mail column. This column is editable and you can change the addresses here yet. The important option on this page is the Check the sending permission. If the field is checked, the function verifies the state of the Allow information sending field in electronic addresses. In case that the sending is not allowed, the email is not sent to this address.
Picture: Electronic addresses from
1st page of the form - Email
This page is used for filling of the text of email and assignment an attachment.
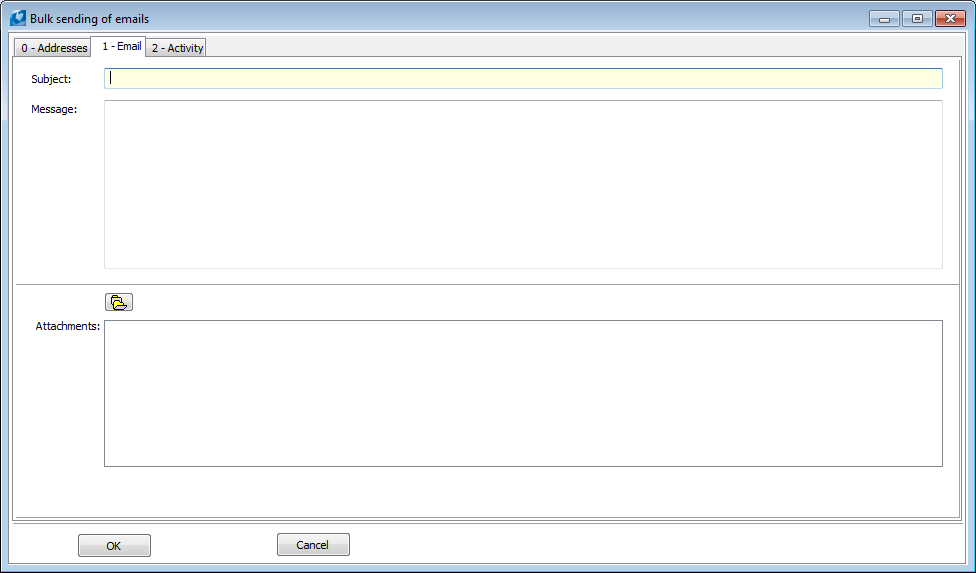
Picture: The Bulk sending of emails form - Email page
In the upper part of the form on this page there are fields by that you can predefine the Subject and the Message of email. In the lower part you can insert the Attachments to email. Always the address is displayed where the attachments is saved.
1st page of the form - Activity
Here you can predefine the fields for activity creation. This page is displayed only when the Create activities field is checked on the 0th page of this form.
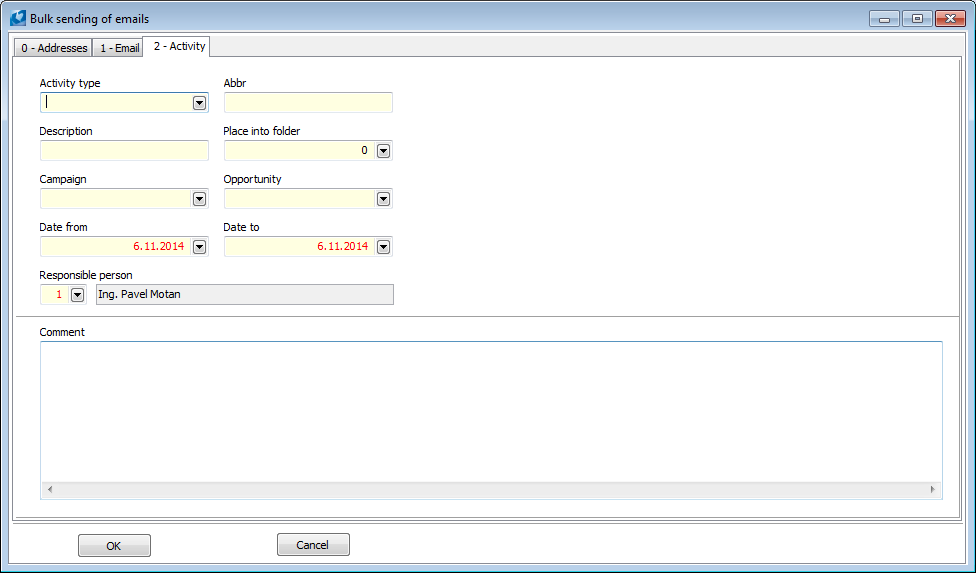
Picture: The Bulk sending of emails form - Activity page
Into the field on this page of the form user can enter the values and these will be entered into the new created activities. It deals with these fields: Activity type, Abbreviation, Description, Place in folder, Campaign, Opportunity, Date, Time, Responsible person, Comment. After pressing the OK button all emails will be sent to the selected recipients and the activities will be created to these emails.
|
|
|
Export AM reports to email
Process No.: ZAK014 |
Script ID number: FZAK036 |
File: AM_EXPORT.PAS |
Script description: Script enables to export the reports to an email and to sent them to the recipients in bulk. |
||
Address in the tree: |
||
Script parameters - default value:
DefaultExport - No Yes - an origin export; No - a new export to email. |
Export_Abbr Activity abbreviation. Value is pre-filled in form field. |
Export_AddNoteAfterExport - No If the parameter is set on "Yes", it adds a note about export to a document. |
Export_AddressType A type of an activity. Value is pre-filled in form field. |
Export_AttachementDocType External documents types, that will be exported as e-mail attachments, from the 9th page of a document. It is necessary to separate individual types by a semicolon. |
Export_AttachementFileName Text which is used as a name of email attachment Protocol in this parameter is used to replace text with values of data module fields: - Field name DM must be shown in square brackets in the text, e.g. [DocumentIdentification] - Also link paths can be used, divided with semicolon [CDo;Zkr] - Data module, from which the fields are taken, depends on export type. In case of “According to document” export type it is data module of given document, in case of “According to supplier/customer” export type it is data module of given suppl./cust. (TD_Baz)
Further we can show link to client appendix which text will be added: - Abbreviation of appendix in percentage sign should be shown, e.g. %AppendixAbbreviation% - Appendix text is automatically taken in correct language version - In appendix text names of data fields can be shown in [] and these will be replaced with their value. |
Export_AutogenerateSubject - No Yes - an email subject according to the document number will be created. |
Export_Campaign A campaign of activity. Value is pre-filled in form field. |
Export_Comment A comment of activity. Value is pre-filled in form field. |
Export_CreateAct - No Yes - an activity to e-mail will be created. |
Export_DateFrom - Current date Date from. Value is pre-filled in form field. |
Export_DateTo - Current date Date to. Value is pre-filled in form field. |
Export_Description Activity description. Value is pre-filled in form field. |
Export_DetailProt - No Yes - a detailed protocol after sending an email will be displayed. |
Export_EditAct - No Yes - a possibility to edit activities. |
Export_EditMail - No If the parameter is set on "Yes", the Edit email field will be automatically checked. |
Export_EmailFromCust - Yes Yes - use an email from a customer when exporting. No - an email from a partner. |
Export_LogoPictureFooter - Footer.wmf A name of a company logo for an email footer. |
Export_LogoPictureHeader - Header.wmf Name of company logo for email header. |
Export_NoInteractive - Yes No - the form for export to email will not be displayed. |
Export_NoteType - 1 A parameter to select a note type. |
Export_Offer Opportunity of activity. Value is pre-filled in form field. |
Export_pdfDirectory Selection of directory with exported "*.pdf" files. |
Export_PlaceInAFolder A folder for location of an activity. |
Export_ReferencerDocActivity - Yes Yes - it transfers activity reference to page 1 of document. |
Export_ResponsiblePreson A responsible person of an activity. Value is pre-filled in form field. |
Export_SavedExPdf Yes - it saves "*.pdf" file from export to email. |
Export_ShowLogoFooter - No Yes - logo will be displayed in e-mail footer. |
Export_ShowLogoHeader - No Yes - logo will be displayed in e-mail header. |
Export_SubjectOfMail Parameter for setting an e-mail subject. A value defined in this parameter is always filled into a subject of a sending email. It is possible to define the text in this parameter so that the values from concrete fields of a customer, eventually of a document, will be filled automatically into the subject of email. Protocol in this parameter is used to replace text with values of data module fields: - Field name DM must be shown in square brackets in the text, e.g. [DocumentIdentification] - Also link paths can be used, divided with semicolon [CDo;Zkr] - Data module, from which the fields are taken, depends on export type. In case of “According to document” export type it is data module of given document, in case of “According to supplier/customer” export type it is data module of given suppl./cust. (TD_Baz)
If the wants to add value from a customer field into a subject of email, it is necessary to define exact name of the appropriate field into square brackets (e.g. [ICO]) in this parameter. An export type has to be set on the value 1 - according to the Supplier/Customer. If you want to generate a value of a document field into a subject of email, it is necessary to set the type of export on the value 2 - according to a Document and define the name of this field again into square brackets in the Export_SubjectOfMail parameter. It is possible to use here the relations of fields. The parameter value has to be e.g. in the [CodeZ;Abbr1] form. Subject of email can be generated by means of combination of more fields all at once. In this case, we must write the fields in the parameter (e.g. [ICO] [Currency]). |
Export_TexForMail Parameter for setting text of email. Protocol in this parameter is used to replace text with values of data module fields: - Field name DM must be shown in square brackets in the text, e.g. [DocumentIdentification] - Also link paths can be used, divided with semicolon [CDo;Zkr] - Data module, from which the fields are taken, depends on export type. In case of “According to document” export type it is data module of given document, in case of “According to supplier/customer” export type it is data module of given suppl./cust. (TD_Baz)
Further we can show link to client appendix which text will be added: - Abbreviation of appendix in percentage sign should be shown, e.g. %AppendixAbbreviation% - Appendix text is automatically taken in correct language version - In appendix text names of data fields can be shown in [] and these will be replaced with their value. |
Export_Type The Type of export: 1 - by the Supplier/Customer; 2 - by the Document. |
Export_TypeOfActivity A type of an activity. Value is pre-filled in form field. |
Export_ISDOCFormat - No Yes - the export is executed to the "ISDOC" format, not to the "*.pdf" format. The parameter may be used in the Invoice out report. |
It is possible to export the report into the email and to sent it to the selected recipients by this script. You can run this function from standard reports by the icon ![]() The Parameter of export form in that you can set some aspects of export will display.
The Parameter of export form in that you can set some aspects of export will display.
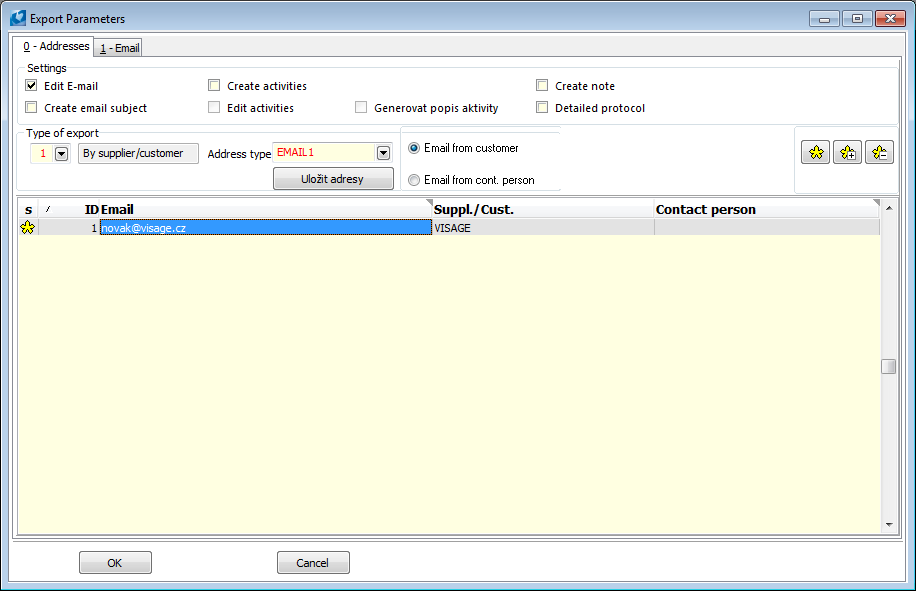
Picture: Export parameters form
Description of Fields:
Edit email |
Display of email before sending with possibility of it's editing). |
Create activities |
By checking of the option is enabled to create activities to the emails. After checking the 2nd page gets accessible. There is possible to set the basic data about activity. |
Edit activities |
It is possible to edit the pre-defined activities after every sending email. If you sent next emails automatically, it is not possible to edit the activity yet. |
Create email subject |
If this option is checked, the number of exported document will enter to the subject of email. This option works only if the export type is set on By Document. |
Detailed protocol |
It provides information not only about the number of emails sent and activities created, but also provides information on which addresses the emails were sent to and to whom the activities were created. If the addresses are changed up to the form of mail of mail client, this change will not be recorded in the log. |
Create note |
If the option is checked, the note with the date of departure and with the email recipient will be entered into the concrete document after sending the email. |
In this form user can select Type of export. Two possibilities are available:
- Export By Supplier/Customer - in this case all document that are determined to one customer will be exported to one file and will be inserted to an individual email as a attachment. And the email form the Customer card by the address type that is selected will be entered into the email address.
- Export By document - in this case all document will be exported to one file and will be inserted to an individual email as a attachment. And the email form the Customer card by the address type that is selected will be entered into the email address. At this option user has choice to select email from delivery, invoice or mailing address.
1st page of the form (Email) is used for setting of Subject and Message of email.
2nd page (Activity) is used for pre-definition of fields for activities creation. This page is displayed only when the Create activities field is checked on the 0th page of this form. Into the field on this page of the form user can enter the values and these will be entered into the new created activities. Following fields are concerned Activity type, Abbreviation, Description, Place in folder, Campaign, Opportunity, Date, Time, Responsible person and Comment.
|
|
|
Verification in the Commercial Register
Process No.: CRM009 |
Script ID number: FCRM024 |
File: OVEROR.PAS |
Script description: Function for verification of Partner in the Commercial Register. |
||
Address in the tree: |
||
Script parameters:
Without parameters. |
It is possible to run this function by means of the Verify button on the 1st page of a Partner card. After activating web pages of the Commercial Register will be displayed, where it is immediately possible to verify correctness of record of name of a company. Simultaneously with activating of web pages the query about the correctness of verification of record into the Commercial Register is displayed. If you select Yes, the date of verification will be inserted to the Partner card, eventually the original date will be replaced with the actual date. If you select No, the original date of creation will be kept. Script cannot be run over Suppl./Cust. card.
|
|
|
Partner - Customer
Process No.: CIS004 |
Script ID number: FCRM042 |
File: ExportPartBaz.pas |
Script description: The script creates customers to selected partners. |
||
Address in the tree: [Sale/Processing of sale orders] [Basic data] [Customers] [Function of customers] [Partner - Customer] [Purchase/Supply] [Basic data] [Suppliers] [Function of suppliers][Partner - Supplier] |
||
Script parameters:
PravoNaRec - Yes If the parameter is set on "Yes", the records on that the user is allowed to are ignored. |
It is possible to settle the Partners and Customers databases by this script. The function creates the records in customer card to selected partners (if they are not linked with the customer).
|
|
|
Electronic addresses conversion
Process No.: CRM010 |
Script ID number: FCRM041 |
File: ConvertionAdresses.pas |
Script description: A script for conversion of electronic addresses. |
||
Address in the tree: |
||
Script parameters:
Without parameters. |
In the 133 version changes have been in the use of electronic addresses in the K2 IS. It is necessary to execute the conversion to use correctly the electronic addresses. The Conversion of electronic addresses script is used for this conversion. This script assigns the correct format to the type of address, thus avoiding storing addresses in wrong format or with undesirable characters. If type of electronic address has the correct format assigned, it is not possible to save the record (e.g. Partner) with electronic address, which value does not correspond the format in the K2.
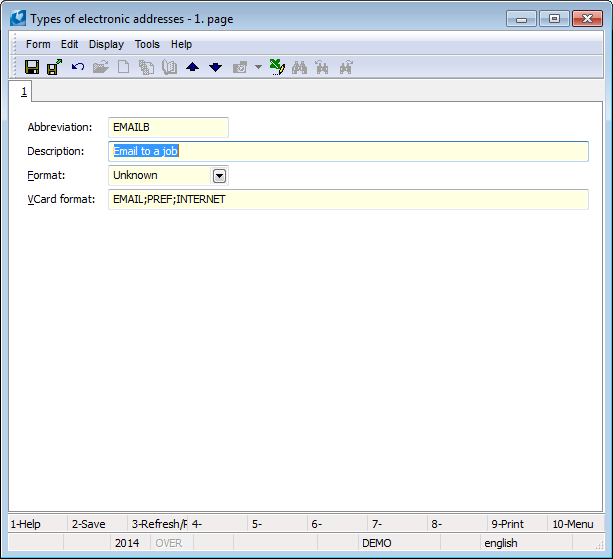
Picture: Type of electronic addresses form - 1st page
After activating the Conversion of the electronic addresses script, the form into that the type of electronic addresses will be loaded will display. There are displayed only the electronic addresses without defined format or if theirs format is set on Unknown. It is necessary to execute the conversion at these electronic addresses.
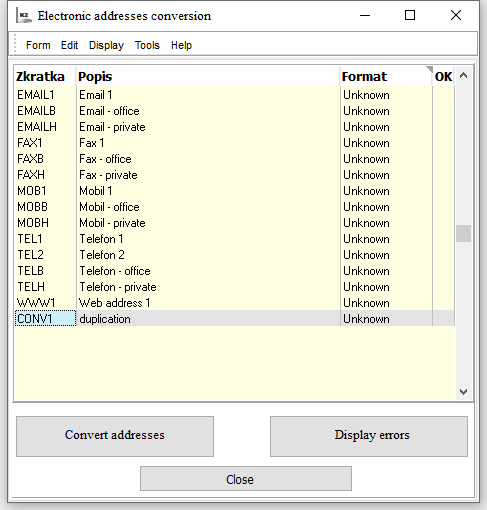
Picture: Electronic addresses conversion form
Conversion is always done at electronic address where ruler is positioned. The format of electronic address is set in the Format column. You can edit this column by the Enter key. If the electronic address has assorted its own format, the conversion can be executed by the Convert addresses button. During conversion script executes automatic corrections of some entered addresses, i.e. Adds dialing code to phone numbers or possibly removes extra spaces.
If conversion was executed correctly, i.e. there were no errors found in electronic addresses or they were corrected automatically, bitmap displays in OK column![]() If there were found errors when conversion, the Bitmap
If there were found errors when conversion, the Bitmap![]() appear in this column. It is possible to display the list of all errors that were found when conversion by the Display errors button. After pressing of the button the Errors form will display with the list of these errors. It is necessary to correct them manually.
appear in this column. It is possible to display the list of all errors that were found when conversion by the Display errors button. After pressing of the button the Errors form will display with the list of these errors. It is necessary to correct them manually.
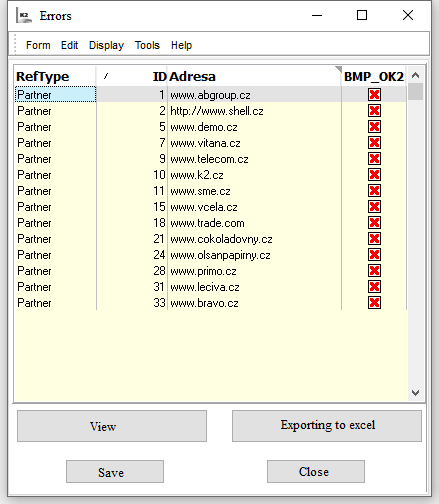
Picture: Errors form
The user has to correct incorrectly entered email address in the Address column. This column is editable by the Enter key, eventually by double click of the mouse. You have to enter electronic address in the correct form that corresponds the selected format into the Address column. If the address is corrected into the correct form, in the column BMP_OK2 there the The Display button in the Errors form is used for switching into the concrete Partner or Contact person. The Export to excel button executes export of the list with all errors into the Excel.
If all electronic address are corrected, it is necessary to save all changes. Use the Save button for that. By pressing of this button, all changes will be saved into the electronic addresses. The Errors form is closed by the Close button.
If you run the script again, the electronic addresses at that the conversion executed, will not be loaded into the form, but again will be loaded only if the electronic address has set the format on Unknown.
|
|
|
Type Conversion of el. addresses
Process No.: CRM010 |
Script ID number: FCRM052 |
File: ElAdrMove.pas |
Script description: Script for conversion of types of electronic addresses at partners and contact persons in bulk. |
||
Address in the tree: |
||
Script parameters:
FromEAType1 - EMAIL1 Abbreviation of type of electronic address that will be transferred. |
FromEAType2 - FAX1 Abbreviation of type of electronic address that will be transferred. |
FromEAType3 - TEL1 Abbreviation of type of electronic address that will be transferred. |
FromEAType4 - TEL2 Abbreviation of type of electronic address that will be transferred. |
ToEAType1 - EMAILB Abbreviation of a target type of electronic address. |
ToEAType2 - FAXB Abbreviation of a target type of electronic address. |
ToEAType3 - TELB Abbreviation of a target type of electronic address. |
ToEAType4 - MOBB Abbreviation of a target type of electronic address. |
Script for conversion of types of electronic addresses at partners and contact persons in bulk. It is necessary to insert partners or contact persons, at which we want to change type of electronic address, in container. Script can be initiated only over Partnersor Contact personsfilter. It’s necessary to set up type of electronic addresses which we want to transfer via FromEATypeand ToEAType parameters. Insert type of electronic address that you want to change (transfer) into the FromEAType parameter, and insert type of address on that the electronic address will be transferred into the ToEAType parameter.
Always 4 types of electronic addresses are transferred by default. If we want to transfer e.g. only one type, then we insert FromEAType1and ToEAType1 parameters with selected values into the function. Remaining parameters must be set with empty value! If you do not set the remaining parameters with empty value, the function transfers electronic addresses by the default setting of these parameters.
After conversion it is always displayed a resulting log with list of executed changes.
|
|
|
Partners Anonymization
Process No.: CRM009 |
Script ID number: FCRM061 |
File: AnonymizePartner.pas |
Script description: Script to delete field values which contain personal data. |
||
Address in the tree: |
||
Script parameters:
Abbr1 - No Yes - value in Abbreviation 1 field is deleted |
Abbr2 - No Yes - value in Field Abbreviation 2 |
Company - No Yes - value in Company field |
Addresses - No Yes - value in fields for entering the Address |
BusinesID - No Yes - value in Field comp. tax reg. no. |
TaxID - No Yes - value in Field comp. tax reg. no. |
EAddress - No Yes - value in Electronic addresses fields. |
DeleteNotes - No Yes - text in Comments tab is deleted |
ActivityType Requested activity type is deleted |
ActivityAll Yes - whole tree of activities is deleted |
GrRights Right for entry is added |
CommentType It adds pre-defined type of comment to automatically created comment |
All - No |
Via this script is possible to delete field values which contain personal data. Field which we want to delete can be defined in script parameters. Script is performed only if there’s no link to Customer. If Partner is linked to Customer then it's necessary to do anonymization above Customer module (Suppliers/Buyers).
|
|
|
Mass SMS sending
Process No.: CRM009 |
Script ID number: FCRM055 |
File: CreateSMS.pas |
Script description: Function for mass SMS sending. |
||
Address in the tree: |
||
Script parameters:
Activity_Campaign - 0 Activity campaign for sent SMS message. Value is pre-filled in form field. |
Activity_Descr Activity Description for sent SMS message. Value is pre-filled in form field. |
Activity_Offer Activity Opportunity for sent SMS message. Value is pre-filled in form field. |
Activity_Type Activity Type for sent SMS message. Value is pre-filled in form field. |
CreateAct - No Parameter defines if to create activities for sent SMS messages. If the parameter is set on Yes, the Create activities flag will be checked automatically. |
DateFrom Date from. Value is pre-filled in form field. |
DateTo Date to. Value is pre-filled in form field. |
DetailProt - No If parameter is set to YES, the Detailed Protocolflag will be checked automatically. |
FilterContactPers - No Parameter to pre-set option Contact Persons Container. |
FilterCustom - No Parameter to pre-set option Suppl/Cust Container. |
FilterPart - No Parameter to pre-set option Partners Container. |
SenderNumber Phone number of mobile device where K2 SMS Service application is installed and from which SMS messages will be sent. |
Message Parameter to enter text of SMS message. |
TypeOfEmailAddr - TEL1 Parameter of electronic address type at which SMS messages will be sent. |
Via this script is possible to mass create and send SMS messages to selected electronic addresses of Contact Persons, Partners and Suppl./Cust. SMS messages are sent from mobile device with Android operating system, at which K2 SMS Service application is installed and which is data connected via web service server with IS K2. Phone number of this mobile device must be entered to SenderNumber script parameter.
After script initialization form with 2 eventually 3 tabs is displayed.
|
|
|
This tab is used to select SMS recipients and to set up their electronic addresses.
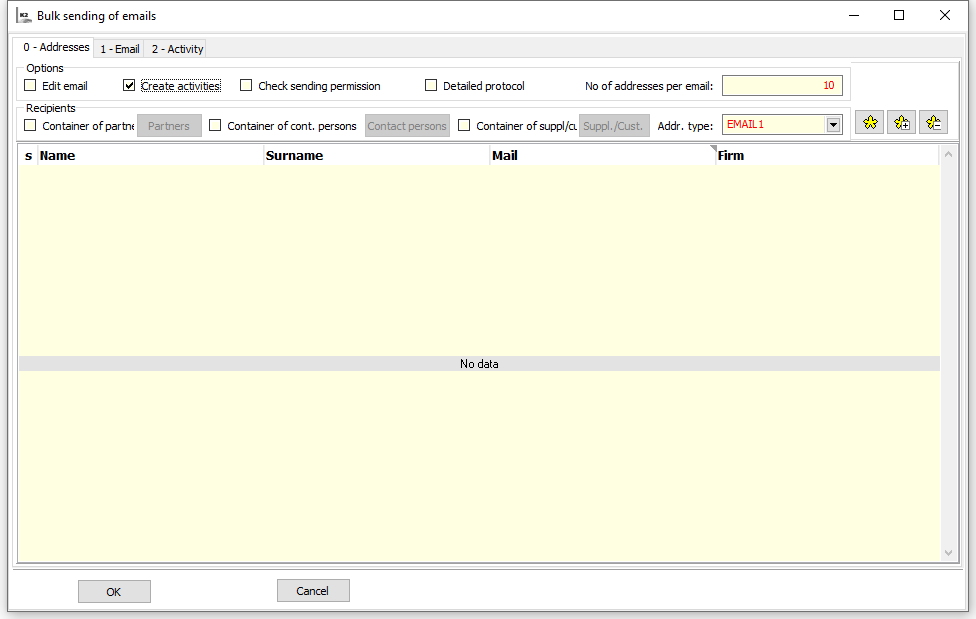
Picture: Folder 0 - Addresses
Upload of receivers of SMS messages, i.e. Partners, Contact persons or Suppl./Cust from container is done via fields ticking from this form page. If any of Partners Container, Container of contact persons or Container of Suppl./Cust. fields is checked, records from containers of these modules will be uploaded. All records will be automatically marked by asterisks after loading. This selection is possible to correct via standard icons with asterisks eventually by the Shift+Enter keys. SMS messages will be sent only to selected recipients.
The Parters, Contact persons and Suppl./Cust. buttons are used for switching to an appropriate book. Buttons will only be accessible after field to enter recipient from dedicated container is checked.
Electronic Addresses of recipients to which SMS messages will be sent are automatically uploaded according to selected type in Address Type field and are displayed in editable Mail column. By mouse Double Click, eventually via Enter key is possible to change the address.
Selected fields description:
Create activities |
If this option is checked, activities will be created to sent SMS messages. After checking, the 2nd page of the form will be available, where it is possible to enter basic data about Activity. |
Detailed protocol |
Detailed protocol is displayed after SMS messages are sent. |
Address type |
Field to select electronic address type of recipients to which SMS messages will be sent. It is type of electronic address which recipient has set in their card. |
|
|
|
This page is used to enter text of SMS message for chosen recipients.
Picture: Folder 1 - SMS
|
|
|
This page of the form is used to pre-define fields for created activities. This tab will be displayed after checking of the Create activities field on the page 0 - Addresses.
Picture: Page 2 - Activities
Values can be entered to fields on this page of the form and these can be later entered to newly created activities. It deals with these fields: Activity type, Abbreviation, Description, Place in folder, Campaign, Opportunity, Date, Time, Responsible person, Comment.
After pressing OK button all SMS messages will be sent to selected recipients and activities will be created for these SMS messages.