|
|
|
Procedures
Procedure is generally suggested regulation where common rules and steps’ sequence of certain company process are defined. Specific process runs according to this regulation.
Each procedure has its header and procedure versions. So called procedure versioning allows to make changes at procedure types which are currently used for processes. New process version is created for the same header in which user can make changes. While for currently running processes at company valid and unchanged version can still be used.
|
|
|
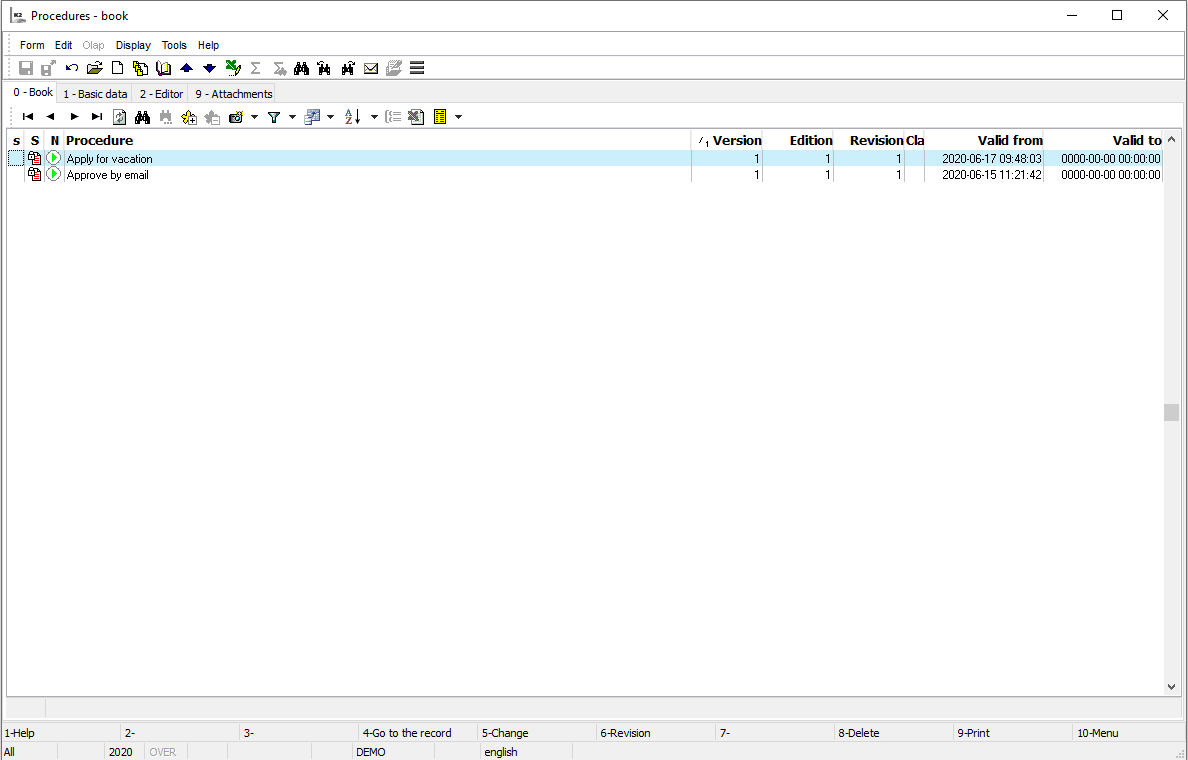
Procedure book
Procedure book contains all headers of Workflow versioned processes. Each procedure header can have several procedure versions. However for each header only one procedure version can be valid at a time and which will be used for process.
Procedures book can be displayed on page 1 of Versioned Procedures book by choosing from drop down menu at Procedure field.

Picture: Procedures - book (form after choosing from drop down menu (highlighted in red circle), displaying of list of procedure headers).
In this book new procedure header can be created by using Ins button or existing header for procedure version can be chosen by highlighting the header and pressing Enter.
|
|
|
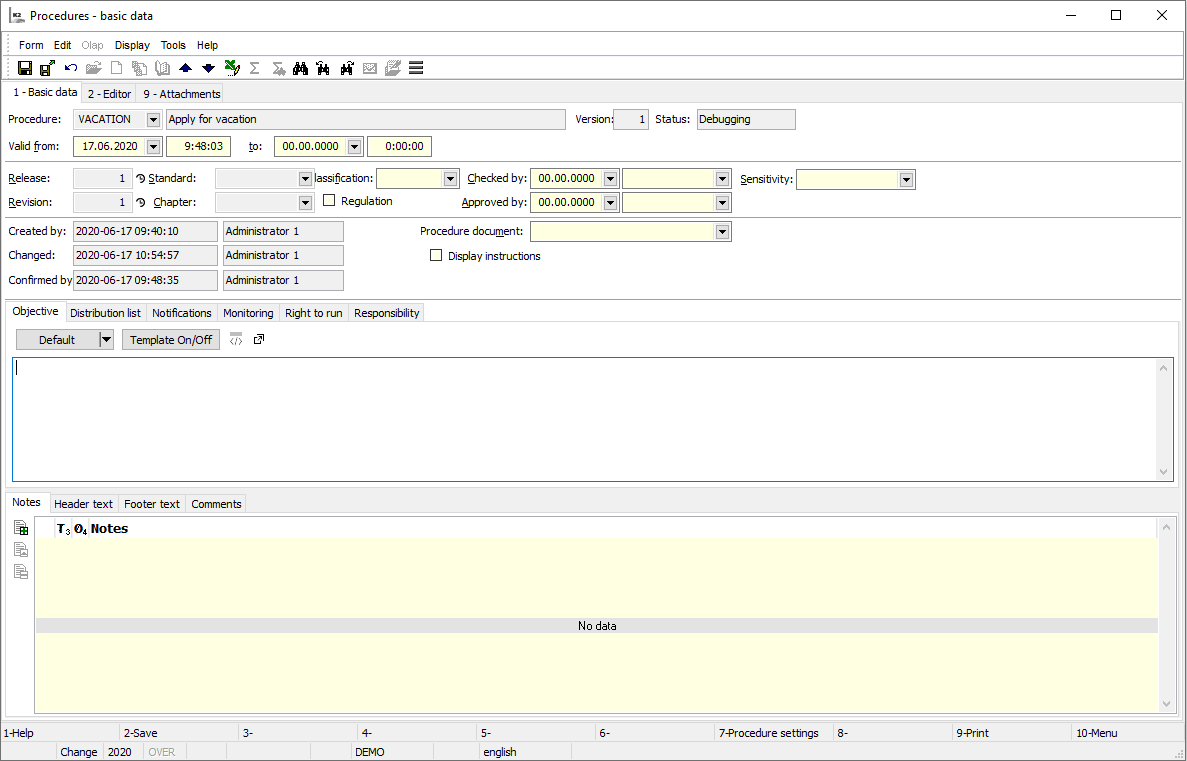
Procedures - basic info (page 1)
On the 1st page of Procedure book basic identification data for procedure header are entered.
Picture: Procedures - page1 Procedure header creation
Description of Fields:
Abbreviation |
Abbreviation of procedure header. It is mandatory to enter abbreviation and it is not allowed to have more headers with the same abbreviation. |
Name |
Name of procedure header |
Type |
Type of procedure header - user codebook, it's used to e.g. sort or group headers according to certain criteria. |
Language Name |
This field allows to assign foreign language name to the header (see User’s parameters - Language). |
Number |
Unique header number automatically assigned by the program. |
|
|
|
Book Versioned procedures
Versioned procedures book is a list of all procedures' versions for Workflow.
Picture: Versioned Procedures - book
Description of columns:
S |
Status of procedure (see icons below). |
N |
Deployment - provided at least one process of given procedure version exists, then icon will be displayed: - it means that from given procedure version processes are created of which at least one process is not yet finished or it's suspended.
If column is empty it means that no process has been created yet from given procedure version. |
Version |
Serial number of procedure version automatically assigned by the program. |
Release |
Release number (not related to version). Number can be edited manually. |
Revision |
Revision is numbered within release and this number can be edited manually. |
Abbreviation |
Abbreviation of procedure name. |
Valid from |
Procedure validity is from given date. |
Valid to |
Procedure validity is to given date. |
When approving versioned procedures, dates infields "Valid from” and "Valid to” cannot be valid for more headers at the same time. This means that one procedure header can only has one valid (approved) version at a time.
Versioned procedure can have various statuses:
|
Editor |
Newly created procedure or new release or revision. Z Process cannot be created from procedure in this status. |
|---|---|---|
|
Approved |
Procedure ready for process creation. It's not possible to make any changes. |
|
Debugging |
Procedure is ready for debugging, i.e. it's possible to create processes and make changes. |
|
Inactive |
I don't want to use this procedure version anymore. Z It's not possible to create new process nor change the procedure from inactive procedure. |
Keys Description:
Ins |
Creation of new procedure version. |
F6 |
New procedure revision (original procedure number will remain in the Release field and Revision field will show one number higher). |
Alt+F2 |
Procedure approval (approved status). |
Alt+F3 |
Procedure deactivation. |
Alt+F5 |
Debugging status set up. |
Ctrl+F2 |
Undo Confirmation of Procedure (from approved status back to editor status). |
Ctrl+F6 |
New procedure release (Release field will show number one higher and Revision field will show number 1). |
Shift+F6 |
Versioned procedure copy. |
Note: Procedure, from which the function is initiated, is copied by creating new revision or release. Release or revision number, validity etc. are then adjusted as per our needs.
|
|
|
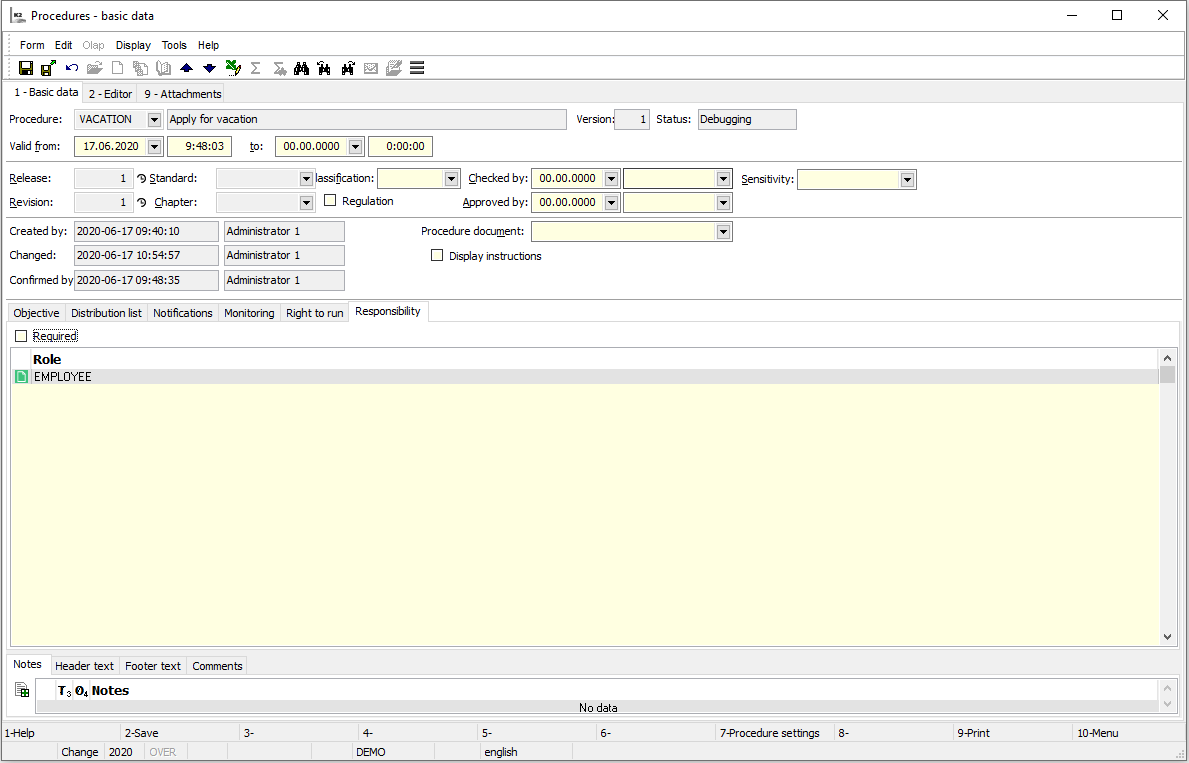
Versioned Procedures - Basic Info (page 1)
On 1. On page 1 of Versioned Procedures we can choose procedure header and find basic information about procedure version, e.g. validity and role which are related to given procedure version.
Picture: Versioned Procedures - page 1 Tab Target
Description of Fields:
Process |
Abbreviation of procedure header, language Name of procedure header. |
Version |
Procedure version number (automatically assigned by the program, numbered from 1 in ascending order for each header). |
Status |
Actual procedure status (Editor, Approved, Debugging, Inactive). |
Valid from |
Time from when the procedure is valid. (Procedure must be also confirmed to become valid.) |
to |
Time to when the procedure is valid. |
Release |
Release number of versioned procedure. This number can be edited after Guidelines field is checked. |
Standard |
General codebook of standards to closer identify given guideline (we complete it ourselves according to valid ISO 9000 standards). Field becomes active after Guidelines field is checked. |
Classification |
Versioned procedure classification (general codebook to closer identify given guideline). |
Reviewed |
Date and contact person which reviewed given procedure (guideline). |
Sensitivity |
Choice from user's codebook. |
Revision |
Revision number of versioned procedure. This number can be edited after Guidelines field is checked. |
Chapter |
Abbreviation of chapter (general codebook to closer identify given guideline). Field becomes active after Guidelines field is checked. |
Guidelines |
By checking this field given versioned procedure will be added to guidelines. |
Approved by |
Date and contact person which approved the procedure version. |
Created, Edited, Confirmed by |
Date and user which created, edited or confirmed the procedure version. |
Procedure document |
Document abbreviation which is assigned to procedure. |
Display assignment |
If checked, Assignment tab is displayed in Process and Work Step. |
Description of tabs:
Objective |
Description of the procedure version objective. (Task of the process.)
|
||
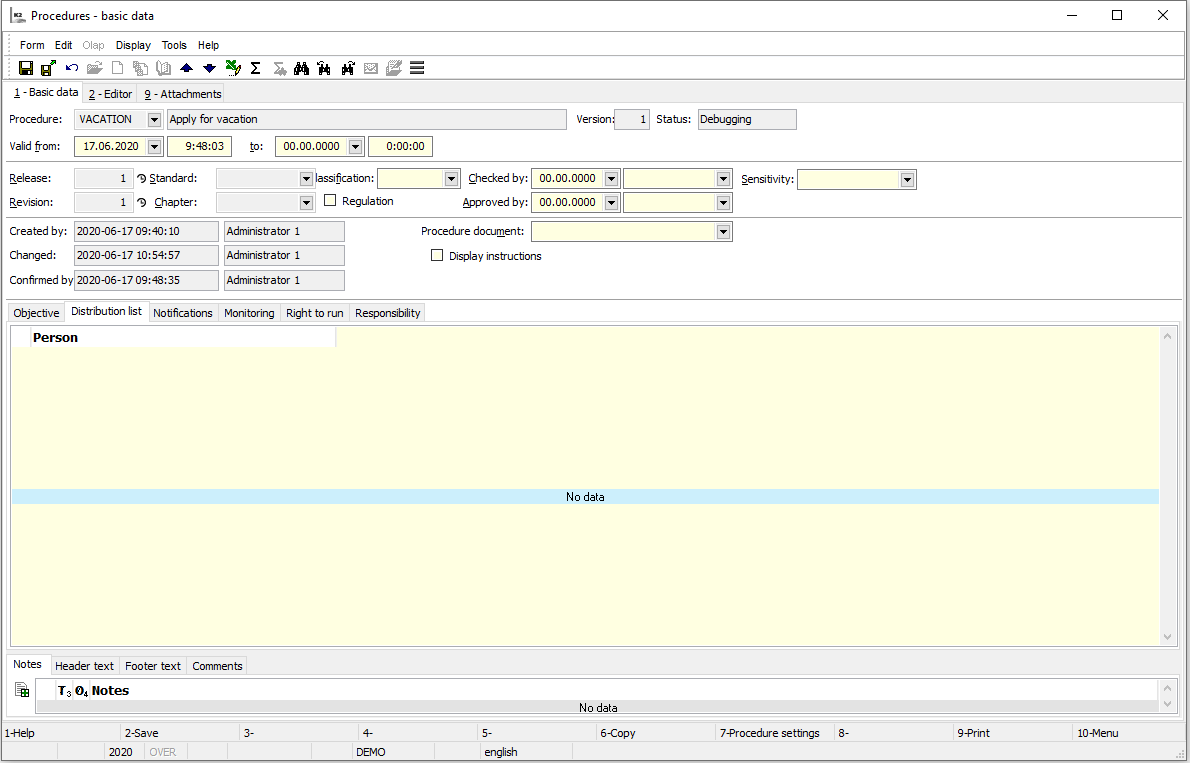
Distribution list |
List of contact persons to which the procedure (guideline) version is addressed. |
||
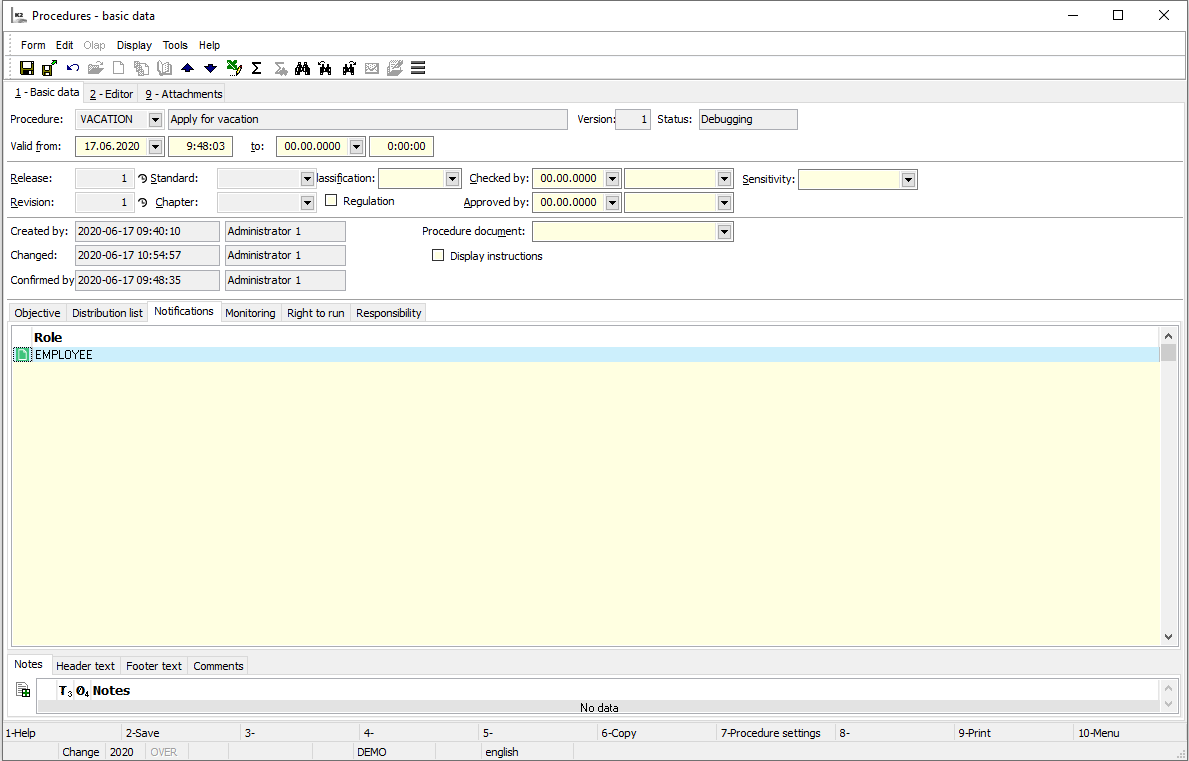
For attention |
A list of roles, where the contact persons assigned to these roles can see the whole versioned procedure in the book Procedures and steps of the user. |
||
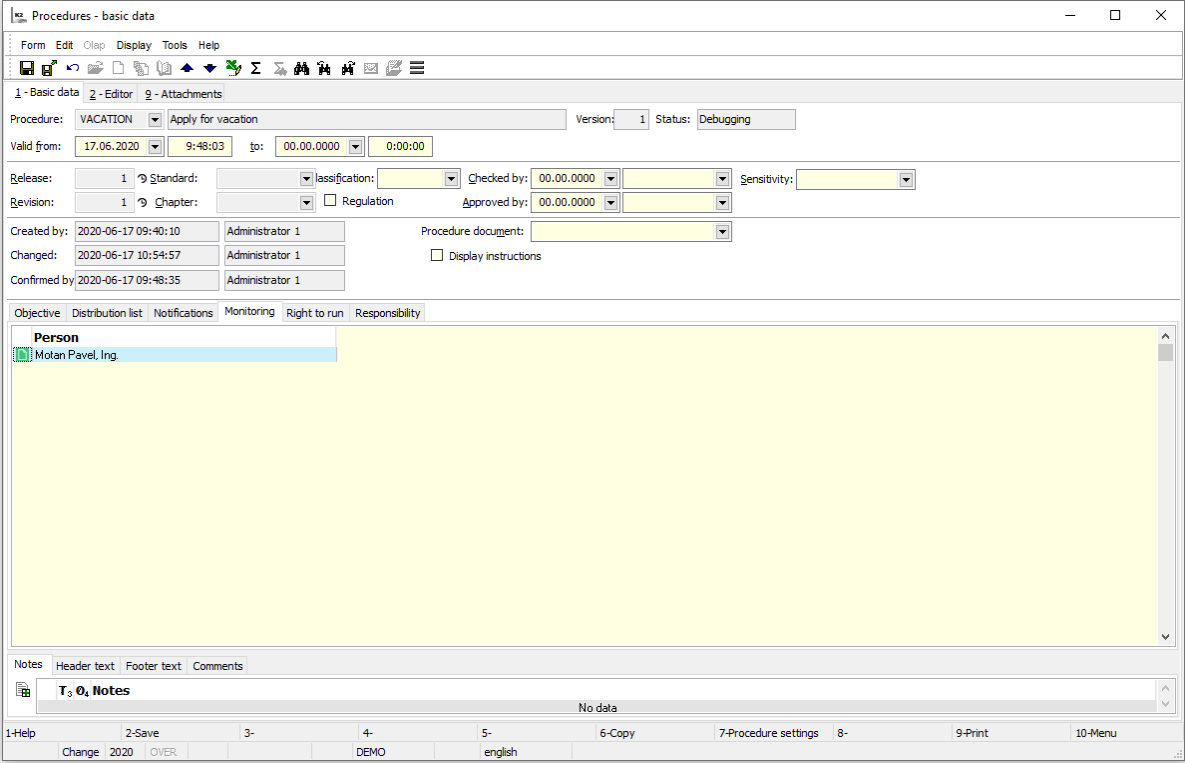
Monitoring |
Contact persons included in this tab will have in Monitored Processes book included processes, which are created from this procedure. They will be able to monitor these processes despite they have no right to Browse process. This function is useful e.g. for process monitoring where other users reporting to the user have different tasks. |
||
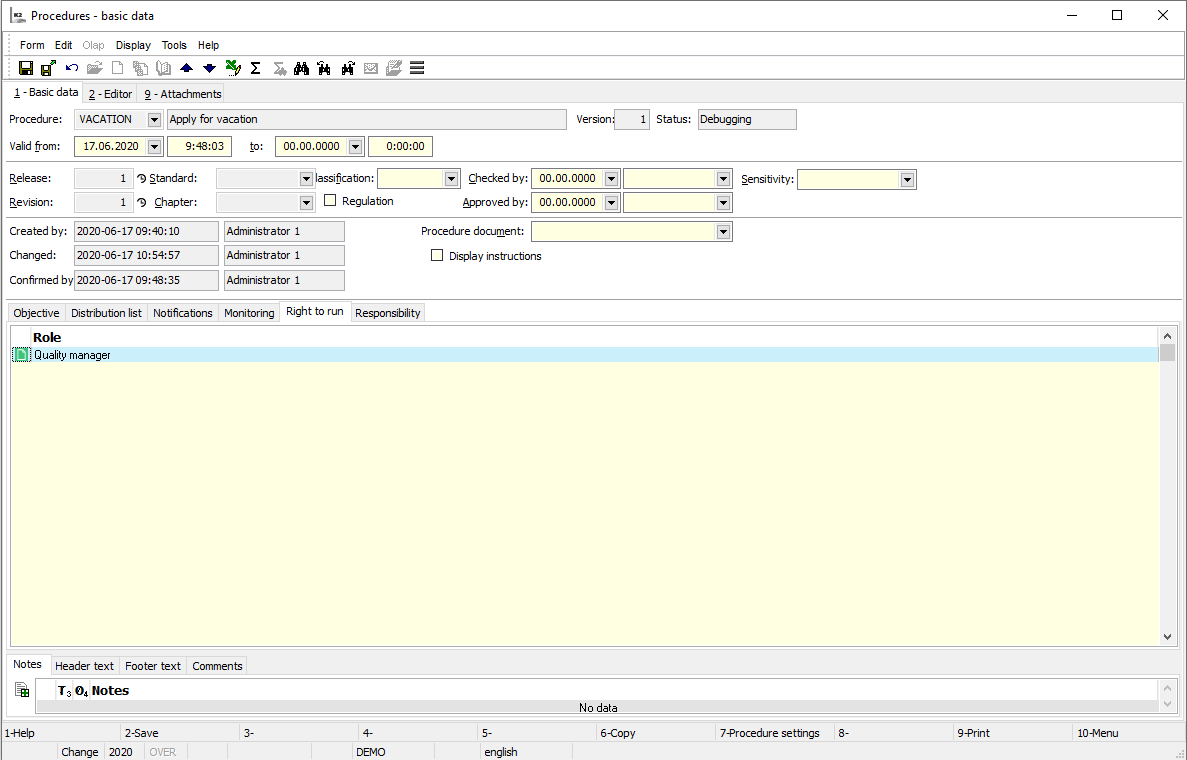
Right to launch |
List of roles where contact persons, included in these roles, can create process from this procedure version. |
||
Responsibility |
List of roles where from contact persons, included in these roles, it's possible to choose person responsible for the process when process is being created from given procedure version. These persons can also cancel the process, provided they also have right to Cancel process. These contact persons can also see whole versioned procedure in User Procedures and Steps.
|
Picture: Versioned Procedures - page 1 Tab Divider
Picture: Versioned Procedures - page 1 Versioned procedures - page 1 - For attention tab
Picture: Versioned procedures - page 1 - Monitoring tab
Picture: Versioned procedures - page 1 - Right to Launch tab
Picture: Versioned procedures - page 1 - Responsibility tab
|
|
|
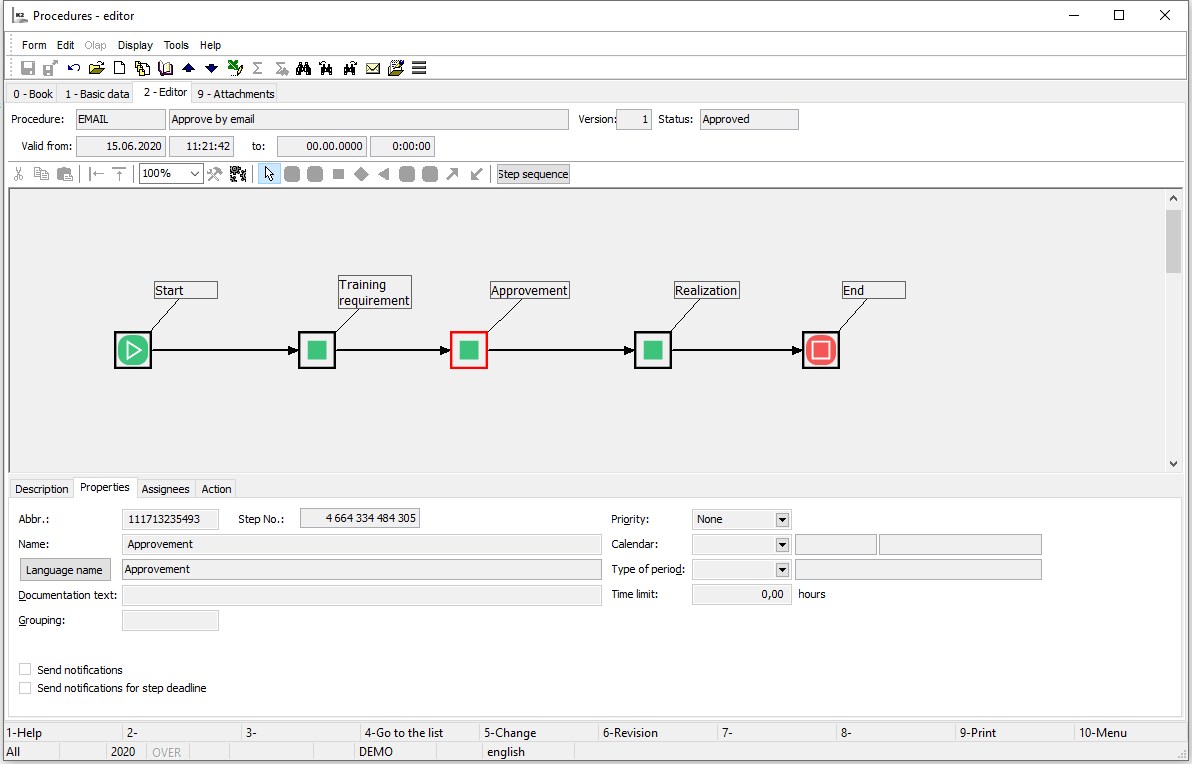
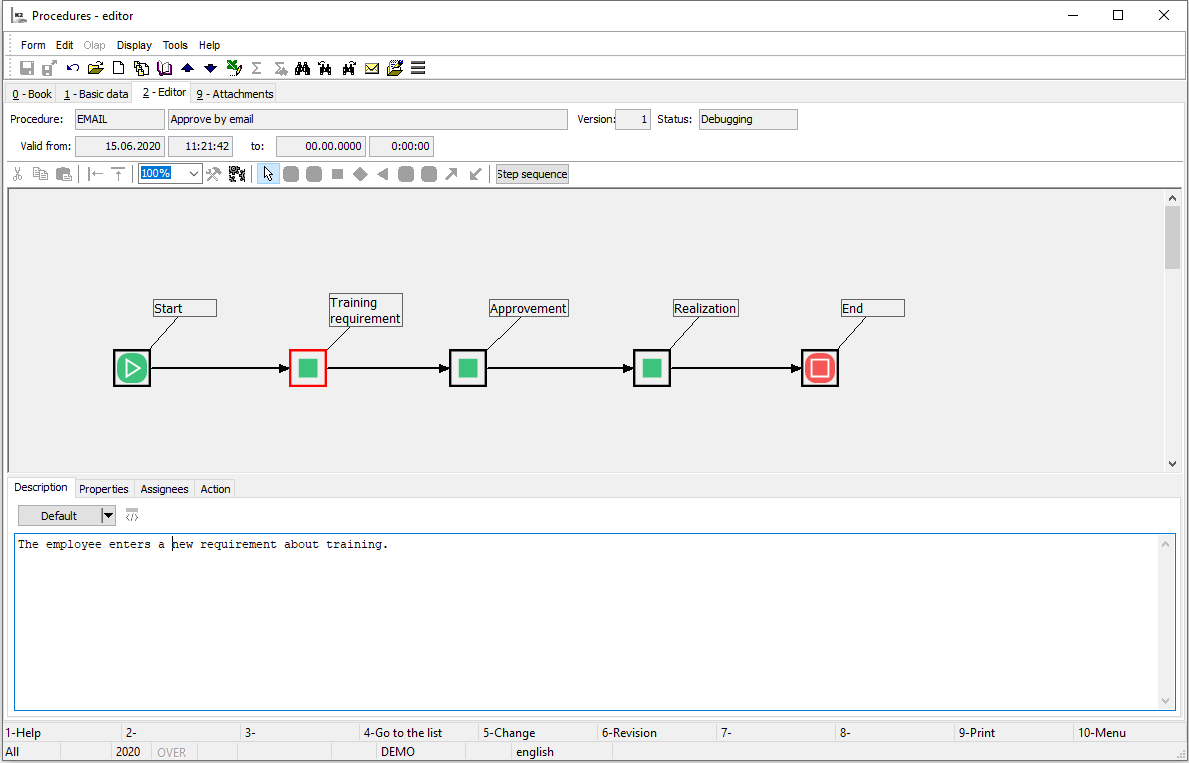
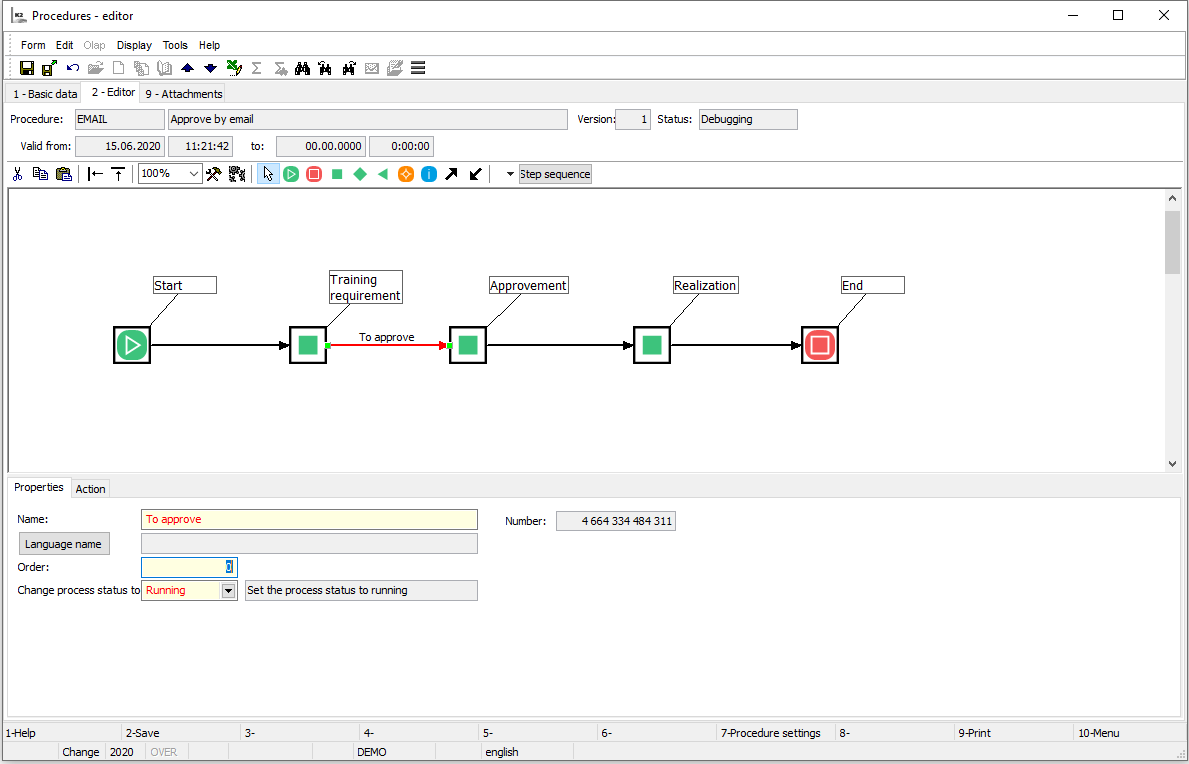
Versioned Procedures - Editor (page 2)
On page 2 of Versioned procedures book procedure chart is defined.
Chart is created from individual procedure steps (chart junctions) which are connected with arrows. All together they show procedure flow.
More data (in tabs Description, Properties, Variables, Actions, etc...) can be added to chart procedures and objects (arrows and junctions). These define other conditions for procedure flow and refine procedure functionality.
Picture: Versioned Procedures - page 2 Page chapter).
Use left mouse button to highlight step or arrow in the chart. Object will be framed in red colour. Combination Ctrl+Shift+left mouse button should be used to highlight in red more components at the same time. Based on chosen object information related to the object are displayed in tabs below chart.
- If no object (step nor arrow) is highlighted then information related to the whole procedure are entered or displayed.
- Description - here it's possible to write text description of the whole procedure. Description is displayed in process which originated from procedure.
- Properties - general information related to procedure and also data which are later entered to Properties tab of individual procedure steps are entered in properties. They are valid for all newly created steps.
- Variables - are used for variables settings in procedure. Variable then gets various process values: dates, numbers, text, logical.
- Action - is used for script and parameters entry (actions which are to be done at certain time).
- If step is highlighted in tabs we enter or display information to chosen step:
- Description - text description of step which can be displayed when step is worked on.
- Properties - in properties we enter identification and time data of step.
- Assignees - roles which should solve given step as well as deputy regime are entered here.
- Action - for each step event parameters or scripts with its parameters can be entered. These parameters and scripts can set up and calculate variables' values in processes, do actions with K2 products, ...
- If arrow is highlighted we enter or display information related to highlighted arrow:
- Properties - arrow properties.
- Action - for Entry event parameters and scripts according to which it's evaluated if we can go through the arrow can be entered.
|
|
|
Chart defines process flow (path).
Junction can be placed in the chart by highlighting desired tool bar icon by left mouse button (icon becomes active) and then we place it by pressing left mouse button to the chart area.
Chart properties:
- Each procedure must begin with only one step of Start type and end with one step of End type. These steps are placed in the chart already at process creation. User can rename or move them.
- Individual steps must be connected with arrow Link. Arrow type Link is executed during process run if step from which the arrow leads is confirmed. Arrow type Back Link is executed during process if step from which the arrow leads is rejected.
- Step types Transformation, Decision and Distribution are equal in regards to processing. These step types must be connected with arrow at both entry and exit points.
- Step types For attention and Check Point are complementary (they are created at the time but have no impact on further progress of the whole process). No arrows can lead from these steps and process is still considered consistent.
- Graphic design of the process can be changed e.g. individual chart objects can be moved.
Connection of two junctions with arrow:
- Arrow type is chosen from tool bar above chart by pressing left mouse button on arrow icon,
- we press left mouse button at junction from which the arrow should lead and then move cursor with pressed button to junction to which the arrow should lead,
- we release mouse button.
All chart junctions can be moved by pressing left mouse button at junction and dragging it.
Highlighted arrow can be reconnected from one junction to another by dragging it with pressed left mouse button at arrow start or end point.

Picture: Versioned Procedures - page 2 Page chapter).
Buttons Description:
|
Cut |
Chosen objects are cut from charts and inserted to clipboard. |
|
Copy |
Chosen objects are copied to clipboard. |
|
Insert |
Objects from clipboard are inserted to chart. |
|
Align left |
Chosen objects are aligned left (into one column). |
|
Top align |
Chosen objects are top aligned (in one row). |
100% |
Display scale |
Change of chart size (in %). |
|
Chart settings |
Chart setting options. (For more details please see picture and fields' description below.) |
|
Consistency test |
By hitting this icon form with test result appears to show if displayed chart is consistent. Program automatically verifies if procedure starts and ends with correct step type and whether steps are connected. |
|
Object selection |
When this icon is highlighted we can select and moveobjects within the chart . We cannot insert them to chart. |
|
Start |
Step type Start - mandatory step, identifies start of process run; each versioned procedure has only one of these junctions. |
|
End |
Step type End - mandatory step, identifies end of process run; each versioned procedure has only one of these junctions. |
|
Transformation Decision Distribution |
Process steps, which functions are identical, must be connected with Link arrow. |
|
Nested procedure |
Step type Nested procedure - process step which allows to insert (nest) one versioned procedure to another. |
|
Check point |
Checkpoint type step - this is step independent of the process run. It doesn't continue to another junction, has no output. (For example: Process reached some important point which certain person wants to check - characteristic is added to check point.) |
|
For attention |
Step type For attention - is used to inform users. Similar like with Check Point, it has no influence on process run. (For example it informs that process has reached to this step or that certain step has been approved in the process.) |
|
Link |
Forward Arrow - process continues to another junction. |
|
Back link |
Back Arrow - can lead to different (earlier) process junction or to step type End. |
|
Binding shape |
Button appears next to Back Link icon if arrow in chart is highlighted. Arrow shape can be selected here:
|
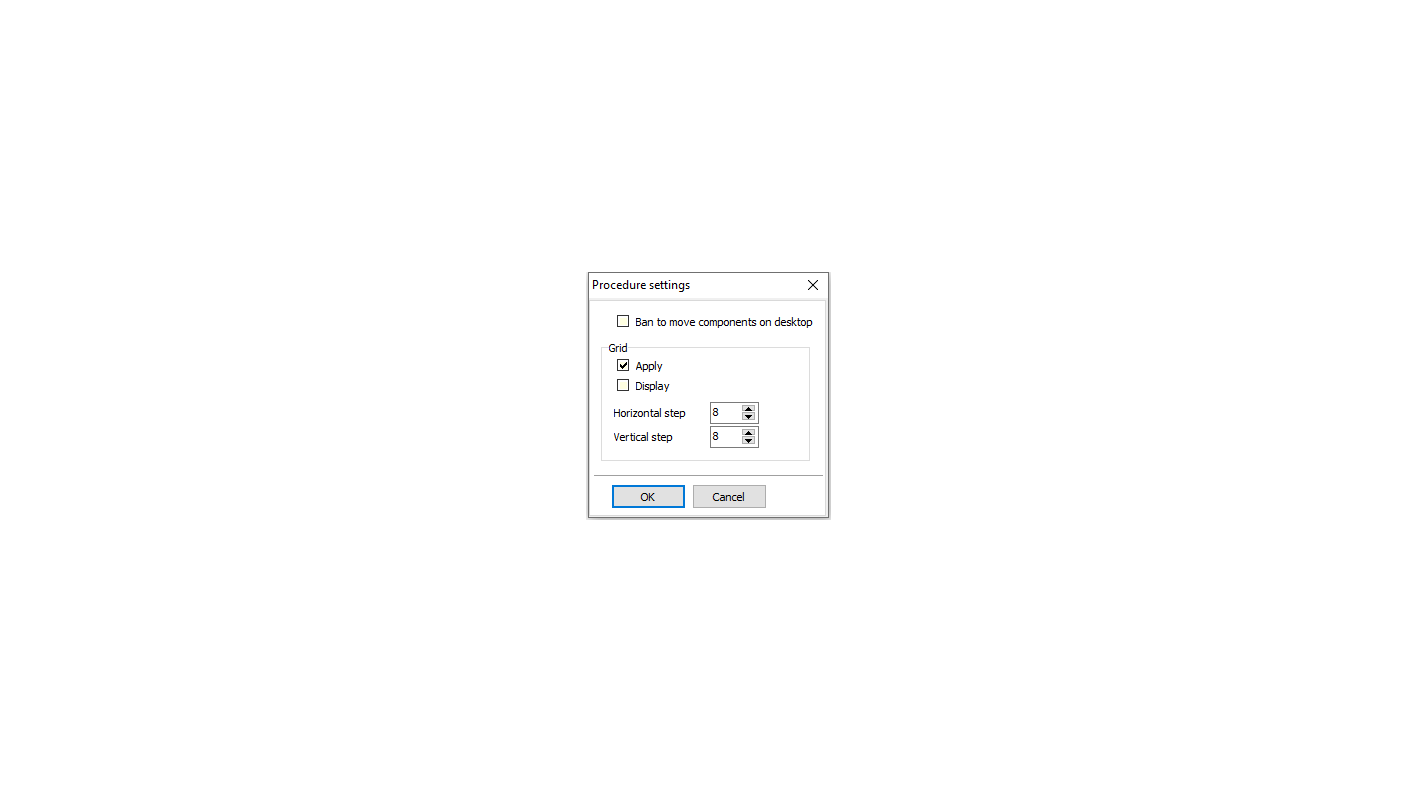
Picture: Versioned procedures - page 2 - Chart settings
Description of Fields:
Grid |
|
|
|
Use |
If this field is checked chart objects are automatically attached to grid. Grid |
|
Display |
By checking this field grid is displayed. |
|
Horizontal step |
Entered number defines pitch between horizontal grid points. |
|
Vertical step |
Entered number defines pitch between vertical grid points. |
Visible descriptions |
When checked Names of chart steps are displayed. |
|
Framing of descriptions |
If checked Names of charts are displayed in frames. |
|
Framing of junctions |
If checked chart junctions are in frames. |
|
Font |
When this button is pressed form to choose font type to describe chart objects is displayed. |
|
Disable desktop components shift |
If this field is checked it’s not allowed to shift chart objects. |
|
Order of steps button
By pressing this button form where individual steps are sorted is displayed. User can then sort steps in chronological order. This can be done with buttons or via function "Drag and drop”. User can also enter steps to different levels based on how he/she wants to number the steps in reports.
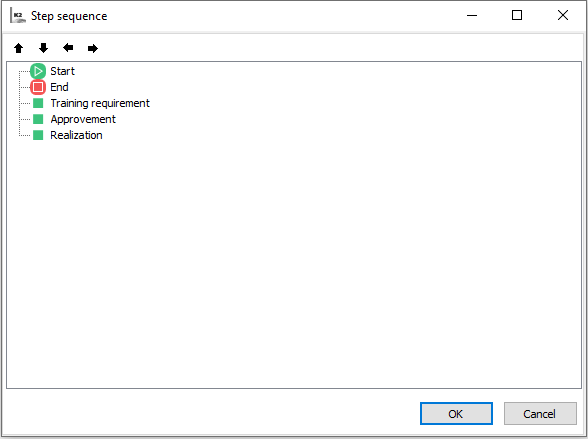
Picture: Order of steps form
Based on how user sorts the steps here they’ll then be displayed in Procedure report or in Guidelines.
|
|
|
Description of procedure or step can be entered under tab Description.
- If no object is selected description applies to the whole procedure.
- If step is selected then it’s only description of the step.
Descriptions are accessible either in Book of steps (for each step) or in Book of processes. Descriptions are also displayed in procedure reports.
Descriptions can be locally assigned by Language description button (see User parameters - Language).
Picture: Versioned procedures - page 2 - Description tab
|
|
|
In this tab we enter or display properties of procedure, step or arrow. If we want to enter procedure properties we have to click anywhere to chart area, apart from step and arrow. If we want to enter step or arrow properties desired object must be highlighted in the chart.
Procedure properties
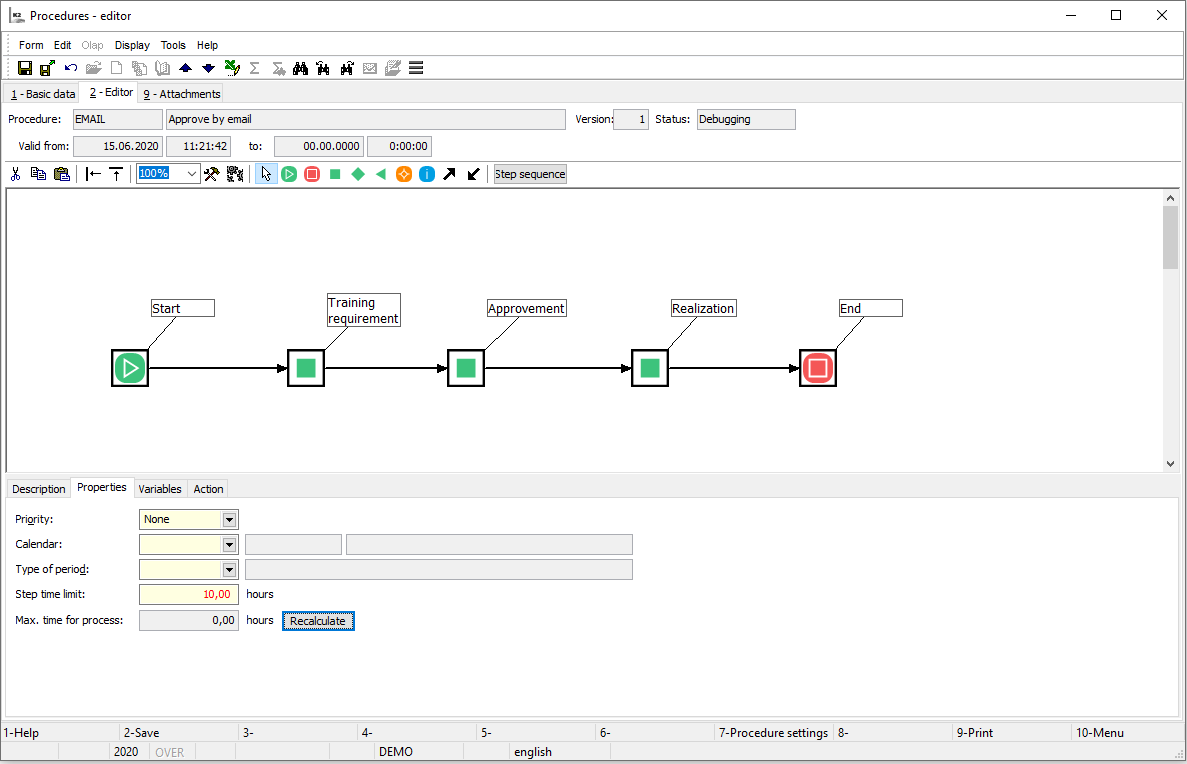
Picture: Procedure properties tab (without step highlighting)
Description of Fields:
Priority |
Each step has its Priority which determines priority of specific procedure. In specific procedure we can then change the priority. Procedure priority is also entered as default value for steps, see below. |
Calendar |
Field, which is entered as default value for steps, see below. |
Interval type |
Field, which is entered as default value for steps, see below. |
Maximum time for process |
Field which shows maximum time of the process run. It's calculated from step values in field Time to complete step and its calculation is based on ‘Longest path through chart’ system (logic). System ignores back arrows and steps forwarding among users during calculation. If user changes time values for steps field is recalculated after procedure is saved or button Recalculate pressed. |
Recalculate |
When this button is pressed so called ‘Longest path through chart’ is recalculated. Value in field Maximum time for process is recalculated according to current values entered in field Time to complete step in individual steps. In procedure chart this ‘Longest path’ is displayed by highlighting junctions and arrows with green colour. |
Time to complete step |
Field, which is entered as default value for steps, see below. |
Fields Priority, Calendar, Interval type and Time to complete step are entered as default values for steps here. Each newly created step will then have these values filled in the fields under tab Properties. If values in these fields will be changed and procedure will have some steps already created, system will ask if changed value should also be updated in already created steps. If "Yes” is entered value is changed in all steps and will be valid also for all newly created steps. If "No” is entered new value will only be valid for newly created steps.
Step properties
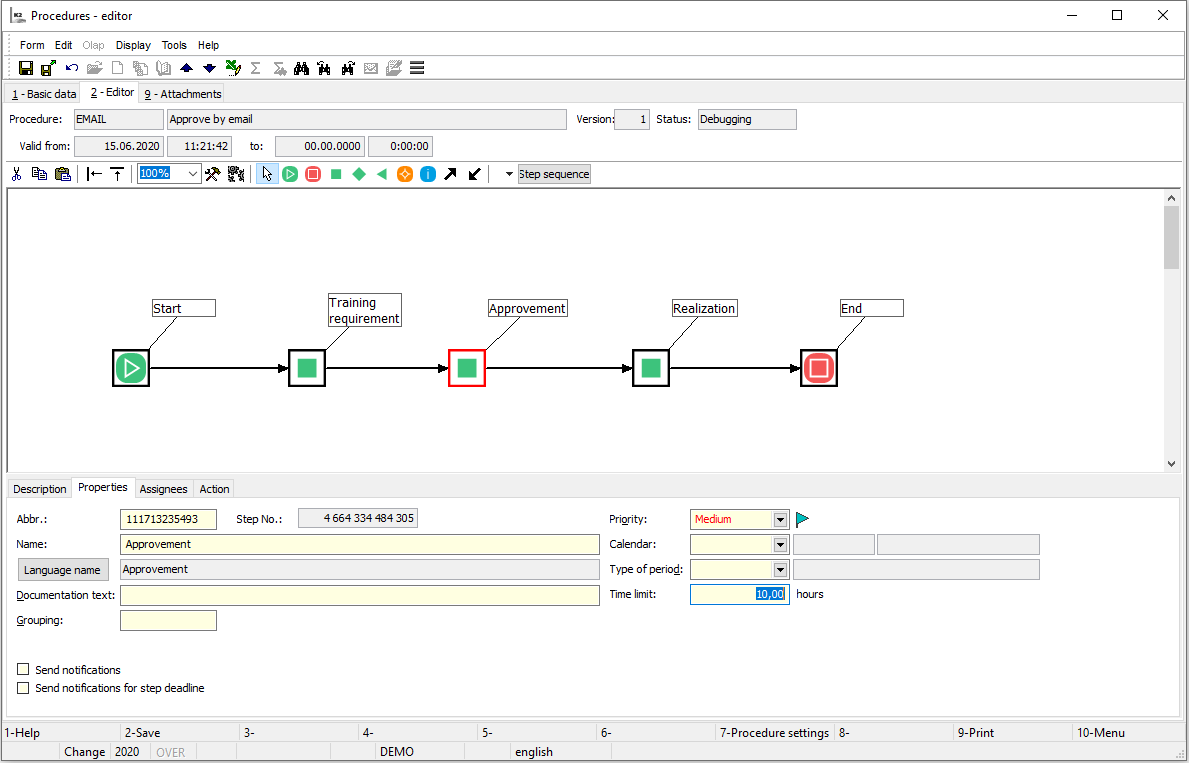
Picture: Properties tab after step is highlighted
Description of Fields:
Abbreviation |
Step abbreviation. It’s pre-defined, can be changed, must be unique within suggested procedure. |
Name |
Name of step. This name will also be displayed in chart at step. |
Language Name |
It allows to enter Name of step in other languages (see User parameters - Language). |
Documentation text |
Text you want to show at step when printing reports Procedure and Guidelines. |
Grouping |
It allows user to include the step in group of steps (see below Grouping of steps). |
Priority |
Step priority is entered. Field is pre-filled according to Priority defined in procedure. User can sort steps according to defined priority in book Work steps/For processing (priority is displayed on page zero in Pt column with flag symbols of various colours - see Work Steps - Book). |
Calendar |
Calendar is entered here - according to this calendar, which defines work shift of users, deadline till when user should process with step will be calculated. Field is pre-filled according to Calendar defined in procedure. Calendar set up see below "Deadline set up” |
Interval type |
Interval type, which specifies value in Calendar field, is entered here. Field is pre-filled according to Interval type defined in procedure. Same interval type must be entered like in field Calendar in used calendar item. |
Time to complete |
Deadline till when user should complete step (approve, forward, reject) is calculated according to Time to complete step. Deadline is displayed in Process step in field Deadline. Field is pre-filled according to Interval type defined in procedure. Deadline to complete step takes into account also values entered in fields Calendar and Interval type. |
Send notifications for new step |
By checking this option notifications will be sent to users when new process step will be created. |
Send notifications related to step completion deadline |
By checking this option notifications will be sent to users when new process step will be created. |
Deadline set up
For correct calculation of deadline to complete the step by users it’s necessary to correctly set up Calendar and Interval type. In these fields we define work time for users (employees), i.e. working hours during which they are at work. Time to complete step is then calculated only in these hours. Calendar must have specific work time set up for users, see picture.
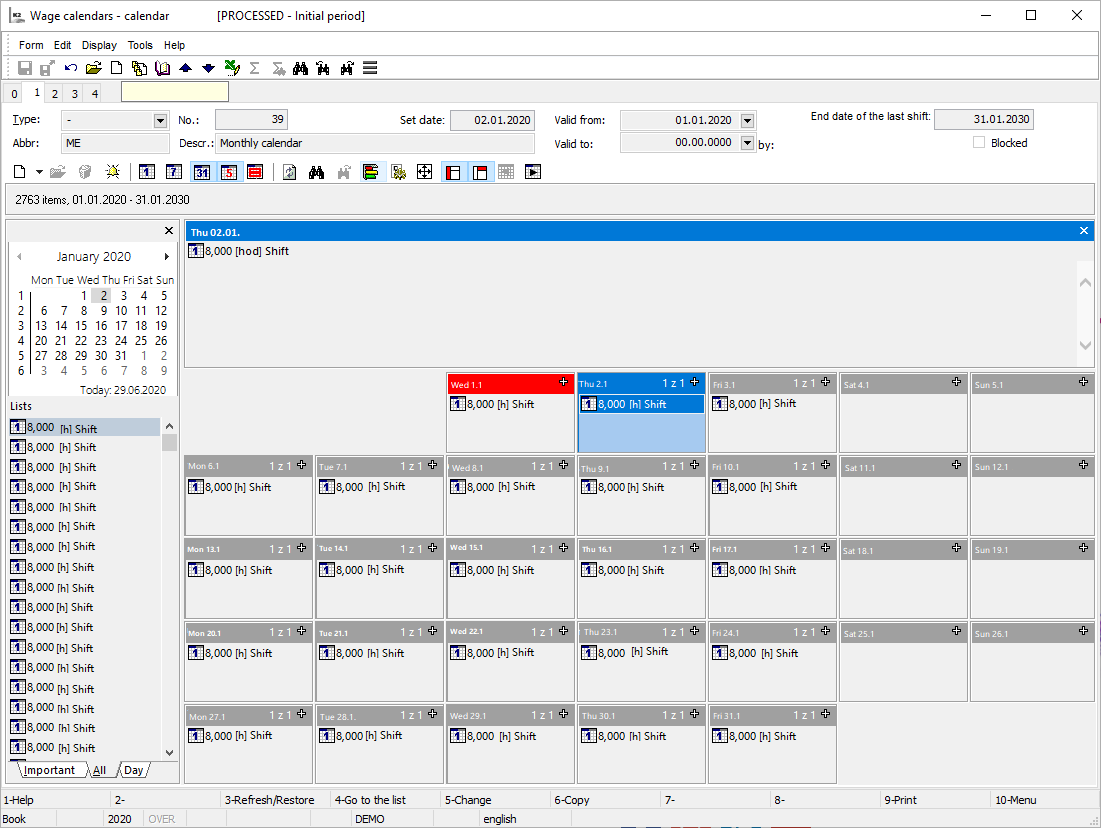
Picture: Payroll calendar, calendar set up
In the picture we can see that calendar "HOD 7,5” has working time set up to 8.00a.m.-4:00p.m. In case we use this calendar in step then step assignees, whose time to complete is being counted down, should have this working time. Time to complete is counted down till 4.00 p.m. first day and continues from 8.00a.m. the next day. These working hours are entered e.g. on page 2 of Payroll calendar book. Same Interval type which was used in procedure step must be entered also in this item.
Arrow properties
When setting arrow properties we decide what status should process change to when passing through arrow (No change, Suspended, ...).
When creating arrow there is behaviour set up under tab Properties and there is No change entered in field Change Process Status to.
Picture: Arrow properties form open in Properties tab window after arrow is highlighted
Arrow can have following properties defined:
Name |
Arrow name - text shown in chart next to arrow. |
Order |
It determines in what order were arrows leading from one junction created and in what order they’ll be served. |
Change process status to |
Here we can influence process status. This can be used for decision making about nested procedure steps or to display process status. Here we can see current process status or get info if process ended with approval or rejection. If process gets through the arrow process status is changed to:
|
Arrow property is also its shape, see icon![]() Icon description - Chart.
Icon description - Chart.
Grouping of steps
Grouping of steps allows user to link more procedure steps in one group. Following step then considers the grouping to be one unit (step). Step grouping is used if people in a step with the same (or similar) task cannot see each other's values for their variables. Therefore they cannot be added to role at one step. Step must be approved by each of them separately and the next step can only be created when all steps in group are approved.
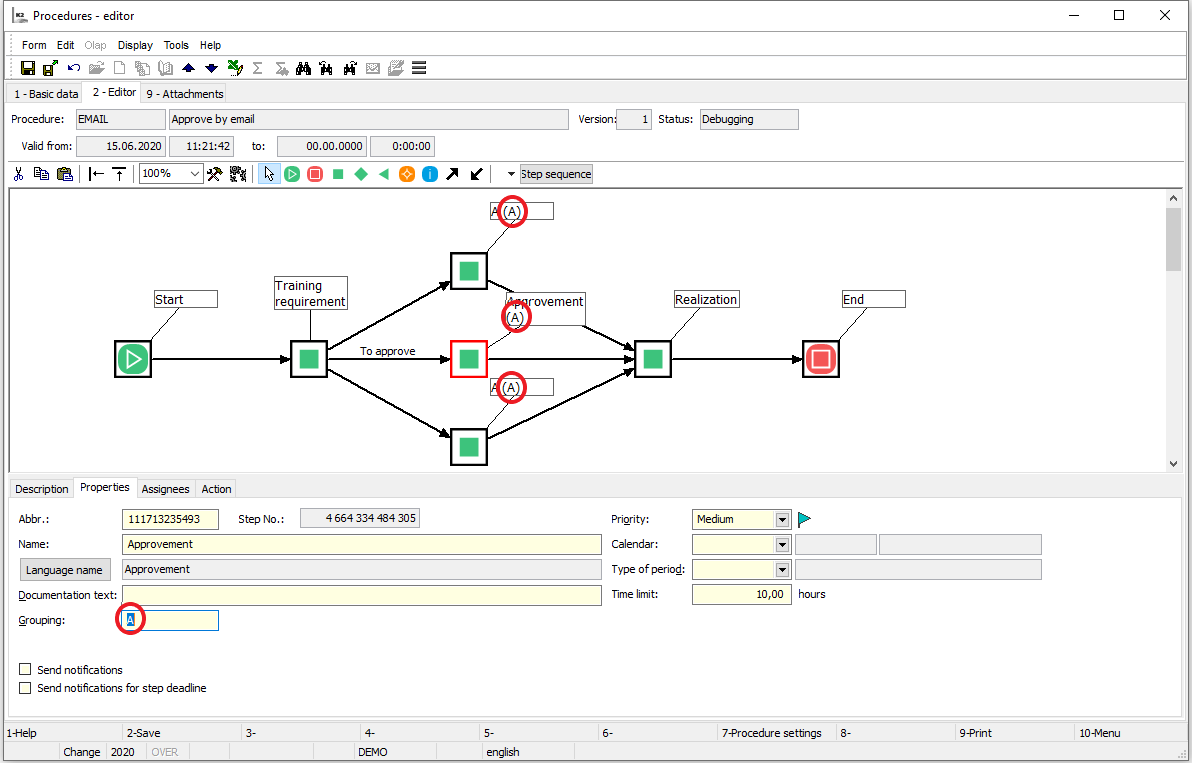
Picture: Versioned Procedures - Editor- page 2- Grouping of steps
Creation of Steps grouping
Step can be included in grouping after it’s marked in Properties tab. This can be done by entering one digit number or letter in field Grouping - so called Marking of grouping. This marking must be equal for all steps which we want to include in one grouping. In chart marking of grouping is visible next to step name. It's letter or number of grouping shown in brackets.
Back link arrow must lead from each step in group. Step is cancelled for all persons at steps in grouping when step is rejected by one user and new step is created to which leads Back link arrow.
Example of use:
Persons assigned to steps "Production Cost Centre”, "Sales Cost Centre” and "Purchasing Cost Centre” (further as "Cost Centre Managers”) should approve revenue which have been sent to each "Cost Centre Manager” by person assigned to step „Enter revenue and submit for Approval Step with name "Revenue approved” cannot be created until all "Cost Centre Managers” approve their steps. Steps "Production Cost Centre”, "Sales Cost Centre” and "Purchasing Cost Centre” have then been included in Grouping "A”. If all steps in this grouping will be approved, step with name “Revenue approved” will be created. If any person from grouping "A” rejects the step, process will be returned back to step „Enter revenue and submit for Approval When step „Enter revenue and submit for approval“ is processed again, new steps will also be created for all persons in grouping.
Note: If person at step "Production Cost Centre” rejected the step before persons at steps “Sales Cost Centre” and “Purchasing Cost Centre” approved their steps, then these steps will be cancelled for them. If however they already managed to approve their steps, they’ll not be cancelled by rejection of another user in the grouping of steps.
|
|
|
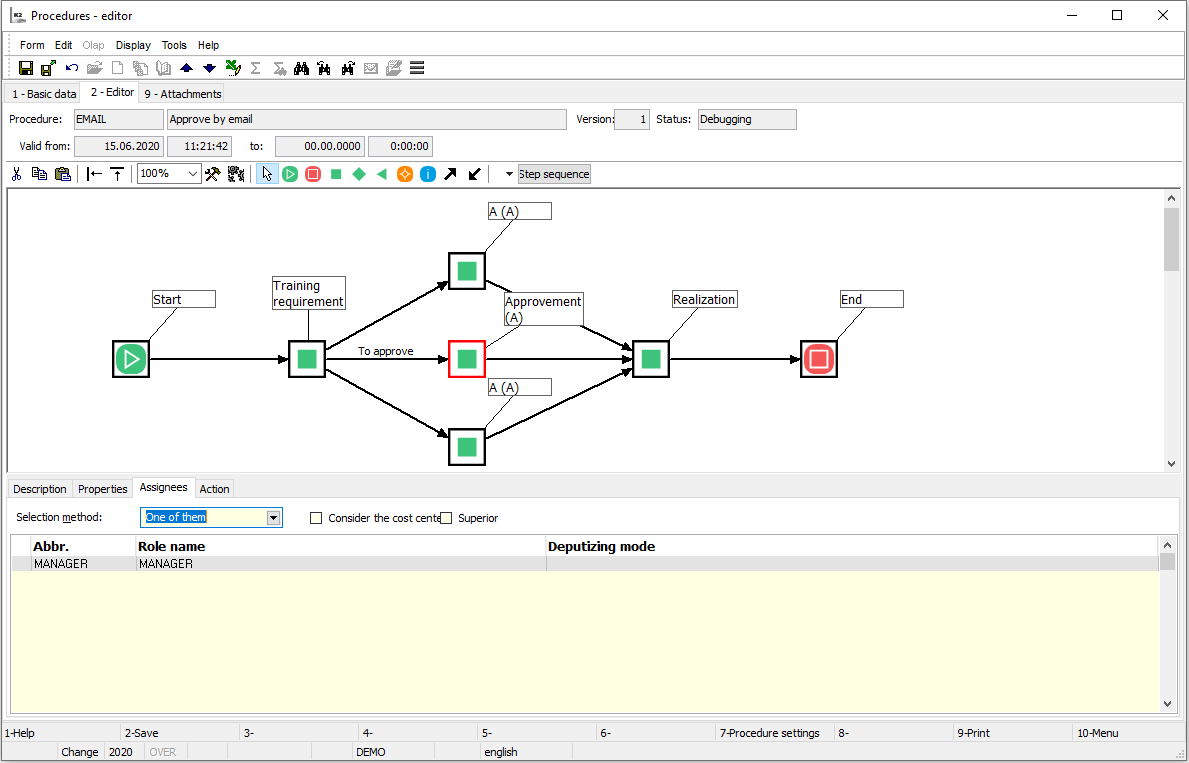
In Assignees tab we enter roles which should process given step. It’s also defined here how the step assignee should be chosen (field Selection method). Set of all contact persons assigned to roles is displayed to user to choose assignees of specific step. From this set of assignees user then chooses step assignee for specific process.
Picture: Versioned Procedures - Editor - page 2 - Assignees
Description of Fields:
Selection method |
Selected method defines how and for whom the step will be created. Default entry is All. |
|
|
One of them |
Step is created for all owners in the Role acceptance of a step by one of these solvers is canceled by the remaining given step. (If one of the assignees proceeds with different event than Reading, step is cancelled for all the others.) |
|
One of selected by user from |
Contact persons list is displayed to user which is about to complete the step and before new step is created from which the user can:
|
|
All |
Step is created for all owners in the Role. All the persons must approve the step. Event Approval is actioned when the last person in role approves the step. In case of Rejection it's enough when one assignee rejects, step is then cancelled for all the others. |
|
All selected by user |
Option to choose contact persons is displayed to user which is just about to complete the step and before new step is created. Step is then created only for selected persons. Further it's then proceeded according to selection All. |
Take cost centre into account |
There is condition to link workflow to organisational structure. If a structure according to job positions is defined in the organizational structure, the tree from this structure will be respected and the corresponding step will be displayed to the solvers from the given branch. |
|
Superior |
There is condition to link workflow to organisational structure. If a structure according to job positions is defined in the organizational structure, the tree from this structure will be respected and the corresponding step will be displayed to the solvers from the given branch. |
|
Roles |
Step assignee from Role book is chosen here. Persons included in these roles can be chosen to solve this step. |
|
Role deputy - Regime |
Regime of role deputy based on which other persons can deputize persons included in roles and shown in Role field. Deputizing description - see Deputizing. |
|
|
|
|
Deputizing is used when assignee is absent (i.e. has active Absence) and the step needs to be solved by another person.
Role deputy regime is set up fro individual Roles in form Step Assignee:
- "Not set up” - deputizing is not active.
- "Manager” - direct manager deputizes according to organizational structure.
- "According to role” - when this regime is chosen we enter manually which Roles can deputize. All persons included in Roles to deputize can substitute the assignee.
- "According to organizational structure” - assignee is deputized by person which in Organizational structure is set in Organizational unit under tab Deputies.
When deputizing in regimes "Manager” and "According to role” option Take cost centre into account can be activated - in this case only persons, which have the same cost center in organizational structure as assignee does, can deputize.
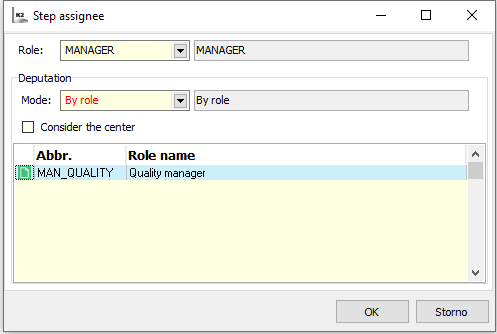
Picture: Deputizing "According to role” set up
All deputies have specific steps displayed in books Steps and For processing. In these books deputies can change assignee by starting operation Deputize (assign the step to themselves) ans start working on the step.
Step resolution can also be transferred to deputy by operation Forward. Option to transfer steps in specific process have following persons:
- all step assignees (for which the step was created),
- all deputies,
- users with right to administrate workflow processes.
It’s possible to transfer steps not only to deputies, but also to other step assignees (or back to the original ones).
|
|
|
Variables allow users to add more values when working with process. This is how the data structure of the process can be broadened (e.g. thanks to the variable we can force users to enter cost center which should approve the invoice or enter start and end date of vacation period, ...) .
With variables we work especially when using parameters in tab Action. Variables which are entered here are created in book Definition of Variables and from this book are then being chosen.
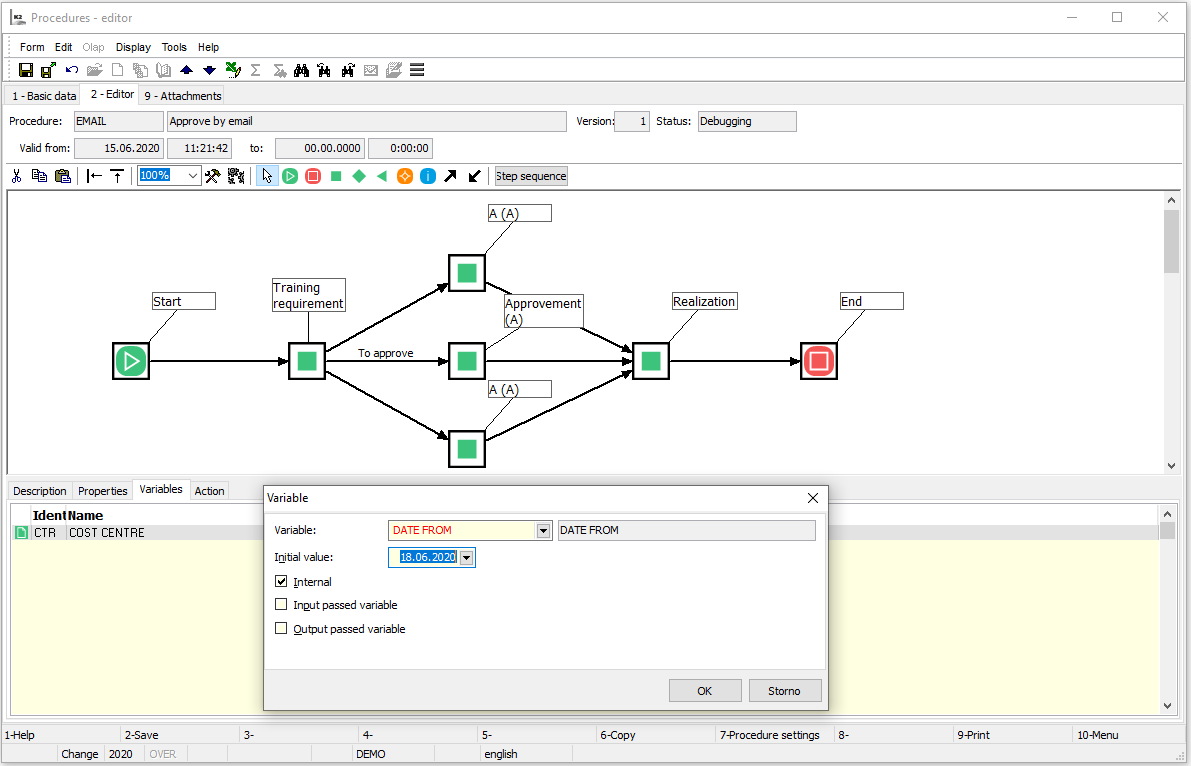
If we want to set up further properties for variable, which will be related only to this procedure, it can be done under tab Variables. Tab will be displayed if no step in chart is highlighted. So we enter variables for the whole process and we use these variables in the steps. Variables can be entered here by pressing Ins key.
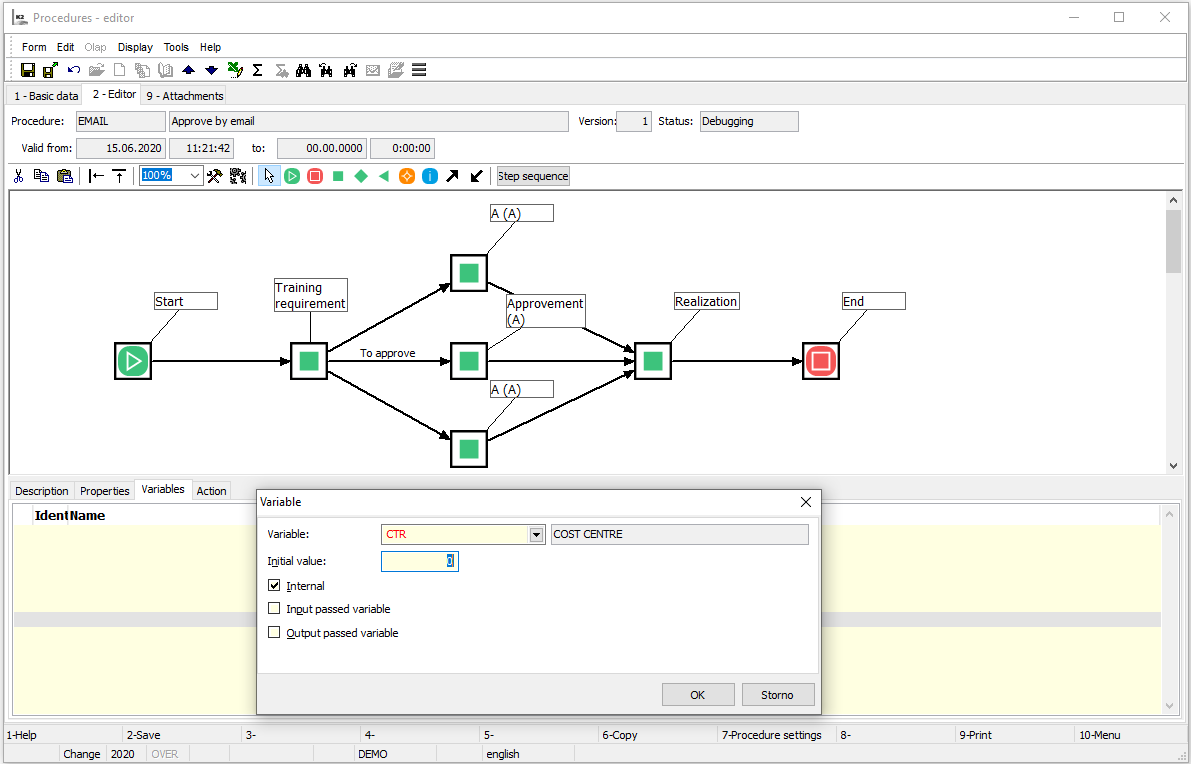
Picture: Form Procedure variable - Versioned procedures - Page 2 - tab Variables
Description of Fields:
Variable |
Variable from Definition of Variables book is chosen to this field. |
Start value |
Here we can enter Value which will be automatically saved to Variable when new process is formed. User can rewrite the value in the process. |
Internal variable |
If Procedure variable is marked as Internal, it will not be displayed in book Steps after pressing Shift+F8. Variable not marked as Internal will be displayed with its current value after pressing these buttons. |
Passed entry variable |
If there When this field is checked and if the same Variable exists insubordinate (subprocess) or superior process, values of this variable will be passed on. Example: There’s a process with step “A“ and variable value “5“. In following subprocess there’s step “B“ with the same variable and with checked field Passed entry variable. To the value of this variable value “5“ from step “A“ is entered. |
Passed exit variable |
When this field is checked values of the same Variable will also be passed back when exiting from subordinate to superior process or vice versa. Example: Step “A“ and variable value “5“ exist in subprocess. In following subprocess there’s step “B“ with the same variable and with checked field Passed entry variable. in step “A“ this variable will also be rewritten to value “6“. |
Source variable |
This field is displayed only when Variables are chosen and option Calculated is ticked. This variable is chosen from Definition of Variables book. Value of source variable is considered in calculated variable (see below). |
Calculated variables
If variable with ticked option Calculated (on page 1 of Definition of Variables book) is your chosen variable then it can be picked by source variable. Source variable replaces calculated variable. Doing so we can achieve that different values can be monitored at the same variable.
Example: We have procedures “A“ and “B“. To make decision in procedure “A“ we are interested in cost centre (variable STR); in procedure “B“ we want to monitor variable DNU_PL:
- In procedure “A“ we enter variable STR to calculated variable HODN1. In procedure “B“ variable DNU_PL.
- If variable HODN1 is displayed at book of steps or book of processes then at processes “A1“, “A2“, “A3“ etc. (which originated from procedure “A“) cost centre (variable value STR) will be displayed in variable HODN1; in processes “B1“, “B2“ etc. variable value will be DNU_PL. Various information (variables which help to inform or decide) can be reflected in calculated variable for different processes.
Picture: Form Procedure variable - Versioned procedures - page 2 - tab Variables
|
|
|
Actions arise in process when steps are worked on by users. Whole process run is driven by these actions.
User or system actions exist.
- User actions are initiated by users themselves by doing certain operation at process step in book Work Steps:
- when step is created event Creation is recorded,
- if user opens the step, event Reading is created,
- if user accepts the step he/she agrees to solve the step, event Acceptance is created,
- if step is forwarded to deputy, event Forwarding is created,
- when approved, event Approval is created,
- when rejected, event Rejection is created.
- System actions are done by the system and are initiated after some user event:
- when step is created event Entry is recorded,
- if step is terminated (i.e. approved or rejected), action Exit is created. If step is addressed for more users event action is completed only when the last user approves the step. If however any from the users rejects the step, action continues further without pending other users’ response,
- Monitoring actions are used to evaluate scripts.
By entering parameters or scripts for the actions we can manage and control the process better as well as determine which direction the process will go (by entering or calculating values of its variables), find out current status of the process or whether process or its individual steps meet time schedule.
Parameters and scripts, entered in actions, are later at certain actions during process run initiated.
- If user approves or rejects the step when reading, action Acceptance is also automatically created. Parameters and scripts entered in action Acceptance are initiated and only then scripts and parameters entered in action Approval, Rejection and Exit are initiated.
- If step is addressed for more users which of everyone must approve it, action Approval is created only when last user approves the step.
- If any of the users rejects the step, there’s no need to wait for other users reaction and action Rejection (or Exit event) is created.
At processes Status change of process is recorded via actions, at steps History of step actions is recorded (in Process book).
New event is entered with Ins button under Action tab.
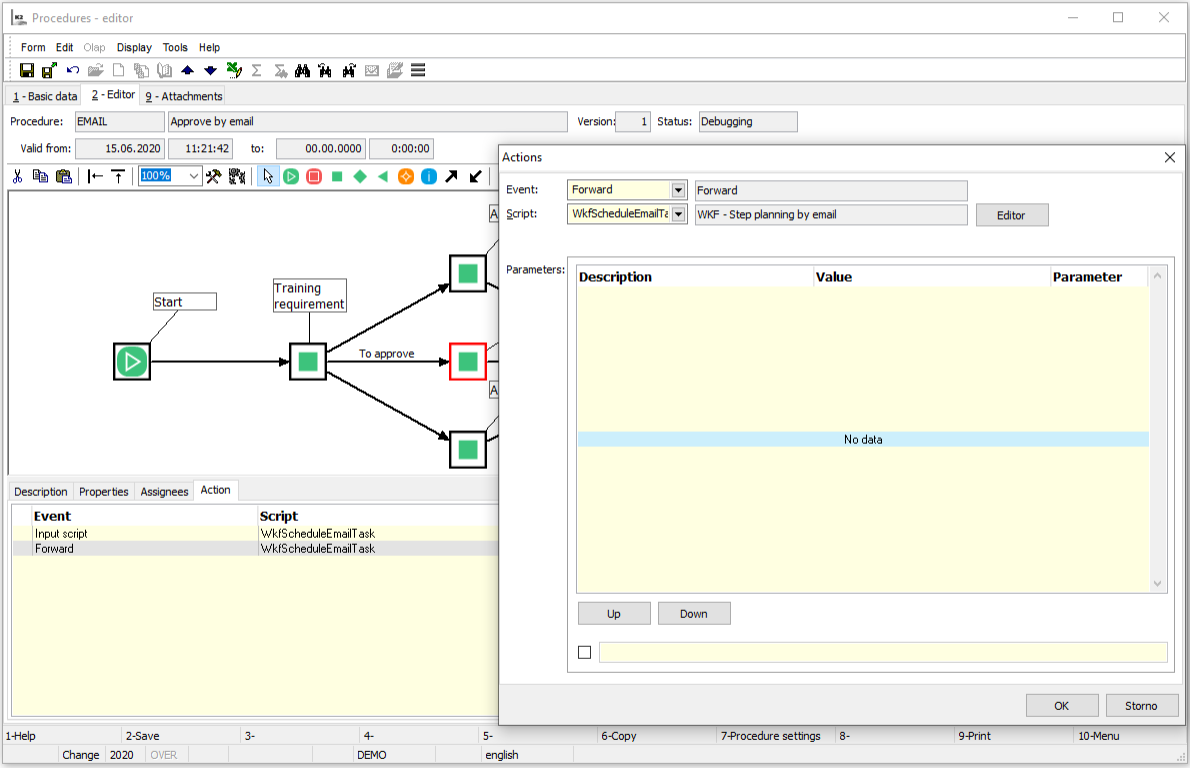
Picture: Form Versioned procedures - basic info - Page 2 - tab Action
Description of Fields:
Action |
Here events are set up at which Scripts should be initiated or Parameters operated. Procedure has Entry as default event set up and this cannot be changed. Arrow has event Entry set up and it cannot be changed. Steps have several events pre-set, see description below. |
Script |
Here we can choose Script which will be initiated at action entered in field Event. Script description - see Scripts. Parameters which will be used and evaluated by the script can be entered in field Parameters. |
Editor |
If Script is chosen text editor with script content is displayed after clicking on this field . |
Parameters |
It is used to enter Parameters which will be operated at given event. Description of parameters - see Parameters. If we entered script and to the same event we also want to add parameters, which however don’t belong to the script, these parameters must be added in the next step (procedure) item. |
Up |
When more parameters are entered, highlighted parameter might be shifted up in the list. |
Down |
When more parameters are entered highlighted parameter might be shifted down in the list. |
|
By checking this field frame on the side becomes active and with programming language it’s possible to add or change functionality of existing parameters here. |
Procedure action
If no object is highlighted in chart, Procedure (process) actions are being created. Only Entry action can be entered as procedure action. It’s initiated when newly created process is saved for the first time.
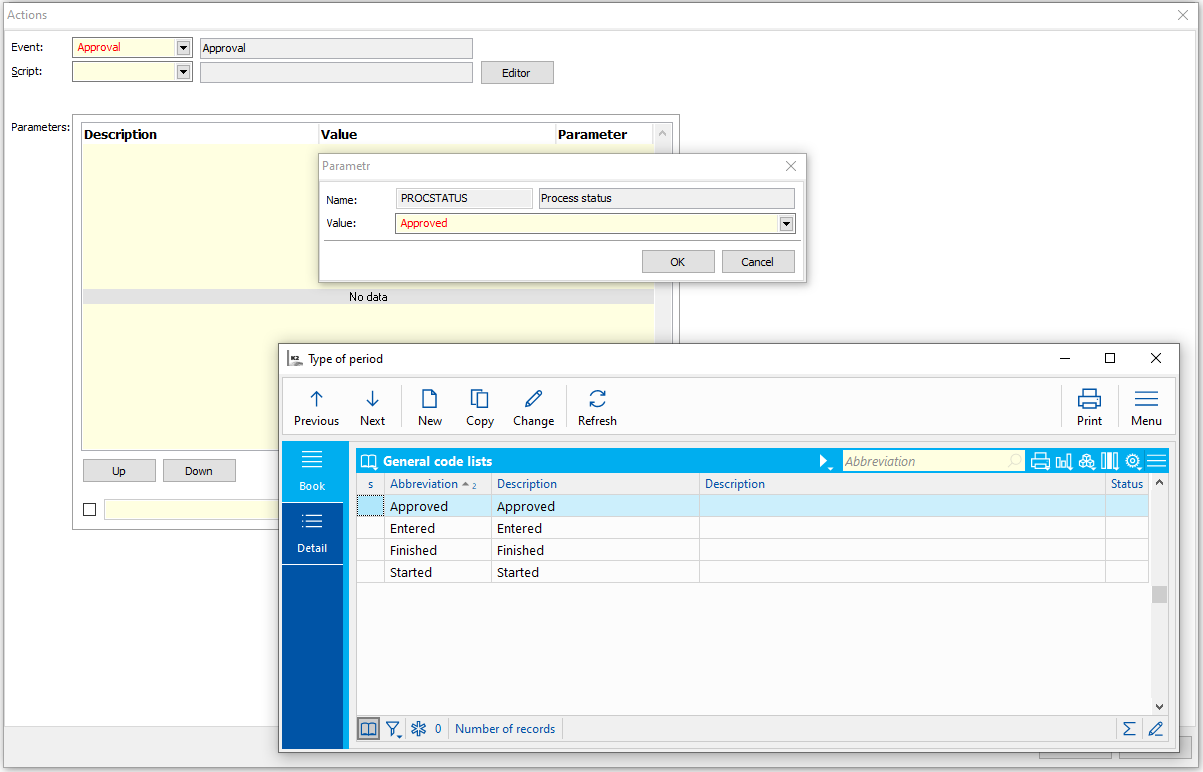
Picture: Form Action in procedure with open menu for field Value at parameter ProcStatus
Object action
If object in chart is highlighted, Action for this object (step or arrow) is created.

Picture: Form Action in procedure step with open menu for field Event.
Description of step actions:
Form |
Script or parameter is initiated when action Form is entered and step detail in book Steps is initiated (display of form Work step). |
Approval |
Script or parameter is initiated when action Approval is entered and step approved by the user (if addressed to more users for approval then all of them must approve). |
Forwarding |
Script or parameter is initiated when action Forwarding is entered and step forwarded to deputy by user. It’s initiated also at Deputizing by user. |
Reading |
Script or parameter is initiated when action Reading is entered and step is read by user. This event happens if user opens step detail (in book Work Steps). |
Acceptance |
Script or parameter is initiated when event Acceptance is entered and step is accepted by user. By accepting user agrees to solve given step. If step should be solved by only one from given Role (see book Versioned procedures, tab Properties), step is cancelled for the others. |
Monitoring |
It is used to evaluate process, it initiates evaluating scripts. When this action is entered field allowing you to enter Type is displayed. Type is user codebook and here we can e.g. enter what should be monitored in evaluation. |
Entry |
Script or parameter is initiated when action Entry is entered. |
Exit |
Script or parameter is initiated when action Exit is entered and step is finished (approved or rejected). |
Rejection |
Script or parameter is initiated when action Rejection is entered and step is rejected by user. If step is addressed to more users, scripts and parameters are initiated already when one of the users rejects. |
Scripts and parameters:
By entering parameters or scripts to At action we define that some other activities are to be executed during this action. This is how we can further manage process run, e.g.:
- influence choice of contact persons for which step will be created,
- set up status of the process,
- calculate value of process and step Variables and work with them,
- insert Product, Document,
- work with product values.
More detailed scripts and parameters description, see Skripts workflow and Parameters workflow.
|
|
|
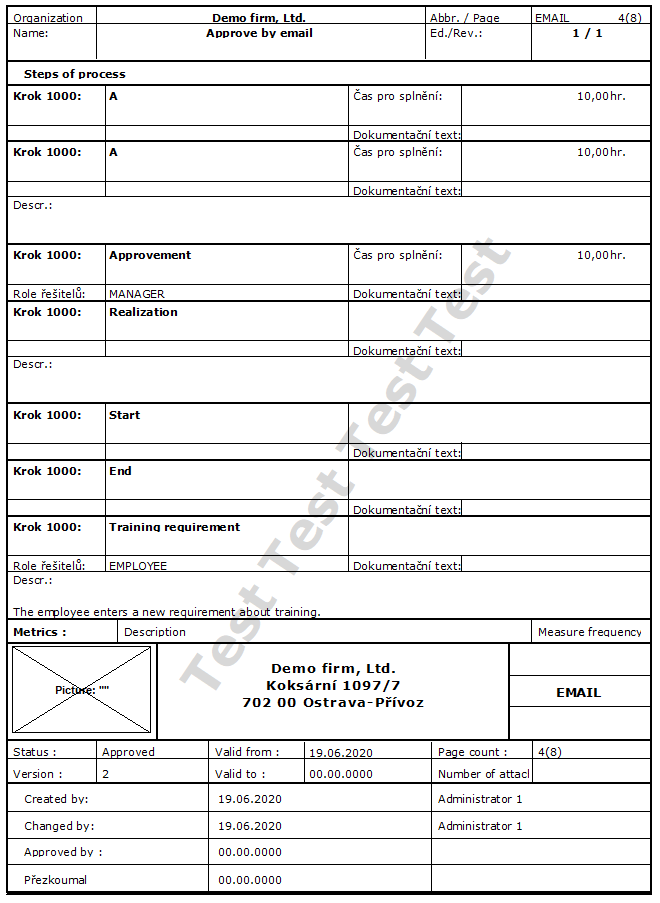
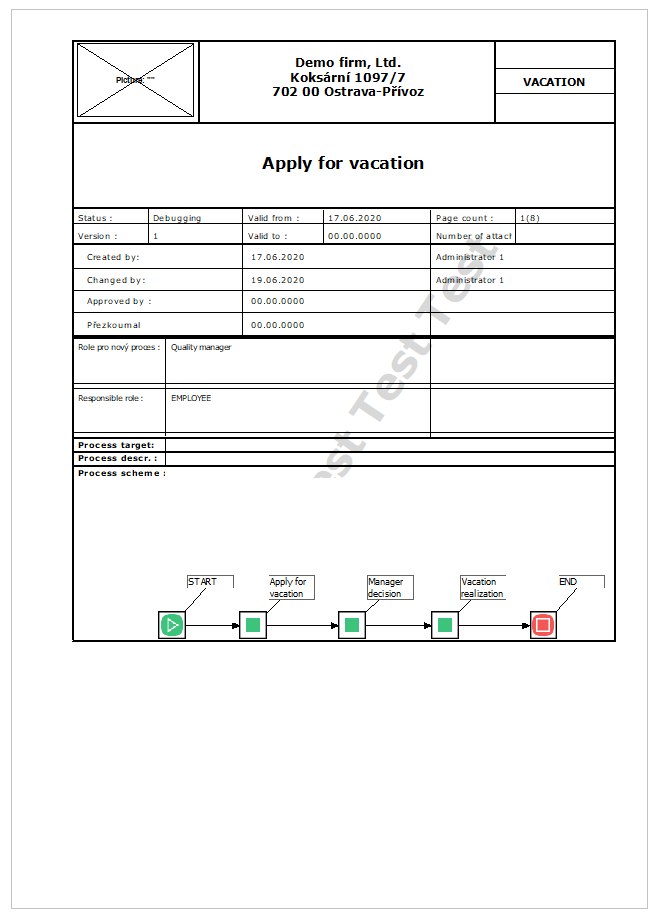
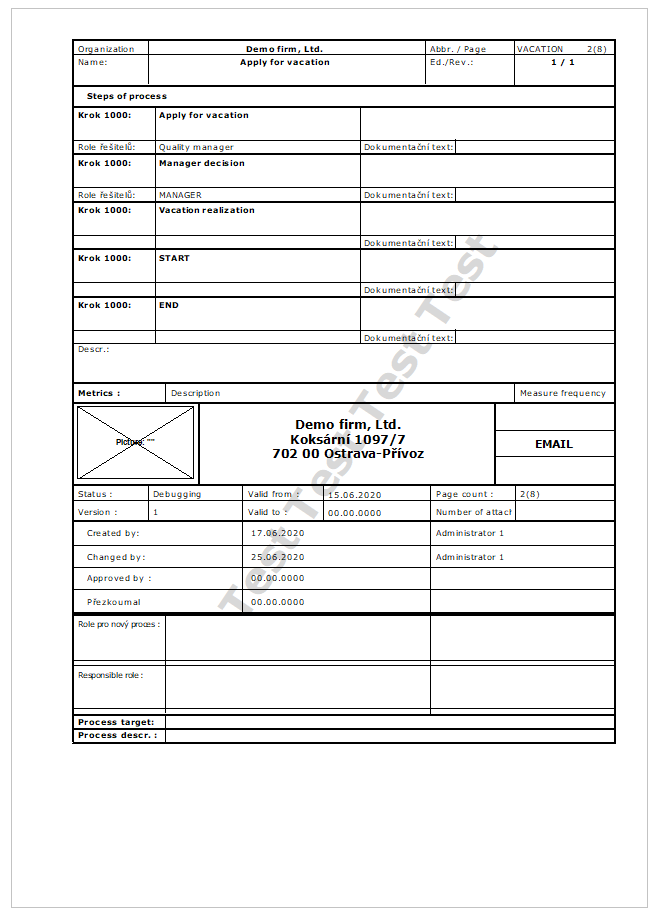
Versioned Procedures - Reports
|
|
|
Process
Process No.: WKF003; WKF004; WKF005 |
Report ID: SWKF002 |
File: WProcedure.AM |
Report description: The Procedure report displays the Workflow Versioned Procedure, its Basic data, Target, Description and Chart It also shows the individual Process Steps with the description, users Role and Evaluation. |
||
Address in the tree: [Work Office] [WorkFlow] [Workflow Administration] [Procedure] |
||
Reports parameters:
DistributionList- No Yes - print according to the Distribution List. The text at the end of the report will contain the names of the people to whom the document is addressed (the contact persons stated in the Distribution List folder on the first page of the Versioned Procedures book). If there more persons are specified in the distribution list, the report will be created for each person. |
LogoPictureFooter - Footer.wmf The file name for displaying the footer. The path to where the file that is to be displayed as a logo is saved is written here. |
LogoPictureHeader - Header.wmf The file name for displaying the header. |
LogoPictureSmall- Logo.bmp The file name for displaying the logo. |
ShowEvaluation- Yes Yes - the evaluation is displayed. |
ShowGraph- Yes Yes - the procedure chart is displayed. |
ShowChapterAbrr - No Yes - the chapter abbreviation is displayed; No - the chapter description is displayed |
ShowLongDescr - Yes Yes - the Long Description of a metric is displayed. |
ShowMetricDescr - Yes Yes - the Description of a metric is displayed. |
ShowNormAbbr - No No - the description of a norm displayed; Yes - the abbreviation of a norm is displayed |
SupplementQuantity - 0 Number of attachments |
|
|
|
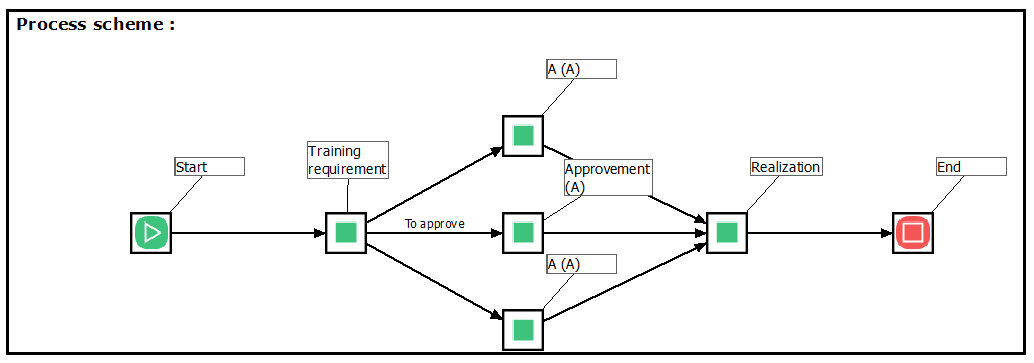
Process Scheme
Process No.: WKF003; WKF004; WKF005 |
Report ID: SWKF003 |
File: WProcessChart.AM |
Report description: The Process Scheme report shows the Procedure Chart with names of the individual Procedure steps. |
||
Address in the tree: |
||
Reports parameters:
LogoPictureFooter - Footer.wmf The file name for displaying the footer. |
LogoPictureHeader - Header.wmf The file name for displaying the header. |
LogoPictureSmall- Logo.bmp Logo. |
Sensitive - The level of sensitivity (the text which will be displayed in the header). |
|
|
|
List of metrics
Process No.: WKF003 |
Report ID: SWKF005 |
File: WMetrikList.AM |
Report description: The list of currently measured metrics of the QMS system. Shows the list of all variables that are marked in the Definition of Variables book as a Metric, and which are used in the confirmed procedures. |
||
Address in the tree: |
||
Reports parameters:
GroupByProcess_DSC1 - Yes Yes - group by procedure; No - the metrics are listed alphabetically according to the Marking. |
LogoPictureHeader - Header.wmf The file name for displaying the header. |
LogoPictureFSmall- Logo.bmp The file name for displaying the logo. |
Sensitive - The level of sensitivity (the text which will be displayed in the header). |