Parameters
In this section we define parameters for setting up IS K2 and individual users.
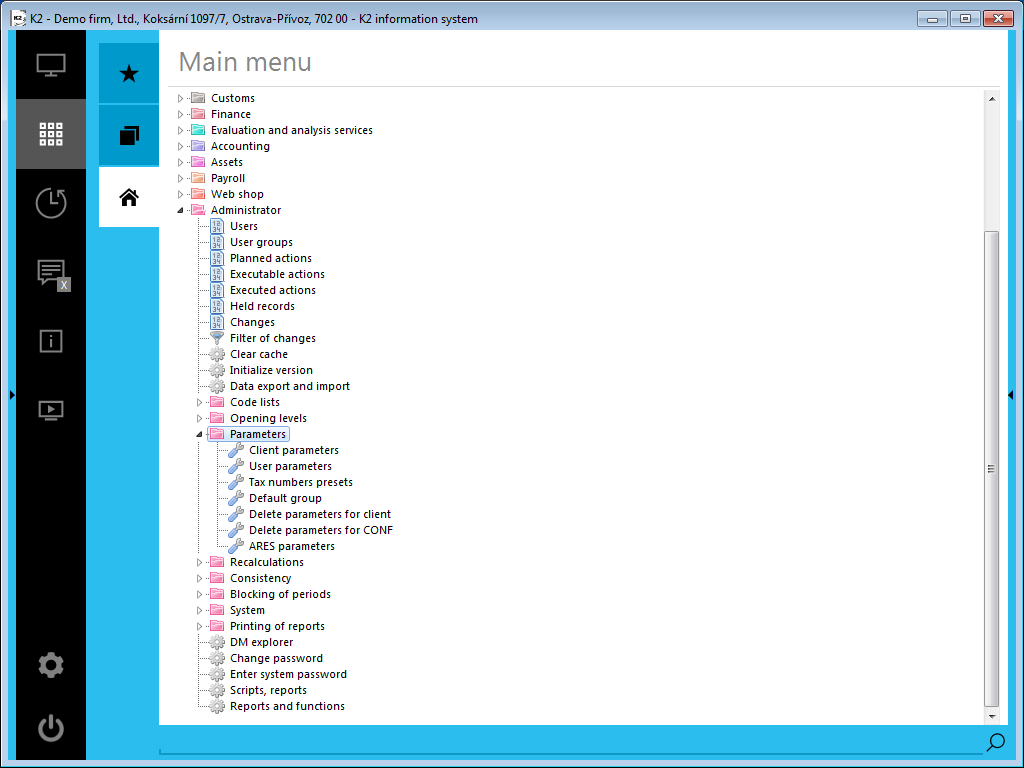
Picture: Open menu module Administrator - Parameters
Client parameters
Before you start work in K2 IS, you have to define Client Parameters inthe module of Administrator These parameters serve for the definition of the name, description and other important data of the client that you are going to work with.
1st - General
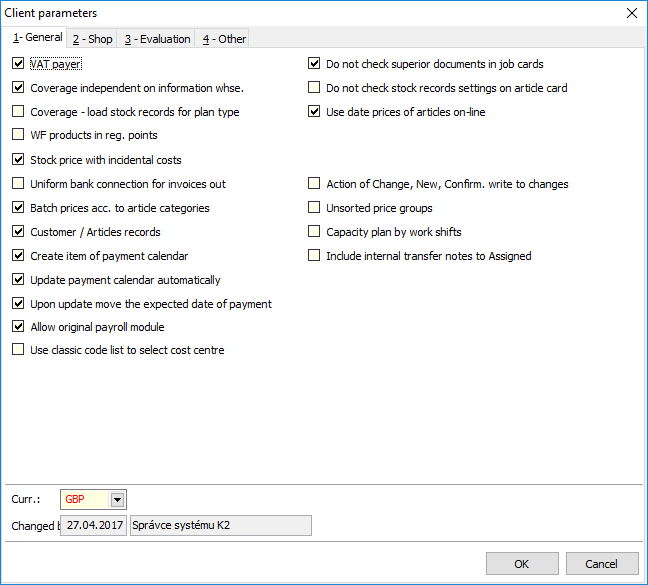
Picture: Client parameters form - 1st page
VAT payer:
- On - the flag determines that you are a VAT payer. It affects the creation of a new Supplier / Customer card - VAT flags for purchase and sale will be turned on the card. Subsequently, purchase and sale documents with the VAT flag turned on will be created accordingly.
- Off - if you are not a VAT payer, do not check the field. When creating a new Supplier / Customer card, the VAT flags will be turned off.
Coverage independent on information whse:
- On - requests from orders and reservation sheets, as well as requests from job cards are displayed for all warehouses (i. e. regardless of the set warehouse in availability).
- Off - document items with an actual or planned warehouse are loaded according to the warehouse set in availability. Requests from orders and reservation sheets, if they do not have a planned warehouse, are not loaded. They are possible to be loaded for particular whses by means of activation of selection Load the items with entered planned whse into Reservation and Ordered. More on the 1st page of Book of warehouses.
Coverage - load stock records for plan type:
- On - if there is a plan type in coverage, then the records about available and min./max. state are loaded except the requirements with this plan type.
- Off - if there is a plan type in coverage, then just the requirements with this plan type are loaded. Records with the information about available and set min./max. are not displayed.
WF products in reg. point:
- On - K2 documents (particular invoices in, bank statements...) can be connected with created processes in the company by means of Workflow module. Registered points are added to those types of K2 documents (Invoices in, Bank statements) in the Workflow products book. If you work with the K2 documents that are added to processes, registered points entered in particular type in the Workfow products book are processed.
- Off - Registered points entered in book Workflow products are not processed.
Stock price with incidental costs:
- On - stock price is the sum of net stock price ('S' field) and Incidental costs.
- Off - stock price is the net stock price without any incidental expenses.
Enter numbers of Suppl./Cust.:
- On - it is possible to enter the customer number manually when entering a new Suppl./Cust.
- Off - after entering a new Suppl./Cust., the customer number is added automatically by the programme.
Insert Article's numbers:
- On - it is possible to enter the customer number manually when entering a new Suppl./Cust.
- Off - after inserting a new article card and saving the form, the article number is added automatically by a programme.
Uniform bank connection for invoices out:
- On - in sales documents the bank connection is added from a customer who is set in own company.
- Off - bank connection from the customer card is copied into sales documents.
Batch prices acc. to article categories:
- On - the price split is displayed according to items of costing model on the 3rd page in the Batch book.
- Off - 3rd page of Batch book is empty.
Customer / Articles records:
- On - all turnovers of articles or customers (connection between the articles record and customers record) will be recorded on the appropriate pages of the cards.
- Off - no articles or customers turnovers will be registered on particular pages.
Allow an original payroll:
- On - the user will be allowed access to the original payroll module (old wages) and Personnel data in this client.
- Off - the user access into the original payroll module (old wages) and to Personnel data in this client is forbidden.
Use classical code list to choose a cost centre:
- On - the classical code list is displayed when choosing a cost centre in change mode.
- Off - the combo box is displayed when choosing a cost centre in change mode.
Use new asset
- The fields cannot be edited manually and are set automatically when the existing Assets module is converted to the new Assets module.
- On - the existing Assets module cannot be used.
Do not control superior documents in job cards:
- On - does not check whether the link between inferior and superior documents has been broken.
- Off - controls if the link between inferior (job card) and superior documents (job card or sales order) has not been broken. Connection means deleting of items from superior document. In this case the program reports the error announcement and awaits the correction from an user. The correction can be done by deleting the link to a superior document or by adding deleted item into a superior document.
Do not control the settings of stock evidence in articles:
- On - it is possible to change options of a stock evidence monitoring even though there is a record in the stock evidence (an article is Available or In receipt) for an article. Attention: this change leads to data inconsistency of stock evidence!
- Off - if the article has the record in stock records (availability, income) then it is not possible to make changes in monitoring options in stock records.
Use date prices on-line:
- On - the date prices are automatically fill in.
- Off - the current prices are used.
Add change mode, new and confirmation into changes as well:
- On - when changing a record, creating a new one or record confirmating a record, this action will be added into the Changes book.
- Off - when changing a record, creating a new one or record confirmating a record, the action will not be added into the Changes book.
Not sorted price groups:
- On - if you do not find the price set for that group for the customer in customer prices, then the base price will be set automatically.
- Off - if the price set for the group of the given customer is not found, then the price group with the lowest number will be found and the price set in this group will be added.
Capacity plan in shifts
- On - resource requirements in the capacity plan are for sources that have time shift records assigned to time sections in the calendar, Shifts broken down according to these shifts. Resource requests in the work queue are broken down by date and time slot of the calendar capacity.
- ff - work queue of resource is not divided into work shifts, just in days.
Count internal transfer note into Assigned
- On - the access to either internal transfer notes (transfer notes within one stock) or interim storage transfer notes is the same. I.e.: they block the articles (the quantity from item with "v" flag is counted into "Assigned"), the item is presented by two lines (release/income) in Coverage in a standard way.
- Off - internal transfer notes do not block an article. Closer description of internal transfer note is in the Logistics / Warehouse / Transfer notes / Internal transfer notes - specifications chapter.
Three-digit country code
- On - in the State Code (States code list) there is a three-digit code and the two-digit country code is in Abbreviation. Used for the payroll module, if enabled, then the country code is read from the abbreviation (must always be two digits)
- Off - There is a two-digit code in the Country Code
Currency
- Client currency.
VAT Legislation 2019
- New method of calculation from - date (Date of accounting case), from which the calculation of VAT from above and rounding of the cash payment according to the legislation valid from 1. 4. 2019.
3 - Evaluation
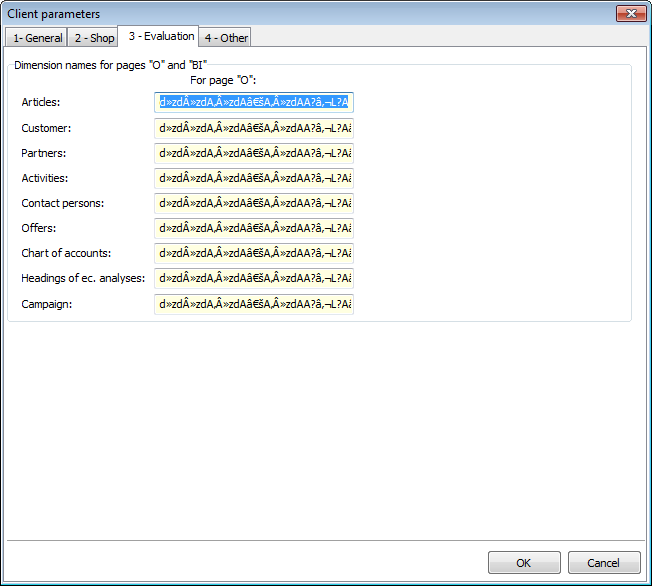
Picture: Client parameters form - 3rd page
The user can define naming of particular dimension that will be displayed in OLAP ("BI" page for Oracle user).
4 - Other
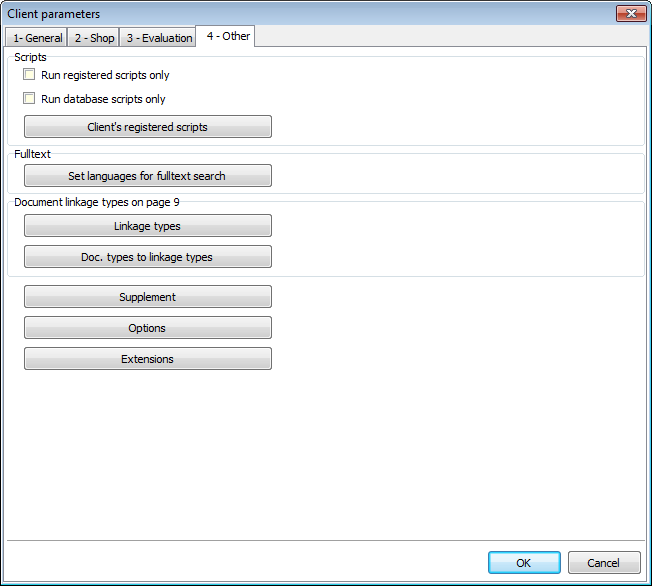
Picture: Client parameters form - 4th page
Run registered scripts only:
- On - it enables to run scripts and reports with a valid certificate.
- Off - it runs any scripts and reports which must not contain an invalid certificate.
Note: The program checks certificates, so the scripts have to contain valid certificates or without certificate.
Run database scripts only:
- On - it enables to run scripts and reports that are saved in the database only.
- Off - Runs scripts and reports from the database and file system.
Client's registered scripts - the book Administration of client's registered scripts, which contains registered scripts in registered points, runs by means of pressing this button. A new script can be inserted by means of Ins key. It is possible to choose scripts just saved in database.
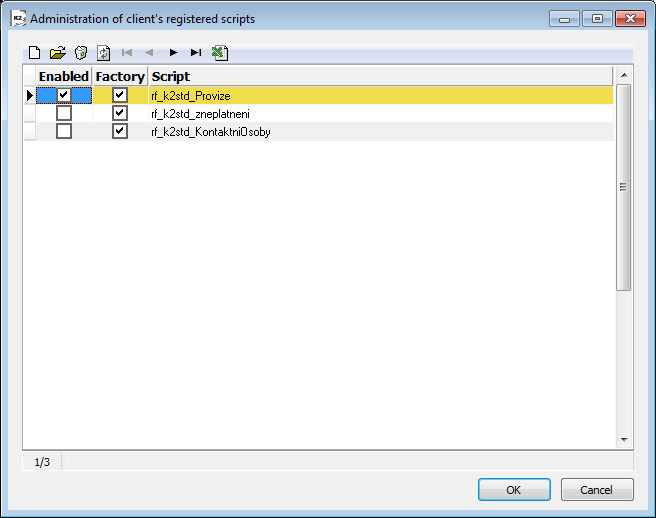
Picture: Administration of client's registered scripts book
Columns Description:
Enabled |
Registered script will run. |
Distributed |
Checked scripts are preset. |
Supplement
If we want to print information from the extract of the Commercial Register in the footer of issued documents (e. g. invoices out, orders out, delivery notes, offers, etc.), we must define an addendum of type ‘OR’ on the 1st page of the Client parameters form. Use the Addendum button to open the Language Supplements book, in which use the Ins key to insert an addendum with the abbreviation 'OR’ and write all important information from the Commercial Register extract in the lower window. The program will insert all those information into print reports automatically.
Attention: Once you have set the print of the supplement of 'OR' type, this information will still be printed on the documents (this operation can no longer be canceled).
Note: Just in case you have the right for these operations, you can insert a new supplement into Language supplements book and edit it.
Options
The first tab Options contains a field to enter Api Key. It is necessary to generate this key within the Google Account and it serves to correctly display a position on Google Maps in universal forms.

Picture: The form for setting the Api Key
Operations on big tables
The form for the definition of operations on big tables is displayed by means of the Options button.
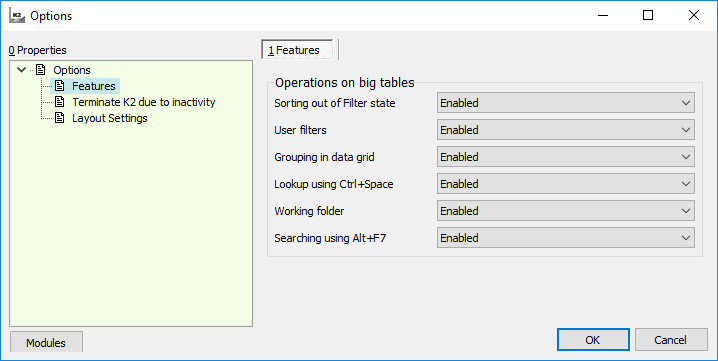
Picture: The form for the definition of operations on big tables
Sorting out of Filter state |
In this field you can define if it is possible to sort records by means of pressing the mouse button on a column header in the Book mode. |
User filters |
In this field you can define if it is possible to create new selection definitions. |
Grouping in data grid |
In this field you can define if it is possible to group records in the table. |
Lookup using Ctrl+Space |
It enables to display filters that are predefined under any menu tables by pressing the Ctrl+table space keys. |
Working Folder |
In this field you can define if the work folder will be displayed ( Filter: Working Folder). |
Searching by means of Alt+F7 |
In this field you can define if the searching is Enabled, Forbidden orOn rig. |
You can choose from these three possibilities:
- Enabled (always),
- Forbidden (always, (except the users with service right)),
- According to user right .
Attention: Restrictions of operations on big tables do not apply to the user with the service right.
You can display the list of all registered data modules by means of Modules button.
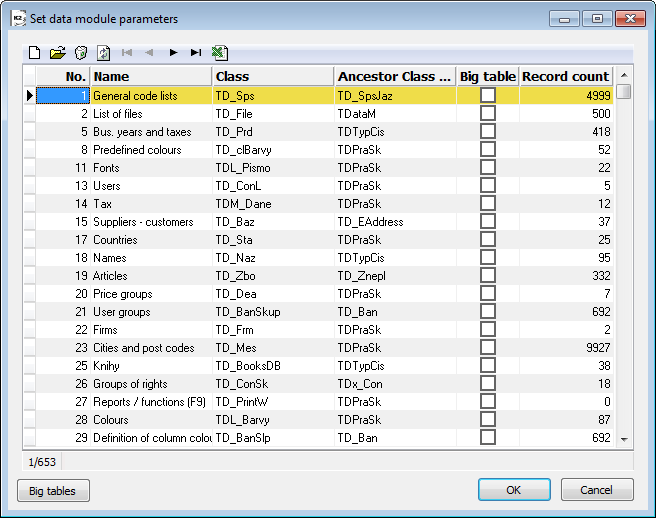
Picture: The form called Set data module parameters
By means of Big tables you can open the form for record count that determinates "big tables". The standard is that the big table is defined over 10000 records included. According to entered number all the data modules that meet this limit will be checked automatically.
You can also define data module as a big table separately:
- You can enter the form by means of left mouse button double click and check the field Big table.
- If you cancel the ticking, no big table operations will be done for that data module.
Terminate K2 due to inactivity
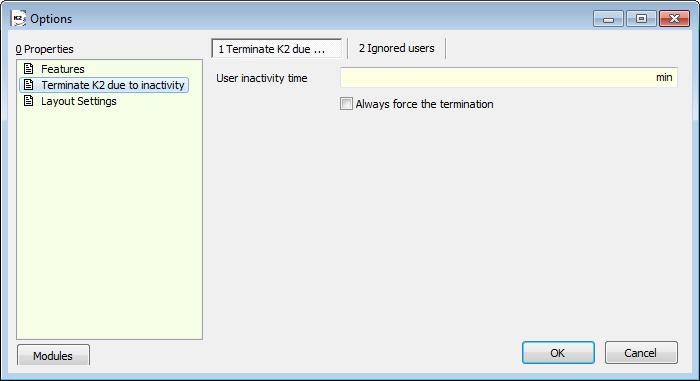
Picture: Terminate K2 due to inactivity form
User inactivity time |
In this field you can define after how many minutes of user inactivity will K2 be terminated. User activity is measured by keystrokes, mouse buttons and database communication. |
Always force the termination |
If this field is checked, the K2 will be terminated even In the case that the user is in Change mode. |
Note: User inactivity can be evaluated using the registered function rfaK2_CanTermByInactivity. An example ExampleRF_CanLogoutByInactivity.pas has been created for this registered function, which will perform any calculation. Setting the ExitCode value then determines whether the user should continue to log off or not.
Ignored users folder
You can define the list of users, who the automatic termination does not concern them, on Ignored users folder.
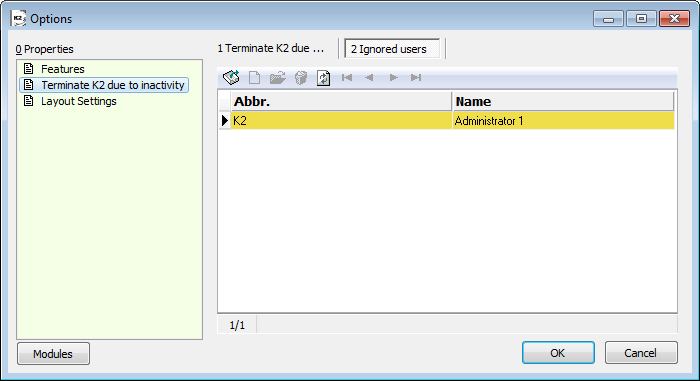
Picture: Terminate K2 due to inactivity - Ignored users tab
Extension
The Extensions button is available just for users with the right Service actions. The Extensions function is mainly for IS K2 administrators for an import and files installation extensions into all clients at the same time.
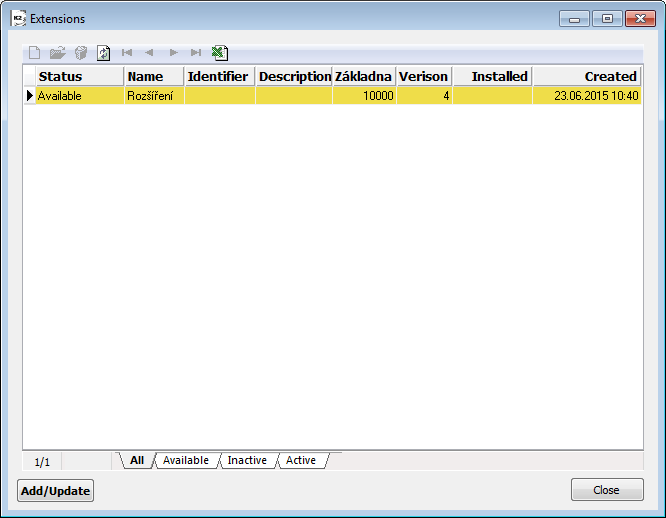
Picture: The list of extensions - the All tab
Extension.xml with the set extension is loaded up by the Add/Update button. All added extensions are displayed in All folder. After opening the record with the icon  , we can install / uninstall the loaded extension, turn it on / off.
The extension distinguishes tree states:
Available: the extension files are available on the disk, but no tables have been created
Turn off: the validity was verified (conflicts of numbers and classes). The tables have been created, but the registration into an internal Dictionary has not been activated
Active: the extension is working in full
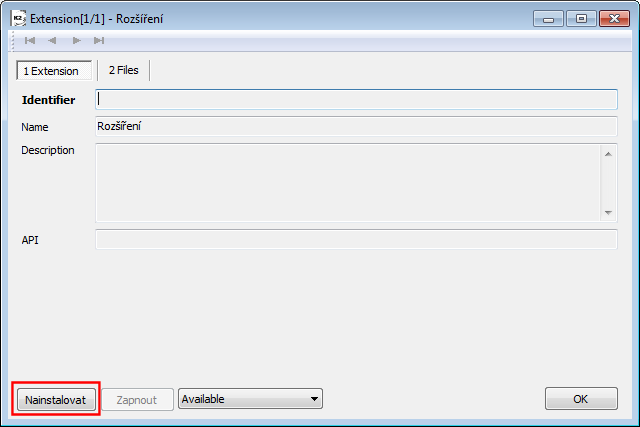
Picture: The open extension record "Readers" - Available state
Lets install the extension file by the Install button, that extension is deleted from Available folder/state and the is transferred into Inactive folder/state.
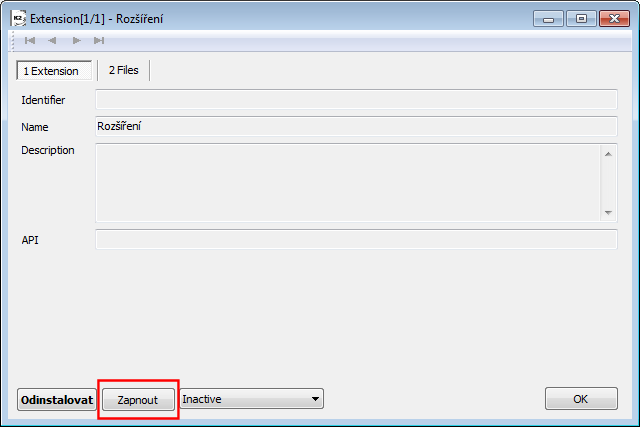
Picture: The open extension record "Readers" - Inactive state
If the extension file is installed (Inactive state), the On button will be active and registration into the internal Dictionary will be done. The extension file in Active state will appear in all the existing clients.
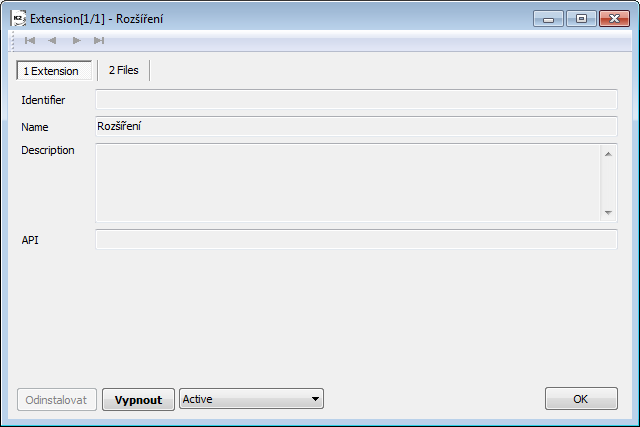
Picture: The open extension record "Readers" - Active state
Settings for pre-filling tax numbers of the Suppl./Cust. card.
The K2 system allows you to set links between the so-called tax numbers (IN, VAT Reg. No. Register Number (not on the form) and Tax Number). The settings determine which number is to be automatically created from another number.
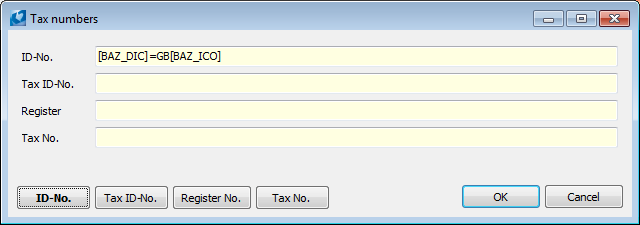
Picture: Setting pre-filling tax numbers
In the fields we enter the formula to be used when filling in the number. We insert a specific field by pressing the button at the bottom of the form. The field is always inserted at the end of the line in which we have the cursor. E.g. the setting in the picture means that when writing the value in the IN field (the field in which the formula is written) the VAT number field (at the beginning of the formula) should be created automatically as CZ characters and what we write in the IN field (definition after the equal sign) . The definition was created by setting the cursor to the IN field, pressing the VAT number button, resetting the cursor in the IN field, typing '= CZ' and pressing the IN button.
If we want to fill in more additional data from one filled-in field, we separate the individual formulas with a semicolon.
User parameters
The parameter settings are stored in the MEMPAR table in the data directory of each company.
Note: A list of all selected options (checked boxes) for each user is displayed on page 7 of the Users tab.
General (Page 1)
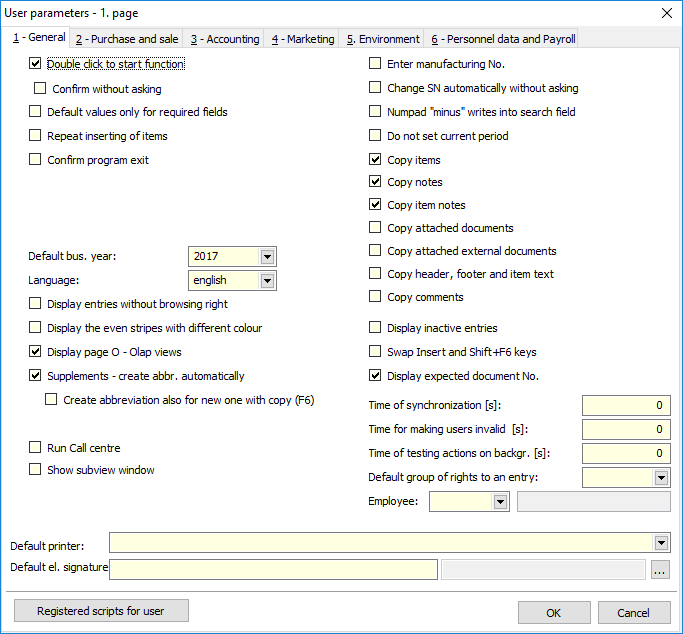
Picture: Client parameters form - General
Close menu:
- On - the background with K2 desktop will be closed automatically if you run the module.
- Off - the K2 desktop remains open.
Double click to start function:
- On - to enter the module from the desktop, it is necessary to press the mouse button twice. If you check this field, you are able to move the button on the desktop by left mouse button.
- On - to enter the module from the desktop, it is necessary to press the mouse button.
Confirm without a question:
- On - no verification query for confirmation will be asked upon a document confirmation. If there are any conditions for a date confirmation renewing, then the verification to renew the date of confirmation will be displayed.
- Off - the standard verification query "Do you want to confirm the document?" will be asked upon a document confirmation.
Default values only for required fields:
- On - if some fields of the form are set as disabled (prevent access to the field), then the set default values are loaded just into these defined obligatory fields, it means required fields (see the 6th page of the Users card).
- Off - if some fields of the form are set as disable, then the user has the default values set to all disabled fields (either required or blocked) upon record saving.
Repeat inserting of items:
- On - upon inserting a new item, it is possible to make your work faster. The form for inserting a new item will appear after you save the previous one. It is not necessary to press Ins key repeatedly.
- Off - upon a new item inserting, you need to press Ins key.
- It does not refer to the purchase and sale documents. These documents have a
 Re-enter items button on page 2.
Confirm program exit:
- On - when the program is closed by standard way, the system asks if you really want to exit K2.
- Off - using Ctrl + Alt + X or pressing the cross in the upper blue bar will end the program immediately (without further prompting).
Default bus. year:
- It is necessary to enter the period (usually year), where new documents should be created.
Language:
- You can choose a language, in which e.g. IS K2 reporting will appear, from the selection menu into this field.
Display records of code lists without the right for browsing:
- On - although we will not have the right to view the code list in the Users book, we will see all the entries in the code list.
- Off - if we do not have the right to view the relevant code list in the Users book, we will see empty entries in the given code list.
Show even bars in the grid in a different color:
- On - if this option is checked, each even record will be displayed in each table in a colored grey bar.
- Off - even records in tables will not be highlighted.
Display 0 page - views in OLAP:
- On - when this option is enabled, the "O" page will be displayed in almost every book, which is used for OLAP views.
- Off - "O" page will not be displayed for the access of views in OLAP.
Supplements - create abbr. automatically:
- On - a supplement abbreviation in 'xxx-ddmmyy’ format will be automatically created when creating a new supplement (Ins).
- Off - You need to add the abbr in a new supplement manually.
- Create abbreviation also in new one with copy (F6) - the abbreviation is automatically created in 'xxx-ddmmyy' format. By means of F6 key, it is for a variant of a new supplement as well.
Run call centre:
- This function is in development.
Show subview window
- It activates the possibility to show subview windows in the individual modules.
Enter manufacturing No.:
- On - there is an obligation to enter a Manufacturing No. in the Article card, where you enter an article with a serial number.
- Off - manuf. numbers are not entered in the Article card.
Change SN automatically without asking:
- On - if it is permit to create serial numbers in the article automatically (checking field in the Article card) and at the same time the serial number is not found or entered during the dispatch of this article, then the automatically created available serial number is filled in.
- Off - after asking, the same action as upon the On selection will be done.
Numpad minus writes into search field:
- On - minus key from numerical keyboard (grey minus) writes to the search field.
- Off - goes to the previous entry in the book or view in grey or minus.
Do not set current period:
- On - a period (in intervals selection Alt+F10), that has been entered during the last work, will maintain when you log on. This function is suitable for account clerks, who close selected periods and current states in current period are not so important. Otherwise it would be necessary to set the field Period To again and again.
- Off - when logging in to the program, the Period To field is automatically set according to the current date in the specified display interval. This function is especially suitable for workers with a warehouse, where it is desirable, for example, to display the current status on September 1, and not the status from August 31, until the operator manually switches the Period To field every month.
Copy items:
- On - all item data, i.e. document items, payment conditions, notes etc. will be copied when copying documents.
- Off - no item data, i.e. document items, notes etc. will be copied when copying documents. The payment conditions will be loaded from the Suppl./Cust. card. Upon a copy of inferior linked document, in this case the items from superior document, which has not either linked or banned the document, will be added into a document as well.
Copy notes:
- On - the notes from the 1st page of the original document will be copied when copying documents (by means of F6 key), (besides supplements DH and DF, behaviour of which is governed by the parameter Copy header and footer).
- Off - the notes from the 1st page of the original document will not be copied.
Copy item notes:
- On - the item notes will also be copied when copying documents.
- Off - the item notes will not be copied when copying documents.
- Note: If you copy items, item notes are not copied (regardless the parameter setting).
Copy attached documents:
- On - if this parameter is checked, the attached documents on the 9th page will be copied when copying a document by F6 key.
- Off - default parameter is off and when you copy document, then linked documents on the 9th page will not be copied upon document copying F6.
Copy attached external documents:
- On - if you copy a document by F6 key, attached external documents on the 9th page are copied as well.
- Off - the parameter is off by default. If you copy a document by F6 key, the attached external documents on the 9th page are not copied.
Copy header, footer and item text:
- On - a copy of a header and footer is automatically created when copying a document.
- Off - header, footer or item text will not be copied automatically when you make a copy of documents.
Note: Copying of these supplements also depends on the fact if the parameters Copy notes and Copy item notes are checked or not. I.e. if the copying of item notes is forbidden, then Item text is not copied as well.
Copy comments
- On - a copy of comments is automatically created when copying a document.
- Off - comments are not copied when creating a copy of document.
Display inactive entries:
- On - inactive (invalid, blocked) records are displayed in the Book mode.
- Off - inactive (invalid) records are displayed just in Filter off state, just in case the form enables this state.
- Invalid records are displayed by grey colour.
Swap Insert and Shift+F6 keys:
- On - the functions of both keys are interchanged. New record from specimen is created by Ins key and Shift+F6 creates a new doc.
- Off - Ins key creates a new record and Shift+F6key is used for entering a new document from specimen.
Display expected document numbers:
- On - an expected doc. number with the question mark will be displayed (xxx?). If you break doc numbering, the Error message is already displayed during doc creation not after its saving.
- Off - correct number of document will be entered automatically after you save it without previous displaying.
Time of synchronization [s], Time for making users invalid [s], Time of testing actions on backgr. [s]:
In these three values the time is being checked constantly by default. The settings is recommended in those companies, which overcharge their servers.
- Time of synchronization [s] - if the time is up, it regularly checks, whether selected code lists have been actualised. If the value is lower than 10, then the state of cache code lists is controlled once per 86,4s.
- Time for making users invalid [s] - checks, whether the particular user has being made inactive. If the value is lower than 10 or higher than 10000, then the required state of activity is controlled once per 60 s.
- Time of testing actions on backgr. [s] - checks, whether defined action runs and if so, then it runs on background. If the value is lower than 10 or higher than 10000, then the required state of activity is controlled once per 60 s.
All entered times are just indicative, as the program evaluates them in inactivity time. This is not about exact timing.
Default group of rights to an entry:
- It is not necessary to fill in this field. In case that the value is added from the Group of rights table, then that value will be added to newly created records into 'GrRi' column. The user, who has not this group of rights added, could not see records with this group of rights.
Employee:
- It is not necessary to fill in this field. In case that the value is added from the Officers table, then that value will be added to either new or copied free documents into Officer column. If this field is not filled, a default value or a value fromc copied document will be inserted into documents.
Default printer:
- The user can choose the printer, which will be default for printing documents from IS K2, from the list.
Default el. signature:
- The user can assign the signature (in the shape of particular string), which the ".pdf" exports will be signed with (if there is no different way in reports or by means of parameters). By
 button,the form Choose certificate, where the user choose the particular signature from, will be displayed.
Registered scripts for user:
- By pressing this button you can open the Administration of user registered scripts book, which contents scripts that are registered for a user (no for the whole client). It is possible to choose scripts just saved in database.
User Parameters - Language
In the user parameters it is possible to set the language in which the user will see descriptions of all fields and column headings inthe whole K2.
Note: The Czech installation of K2 has the language "implicit" identical to "Czech", Slovak installation K2 to "Slovak" etc.
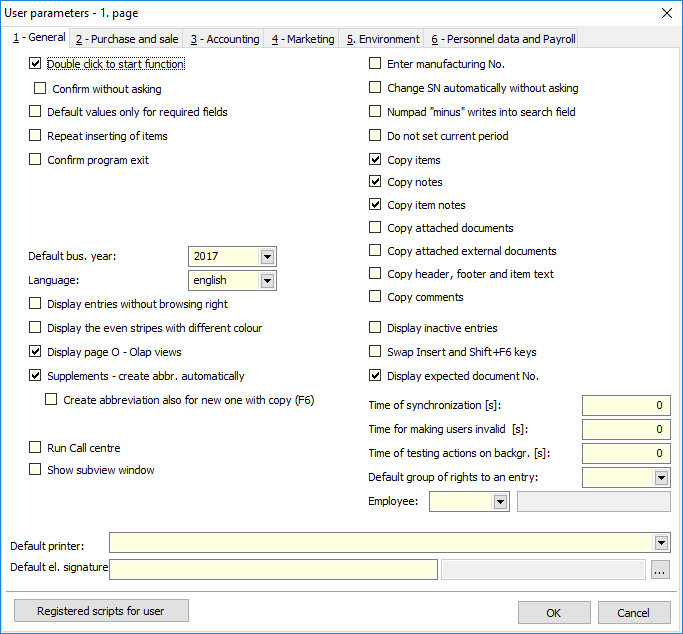
Picture: User parameters - the General tab
If the user selects a different language in the Language field, then all field descriptions will be displayed in that selected language.
The user can ensure that the values of the fields entered by him are displayed in this different language after selecting that different language. He/she does this by entering these values in other languages (the user can localize his/her names and descriptions in the fields). Todo this, use the Language Name or Language Description field in the certain books.
Example: Entering a language name for the article
The "English" language is set in User parameters. Now, a name in Czech language is saved in the Language name field.
After pressing the Language name (Lang. descr.) button and then the Insert key, it is possible to add language names for the different languages. So, in our case select "English" in the Language (Language) field and enter the translation of the name "Salve" in the Text field.
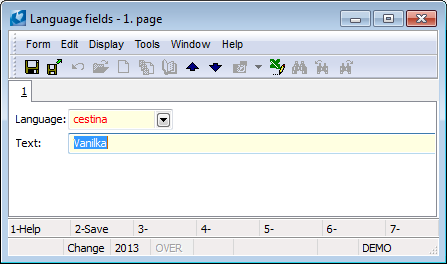
Picture: The form to enter language names
A language name for English language is displayed in the Language name field. In the same way, you can insert a language name for other languages.
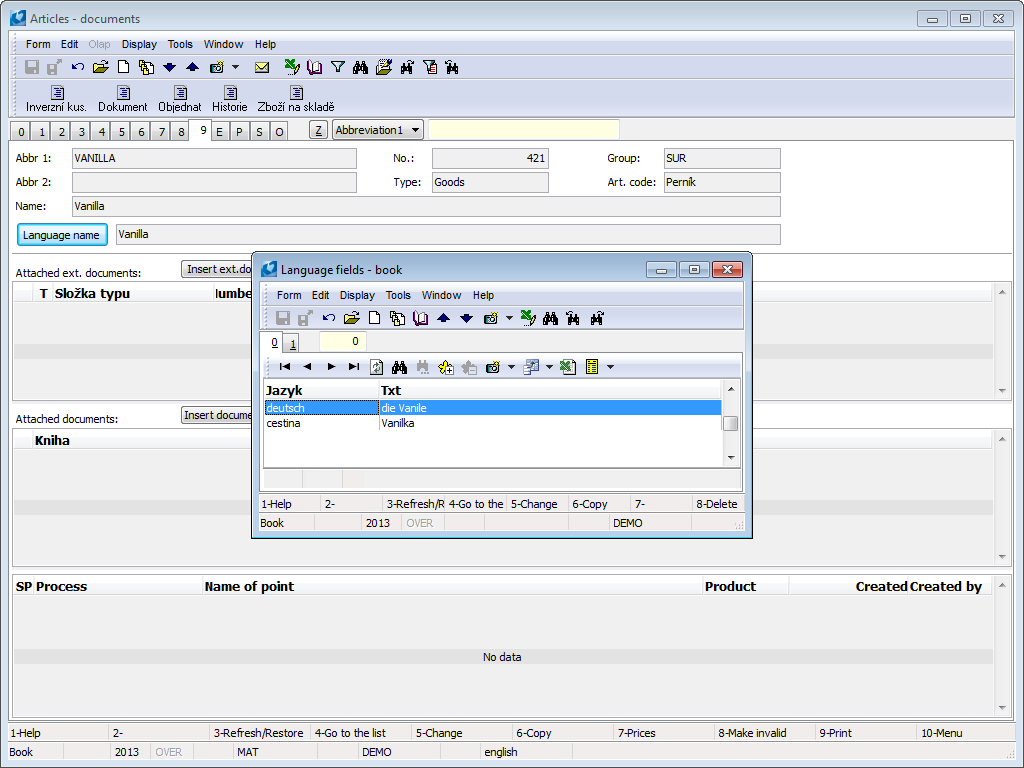
Picture: The form to enter language names (localization of names for English and German language)
It is possible to change and delete the records In the language fields too.
Purchase and Sale (2nd Page)
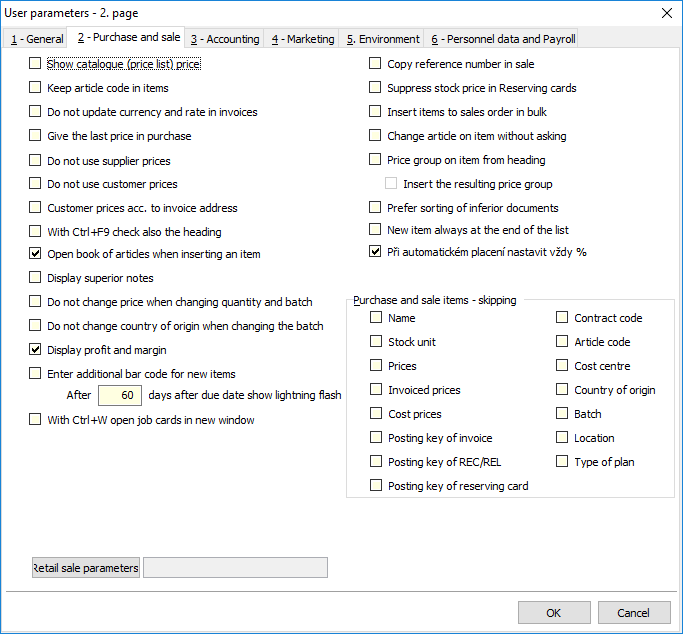
Picture: Form User parameters- Purchase and Sale
Display catalogue (price list) price:
- On - the basic selling article prices will be displayed in Sales items.
- Off - a selling price of article will not be displayed in an item.
Do not update currency and rate in invoices:
- On - when changing the header of the superior document in both Purchase and Sale, the Currency, Exchange Rate and Tax Type will be retained in the subordinate documents.
- On - when changing the header of the superior document in both Purchase and Sale, the Currency, Exchange Rate and Tax Type will be updated in the subordinate documents.
Add last price in purchase:
- On - Last invoiced price from the Articles card will be added into the price for UM upon an item inserting into Purchase document. If you use supplier prices (parameter Do not use supplier prices is off), then the price from supplier price list has the priority over the last price.
- Off - when inserting an item into the Purchase Document, the purchase price from the Article card or the supplier price is added to the price per unit.
Do not use supplier prices:
- On - even though the supplier will have a preset supplier price on the 4th page of the Article card, the Purchase Price from the Article card (or the last price) will be inserted in the Purchase item.
- Off - if the supplier has the purchase price specified in the supplier prices on the 4th page of the Article card and the currency of the supplier price list item corresponds to the supplier's currency, this will be filled in automatically in the Purchase item.
Do not use customer prices:
- On - even though the supplier will have a preset customer price on the 5th page of the Article card,a price group from the Article card corresponding to its standard classification into price groups will be inserted in the Sales item.
- Off - compilation of a selling price will follow the standard procedure.
Customer prices acc. to invoice address:
- On - If the Use new price lists option is enabled (see Price list settings), the price is calculated for the customer at the billing address. If the Use new price lists option is not enabled, then the determination of the selling price will not be governed by the main customer, resp. by the customer specified in the invoicing address, provided that a price list for this main Suppl./Cust. is entered on the 5th page of the article card.
- Off - the determination of the selling price will be governed by the main customer in the header of contract.
With Ctrl+F9 check also the heading:
- On - if you start to run Fast filter, filters for either Suppl./Cust. or for particular sales order (orders) will start in Sales or Purchases documents. In the filter, we get all the documents that are linked to the selected Suppl./Cust. tab at the same time. and the contract (order).
Attention! - If the field is checked, this functionality does not work when you open the form for conditions of Fast filter (Alt+F9), but just during switching into Fast filter from Book mode with the using automatic setting for filter conditions.
- Off - a filter for the particular Suppl./Cust. is activated upon switching into the Fast filter mode on the Sales or Purchase documents. All documents for particular customer (supplier) will be acquired.
Open book of articles when inserting an item:
- On - selection of articles is automatically offered when inserting Sales (Purchase) item.
- Off - it is necessary to select an article by means of F12 key when inserting a sales (purchase) item.
Display superior notes/comments:
- On - if we are working, for example, with an Contract in Sales and the given customer has some notes entered in his card, then these will also be displayed in header of contract. The same is also for Invoice out, where potential notes from header of Contract are displayed. Comments are also displayed in this way in universal forms. Comments from the customer and comments from the parent document are displayed in separate tabs.
- Off - just the notes, that are saved in own document, are displayed.
Do not change price when changing quantity and batch:
- On - This is related to quantity prices and batches. If we change one of these criteria, the price will not change in this case.
- Off - adjusts the price to changes in quantity and batch changes.
Do not change country of origin when changing the batch:
- On - if a country of origin other than the one specified in the Batch is entered in the Article card, the country of origin from the Article card will be entered in the document item that will have the entered batch.
- Off - a country of origin from the Article card will be entered into a document item by default if an item does not have the entered batch. In case, there is a batch, the country of origin will be entered from Batches.
Display profit and margin:
- On - the field with information about a planned and real profit and a margin counted from the document items will be displayed in the header on the 2nd page of Sale documents.
- Off - the fields displaying a profit, a margin and a stock price of items on the 2ndp age of Sales documents are not displayed.
Enter additional bar code for new items:
- On - the cursor will be automatically set to the Bar code field when entering new data into the form Purchase item, Sale item or Transfer note item.
- Off - a cursor is automatically placed on the Article field when entering new data into the form Purchase item, Sales item or Transfer note item.
Lightening flash after maturity days:
- Number of days after due date, when the icon for the status of invoice "payment" should change (flash will appear). Concerning Invoice In, Invoice Out and Transfer notes.
With Ctrl+W open job cards in new window
- On - the Transfer notes book will be open in a separate window when using Ctrl+W keys from sales orders. To go back to sales order just close Transfer notes book by e.g.Esc key.
- Off - To switch folder tab to Transfer notes book, use Ctrl+W key from sales order. This behaviour is the same as switching among documents in modules Purchase and Sale. It is necessary to use Ctrl+Z key combination if you want to go back to sales order.
Copy reference number in sale:
- On - a Reference No. from an invoice, on that the cursor is placed, is copied when creating a new free document by F6 key. If you copy the invoice, which attaches sales order, then variable symbol from sales order is copied.
- Off - when copying an Invoice ou, a reference no. is generated according to the preset definition from the book of sale or you can add it manually. It works in the same way in free document as well.
Suppress stock price in Reserving cards:
- On - there will be no sum of planned stock prices (net price, gross price, VAT) displayed in the heading of a reserving card. Furthermore, with the default display of columns, columns showing the sales price will be set on pages 2 and 4 instead of the planned stock price.
- Off - the sum of planned stock prices will be displayed in the heading of reserving card. By default, the columns displaying the planned stock price are set on pages 2 and 4.
Insert items to sale order in bulk:
- On - when inserting items on the 2nd page of the Contract, after pressing the Ins key, the form for bulk insertion of items will be displayed (same as normally called up on the 2nd page of Purchase and Sales documents by pressing the Shift + F6 keys). You can insert items into sales order faster.
- Off - after pressing the Ins key on the 2nd page of the Contract, the Sales Item form will be called up, in which we enter the required goods. The form for inserting items in bulk will be opened after pressing Shift+F6 key.
The change of articles on items without query as in newly inserted:
- On - upon opening the document item by Enter key in Change mode it is possible to select another articles by means of Ctrl+arrows keys. The system overwrites all data according to selected articles in the form.
- Off - upon opening a document item by means of Enter key in Change mode and after pressing Ctrl+arrows, the system will ask you: "Would you like to maintain current value of items?" In case of Yesanswer, the articles will be changed, but the values in items, which are depended on selected articles (prices, country of origin etc.), will not been changed. In case of No answer, all values depended on selected articles will be overwritten. By pressing Cancel button, you will return to the field to select articles, where the origin values have been returned back.
Price group on item from heading:
- On - upon inserting an item of article on the 2nd page of sale and purchase documents, the field Price group will be preset according to the same field from the 1st page of documents after pressing Ins key.
- Off - when inserting an item of articles on the 2nd page of sale and purchase documents, then after pressing Ins key the field Price group will be preset according to document item on which the cursor is currently placed.
Insert the resulting price group:
This parameter is possible to use just in case the parameter Price group on item from heading is on.
- On - a resulting price group will be displayed in the Price group field on a Purchase/sale item. It is used e.g. as a base price during the calculation from the original price group. If the field is empty, it means that price is not counted from any price group.
- Off - in the field Price group, a source - original price group, according to which the price is determined, is always displayed.
Prefer sorting of inferior documents:
- On - items on inferior documents are numbered (and are ordered as well) independently on an item number in a superior document. Upon a new item inserting on the 2nd page of purchase and sale, this item will be inserted accor. to current cursor staying or at the end accor. to query and parameter New item in the middle without question.
- Off - a new item on an inferior document takes the number from superior document.
New item always at the end of the list
- On - the item is always inserted as the last one when entering a Purchase/Sale item.
- Off - the item is inserted on the place where the light indicator is currently placed when entering a Purchase/Sale item.
Always set % for automatic payment:
- On - "100 %" is always set in an input form upon automatic payment by cash register (Shift+F2) or by internal document (Shift+F3) on purchase and sales documents.
- Off - the setting of checkbox % is remembered for automatic payment.
Cash invoice parameter
- The button enables to set the configuration of cash invoice parameters running in K2 4Web.
Accounting (Page 3)
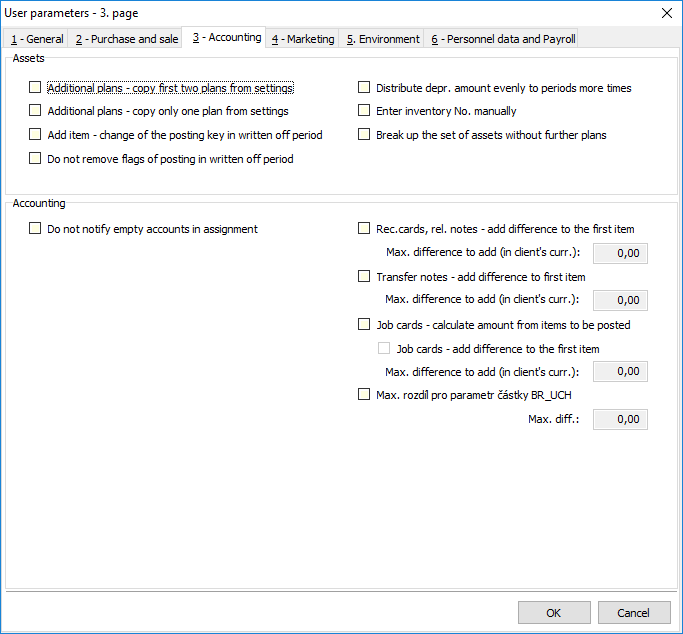
Picture: User parameters form - Accounting
Assets
The first two parameters relate to adding additional plans to the asset card.
Additional plans - copy first two plans from settings:
- On - the first two plans from the setting of plan types will be copied into a new card.
- Off - the 3rd plan from setting of plan types will be copied into a new card.
Additional plans - copy only one plan from settings:
(Combination with Previous parameter)
- Parameter 1 On + Parameter 2 On: Just the first plan from the setting of plans types will be copied into a new Asset card.
- Parameter 1 On + Parameter 2 Off: The first two plans from the categories of plan types setting will be copied into a new card.
- Parameter 1 Off + Parameter 2 On: 3rd plan is copied into a new card.
- Parameter 1 off + Parameter 2 off: The 3rd plan will be copied into the 2nd plan into a new card.
Another two parameters influence adding items on the 2nd page of asset card.
Add item - change of the posting key in written off period
- On - enables to add the item into already written off period. Relates to e.g. cost centre, price increasing, contract codes etc.
- Off - a new item is able to add just to period, which has not been written off yet.
Do not remove flags of posting in written off period:
- On - if you change the posting key in written off period, then flags for posting will not be changed.
- Off - flags for posting will be changed if you change a posting key or make a change in documents.
Distribute depr. amount evenly to periods more times:
- On - the program distributes depr. amount evenly to periods.
- Off - the program does not allow you to distribute the year for a second time.
Enter inventory No. manually:
- On - inventory number has to be entered manually.
- Off - the inventory number will be created automatically.
Break up the set of assets without further plans:
- On - if assets has more plans on more cards, it is able to divide it according to number of items or according to price without creating other cards entered according to other written off plans.
- Off - if the assets has more plans on more cards, it is possible to distribute it further according to number of items or according to price, but each new asset will be consist from so many cards how many has had the original asset.
Accounting
Do not notify empty accounts in assignment:
- On - if you do not have the accounts set for Dr and Cr, then upon posting and assignment the program does not pay attention. But it does not allow to save it.
- Off - if we do not have set the accounts for DR and CR ina posting key, the program will notify us and does not allow to save the document.
Rec. cards, rel. notes - add difference to the first item:
- On - the difference will be added to the first posted item when posting items of receipt cards or release notes. If the difference is higher than maximum of entered value, it is not added to the item and stays on the document quantified.
- Off - a possible difference is not added to the posted items and is only quantified on the document.
Transfer notes - adds difference to first item:
- On - the difference will be added to the first posted item when posting items of a transfer note. If the difference is higher than maximum of entered value, it is not added to the item and stays on the document quantified.
- Off - a possible difference is not added to the posted items and is only quantified on the document.
Job cards - calculate amount from items to be posted:
- On - the amount is calculated just from those items that are determined for posting.
- Off - the amount is calculated from all the items on a job card.
Job cards - adds the difference to the first item:
- On - the difference will be added to the first posted item when posting items of a Job card. If the difference is higher than the maximum of the value entered here, it is not added to the item and only remains quantified on the document.
- Off - a possible difference from all items of job cards is not added to posted items and is only quantified on the document.
Max. difference for a @BR_UCH parameter:
- On - the value of a posting key will be posted only up to the specified limit. If the parameter value is higher than a value of the specified limit, the amount parameter @BR_UCH will not be posted.
- Off - the value of this parameter will be posted without any limit.
Marketing (4th page)
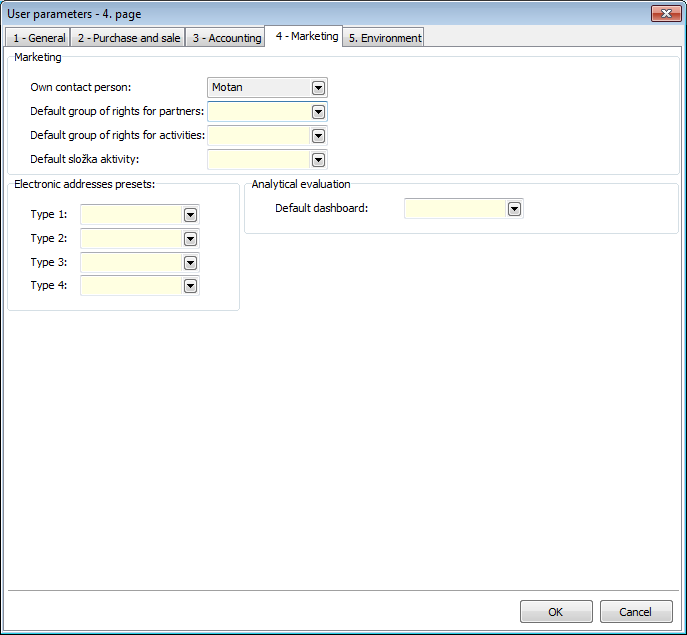
Picture: Form User parameters - Marketing
Marketing
Own contact person:
- Field is just for reading. Value is loaded from User field on contact person. Just in this field it is possible to link user with contact person. User can be connected just with contact person. Contact person takes default group of rights of that user.
Default group of rights for partners:
- You can add group of rights to a user and those will be added to all new partners that will create in future. This way you can insert new records easily. They will be limited for browsing and editing to users, who do not have the right for records with this group of rights.
Default group of rights for activities:
- You can add group of rights to a user and those will be added to all new partners that will create in future. This way you can insert new records easily. They will be limited for browsing and editing to users, who do not have the right for records with this group of rights.
Default dashboard
- The field for entering default dashboard. This dashboard will be always displayed after user's signing in web application K2 4 WEB.
Electronic addresses presets
Because of this function, you can preset 4 types of electronic addresses, which should be displayed in Partners, Contact Persons and Suppl./Cust. books. Preset electronic addresses are displayed in these books after pressing Field(H) button:
- Function of this button is set as default in books.
- In every line theDescription of electronic address is always in the first column (field), Abbreviation in the second, particular electronic address is in the third. A field for "Country" entering can be displayed after Abbreviation in particular format of electronic address.
- ... - by pressing this button:
- Displays the form for sending emails with preset emails of contact persons. "Email" has to be entered in field Format in Type of electronic address.
- runs internet pages of a contact person. "WebAddress" has to be entered in field Format in Type of electronic address.
Preset types of electronic addresses are also displayed as header in columns in Partners and Suppl./Cust. books upon inserting of contact persons. Electronic addresses of contact persons according to preset types are displayed upon inserting of contact persons in particular columns.
Create and use a Type of electronic address
When you create a type of electronic address in the book Types of electronic addresses, you need to enter the right Format or FormatVCard besides Abbreviation and Description.
According to format of electronic address, which you enter in Format field, the system controls the right assignment of particular electronic address in books Partners, Contact persons, Suppl./Cust. by the user.
In K2 these formats of electronic addresses exist:
- "Email" - email that we enter must contain "@", "." and the supplement country at the end.
- "Fax" - enter the number of fax without spaces. Country abbreviation is entered in the field Abbreviation of electronic address. If you fill the Country abbreviation, which has the field Telephone preset fulfilled, then you do not need to enter this preset for the number of fax. If you do not fill the country or the chosen country does not have the field Telephone preset fulfilled, the system requires to write telephone preset into fax number (e.g.: +420).
- "Mobile" - enter tel. number for mobile phone - see "Fax".
- "Phone" - enter tel. number for landline - see "Fax".
- "WebAddress" - electronic address (internet page) must be entered in format: http://xxxxxxxxxx.cz (or suffix of another country)
- "Unknown" - the system does not control the electronic addresses.
Setting the field FormatVCard:
- You can define a name field, where the electronic address should be saved as contact in application, which you use for electronic post (e.g. Outlook). Concerning the function for Save contact button.
- Example Save electronic address, Format: "Mobile". Entering the field FormatVCard: "TEL;HOME;VOICE". Mobile phone is saved in application into the field, which has the name "TEL;HOME;VOICE".
Environment (5th Page)
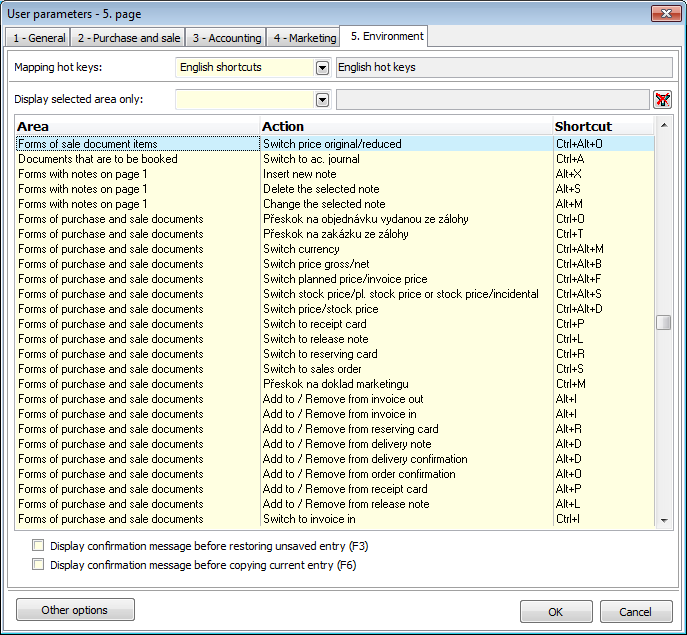
Picture: Form User parameters - Environment
Mapping hotkeys:
- The field contains the selection for language distribution for hot keys in K2 IS. All key abbreviations of selected language distribution will be displayed in a window after you select this field. This field is empty by default.
Display selected area only:
- After you select language abbreviations for better arrangement you can filter particular area (e.g. Purchase items).
The button  :
:
- Filter of areas will be off by pressing this icon.
Display confirmation message before restoring unsaved entry (F3)
- If the field is checked, then after pressing F3 key the question for confirmation of this action will be displayed. The option is off by default.
Display confirmation message before copying current entry (F6)
- If the field is checked, then after pressing F6 key the question for confirmation of this action will be displayed. The option is off by default.
Another options:
- After pressing this button the from for another setting of user parameters will be displayed.
Another options
Setting in these Other options relates only to so called automatic forms. This term means the forms that are created automatically without activities of a programmer, it means a programmer "does not draw" them. The automatic form is e. g. the form for administration of selection (Administration of conditions) or this Other options form.
Data grid
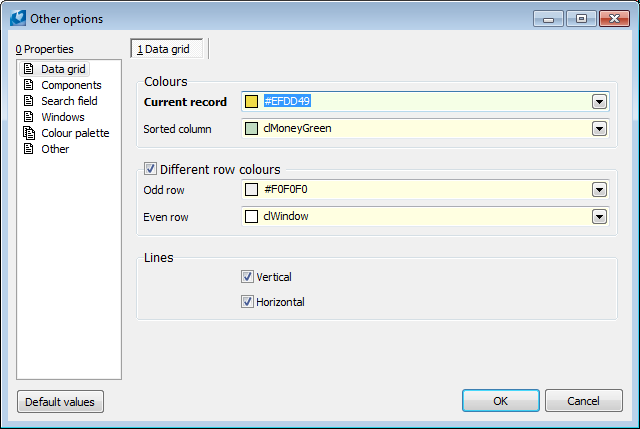
Picture: Other options form - Data grid tab
Current record:
- The colour for marking of a current record (where the light indicator is positioned) is selected in this field.
Sorted column:
- Here the colour for marking the header of a column that was sorted will be selected.
Different row colours:
- On - if the field is checked, the odd and even rows will be displayed coloured according to the setting in the automatic forms.
Vertical:
- When checking of this option only the lines of columns will be displayed in the forms.
Horizontal:
- When checking of this option only the horizontal lines of rows will be displayed in the forms.
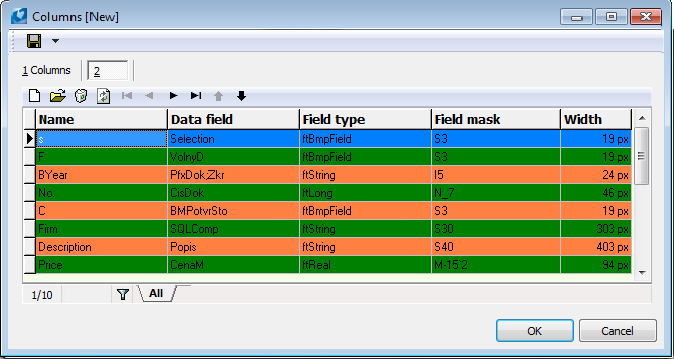
Picture: Form for administration of columns according to the setting on the Data grid tab
Components
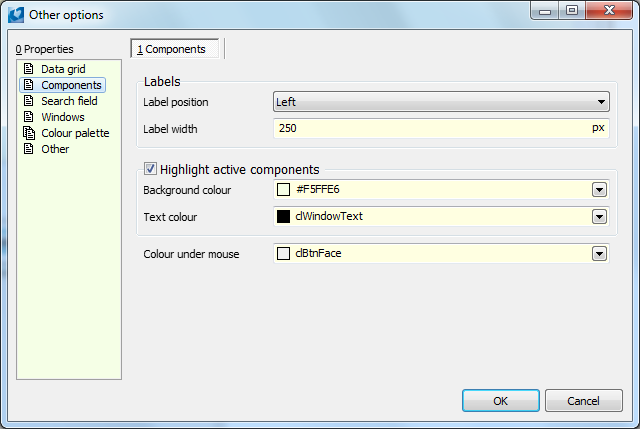
Picture: Other options form - Components tab
Label position:
- In this field select the option on which position the label should be positioned (up, left, ...).
Label width:
- The maximal number of characters of a label is written to this field.
Highlight active components:
- If this field is checked, the background and the text in the automatic forms will be displayed according to the settings of these fields (see the Other options - Components picture).
Colour under mouse:
- If you set the mouse indicator on a button in the automatic form, the button will be pictured according to the defined colour.
Search Field
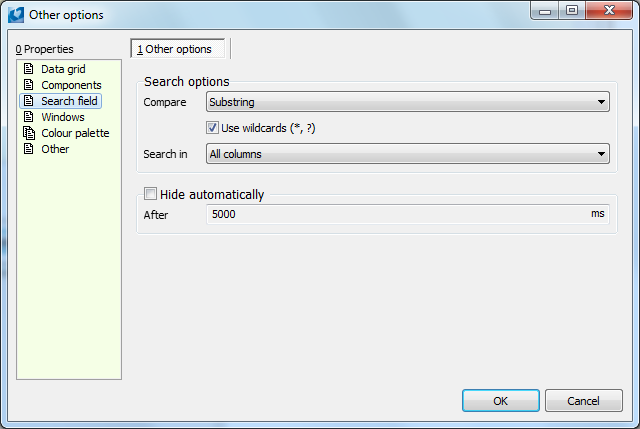
Picture: Other options form - Search field tab
Compare:
- When searching of records the program will compare the string of characters according to the selected possibility fromthe menu of this field:
- From beginning - comparison will be executed from the first character.
- Substring - comparison will be executed in all length of the text.
Use wildcards:
- If this field is checked, you can use the wildcards when setting of a value of a filtering condition.
Search in:
- In this field you select in which column of a table will be searched (in a current column, inthe sorted column or in all columns).
Hide automatically:
- If the field is checked, the text in the search field will be deleted after passing of a time that is set in the After field (the time is set inthe milliseconds).
Windows
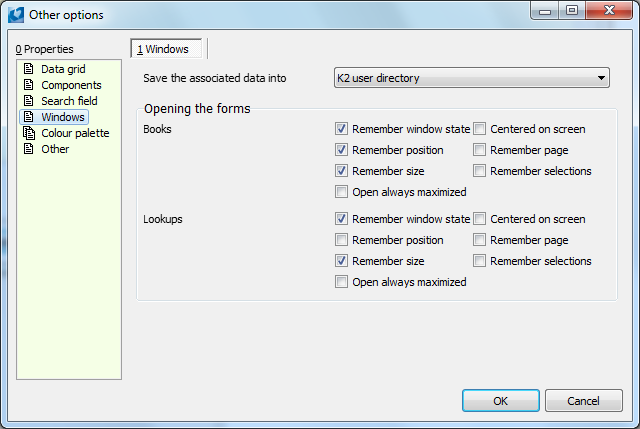
Picture: Other options form - Windows tab
Auxiliary data storage
In this field we specify where the auxiliary data that is created when working with will be stored K2 - eg it is about remembering the state of the window, the position of the window, the size of the window.
- In the user directory K2 - data is stored directly in directory installed K2. The directory is named "U0001", "U0002", "U0003", etc., where the number corresponds to the user number. This option is used in in case the user connects to K2 from different computers.
- In the local directory - data is stored in the Windows user directory.
Remember window state:
- If you check the field, the program will remember, whether the window is maximized or not (the origin size of window for "restoration").
Remember position:
- If the field is checked, the windows of code lists will be displayed on the same position on which it was closed at least.
Remember size:
- If this field is checked, the code lists will be displayed in the same size in which they were closed.
Open always maximized:
- When checking of this field all windows of code lists will be maximized after opening (otherwise the windows of code lists will be in the same size in which they were closed at least).
Centred on screen:
- When checking of this field all windows of code lists will be displayed in the middle of the screen (otherwise the windows of individual code lists will be located on the position on that they were closed at least).
Remember page:
- If this field is checked, the book will be displayed on the same page on which they were closed.
Remember selections:
- When checking of this field the selection that was open when closing the book will be displayed after re-opening in the book.
Colour palette
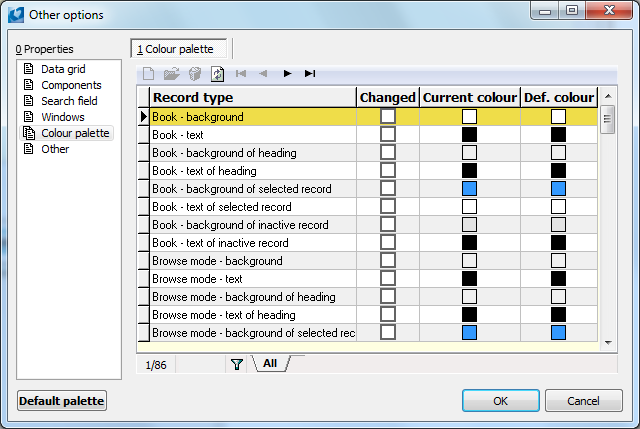
Picture: Other options form - Colour palette tab
- It serves for setting of background colours and text e. g. in the book or in the tree menu. Here you can add a certain tone to the colours too (e. g. the Colour 16 item (light grey)).
 (F5 key) - the form for change of colour of item of colour palette will be displayed after pressing.
  (Delete key) - after pressing the item of colour palette will be deleted from the list.
  (F3 key) - after pressing the data on the form will display.
  (Ctrl+Home) - after pressing the light indicator will be positioned on the first record.
  (Up-Arrow) - after pressing the light indicator will be positioned one record up.
  (Down-Arrow) - after pressing the light indicator will be positioned one record down.
  (Ctrl+End) - after pressing the light indicator will be positioned on the last record.
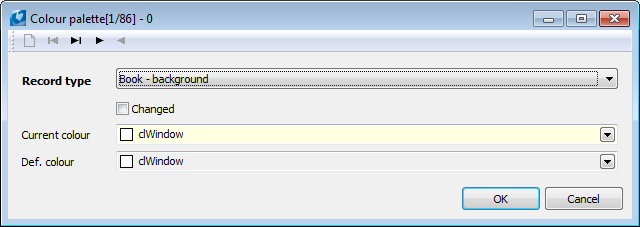
Picture: The form for colour setting
- Record type - the name of the opened item,
- Changed - the field will be automatically checked at the moment of the change of a record,
- Current colour - the current defined colour,
- Def. colour - default colour.
- If you want to change the colour in the item of palette, then in the Current colour field press the F12 key. The menu of predefined colours will be opened. It is possible to mix a custom colour in this form. Save the selected colour to the Custom colours by the Add to custom colours button and confirm the selection of colour for this item by pressing the OK button. The system automatically adds the code to this custom colour.
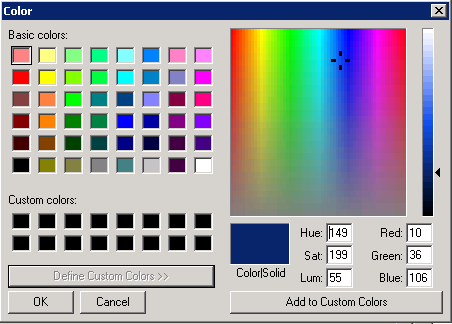
Picture: The form for colour selection
- The Changed field will be checked on the changed item.
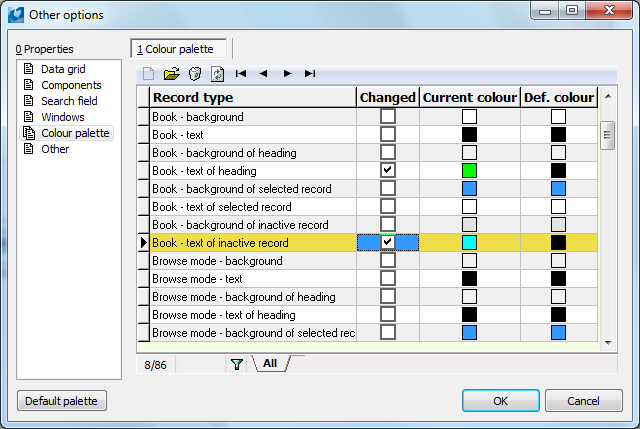
Picture: Other options form - Colour palette tab - changed records
- Default - setting of colours will be stated to the default state and the Changed field will not be checked.
Other
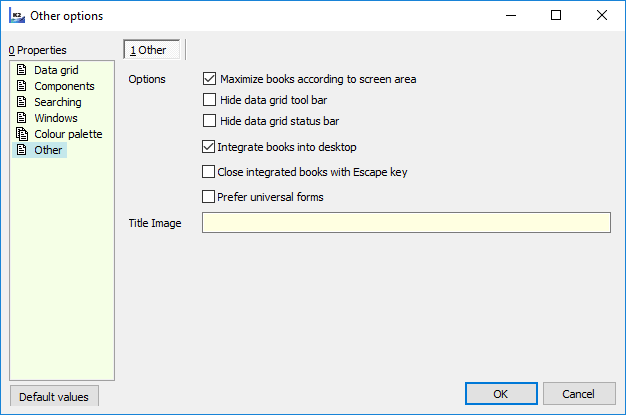
Picture: Other options form - Other tab
Multi-conditional searching on page 0 (Alt+F7):
- If you check this field when searching by the Alt+F7 key the form in that you can set more conditions will be displayed.
Columns settings depending on data module state:
- If you check this field, the program will remember setting of columns in the state of data module (Filter, Book, Selection,...).
Maximize books acc. to screen area:
- If you check this field and the screen area is maximized, then all books will be opened as maximized too.
Hide data grid tool bar:
- If you check this field, the data grid tool bar will be hidden.
Hide data grid status bar:
- If you check this field, the data grid status bar will be hidden.
Integrate new activated books into desktop
- If you check this field, the activated book will be opened in a new tab as a part of the desktop. If the field is not checked, the book will be activated as an individual window.
Close integrated books by Esc
- If you check this field, you can close an integrated book by the Esc key.
Personnel and wages data
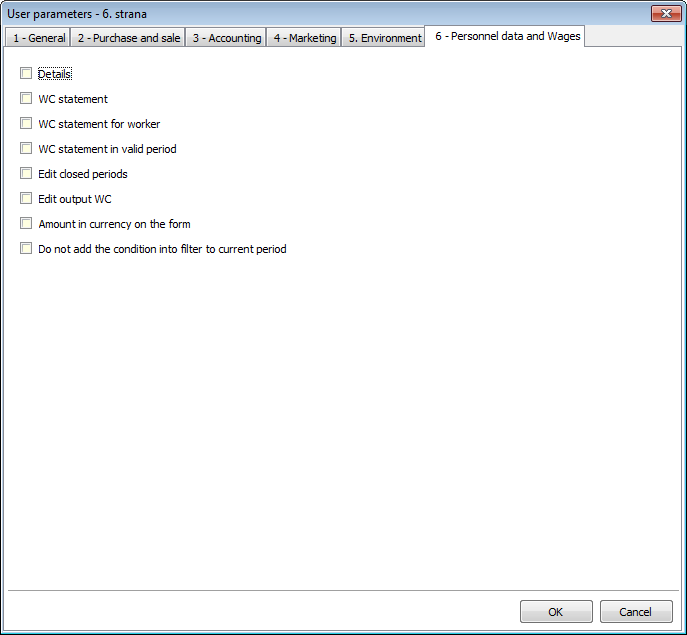
Picture: The User parameters - Personnel and wages data form
- Details - this checking flag is necessary if you want to see more information. If you want to have 'Detailed information about procession’ button displayed on the first page in Wage data or magnifiers in some fields, which you display details by means of, just press this checkbox. Standard item grids of calendar in Wage data on page C below calendar component will be displayed by checking as well.
- WC statement - if it is checked, then folders "Statement" on the 4th, 5th and 6th page of Wage data + H page will be displayed.
- Wage components for employee - if it is checked, then folders "Short statement - for an employee" on the 4th, 5th and 6th page of Wage data will be displayed. If the "Wage components" is checked at the same time, then the folders Statement - for an employee on the 4th, 5th, 6th and H page will be displayed.
- WC statement in valid period - if it is checked, then the folder "Period of validity" on the H page will be displayed (for "Statement", "Statement - for an employee - acc. to marks)
- Edit closed periods - the user can edit the closed periods after you check it. It is valid for a change of records in bulk as well. If you are in closed period in 'change mode', the text in upper part of the form will inform you.
- Edit output WC - if it is checked, the user can edit output WC on the 6th page of Wage data. If it is edited manually on the 6th page, the program will write down who and when the change has been done.
- Amount in currency on the form - if you check it, the field for wage managing in foreign currency will appear.
- Do not add the condition into filter to current book - if you make a filter in wage books, then either a condition to a current book is added into conditions. If you check it, the condition will not be added.
Default group
The user can assign the required group of rights for creating new records to the function. Each new record created by the user will then implicitly contain this right to the record (PraSk). This way you can insert new records easily. They will be limited for browsing and editing to users, who do not have the right for records with this group of rights.
For other users, group rights for creating new records can be set in the User Parameters on the "1-General" tab in the Default record rights group field.
Deletion of parameters for client
Once started, all user settings (MEMPAR table) for the client are cleared.