Coupon Discounts
Discount Coupons
The Book of Discount Coupons keeps record of discount coupons. You can create a discount coupon with the Ins key or do so in bulk from contact persons via the Create Discount Coupon bulk action.
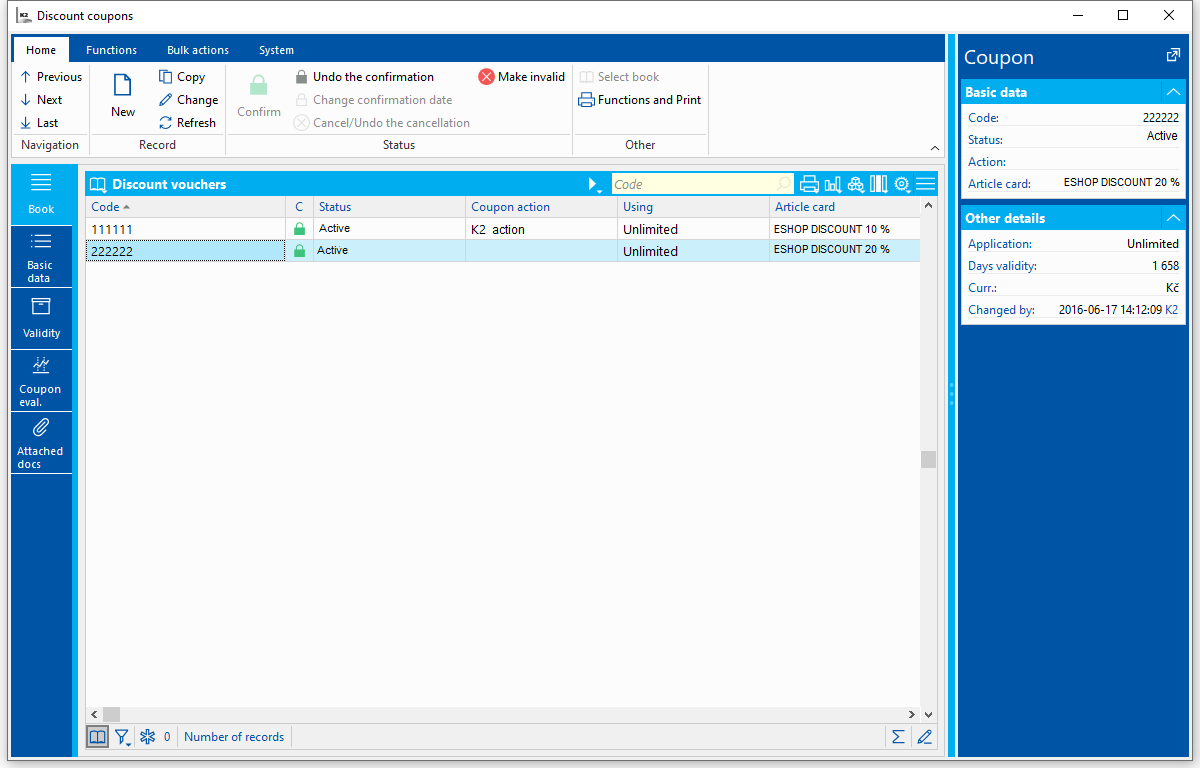
Picture: The Book of Discount Coupons
Discount Coupons (1st page)
Field description:
Code |
The code of a discount coupon. |
|||||||
Status |
The field for selecting from a code list that enables filtering of documents according to the selected status. |
|||||||
Discount Offer |
The name of a discount offer. |
|||||||
Article Card |
An Article card which represents a discount coupon. |
|||||||
Redemption |
You may choose from the options Unlimited, Single Use, Repeatable. In the case of choosing Repeatable, the Number of Redemption field will appear, in which you can enter the number of repeated redemptions of a coupon. |
|||||||
Discount |
The value of a discount. The discount may also be entered in percentage (by checking the 'percentage' flag). |
|||||||
Currency |
The currency that is applied to a discount. |
|||||||
Valid From Amount |
You may limit the discount coupon by an amount from which the coupon can be redeemed. |
|||||||
Max. Discount |
The maximum amount of a discount. |
|||||||
Validity |
|
|
||||||
Additional Text |
An additional text may be entered here. |
|||||||
Contact Person |
A contact person linked to the discount coupon. |
|||||||
Changed By |
The name and the date of the user who made the last change to the record. |
|||||||
Free Shipping |
If a discount coupon with this option is redeemed, the price for the shipping will be "0" if the given record in the Book of Purchases for E-shop has the Free Shipping - Discount Coupon flag checked. |
|||||||
unique customer |
If checked, the discount coupon may be applied only once for the given customer. With next attempts to apply such a discount coupon, a message will appear: "The entered discount coupon can be redeemed by customers only once." |
|||||||
from net amount |
If checked, the discount will be calculated from the Net amount. |
|||||||
round to units |
If checked, the amount on the Sales Order will be rounded to integer units when redeeming a discount coupon. Note: This applies to only those discount coupons whose discount is set in percentage. |
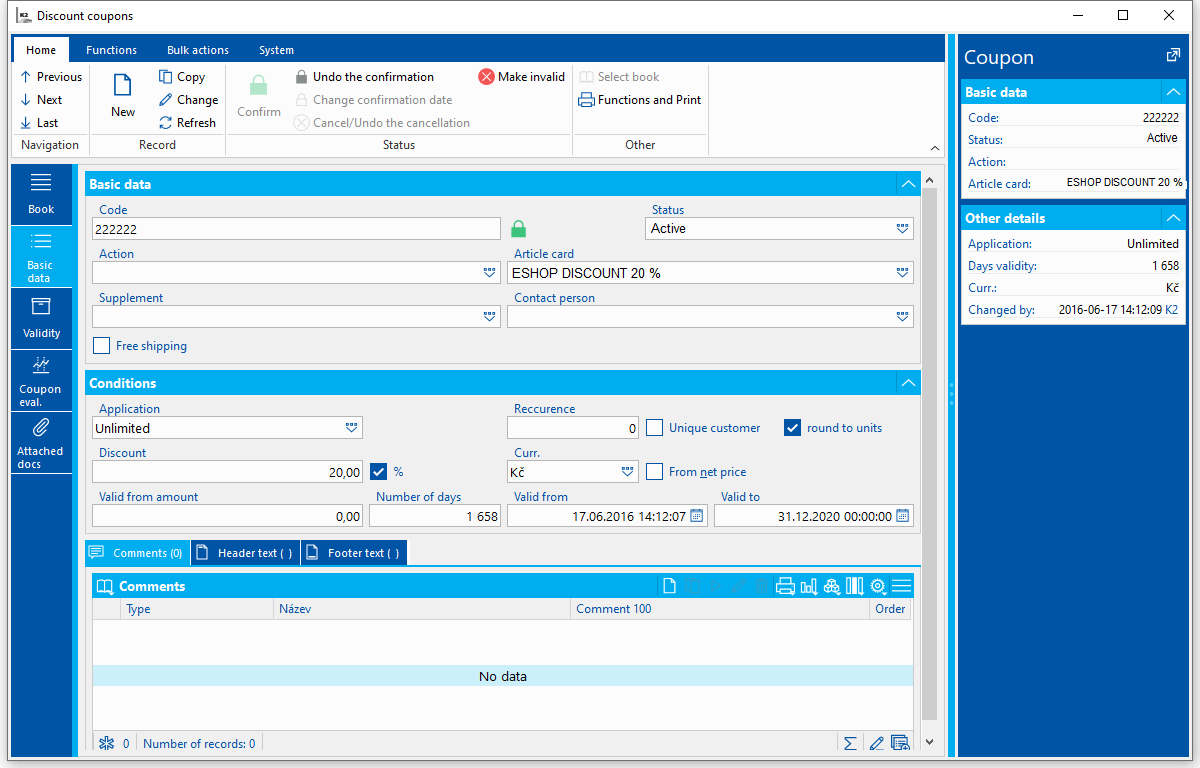
Picture: Discount Coupons (1st page)
Discount Coupons - Validity (2nd page)
The validity of discount coupons may be limited to individual books of Sale, e-shop categories, address keys, and product keys.
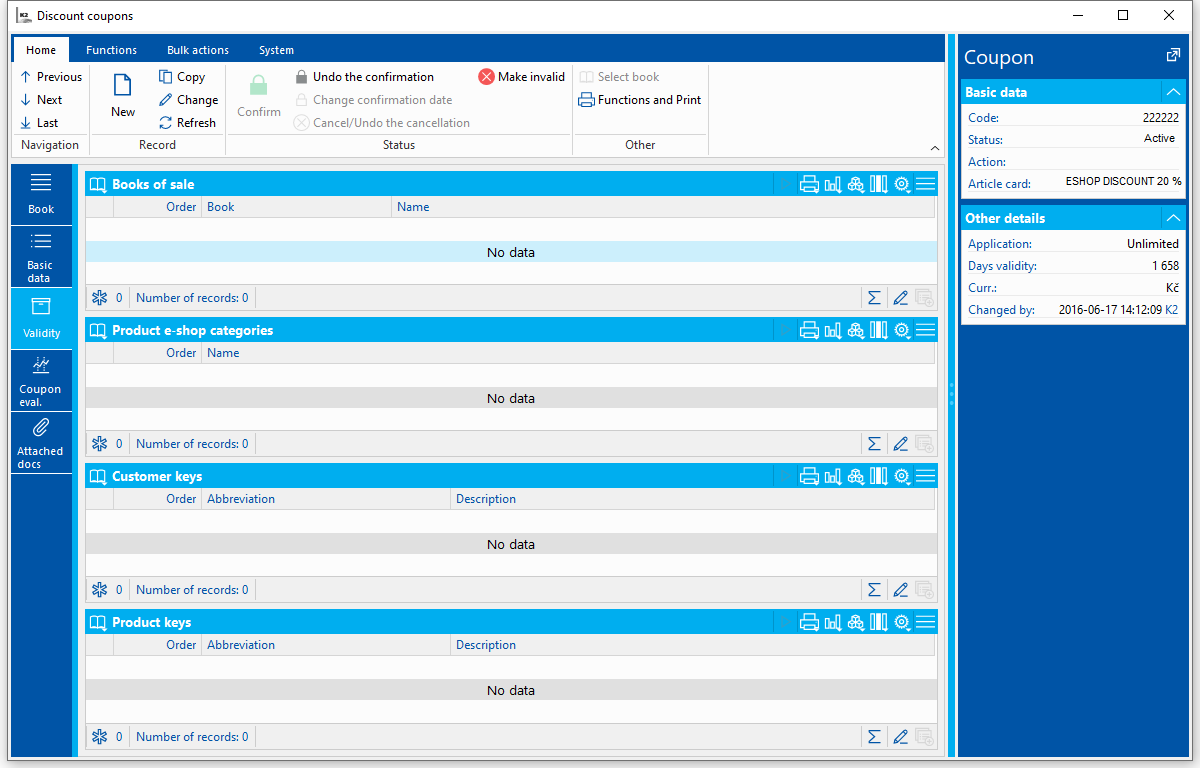
Picture: Discount Coupons - Validity (2nd page)
Discount Coupons - Evaluation (3rd page)
On the Evaluation page we may find the statistics of redeeming, and the statistics of discounts in Gross and Net amounts. A list of documents with an applied coupon is stated in the bottom table.
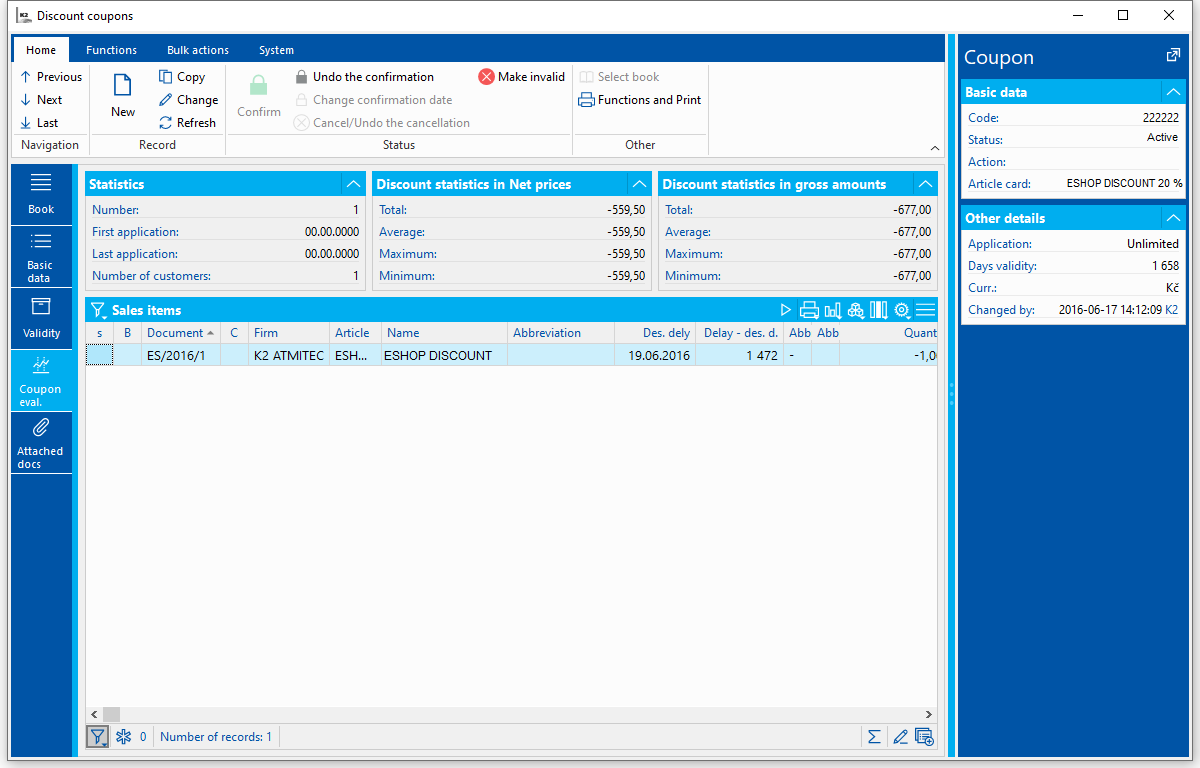
Picture: The Book of Discount Coupons - Evaluation (3rd page)
Discount Coupons - Documents (9th page)
On 9. page it is possible to discount coupons assign any documents. Further work description with the attached external documents and documents is stated in the chapter Basic Code Lists and Supporting Modules K2 – 9th Page.
The settings of discount coupon status
The function enables to set a user value from the code list to the Ready, Active, Redeemed and the Invalid status.

Picture: The settings of discount coupon status
Functions for Discount Coupons
Alt+F3 |
Activation of a discount coupon. The date from which the coupon is valid is entered. The date will be filled in to the Valid From field on the 1st page of discount coupons. |
Ctrl+F3 |
Deactivation of discount coupons. A coupon set for deactivation must be in the 'Active' status (resp. the value set by the 'Settings of Discount Coupon Status' function). |
Shift+F6 |
Multiplying of discount coupons. A form will appear, into which the number of new discount coupons that are to be created is entered. By setting the initial/final part of coupons, you may influence the code of a discount coupon. |

Picture: The Multiplying Coupons form
Selling in Shop (Retail Sale)
In the case of retail sale in a shop, you may use the function Selling in Shop (Retail Sale) to create documents.
You can set a Retail Sale in the touch control mode (the Touch Control parameter accessible in Retail Sale Parameters) or in the classic mode.
Preparation for Running a Retail Sale
The Retail Sale function works over the Retail Sale book and is accessible from the tree menu Sale / Processing of Sales Orders / Selling In Shop (Retail Sale). The Retail Sale book represents a book of Sales Order that has been adjusted to use in retail sale.
Before running the function, it is necessary to set the following:
- Add the Customer card that represents the usual (anonymous) customer into the Suppl./Cust. code list. Enter the obligatory card-creating data in this record. Use the Customer card to fill in the DefaultCustomer in Retail Sale Parameters (see below). For this customer, the Sale documents (sales orders, invoices out, release notes) will be issued for an anonymous customer in retail selling, if another customer will not be selected.
- If user wants to, he/she can set the Retail Sale Parameters in the Retail Sale Parameters function from the tree menu Sale / Processing of Sales Orders / Selling in Shop (Retail Sale) / Retail Sale Parameters.
- Set the payment terminal configuration TCP/IP in Payment terminal configuration TCP/IP function from the tree menu Sale / Processing of Sales Orders / Selling in Shop (Retail Sale) / Payment terminal configuration TCP/IP.
Retail Sale Parameters
Before the first run of a Retail Sale, it is necessary to set the parameters (e.g. a Book of Sale, the values in a Sales Order, etc.). This may be set with the Retail Sale Parameters. The function is activated from Sale / Processing of Sales Orders / Selling in Shop (Retail Sale). Data in blue are obligatory.
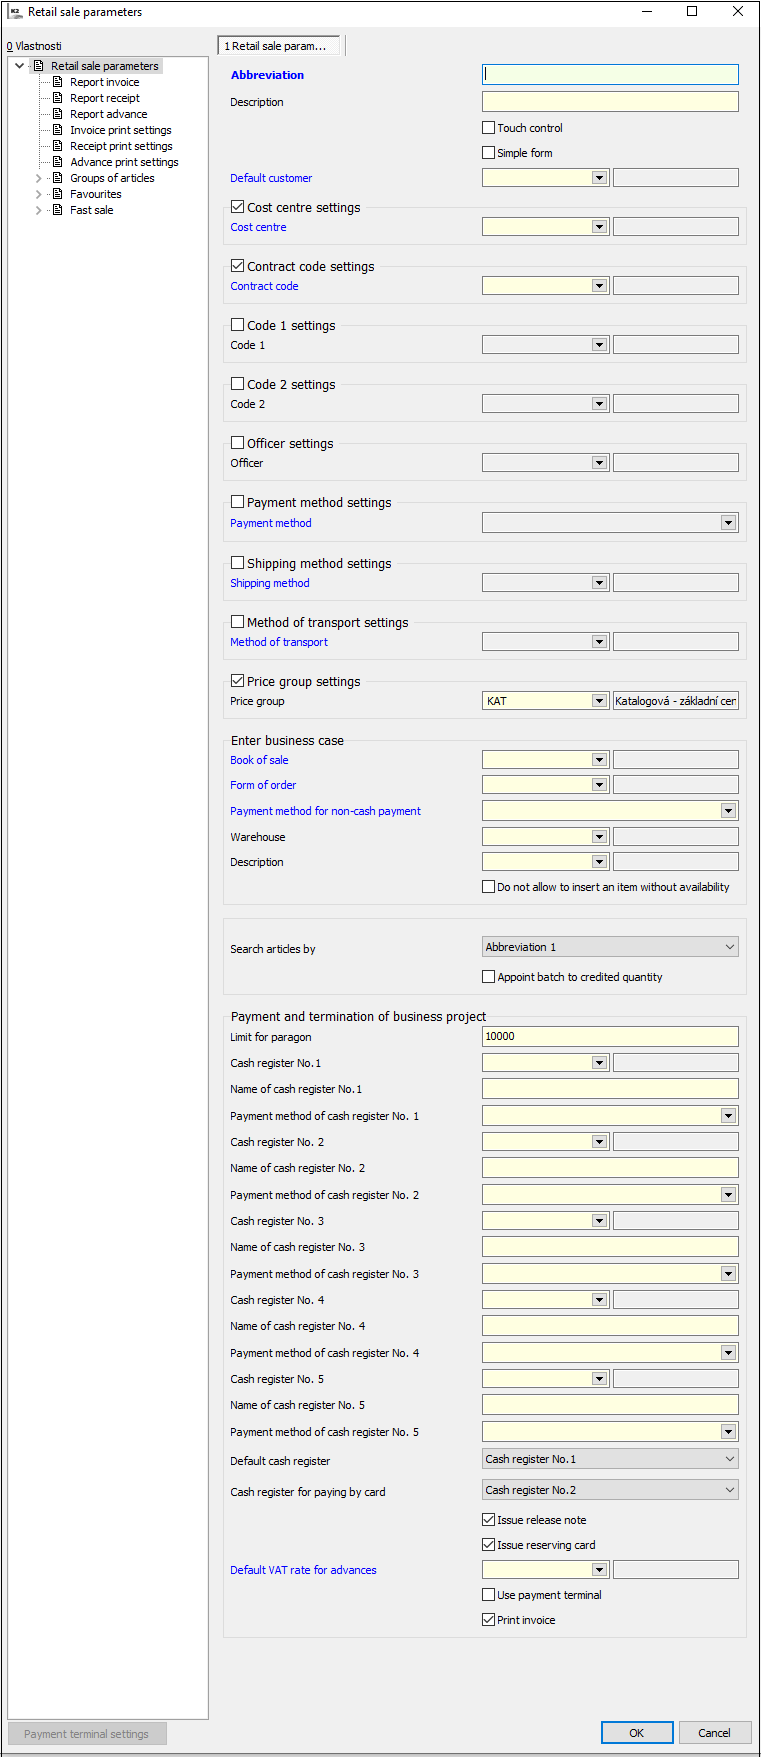
Picture: Retail Sale Parameters
Field description:
Abbreviation |
The abbreviation of a shop. The name is optional. |
Description |
The description of a shop. The name is optional. |
Default Customer |
The abbreviation of a customer who will be automatically set in a new Sales Order. |
Cost centre |
The contents of the Cost Centre field created on a Sales Order and subsequently in other created documents. If the Cost centre settings field is not checked, then the value from the customer selected in the Default customer field is filled in. If the entered value is not on the customer's card, then an error message will be displayed when trying to save the parameters set in this way. |
Contract Code |
The contents of the Contract Code field created on a Sales Order and subsequently in other created documents and their items. If the Contract code settings field is not checked, then the value from the customer selected in the Default customer field is filled in. If the entered value is not on the customer's card, then an error message will be displayed when trying to save the parameters set in this way. |
Code 1 |
A code for the auxiliary analysis of accounts. If the Code 1 settings field is not checked, then the value from the customer selected in the Default customer field is filled in. |
Code 2 |
A code for the auxiliary analysis of accounts. If the Code 2 settings field is not checked, then the value from the customer selected in the Default customer field is filled in. |
Officer |
A reference to personnel data. If the Officer settings field is not checked, then the value from the customer selected in the Default customer field is filled. |
Payment Method |
Automatic settings of the option whether to pay the transaction in cash, or whether to invoice it (i.e. payment will not be required). This settings may be set in the 'Payments' form in need of an operative change, if other circumstances allow it. If the Payment method settings field is not checked, then the value from the customer selected in the Default customer field is filled in. If the entered value is not on the customer's card, then an error message will be displayed when trying to save the parameters set in this way. |
Shipping Method |
The contents of the Shipping Method field created on a Sales Order and subsequently in other created documents. If the Delivery terms settings field is not checked, then the value from the customer selected in the Default customer field is filled in. If the entered value is not on the customer's card, then an error message will be displayed when trying to save the parameters set in this way. |
Method of transport |
The contents of the Method of Transport field created on a Sales Order and subsequently in other created documents. If the Shipping method settings field is not checked, then the value from the customer selected in the Default customer field is filled in. If the entered value is not on the customer's card, then an error message will be displayed when trying to save the parameters set in this way. |
Price Group |
The price group that will be used to value the articles of sale. If the Price group settings field is not checked, then the value from the customer selected in the Default customer field is filled in. |
Entering a Business Transaction |
|
Sale book |
Which book the Sales Orders will be created into. It is recommended to create a separate Book of Sale for Sales Orders created by a Retail Sale. |
Form of order |
The contents of the Form of Order field in a created Sales Order. |
Payment Method for Non-Cash Payment |
Selection from the 'Payment Method' code list. |
Warehouse |
The abbreviation of the warehouse that is to be set during the creation of a Sales Order or a Release Note. This warehouse will also be set as an Informative one in the Articles code list when entering articles into the item. |
Description |
The value will appear in the Description field of an issued Sales Order. |
Do not allow to insert an item without an availability. |
If it is checked, then when trying to insert an item without adequate availability in the warehouse, the item will not be inserted. If it is not checked, then only a message is displayed that the articles are not in warehouse, but because, for example, the seller has the articles "in front of him" or "in hand", then such articles can be inserted on the document. This option solves situations when stocks are out of date. |
Search Article By |
The option defines in which way the article will be searched for. - EAN. The entered EAN on Article cards will be searched. If not found, the abbreviation of the article, the abbreviation 2 of the article, and the name of the article will be searched for. - Abbreviations1. Firstly searches through the abbreviations of the article, then searches the EAN code, and then the abbreviation 2 and name of the article. - Abbreviation2. Firstly searches for the abbreviation 2, then abbreviation 1, followed by search for EAN and name of the article - Name. Firstly searches through the article name, then abbreviation 1, then abbreviation 2, and lastly EAN. |
Assign Batch to Credited Quantity |
The option defines whether to assign a batch to a negative item. Parameter not supported. |
Payment and Termination of Business Transaction |
|
Limit to Receipt |
For a business transaction above the value stated here, it will not be possible to issue a receipt, but an invoice out will be issued. By default, the value is set at CZK 10,000, because above this value there is an obligation to issue an invoice out. Note: If an invoice out should be printed exceptionally for a document with a lower value, then the Print invoice field can be checked directly on the retail sales form. In this case, the receipt is not printed, but the invoice out document. |
Pokladna1 |
The settings of the Cash Register book that will be applied during payments. |
Name of Cash Register 1 |
The name of the cash register that will be displayed on the payment form. |
Payment Method for Cash Register 1 |
If you choose the CashRegister1, the Payment Method value will be filled in with the selected payment method on a Sales Order document and other subordinate documents. |
Cash Register 2 - 5 |
The settings of the Cash Register 2 - 5 that will be applied during payments. |
Name of Cash Register 2 - 5 |
The name of the cash register 2 - 5 that will be displayed on the payment form. |
Payment Method for Cash Register 2 - 5 |
When choosing the Cash Registers 2 - 5, the Payment Method value will be filled in with the selected payment method on a Sales Order document and other subordinate documents. |
Default Cash Register |
The cash register that will be offered to be paid with automatically with each opening of the Payments form. |
Cash Register for Card Payments |
The cash register that will be connected to the terminal for non-cash payments. |
Create Release Note |
If checked, a Release Note for the business transaction will be issued. |
Create Reserving Card |
If the Create Release Note parameter is checked and it was not possible to issue a Release Note due to insufficient availability in stock at the same time, a Reserving Card will be issued in the case of checking this parameter. |
Default VAT Rate for Advances |
Selection from the 'Rates' code list. |
Use Payment Terminal |
If checked, it checks the settings with a payment terminal. |
Print Invoice |
If checked, an Invoice Out is printed out. If not checked, a receipt will be printed out. Applies to documents with a value less than the value specified in the Limit for the receipt parameter. |
The Invoice Report, Receipt, and Advance Tabs
You can choose the report that is to be printed out in these tabs.
Invoice print settings, receipt printing settings, advance print settings tabs.
Details on printing these documents can be set on these tabs.
The Article Groups, Favourites and Quick Articles Tabs
These tabs enable you to set the number of columns and the width of buttons. The List of Articles section enables you to define individual cards to be displayed in the Groups, Favourites, or Quick Articles sections.
Example of definition of favourites
Definition of number of columns and button width. You can check whether the buttons should show the previews of articles.
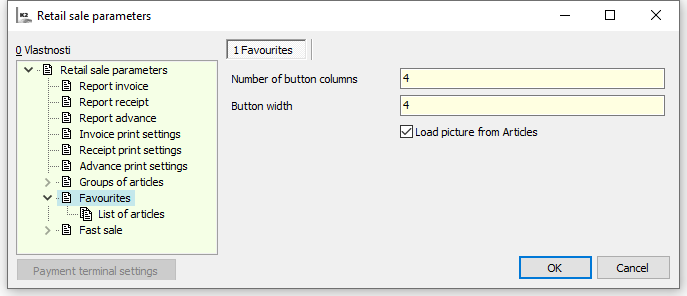
Picture: Favourites - button definition
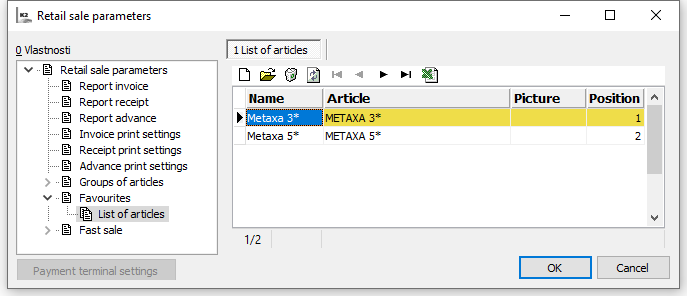
Picture: List of articles for the Favourites section
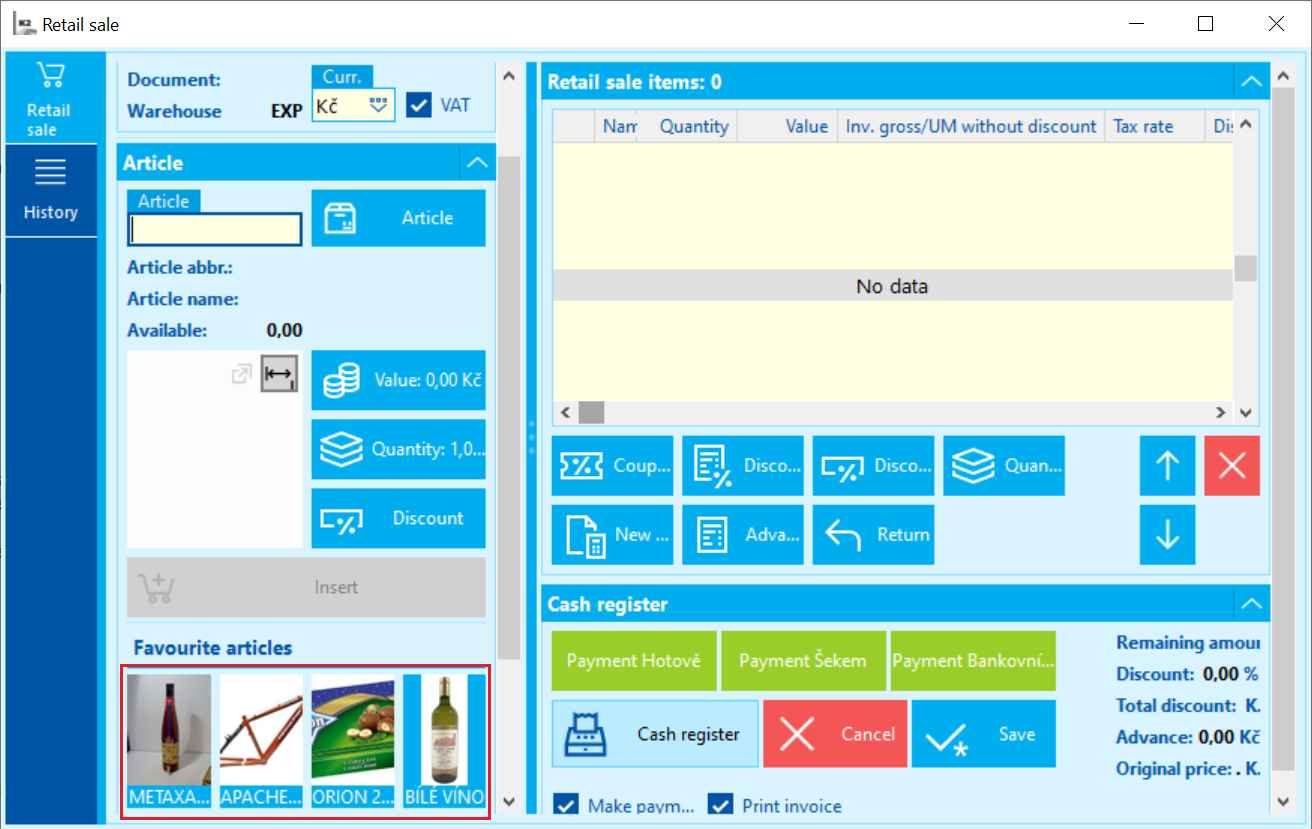
Picture: Favourites displayed in a Retail Sale
Retail Sale
Retail Sale Tab
After running, a Retail Sale will be set into status in which you can directly start entering the business transaction. The cursor will be set in the Article field. The customer is set according to the value in the Retail Sale parameters. You can display the Retail Sale in touch control mode or in the standard display. You can set the touch control mode in Retail Sale Parameters.
Cursor is set in the Article field and the seller can enter individual sales items directly (e. g. by a bar code reader), or enter a quantity if this value is not part of the bar code.
If there are also preferences for favourite articles or quick sales entered in the sales parameters, then it is also possible to enter sales items by selecting from these buttons.
In the lower part of the form, there are buttons for payment and for entering the most common business operations (receiving a advance, applying advance, applying discount coupons, returning articles).
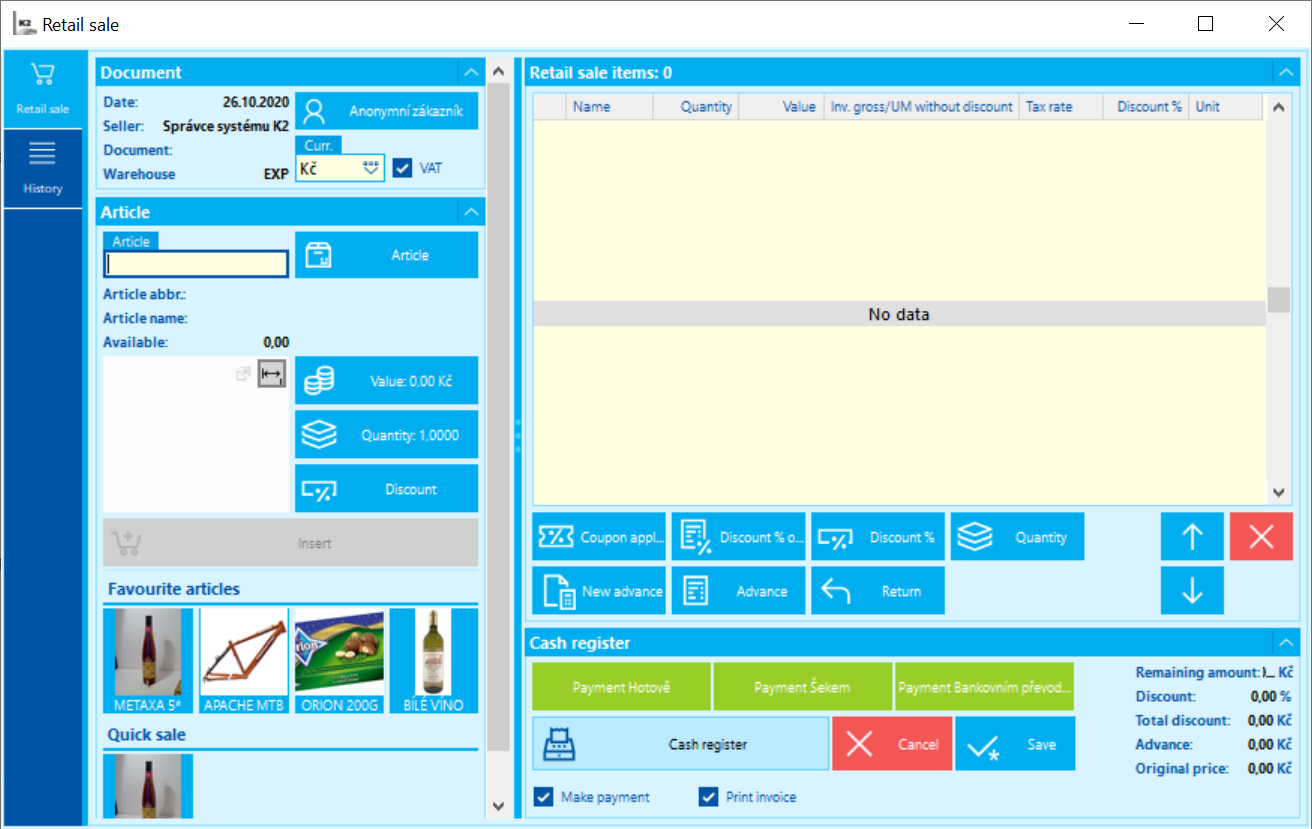
Picture: The status of Retail Sale book after initial running (with touch control on)
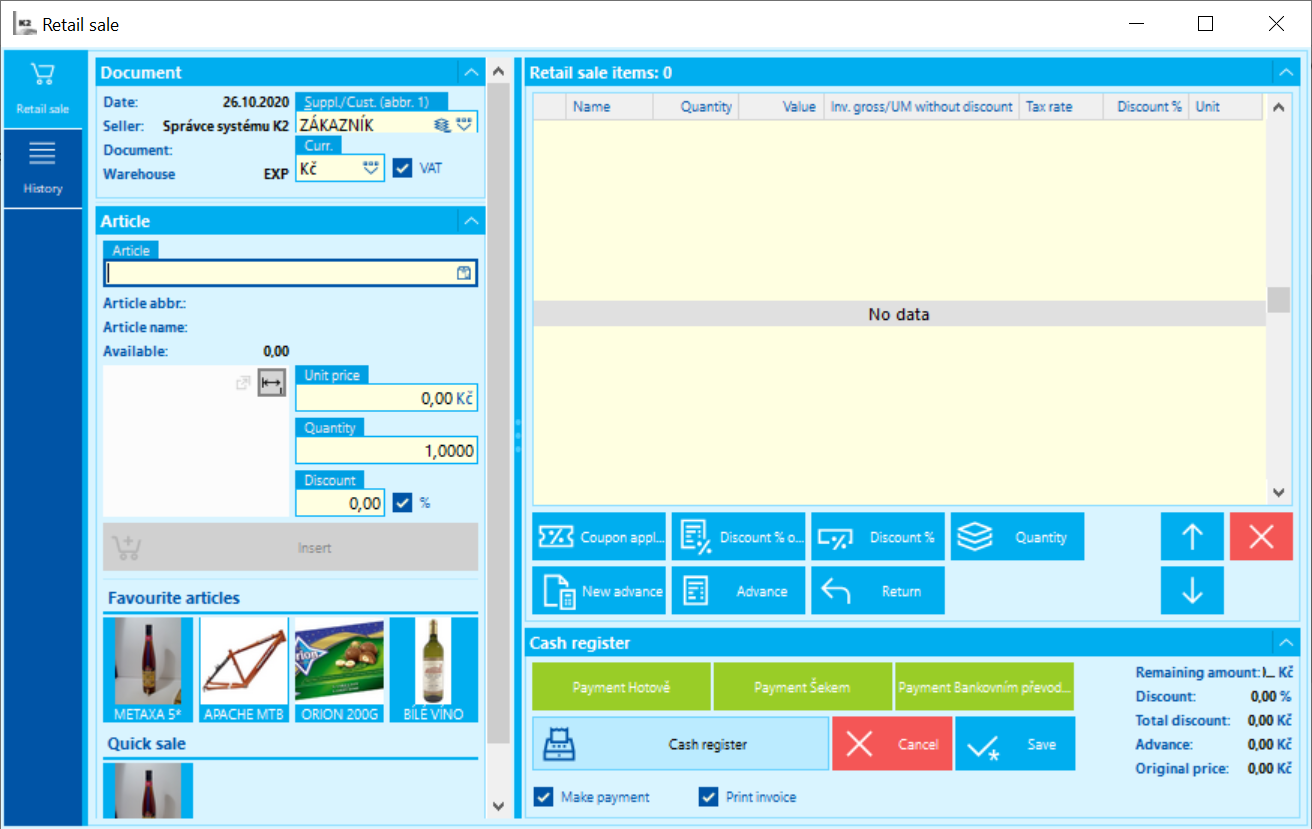
Picture: The status of Retail Sale book after initial running (with touch control off)
The Retail Sale tab is divided into section Document and Articles which is used for entering of a new item, and a section for displaying all items of the document or all applied Advances.
Fields description of a Document section
Date, Seller |
Informative data about the current day and the logged in user. |
Document |
If you enter a new business transaction, the number of the transaction will appear in the field if the user parameter Show Expected Document Number is on. If the parameter is off, the field will remain empty when entering the transaction. In the case of browsing already created documents, the number of the Sales Order will show here. |
Customer |
The button for choosing a customer. The value from the Retail Sale parameters is set by default. |
VAT |
Whether the document includes the VAT or not. |
Warehouse |
Information about the set warehouse. Can be set in Retail sale parameters. |
Currency |
The document currency. |
|
In the mode of viewing or editing a previously saved document, information about the existence of subordinate documents is displayed. |
Fields description of a Articles section:
Articles |
Used for defining a new item. The way of entering is influenced by the Retail Sale parameter Search Articles By, in which the preference for searching items from a book of Articles is defined. - EAN. The entered EAN on Article cards will be searched. If not found, the abbreviation of the article, the abbreviation 2 of the article, and the name of the article will be searched for. - Abbreviations1. Firstly searches through the abbreviations of the article, then searches the EAN code, and then the abbreviation 2 and name of the article. - Abbreviation2. Firstly searches for the abbreviation 2, then abbreviation 1, followed by search for EAN and name of the article - Name. Firstly searches through the article name, then abbreviation 1, then abbreviation 2, and lastly EAN. |
Article Abbreviation, Article Name, Availability |
After user chooses an Article, the informing data about the item, such as its abbreviation, name, availability, and a preview of article image (if added), will be completed to the item. |
Unit Price |
Will complete a price according to the pricing settings after choosing an article. If the user (seller) has right Change of invoice price, he/she can edit the price. |
Quantity |
The item quantity. |
Discount |
Discount can be filled if the user (seller) has right Change of invoice price. |
Weight EAN code.
Entering barcodes in the seller allows the use of so-called weight EAN codes, i. e. codes that contain weight. The typical example is the sale of meat products or fruits and vegetables. Based on compliance with the conditions of the EAN code registration in IS K2, the system automatically recognizes the articles with the weight EAN and inserts the correct article card in the Articles field and then adds the relevant weight of the articles in the Quantity field.
The conditions for using the weight barcodes in IS K2:
A barcode exactly 12 characters long (i. e. without the last control character) must be inserted on the article card in the barcode section and must start with a pair of numbers 25, 26 or 28 and 29. The first 6 characters are considered EAN. Zeros must be entered from position no. 7. If this two digit number is found in the bar code and the following four characters correspond to the EAN saved on the article card, then the system considers the given EAN as a weight and considers the position in the eighth to twelfth place as a weight. In the case of the two digits 25 and 26, the five numbers in positions eight to twelve are considered to be an integer, in the case of the two digits 28 and 29 they are considered to be a number with two numbers before the decimal point and three after the decimal point.
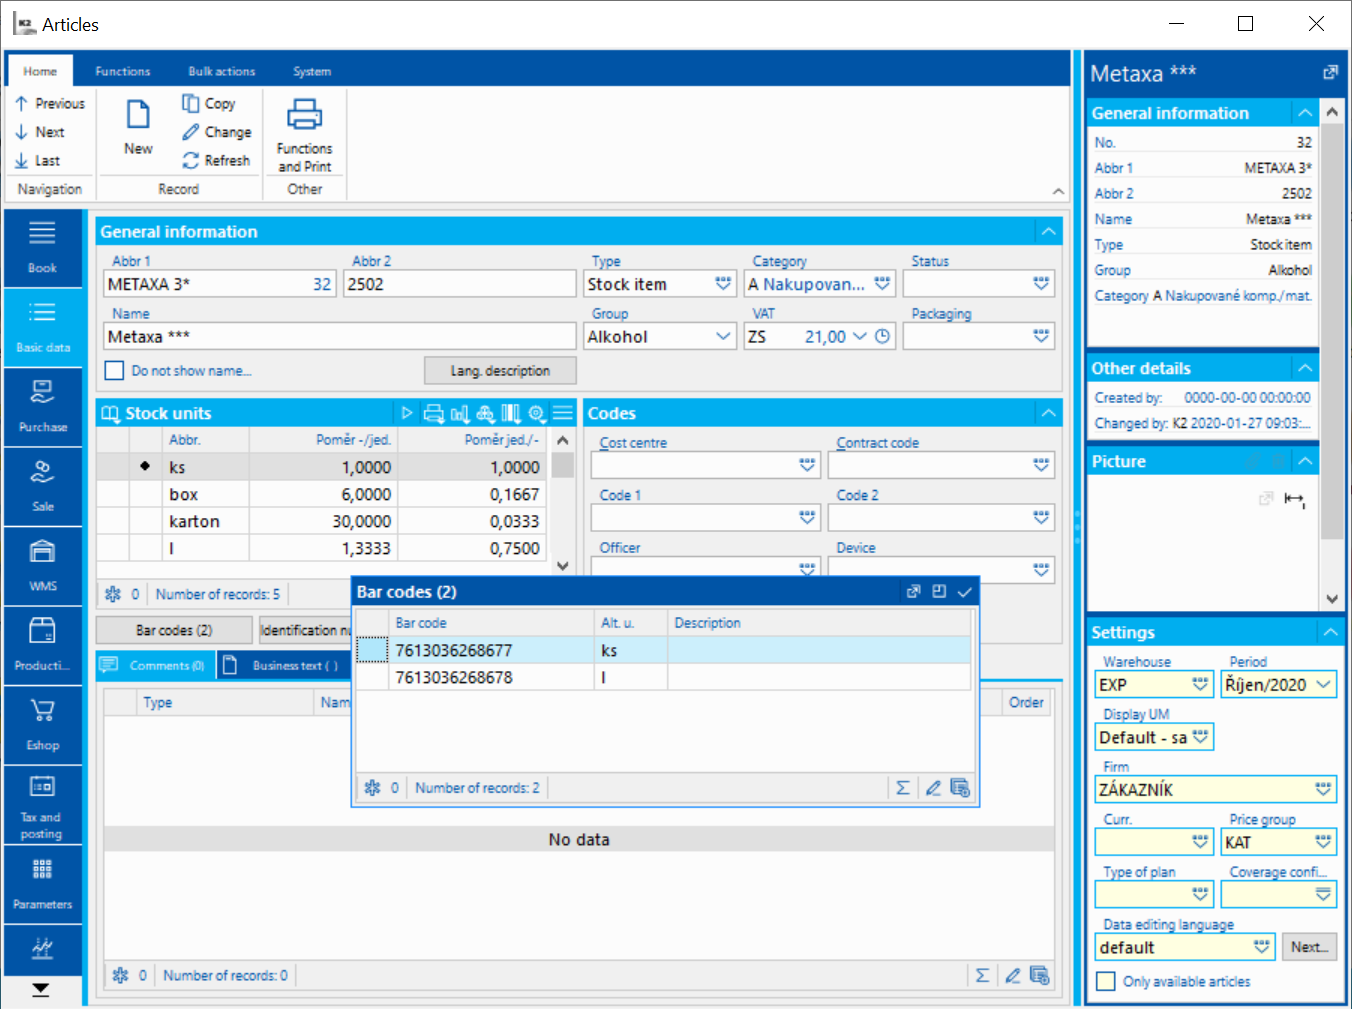
Picture: Example of article with entered weight EAN code
If bar code 2843210000556 exists (note: Position number 13 is control and is calculated automatically. This control position is ignored. In this case it is number 6),it is article card on which is EAN 284321000000. After reading the bar code, the Article field is filled with the value Anise and 0.055 kg is added to the Quantity field. Because it is a two digit number 28 or 29, then it is a weight EAN to three decimal places.
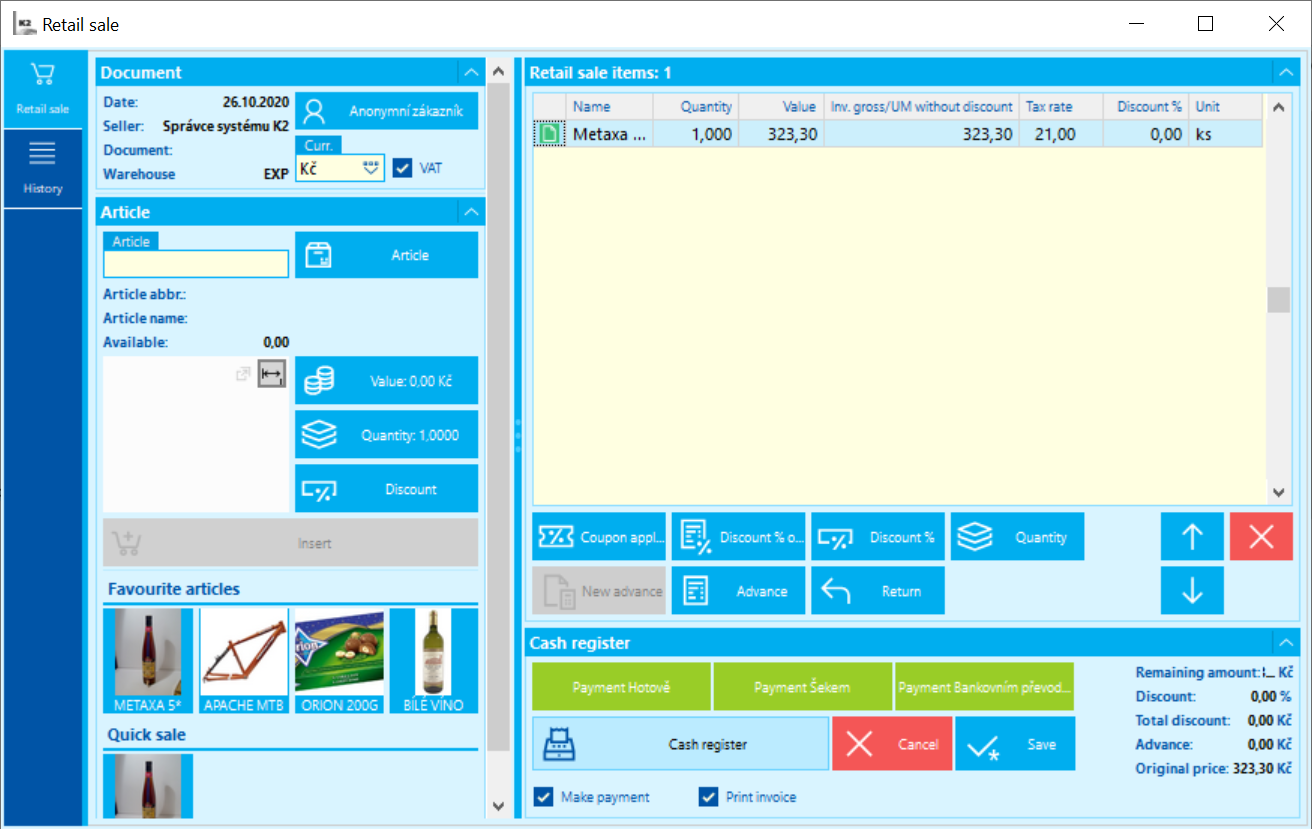
Picture: Example of inserting an item with a weight code at the seller
If Article Groups, Favourites or Quick Sale are defined in the Retail Sale parameters, buttons corresponding to the set articles will show.
Article Groups - Article groups are defined in Retail Sale parameters. You can enter a selected product key. After pressing the button, all items of the product key will be displayed. If an image is saved on an Article card, it will also be displayed along with the name of the article.
Favourites - If some articles are sold on a regular basis, it is possible to define the given card in Retail Sale parameters in the Favourites section. When entering a new business transaction, you can press the button with this article, which will be selected for the article field in the New Item section.
Quick Sale - If the Quick Sale parameter is set in the Retail Sale parameters, an item of Sale with defined article and quantity will be created after pressing the button.
On the right is a table for entering sales items. Under the tab with the items are buttons that allow you to perform selected actions. This includes creating a new advance, applying an advance, applying a discount coupon, a discount on item, a discount for purchase, return (credit note) and button for quantity change. To the right of these buttons are buttons for moving the cursor between items and also a button for deleting an item.
New Advance
After pressing the New Advance button, a form for entering a new Advance will open. The staff will enter the amount of the Advance. The Advance Received will be filled in to the customer selected in the 'customer' button in the Basic Data section. Confirming the amount will display a record in the right section of the form. The staff will choose the button for paying the Advance. This step will create an Advance Received.
The button is active only if no Sales Order is being processed.
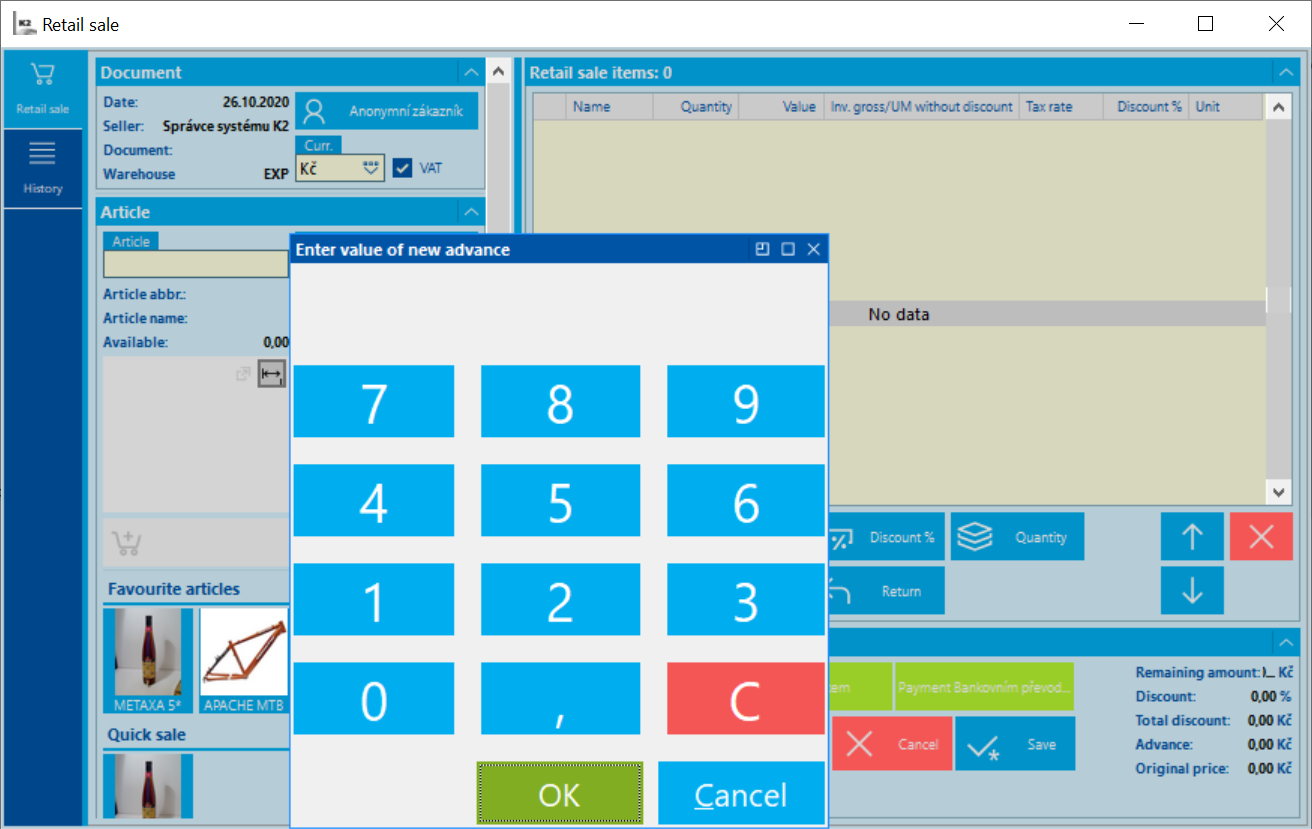
Picture: Entering a new advance
Advance
After pressing the button Advance, a form will appear, into which the user will enter the reference number of the Advance (by choosing it from the book or e.g. by a reader). Alternatively, user can press the Select advance button to search for a advance. A list of customer advances will display. Confirming it with OK will lead to draw of the Advance for the processed business transaction. In the Advance section on the right, a table with an inserted advance record will be displayed. After applying the Advance, the remaining amount to be paid off will lower by the applied (paid off) Advance.

Picture: Applying an advance
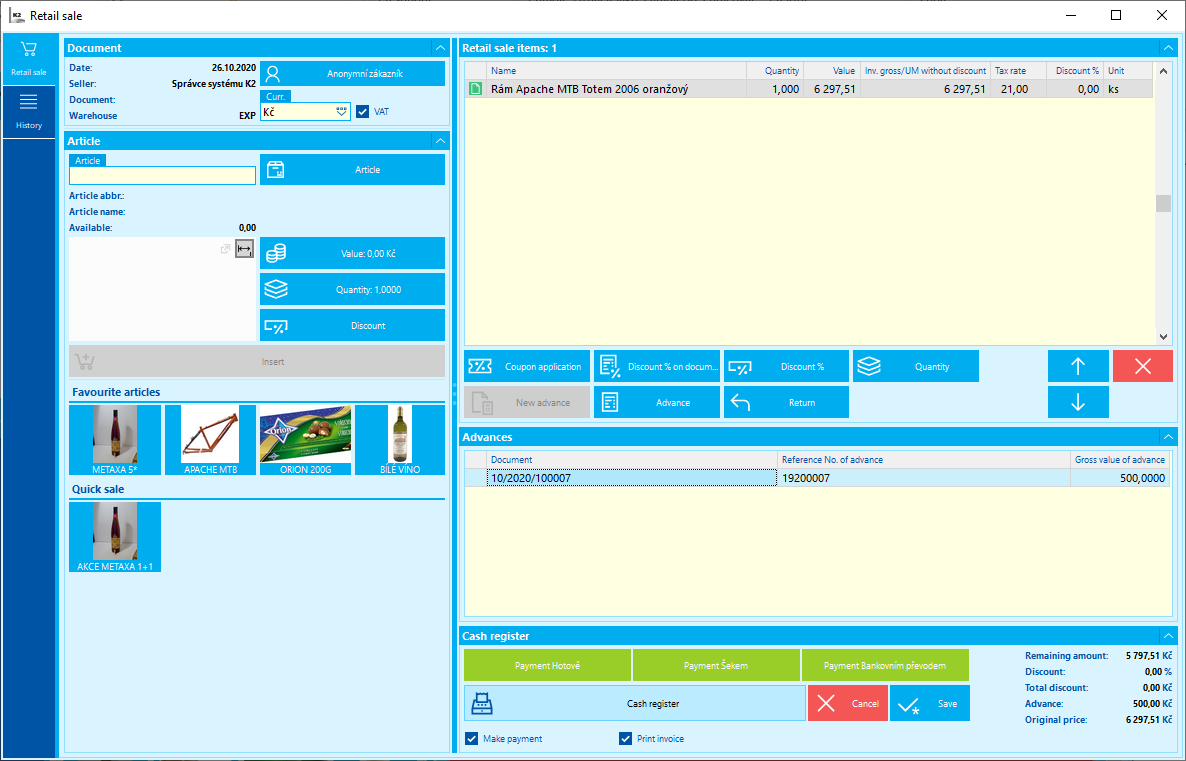
Picture: Applied advance
Discount Coupon
After pressing the Discount Coupon button, a form will open into which the staff will enter the discount coupon. After confirming the option, the item representing the discount coupon will be added.
Discount %
After pressing the Discount % button, a form with a calculator will open, in which the staff will enter the discount amount in percentage for the item on which the light indicator is positioned.
Discount % on Document
After pressing the Discount % on Document button, a form with a calculator will open, in which the staff may enter the discount for all items of a document.
Entering a Business Transaction
After running Retail sale function, the retail sale in status for entering a new documents will display.
After running the Retail Sale function, two folder tabs become available. The Retail Sale tab and the History tab. In History tab, user sees the list of already created documents in a Sales book, which is intended for retail sale documents. User can enter a new business transaction with the New button on the Retail Sale tab (bottom right).
The Customer and Currency fields will be completed according to the settings of the Retail Sale parameters. In the New Item section, choose a new item by selecting in from the Articles code list or by entering its bar code. If the quantity differs, edit it, and confirm the creation of the item on the document by the Insert Item button. User may add other items to the document. In the right section is a list of items. In the bottom section is the current value of the whole Sales Order.
History Tab
You can see a list of already created documents in the History tab.
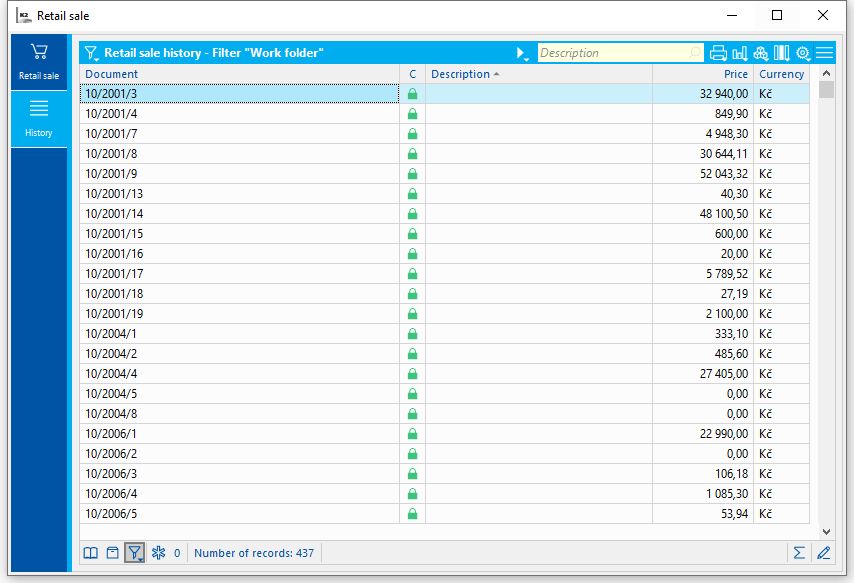
Picture: Retail Sale - History tab
Loyalty programs
Further description see Web and E-shop part.