Contact persons
The book of Contact Persons is the database of all persons stated at all the partners. The database is also extended by the individually submitted persons.
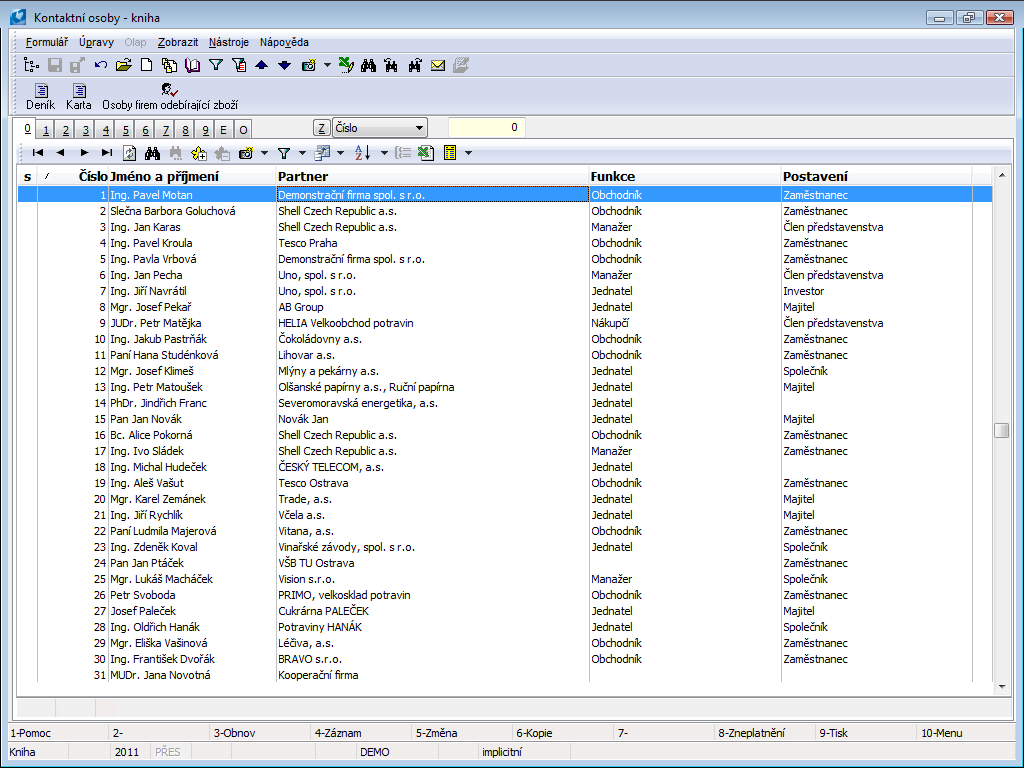
Picture: Contact persons book
The contact person's card is linked to data from the Partner's card (eg activity diary), but also other fields important for the inclusion of a specific person. If we want to register only the contact person and activities related to it, we must create a fictitious partner with the abbreviation equal to Surname. You paste the surname, name and title of this person to the partner name. On the contrary, if you contacted the partner at whom you do not know the exact initials of the contact person, you create a new card of the contact person (for the registration of activity) but to the Surname field you paste the information that you know or expect (e.g. secretary, economist, accountant etc.). If one contact person comes up for more partners, it has to be submitted for each partner separately (by the individual card).
You cannot delete any card from the Contact Persons database, the Contact Person card can be cancelled by F8 key only. If contact person is also officer then the officer is cancelled too.
Attention: The User field must be pasted on the 1st page of the contact person card in the case of your own employees!
Contact persons card
Basic Data (page 1)
On the 1 st page there are given basic information about contact person. By Ctrl + Enter keys can in Browse on 1 st Page of contact persons card open 1 st Page of Partner card.
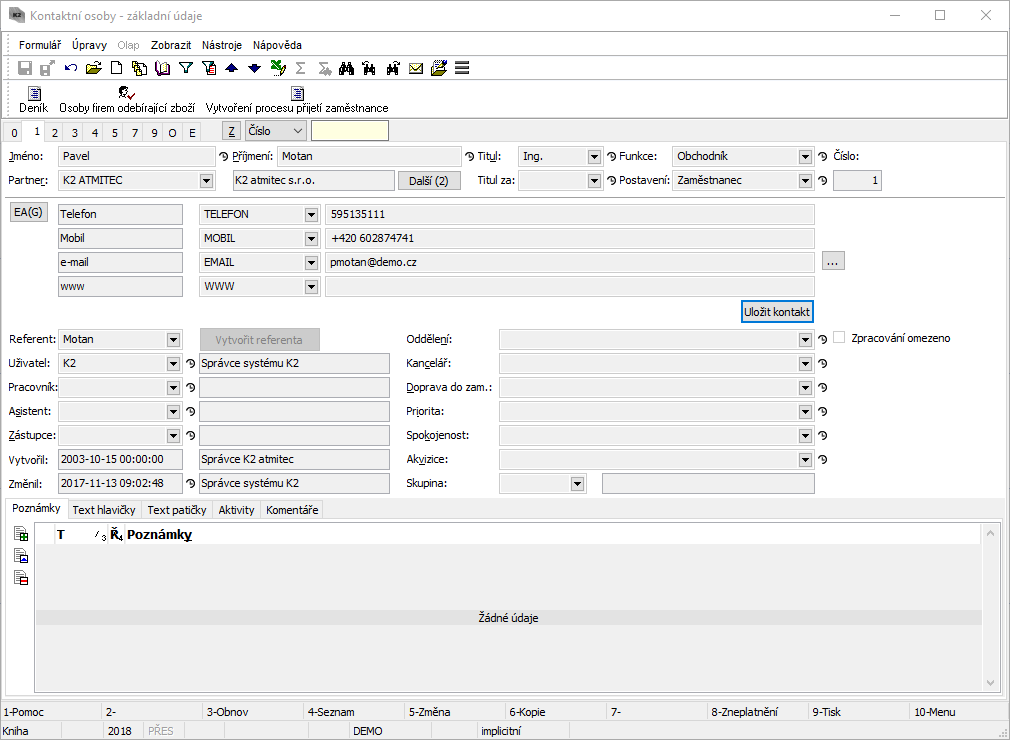
Picture: Contact person- 1 Page chapter).
Description of Fields:
Name |
Name of a contact person. You do not have to fill it if you do not know the correct initials (optional). |
Surname |
The surname of a contact person. Fill open initials - for the print in bulk (obligatory field). |
Title |
It is obligatory to fill this field also for persons without the title because it is used for correspondence in bulk. It is possible to use "Mrs.", "Ms", "Miss" title too. |
No. |
The ordinal number of the contact person that is assigned by program automatically. |
Function |
The official classification of a person (identical to the function in a business card). |
Partner |
Interconnection to the Partner tab. Next (0) button displays info about number of other connected partners. When you press the button, list of all other connected partners will display and new partners can also be added in this form with Ins key. Contact person, which has more partners assigned, has on page 0 icon |
Next () |
Button allows to link contact person with other partners. List of partners is displayed after Next button is pressed, new entry can be done with Ins key. Number of these additionally linked records is shown in brackets of the button. |
Ti. after |
To this field there is set the title that is presented after the name (e. g. „DiS.“, „CSc.“ etc.). |
Position |
It describes e. g. influence on realization of an opportunity. In contrast to the Functions it deals with an unofficial division. |
EA(G) |
By pressing of this button all electronic addresses of a contact person will display. Note: Way of control is described on the 1st page of Partner card in the Electronic addresses item part. |
Fields |
The fields for entering of the electronic addresses will display according to the predefined 4 type of electronic addresses in four rows. Setting of these 4 types: see the Electronic addresses presets, the User parameters book - 4th page (tab Marketing). Save contact - the electronic addresses of the partner are saved as a contact into the Outlook application by this button. If it is installed a different application that is associated with the „*.vcf“ file type, the contact will be saved here. |
Officer |
Field contains link to Officers book. We can set up value of this field via Create Officer button - which can be done in Browse regime. It's not possible to delete existing filled value. Function is bounded by Codebooks - Officers - Edit Officer right. |
User |
He/She is set from the code list of Users of the system (an internal user). In this case the person should be stated in activities in the Responsible person field. (However the user can define a different user than himself/herself as a responsible person in the activity.) If the User field is not entered, it deals with an external contact person. User can be linked to a contact person only if he/she is not yet assigned to another contact person. Attention: The contact person should be use either as a contact or as a responsible person. This division influences the sorting of activities. Then the program sorts activities by the classification in the Contact person and Responsible person fields (see the 1st page of the Activity card). If you log into the K2 IS through the K2 Android client, it is through a Contact person. This contact person overtakes all rights of here defined user for these purposes. Right to set up this field has only user with right to change another user, Admin - Users - Change of Users. If contact person contains value in Officer field, then to insert value to User field it’s necessary to also have Codebooks - Analytical Axes - Edit Officer right. |
Employee |
Link to HR. User can be linked to a contact person only if he/she is not yet assigned to another contact person. Also every employee must have linked record in Officers book, i.e. linked contact person with “Officer” type must exist. |
Assistant |
E. g. a next person with whom you can communicate in case of absence of the contact person. |
Substitute |
Next person with whom you can communicate in Case of absence of contact person and assistant. |
Department |
Department in that the contact person works, e. g. economic, business, marketing, etc. |
Office |
A city where the contact person works. If the city is identical to the headquarters, then you can enter the city according to the company address, otherwise write the city of a branch. |
Mode of transport. |
Used commuting. |
Priority |
Priority for deciding, to whom to attend in the time pressure. |
Satisfaction |
This field can express e. g. a personal relationship of contact person (user can modify it). |
Acquisition |
It is recommended to fill it the same as Partner card |
Group |
Contact persons group. |
Limited usage |
Flag shows that usage of personal data of this partner is limited. |
Note: It is recommended to insert OS note in every contact person card, where we enter salutation of the person we want to use is mass communication (e. g. "Dear Mr. Smith, "). OS note can be created by inserting I1 note type (description with max. 80 characters). We change note abbreviation from I1 to OS. Salutation can then be entered to Description field. For more contact persons we can use Add Salutation for Contact Persons script (KOS_DOPLOSL1).
In this page, like in Other module IS K2 it is possible with Notes. Closer description of work with notes is stated in Basic Code Lists and Supporting Modules K2 – Notes chapter
List of activities (2nd page)
The 2nd page of Contact Person card is almost identical with 2 nd Page of Partner card. The only difference is that the Contact Persons tab lists activities related exclusively to the selected contact person. The Tasks tab is also available here to link a contact person with tasks. On top of that there are also Job Positions - Occupancy, Job Positions - Candidate and Discount Coupons.
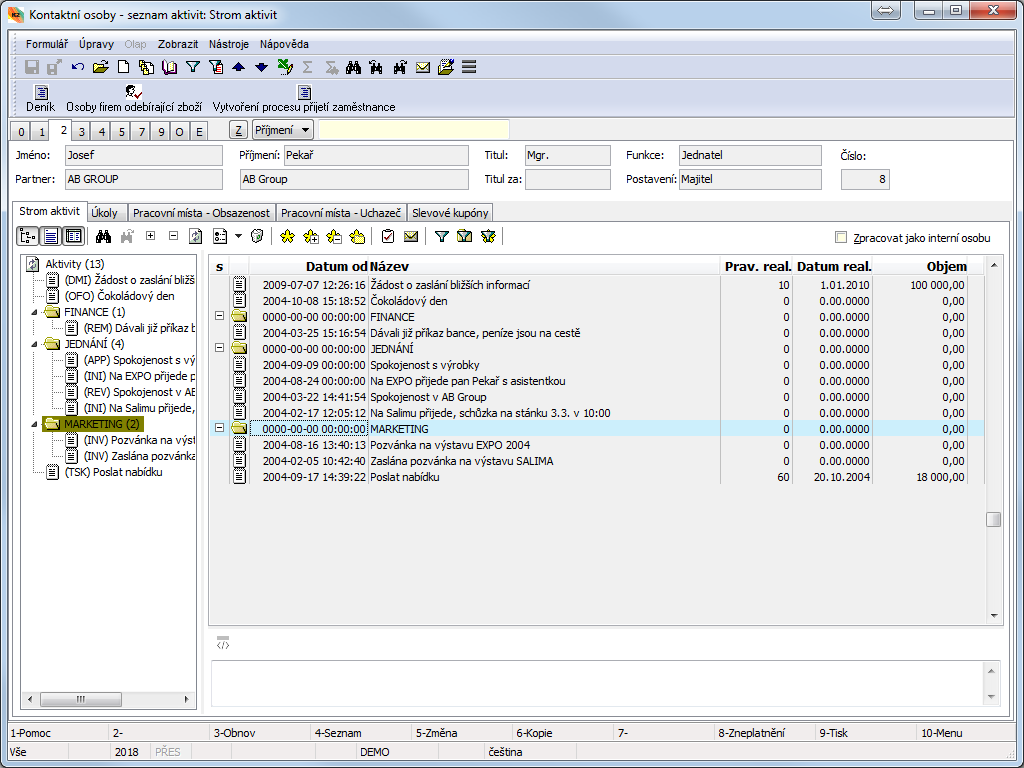
Picture: Contact person- 2 Page chapter).
A problem may occur during the activities display at the moment when you want to sort out the activities according to the responsible person. It is necessary to define for every person whether the contact person is considered as the internal or external one. If the User entry on the 1stpage of the contact person card has been pasted, this person is internal and the activities according to the responsible person are displayed upon the sorting (it means the actions that were executed by the user). Otherwise, the specified contact person is external and the activities are displayed sorted by contact person (i. e. how many times this contact person has been negotiated). The option Process as Internal Person is automatically checked as soon as the User field has been pasted.
The tasks related to this contact person are arranged on the Tasks . You can create, assign existing, delete, confirm or cancel individual tasks.
|
The form for creating a new task will be displayed. |
|
The Tasks book from that you can assign already crated task to a document displays. |
|
You can change data in task that is indicated. |
|
You can delete an indicated task. It is not possible to delete a confirmed task. |
|
You can confirm an indicated task. |
Only unconfirmed task can be assigned to the contact persons by this way. Each task can be linked with one document in the K2 IS only. However it is possible to link up one document with more tasks. Exceptions are Contact persons and Partners, which can be linked to task independently of document choice.
Information from Organisational Chart module are displayed in tabs Job Positions - Occupancy and Candidate. If certain contact person is included in job position, possibly if he/she is a candidate for job position within organisation, then this information is entered in Organisational Charts module and in Contact Persons is only displayed.
Picture: Job Positions - Occupancy tab
Picture: Job Position - Candidate
Additional data (3rd page)
This page is used to Connecting with Human resources.
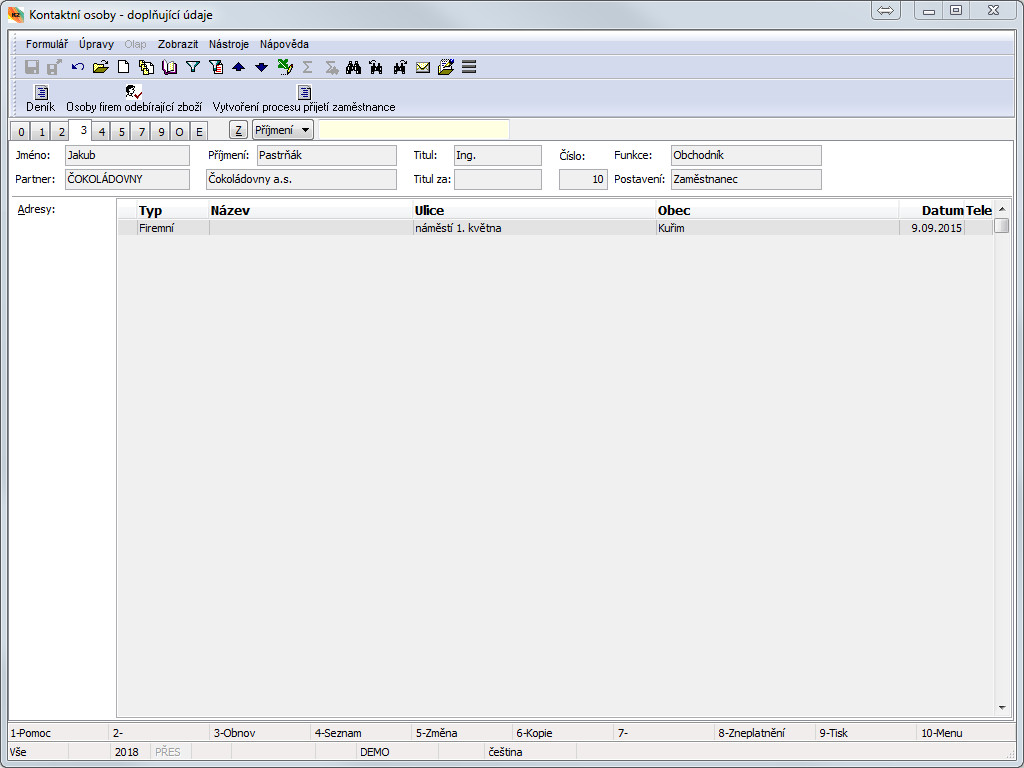
Picture: Contact person- 3 Page chapter).
Description:
Addresses |
Fill in e.g. in the case of the temporary residence, address for the goods delivery or similar. If there’s name filled in the address, then it’s automatically taken to document. If name is empty, then name + last name from contact person card are taken to document. The standard types of addresses Eshop (delivery address) and EshopF (invoicing address) are used for the online store - the data entered by the registered user of the eshop are registered in them. Note: You can insert a new address in Change mode by Ins key. |
Classification and Employment (4th Page)
Page 4 is divided into two parts.
Marketing Classification is used to Sorting of contact person to created groups (e. g. a group of contact persons, which we invite to corporate events, to which we send invitations or wishes for new year, etc.). To the Classification field it is possible to write e.g. personality traits that are related to work (dominant, precise or similar). You can activate the appropriate form in every window in Change mode by Ins key. When changing Marketing Classification via mass action (menu Form/Mass Actions/Change of Items) current valid Marketing Classification and Marketing Classification valid in future change or remove at option Change or Remove.
Absence part is used to enter absence for workflow.
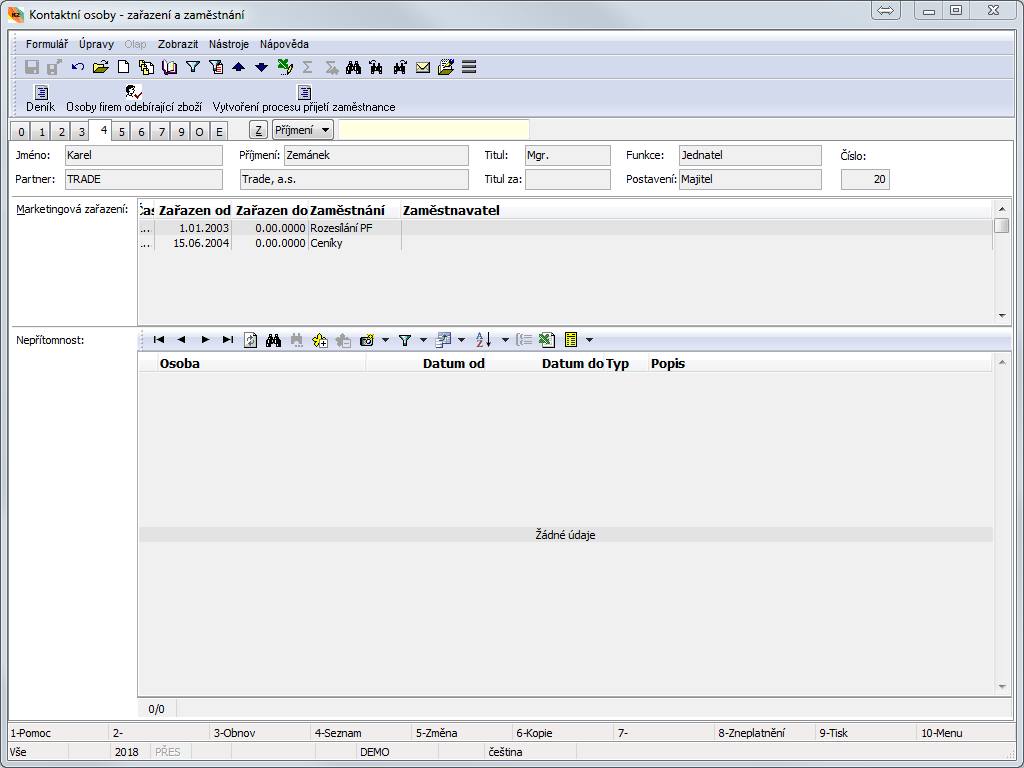
Picture: Contact person- 4 Page chapter).
Qualification (5th page)
All the qualifications that the submitted contact person is classified in are automatically displayed on the 5th page of contact person card. This mutual relation is created at the moment of the contact person inserting to the 3rd page of Qualification card (see the Wages – Qualification chapter).
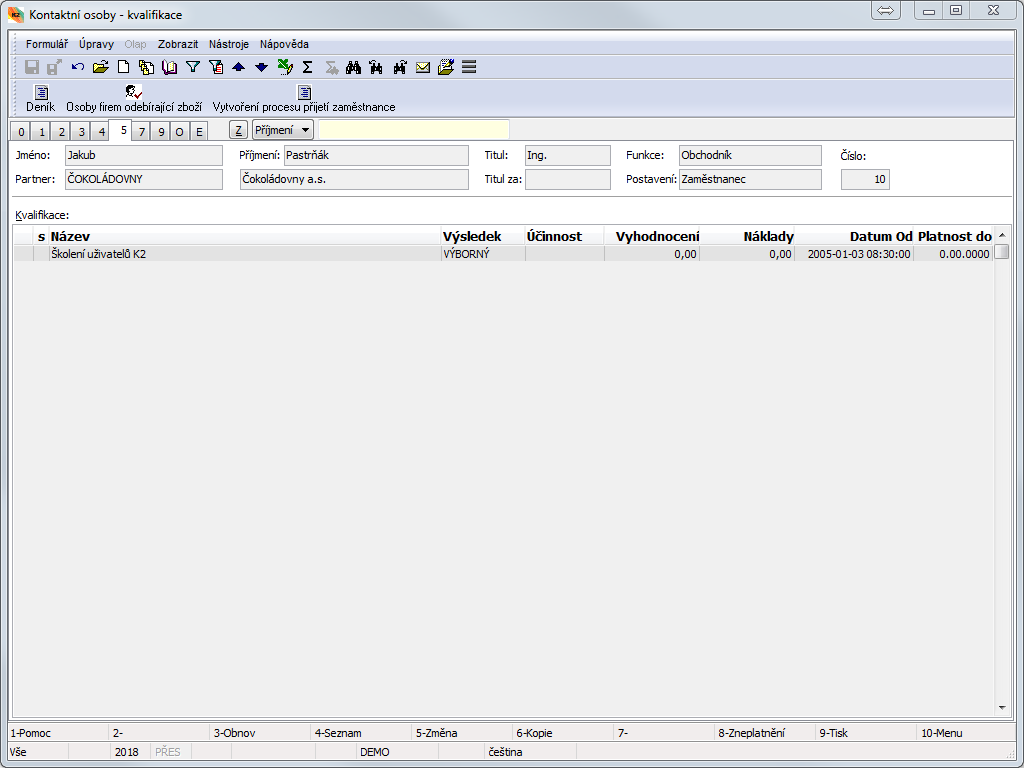
Picture: Contact person- 5 Page chapter).
Calendar (7th page)
This page is identical with the 7th page of a Partner card. The description is stated in the Partners - Partner card - Calendar (7th page) chapter.
Documents (page 9)
9. It is possible to add the documents, process or external documents on the 9thpage of a contact person (see the Basic Code Lists and Supporting Modules K2 – 9thpage). Page chapter).
E-shop (11st page) - CONTACT PERSONS
Access data of individual contact persons are recorded on this page. The page can only be displayed by the user with the right Browse I-shop data set in Rights – Other – I-shop. The data can only be edited by the user with right Change i-shop data (on the same place).
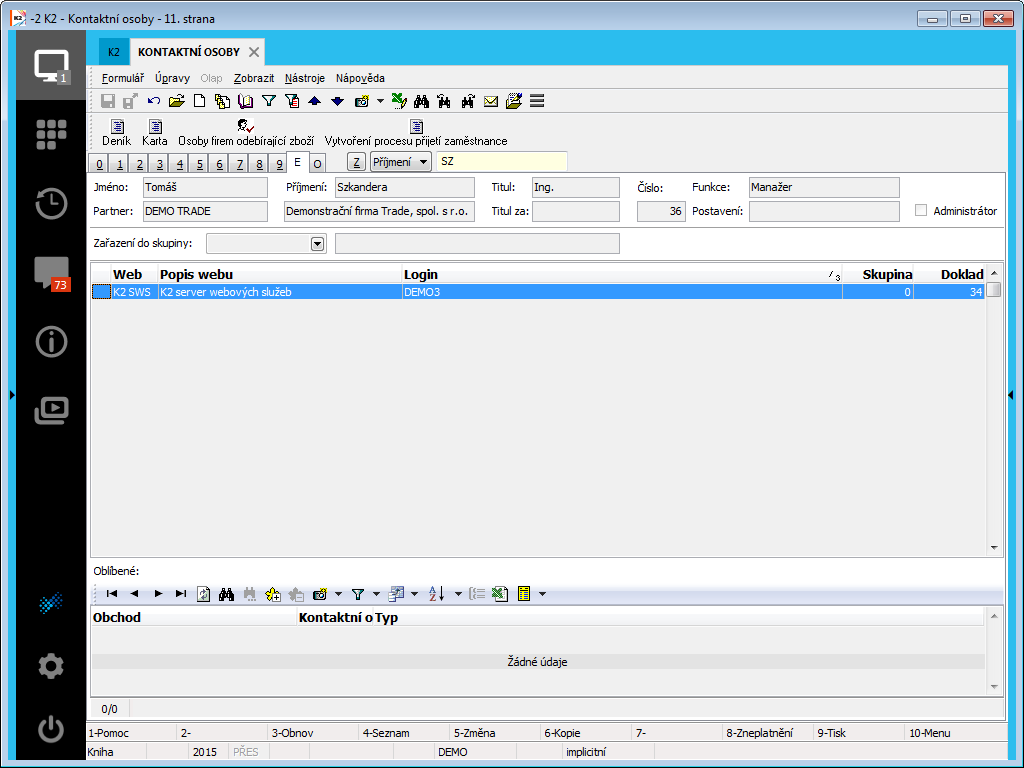
Picture: Contact Persons – Page E for I-shop
By checking Administrator flag we ensure that this person has right to access Administration book in K2 4 WEB client and also to create and change data in this book. Field is accessible only if user has Administration - Users - Change of Users right.
Via Classify to Group field we can sort e-shop users according to their area of interest. According to this we can then set up or limit access to E-shop data - especially in log-in screen.
In upper table access to individual applications, where user should have access, are set. Data can be displayed by double clicks by the left mouse button on the line values of which you want to display in detail. New login data are entered by Ins key, the unused data can be removed by Delete key.
If we want to limit log in only for e-shop, we fill it in. If e-shop field remains blank, then log in for all web service applications remains the same. Completed and empty e-shop can also be combined: there’ll always be checked only values for specific e-shop entered in login details, for all other accesses only general password will be checked. Entry of specific e-shop will be filled when registering from thee-shop. If we want user to use the login details for all our e-shops, we have to delete entry from Field E-shop.
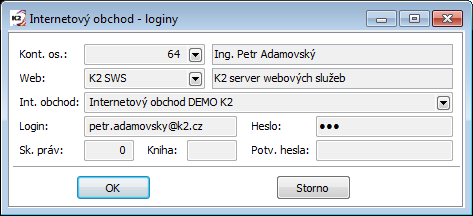
Picture: Displayed record of login data of contact person
Items of bottom table display saved favourite links of the user. They are used only for information - content of the table cannot be edited via K2.
Work with contact persons
This book is a list of internal and external persons that are inserted at the partners. Here are inserted Responsible (internal) persons of your company and Contact persons of our Partners. The book is a list of all important persons with all necessary contacts that it is possible to search easy, to display e. g. by means of reports and to use whenever. It is possible to create contact persons standardly directly in the book. It is very important to select an appropriate Partner at a Contact person when creation and entering of individual fields. The person will be assorted to a right Partner by this way.
Next possibility to assort a Contact person to a Partner is directly in his/her Partner card. The The 3rd page in this card is intended for this purpose. List of all Contact persons of given Partner is always displayed here in the lower part and in Change mode with Ins key is also possible to open Contact persons book, select specific contact person and assign him/her to partner.
It is possible to import the contact person into the database by the Import of contact persons (ImKos.pas) script. It deals with an import from the "*.xls" file. This function enables to import the Contact persons including theirs Electronic addresses into the K2 IS.
All communication with Contact persons is registered here by means of Activities. The list of these activities is stated on the 2nd page of Contact person card. Here you can whenever find all activities that are recorded in the form of activities and that are related to this person historically.
The Contact persons book enables to register the user any personal and marketing information too. These can be evaluated and assigned to the persons, e. g. presents or promotional items and kept their records respectively records of costs associated with them.
There are available lots of reports and scripts in this book, e. g. for creation of activities, searching of contacts or phone numbers. Theirs list is stated in a different part of the K2 IS.
Functions above Contact persons module
Discount coupons for selected records can be created via mass action Creation of Discount Coupons. Function can be run over container or records marked with asterisk. Function can be launched from Form/Mass Actions/Creation of Discount Coupons menu. When launched form Creation of Discount Coupons is displayed.

Picture: Creation of Discount Coupons form
We enter beginning and end of coupon discount name and select sample according to which field on page 1 of created coupon discount is completed.
Record is then created in Discount Coupons book and in the record in Code field name consisting of 3 parts is created. First part will contain characters which will be entered in Name Beginning field in Creation of Discount Coupons form. Second part contains generated name and third part of the code contains characters which have been entered in Name End field in Creation of Discount Coupons form.
Values from discount coupon, which has been selected to Sample field in Creation of Discount Coupons form, will be auto-filled to fields in page 1. Name of a contact person, for which coupon has been created, will be filled to Contact Person field.
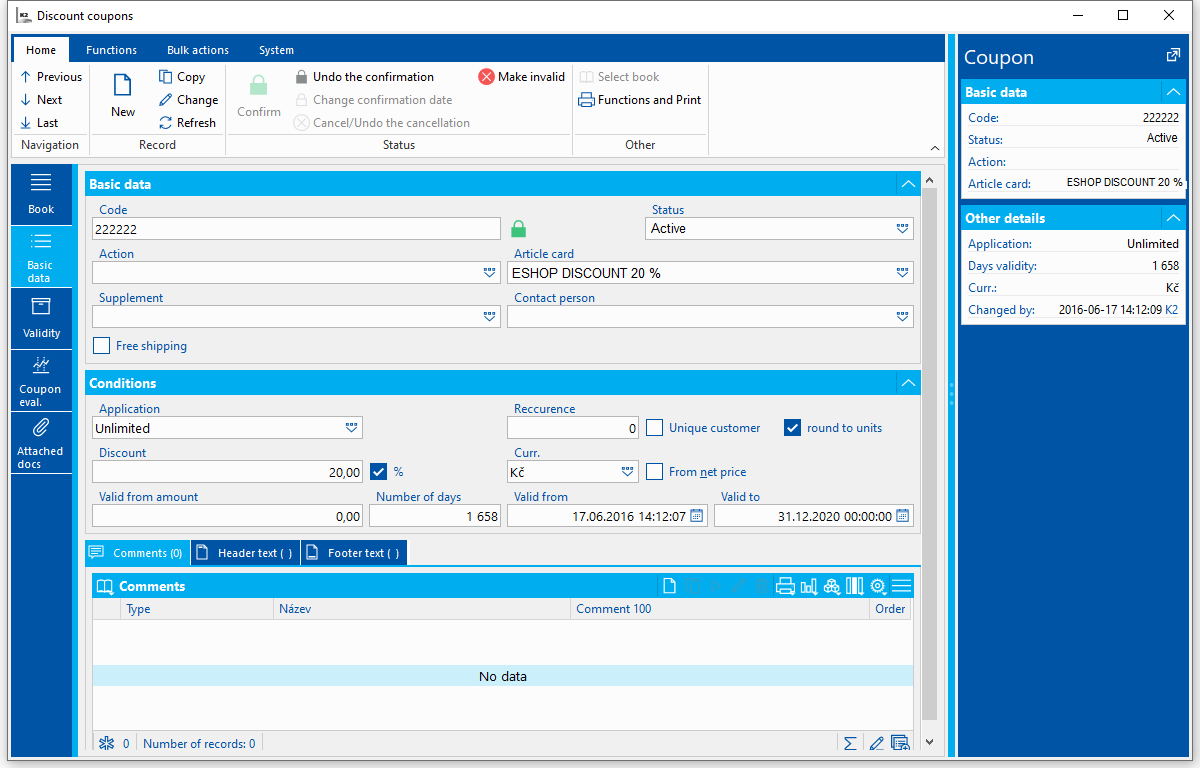
Picture: Page 1 of discount coupon created by Creation of Discount Coupons bulk action
Reports over the Contact persons
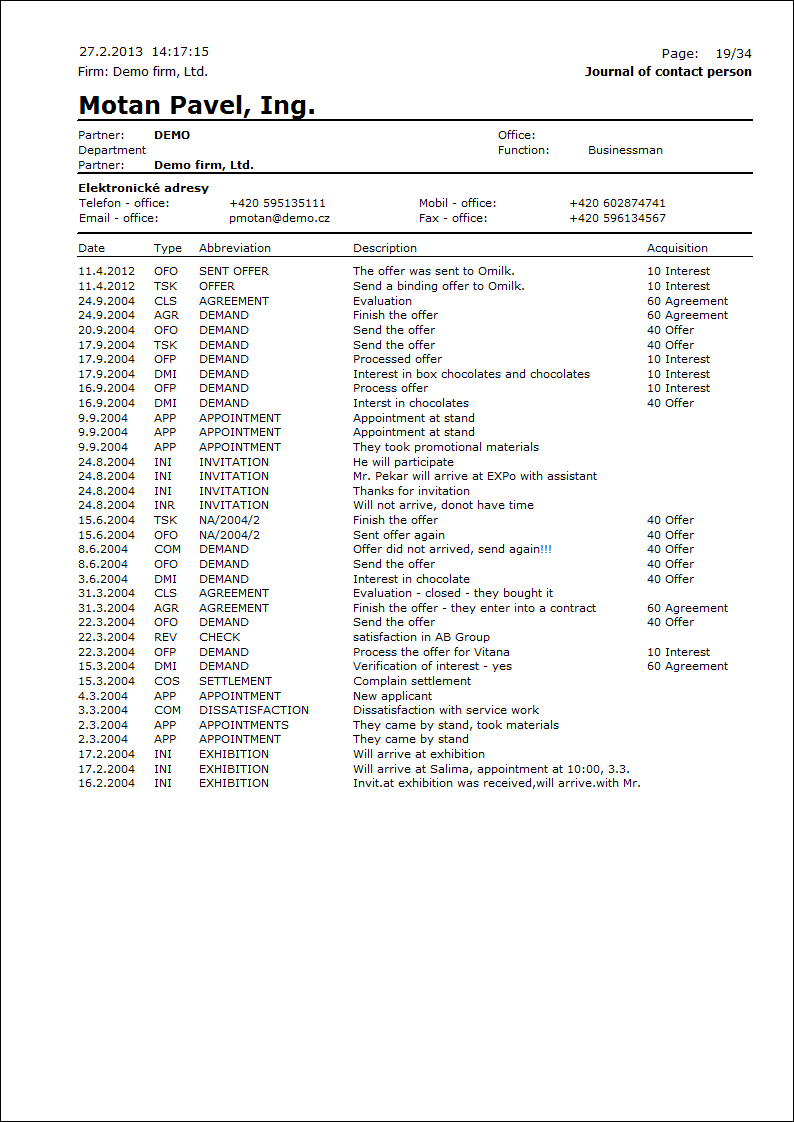
Journal of contact person
Process No.: CIS006 |
Report ID: SCRM016 |
File: KOS_SEZ02 AM |
Report description: The journal of a contact person displays the basic information about the contact person and his/her list of activities. It is possible to select the period of activities parametrically, eventually to display comment to an activity (from the 1st page of the Activities book). |
||
Address in the tree: [Marketing - CRM ] [Contact Persons] [Printing of records - lists] |
||
Reports parameters:
Activity - Yes It is possible to define parametrically whether to display the activities. |
Activity_To - 31.12.2050 Activities to. |
Aktivity_From - 0.00.0000 Activities from. |
Comment - No It is possible to display a comment of individual activities by this parameter. |
Number_of_activities - 100000 The number of displayed activities. |
Calendar of contact person
Process No.: CIS006 |
Report ID: SCRM042 |
File: CALENDAR.AM |
Report description: The report displays activities of a Contact person sorted by the date (calendar). If the calendar of an internal contact person is printed, then the Contact person from the activity is displayed in the Person column. Otherwise the Responsible person from activity is printed here. It is possible to run the report per the certain period from-to. |
||
Address in the tree: [Marketing - CRM ] [Contact Persons] [Printing of records - lists] |
||
Reports parameters:
DateFrom - 0.0.0000 The date from that the activities should be written from Calendar |
ToDate - 00.00.0000 The date till that the activities should be written from. Calendar |
DisplayComments - No It is possible to display a comment of individual activities by this parameter. |
TypeEmailAddress - MOBB The type of the email address that appears in the report. |

Cont. persons - birthday + phone
Process No.: CIS006 |
Report ID: SCRM017 |
File: KOS_SEZ03 AM |
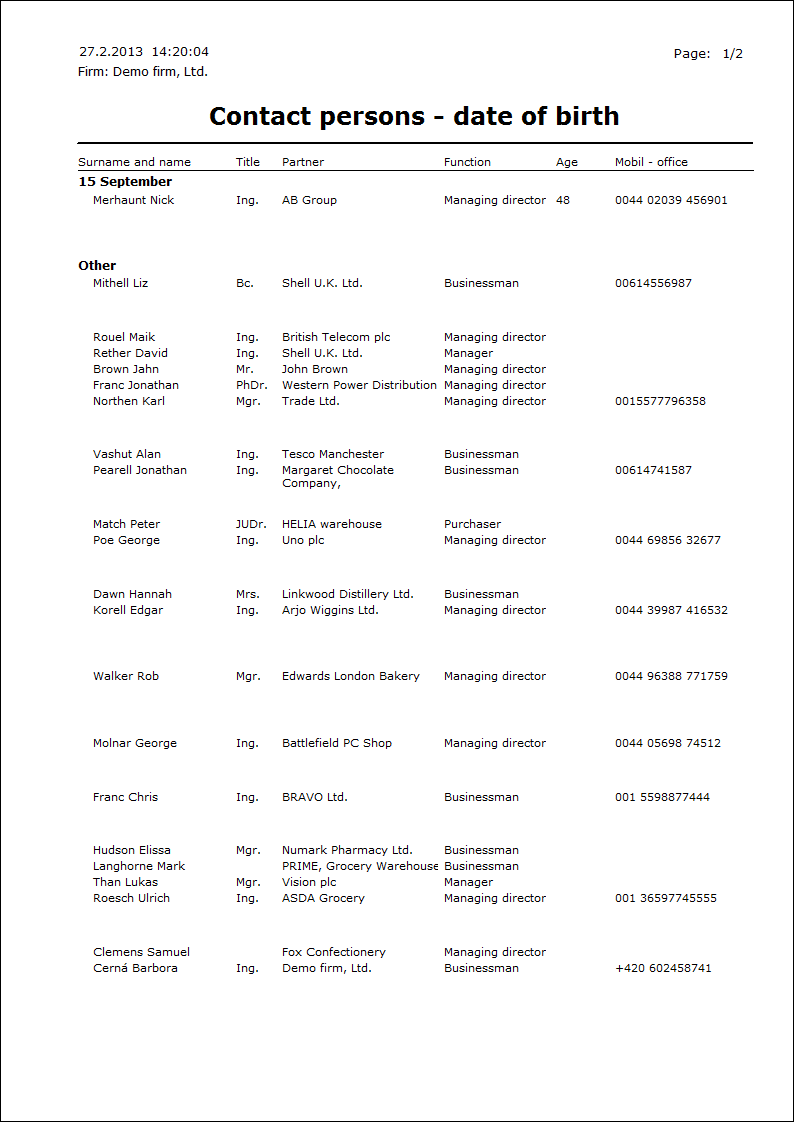
Report description: The report displays the list of Contact persons with their's phone numbers. Contact persons are sorted in the report according to the date of birth. |
||
Address in the tree: [Marketing - CRM ] [Contact Persons] [Printing of records - lists] |
||
Reports parameters:
Without parameters. |
Contact persons - self-stick labels 14pcs/A4
Process No.: CIS006 |
Report ID: SCRM015 |
File: KOS_SEZ05 AM |
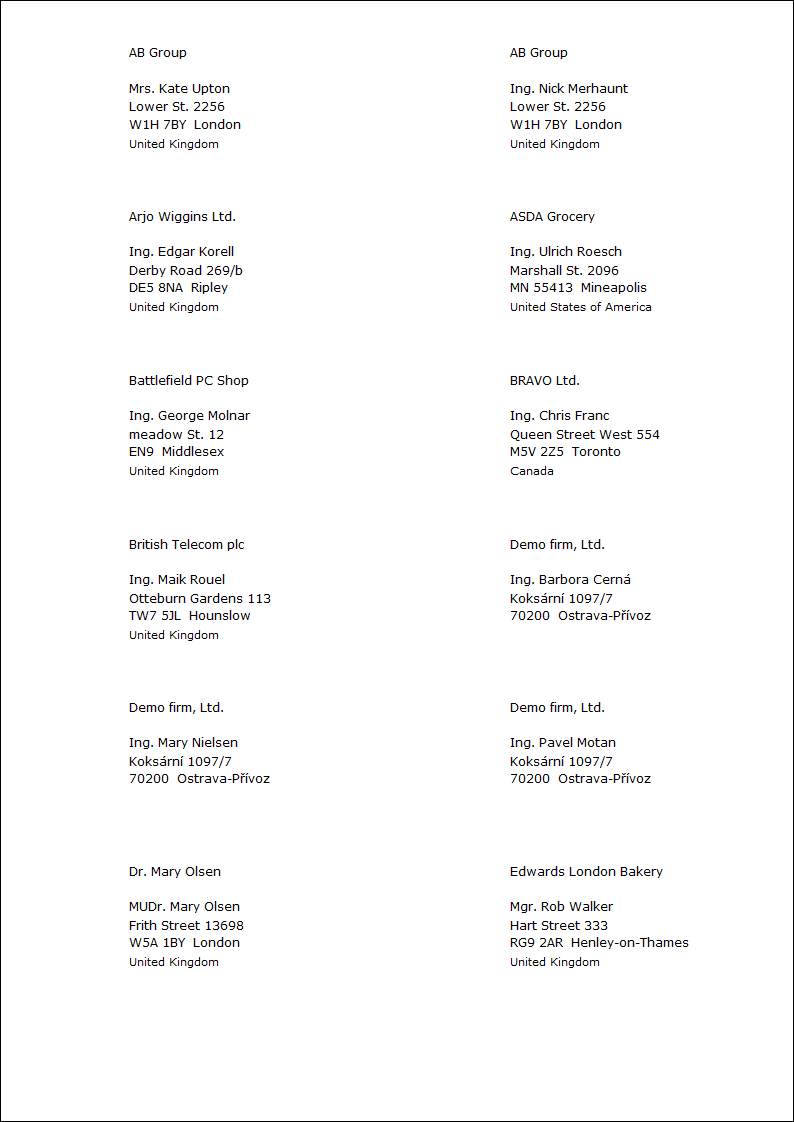
Report description: This report enables to print initials of Contact persons on the self-stick labels. It is possible to set the height of the label parametrically. |
||
Address in the tree: [Marketing - CRM ] [Contact Persons] [Printing of records - lists] |
||
Reports parameters:
PreferPartnerAddress - No Yes - the address from a Partner is preferred. No - the address that is on the 3rd page of a Contact person is printed. |
AddressType The type of address from the 3rd page of a Contact person. |
Height - 41.2 Height of a label (in millimetres). |
Left - 29 Text alignment on the left (in mm). If number will be less than 29 then text will be moved to the left, higher number will move the text to the right. |
Envelopes without logo-cont. persons
Process No.: CIS006 |
Report ID: SCRM019 |
File: KOS_OBALKY.AM |
Report description: This report enables to print the initials and addresses on envelopes. It is possible to set the distance from the left edge ("Width" parameter) and the distance from the top edge ("Height" parameter) parametrically in the report. |
||
Address in the tree: [Marketing - CRM ] [Contact Persons] [Printing of records - lists] |
||
Reports parameters:
Height - 3 The distance from the upper edge in cm. |
Width - 7 The distance from the left edge in cm. |

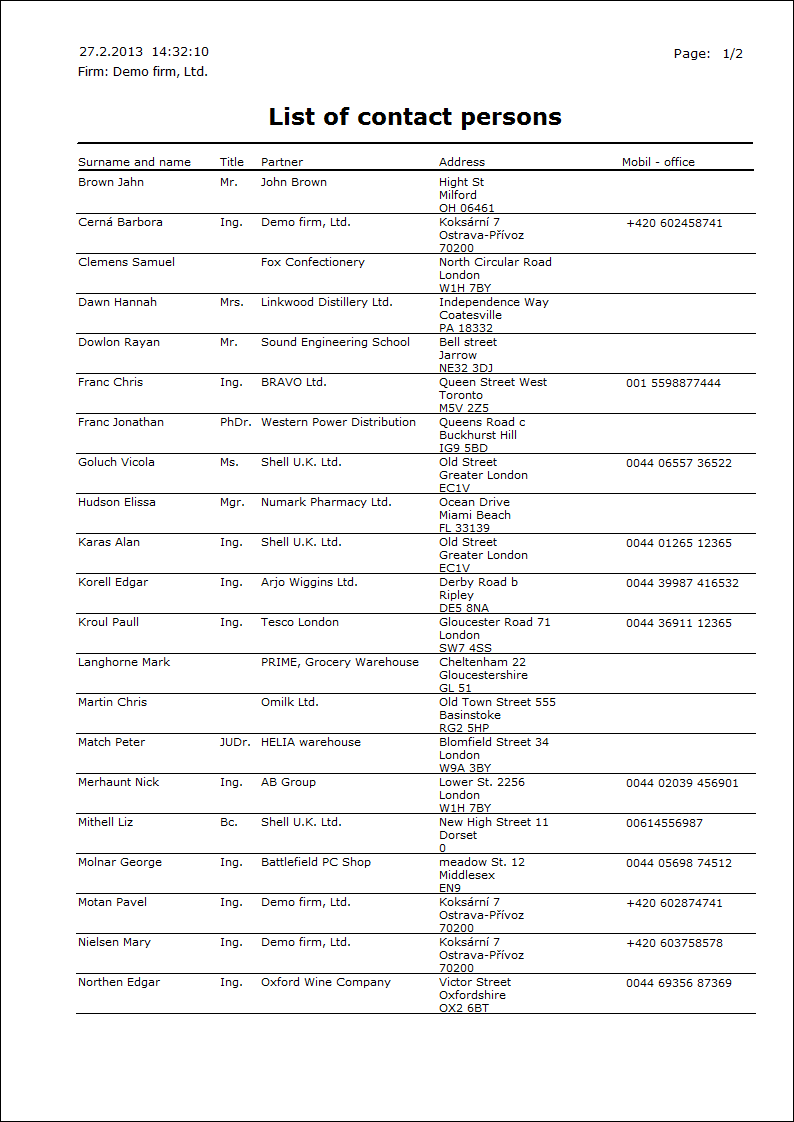
List of cont. pers. by name with mobile
Process No.: CIS006 |
Report ID: SCRM020 |
File: KOS_SEZ01 AM |
Report description: This report is the list of contact persons with the mobile phone number. It is also possible to display address, eventually function and position of a contact person parametrically in this report. |
||
Address in the tree: [Marketing - CRM ] [Contact Persons] [Printing of records - lists] |
||
Reports parameters:
ShowAddress - Yes Yes - address of contact person is displayed in the report; No - address is hidden and the Functionand Position of contact person are displayed. |
Listing of personal data
Process No.: CIS006 |
Report ID: SCRM021 |
File: ListOfPersonalData.AM |
Report description: Report displays list of all personal data which are linked to given person in K2 IS. In parameters is then possible to set which modules should be displayed. |
||
Address in the tree: [Marketing - CRM] [Contact persons] |
||
Reports parameters:
AdminPersonalData Admin of personal data can be set up in report header |
AllowCancelled Yes - enables processing of cancelled records |
CurrentRecord Yes - allows processing of current record |
EvaluationFilter Yes - allows processing of container records |
IgnoreFieldRight Yes - ignore right to field |
IgnoreSelection Yes - process records no matter of marked records |
Marketing Yes - displays personal data from Marketing module |
PersonalData Yes - displays personal data from HR module |
ShowSelectionInfo Yes - displays information about filter |
OnlyBrowse Yes - run report only in Browse mode |
WholeTable Yes - process records from whole table |
Scripts, functions
Contacts
Process No.: CIS002 |
Script ID number: FCIS012 |
File: Mar_Hle.PAS |
Script description: The basic function of the script is to search, to update or to insert the new Partners, Contact persons and Customers (Suppliers/Customers). |
||
Address in the tree: |
||
Script parameters:
Code The value that is set in this parameter will be pre-filled in the Code field. |
CreateNewZIPCODE - Yes If the Postcode is not found, the script will create it. |
Group - Supplier The value that is set in this parameter will be pre-filled in the Group field. |
ImportFile You can specify the path to the imported file by this parameter. |
ShowOpenDialog - Yes If this parameter is set on No, the dialogue for selection of an imported file will not display. The file is imported according to a defined path. |
1st page - Searching
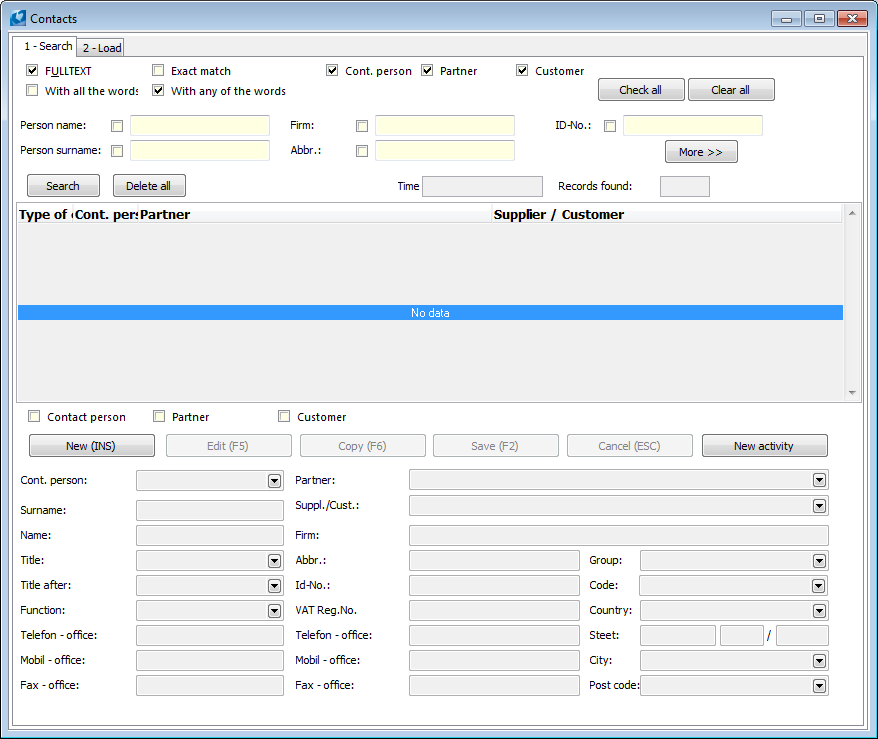
Picture: Contacts form for searching and establishing contacts
In the upper part of the form there are options how to search and in which book to search.
Select by checking:
- way of searching:
FULLTEXT |
Script searches words and theirs parts too and displays found records. |
Exact match |
Script searches only whole words and displays found records. When WhenExact match it is not taken into consideration further two possibilities of searching. |
With all the words |
The script displays the records that contain all entered words. |
With any of the words |
Script displays the records that contain at least one entered word, but from every entered field. |
- book that you want to search in:
Cont. person |
Script search in the Contact persons book. |
Partner |
Script search in the Partners book. |
Customer |
Script search in the Suppliers/Customers book. |
The fields that can be searched through:
Person name |
It is searched in person names. |
Person surname |
It is searched in person surnames. |
Firm |
It is searched in company names. |
Abbr |
It is searched in company abbreviations. |
Comp. tax reg. no. |
It is searched in company ID-No. |
More |
By pressing of the More button next options of searching display (e. g. by address). |
Note: If you want to search by these fields, it has to be checked. If the options are not checked at these fields, only the values are entered there, these values will not be taken into consideration.
By pressing of the Search button the records by the entered parameters start to search. By the Delete all button all parameters will be deleted. The Time field will display how long takes the system the searching . The Records found field displays number of found records by entered criteria.
Example:
You want to find the company whose name contains the "Demonstrating" word and the surname of person contains "Motan" word.
In the Company field there is entered "Demonstrating", in the Person surname there is entered Motan. That means the person will be searched whose surname contains "Motan" and at the same time he/she is entered as a Contact Person of the Company which name contains "Demonstrating" word.
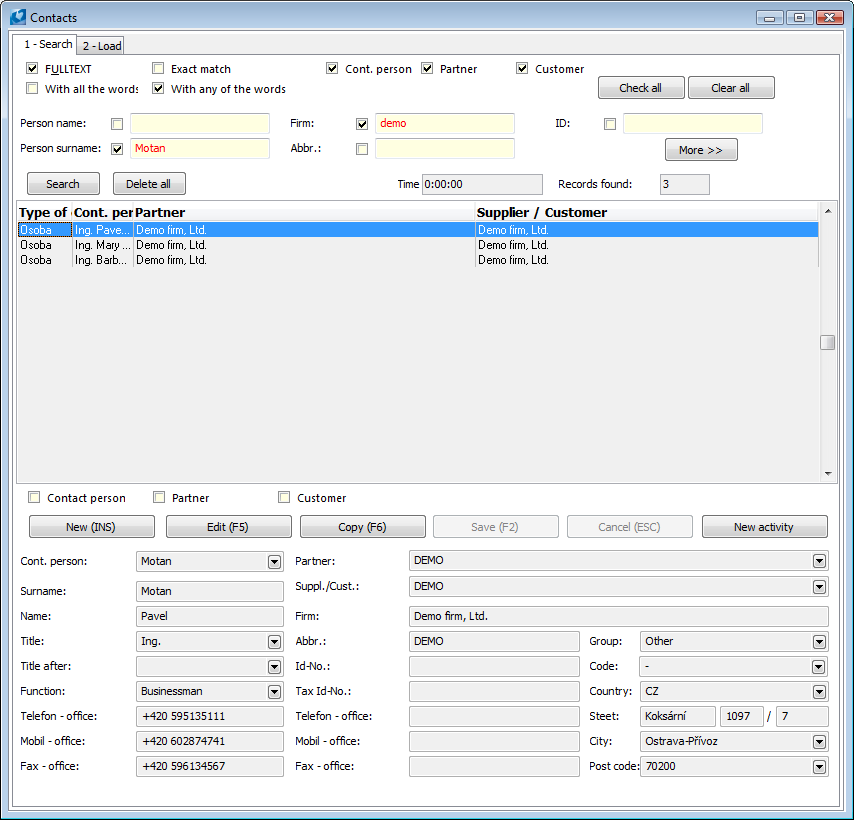
Picture: Example for searching
After entering of searched text press the Search button and if the record that fill the condition will be found, it will be displayed in the middle part of the form. In the Type of cont. column there is displayed that the person was found as the Person type and he/she is assorted to the Supplier/Customer and to the Partner at the same time.
There can be more found records; next information will display to one of them in the lower part of the form by marking one of the found records. You can work with any values of fields of this record in edit fields:
- by means of checking fields (Contact person, Partner or Customer) say, which record you want to edit,
- by pressing of an appropriate button you define, what you want to execute with this field:
- create a new record by the New button or by Ins key,
- change a marked record by pressing Change button or F5 key,
- copy the record by Copy button or F6 key,
- save the created or changed record by Save button or F2 key,
- cancel the executed changes by Cancel button or Esc key,
- create a new activity to the selected record by the New activity button in the Activity book.
2nd page - Loading of records from the "*.xls" file
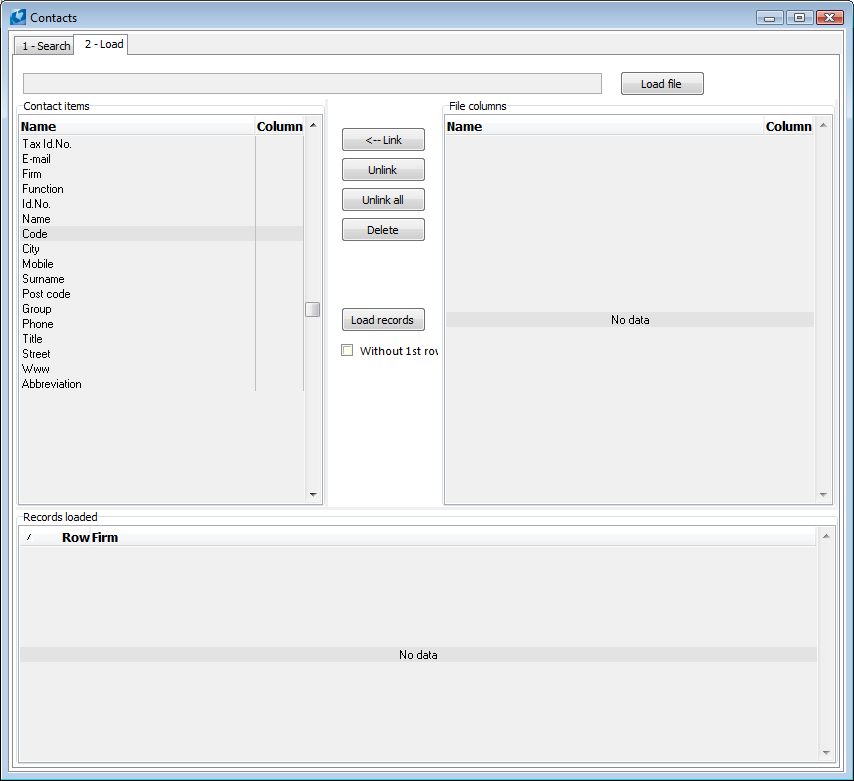
Picture: Contacts - Load tab for loading of records from Excel
Form parts:
Contact items |
Here are preset heading of values ??of individual records. |
File columns |
Here will be loaded the heading of columns of loaded file. |
Records loaded |
Individual records (rows) from a loaded file will be displayed here. |
Form buttons:
Load file |
It displays the form to select the file from that the records will be loaded. |
Link |
It links the selected column of an input file with selected field in the K2 IS, that means with an item of the contact. |
Unlink |
It unlinks linked column of an input file with the item in contact in the K2 IS. |
Unlink all |
It unlinks all linked columns of an input file with the items in contact in the K2 IS. |
Delete |
Loaded file will be deleted from this form. |
Load records |
It loads the records from file into the Records loaded field. |
Without 1st row |
By checking this field the script will take into consideration the first row of the "*.xls" file in that the heading of the records is mostly entered. If this field is not checked, the script will consider the first line as a record, not as the record header. |
Process of records loading:
- By the Load file button select the file according to that you want to search, eventually save the new records,
- The heading (1st row) of the "*.xls" file will load into the File columns part after loading of the file,
- at the bottom of the form, records (individual lines) from our file will be inserted into the Loaded records section, but only the Row column will be filled in,
- fill the next columns by assorting of records of the File columns field to the records in the Contact items field, see the Process of records assorting bellow,
- reload the records by means of the Load records button.
Contact items represents fields in the K2 IS. These are identical with fields on the 1st page of the Contacts form according to that you can search the contacts (on the 1st page in the upper part). These fields will be prefilled (on the 1st page in the lower part) if the contact is not found.
Process of records assorting:
- set the cursor on the record in the File Columns form section, in the same way select the item with which you want to link the record in the Contact Items form,
- link these items by the Link button.
- in the Contact items part of the form in the Column column you can see which column have you been linked together thanks to displaying of letters.
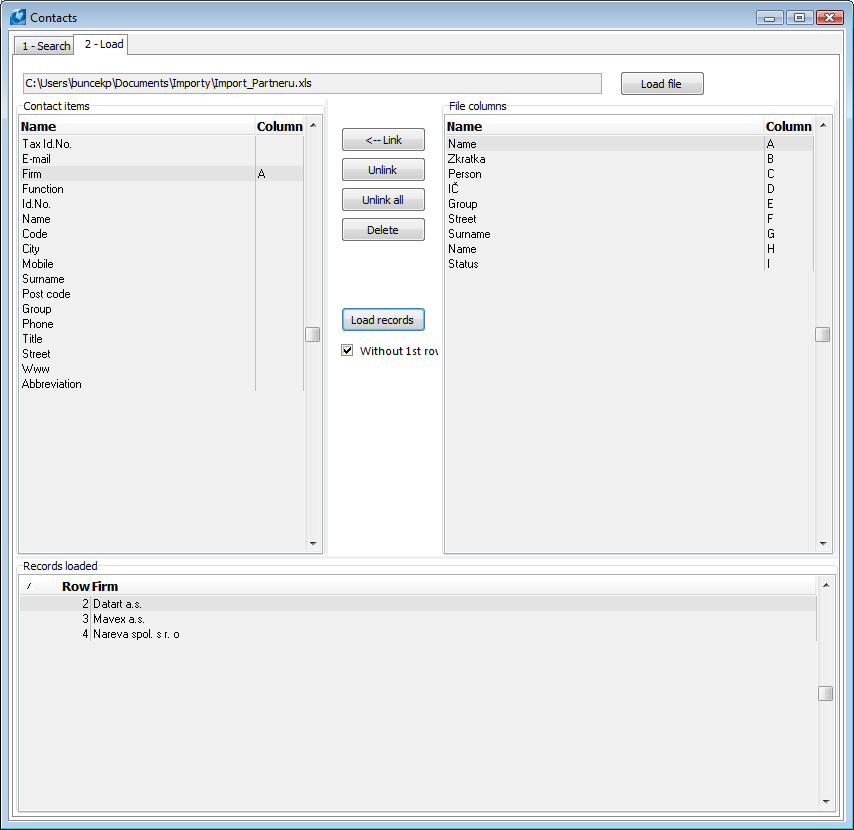
Picture: 2nd page of the form - Contacts - Load
In case that the records are assorted and loaded correctly, the First record and Next record buttons will display on the 1st page of the form. By pressing the First record button the data of the record (row) from Excel will be prefilled into the searching fields and according to the checked fields the records will be searched in books. By the Next record button the next row of the loaded file from 2nd page will be loaded into the searching fields and the searching will be run. If you want to start searching from a record other than the first one loaded, use the cursor on the 2nd page in the Loaded records section to mark the record before the record you want to load, switch to the 1st page and press the Next record button.
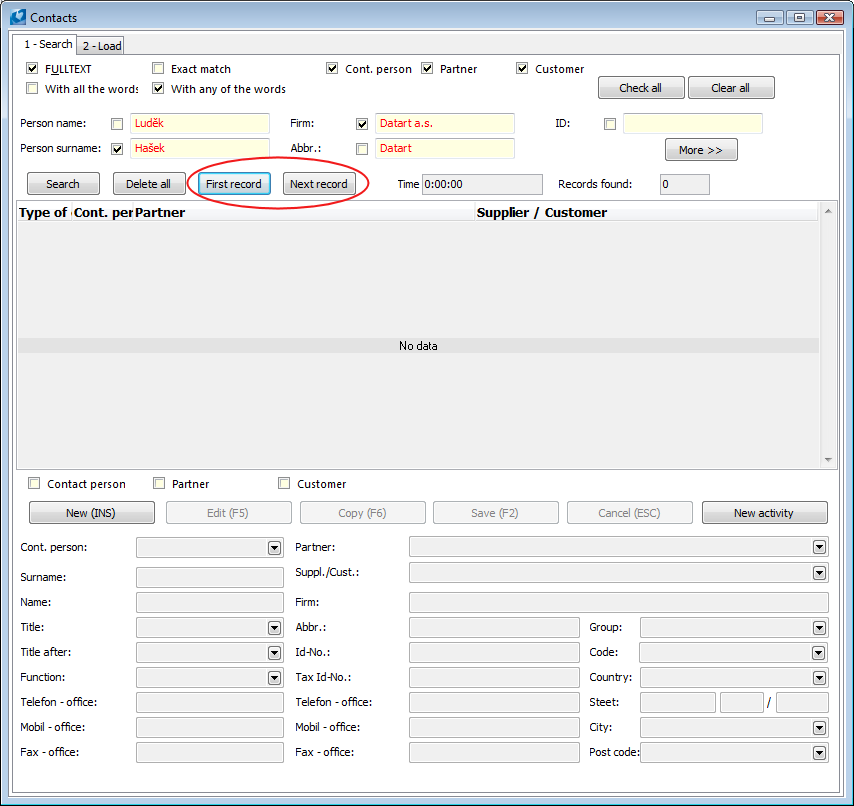
Picture: Setting the 1st page of the Contacts form
With such searched records you can work further by the same way, how is described at the searched records on the 1st page.