Commercial Consignments
The Commercial Consignments module is used to record consignments, letters and collections that are executed by public carriers (e. g. PPL, DHL), eventually by a different way, e.g. internally. Further it is possible to execute a check of collections, and eventually to print labels for individual carriers.
Services of Consignment
The book of Services of Consignment is used for setting your own numbering of consignments or parcels. Numbering stands for a number that is defined by a carrier for the combination of Country - Method of Transport - Payment Method. In most cases, carriers provide these numbering intervals for this combination. In situations where the numbering interval is not assigned for a particular country, method of transport, or payment method (it is general or reflects only some of the elements), you can set the services of a consignment in a way that the respective element is not taken into consideration during the search for optimal service of numbering consignments. It is done in the following way:
- leave the Country field empty;
- fill in " - " (dash) into the Method of Transport field;
- fill in " - " (a dash) into the Method of Transport field.
This number consists of a fixed part (a so-called prefix) and a changeable part that increases in value with every next consignment.
The record that is created in this book must be assigned to a specific Book of Consignment Services, where the records of consignments will be executed. Assign the created service to a specific defined book in the tab 3 - Definition of Services. Upon the creation of codes for a consignment (parcel), the right service for numbering will be searched for among the services assigned to the particular book (for more information, see the rule of combination Country - Method of Transport - Payment method stated above).
If you do not wish to continue using the service, you can confirm a particular record, or delete it from the Book of Consignment Services.
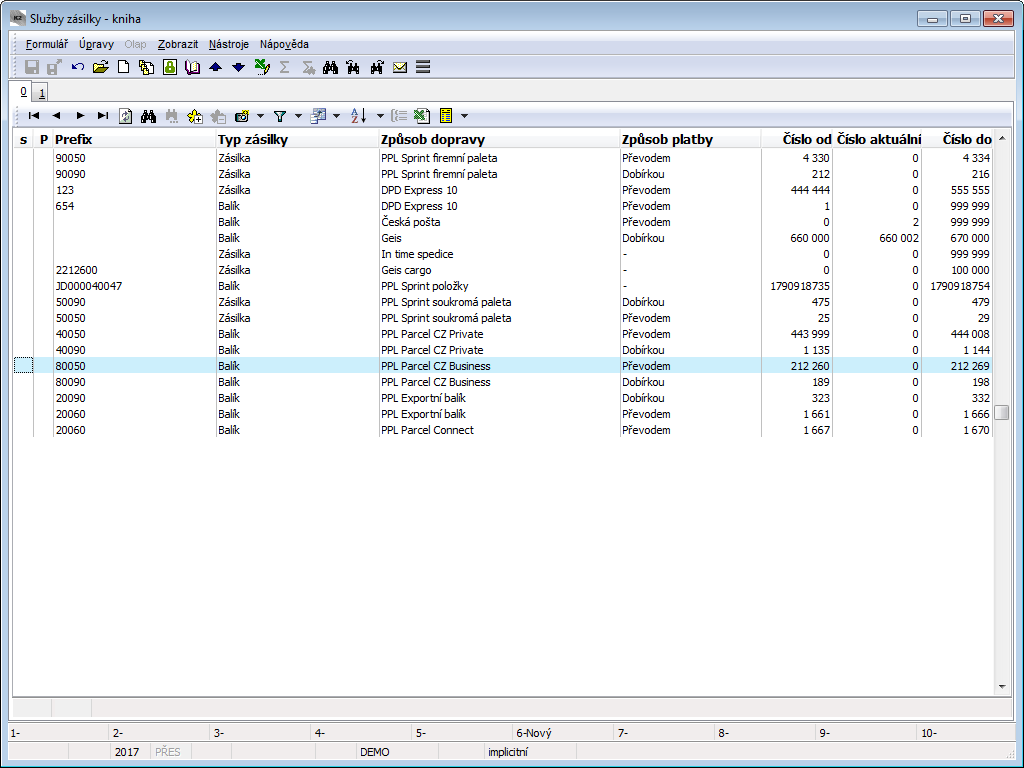
Picture: Mail services - book
Basic Data (page 1)
On the 1st page of Consignment services there are all necessary data for correct setting of consignment numbering or package numbering. The user always works with information and values assigned by a particular carrier.
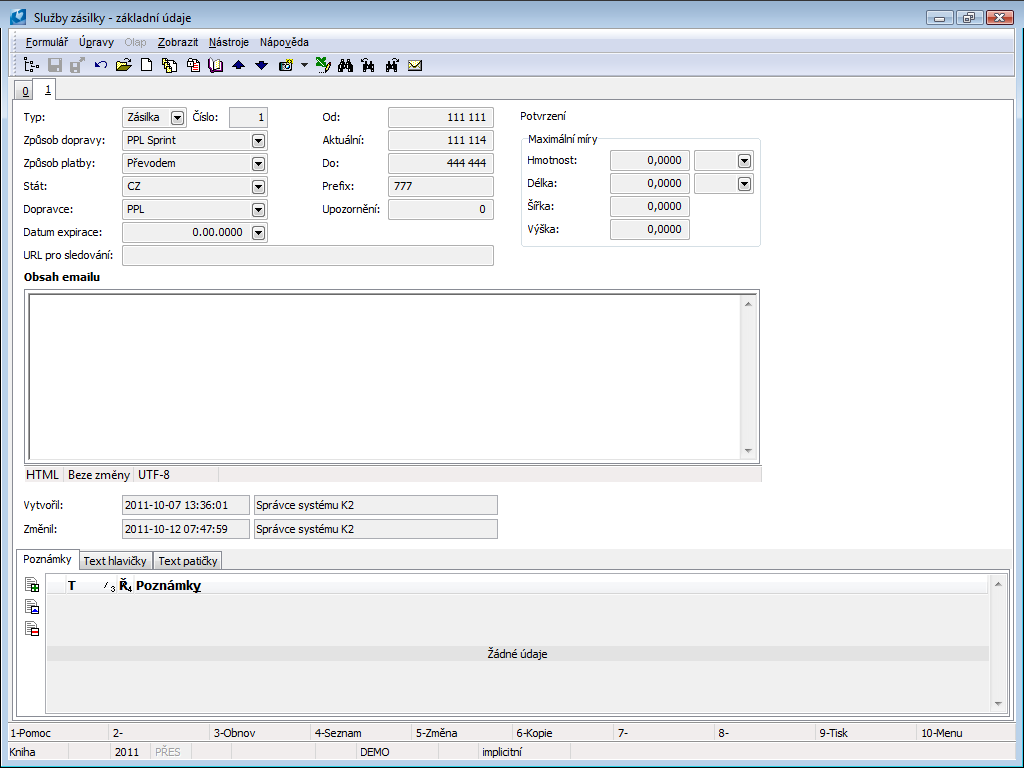
Picture: Consignment Services - basic data
Fields' Description:
Type |
Type of service. According to the type, determine whether the numbering of consignments or packets should occur. The settings depends on the methodology of numbering at a specific carrier company - for more information, see the sub-chapters of Carriers - Settings Specifications. |
No. |
An ordinal number of a service in the book. |
Method of Transport |
The transport method of a consignment. The service for numbering will be searched for according to the method of transport. If you do not wish to take the method of transport into consideration, fill in " - " (a dash). |
Payment Method |
The payment method of a consignment. The service for numbering will be searched for according to the payment method. If you do not wish to take the payment method into consideration, fill in " - " (a dash). |
Country |
The country of a consignment (according to the address of the consignment's recipient). The service for numbering will be searched for according to the country. If you do not wish to take the country into consideration, leave the field empty. |
Carrier |
The field for the selection of a consignment's carrier. The user selects one from the book of Partners. |
Expiration Date |
Time validity for numbering consignments or packets. This date is linked to the notification of numbering depleting possibility. |
URL for Following |
A web address for monitoring the current status and movement of a consignment. |
From |
A floating part of a number for consignment numbering. It is the beginning of the time interval and it is added after the fixed part of number. |
Current |
The current number of a consignment in the time interval set in the From To fields. |
To |
A floating part of a number for consignment numbering. It is the end of the time interval and it is added after the fixed part of number. |
Prefix |
Prefix is the fixed part of a number for consignment numbering. Prefix is a number which expresses the interval in the From To fields. A created consignment thus always obtains a number code in the form of Prefix + number in the From To interval. |
Notice |
A field for setting notifications for depleting numbering interval. The entered value determines how many numbers before the end of the interval should be notified of the approaching expiration of the interval. To enable this function, you have to activate notifications and the option Expiration of Consignment Numbering. Example: End of the interval is 100. Current number is 90. If the alert value is = 10, then when the code for package 91 is generated, the user receives a notification. In other words, the notification is activated when the difference between the end of the interval and the current number is less than the value entered in the Notification field. |
Maximum Measures |
No more than the maximum possible value of a consignment. These values are connected with the check during consignments creating and there is no possibility to create a consignment, which exceeds these values. |
E-mail Contents |
Contents of an e-mail for the customer whom the packet is delivered to. Text entered in this field is filled into the confirming e-mail automatically. E-mail is created for a customer e.g. via the Send E-mail from Collection script. You can edit the text, or set that the values from particular consignment fields can be filled into the created e-mail automatically. If the user wants the value from the consignment field to appear in the text of an e-mail, they must enter the correct name of the corresponding field into brackets when entering their own text in the field E-mail Contents. If you need to get to a service within a definition of service to package to a field from a consignment, you must use e.g. the link [ShipmentId;ParcelCode2]. Text entered e.g.: "Your number packet [ParcelCode2] has been sent.", will be filled into email as: "Your packet number 128562 has been sent." The value from the Consignment Code 2 field is always filled into the text. It is also possible to make us of the continuity of these fields. If e.g. the following is entered in the URL for Following field: "www.ppl.cz/[ParcelCode2]", an URL address with a specific number of a consignment sent will be completed into the text. In this case it is necessary to insert [Service;URL] into the prepared text. This is way you can say that the value from Consignment Services from the URL for Following field should be filled into text. Example Entered text: "You can follow the consignment on [Service;URL] address." In a sent e-mail, it will manifest as the following: "You can follow the consignment on address www.ppl.cz/128562, if "www.ppl.cz/[ParcelCode2]" is entered in the URL for Following. |
Created |
Name of the user who created a record. |
Changed |
Name of the user who changed a record. |
For You can add any types of notes toConsignment Services; you can also use Header Text or Footer Text. Further work description with The notes is listed in chapter Basic Code Lists and Supporting Modules K2 – Notes.
Consignments
The book of Consignments is important for recording all consignments and packets sent. The list of all consignments is mentioned on page 0 in this book. Individual packets are the items of consignments. One consignment can obtain several packets (articles that belong to each other are wrapped individually, but they are sent as one consignment).
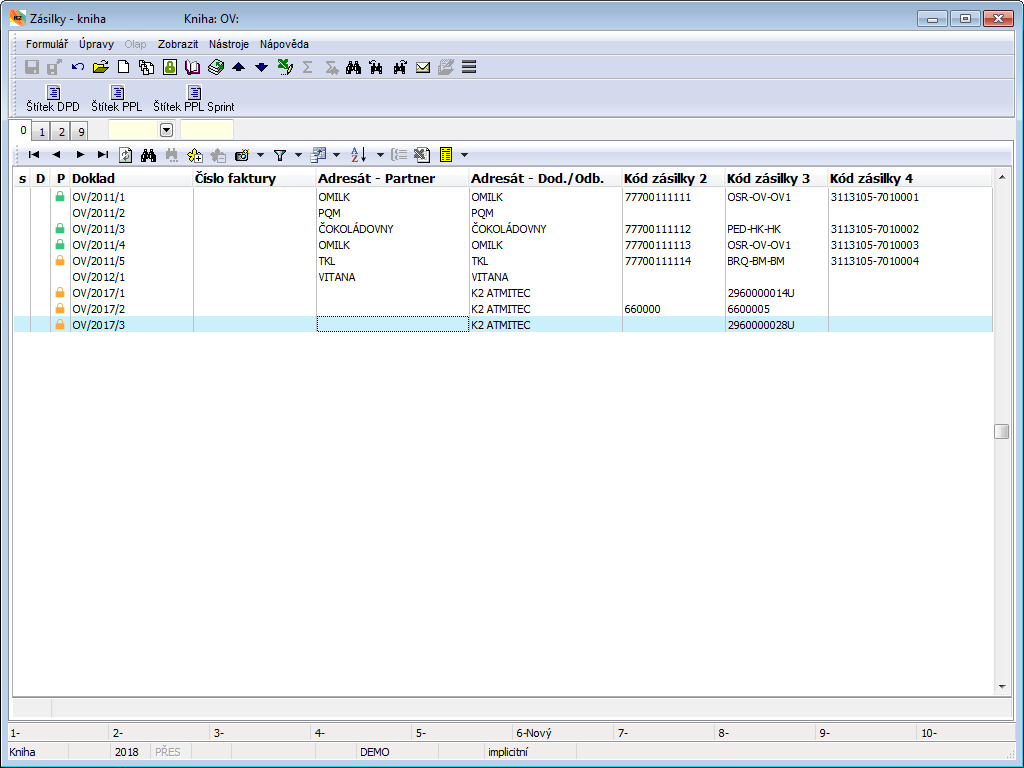
Picture: Consignments - book
Creating Consignments
You can create consignments via the Ins key manually without any default link to Sale documents.
You can also create consignments and packets directly from Sales Orders or subordinate documents via the Create Consignments script ("ParcelCreate.pas"). The description of the script is in a document called Catalogue of Scripts.
Consignments and packets may be created directly from page 0 from the book of Delivery Notes by means of the Ctrl+B keys. A consignment and a packet is created either to a Delivery Note that is currently selected by the cursor, to documents in a container, or to documents marked by an asterisk. Values from a consignment heading will be taken from the first document in case they are run over more delivery notes. A consignment is automatically created in the Book of Consignment Services according to the assignment of Consignment Services in this book. A created consignment will be saved automatically. If the user uses the Shift+B key combination on a Delivery Note that is already assigned to a consignment, they will be switched to this consignment.
In the book of Delivery Notes, the columns 'CFIDParcel' and 'CBParcel' are available for the user. There the user can add columns to page 0 of the book of Delivery Notes. Two bitmaps are connected with the "CBParcel" column. If there is an Icon ![]() in this column for a specific delivery note, this delivery note is part of a package that has already been confirmed at least once. The icon
in this column for a specific delivery note, this delivery note is part of a package that has already been confirmed at least once. The icon ![]() means that this delivery note is part of an unconfirmed package and the icon
means that this delivery note is part of an unconfirmed package and the icon ![]() means that the delivery note is part of a free package. In the "CFIDParcel" column, a number of a packet to which a respective Delivery Note is assigned to is written. There is also the 'BFRepackedParcel' column available in the book of Delivery Notes. This column is important for an identification of a "repacked" packet. If a Delivery Note is a part of repacked packet, the column will display the icon
means that the delivery note is part of a free package. In the "CFIDParcel" column, a number of a packet to which a respective Delivery Note is assigned to is written. There is also the 'BFRepackedParcel' column available in the book of Delivery Notes. This column is important for an identification of a "repacked" packet. If a Delivery Note is a part of repacked packet, the column will display the icon ![]() A Delivery Note marked this way is a part of more than one packet, and these packets are in the status of Cancelled or Unpacked.
A Delivery Note marked this way is a part of more than one packet, and these packets are in the status of Cancelled or Unpacked.
Confirming Consignments
Double confirmation is available for the records in this book. First confirmation generates codes for packets and consignments. Userwise, the first confirmation means that a consignment is closed, i.e. a packet is packed and ready for e.g. label sticking. After the first confirmation, you cannot insert any other packets into a consignment and you can only edit some fields. The first confirmation always automatically confirms all packets (or Delivery Notes). You cannot undo the confirmation of Delivery Notes to an already confirmed consignment. The user can assign a confirmed consignment to a requested Collection. After the first confirmation, a consignment will be marked with the icon 
Second confirmation can only be made after assigning the consignment to a Collection. The second confirmation of a consignment is also done automatically by confirming the Collection for a second time. After the second confirmation, a consignment will be marked with the icon 
Note: Only users with the Administrator - General - Service Operations right can undo the confirmation of a packet after the second confirmation. The user should not make any changes that would change the contents of packet. Any change made to a Delivery Note would not be transferred to either consignments or packets, and the user must do so manually. This service right is important for additional editing of invoices.
Basic Data (page 1)
The 1st page of Consignments provides data about the whole consignment. There you can find information about the sender of the consignment, its addressee, information about the payment method and the method of transport, and also the sums of some values and prices from individual packets of the consignment are stated there.
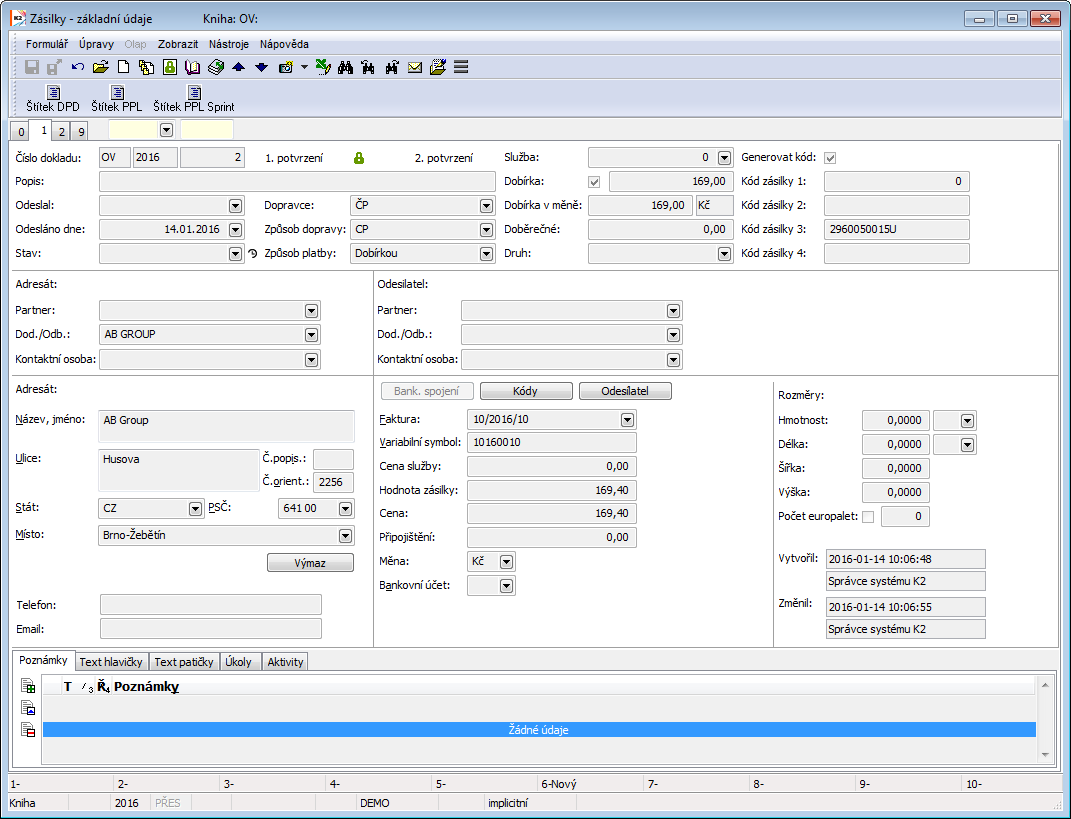
Picture: Consignments - basic data
Fields' Description:
Document Number |
Number, business year and book of a document. |
Description |
An arbitrary description for distinguishing individual consignments. |
Consignor |
The name of the employee who sent the consignment. The field is a reference to the list of Contact persons. In this field a contact person is set by default upon a consignment creation. It is set in parameters as a Own contact person. |
Sent |
Date of mail sending. |
Status |
Mail status. The user chooses from a code list of defined statuses. You can add more records to this code list any time. |
Carrier |
The field for a selection of a consignment's carrier. The user selects one from the book of Partners. In The Mode of Transport book, the filter will be created after selecting a carrier (partner). |
Method of Transport |
The transport method of a consignment. The offer is limited by carrier selection. |
Payment Method |
The method of payment. |
Service |
Consignment service, which gives number to a consignment and which refers to it. The filed cannot be edited. |
Cash on Delivery |
COD will be calculated by the activation of this option. In the case of COD, there must be an Invoice added to the consignment. The value of COD will be completed by the Remaining Amount from this Invoice. It is not possible to confirm the consignment if an Invoice is not added. The option is automatically activated according to the payment method (the option Cash on Delivery in the record of the Payment Method) when you create a consignment by means of the Create Consignment script, or by using the Ctrl+B keys from the book of Delivery Notes. |
Cash on Delivery in Currency |
In this field, the currency and COD will be calculated in the currency of the added Invoice. |
Cash on Delivery |
A fee for the COD service. |
Category |
Category of mail. You can choose from a pre-defined code list that contains basic carrier services for a specification of a consignment. You can add more records to this code list any time. The offer of consignment services is filtered according to the settings in the consignment configuration. |
Generate Code |
After the first confirmation of a consignment, numbers will be generated in the fields Consignment Code 1 to Consignment Code 4, depending on the specific carrier that is supported by standard. The Generate Code field is active by default. When you confirm a consignment, the program is trying to find a service which meets the requirements of the Method of Transport, Payment Method and the Country written on the consignment. If there is no concordance, the consignment will not be confirmed. If the user wants to confirm a consignment without generating the codes, the field Generate Code should not be checked. Generated codes cannot be changed afterwards. |
Addressee, Consignor |
The user enters a Consignor and an Addressee here. It is possible to select them from the book of Partners, Suppl/Cust., or Contact Persons. The Partner and Suppl./Cust. Fields are interlinked. You can create a contact person regardless of any links to a partner. When creating a consignment from the documents of Sale, a contact person will be filled in from a respective Sales Order. |
Address (in Addressee part) |
A contact address of a consignment's addressee will be completed from an address entered in the document when creating a consignment from Delivery Notes (Ctrl+B), and if there is no such address entered, it will be completed with the address of the carrier in the Delivery Note. The rules for loading an address when creating consignments from Sales Orders via the Create Consignments script are described in the Catalogue of Scripts. The address can be also selected from the list of addresses according to the entered addressee via the Known Addresses button (in the Change mode). The address may be entered manually as well. You can delete an address with the Deletion button (in the Change mode). Attention: If you change an addressee, then the address will not be changed automatically. Required address is necessary to select exactly by means of Famous Addresses button. |
Telephone, E-mail (section Addressee) |
Contact data of a consignment's addressee. When creating consignments from Delivery Notes via the Ctrl+B keys, a telephone / e-mail will be transferred only if it is set in the free delivery address in a Delivery Note. When creating consignments via the Create Consignments script, it will be completed according to the set parameters of the script (a detailed description is provided in the Catalogue of Scripts). |
Consignor |
The function of button is to display the consignor address. |
Consignor address |
Consignor address is displayed by means of Consignor button. This address is loaded from a Branch set in the Book of Consignment Services by default. A Branch Office Name will be filled into the field Name in the address. The address can also be selected from the list of addresses according to the entered addressee by means of the Known Addresses button (in the Change mode). The address may be entered manually as well. You can delete an address with the Deletion button (in the Change mode). Attention: If you change an addressee, the address will not be changed automatically. Required address is necessary to select exactly by means of Famous Addresses button. |
Known Addresses |
Button for selection of an address. After pressing it, a list of all addresses of a selected Partner, Contact Person and a Suppl./Cust. will be displayed. The button is available only in the Change mode. |
Telephone, E-mail (section Consignor) |
Contact data about a consignment's consignor. When creating a consignment via the Create Consignment script, it will be filled in according to the settings of parameters of the "EAddressTypeAbbrEmail" and the "EAddressTypeAbbrPhone" scripts from the contact data of a Branch Office (set in the Book of Consignment Services). |
Bank Connection |
The button for field displaying, for bank account assigning, for invoices, or for numbering of some values of a consignment. |
Invoice |
The field for selecting an Invoice to be added to a consignment. If a consignment is sent as COD, i.e. COD field is checked, then it is a compulsory field. |
Variable Symbol |
Variable symbol It is filled from an Invoice connected with a consignment. |
Service Price |
The price of a service used (e.g. a price for traffic). By default, the field is filled only during mail order communication with PPL and an active request for automatic filling of this field. Detailed description in the Script Catalog for the script Setting parameters for communication with PPL (MyApi). |
Consignment Value |
Total value of a consignment. The field represents the sum of the Gross price in the Client's currency of all consignment's packets. This field is default e.g. for the calculation of additional insurance of a consignment, and it can be rounded. |
Price |
The price of a consignment. The field represents the sum of the Gross price in the Client's currency of all consignment's packets. |
Additional Insurance |
This field is used to calculate the price of an additional insurance to a consignment. |
Currency |
A currency in which services are evaluated (i.e. applies to fields Service Price, Consignment Value, Price, Additional Insurance). It is filled in with a currency that is set in the Client parameter. |
Bank account |
A bank account. This field is a link to the Bank Account book, where you can find a list of all your accounts in all banks. |
Codes |
A button for the display of consignment codes (Code 1, Code 2, Officer, Cost Centre, Consignment Code) - enables user differentiation of a consignment. |
Dimensions |
Consignment parameters (Weight, Length, Width, Height, Number of Pallets). The Handling Unit field is also available in universal forms. Used for pallet transport. |
Created |
The name of the employee who created the document. |
Changed |
The date and name of the employee who made the last change of the document. |
It It is possible to add tasks and any type of notes to Consignments. You can also use Header Text or Footer Text. Further work description with The notes is listed in chapter Basic Code Lists and Supporting Modules K2 – Notes.
Items (page 2)
On the 2nd page there are all items of a consignment, i.e. its particular packets.
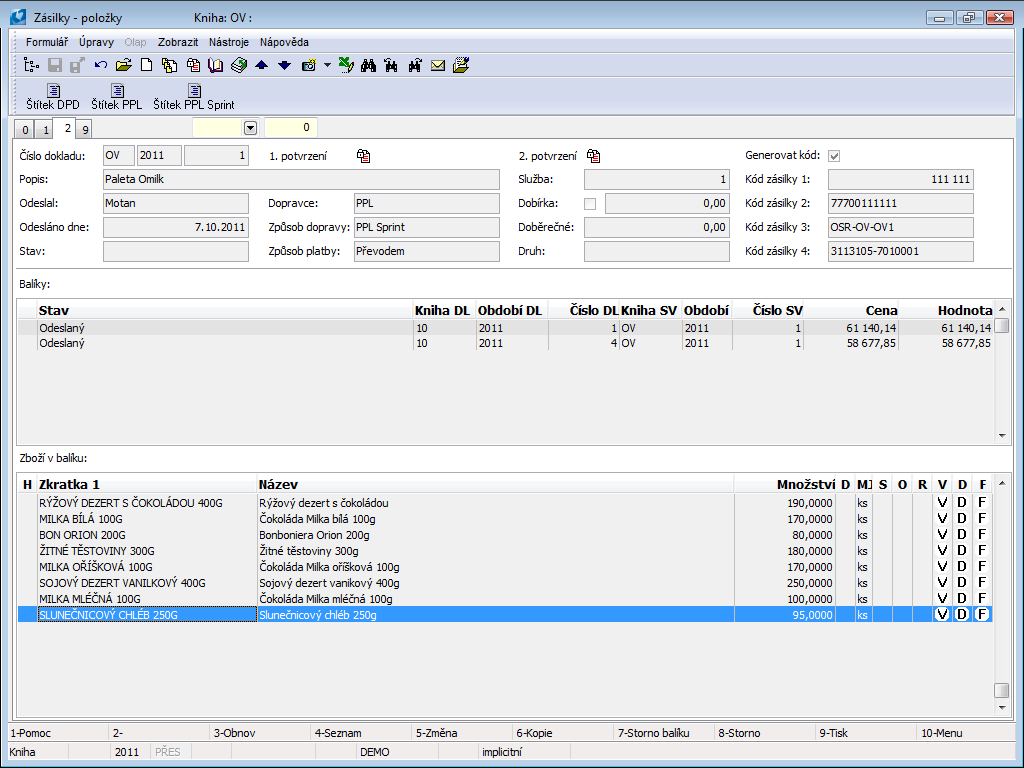
Picture: Consignments - Items
The heading of the page contains all information about a whole consignment.
In the middle there is a list of all Packets which belong to this consignment. The lower part of the Articles in Packet form states the articles which belong to the consignment's packet. There is always a list of articles of this packet on which the light indicator is positioned. This part of the form is used only for display. The items of the packet cannot be changed. Each packet represents one Delivery Note, i.e. the list of articles in the packet equals the items of a specific Delivery Note. If the user wants to change the packet in some way, e.g. to add some items, they must change the Delivery Note.
Add the already existing packets into the consignment from the book of Packets via the F7 key. You can detach a packet from the consignment via the Shift+Delete keys in the Change mode.
Packet Statuses
Each packet is usually in a specific status. This state is available in the column Status on the 2nd page of a consignment, or after clicking on a particular packet in the Status field. The value of this field changes automatically after individual tasks during the work with consignments. Besides statuses that are set automatically, you can add other statuses to packets by means of a standard script called Change Packet Status.
Packet Statuses:
Open |
The default state for a newly created packet. |
Wrapped |
Confirming a consignment will automatically confirm its Delivery Note and the packet status will change to Wrapped. |
Ready to Send |
The status after the packet is added to a collection. |
Checked |
The packet was checked before sending. This status is adjusted by a standard script Check Packets in Collection. |
Sent |
The packet is added to a double confirmed collection. |
Following statuses can be adjusted according to the script Change Packet Status.
Delivery Attempt |
Information from a carrier. Unsuccessful attempt to deliver the consignment to a customer. |
Ready for Pickup |
Delivered to a delivery point. |
Cancelled |
A cancelled packet (cannot be added to any collection). In this situation the packet is separated from its Delivery Note and then you can create a new packet from that Delivery Note (and add it e.g. to another consignment). |
Send Back |
The customer has not picked the consignment up. |
On the Way Back |
The packet has been sent back. |
Refused to Take Over |
The addressee refused to accept the packet (e.g. a damaged packet). |
Returned |
Information from a carrier. Delivered back. |
Undelivered |
The packet was not delivered successfully. |
Delivered |
Information from a carrier. The customer accepted the consignment. |
Unpacked |
The packet is was unpacked after it has been delivered back. In this situation the packet is separated from its Delivery Note and then you can create a new packet from that Delivery Note (and add it e.g. to another consignment). |
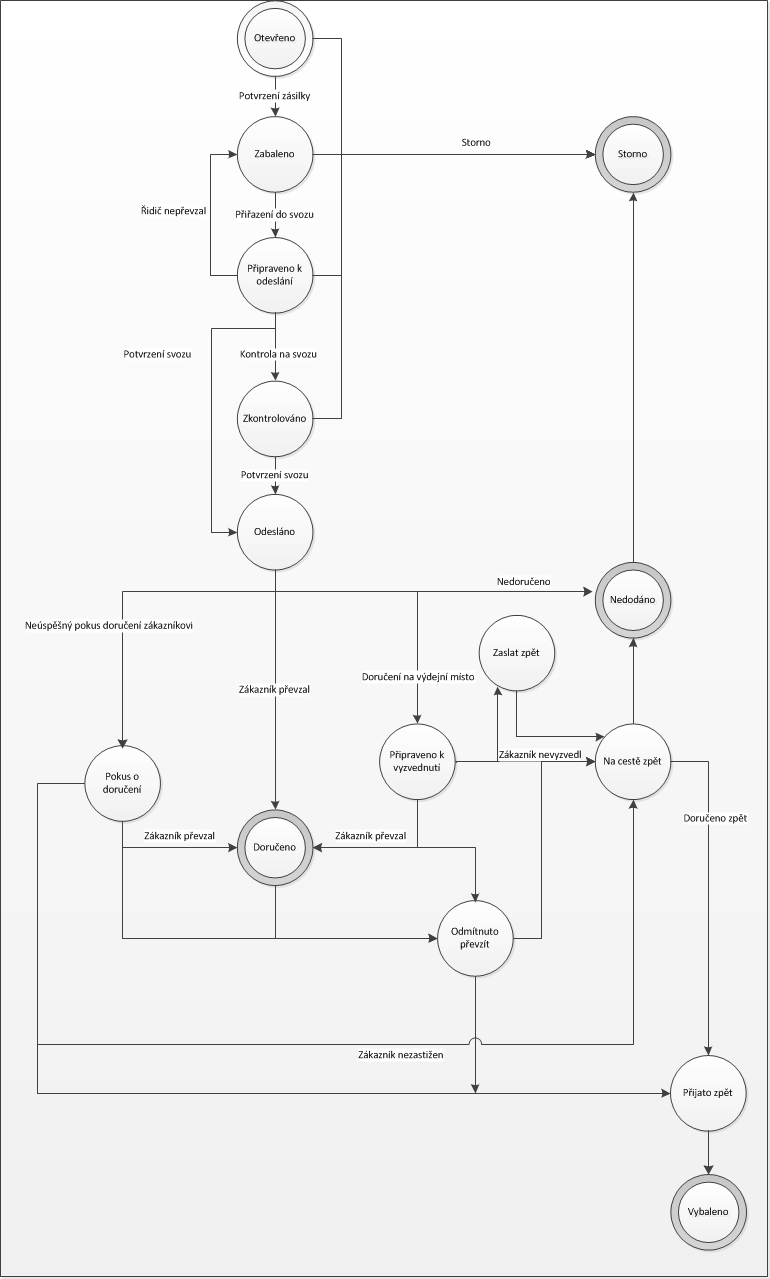
Picture: Packet Statuses
Documents (page 9)
On the 9 th document page Bulk posting form is possible same as in other documents in IS K2 inserting documents or processes. Further work description with This page is listed in the chapter Basic Code Lists and Supporting Modules K2 – 9th Page.)
Functions over Consignments
F7 |
Insert a consignment into a Collection (page 0). Only consignments with the first confirmation may be added to a Collection. |
Ctrl+F7 |
Services for a consignment. Opening them in the Change mode over the page 1 allows you to define / edit the services for a consignment. When in the Change mode over the page 0 or 1, you can only display the services saved for a consignment. |
Collections
Collections represent a list of packets that are ready to be collected by a carrier. The list of all executed Collections is in the book of Collections.
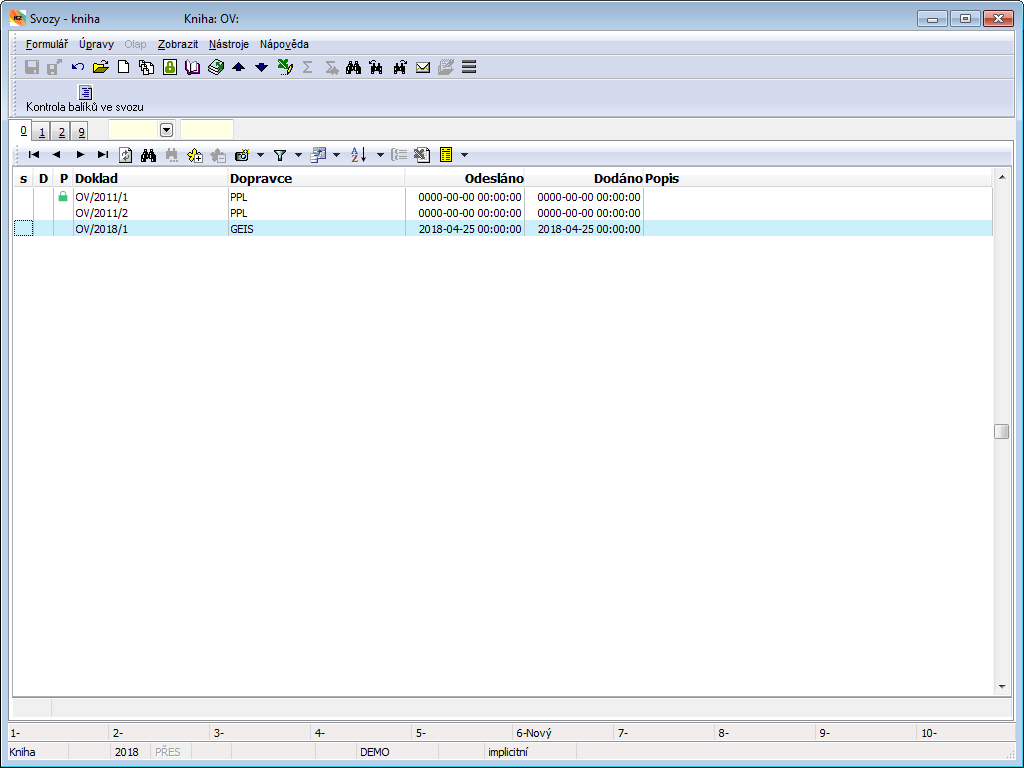
Picture: Collections - book
Packets are the items of Collections. Individual parcels added to Collections via Sales Orders. When creating an Order for a Collection, the staff will use the information from these created Collections. Double confirmation of records is also available in the book of Collections. To collection after first confirmation ( ),other packaging cannot be add, you can only enter some of the fields in the document's header. The first confirmation means that the packets are prepared to be sent in the expedition, and a requested check may take place. The staff will perform a physical check, making sure that the articles in the expedition correspond to the articles in the Collection. For the purposes of the check, a warehouseman may use a report that will display and print a list of all packets located in the Collection. To further check the Collections, the user may use the Collection Check script.
Second confirmation of collection( ) means that the packet has been taken by the carrier. If all packets of a consignment have been completed, i.e. all Collections have left or have been cancelled, the second confirmation of a Collection will automatically confirm its consignment as well. After the second confirmation, you may also run scripts for the export of data sentences for carriers over the Collections.
Basic Data (page 1)
The 1st page of Collections states the basic data. This information forms the heading of a document and relates to the whole Collection.
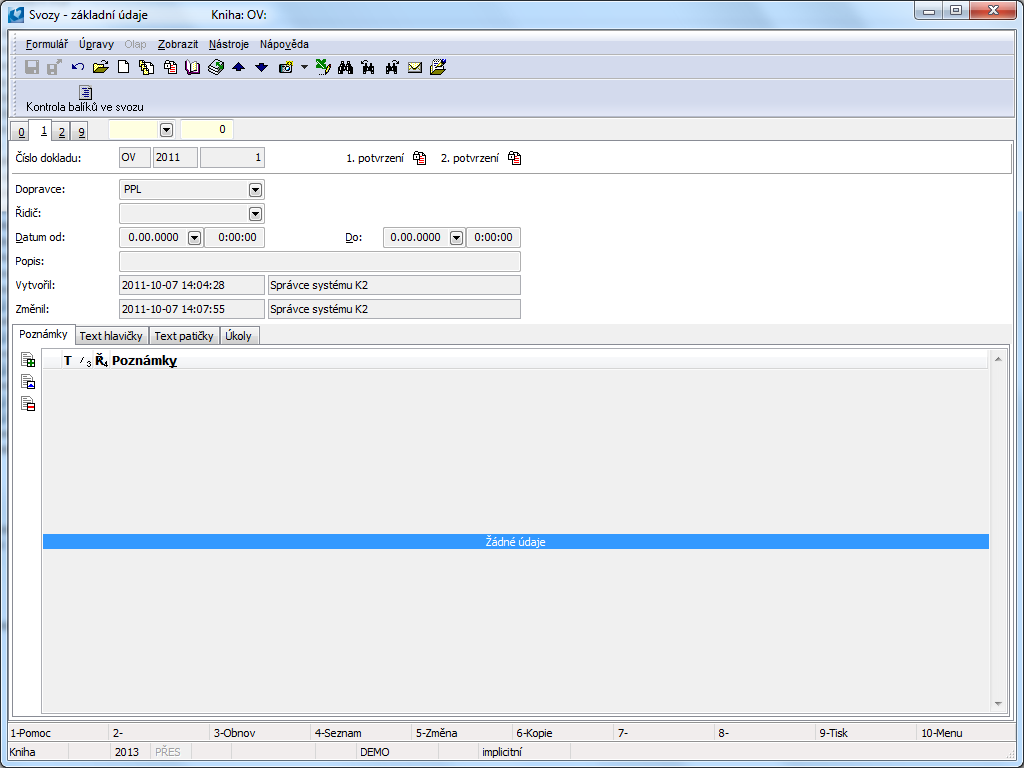
Picture: Collections - basic data
Fields' Description:
Document Number |
Number, business year and book of a document. |
Carrier |
The field for a selection of a consignment's carrier. The user selects one from the book of Partners. After choosing a carrier, a Selection in the book of Contact Persons will be created, where only the contact persons of this partner will be located. |
Driver |
A carrier's driver who picks up a consignment. The field is a link into the Contact Persons book. The partner of a specific person will be automatically filled into the Carrier field after you select an appropriate contact person. |
Date From |
The date is a start from when the staff can prepare a Collection and add packets to it. |
Date To |
The date is a limit till when the staff can prepare a Collection and add packets to it. |
Description |
Any description used to distinguish particular consignments. |
Created |
The date and the name of an employee who created the order. |
Changed |
The date and name of the employee who made the last change of the document. |
It is possible to add any notes to Collections, and you can also use Header Text or Footer Text. Further work description with The notes is listed in chapter Basic Code Lists and Supporting Modules K2 – Notes.
Items (page 2)
On the 2nd page, all items of the Collections are displayed. This represents a physical list of all assigned packets.
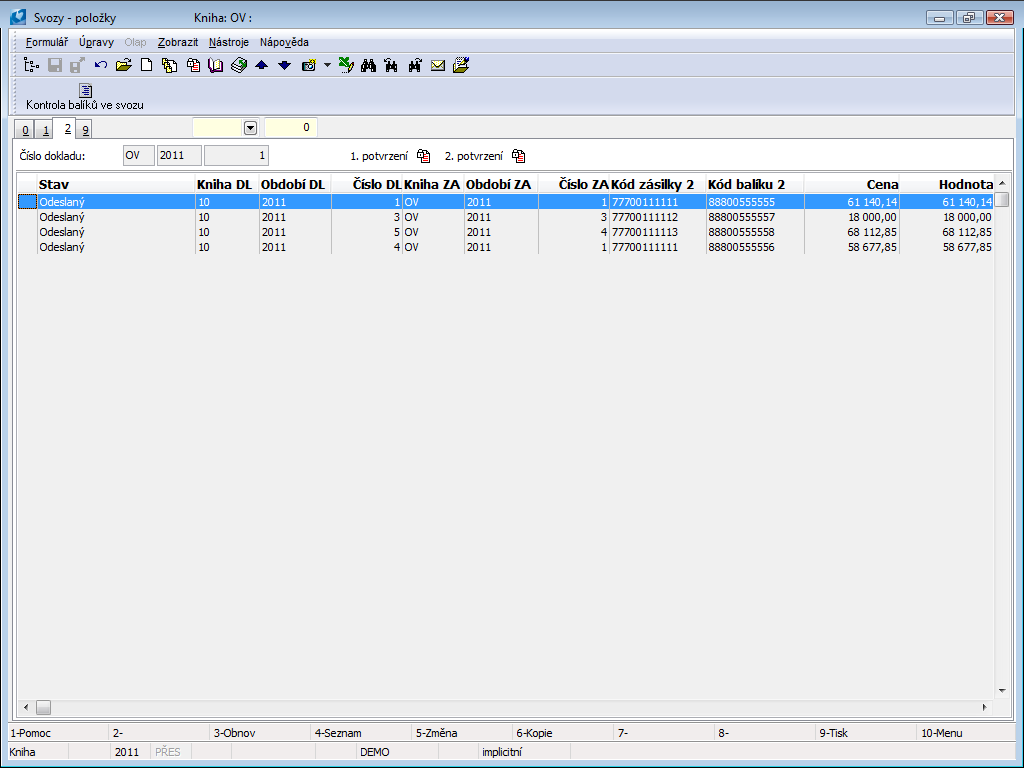
Picture: Collections - items
Assign packets to a Collection via consignments from the book of Consignments, using F7. The already existing packets may be removed from a Collection in the Change mode with the key combination Shift+Delete.
Documents (page 9)
On the 9 th document page Collection is possible same as in other documents in IS K2 inserting documents or processes. Further work description with This page is listed in the chapter Basic Code Lists and Supporting Modules K2 – 9th Page.)
Packets
The Packets book is a list of all created packets.
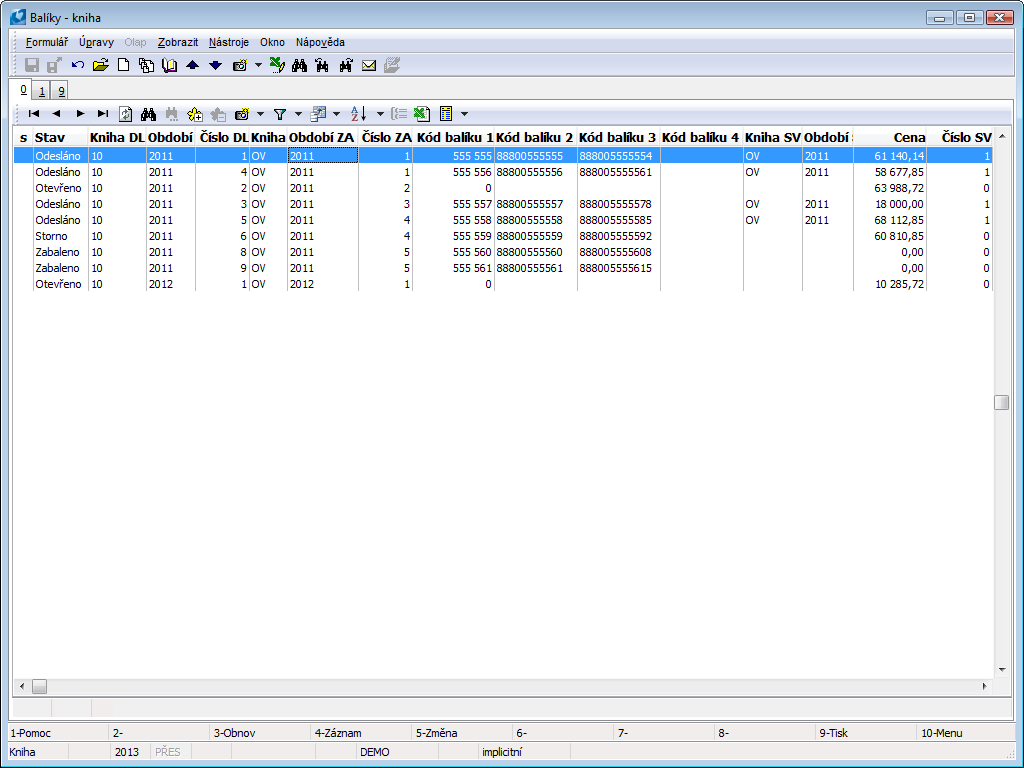
Picture: Packets - book
The user can use this book for a better overview and for easier search for packets by their codes within all consignments.
The user can create and change the so-called free packets (i.e. packets without a consignment), and then connect them individually or in bulk to a consignment via the F7 function. The moment the packet is added to second time confirmed consignment, it cannot changed anymore.
A free packet may be created with the Insert key and then added to a Delivery Note. Free packets may be inserted directly from the book of Delivery Notes via the Shift+B keys. The function is launched on page 0 and the packet is created for a Delivery Note where the cursor is currently set on. The user can adjust and save the field of a packet afterwards. If the user uses the Shift+B key combination on a Delivery Note that is already added to some free packets, they will just be switched to this packet.
If a packet already has a matched numbering service, the consignment codes can no longer be changed. To change the code or the Delivery Note, the user must CANCEL the packet, create a new one, and generate or enter new codes.
In the book of Delivery Notes, the columns 'CFIDParcel' and 'CBParcel' are available for the user. There the user can add columns to page 0 of the book of Delivery Notes. Two bitmaps are connected with the "CBParcel" column. If there is an Icon ![]() in this column for a specific delivery note, this delivery note is part of a package that has already been confirmed at least once. The icon
in this column for a specific delivery note, this delivery note is part of a package that has already been confirmed at least once. The icon ![]() means that this delivery note is part of an unconfirmed package and the icon
means that this delivery note is part of an unconfirmed package and the icon ![]() means that the delivery note is part of a free package. In the "CFIDParcel" column, a number of a packet to which a respective Delivery Note is assigned to is written. There is also the 'BFRepackedParcel' column available in the book of Delivery Notes. This column is important for an identification of a "repacked" packet. If a Delivery Note is a part of repacked packet, the column will display the icon
means that the delivery note is part of a free package. In the "CFIDParcel" column, a number of a packet to which a respective Delivery Note is assigned to is written. There is also the 'BFRepackedParcel' column available in the book of Delivery Notes. This column is important for an identification of a "repacked" packet. If a Delivery Note is a part of repacked packet, the column will display the icon ![]() A Delivery Note marked this way is a part of more than one packet, and these packets are in the status of Cancelled or Unpacked.
A Delivery Note marked this way is a part of more than one packet, and these packets are in the status of Cancelled or Unpacked.
Basic Data (page 1)
On the 1st page of the book of Packets there is basic information about a particular packet.
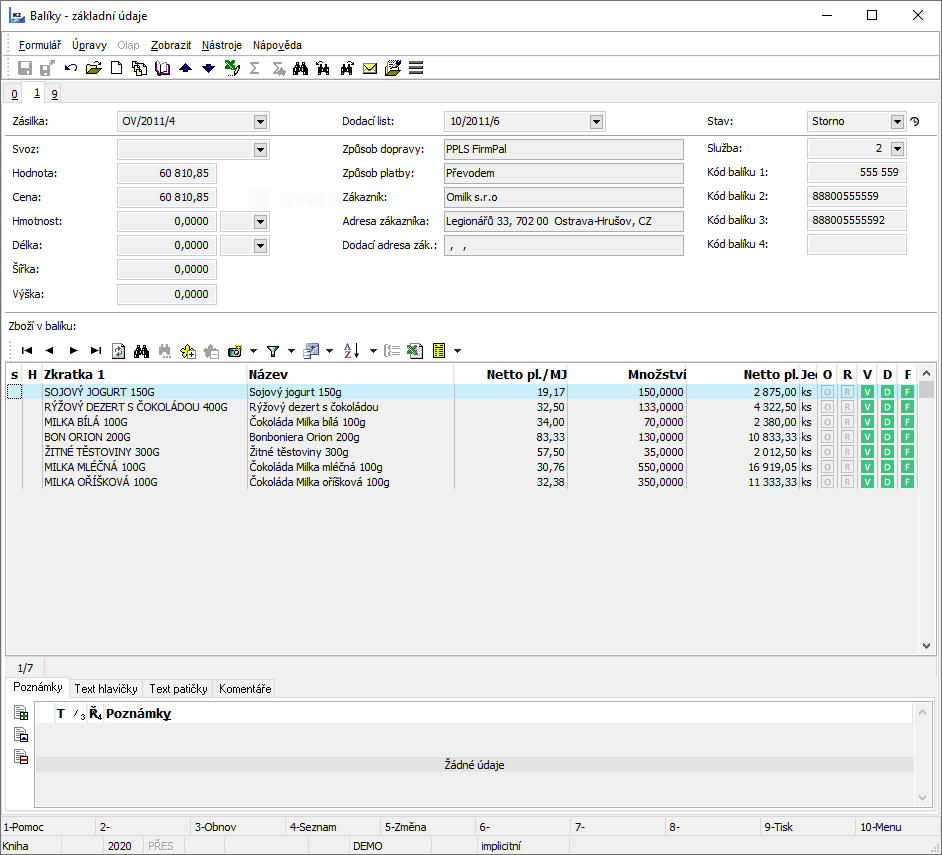
Picture: Packets - basic data
In the upper part of the form on the 1st page of the book of Packets, basic information about a particular packet is stated.
Fields' Description:
Consignment |
Consignment number where the packet is added to. |
Delivery Note |
Package number of receipt card. |
Method of Transport |
Method of Transport automatically filled from receipt card. |
Payment Method |
Payment method automatically filled from receipt card. |
Customer |
Customer automatically filled from receipt card. |
Customer Address |
Customer Address automatically filled from receipt card. |
Collection |
Collections number where the packet is added to. |
Value |
Packet value (usually used for an insurance of packets). This amount may differ from the actual price of packet. |
Price |
Packet price for a price determination of COD. |
Weight |
Weight of a packet. |
Length, Width, Height |
Basic dimensions of a packet. |
Handling unit |
Used for pallet transport. Field is available for user only in Universal forms. |
Status |
Current status of a packet. This field will be automatically filled with a value from the previously defined code number of statuses during the work with the consignment system. |
Service |
A service according to which the packet codes are generated will be filled into this field. |
Packet Codes |
Fields where the packet codes are generated after consignment confirmation according to the service settings. |
Status for monitoring |
Only in Universal Forms. The last state of the package, in which it is located according to the information from the carrier. It is filled in using the Balíkobot - consignment status script and further on the basis of the user definition of status abbreviations in the Balíkobot - carrier settings script. The status of the first package of the consignment is also displayed in the consignment - in the right preview panel. The status of the package is also displayed in the right preview panel on the bound delivery note. |
Address for monitoring |
Only in Universal Forms. After sending the shipment data to the Balíkobot (first confirmation of the shipment), the tracking address of the package is stored in each package - a link to the page of the relevant carrier. It is also available in the right preview pannel. The address from the first package of the shipment is also displayed in the Consignments, and only in the right preview panel. The data is also displayed for the bound delivery note, again in the right preview panel. |
The lower part of the Articles in Packet form displays a list of all articles belonging to the given packet. Pressing Enter on any article will open the Sale Item form with detailed information about the articles in the packet.
Ext. Documents (9th Page) - Packets
On the 9 th document page Packaging is possible same as in other documents in IS K2 inserting documents or processes. Further work description with This page is listed in the chapter Basic Code Lists and Supporting Modules K2 – 9th Page.)
Consignment Configuration
Consignment Configuration is a part of Business Consignments in the K2 IS. This configuration is determined for the settings of services of individual carriers, the settings of methods of transport, or the method of numbering consignments. You can also set there the path to databases provided by carriers. When activating the configuration, the List of Consignment Configurations form is displayed.
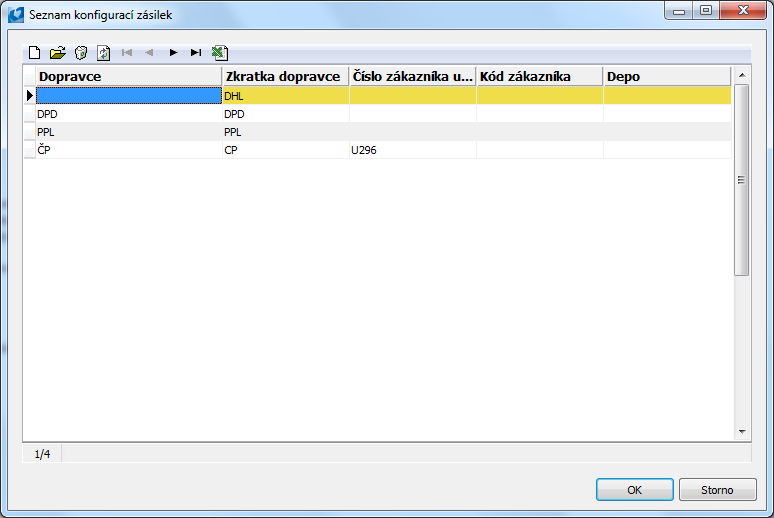
Picture: The List of Consignment Configurations form
The list of carriers that are used by the company is stated in the form, i.e. a list of all configurations for these carriers. Insert a new item with the Ins key. After pressing this key, a form with several items is displayed. It is possible to execute the configuration of services of the carrier in the form. The same form is also displayed after pressing the Enter key on an already created record.
Configuration
The first folder of Configuration serves for a determination of a particular carrier that the user makes a configuration for.
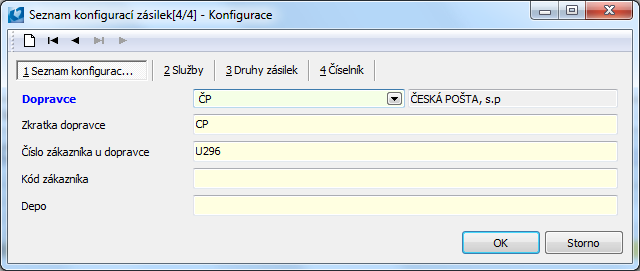
Picture: The Configuration tab
Fields' Description:
Carrier |
The field for selection of a consignment's carrier. The user chooses from the Partners code list, where an appropriate carrier must be added. |
Carrier Abbreviation |
Carrier abbreviation. |
Customer Id in Carrier |
A number assigned by the carrier. It is usually used for access to web services. |
Customer Code |
Customer code for an export. |
Depot |
Enter the number of a carrier's depot into this field (if required). |
Services
The next tab - Services - is used for setting the services that are provided by a carrier and that are to be used.
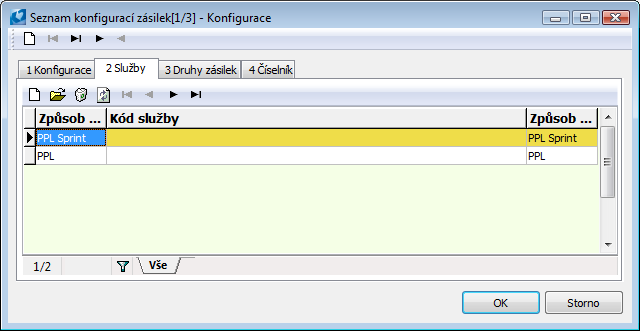
Picture: The Services tab
A new item (service) is entered here with the Ins key. A form for the specification of the service will appear.

Picture: The List of Consignment Configurations form
Fields' Description:
Method of Transport |
This field is meant for a method of transport within this service. |
Service Code |
An abbreviation or a code of the service. |
Numbering Method |
A numbering method of the service. The settings of a numbering method determine the generating of consignment codes that will be transported by this service. This concerns particularly Consignment Code 3 and Consignment Code 4. It defines the algorithm according to which the codes will be generated, or, as the case may be, which database table will be used upon the creation of these codes. This field is a reference to the Numbering Method code list. |
Consignment Category
The Consignment Category tab is used to select carrier services through which you can specify a consignment category. The selection is made from a pre-defined code list, which contains basic services of a given carrier. It is possible to enter next records to this code list whenever. A consignment category set here may then be assigned to a specific consignment of a specific carrier (the field Category on the 1st page of the consignment).
Examples of Consignment Categories: The Czech Post - DE (Parcel Delivery To Hand + guaranteed delivery time)
Code List
This tab is used for setting files with auxiliary information. Auxiliary files are used by scripts that generate individual consignment codes in the K2 IS. It deals e. g. with determination of whether Depots are set. Every item is defined by a Type of and a Path to the file. Insert a new item with the Ins key.
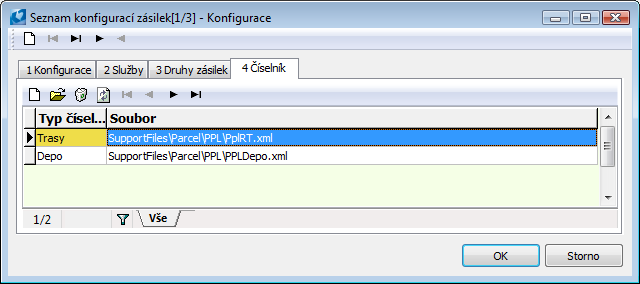
Picture: The Code List tab
Reports over Consignments
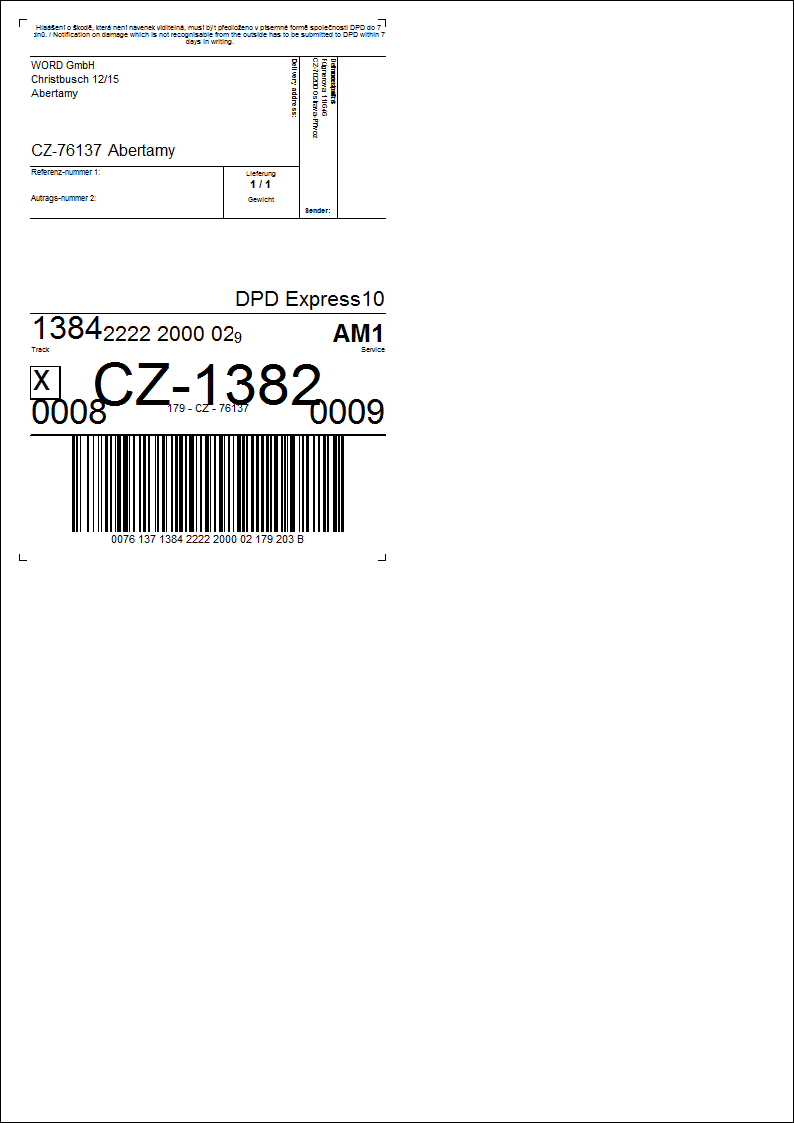
DPD Label
Process No.: CRM013 |
Report ID: SCRM057 |
File: ParcelDPDLabel.am |
Report description: Label printing for DPD service. |
||
Address in the tree structure: |
||
Report parameters:
FragileList - ' ' List of defined methods of transport for fragile packets. |
ParcelId - 0 Packet number for print. |
PayMeCard_DSC1 - ' ' A defined payment method for card payment. If the payment method is the same as the one on the consignment, the label will be printed with the payment method = 'Card Payment'. |
PayMeCash_DSC1 - ' ' A defined payment method for payment in cash. If the payment method is the same as the one on the consignment, the label will be printed with the payment method = 'In Cash'. |
ShowPayMet_DSC1 - No Yes - payment method from a consignment will be displayed in the record. |
ShowPrice_DSC1 - No Yes - price will be displayed in the record (from a COD field). |
ShowWarSym_DSC1 - No Yes - variable symbol from a consignment will be displayed in a record. |
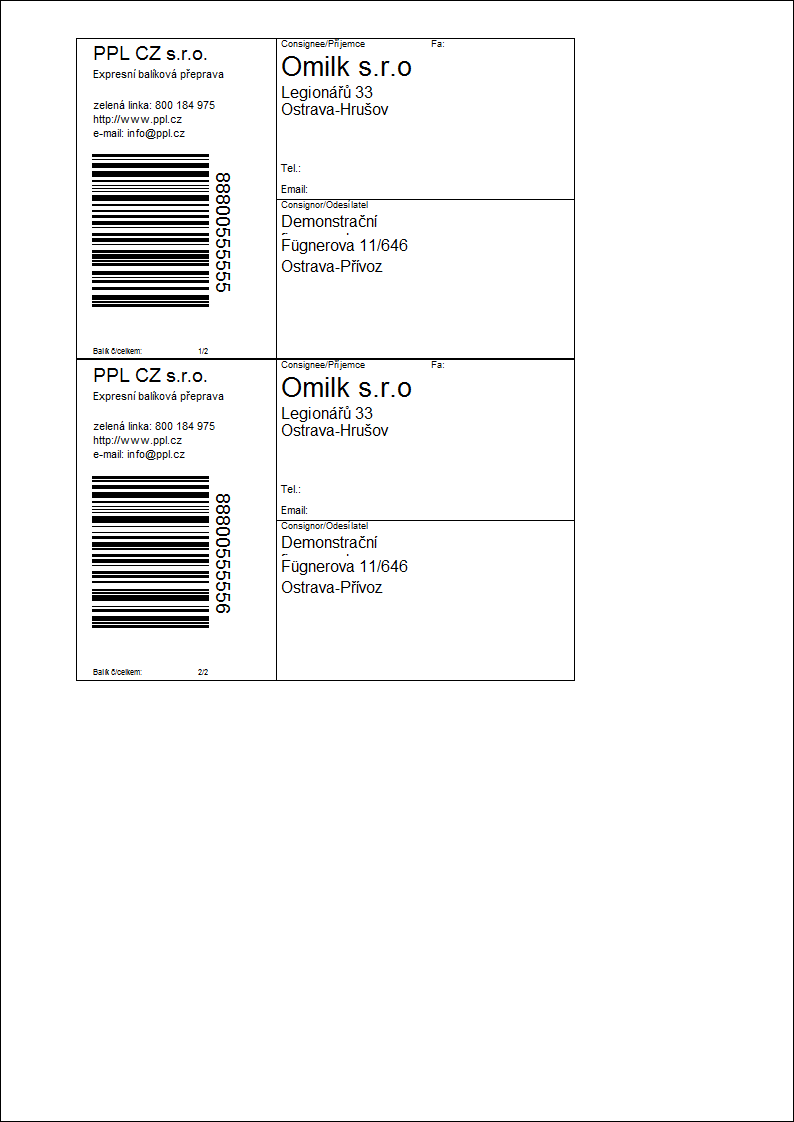
PPL Label
Process No.: CRM013 |
Report ID: SCRM058 |
File: ParcellPPLLabel.am |
Report description: Label printing for PPL service. |
||
Address in the tree structure: |
||
Report parameters:
FragileList List of defined methods of transport for fragile packets. |
NoteType_DSC1 A note type from whose text will appear in the report. |
Parcelld Packet number for print. |
PPLDepoName_DSC1 A parameter for entering the name of a PPL depot from which the packet has been sent. |
PPLDepoStreet_DSC1 A parameter for entering the address of a depot from which the packet has been sent. |
PPLDepoTelFax_DSC1 A parameter for entering the phone number and fax of a depot from which the consignment has been sent. |
PPLDepoWeb_DSC1 A parameter for entering the website address and e-mail of a depot from which the consignment has been sent. |
PPLDepoZIP_DSC1 A parameter for entering the postal code and location of a depot from which the consignment has been sent. |
ServiceName_DSC1 Name of a service. |
Process No.:
Process No.: CRM013 |
Report ID: SCRM059 |
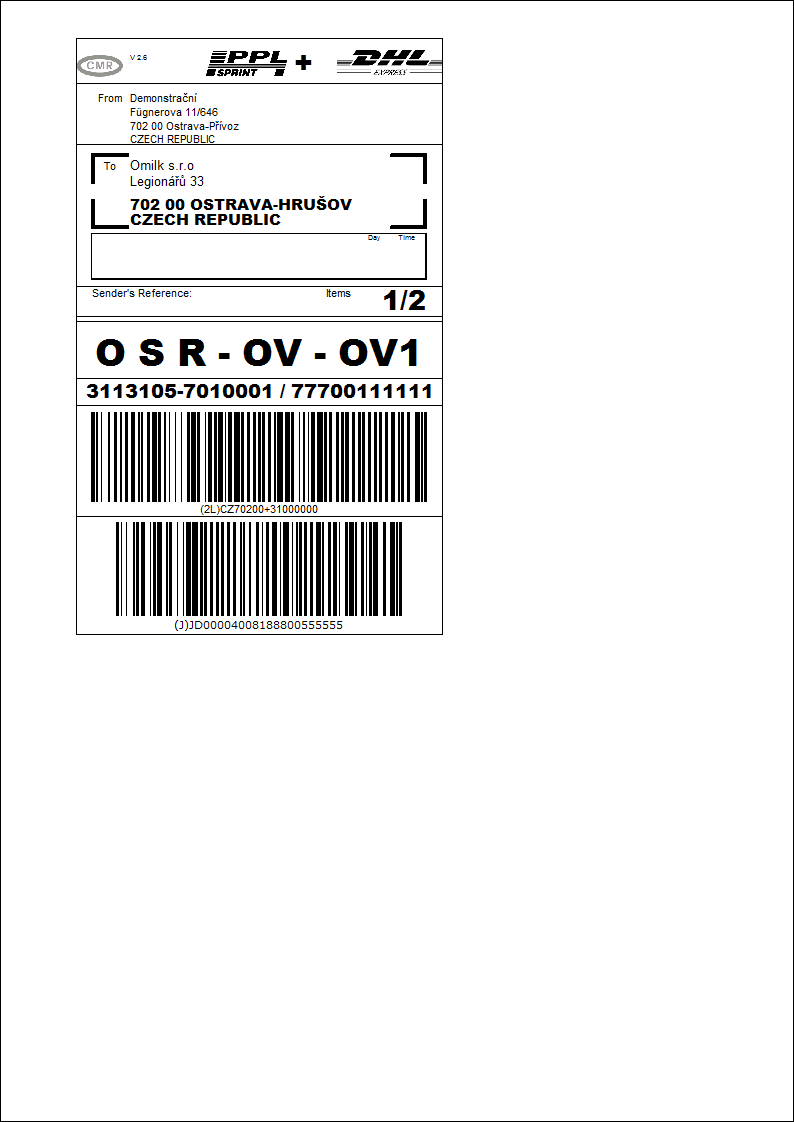
File: ParcellPPLSprintLabel.am |
Report description: Label printing for the PPL Sprint service (New DHL freight). Reference no. (Sender's reference) on the label is the number of the package's Delivery Note. |
||
Address in the tree structure: |
||
Report parameters:
ParcelId - 0 Packet number for print. Enables to print a label for only one selected package from a consignment containing multiple packages. Enter the package's internal number (the 'Id' field). |
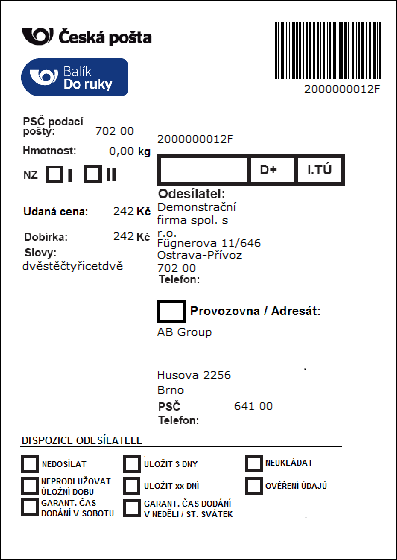
Czech Post Label
Process No.: CRM013 |
Report ID: SCRM063 |
File: ParcelCPLabel.am |
Report description: Label printing for the Czech Post. |
||
Address in the tree structure: |
||
Report parameters:
PostingPost_DSC1 Parameter for assigning postal service code. The code assigned in this parameter is displayed over the bar code. |
Parcelld Packet number for print. |
FragileList List of defined methods of transport for fragile packets. |

List of Consignments
Process No.: CRM013 |
Report ID: SCRM060 |
File: ItemsList.am |
Report description: The report shows a list of consignments with the possibility to display individual packages and their items. The report can be run in the Consignments book. |
||
Address in the tree structure: |
||
Report parameters:
ShowItems - No Yes - the items of the consignment's packages are displayed in the report. |
ShowPackage - No Yes - the packages are displayed at individual consignments in the report. |
List of Packages
Process No.: CRM013 |
Report ID: SCRM061 |
File: PackageList.am |
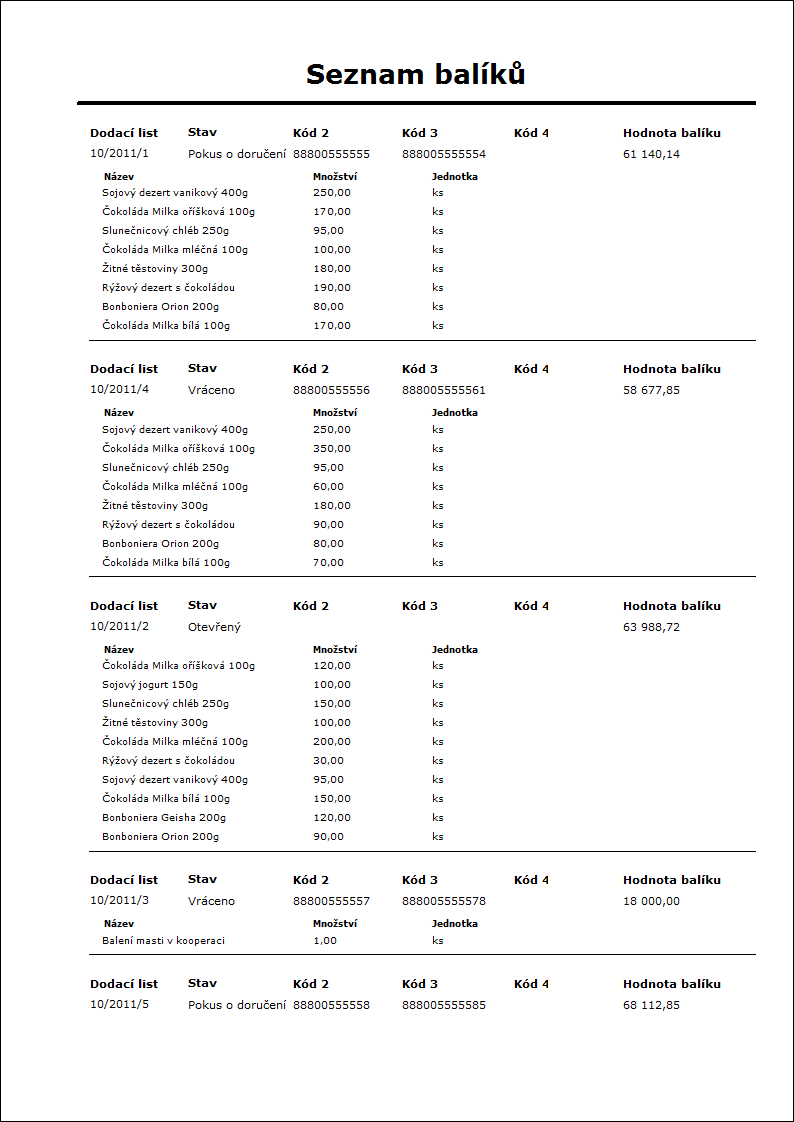
Report description: The report shows the list of packages with the possibility to display the items of these packages. You can run this report in the Packets book. |
||
Address in the tree structure: |
||
Report parameters:
ShowItems - No Yes - the items of individual packages are displayed in the report. |
GroupByShipment - No Yes - sorting of packages according to their consignments. |
List of Packages in Collection
Process No.: CRM013 |
Report ID: SCRM062 |
File: ListPackagesToCollection.am |
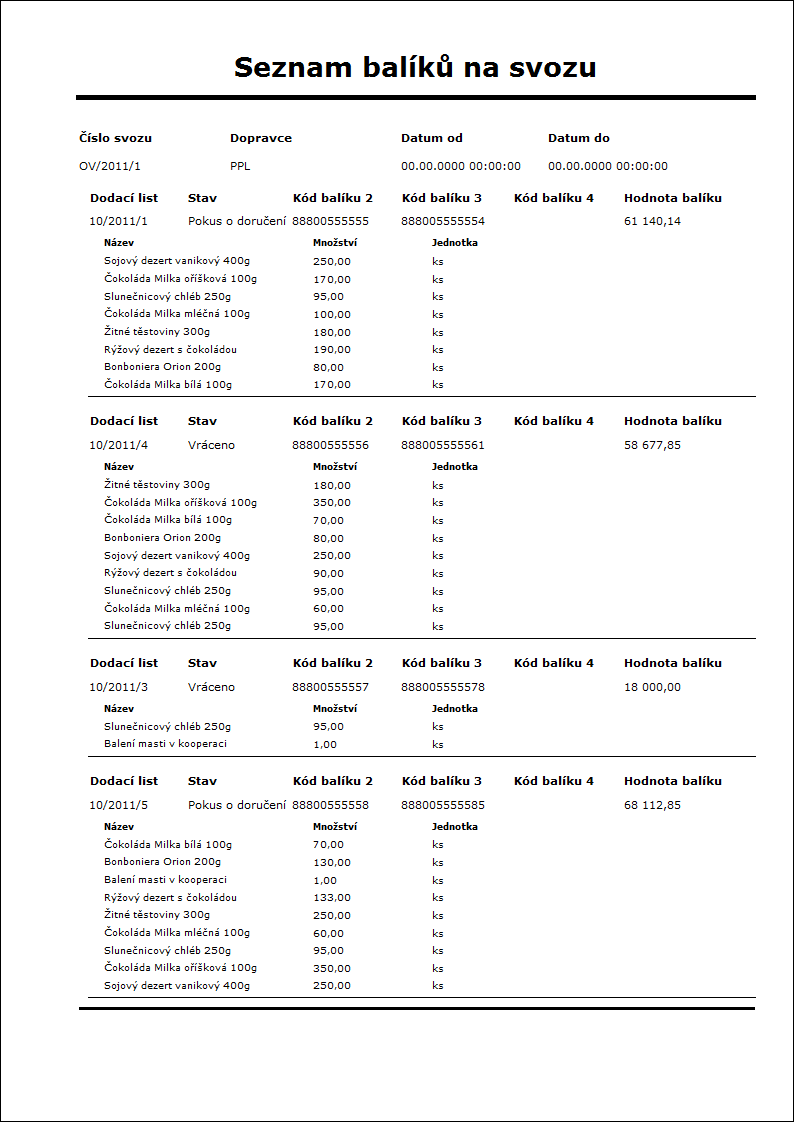
Report description: The report displays a list of packages that are sorted by the Collection they are classified to. The packages of collections may be further sorted according to their consignments. With the use of this parameter, you can display also the items of packages. The report can be run in the Collections book. |
||
Address in the tree structure: |
||
Report parameters:
ShowItems - No Yes - the items of individual packages of Collection are displayed in the report. |
GroupByShipment - No Yes - sorting of packages by consignments within individual Collections. |
Czech post label 1
Process No.: CRM013 |
Report ID: SCRM069 |
File: ParcelCPLabel1.am |
Report description: Label printing for the Czech Post. |
||
Address in the tree structure: |
||
Report parameters:
PostingLogo_DSC1 - 1 A logo displayed on the label. 1 - to hand, 2 - to post office, 2 - oversized , 3 - express. |
Parcelld Packet number for print. |
FragileList List of defined methods of transport for fragile packets. |
MultiPieceShipmentService - Yes This parameter defines how to print labels for multi-piece parcels. Yes - multi-piece parcels are respected, the label carries information about the consignment's main package. No - a separate label is printed for each package even in the case of multi-piece parcels (the label does not carry information stating that this is a multi-piece parcel). This does not apply to Cash on Delivery consignments. Note: The same parameter is also in the script for creating a data sentence (Export file of the Czech Post type N) and must be set to the same value as in the label. |
PostOfficeZipCode_DSC1 - ' ' Postal service code of the service post if it is different than the postal code of the sender's address. |
List of Packages of Collection Without Bar Code
Process No.: CRM013 |
Report ID: SCRM064 |
File: ListOfPackagesWithoutBarCode.am |
Report description: The report displays a list of packages that are sorted by the Collection they are classified to. The packages of collections may be further sorted according to their consignments. With the use of this parameter, you can display also the items of packages. It is not possible to display bar codes of Collection in this report. The report can be run in the Collectionsbook. |
||
Address in the tree structure: |
||
Report parameters:
ShowItems - No Yes - the items of individual packages of Collection are displayed in the report. |
GroupByShipment - No Yes - sorting of packages by consignments within individual Collections. |
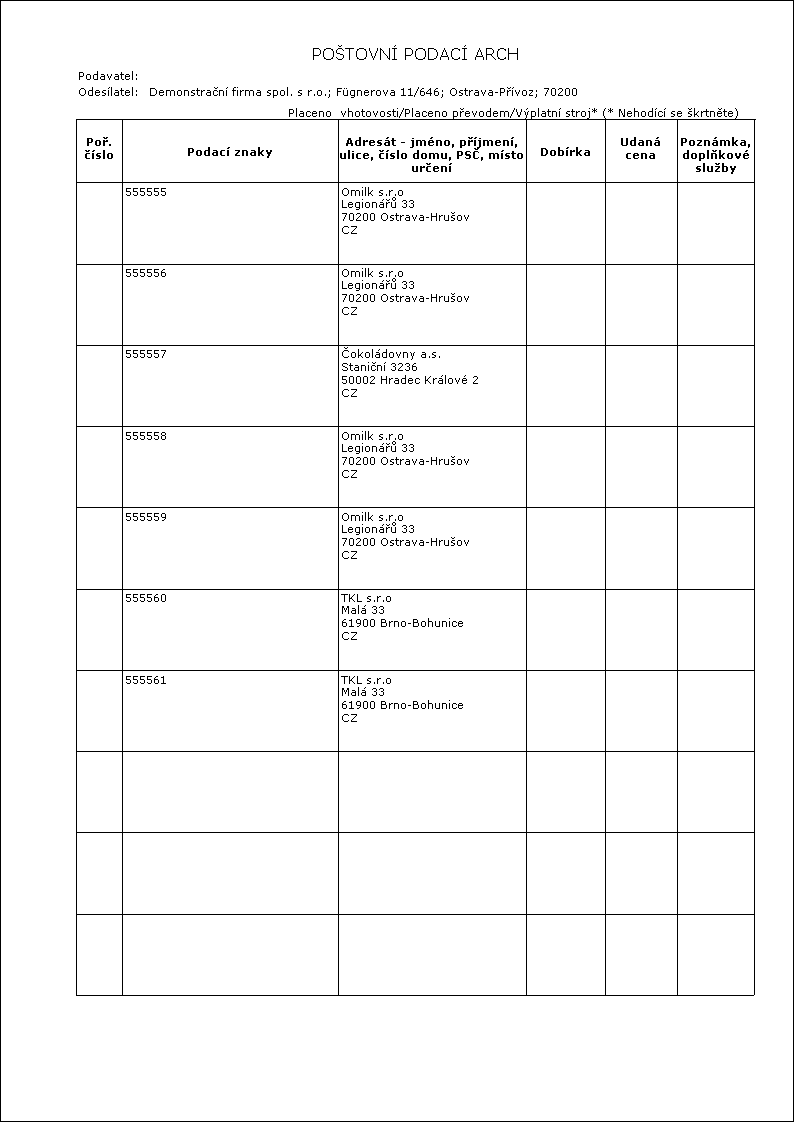
Packets - Bulk Posting Form
Process No.: CRM013 |
Report ID: SCRM065 |
File: ParcelFilingSheetNew.am |
Report description: The print of Bulk Posting Form report for packages with pre-filled data. You can print this report in the books of bulk pick up, parcels and shipments. The "Cash on Delivery" column shows value from the Cash on Delivery field from the package, the "Value Stated" column shows value from the Consignment Value field. |
||
Address in the tree structure: |
||
Report parameters:
Code - 1 By means of this parameter, you can define the fields of packages (Package code 1 - 4) which the Posting Marks are pre-filled in from. 1 - Package code 1, 2 - Package code 2, 3 - Package code 3, 4 - Package code 4. |
Submitter Parameter for entering any text in the Submitter field. |
OrderNumbers - No Yes - the ordinal number will be added into the report. |
Scripts, functions
Carriers - Settings Specifications
Some settings, and sometimes even the program's behaviour, may differ during the creation of packets based on individual carriers for whom you prepare consignments. That is why we are going to bring attention to the specifications and differences of the program's settings for individual carriers in the following chapters.
In Time
The settings and the behaviour of the Consignment module for carriers In Time differs from the standard settings in these points:
Communication with Server - Settings
Using the Set Parameters for Communication with IN TIME script (ParcelExportIntimeParams.pas) you can set parameters for the communication with the In Time company's server. The script can also pre-set the filling in of services to individual consignments for individual books of consignments. The description of the script is provided in the chapter Set Parameters for Communication with IN TIME.
Consignment Services
For the In Time company, set the Type field to "Consignment". Range of numbering (fields From - To) may be set arbitrary; however, the range must be sufficient for the amount of issued consignments and packets. This numbering range is not used for generating of the main code (main identification) of a consignment for the In Time company, but for the internal numbering within K2 (for more information, see field Consignment / Packet Code 1).
Consignment Numbering
The K2 program does not assign an identification code to an In Time consignment - this is done by the AZ application of a carrier. The same as with consignments for other carriers, the code will be assigned upon the confirmation of the consignment - in that moment, the K2 program will generate an XML file with information about the consignment, and will send it to the carrier's server. The server will generate a corresponding code and will return it to the K2 program. The consignment is saved into the AZ application (section "My Consignments", the status of the consignment is "Sent" = "No") and it is ready to be sent for further processing. If there are any problems with the communication, an error report will be sent back.
Consignment Code 1: This is an internal order number within the K2; it is set in the From / To interval defined in Consignment Services.
Consignment Code 2: This is the main identification code of a consignment and it is generated by a carrier; it is defined by the identification code of the customer and the order number assigned from the interval.
Consignment Code 3: This represents the number of packets that have already been processed in a consignment upon the request for a code generation being sent; these packets have already been assigned with a code.
Consignment Code 4: Not used.
Packet Code 1: This is an internal order number within the K2; it is set in the From / To interval defined in Consignment Services.
Packet Code 2: This is the main identification of a packet code, generated by a carrier; it is defined by the identification code of the customer + a service's letter + an order number from the assigned interval; the information about the number and order of colli within the consignment may be found behind the asterisk (example: 4V0S00000008*001003).
Packet Code 3 and 4: Not used.
Confirmation / Undo-Confirmation of Consignments
The confirmation of consignments has the same meaning as for consignments for other carriers - the document will be locked and a unique code will be generated for the consignment. The code, however, is not created by the K2 program - this is done by the server of a carrier (see the section Consignment Numbering above).
You can undo the confirmation of a consignment only if a consignment is saved in the InTime AZ application, and its status is "Sent" = "No". A consignment is always in this status after being confirmed (after its code has been generated). After a reconfirmation, any changes made will not reflect in the record of the "AZ InTime" application!
Sending Data from Collection
Consignments in the "AZ InTime" app must be assigned to batches. This defines them to be processed by a carrier. The batches may be created from loaded consignments directly in the "AZ InTime" app, or via the script Send Consignments to IN TIME (ParcelExportInTimeCompleteArticle.pas) in the K2 program, which may be run over a specific Collection to which the consignments are assigned. Script consignemts in “AZ InTime” will be moved to batches (status “Send” = “Pending, consignments are in section “My consignments batches”). After transferring the consignments to batched, you cannot undo the confirmation of Collection in the K2 program.
DPD
Specifications and necessary settings for the DPD company.
Consignment Services
For the DPD company, set the Type field to "Packet".
Configuration
For a correct and complete print of information about the services of a consignment on a label, you must enter the DPD services in the configuration of the DPD carrier in Consignment Categories. This is done the same way as in the DEMO Client (texts and descriptions stated there are then used on the label). A label's print report supports only the services that are set in the DEMO Client.
Settings of Consignment Numbering
The number of a consignment is a 14-character + check numbers: DDDD x y LLLLLLLL p.
A carrier should assign their customer a 10-character number created by characters in the example "x y LLLLLLLL". However, if a carrier assigns the customer a whole 14-character number, the first four numbers must be ignored when entering the number string to the K2 program. The first four letters DDDD are a number identification of a collection depot. This information is ascertained by the K2 program itself, you do not need to enter it anywhere.) Split the rest of the 10-character number between the prefix and the numbering range in Consignment Services.
The Czech Post
Marking Consignments By Time Zones (A, B)
K2 IS Settings:
- The "Zv_doruc_pasmo.csv" file, which is a part of the installation, must be copied into the K2\SupportFiles\Parcel\CP2 directory.
- If you need to force a morning or afternoon delivery, you have to set up records "DR1A" and "DR1B" in the Consignment Category and assign them to the Czech Post (tab 3 - Consignment Categories) in the Consignment Configuration.
- You then need to assign a requested category to individual consignments (on the 1st page in the Category field).
According to the selected category, the label may be marked in the following ways:
- The DR category (i.e. Delivery to Hand without a specification of time zone): if a location supports afternoon deliveries, then automatically by the B letter (afternoon delivery); if a location does not support afternoon delivery, then automatically by the letter A (morning delivery).
- The DR1A category (i.e. request for a morning delivery): by the letter A.
- The DR1B category (i.e. request for an afternoon delivery): if a location supports afternoon deliveries, then automatically by the B letter (afternoon delivery); if a location does not support afternoon delivery, then automatically by the letter A (morning delivery).
The resulting service will be automatically written into the data file (created by the script Export File of The Czech Post Type N ("ParcelCPExportN.pas").
Carriers - Implementation
General Implementation of Consignment Services
Structure of Books
- Packets (1 packet = 1 Delivery Note)
- Consignments (1 packet contains 1 or more packets)
- Collection (1 collection creates 1 or more consignments, the packets are physically the items of Collections)
General steps to implement carriers:
Contract - agreement with a carrier
- arranging conditions, agreement about services
- acquiring identification and login data
- possible acquiring of numbering code intervals
Data Settings in K2
- Set up a Suppl./Cust. card and a Partner for a carrier
- Create a Branch Office with your address to the partner representing your own company
- Define Payment Methods
- Define a Method of Transport that will identify the given carrier or products used
- Set the given carrier according to specifications described for each carrier in the Consignment Configuration
- Create records for consignment numbering in the book of Consignment Services
- In case of need, set up a book (books) of documents for consignments
- Assign records of the consignment service to books of documents
- Perform any necessary additional settings of the consignment communication (the functions are in a tree menu)
Verification Process
When you finish with all settings, you may proceed to create data (consignments). Most carriers require a verification process before running the actual operation (communication), where they require the data and labels to be sent for all combinations that may occur (products, services, one-packet and multi-packet consignments, all payment methods).
Work with Consignments
1. Create Consignments
- The script Create Consignments (ParcelCreate.pas) over a Sales Order
- creates a consignment and packets + Delivery Notes
- The Ctrl+B key combination over Delivery Notes
- creates a consignment and a packet
- The Shift+B key combination over Delivery Notes
- creates a free packet (without consignment)
2 Confirmation of Consignments
- The first confirmation assures the generation of codes
3 st Label Printing
- Labels may be printed over Sales Orders that have been confirmed at least for the first time
4 Assigning consignments to Collections and sending data to the carrier, alternatively ordering a Collection
Support of Supplementary Services
Services of carrier companies applied to particular consignments are saved into the XML field in the headers of consignments. This can be done via special scripts or by means of the Ctrl+F7 keys over the 1st page of consignments in the Change mode.
An overview of consignment services can be displayed on the form that is opened after pressing the Ctrl+F7 keys over page 0 or the 1st page in the Browse mode.
The is no support for services in Sale - this means that a Sales Order (e.g. from an e-shop) does not contain any information about its respective services. By default, services may be added after a Sales Order has been created.
Current versions support services for Geis Parcel, Geis Cargo, and In Time.
The solution for the COD - Cash on Delivery service is universal for all carrier companies. This service is handled by the Cash on Delivery option in a consignment's header - it is pre-set automatically based on the Cash on Delivery option in the Payment Method record.
Implementation via DPD (through API)
Contract - Agreement - with a Carrier
- you are assigned with a login name and password for the DPD app
- if you are assigned with a numbering as well, its use is only informative and it is not necessary for further work
Data Settings in K2
- Creating Records in Basic Code Lists
- Set up a Suppl./Cust. card and a Partner for a carrier
- Create a Branch Office with your address to the partner representing your own company.
- Define Payment Methods
- Define the Method of Transport for DPD
- Configure Consignments - set configuration for a given carrier
- Page 1
- Carrier: Assign the partner's DPD record from the book of Officers
- Customer's Number at Carrier: do not fill in, this is set in the configuration script, see further
- Customer Code: do not fill in
- Depot: do not fill in, this is set in the configuration script, see further
- Page 2 - Services
- Assign a "DPDPApi" (system record) numbering to the method(s) of transport for DPD
- Page 3 - Consignment Categories
- For a correct and complete print of information about the services of a consignment on a label, you must enter the DPD services in the configuration of the DPD carrier in the Consignment Categories tab. This is done the same way as in the list below (texts and descriptions stated there are then used on the label). (Note: select he service for the Category field on the first page of a specific consignment.)
Abbreviation |
Name |
Description |
101 |
D |
|
109 |
D-COD |
Cash on Delivery / C.O.D. |
136 |
D |
|
154 |
PARCELLetter |
DPD PARCELLetter |
155 |
PM2 |
DPD 18:00 / DPD GUARANTEE |
161 |
PM2-COD |
DPD 18:00 Cash on Delivery / DPD GUARANTEE C.O.D. |
179 |
AM1 |
DPD 10:00 |
191 |
AM1-COD |
DPD 10:00 Cash on Delivery / C.O.D. |
225 |
AM2 |
DPD 12:00 |
237 |
AM2-COD |
DPD 12:00 Cash on Delivery / C.O.D. |
327 |
D-B2C |
PRIVATE ADDRESS / B2C |
329 |
D-B2C-COD |
PRIVATE ADDRESS / B2C - C.O.D. |
350 |
AM0 |
DPD 08:30 |
352 |
AM0-COD |
DPD 08:30 Cash on Delivery / C.O.D. |
839 |
D-EVE |
EVENING DELIVERY 17:00-20:00 |
840 |
D-EVE |
EVENING DELIVERY 17:00-20:00 |
841 |
D-COD-EVE |
EVENING DELIVERY 17:00-20:00 CASH ON DELIVERY |
842 |
D-COD-EVE |
EVENING DELIVERY 17:00-20:00 CASH ON DELIVERY |
- Page 4 - Code List
- Do not set
- Consignment Services - set up one or multiple records for the numbering of packages. Do so according to the carrier's (assigned) numbering intervals. The basic principle of numbering packages is that the service is searched for based on the compliance of the fields Country - Method of Transport - Payment Method. In situations where the numbering interval is not assigned for a particular country, method of transport, or payment method, you can set the services of a consignment in a way that the respective element is not taken into consideration during the search for optimal service of numbering consignments. It is done in the following way:
- leave the Country field empty;
- fill in " - " (dash) into the Method of Transport field;
- fill in " - " (a dash) into the Method of Transport field.
- Set the Category field to "Package" for the DPD company. The range of numbering (fields From - To) may be set arbitrary; however, the range must be sufficient for the amount of issued consignments and packages. This numbering range may be used only for internal numbering within the K2 system. A package's main code is generated by the DPD company's server.
- Assign Consignment Category to aBook of Consignment Services - if you have not created books of document yet, you need to create it for the consignments. The consignments are recorded in the Books of Consignment Services. It is necessary to insert the record from the book of the Branch that represents your own company (or the place with an address from where the consignments in of this book will be sent). The address of this branch will then be filled in as the consignor's address and will be added to the label. On the Service Definitions tab, we assign the numbering records from the Shipment Services book that can be used in the given book.
- Complementary Settings of Communication with Carrier and Consignment Behaviour - by means of the Set Parameters for Communication with DPD script (ParcelDPDGeoApiParams.pas), set the parameters for communication with the server of the DPD company and the characteristics of the consignment communication.
- Obligatory settings:
- Login to access DPD app
- Password to access DPD app
- Customer's number at carrier (generated based on login)
- Collection depot (The identification number of the collection depot must be entered in the field according to the contract with the carrier. The menu of pick-up depots can be displayed using the button Collection depot - and overwrite the selected value from the "Customer AddressId" column in the field.)
- Payment methods for payment in cash
- Payment methods for payment by card
Verification process and creating consignments
When you finish with all settings, you may proceed to create data (consignments). Most carriers require a verification process before running the actual operation (communication), where they require the data and labels to be sent for all combinations that may occur (products, services, one-packet and multi-packet consignments, all payment methods).
- Create Consignments
- The script Create Consignments (ParcelCreate.pas) over a Sales Order
- creates a consignment and packets + Delivery Notes
- The Ctrl+B key combination over Delivery Notes
- creates a consignment and a packet
- The Shift+B key combination over Delivery Notes
- creates a free packet (without consignment)
- Confirming Consignments - the assignment of an identification code to a DPD consignment will occur after the first confirmation of the consignment - in that moment, the K2 program will generate an XML file with information about the consignment, and will send it to the carrier's server. The server will generate a corresponding code and will return it to the K2 program. In that moment, the consignment is saved in the DPD company's server and is ready for further processing by the carrier. If you cancel the first confirmation of a consignment, it will be automatically deleted from the DPD server together with the codes of packages in the documents in the K2 system. After you re-confirm the document, new package codes will be generated (and new labels must be printed).
- Print Labels - to print labels, use the DPD Api Label report (ParcelDPDLabelApi.am).
- Assigning consignments to Collectionsand sending data to a carrier, eventually ordering a Collection - order a Collection by using the DPD Consignment Communication script while setting the parameter "CommandProcessId" = 1 (default value). The script may already be run in the Collection after the first confirmation; after a successful communication with the DPD server (ordering a Collection) the second confirmation will occur automatically. (If the user performs the second confirmation manually, they can run the script as well.) Other functions of the DPD Consignment Communication are described in the Script Catalogue.
PPL Sprint Label Implementation
Contract - Agreement - with a Carrier
- you are assigned with a login name and password for the PPL app
- you are assigned with a customer number
- you are assigned with numbering for individual products
Data Settings in K2
- Creating Records in Basic Code Lists
- Set up a Suppl./Cust. card and a Partner for a carrier
- Create a Branch Office with your address to the partner representing your own company.
- Define Payment Methods
- Define a Method of Transport for the individual PPL products (PPL provides a different range of numbering and a different prefix for each type of their product; in the case of "PPL Sprint" this covers the products "PPL Sprint Private Pallet" and "PPL Sprint Firm Pallet", while it is not necessary to meet any given form of abbreviation or the description of the record). Load items are numbered together with consignments in the case of the PPL Sprint products. For the numbering of load items, it is necessary to define an individual Method of Transport with the abbreviation "PPLS Item"!
- Configure Consignments - set configuration for a given carrier
- Page 1
- Carrier : assign from Partners book a partner PPL record
- Customer's Number at Carrier: fill in the assigned number (do so also in the script for the communication settings, see further on)
- Customer Code: do not fill in
- Depot: do not fill in
- Page 2 - Services
- Add "PPL Sprint" (system record) to the methods of transport that represent the used products and to the method of transport for the numbering of load items
- Page 3 - Consignment Categories
- Do not fill in
- Page 4 - Code List
- add the record in which the path to the file of the routing table will be stated. Set the code list type to "Routes" and enter the reference for the "PplRT.xml" file into the File field (the file is saved in the "K2\SupportFiles\Parcel\PPL" directory by default). If the file is older than 1 day, it will be automatically updated during the first confirmation of a consignment (i.e. upon the generation of consignment codes).
- Consignment Services - for every used type of product, set up a record with a corresponding method of travel and a corresponding allowed payment method, and set the field Type = "Consignment". Fill in the first 5 numbers from the assigned interval into the Prefix field. Further on, create a record for the numbering of items with the "PPLS Item" method of transport and the "-" payment method (unspecified payment method), and set the field Type = "Package". Fill in the first 11 characters from the assigned interval (document name + 9 numbers) into the Prefix field. If the following numbering interval (10 positions) starts with zeroes, do not enter them anywhere - the program will do so itself upon generating the code.
- Assign Consignment Category to aBook of Consignment Services - if you have not created books of document yet, you need to create it for the consignments. The consignments are recorded in the Books of Consignment Services. It is necessary to insert the record from the book of the Branch that represents your own company (or the place with an address from where the consignments in of this book will be sent). The address of this branch will then be filled in as the consignor's address and will be added to the label. On the Service Definitions tab, we assign the numbering records from the Shipment Services book that can be used in the given book.
- Complementary Settings of Communication with Carrier and Consignment Behaviour - by means of the Set Parameters for Communication with PPL (MyAPI) script (ParcelPPLMyApiParams.pas), set parameters for the communication with the PPL company's server (login, password, customer number at the carrier). By using the PPL Sprint - Weight from Package you can define the way of calculating the weight of individual items within the PPL Sprint consignments. By using the PPL Sprint - Numbering of Items by Packages you can define whether a transporting item represents each item of a Delivery Note, or the package (Delivery Note) as a whole. A closer description is provided in the Script Catalogue.
Verification process and creating consignments
When you finish with all settings, you may proceed to create data (consignments). Most carriers require a verification process before running the actual operation (communication), where they require the data and labels to be sent for all combinations that may occur (products, services, one-packet and multi-packet consignments, all payment methods).
- Create Consignments
- The script Create Consignments (ParcelCreate.pas) over a Sales Order
- creates a consignment and packets + Delivery Notes
- The Ctrl+B key combination over Delivery Notes
- creates a consignment and a packet
- The Shift+B key combination over Delivery Notes
- creates a free packet (without consignment)
- Confirm Consignment - the assignment of an identification code will occur during the first confirmation of a consignment - the numbering the numbering is executed on the part of the K2 program. Overview of generated consignment codes:
- Packet Code 1: The order number from the assigned interval for the first item of the package, without a prefix. (If the numbering by packages is set, then a package number).
- Packet Code 2: The order number from the assigned interval for the first item of the package, without a prefix. (If the numbering by packages is set, then a package number).
- Packet Code 3: The prefix from the record of a service for the numbering of items.
- Packet Code 4: The order number from the assigned interval for the last item of the package, without a prefix. (If the numbering by packages is set, then a package number).
- Consignment Code 1: The internal number of the consignment.
- Consignment Code 2: The actual consignment code, i.e. the actual number from the assigned interval for the numbering of consignments, prefix included.
- Consignment Code 3 and 4: The sorting code and consignment routing (for label).
- Print Labels - to print labels, use the PPL Label report (ParcellPPLSprintLabel.am).
- Assigning consignments to Collectionsand sending data to a carrier - send record data to the carrier by using the PPL Consignment Communication script (ParcelPPLMyApi.pas) while setting the parameter "CommandProcessId" = 1 (default value). For the print of a completion protocol, use the List of Packages in PPL Sprint Collection over Collections (ListPackagesToCollectionPPLSprint.am). Other functions of the PPL Consignment Communication are described in the Script Catalogue.
Note: Dimension of Load Item - If the PPL Sprint - Numbering Items by Packages parameter is activated by the Set Parameters for Communication with PPL (MyAPI) script, the fields with the dimension of the package will also be completed into the data sentence. The values are taken from the package headers (if all dimensions are entered); if none are entered, they will be taken from the consignment headers.
PPL Parcel Implementation
Contract - Agreement - with a Carrier
- you are assigned with a login name and password for the PPL app
- you are assigned with a customer number
- you are assigned with numbering for individual products
Data Settings in K2
- Creating Records in Basic Code Lists
- Set up a Suppl./Cust. card and a Partner for a carrier
- Create a Branch Office with your address to the partner representing your own company.
- Define Payment Methods
- Define a Method of Transport for the individual PPL products (PPL uses a different range of numbering and a different prefix for every type of product (which codes the type of products, depot number, distinguishing between payments by cash on delivery or not, and the use of the "Documents Back" service). The abbreviation of the record may be arbitrary (according to the customer's needs). However, the service must be described in the Description field the way it is required by the PPL company (the text is used for the print of labels):
|
|
|
|
- Configure Consignments - set configuration for a given carrier
- Page 1
- Carrier : assing from Partners book a partner PPL record
- Customer's Number at Carrier: fill in the assigned number (do so also in the script for the communication settings, see further on)
- Customer Code: do not fill in
- Depot: do not fill in
- Page 2 - Services
- Assign the "PPL" (system record) numbering to the methods of transport that represent the products used
- Page 3 - Consignment Categories
- If you wish to use the services for an evening or a Saturday delivery, you need to define the respective records in the code list of Consignment Category and then insert these in the tab. "SD" for a Saturday delivery and an "ED" for an evening delivery. The request for an evening or a Saturday delivery is set in the Type field in the consignment. (Upon the printing of labels and sending the data, such request of a consignment will be evaluated; if the recipient's postal code supports the given service, the information about it will be added to the label or the data file.)
- Page 4 - Code List
- Do not fill in.
- Consignment Services - for every used type of product, set up a record with a corresponding method of travel and a corresponding allowed payment method, and set the field Type = "Package". Fill in the first 5 numbers from the assigned interval into the Prefix field. (Note: There is only one numbering line for the "PPL Export Package" and "PPL Parcel Connect" products. If you wish to use both of the products, you need to divide the assigned interval into two products (services records).)
Example: You are using the "PPL Parcel Business" product. You will use the methods of payment by "transfer" and by "Cash on Delivery". You will be assigned with two intervals (with prefixes) by the PPL company - one for "Parcel Business non-Cash on Delivery" and one for "Parcel Business Cash on Delivery". Define a method of transport with an abbreviation, e.g. "PPL Business", and with a description in the exact format f "PPL Parcel CZ Business". In the Configuration of Consignments, create a record in tab 2 - Services: method of transport = PPL Business, method of numbering = PPL. Set up two services in the Consignment Services: the first one with the method of transport in the format of "PPL Business" and the method of payment to "Transfer", the second one with the method of transport in the format of "PPL Business" and the payment method to "Cash on Delivery". Fill in the assigned numbering to each service.
- Assign Consignment Category to aBook of Consignment Services - if you have not created books of document yet, you need to create it for the consignments. The consignments are recorded in the Books of Consignment Services. It is necessary to insert the record from the book of the Branch that represents your own company (or the place with an address from where the consignments in of this book will be sent). The address of this branch will then be filled in as the consignor's address and will be added to the label. On the Service Definitions tab, we assign the numbering records from the Shipment Services book that can be used in the given book.
- Complementary Settings of Communication with Carrier and Consignment Behaviour - by means of the Set Parameters for Communication with PPL (MyAPI) script (ParcelPPLMyApiParams.pas), set parameters for the communication with the PPL company's server (login, password, customer number at the carrier). A closer description is provided in the Script Catalogue.
Verification process and creating consignments
When you finish with all settings, you may proceed to create data (consignments). Most carriers require a verification process before running the actual operation (communication), where they require the data and labels to be sent for all combinations that may occur (products, services, one-packet and multi-packet consignments, all payment methods).
- Create Consignments
- The script Create Consignments (ParcelCreate.pas) over a Sales Order
- creates a consignment and packets + Delivery Notes
- The Ctrl+B key combination over Delivery Notes
- creates a consignment and a packet
- The Shift+B key combination over Delivery Notes
- creates a free packet (without consignment)
- Confirm Consignment - the assignment of an identification code will occur during the first confirmation of a consignment - the numbering the numbering is executed on the part of the K2 program. Overview of generated consignment codes:
- Packet Code 1: The current number for a package from the assigned interval, without the prefix.
- Packet Code 2: The current number for a package from the assigned interval including the prefix (11-place number).
- Packet Code 3: The current number for a package from the assigned interval including the prefix + the checking number (12-place number).
- Consignment Code 2: Code 2 from the first package of a consignment.
- Print Labels - to print labels, use the PPL Label report (ParcelPPLLabelMyApi.am) or the PPL Label, A4, s (ParcelPPLLabelMyApiA4.am).
- Assigning consignments to Collectionsand sending data to a carrier - send record data to the carrier by using the PPL Consignment Communication script (ParcelPPLMyApi.pas) while setting the parameter "CommandProcessId" = 1 (default value). For the print of a completion protocol, use the List of Packages in PPL Collection over Collections (ListPackagesToCollectionPPL.am). Other functions of the PPL Consignment Communication are described in the Script Catalogue. Using script PPL - Ordering consignments collection (PPLCreatePickupOrder.pas) is possible to send an order to carrier for consignments collection.
Geis Cargo Implementation
Contract - Agreement - with a Carrier
- you are assigned with up to 8-place customer number (also defines as a "number of the Collection address")
- you are assigned with a numbering range of consignments
Data Settings in K2
- Creating Records in Basic Code Lists
- Set up a Suppl./Cust. card and a Partner for the carrier. It is necessary to add a commentary to the card of Partner (of any type - the type must then be referred to in the report of List of Packages in Geis Collection) with the following text:
- Transports are subject to General trade conditions, current status GEIS CZ, spol. s.r.o., Comp. Reg. No.: 44567359 st The company is registered in the Commerical Register kept by the Regional Court in Plzeň, department C, insert number 14475.
- Create a Branch Office with your address to the partner representing your own company.
- Define a Payment Method (it is not necessary to distinguish the payment methods for the communication with Geis Cargo, the numbering is unite; the payment methods are used only for a general trade distinguishing - Cash on Delivery, bank transfer, etc.)
- Define a Method of Transport (e.g. Geis Cargo)
- Configure Consignments - set configuration for a given carrier
- Page 1
- Carrier : assign from Partners book a partner Geis Cargo record
- Customer Number at Carrier: do not fill in
- Customer Code: fill in the assigned 8-placed number of the customer (the number of a Collection address)
- Depot: do not fill in
- Page 2 - Services
- Assign a "Geis Cargo" (system record) numbering to the method(s) of transport for Geis Cargo
- Page 3 - Consignment Categories
- Do not fill in
- Page 4 - Code List
- Do not fill in
- Consignment Services - set up one or multiple records for the numbering of consignments. Do so according to the carrier's (assigned) numbering intervals. The numbering at Geis Cargo should not be divided; it should be sufficient to set up a single record. The basic principle of numbering packages is that the service is searched for based on the compliance of the fields Country - Method of Transport - Payment Method. In situations where the numbering interval is not assigned for a particular country, method of transport, or payment method, you can set the services of a consignment in a way that the respective element is not taken into consideration during the search for optimal service of numbering consignments. The following settings should be suitable for Geis Cargo:
- leave the Country field empty;
- fill in the Method of Transport field with a selected method of transport (e.g. Geis Cargo)
- fill in " - " (a dash) into the Method of Transport field.
- Set the Category field to "Consignment" for the Geis Cargo company. The numbering range (the From - To field) should be set according to the assigned range
- Assign Consignment Category to aBook of Consignment Services - if you have not created books of document yet, you need to create it for the consignments. The consignments are recorded in the Books of Consignment Services. It is necessary to insert the record from the book of the Branch that represents your own company (or the place with an address from where the consignments in of this book will be sent). The address of this branch will then be filled in as the consignor's address and will be added to the label. On the Service Definitions tab, we assign the numbering records from the Shipment Services book that can be used in the given book.
- Complementary Settings of Communication with Carrier and Consignment Behaviour - by means of the script Set Parameters for Communication with Geis (ParcelGeisParams.pas), set complementary parameters for the control of consignments. A closer description is provided in the Script Catalogue.
Verification process and creating consignments
When you finish with all settings, you may proceed to create data (consignments). Most carriers require a verification process before running the actual operation (communication), where they require the data and labels to be sent for all combinations that may occur (products, services, one-packet and multi-packet consignments, all payment methods).
- Create Consignments
- The script Create Consignments (ParcelCreate.pas) over a Sales Order
- creates a consignment and packets + Delivery Notes
- The Ctrl+B key combination over Delivery Notes
- creates a consignment and a packet
- The Shift+B key combination over Delivery Notes
- creates a free packet (without consignment)
- Confirm Consignment - the assignment of an identification code will occur during the first confirmation of a consignment - the numbering the numbering is executed on the part of the K2 program. Overview of generated consignment codes:
- Consignment Code 1: The current number from the assigned interval, without the prefix.
- Consignment Code 2: The current number from the assigned interval including the prefix.
- Consignment Code 3: The current number from the assigned interval including the prefix.
- Consignment Code 4: Not used.
- Print Labels - to print labels, use the Geis Cargo Label s report (ParcelGeisCargokLabelW.am).
- Label Numbering - by Items of Sale: one number from the assigned numbering interval is used for each consignment. By default, the labels are printed according to the number of items on the Delivery Note (each items is a transported piece). The complete Geis Cargo consignment number (on the label) consists of the consignment number (13 places), the order number of the item (2 places) and the checking number (1 place).
- Label Numbering - by Packages (by Delivery Notes): one number from the assigned numbering interval is used for each consignment. By using the script Set Parameters for Communication with Geis and activating the option Cargo by Packages (1 package = 1 label), you can assure the print of labels per packages. This can be useful in situations where several items of Sale create one transport item (must be on one Delivery Note). The complete Geis Cargo consignment number (on the label) consists of the consignment number (13 places), the order number of the package (2 places) and the checking number (1 place).
- Assigning consignments to Collections and creating data file for the carrier: to create a text file for the submitting of consignments at the Geis company, use the Geis Export File EDI type script over the Collection (ParcelGeisExportEdi.pas). For the print of a completion protocol, use the List of Packages in Geis Collection over Collections (ListPackagesToCollectionGeis.am).
Note: The files of routing tables are automatically updated upon the print of labels, the print of completion protocol, and upon running the script for creating a data file. They are physically saved in the K2\SupportFiles\Parcel\Geis directory.
Geis Parcel Implementation
Contract - Agreement - with a Carrier
- you are assigned with up to 8-place customer number (also defines as a "number of the Collection address")
- you are assigned with a 3-placed customer ID
- you are assigned with a numbering range of consignments
Data Settings in K2
- Creating Records in Basic Code Lists
- Set up a Suppl./Cust. card and a Partner for the carrier.
- Create a Branch Office with your address to the partner representing your own company.
- Define a Payment Method (it is not necessary to distinguish the payment methods for the communication with Geis Parcel, the numbering is unite; the payment methods are used only for a general trade distinguishing - Cash on Delivery, bank transfer, etc.)
- Define a Method of Transport (e.g. Geis Parcel)
- Configure Consignments - set configuration for a given carrier
- Page 1
- Carrier : assign from Partners book a partner Geis Parcel record
- Customer Number at Carrier: fill in with the assigned 3-placed customer ID
- Customer Code: fill in the assigned 8-placed number of the customer (the number of a Collection address)
- Depot: do not fill in
- Page 2 - Services
- Assign a "Geis Parcel" (system record) numbering to the method(s) of transport for Geis Parcel
- Page 3 - Consignment Categories
- Do not fill in
- Page 4 - Code List
- Do not fill in
- Consignment Services - set up one or multiple records for the numbering of consignments. Do so according to the carrier's (assigned) numbering intervals. The numbering at Geis Parcel should not be divided; it should be sufficient to set up a single record. The basic principle of numbering packages is that the service is searched for based on the compliance of the fields Country - Method of Transport - Payment Method. In situations where the numbering interval is not assigned for a particular country, method of transport, or payment method, you can set the services of a consignment in a way that the respective element is not taken into consideration during the search for optimal service of numbering consignments. The following settings should be suitable for Geis Parcel:
- leave the Country field empty;
- fill in the Method of Transport field with a selected method of transport (e.g. Geis Parcel)
- fill in " - " (a dash) into the Method of Transport field.
Set the Category field to "Consignment" for the Geis Parcel company. The numbering range (the From - To field) should be set according to the assigned range.
- Assign Consignment Category to aBook of Consignment Services - if you have not created books of document yet, you need to create it for the consignments. The consignments are recorded in the Books of Consignment Services. It is necessary to insert the record from the book of the Branch that represents your own company (or the place with an address from where the consignments in of this book will be sent). The address of this branch will then be filled in as the consignor's address and will be added to the label. On the Service Definitions tab, we assign the numbering records from the Shipment Services book that can be used in the given book.
- Complementary Settings of Communication with Carrier and Consignment Behaviour - by means of the script Set Parameters for Communication with Geis (ParcelGeisParams.pas), set complementary parameters for the control of consignments. A closer description is provided in the Script Catalogue.
Verification process and creating consignments
When you finish with all settings, you may proceed to create data (consignments). Most carriers require a verification process before running the actual operation (communication), where they require the data and labels to be sent for all combinations that may occur (products, services, one-packet and multi-packet consignments, all payment methods).
- Create Consignments
- The script Create Consignments (ParcelCreate.pas) over a Sales Order
- creates a consignment and packets + Delivery Notes
- The Ctrl+B key combination over Delivery Notes
- creates a consignment and a packet
- The Shift+B key combination over Delivery Notes
- creates a free packet (without consignment)
- Confirm Consignment - the assignment of an identification code will occur during the first confirmation of a consignment - the numbering the numbering is executed on the part of the K2 program. Overview of generated consignment codes:
Packages are numbered in the first place.
- Package Code 1: The current number for a package from the assigned interval, without the prefix.
- Package Code 2: The current number for a package from the assigned interval including the prefix (11-place number).
- Package Code 3: The current number for a package from the assigned interval including the prefix + the checking number (12-place number).
- Package Code 4: Not used.
The number is then transferred from packages to the consignment.
- Consignment Code 1: Do not fill in.
- Consignment Code 2: Code 2 from the first package of a consignment.
- Consignment Code 3: Code 3 from the first package of a consignment.
- Consignment Code 4: Not used.
- Print Labels - to print labels, use the Geis Parcel Label s report (ParcelGeisParcelLabelW.am) or the Geis Label, A4 report (ParcelGeisParcelLabelWA4.am).
- Assigning consignments to Collections and creating data file for the carrier: to create a text file for the submitting of consignments at the Geis company, use the Geis Export File EDI type script over the Collection (ParcelGeisExportEdi.pas). For the print of a completion protocol, use the List of Packages in Geis Collection over Collections (ListPackagesToCollectionGeis.am).
Note: The files of routing tables are automatically updated upon the print of labels, the print of completion protocol, and upon running the script for creating a data file. They are physically saved in the K2\SupportFiles\Parcel\Geis directory.