Accounting basic settings
In the section Basic accounting settings we can work with accounting schedule, set up VAT accounting, define account correlations, matching symbols and accounting books.
Accounting books
All Accounting documents can be divided into individual books. Books can be set in function Book administration. Switching the book is done with the Alt + F10 key (after switching the book, the cursor is automatically set to the last entry in the table). table).
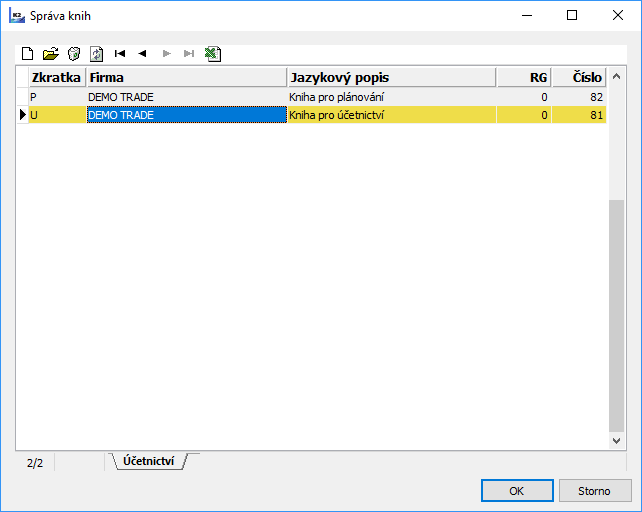
Picture: Book administration - Accounting books
It is necessary to enter the obligatory abbreviation, description and select own company if you insert a new book (via the Ins key).
Description of the work with books, the settings principle and the description of page 0 are stated in the Administrator / Administration of Books chapter.
Basic Data
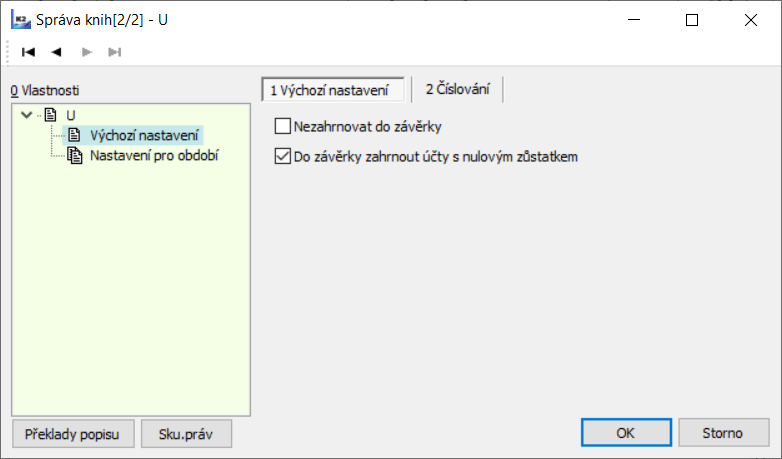
Picture: Accounting books - default settings
Description of Fields:
Do not include into closing books |
If the box is checked, the book is not part of the balance; when closing accounting books a balancing an accounting document is not created. If the box is off, the, book is part of the balance; when closing accounting books a balancing an accounting document is created. Field is not checked by default. |
To closing books include accounts with zero balance. |
If the field is checked, when closing the books via analytical axes (center, ...), accounts are also closed which have a total balance of zero, but the balance on analytical axes is not zero. If the check box is cleared, accounts with a total zero balance will not be closed when the ledgers are closed. |
Numbering
This tab defines the numbering of all documents of the Accounting module.
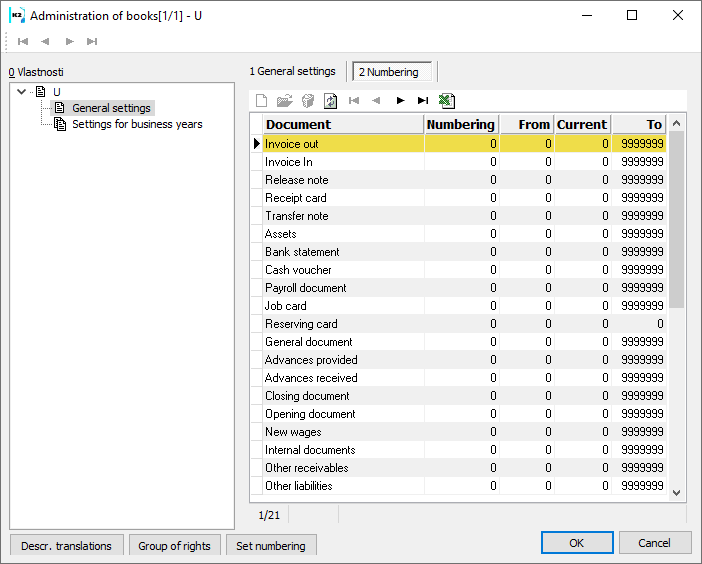
Picture: Accounting books - Numbering
Accounting settings in the Administration of own companies
In the Administration of own companies on the Accounting tab, you can set:
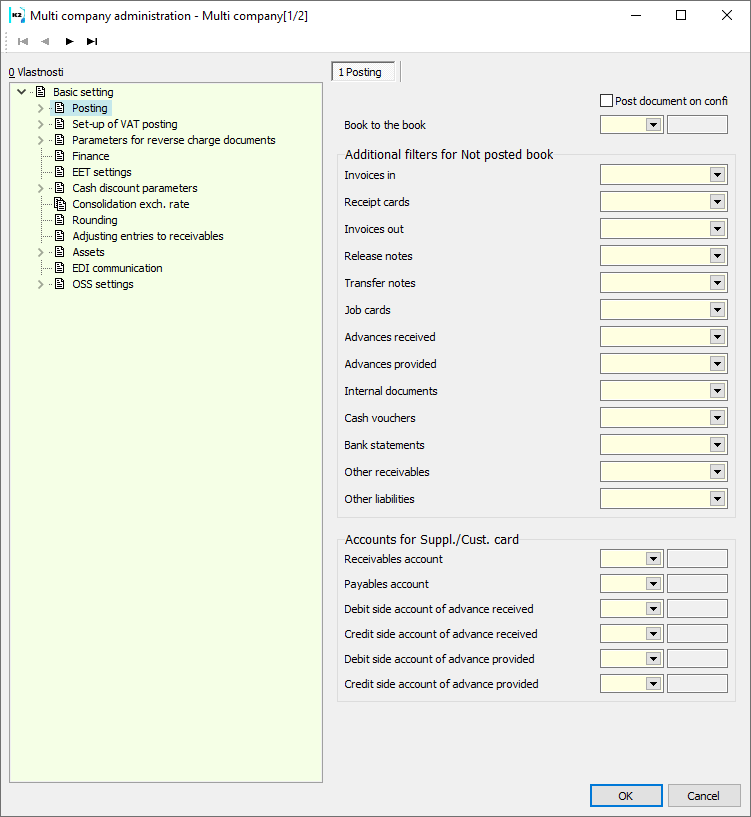
Picture: Administration of own companies Accounting
You can set up automatic posting of documents for posting primary documents - turn on the Automatically post document on confirmation option and set the book in the Post to book field. Initial documents are then automatically posted upon confirmation. It is assumed that the user who confirms the document has the "New accounting document" right. If an error occurs during automatic posting (no contact specified, account is missing ...), the error log will not be displayed.
We can set additional filters for the book Unposted (see chap. Additional filters for the book Unposted).
In the section Accounts or the Supplier / Customer card, you can set up receivables and payables accounts, which will be added to the new Supp./Cust. cards.
Accounting schedule
An accounting schedule is the compilation of accounts in a form that exactly matches the entity and its needs. In IS K2, posting keys can be made only to those accounts that appear in the accounting schedule. Changes to accounting schedule are made by introducing a new account, deleting the account or a text change of the account. The method of handling accounts depends mainly on whether the account has already been charged.
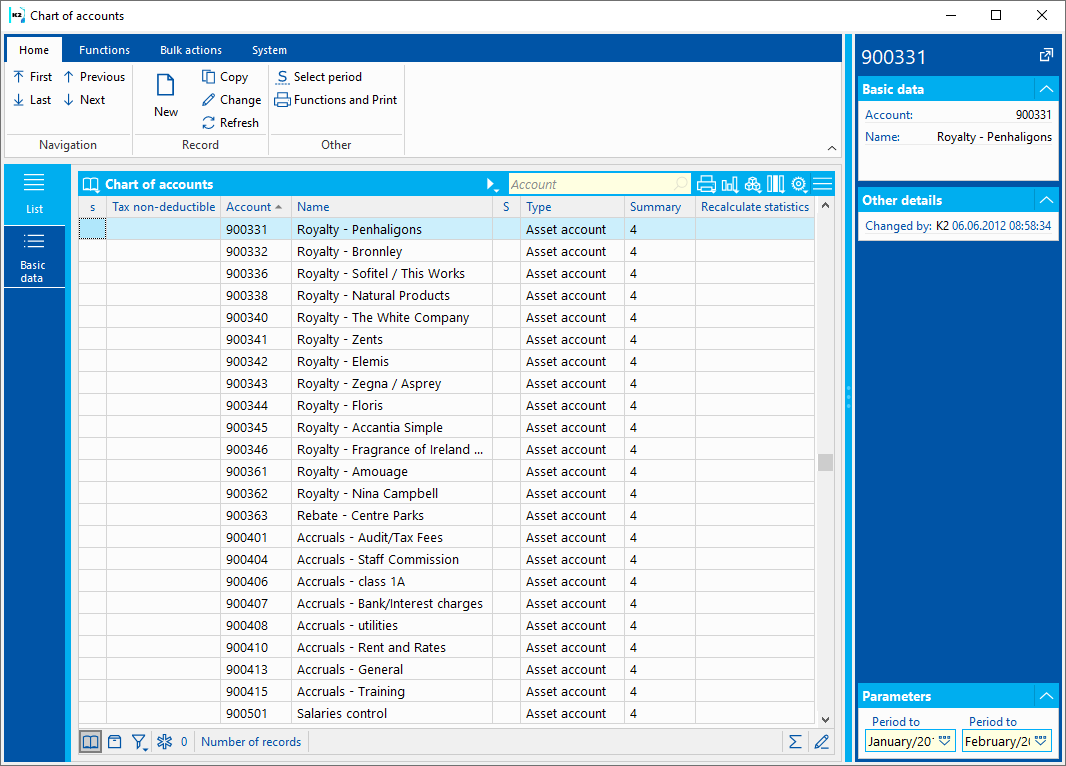
Picture: Accounting schedule - List
In the account book, we see all accounts sorted by alphanumeric code, account names, designation, whether the account is a collection (bitmap ![]() ), account type and collection account into which the account is calculated. In column D, the bitmap
), account type and collection account into which the account is calculated. In column D, the bitmap ![]() indicates accounts that are not tax deductible.
indicates accounts that are not tax deductible.
Only those accounts whose validity falls within the selected period are displayed in the book. To change the period, press Alt + F10 and then select another period.
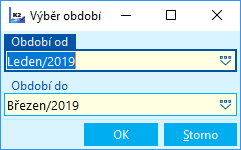
Picture: Select the displayed interval Alt + F10
If an exclamation point appears in the Recalculate Statistics column, it means that the fields in the Axis Calculation to Statistics section or the Open items field have changed and the statistics recalculation has not started.
Account - Basic Data.
On Basic Data tab of the Chart of accounts, we define the basic data of individual accounts of the chart of accounts.
Picture: Chart of accounts - Basic data tab
Description of Fields:
Account |
An account is a string of arbitrary alphanumeric characters. The account number can be up to 20 characters long. The accounting schedule is divided into analytical and collection accounts:
The following assumptions apply to the operation of the K2 program:
Failure to comply with these rules does not guarantee the correctness of the totals for individual classes and groups. Failure to load the analytical account in the collection may result in the account being omitted from the balance sheet or profit and loss account. The closing accounts (701, 702 and 710) and account 431 can have only one analytic account. Even if that they will have multiple analytical accounts, then the closing operations will be performed on the first of the analytical accounts. |
Type |
Account type - Balance sheet, Result, Opening closing, Ending closing, Off-balance sheet, Off-balance sheet opening or Off-balance sheet closing |
Number |
The internal number in K2, which is automatically generated by program. |
Account name |
Account name |
Language name |
Account name in chosen language. |
General ledger |
After pressing the button, the General Ledger - Turnovers tab of the relevant account will be displayed. |
Collection account |
The number of the relevant collection account to which the current account is calculated. |
Closing account |
An account to which the closing will take place automatically. |
Valid from |
The period from which the account is valid. The period is entered if we add a new account to the chart of accounts that should not have been used in the previous period. If we view the table of accounts (list) for the period preceding the specified period in this field, the account will not appear in the list. |
Valid to |
The period from which the account is valid. The period is entered if The validity of account expires. If such an account is replaced by another, we will insert a link to the new account in the expiring account using a note of the type Replacement account (see chapter Replacement account). If we view a table of accounts for the period following the specified period in this field, the account will not appear in the list. |
Calculation of axes into statistics |
Designation of axes (Cost Center, Contract code, Article code, Code 1, Code 2, Code 3,Code 4,Code 5,Code 6, Officer, Device, Customer) by which it can be filtered in the General Ledger. The axes that are being evaluated should be turned on (the filter calculation is then faster). |
Group of accounts |
Possibility to divide accounts into groups. It is used in financial planning. |
Replacement account |
Replacement account Closer description is in the chap. Replacement account. |
Collection |
Indication of whether the account is a collection account, cannot be charged to the collection account. |
Open item |
Indication, if the account is open item. On open item account a matching Symbols can be created. It can be changed if the account was not charged in a closed period. |
Non-deductible for tax purposes |
Indication, if the account is tax deductable. |
Load after periods (turnover recalculation). |
Indication of how the turnover calculation is performed. If the box is checked, the turnover recalculation will take place for the given account in periods. The field is used when there are very many records in the account. |
Overheads |
Indicates whether the account is overhead. It is used in financial planning. |
Entering Cost centre |
Here we specify whether the entry of the cost center is Blocked (cannot be entered), Mandatory or Optional when posting to the account. |
Entering contract code |
Here we specify whether the entry of the contract code is Blocked (cannot be entered), Mandatory or Optional when posting to the account. |
Entering Article code |
Here we specify whether the entry of the article code is Blocked (cannot be entered), Mandatory or Optional when posting to the account. |
Entering device |
Here we specify whether the entry of the device is Blocked (cannot be entered), Mandatory or Optional when posting to the account. |
Entering code 1 |
Here we specify whether the entry of the code 1 is Blocked (cannot be entered), Mandatory or Optional when posting to the account. |
Entering code 2 |
Here we specify whether the entry of the code 2 is Blocked (cannot be entered), Mandatory or Optional when posting to the account. |
Entering code 3 |
Here we specify whether the entry of the code 3 is Blocked (cannot be entered), Mandatory or Optional when posting to the account. |
Entering code 4 |
Here we specify whether the entry of the code 4 is Blocked (cannot be entered), Mandatory or Optional when posting to the account. |
Entering code 5 |
Here we specify whether the entry of the code 5 is Blocked (cannot be entered), Mandatory or Optional when posting to the account. |
Entering code 6 |
Here we specify whether the entry of the code 6 is Blocked (cannot be entered), Mandatory or Optional when posting to the account. |
Entering officer |
Here we specify whether the entry of the officer is Blocked (cannot be entered), Mandatory or Optional when posting to the account. |
Entering matching |
Here we specify whether the entry of the matching symbol is Blocked (cannot be entered), Mandatory or Optional when posting to the account. If the account is not open item account, the field is grayed out and set to Blocked. |
Entering customer |
Here we specify whether the entry of the Customer is Blocked (cannot be entered), Mandatory or Optional when posting to the account. |
It is possible to assign comments, eventually you can use the Header Text or the Footer Text.
Change in Chart of accounts
IS K2 is delivered with standard Chart of account. When commissioning before the start of accounting, we must check the chart of accounts, for analytical accounts that we do not use, set the validity until the date before the start of the company's operation in IS K2 (or delete them with the F8 key), and complete the collection and analytical accounts that are part of our entity's chart of accounts (F6 or Insert keys).
Financial statements, such as the balance sheet and income statement and other analyzes (Economic Analysis module), add the values of turnovers, opening balances or collection account balances to their lines. Therefore, when creating a new collection account, it is necessary to think about which line of the balance sheet, income statement or other analysis the account belongs to, and add it to the relevant row and column of the corresponding economic analysis.
Adding new accounts is performed in the standard way (using the Insert or F6 key). We will fill in the necessary data - account, its name and type. For analytical accounts, their collection account as well as the closing account must be filled in. For collection accounts, we must not forget to check the Collection box and also fill in the collection (except for classes) and closing account.
On Basic Data tab it is possible to set the period of its validity. For periods outside the validity of the account, the account is actually excluded. In IS K2, automatic selection and automatic checking of only valid accounts for a given period is supported, i. e. if we set the period (using the Alt + F10 keys) in a certain interval, we will see only those accounts whose accounting schedule is accessible. validity falls within this period.
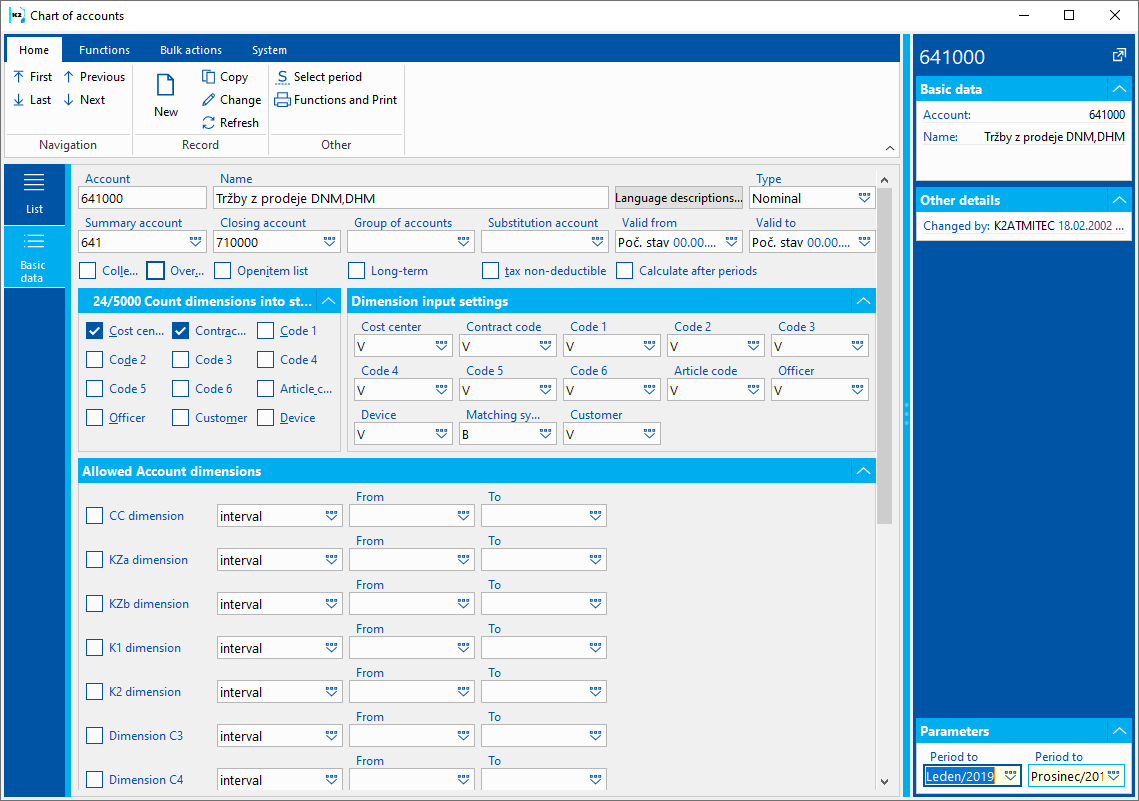
Picture: Account validity period change
The account is changed by adding a new account in IS K2, which will be valid for the new period. For the original account, we recommend adding any character (except a space) to the end of the account number; in the Replacement account field, enter the account that will replace the account. Next, for the original account, set the validity period by filling in the Valid until field, and for the new account, set the validity period by filling in the Valid from field.
If the newly created account is to replace the original one, then in the Chart of accounts, we will insert a Replacement account into the original account field.
This setting can be used for automatic account exchange:
- in the opening document of the Exchange invalid accounts for replacement in the opening document, function - the original account is replaced by a replacement,
- in economic analyzes of the Economic Analysis - Add replacement accounts function - the replacement account is added to the analysis lines in which the original account is.
Function over Chart of accounts
General ledger |
After running the function, the General Ledger - Turnovers tab of the relevant account will be displayed. |
F8 |
Delete an account that has not yet been billed. It is not appropriate to delete collection accounts from the chart of accounts, even if the entity does not use them (after deleting the collection account, the definition of economic analyzes, balance sheet and income statement must be adjusted). |
Posting keys
Posting key defines way of posting of individual documents. The more detailed the posting key is defined, the less work remains in the liquidation and subsequent accounting of documents.
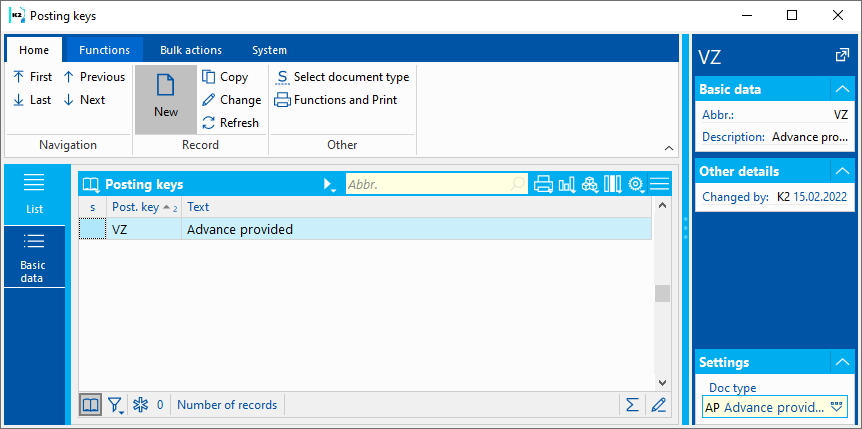
Picture: Posting key - list
List of posting key is always limited on one type - e. g. Internal Document (posting key type displayed in list is stated in record preview in Settings part). If you want to work with another type, use the Alt + F10 keys, select the type and confirm it with the Enter key.
If we record and account for more companies in IS K2, which have the same accounting, it is possible to copy posting keys between individual companies. Therefore, we adjust the posting key only in one client and import it into the others. You can use the Export and import data function (in the Administrator tree menu) to transfer to other clients.
Posting key - Basic Data
When creating a new posting key, the Posting key type field is pre-filled, then we fill in the Abbreviation field with a maximum five-digit abbreviation and the Description field. Check the Blocked box if the posting key is no longer to be used. One posting key can contain any number of rows.
The Post Tax Type and VAT Rate field is available for the type IO, II, AR, AP, OL, PO, OR, IN and BA.
The field Post only paid advances field is accessible for type 'PA’ and 'RA',.
For the 'VR' type, is in posting key field the Do not post planning job cards.
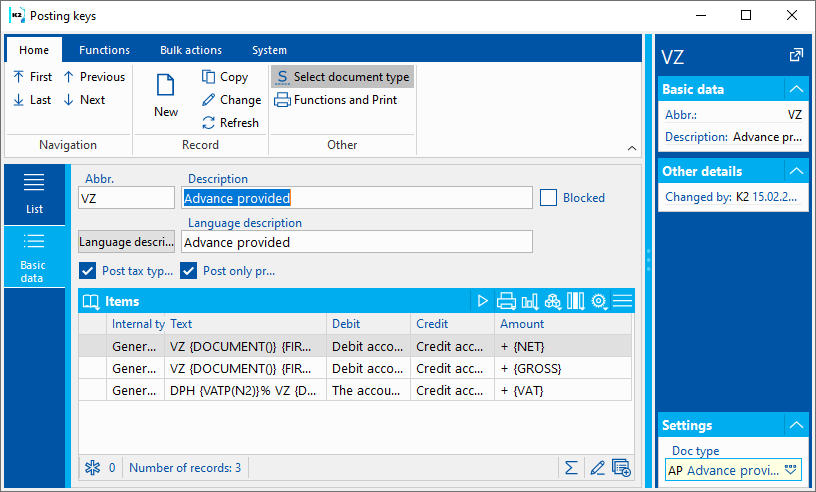
Picture: Posting key - Basic Data
We insert individual lines (items) of the posting key in the Change on the Basic data tab of the respective posting key. The Posting key item form is displayed (see the following picture), in which we define the posting key. The order of the individual lines can be changed with the keys Ctrl + Shift + up arrow and Ctrl + Shift + down arrow.
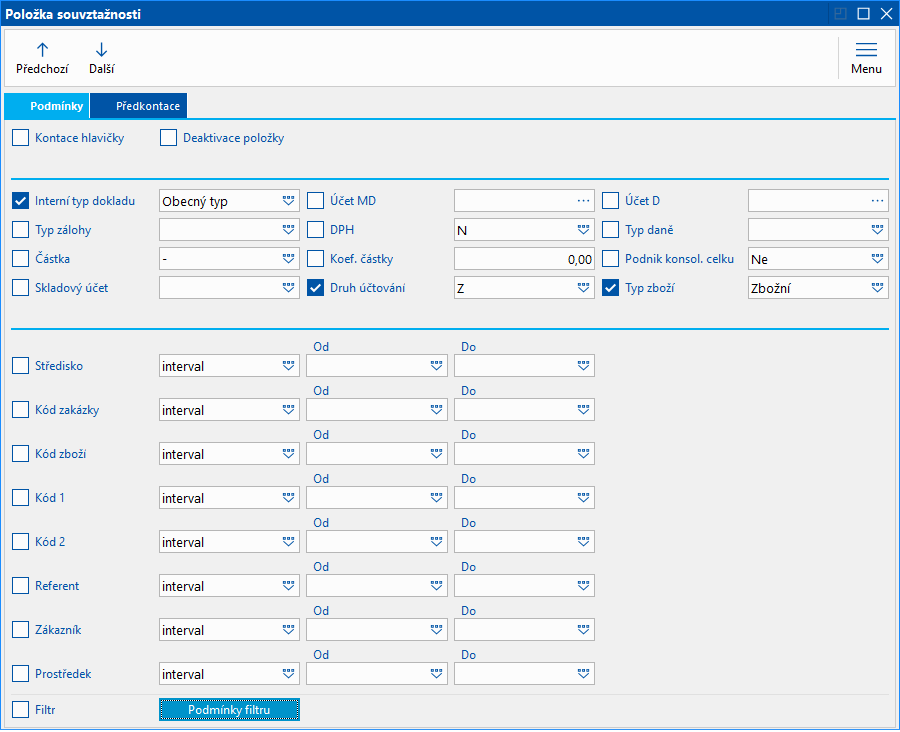
Picture: Posting key item Invoices in - Conditions
On Conditions tab, we specify to which primary documents (or its items) the posting key line applies. E.g. in the Posting key item Invoice in picture, the posting key is set only for article items (in the article type field). Other types (non-stock items,…) are defined on another line of posting key.
Description of Fields:
Posting key header |
If the field is checked, the posting key line refers to the header of the original document. If the field is not marked, it relates to the item (s) of the document. Header posting key is used, for example, to set up VAT posting on invoices. |
Deactivate an item |
If this field is checked, the posting key line will be ignored during liquidation. This is how we mark those posting key items that we will not use, but we do not want to delete. |
Internal type of document |
For some document types, specifies that the posting key is active only for a specific document type. It is thus possible, for example, to differ between a different posting key for the receipt and expenditure card or to differ between the posting key for the invoice and the drawing of the advance payment on the invoice. |
Advance type |
The field is accessible only in the posting keys of Invoices in, Invoices out, Advances received and Advances provided. Possibility to select the type of advance from the code list. |
Credit and Debit side account |
By selecting this field and entering the account by selecting from the chart of accounts, the validity of the posting key can be limited only for a certain account on the page Debit side resp. on the Credit side. |
Stock account |
Field accessible only for Invoice In and Invoice out By selecting this field and entering the account by selecting from chart of accounts this account can be checked with the warehouse account from the document item for which there is a receipt card or release card. The warehouse account entered in the Posting type field is checked. If it is not filled in, then it checks the Account field. |
Company of consolidation unit |
By checking the box, it is possible to differ accounting for companies that are / are not a company of the consolidation group (according to the check box on the Suppl./Cust. tab). |
Category 1, 2 |
Category 1 field, resp. Category 2 we use on the Payroll Data tab for additional identification data. By selecting this field and entering the appropriate category, the validity of the posting key can be limited to a certain category only. |
NA codes |
This field is accessible only in posting keys of Transfer notes. By marking the field, we specify that for the field of all codes (cost center, contract code, article code, code 1, code 2, code 3,Code 4,Code 5,Code 6, officer) the code to which the charged transfer note is transferred will be important. If the field is not marked, then the codes from which the charged transfer notes is transferred apply. |
Cost centre |
By selecting this field and entering the interval, the validity of the posting key can be limited to a certain cost centers only. The condition for the cost center can be switched on only if the cost center is charged to both the Debit side and Credit side accounts. |
Contract code |
By selecting this field and entering the interval, the validity of the posting key can be limited to a certain contract codes only. The condition for the contract code can be switched on only if the cost center is charged to both the Debit side and Credit side accounts. |
Article code, Code 1,Code 2. Officer, Device, Customer |
By selecting these fields and entering an interval, the validity of the posting keys can be limited only to certain article codes, codes 1, codes 2, officers, devices and customers. The condition for the certain code can be switched on only if the code is charged to both the Debit side and Credit side accounts. |
Type of accounting |
The accounting type is entered on the Article tab (Taxes and Posting tab) or on the Batch tab (if the posting type is entered on the batch, it takes precedence). It determines the type designation of articles, especially with regard to production. Here you can activate the posting key only for the selected type of accounting. |
Type of Article |
The type of articles means the items Stock, Non-Stock, etc. In the field we can enter the type of articles for which the posting key line is to apply. |
Amount +/- |
If you do not specify this parameter, the posting key will be active regardless of the sign of the amount. If we enter '-’, posting key will be active only if the result of the amount is negative. If we enter '+’, posting key will be active only if the result of the amount is positive. We will therefore use the field if we need to post negative amount other than a positive amount (e. g. for posting job cards). Attention: The program tests for a sign the result that is listed in the Amount field (at the bottom of the posting key item). This means that if, for example, we want to charge a negative net amount with a positive sign, but with The Debit side and Credit side reversed, we enter the parameter ‘- {NET}’ in the Amount item. Since the amount is negative, the result will be positive. In the Amount +/- field, enter the '+’ sign. |
Amount coeff. |
Here you can enter the coefficient by which the amount is to be multiplied. |
VAT |
If you enter a VAT rate in the field, this posting key will only be active for the relevant VAT rate. |
Tax Type |
Here it is possible to distinguish accounting according to individual types of taxes - Domestic, Export of articles, ... |
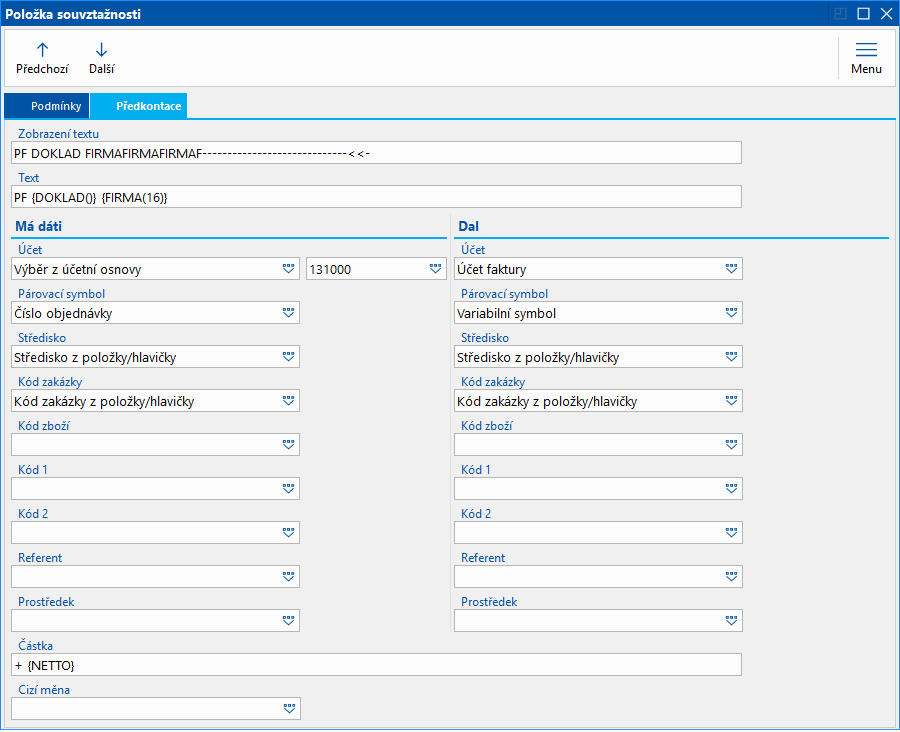
Picture: Posting key item Invoices in - Pre-posting key
On the Pre-posting key page, we define which fields are filled in on the accounting document and how they are filled in. We can fill in the field with either a specific data or a parameter. The parameter will then be replaced by a specific data only when the original document is liquidated. In the Posting key item Invoices in picture, the Debit side account is specifically defined, the parameter is defined, for example, Credit side account ("Invoice account" - when posting a document, the account from the invoice is inserted).
Part of the form with the fields Account, Matching symbol, Cost Center, Contract code, Article code, Code 1, Code 2, Code 3,Code 4,Code 5,Code 6 and Officer and Device is divided into two columns. We add data for billing to the Debit side account to the left of them and data to the Credit side account to the right.
Description of Fields:
Text |
The text to be added to the accounting sentence during pre-posting key (Description field in the accounting document) is entered in this item. It can be made up of specific characters or parameters or a combination of them. Enter the parameter in the Text field with the Enter key from the list of parameters, which can be called up with the F12 key or the '?’ Key. When entering text parameters, it is necessary to enter the length of the text, or numbers, i.e. we state the number in brackets immediately after the parameter name. |
Text display |
In this field we see how the text defined in the Text field will be displayed. Specific data, which will be entered only during liquidation, are replaced in this field only by the corresponding number (according to the length entered in the Text field) of wildcards. |
Account |
In this field we fill in the account to which we will post the document. In addition to a specific account from the chart of accounts, we can enter various parameters. |
Matching symbol |
This field serves for setting the matching symbol definition of the accounting documents (see the Accounting - Matching Symbols chapter). |
Cost centre, Contract code, Article code, Code 1, Code 2, Code 3,Code 4,Code 5,Code 6. Officer, Device |
Cost Centre, Contract Code, Article Code 1, Code 2, Code 3,Code 4,Code 5,Code 6, Officer and Device serves to divide accounting movements into axes, according to which we can evaluate economic results. If we enter a parameter in the field, the specific data will not be read until it is liquidated from the posted document. |
Amount |
In the field we fill in the amount that will be charged by the given posting key line. We enter the amount using a parameter that we select from the menu of amounts for various documents. Call up the parameter menu table with the F12 keys or the grey plus or grey minus keys. If we use the grey minus button, the given amount will be charged with a negative sign. The amount can be formed by more parameters, which we add (enter using the grey plus button) or subtract (enter it using the grey minus button). An example of a combination of amount parameters might be Net from header minus Net from items. |
Foreign currency |
It is possible to enter a foreign currency in the field. The document is then posted in the currency of the company itself and in a foreign currency. |
In IS K2 is a function Export and Import Data that allows you to copy posting key from one client to another. Therefore, we adjust the posting key only in one client and import it into the others.
Date export and import
The function is started from the Administrator - Export and import data tree. After starting, the form Export - import will be displayed. Form has two tabs (Export and Import).
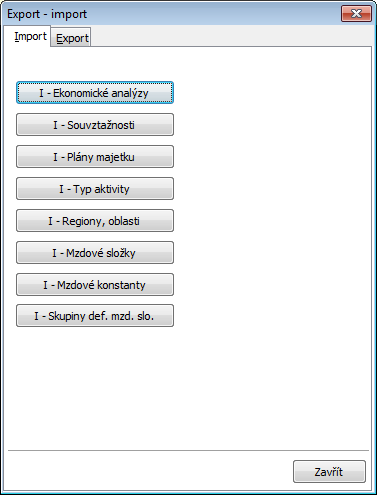
Picture: Export - import - Import tab
Export
- Switch to the client (e. g. INIT), from which we will copy the posting key and start the function Administrator - Export and import of data from the tree.
- Pressing the E - Posting keys button on the Export tab will display the Posting keys Export form, where the posting keys will be exported. By default, the location in the SERWISW directory in K2 is displayed.
- For the export to be successful, you need to edit the name of the exported file. By default, the name EXIMSOUV * .XML is offered. The * symbol must be deleted from the name, otherwise it cannot be exported.
- Press the Save button to export all posting keys.
Import:
- Switch to the client to which we want to copy the relevant (one or more) posting keys and start the function Administrator - Export and import of data from the tree.
- Pressing the I - Posting keys button on the Import tab will display the Posting keys Import form, where the posting keys will be imported. By default, the location in the SERWISW directory in K2 is displayed.
- After selecting the file and pressing the Open button, the Import book will be displayed - a book in which we select the posting keys to be imported in the standard way and perform the import with the Enter key and then confirm the message "Do you want to import posting keys".
Matching Symbols
Matching symbols are used to match primary and accounting documents. They are most often used to control movements on account 131 - Acquisition of goods, 111 - Acquisition of material. When acc. Assignment the Invoices in and Receipt notes, a matching symbol is created (usually the number of the Order issued) and is stored in the accounting documents upon posting. It is then possible to check whether there are Invoices in for all Receipt notes and whether the Receipt notes have the correct stock prices.
Another use can be:
- matching the invoice / advance and its payment (according to the reference number),
- matching the advance invoice and the invoice containing the deduction of this advance,
- matching invoices in for incidental costs associated with the acquisition of articles with receipts notes for these articles, etc.
We insert matching symbols either in accounting documents or in primary documents. In accounting, it is possible to create matching symbols only for open items accounts. Therefore, we must mark the accounts that we want to use in this way in the accounting schedule as balance accounts (see the chapter Accounting - Accounting schedule).
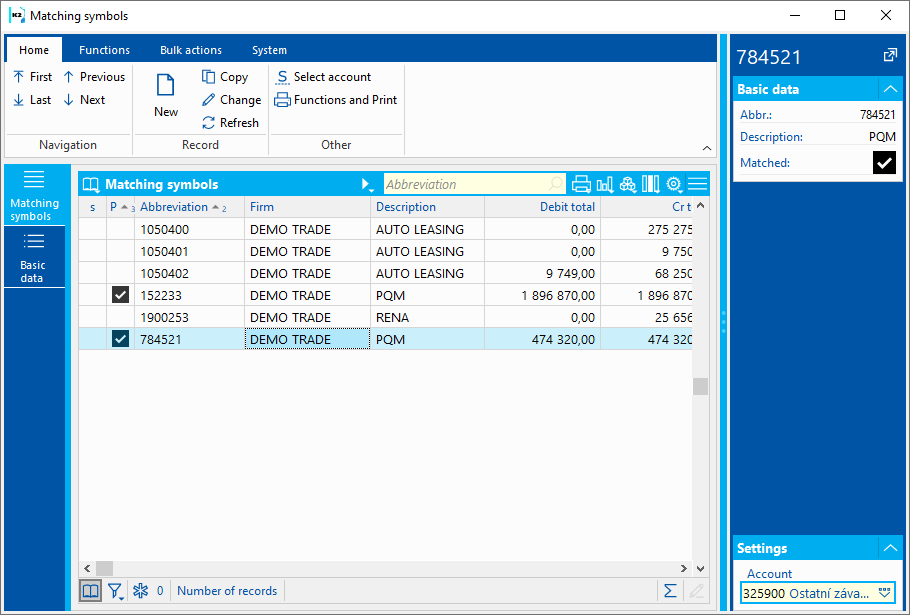
Picture: Matching symbols code list
Code list Matching symbols can be opened from the tree Accounting - Basic accounting settings - Matching symbols. Using the Alt + F10 keys, we can switch between the list of matching symbols for individual balance accounts (selecting the relevant account with the Enter key) and the list of matching symbols for primary documents (using the Esc key). You can also select an account in the record preview in the Settings section.
The second option is to display the Matching Symbols code list in the Matching Symbol field in the accounting document. The displayed code list contains a table of all matching symbols for the given Open items account. This account is displayed in upper bar.
Separate code list The matching symbols of the original documents are displayed in the the Matching Symbol field in the primary document.
Columns description:
Paired |
Matching symbol pairing indication. |
Abbr |
Abbreviation field contains matching symbol. |
Description |
Further description of matching symbol. |
Credit side account, Debit side account |
The turnover of Cr and Deb of the matching symbol is automatically updated when the journal entry is saved. If Turnover Cr and Deb is the same, the pairing symbol is paired, otherwise it is unpaired. |
Basic Data
The Basic Data tab displays all accounting documents on which this matching symbol is entered.
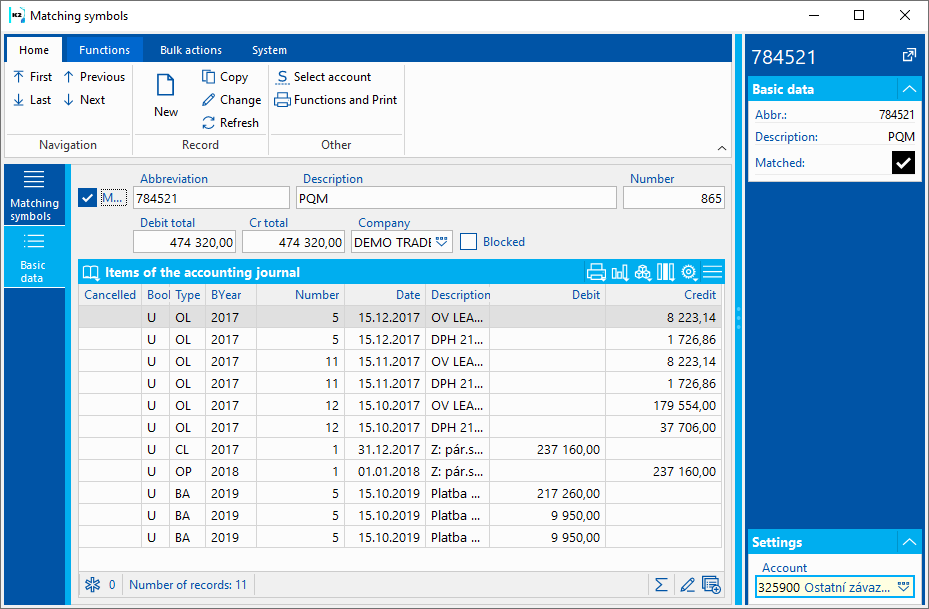
Picture: Matching Symbols book - Basic Data tab
Work with matching Symbols
Matching Symbols can be entered these ways:
- Using posting keys,
We enter the matching symbols in the given posting keys in the field Matching symbol only by means of parameters. A specific matching symbol is automatically created during posting. Therefore, depending on the entered parameter, the contract/order number, contract code, invoice number, reference number, personal number in wages, matching symbol from the original document, matching symbol from the invoice, etc. will be inserted into the matching symbol. If a matching symbol is specified for an account that is not a open item account, the matching symbol is not created. |
- Entering an item of Accounting Journal.
The matching symbol can be entered in Accounting Journal item or when posting the original document. |
- Entering into primary document.
The matching symbol can be entered in the Matching Symbol field in the primary document. In the posting keys that we will use to post this document, The Matching Symbol parameter from the primary document must be specified in the Matching Symbol field. Of course, it is also true that the account for which the matching symbol will be created must be an open item account. In the Matching symbol field, you can use the icon |
- By pairing in General Ledger, see chap. General ledger - Matching Symbols.
General Ledger - Analytical Accounts by sorting report is used to list all unpaired documents by sorting, which runs over the General Ledger. In the General Ledger, on the Movements tab of the selected account, use the Alt + F10 keys to set the appropriate interval of periods for which we perform the check. On the General Ledger - Analytical Accounts by sorting report, set the parameters "Sort = 1" and "OnlyUnpaired = Yes" and print the report.
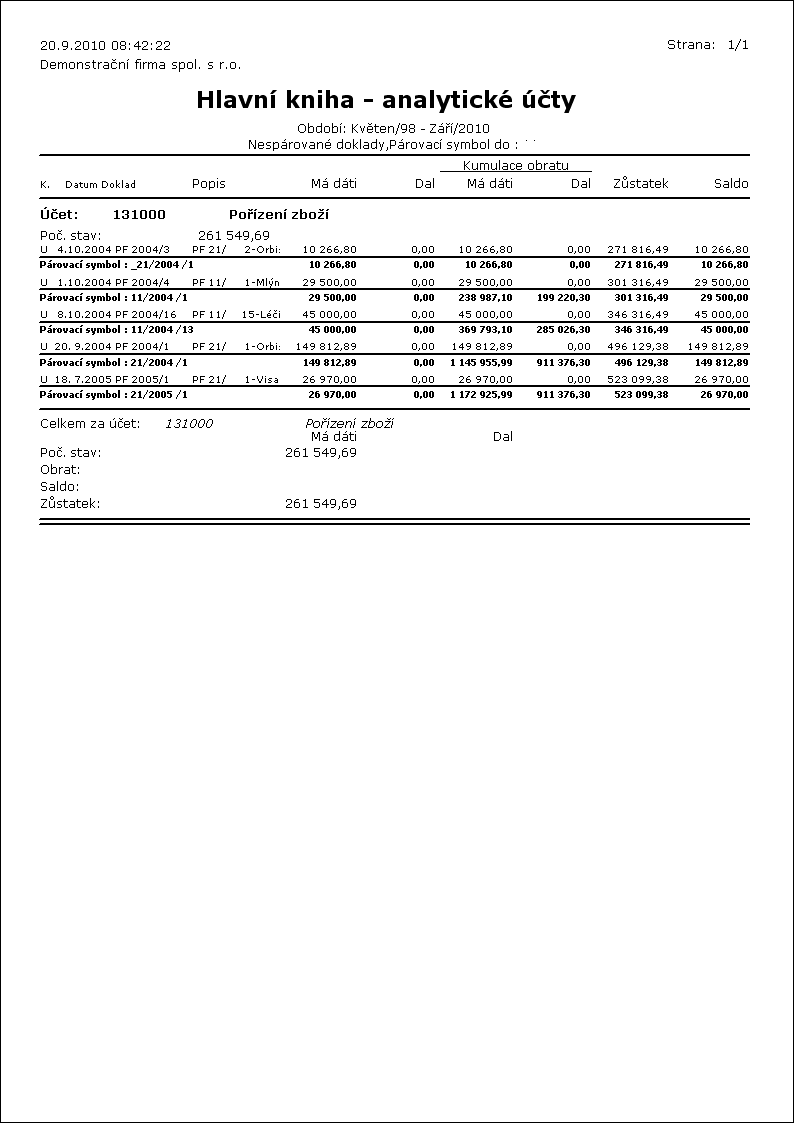
Picture: General Ledger - Analytical Accounts by Sorting report with parameters Sorting = 1 and OnlyUnpaired = Yes
Function over matching Symbols
Alt+F3 |
Update the Paired field of the displayed account according to whether the matching symbol is paired (turnovers of the Debit side account and Credit side account are the same - on) or unpaired (turnovers of the Debit side account and Credit side account are different - off). |
Alt+Shift+F3 |
Update the Paired field of matching symbols field for all accounts. |
Ctrl+F3 |
Performs recalculation of matching symbols turnover of display account. |
Ctrl+Shift+F3 |
Performs the turnovers recalculation for all macthing symbols. |
User parameters
In User Parameters on page 3, the following parameters are available for Accounting:
Do not report empty accounts in liquidation |
On - if we have not set up accounts for Credit side and Debit side accounts, the program will not notify us of this during liquidation and posting, but will not allow us to save the document in this way. Off - if we do not have defined accounts for the Credit side and Debit side accounts in posting key, the program will notify us of this and will not allow us to save the document. |
Receipt cards, release card - add the difference to the first item Max. difference to be added in the client's currency |
On - when posting items of receipt card or release card, adds the difference to the first item charged. If the difference is higher than the maximum of the value entered here, it is not added to the item and only remains quantified on the document. Off - any difference is not added to the charged items and remains only quantified on the document. |
Transfer notes - add the difference to the first item Max. difference to be added in the client's currency |
On - when posting items of transfer notes, adds the difference to the first item charged. If the difference is higher than the maximum of the value entered here, it is not added to the item and only remains quantified on the document. Off - any difference is not added to the charged items and remains only quantified on the document. |
Job cards - calculation of the amount from charged items |
On - calculates the amount only from those items that are intended for billing Off - calculates the amount from all items on the job card |
Job cards - add the difference to the first item Max. difference to be added in the client's currency |
On - when posting items of job card, adds the difference to the first item charged. If the difference is higher than the maximum of the value entered here, it is not added to the item and only remains quantified on the document. Off - any difference from all items of the job card is not added to the charged items and remains only quantified on the document. |
Max. difference for amount parameter BR_UCH Max. difference |
On - the posting key value is posted only up to the specified limit. If the value of the parameter is greater than the value of the specified limit, the BR_UCH amount parameter will not be posted. Off - the value of this parameter is posted without restriction. |
Data settings in books and documents
Before we start acquiring initial documents in IS K2, we should correctly fill in certain data important for accounting. This is the data in the book settings and on the Article tab.
Important data in books settings
Books: |
Important fields: |
Books of Sale |
|
|
|
Books of Purchase |
|
|
|
Book of Warehouses |
|
|
|
Books of production |
|
|
|
Warehouses |
|
|
|
Cash register |
|
|
|
Bank Accounts |
|
|
|
Books of internal documents. |
|
|
|
Books of other receivables |
|
|
|
Books of other liabilities |
|
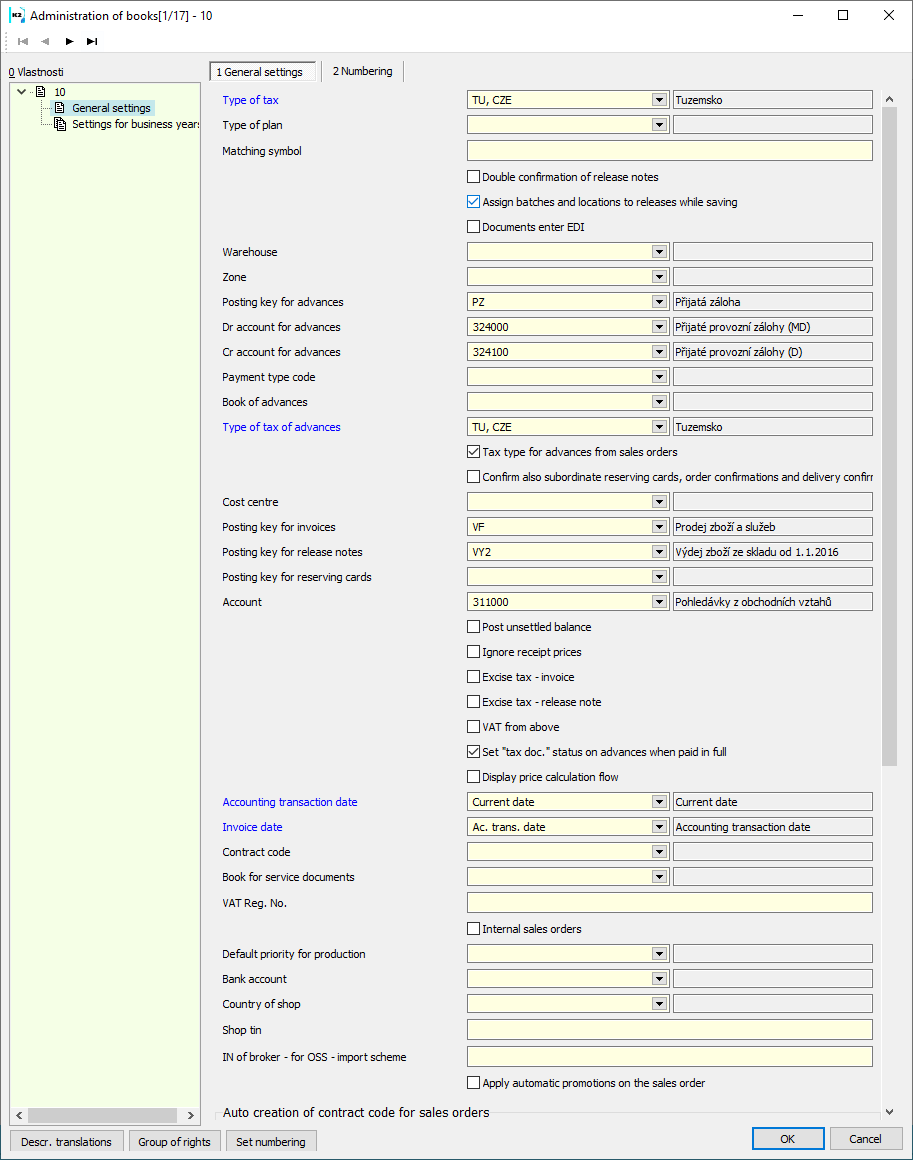
Picture: Setting Sale Books, (settings Purchase Books, is similar)
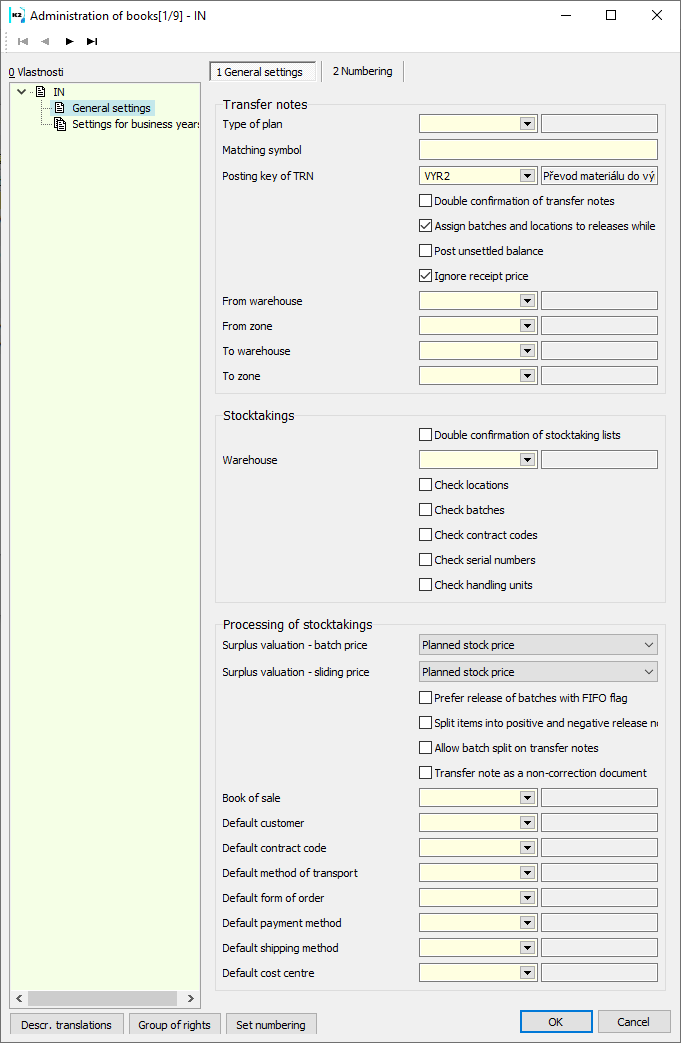
Picture: Settings Warehouses book
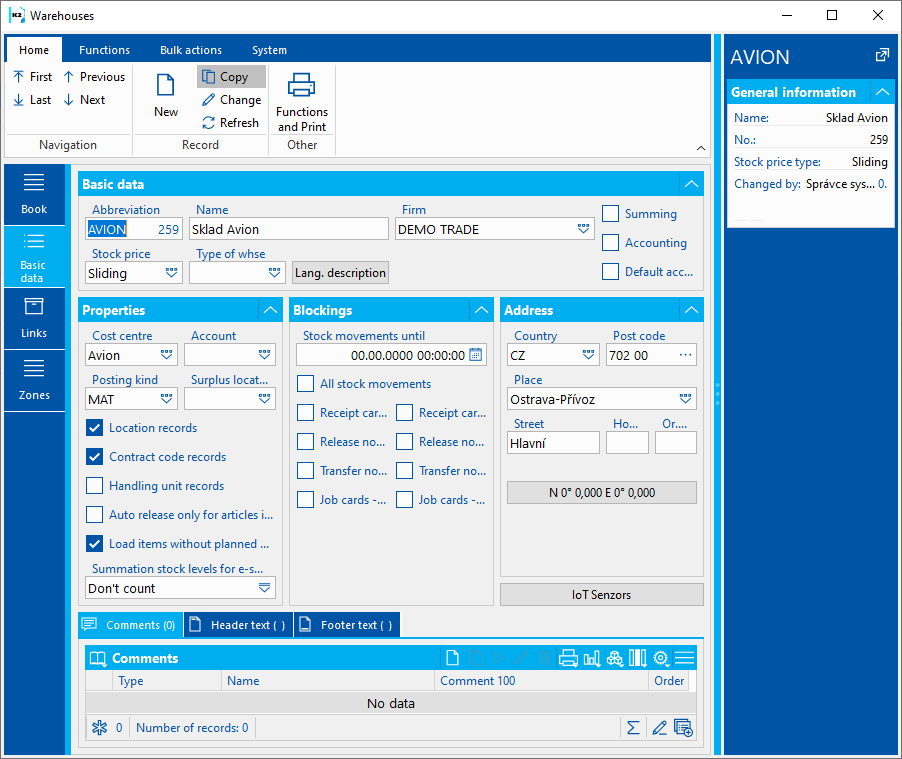
Picture: Settings Warehouse
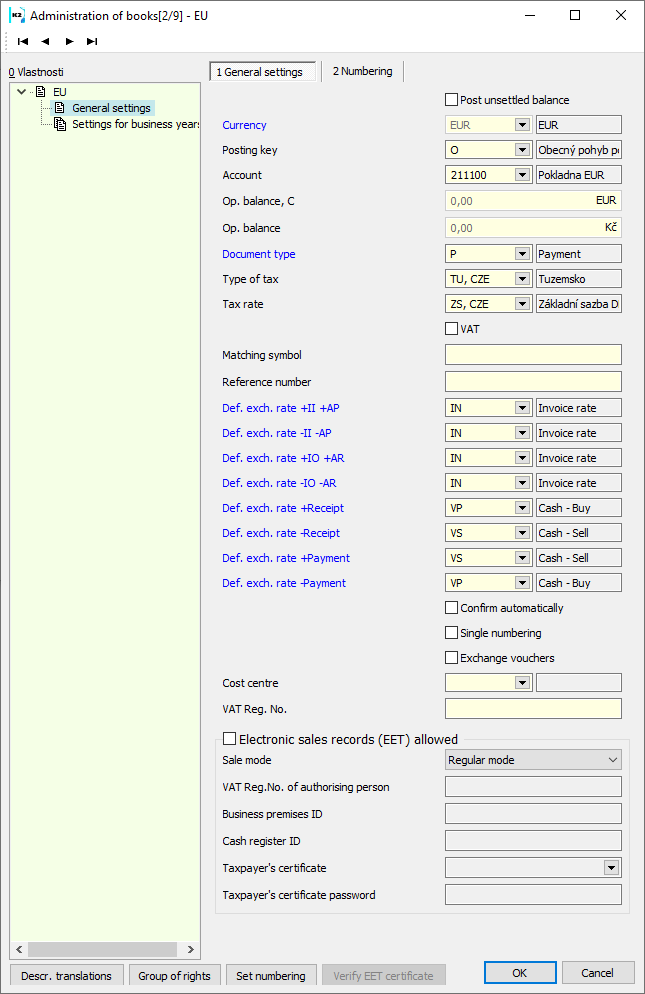
Picture: Settings Cash register (settings Bank Account is similar)
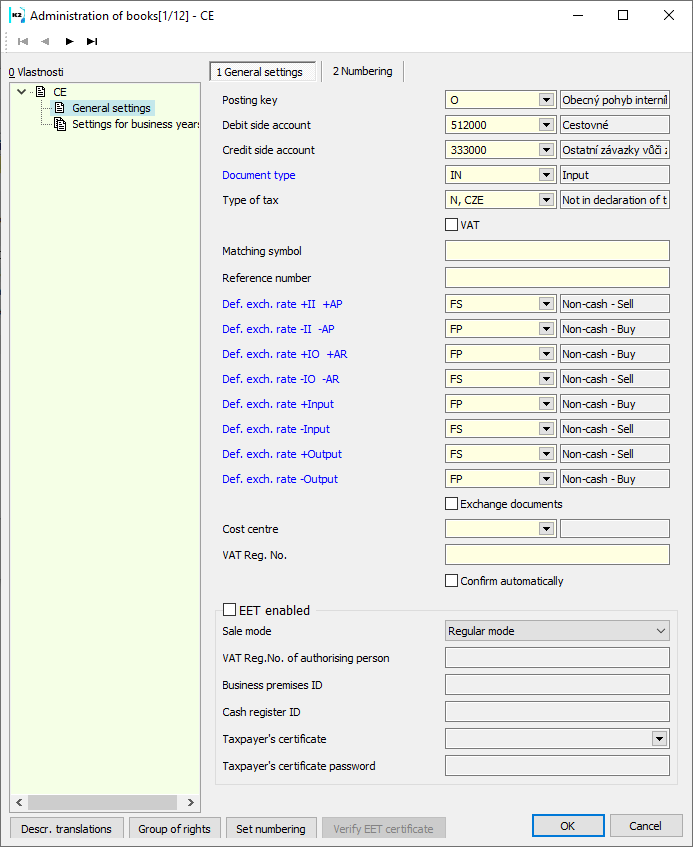
Picture: Settings Books of internal documents
Important data on Article card
On the Article tabs, which represent non-goods items (e. g. packaging, transport, etc.), the field Account - purchase and Account - sale must be filled in (tab Taxes and posting on the article card).
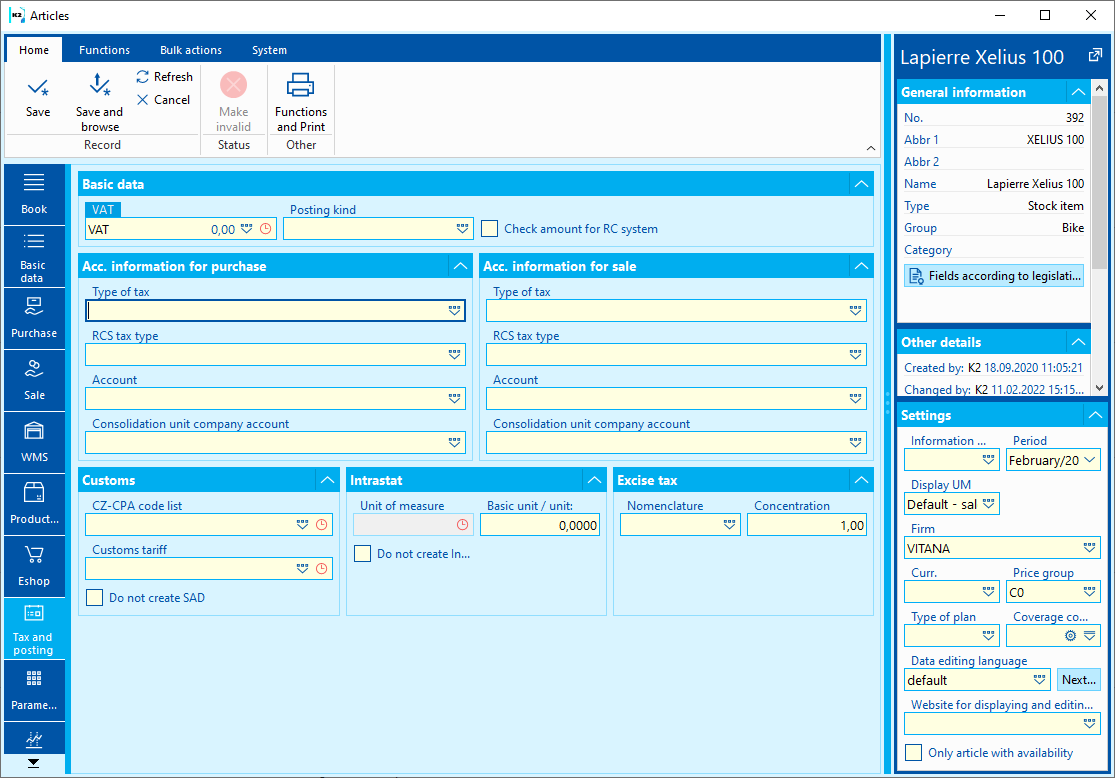
Picture: Article card - Taxes and posting tab
For goods items, the type of posting must be set (fill in the Posting type field on the Taxes and posting card tab). If a batch is specified on a document item, the Posting Type on the Batch tab takes precedence (if not empty).
Important data on documents
If important data in the Book settings and on the Article tabs are filled in correctly, then the important fields for billing will be filled in automatically in most documents.
We manually edit Cash Receipts, Internal Documents and Bank Statements, unless they are a payment for an invoice, advance, other liability, other receivable or payroll liability - in which case we must fill in the Account field on the item.
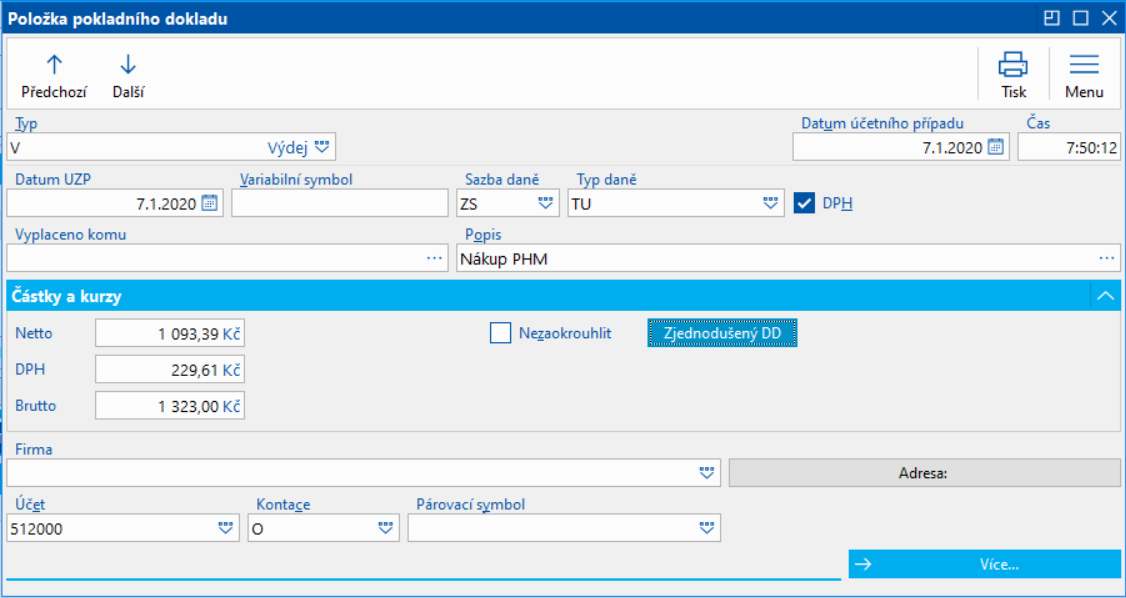
Picture: Cash voucher item
Addition of important data on confirmed documents
If we start acquiring the original documents and we have not yet set up the Books correctly, some important data may be missing from the documents. (We will discover the error at the latest when posting the document). In order not to have to confirm the documents (especially invoices and stock documents), we will use the Bulk Action function.
Example: We noticed that some invoices received do not contain posting keys. We adjust invoices.
Process:
- On the invoices received, we will create a filter of all invoices that do not have a specified posting key - the condition of the Posting key filter is empty.

Picture: Posting key filter condition is empty
- We mark the documents in the filter with an asterisk. On these documents we run from ribbon the bulk action Change of posting key. In the Posting key change form, check the Posting key field (for headers and items) and enter a value.
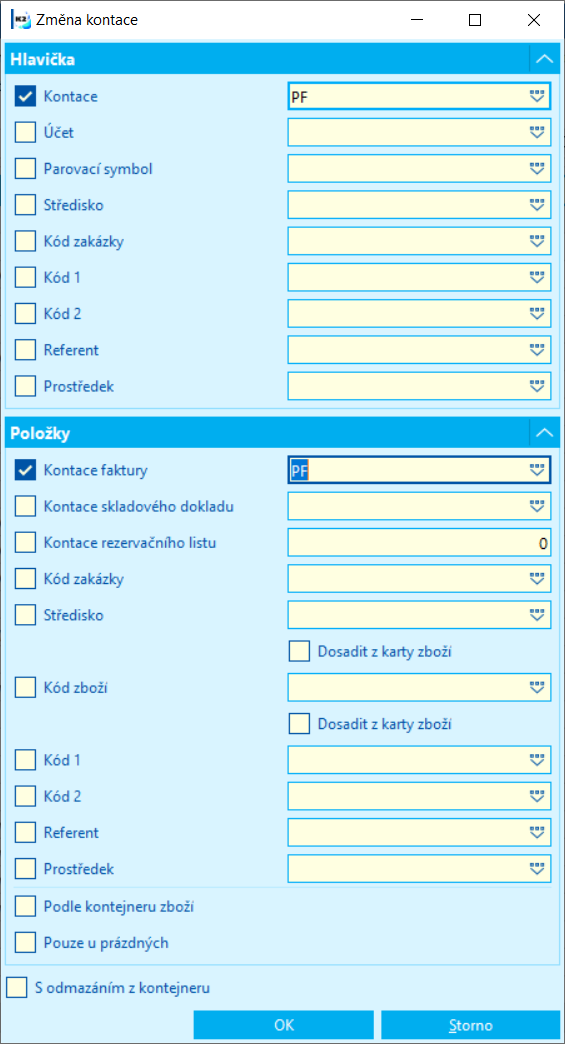
Picture: Bulk Action form Change of posting key
Example: We noticed that some invoices received do not contain account. We adjust invoices.
Process:
- On the invoices received, we will create a filter of all invoices that do not have a specified account - the condition of the Account filter is empty.

Picture: Account filter condition is empty
- We mark the documents in the filter with an asterisk. On these documents we run from ribbon the bulk action Change of posting key In form Change of posting key, we check the Account field and enter the account value.
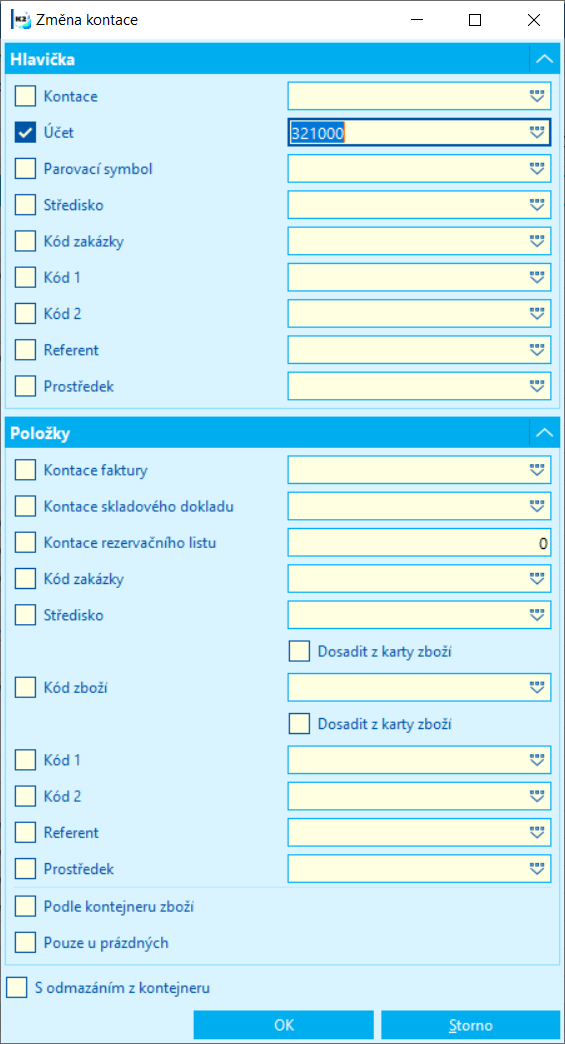
Picture: Bulk Action form Change of posting key