Steps
Steps are specific tasks created for individual users from the process. They enable user to respond to these tasks in time. The users process the steps with the use of Operations. By performing these operations, the so-called step events are created and steps are gradually created for other users as suggested in the versioned procedure. Each user can display the steps designed specifically for them, or the steps designed for the users they represent.
Browse Worksteps book
Worksteps book displays list of all steps for currently logged user. In this book, the user can open the detail of the step they have currently selected by pressing the Enter or F4 key to display the form that is used to process the step along with the information they need to process the step.
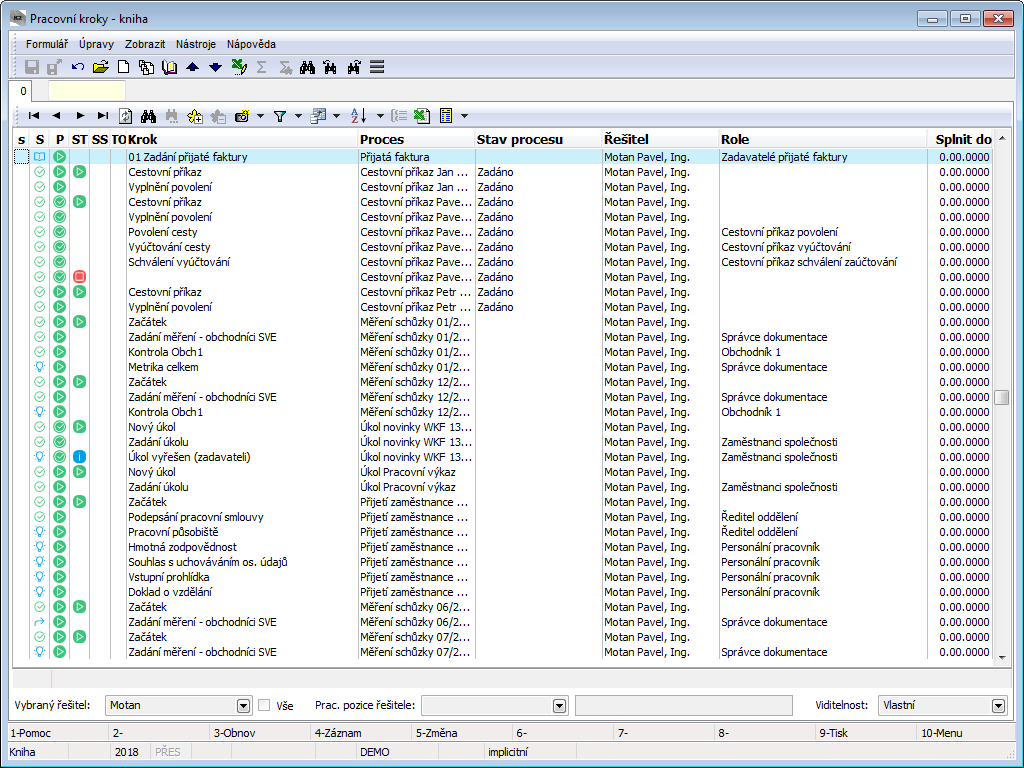
Picture: Book Browse Worksteps
Description of columns:
s |
Column to mark the record with asterisk. |
S |
Step status. Shows the current status of the step, i.e. what operations the user has performed with the step.
|
P |
Process Stages Shows current status of the process in which this step is created. - Running, process which has not been finished yet.
|
St |
Type of step:
If there is no icon, it is a different step than Start, End, Checkpoint or Cognizance , i.e. standard step. |
Pt |
Step Priority. The icons in this column indicate the priority of the step. If there is no icon, the step has no priority. |
SS |
In For processing book following icons can be displayed in this column.
We can refer the marked steps to other users or delegate it (i.e. we can refer the step to ourselves).
|
TO |
Column which might contain a red dot icon, icon indicates that the step was or will be processed in delay. For an ended step, this means that the time entered in the Deadline field is earlier than the end date of the step. For unfinished step, this means that the assignee is in delay, current date is higher than date in Deadline field. |
Process |
Language name of process. |
Process |
The language name of the procedure header from which the process is created. |
Step |
The language name of the step. |
Process status |
Displays the Status of a process. For settings, see Versioned Procedures - Events, Parameters description, the ‘ProcStatus’ parameter. |
Owner |
The user to whom the step is intended. |
Sent by |
User who sent the step forward. |
Created on |
The date of the creation of the step. |
Deadline |
The requested deadline of ending the step. (This is calculated based on the entered time in the Time for Filling the Task field and the calendar set for that step. |
Note: The user can process the step typesCognizance and Checkpoint by approving them but this has no effect on the procedure. The process will not be stopped because the step was not processed.
Description of fields in the bottom bar (fields are accessible only in derived books):
Selected Assignee |
The contact person bound to the logged-in user is offered |
All |
Select any contact person after checking a field in the Selected Assignee field. |
Work position of assignee |
If the workflow is linked to the organizational structure, it is possible to choose the Organizational unit. |
Visibility |
If the workflow is linked to the organizational structure, it is possible to choose whether you want to see only your own steps, the steps of direct subordinates or the steps of all subordinates. |
Always Delegate |
After checking this field, all the delegates steps will show (set absence is ignored). |
Monitored Processes |
After checking this field, the user will see the pending steps and also the unfinished pending steps for which he is specified as a Monitoring Person, regardless of who the owner of the step is. The Monitoring Person has the right to add comments to these steps. |
Creating a process in the Browse Worksteps book
A process can be created not only in the Processes book, but also here in the Browse Worksteps book by pressing the Ins key. After pressing this key, the Procedures - Book form appears where we select the procedure header according to which the process should be created.
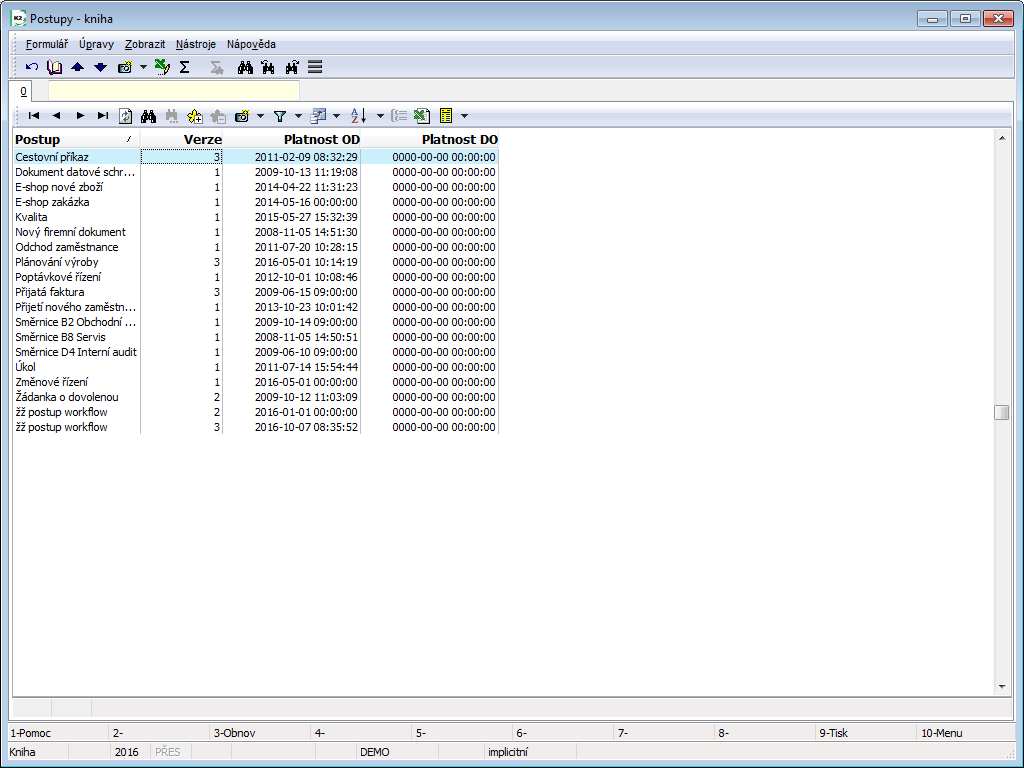
Picture: Procedures - Book - a list of procedure headers according to which the process can be created
Description of columns:
Process |
The language name of the procedure header. |
Version |
Serial number of the version of the procedure. |
Valid from |
The date from which the version of the procedure is valid. |
Valid to |
The date until which the version of the procedure is valid. If the date is zero, the version is valid indefinitely. |
After selecting the procedure header for the process, the New Process form appears, where we can fill in more data:
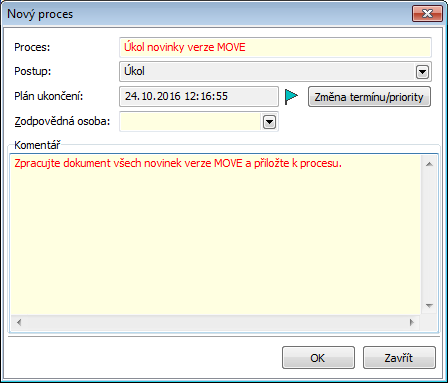
Picture: Form New Process
Description of the form
Process |
The name of procedure The field is pre-completed according to the name of the procedure header. This name can be changed by the user. |
Process |
Name of header of the procedure. |
Planned end date |
Date and time when the process is scheduled to end - calculated as the longest possible route through procedure, according to the values ??entered in the Time for Filling the Task fields in the individual steps. |
Responsible person |
The person responsible for the process. He/she is selected from list of contact persons categorized into roles in Responsibility tab of procedure. In the versioned procedure, it is possible to set that this person must be entered obligatorily (the Requireoption). |
Change priority/time |
This button enables the authorized user to change the pre-defined values from the step of the Priority and Time for Filling the Task fields. For more information, see Change Priority/Time. |
Comment |
A comment can be entered here. The comment text is a simple text without the formatting option. |
After pressing OK button new process is created and first step is created for designated persons according to settings in Procedure.
Work Step
Step detail - Work Step form can be opened with F4 or Enter button on selected entry (of step) in Work Step book. This is how we can display information about Process and Process Step. Form is used to process step via so called Operations which are in the form displayed as icons. Operation icons are active provided highlighted step is meant for user. Certain Step Events are created by operations with steps. User can process the step either by pressing left mouse button on operation Icon or with key shortcuts (description below).
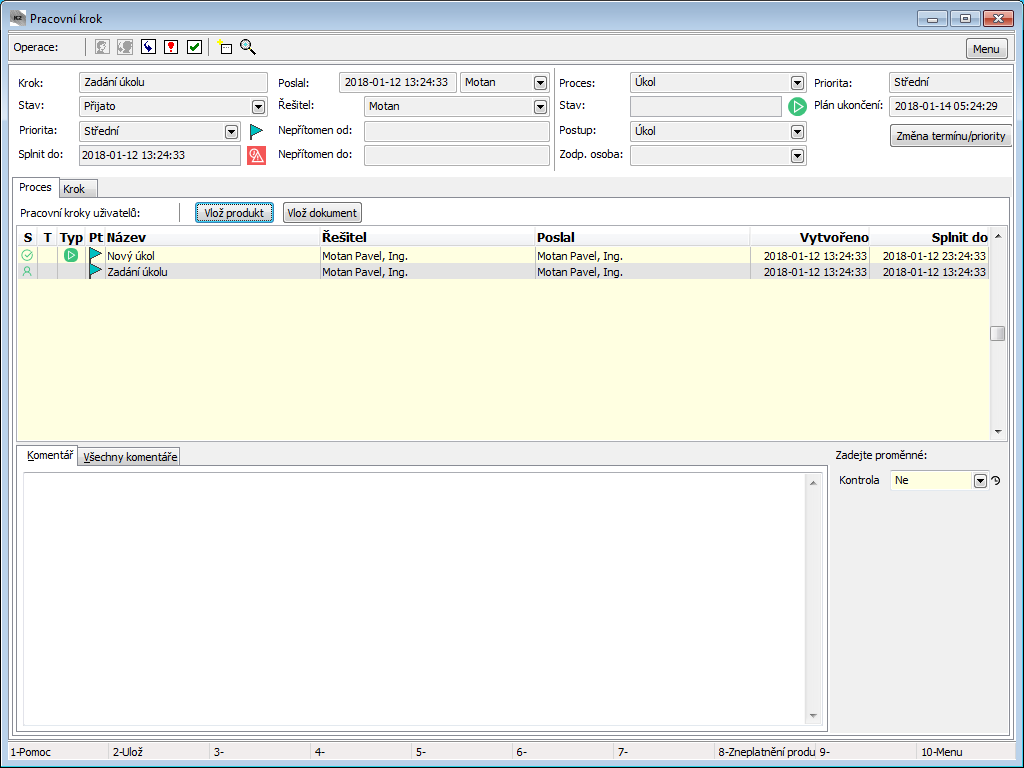
Picture: Work Step form (displayed by pressing Enter on selected step)
Description of icons and key shortcuts of operations:
|
Alt+F3 |
Acceptance - user accepts step via this operation to show other users that he/she’ll solve the step. |
|
Ctrl+F3 |
Forwarding - this means that user wants for some reason forward the step to another user for solving. Step can be forwarded to user which is listed in User Group of this step (see step Properties, page 2 of Versioned Procedures book). |
|
Ctrl+F4 |
Deputizing - this function is used if we want to solve step for another user. By pressing icon Deputize step is so called forwarded to ourselves and step detail is displayed directly so that we can start working on it. |
|
Alt+F5 |
Rejection - by this operation user rejects the step to show that he/she doesn’t agree with something in the step (e.g. variable value). This operation can be performed only if Back Link arrow leads from step in procedure chart. When rejected step, to which back arrow leads, will be created. When rejected by one user step is cancelled also for other step users which haven’t processed the step yet, or possibly the steps in group are cancelled. |
|
Alt+F6 |
Approval - by approving user agrees with all what relates to step and what is displayed to him/her and moves process forward to other users. When step is approved by all selected users, another step to which leads forward arrow Link is created. |
|
F7 |
Comment - user can add a comment to step if he/she wants to comment. This comment then be viewed by all process users. In Comment form user can add Name and comment text which can be formatted as needed. User can change his/her comment provided step hasn't been ended yet (by approving, rejecting or forwarding). |
|
Alt+F8 |
View Process - form Process Chart is displayed (description below). |
|
Alt+F1 |
Step Description - description of step, from which the form is opened, is displayed. Description must be entered in Properties of procedure step in Versioned Procedures book to be displayed. |
|
Shift+F8 |
Set up of Variable Values form is displayed where Process variables appear with their current values, provided they haven’t been marked as Internal in Variables tab of Versioned procedures book. |
Sequence of step events when user performs operations:
- User can perform operation Acceptance or Forwarding and event Acceptance is created (icon
 ) or Forwarding (icon
  ).
).- In case of user’s Acceptance of step and if option One of Them or User Way One of Them is chosen in field Selection Method in Properties of Process Step, step is cancelled for all other users in given user group (at all those users will at this specific step in book Work Steps appear icon
 .)
.) - In case of user’s Forwarding form Selection of Participants with Users will appear, where we can choose user to which we want to forward the step, selection can be confirmed with OK button. (see picture below: Selection of Participants form, icons in form in column ‘S’ show what operations have users already done with the step.
- In the case of Step Forwarding and the Substitutionability setting according to the Role, a Representative is also offered, regardless of the Absence. During the Forwarding of a step, the solver will assign either to the Representative or to the Deputy the steps that he knows he will not be able to perform due to his absence. The same can be set in organizational structure. However, the representative must have the same role set as the Solver.
- Example from picture ‘Selection of Participants form’ - Task Assignment step is currently being processed by user Demonstration User - eng, which is shown with icon
 User Administrator of K2 system has in column S icon , which means that step has been already created for him once and the step has been forwarded to
 another user. No step has been created yet for other potential step users, no icon is shown in column S. In column S also all other icons of step events can be displayed.).
- In case of user’s Acceptance of step and if option One of Them or User Way One of Them is chosen in field Selection Method in Properties of Process Step, step is cancelled for all other users in given user group (at all those users will at this specific step in book Work Steps appear icon
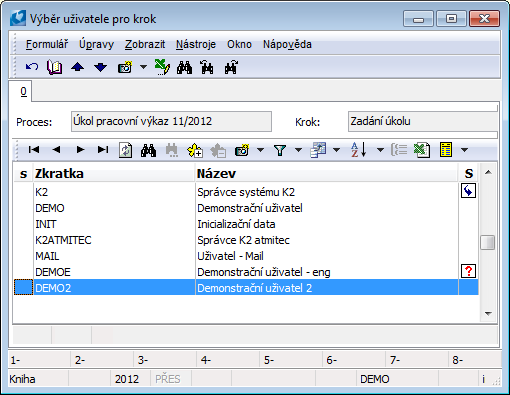
Picture: Selection of Participants form
- After step is accepted operation and then event Approval (icon
 ) or Rejection (icon
  ) of process. This is when step processing ends and according to versioned procedure settings further steps are created in Processes and Work Steps books.
 - User can then, after step detail is opened, perform operations Approval or Rejection, in this case event Acceptance is automatically created.
- If process is cancelled, at unfinished steps is displayed icon
 .
. - User can also perform operation Deputize, at step which someone else should solve but user wants to deputize him/her and solve the step for them.
Note: This sequence of events is valid also for step which can be solved from page zero of Steps book (without displaying step detail).
Description of fields of Work Step form:
Fields related to step:
Step |
Name of step. |
Status |
Status of step (read, accepted, approved, rejected, forwarded (deputized), cancelled). |
Priority |
Step priority set in procedure or in process. |
Deadline |
Time till when the step must be completed (finished). |
Sent by |
User which sent the step. |
Owner |
Owner (assignee) of the step. |
Absent from, Absent till |
If user has current absence set in Workflow Users book, it is displayed in these fields. |
Fields related to Process:
Process |
The name of procedure |
Status |
The status of the process. |
Process |
Procedure name. |
Resp. person |
Person responsible for process. |
Priority |
Process priority. |
Planned end date |
Planned process end date calculated from Time to Complete fields at individual steps. Field value can be changed with Change of Priority/Time button, see below. |
Change priority/time |
Priority and time conditions for process steps can be changed with this button. Button is active only if user has right to change. Key description, see Change of Priority/Time. |
All Users’ Work Steps of given process which have been already processed, as well as currently created step, are displayed in Process tab (see picture above). Tab can also contain Documents and Products assigned to process as well as steps Comments entered by users.
all Comments of users Work Steps can be displayed or hidden by clicking on icon ![]() and
and ![]() . We can display or hide comment of each step by pressing mouse button at Folder icon.
. We can display or hide comment of each step by pressing mouse button at Folder icon.
Insert Product:
This button allows user to insert Products to process, i.e. Received invoice, Sales Order...
Button is active if settings of Events tab on page 2 of specific step in Versioned Procedures book are:
- in Event field ‘Form’
- in Parameter field ‘InsProd’
- specific header of desired product type (received invoices, sales orders, orders, activities...) chosen in Product field.
After pressing Insert Product button list of product types is displayed from which we can choose the type we want to insert to step. Book of chosen product with list of records is then displayed, e.g. Received invoices book. Specific product which will be inserted to step can be chosen with double click of Left Mouse Button. If procedure is set that button contains only one type of product, by pressing the button book with records for given product type (e.g. Received Invoices book) is displayed directly.
If procedure is set that in step it's mandatory to insert product, ‘black dot’ icon is displayed next to the list. System then doesn’t allow to confirm the step without inserting product to process.
Insert Document:
This button allows user to insert Documents from computer directory to the process.
Button is active if settings of Events tab on page 2 of specific step in Versioned Procedures book are:
- in Event field ‘Form’,
- in Parameter field ‘DocType’,
- specific document type entered in this parameter (original patch when inserting document).
After pressing Insert Document button list of document types is displayed from which we can choose the type we want to insert to step. Dialogue window of chosen document (original folder) is then displayed. Specific document which will be inserted to step can be chosen with double click of Left Mouse Button. If settings of procedure say that button contains only one document type, by pressing the button dialogue with list of documents is displayed.
If procedure is set that in step it's mandatory to insert document, ‘black dot’ icon is displayed next to the list. System then doesn’t allow to confirm the step without inserting document to process.
User can delete inserted product or document by highlighting it and pressing Del key. Product / document can only be deleted until step is finished (approved, rejected, forwarded) and if buttons Insert Product or Insert Document is active. Inserted product / document can only be deleted by user which inserted it in process.
Information from Documents book are displayed after Shift+F4 are pressed on document.
By pressing Shift+F3 can document be saved without need to open it.
User can cancel inserted product or document by pressing F8. Cancellation can only be done at step where product insertion is allowed. Attached process is not visible on page 9 of document at cancelled product.
Columns description of window Users’ Work Steps:
First column |
|
Open Step is displayed in row. Open step means that in the next row text of the comment (if step contains any comments) is displayed. |
|
|
Product or Document is displayed in the row. By double click of left mouse button or with Enter key we can open detail of specific assigned document directly from this form. |
|
|
If field is empty, Comment is displayed in row. |
S |
Icon of Step Status is displayed here (see Work Steps - book Columns description, Column S), according to current status of the step. |
|
T |
If the icon |
|
Name |
Name of Step, Comment, Document or Name of Product is displayed. |
|
Owner |
Step owner (the one who should process the step). |
|
Sent by |
User which forwarded the step to owner (owner of the previous step). |
|
Created on |
Date and time of step creation. |
|
Comment text which is highlighted in Users’ Work Steps field (see picture Work Step form - tab Step) is displayed in Comment tab.
All comments of this process as well as information about who and when entered the comment are displayed in All Comments tab.
In Assignment tab under Text it’s possible to edit process definition, history of entry records is displayed in History tab. (Assignment tab is displayed if in Procedure option Display Assignment is checked.)
In Step tab information about step are displayed.
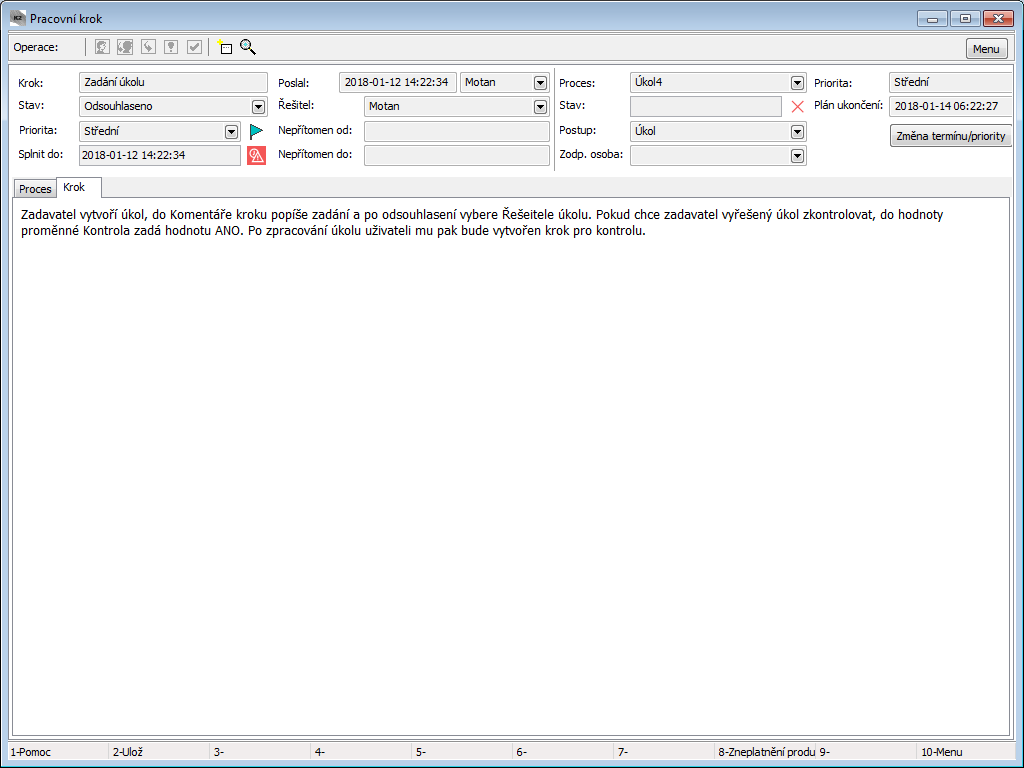
Picture: Work Step form - Step tab
Description of Step tab:
Description, entered in Properties of procedure step, is displayed in Description of Work Step window.
The Alt+F8 key on the Workstep form shows the Process Chart (the same as in the Processes book).
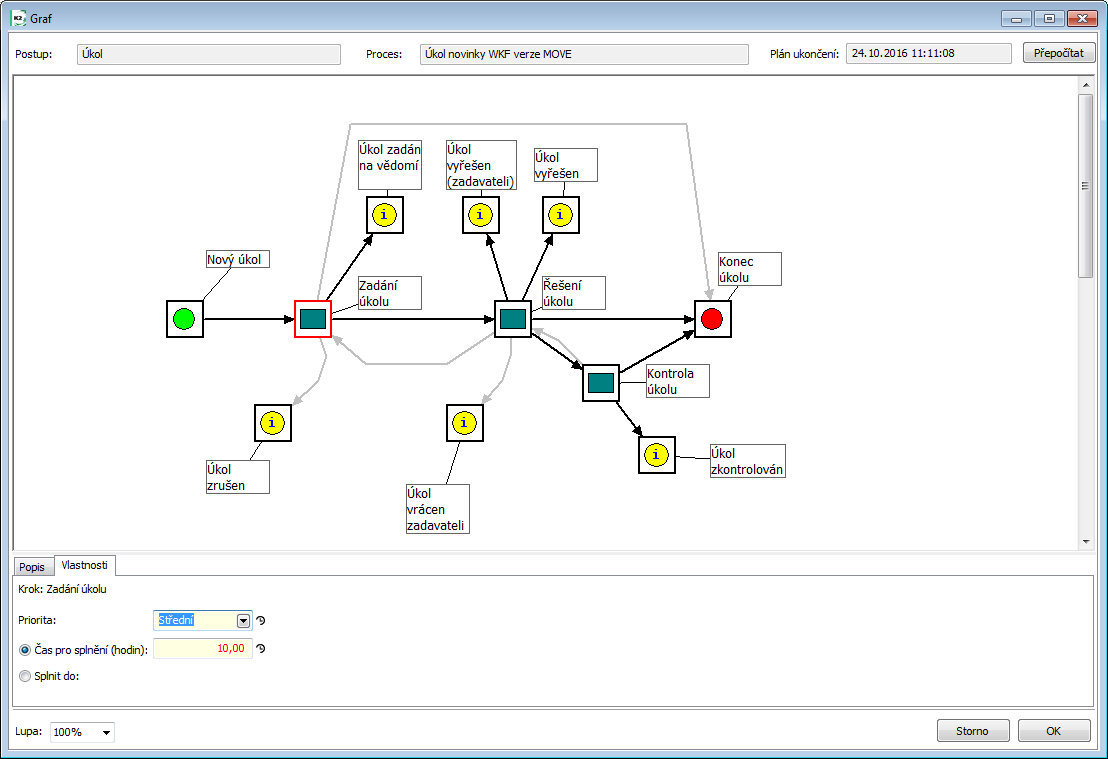
Picture: Process Chart form
Description of the form
The Process Chart form shows the progress of the specific process. The steps and arrows marked in green in the chart have already been processed. The step marked in red indicates where the process is currently standing (a step which is currently being processed). In the Process Chart picture, you can see the Task Assignment step being processed. This step is marked in red. If the steps or arrows in the chart are not marked in green or in red, they have not been created in the given process yet.
Description Tag:
The Description tag displays the description of the steps according to the designed procedure.
Options Tag
The Options tag enables to choose priority from the Priority book.
We can also check the Time for Filling the Task option and enter suitable time in hours.
We can leave the chart by pressing the Esc key or the OK button.
Derived books
Derived books - filters, which contain list of users' steps from specific view, are created by users from Work Steps book for better orientation and easier work.
User can work the same way in these filters like in Work Steps book.
For processing book
For processing is book derived from Steps book, it contains all tasks (steps) of currently logged user, which haven’t been ended by user yet (not yet approved, not rejected nor forwarded to another user). It's primarily dedicated for users to do operations with steps.
Finished steps
Finished Steps filter contains all steps of currently logged user which user has already finished (approved, rejected or forwarded to another user).
Steps of unfinished processes
Steps of Unfinished Processes filter contains all steps of currently logged user, which have been created in not yet finished process (even if user has ended the steps he/she owned).
Mass actions above Work Steps book
Steps approval |
Mass approval of chosen steps is performed. |
Step forwarding |
Mass change of Owner of chosen steps is performed. New Step Owner is entered in entry function form. |
 - the icon indicates that we are stated as the