System
From System menu can be run the function for database administration, books of modules, task scheduler administration fromSystem offer in Administrator module.
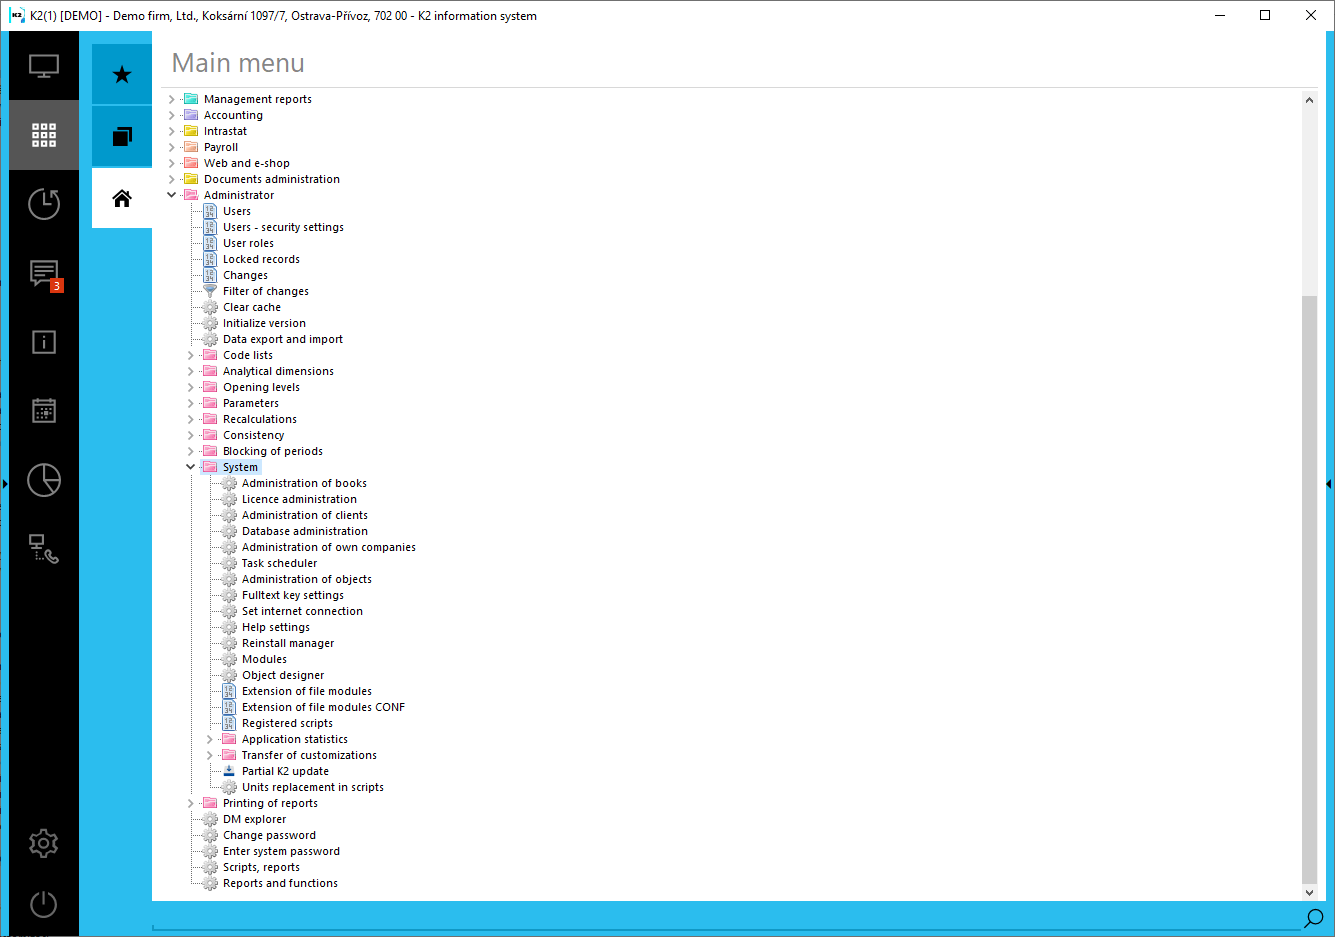
Picture: Open menu module Administrator - System
Administration of books
Book management is a newly created module that is used to insert books of individual data modules. It was created for the purpose of greater clarity and easier entry of books of individual data modules. At present, it is possible to create books of the modules Service, Internal documents, Reminders, Cash registers, Marketing, Bank accounts, Projects, Purchase, Sales and Payables from wages, Other payables, Other receivables, Warehouse, Travel orders, Module 1 - 5, Payroll documents, Price lists, Delivery services, Production, Accounting, Accident books, Mail, Qualifications, e-incapacities, Electronic filing, Maintenance, Assets, Calculations, Contracts - purchase, Contracts - sale, Supplier price lists, Contracts - other. Book management is located in the tree menu Administrator - System - Book management.
To work with the Book Administration, it is necessary to have the Service Interventions right set, which can be found on the 5. page of the user in the Administrator - General.
Books can be created with book abbreviations longer than 2 characters. You can distinguish books, for example, according to the partner's registered office (eg the company "Servis - Ostrava" and "Servis - Praha" (see picture)).
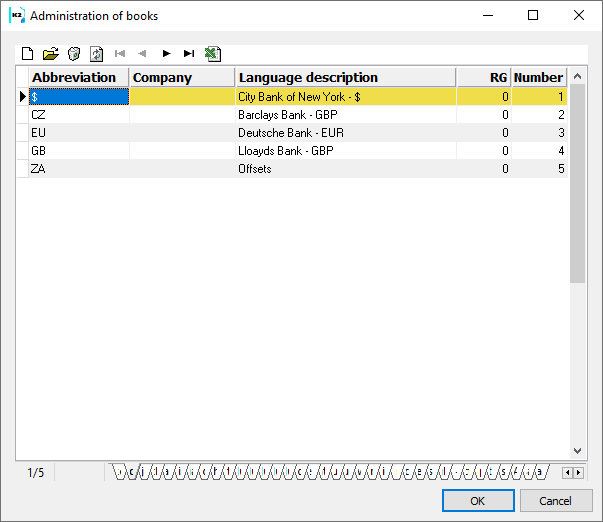
Picture: Administration of books
Book management contains module books, which are divided into the lower tabs of the form (Service, Internal Documents, Reminders, etc.). We'll use either the Ins key or the icon ![]() to create a new book. To edit an existing book, open the book with the Enter key, double-click the left mouse button or the button
to create a new book. To edit an existing book, open the book with the Enter key, double-click the left mouse button or the button ![]() . Delete records is forbidden. Arrows
. Delete records is forbidden. Arrows ![]()
![]()
![]()
![]() serve for moving ruler on the records.
serve for moving ruler on the records. ![]() used to export the contents of the table to Excel. These buttons perform the same function on other Book Management forms.
used to export the contents of the table to Excel. These buttons perform the same function on other Book Management forms.
Description of the form for inserting or editing a record
Administration of books
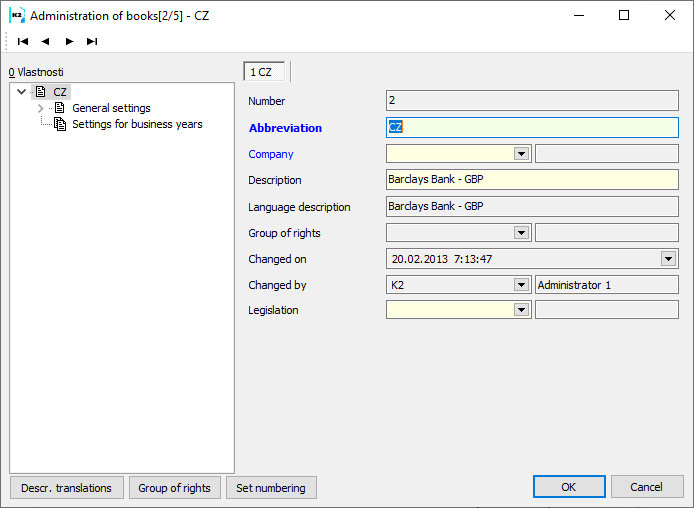
Picture: Book management - Book management tab
Fields Description:
No. |
Automatic generated book number. The numbering goes through all the books created in the book manager (through all the modules in the tabs at the bottom of the form, see above). |
Abbreviation |
Abbreviations for newly created books. The maximum length is 6 characters. |
Company |
We will select the company from the Own company form (list of companies defined for the currently registered client). Only users of this company will be able to work with the book within the set client. If the field is not filled in, then the book will apply to all companies in the client. |
Description |
Book description specifying the book in more detail. |
Language description |
Description of the book, which we will set in the book Language field (Description translations button). It will then appear in the table. |
Group for right |
Individual books can only be accessed by users who have a specific group right defined. You can assign a group right with the Rights Group button. |
Changed on |
The date and time the book was created or last modified. |
Changed by |
The abbreviation and name of the user who created or last modified the book. |
Description translation |
After pressing the button, the book Language field opens, where we can save the Book Description for different languages (Language field in the User Parameters). |
Right group |
Pressing this button or the Ctrl + Shift + F5 keys will open the Rights Groups book, where we will select for which user rights group the created book will be accessible. Rights groups are described in the chapter Administrator - User groups. |
Set numbering |
|
Default settings
The Default Settings tab is different for each module. A description of this tab is provided in the relevant section of the documentation to which the book relates.
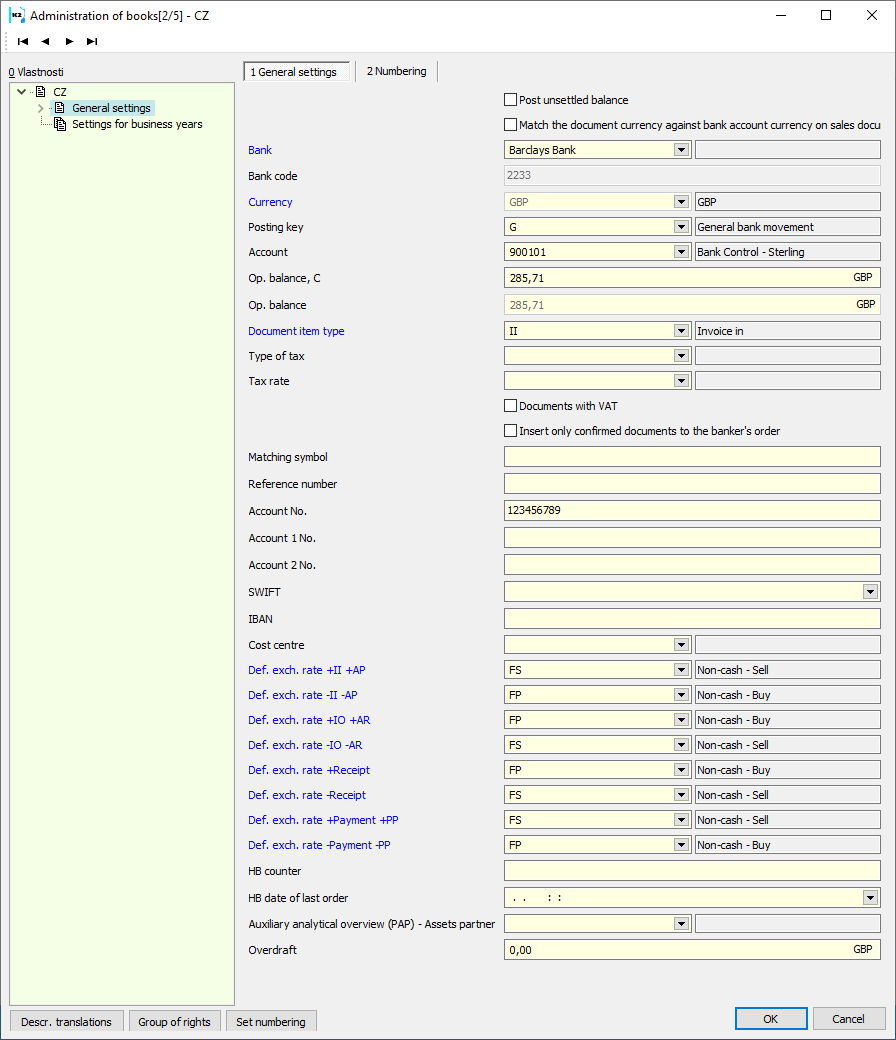
Picture: Book management - Default settings
Numbering tab
The numbering of documents in the selected book is set on this tab.
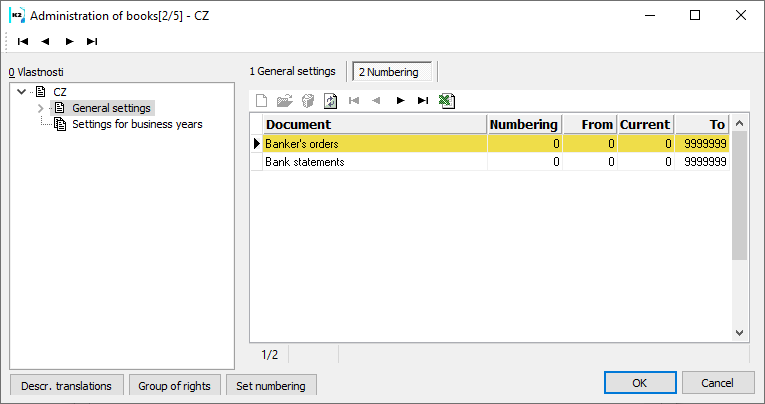
Picture: Book management - Numbering tab
Insert a new numbering record
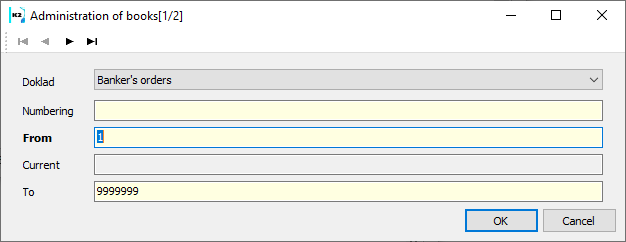
Picture: Form for inserting a new numbering record
Fields Description:
Document |
Drop-down field for selecting the type of document for which we are setting the numbering. |
Numbering |
In this field we can set our own numbering. E.g. "1", which will number eg from 2000. |
From |
Here we set the number from which the documents will be numbered. If we do not fill in the field, the documents will be numbered from 1. |
Current |
Automatically filled in number according to the last created document. |
To |
We will set the maximum number to which the documents will be numbered. The default setting is "9999999". |
Period Setting
By default, the book settings are the same for all periods. This means that the settings on the Default settings tab apply to all periods. Therefore, we do not have to fill in the settings for each period separately. If we want to set different conditions for a certain period, then we must create this period on the Settings for period tab. (For example, the picture shows the period for 2021.)
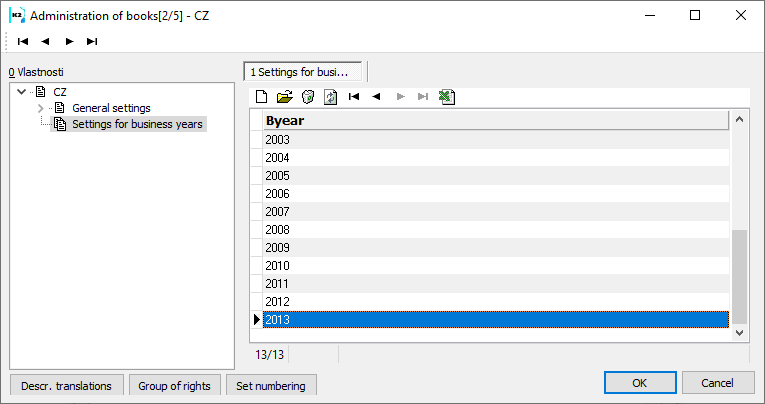
Picture: Book management - Settings for period
Adding a new period
The period setting is only done for the given year. Open the Period drop-down box to select the desired year from the Period book.
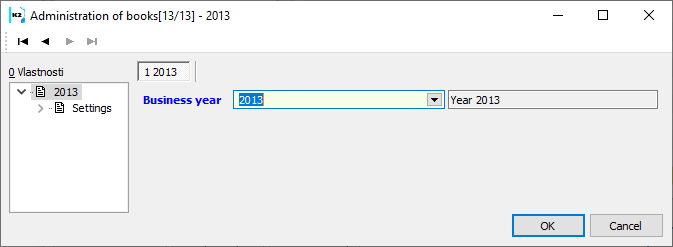
Picture: Period - Book management
Period Setting
On this tab we set the parameters for the given period. The fields are the same as in the Book Management - Default Settings form.
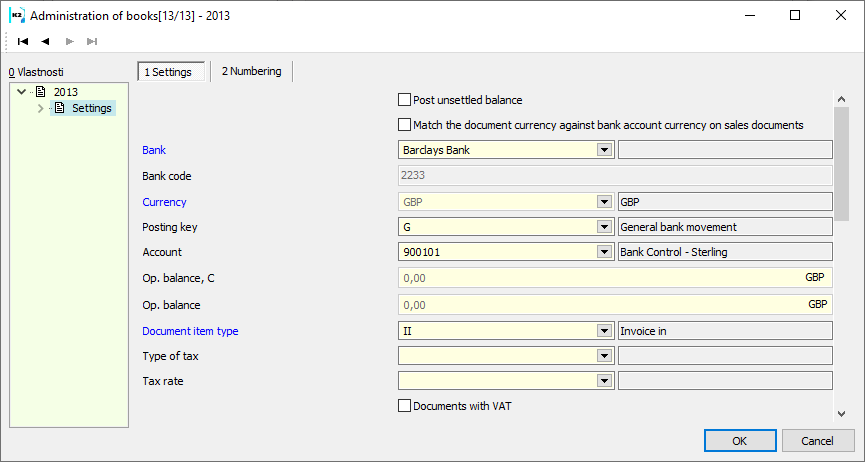
Picture: Period - Settings
In addition, there is a Find Current button on the Numbering tab in the form for creating a new period. When pressed, the number of the last created record is read in the Current field.
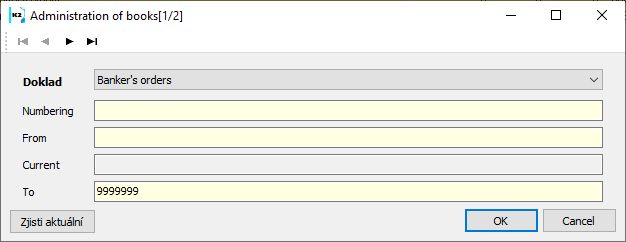
Picture: Form for inserting a new numbering record
Licence administration
The function offers detailed information about K2 licence including overview of licence modules and currently signed users. The function is tree menu Administrator - System - Licence administration.
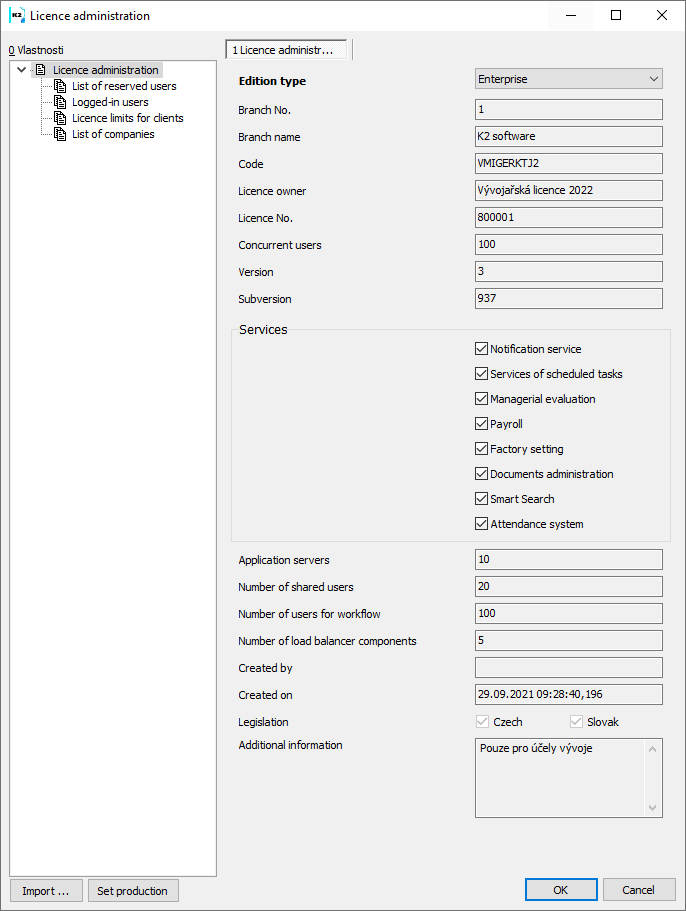
Picture: Administrator - System - Licence administration - folder Licence administration
Fields Description:
Edition type |
Type of bought program edition (Business, Professional, ...). |
Brach No |
Brach No. |
Branch Name |
Name of particular branch. |
Code |
Safety producer code. |
Licence owner |
Name of licence owner (company). |
Licence number |
Licence number (see contract of sale). |
Concurrent users |
The number says the amount of signed users in total. |
Notification service |
If this field is checked, it means that the user has bought the licence for Notification service. |
Scheduled tasks service |
If this field is checked, it means that the user has bought the licence for Payroll. Scheduled tasks service. |
Managerial evaluation |
The checked field means that the user has bought the licence for Managerial evaluation. |
Payroll |
If this field is checked, it means that the user has bought the licence for Payroll. |
Factory setting |
User with this licence is able to administer the setting specified just for administrators. |
Document administration |
If this field is checked, it means that the user has bought the licence for Book management (DMS). |
Version |
Generation number of version. |
Subversion |
Second part of version number |
Application servers |
Number of application servers. |
Number of shared users |
Number of computer connection used by a server of web services. Meant for Internal use. |
Number of users for workflow |
Number of bought module licence Workflow. |
Created by |
User who has created the licence. |
Created on |
Date and time of licence creating. |
Legislation |
Within one K2 it is possible to keep several own companies with Czech or Slovak legislation. A checked box indicates what legislation the user has purchased. |
Additional information |
|
List of reserved users
Users with reserved licence for logging. The number of (reserved) "users" is free. It is included into the whole number of accessible licences (see Concurrent users field). This way you can take licences for users or for running planned automatic tasks.
Logged-in users
The list of users currently logged-in K2 program is displayed in Logged-in users folder. For each logging-in there is a client that the user is signed as. Then you can find there name, additional information, workstation, session, login time and licence type. The total number of logins (consumed licenses) can then be read from the total number of records in the table - a numerical value in the lower left corner (current record number / total number of records).
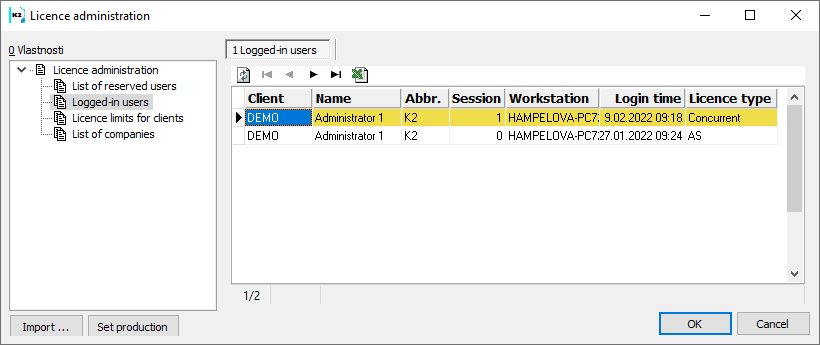
Picture: Administrator - System - Licence administration - Logged-in usersfolder
Licence limits for clients
You can limit the number of logged-in users for clients. In the book Administrator in Basic data (1st page) chapter you can set with whose clients are the users logging as.
The Import button is important for import of licence file into database. The button has the same importance as Licence import upon finishing program installation. In this form you can use this button for e.g. licence changing.
Button Set production is important for setting the K2 installation as production. The button has the same importance as Production upon program installation.
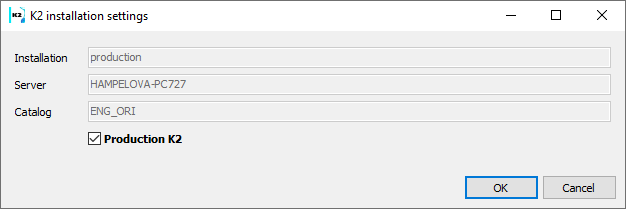
Picture: K2 installation settings
Both the K2 installer and the K2 application send online license usage information to K2 atmitec. Among these information is Name, version and K2 edition, server name, catalogue and client, number of users and identification of database platform.
These information is important for efficiency improvement for another plans of K2 development and for prevention of possible incompatibility. To differentiate whether a given K2 installation serves as a production, it is necessary to use the option of registering the installation as a production in the K2 installer or directly in the K2 application (Administrator - System - License Management).
Non-production K2 are understood as testing, their function is limited. If K2 program is set as "Production", red line with "Test Test Test Test" text will be displayed on the main form. This text is displayed as watermark in reports as well. K2 icon will get grey in non-production state.
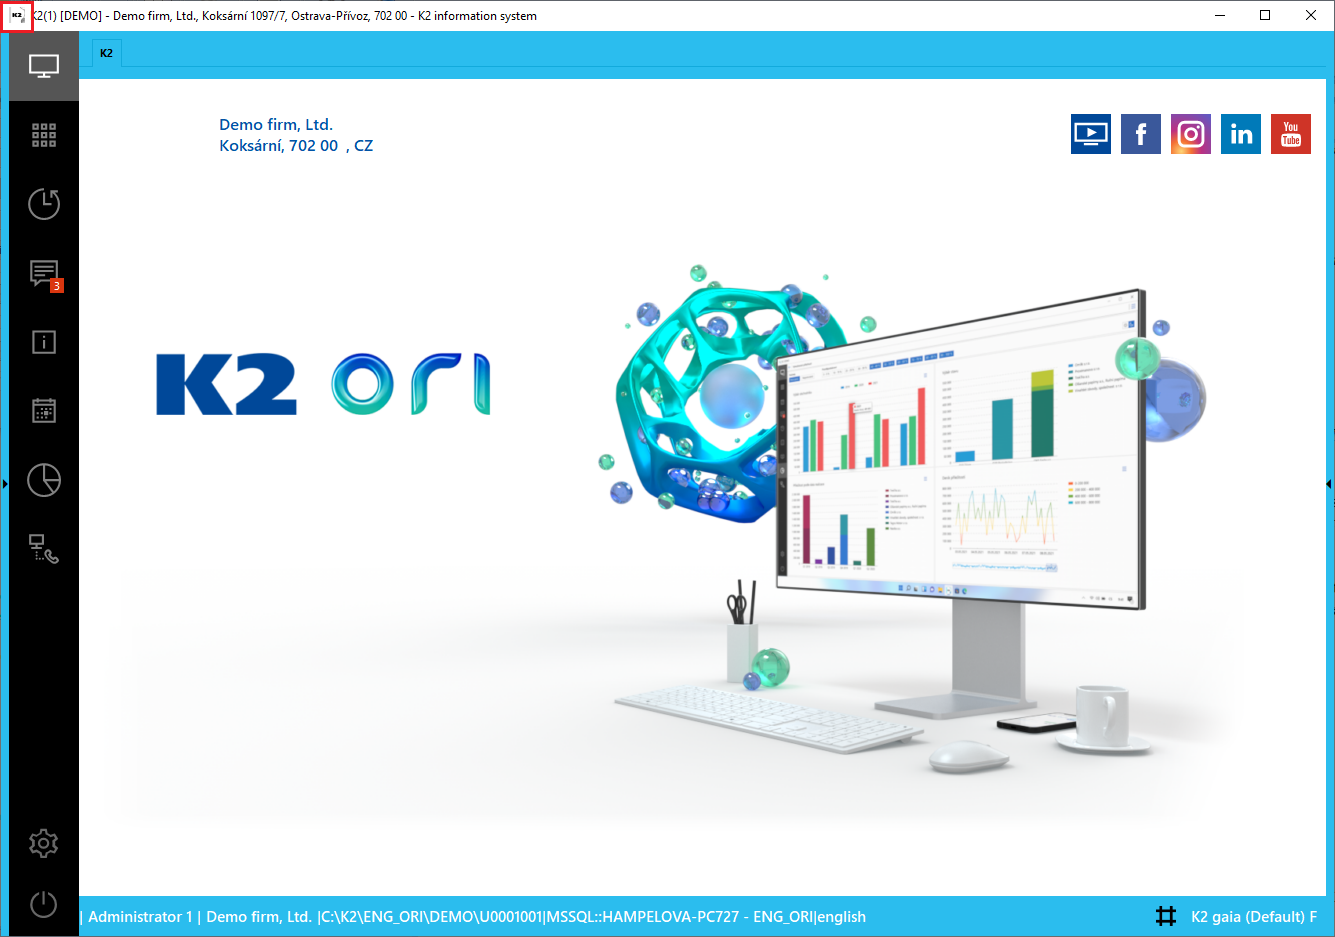
Picture: K2 Desktop - "Non-production" K2
![]()
Picture: Main Task-bar of Windows Operating System, icon shortcut "Non-production" K2
Administration of clients
There are two clients preset in the program, these are DEMO client and INIT client. In the DEMO client, there are introduced the demonstration data for individual K2 modules, where the user can practice the K2 functionality. The client INIT does not contain data, because it serves to create a new client. Administration of clients serves for creating new clients and for maintenance of the existing databases by means of K2.
The list of clients you can see on the page 0.
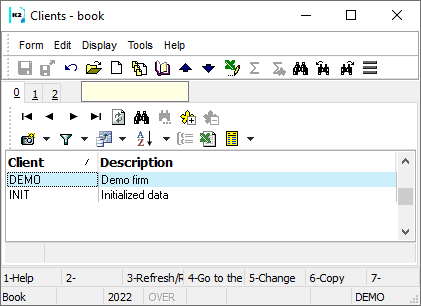
Picture: The Administration of clients form - book
The first page of the form is different for editing an existing client and another for creating a new client by using the Insert key. When editing the existing client, only the description can be changed (the abbreviation must remain the same, because the databases and directories are named by it).
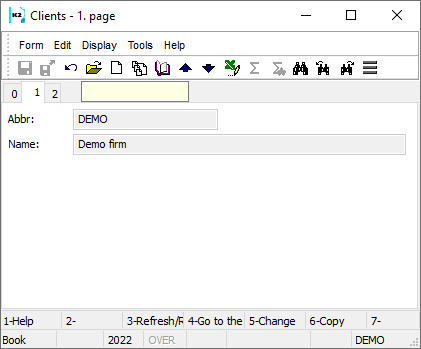
Picture: The Administration of clients form - page 1 in Change mode
When inserting a new client, the check boxes are displayed on the form. They can be checked arbitrarily. Users who work and manage K2 only from K2 must check all fields.
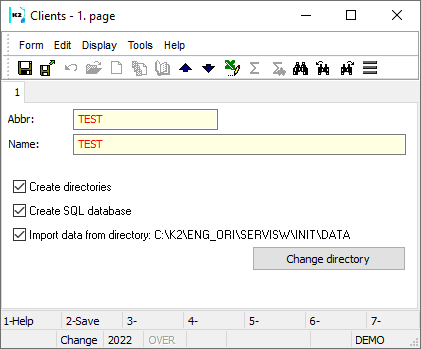
Picture: Inserting a new client - Ins
Selected fields description:
Create directories |
If this checkbox is checked, a directory with the same name as it is specified in the Abbreviation field is created in the main K2 directory. |
Create SQL database |
If it is checked, the database is created on the server. A name of the database consists of the master database name and the client abbreviation. [Database K2 entered at installation] _ [Client abbreviation]. |
Import data from directory |
If it is checked, the data from the selected directory will be imported into the created database. All "*.des" and "*.hes" files of all data tables must exist in this directory. The files for creating INIT and DEMO databases are delivered with the K2. INIT serves for the creation of a new real company, DEMO can be used for testing on data which are prepared by the company "K2 atmitec s.r.o." All "*.des" a "*.hes" files has to be placed in one directory. The directory can be changed by using Change directory button. |
After pressing F2 key, the changes are saved and actions selected by the user are executed. The user is informed on currently running actions by means of dialogue boxes with the client creation progress. It is not possible to work in K2 during this time.
Databases administration
A list of all available tables for the current client is displayed.
Multi company Administration
By means of this function Administration of multi company it is possible to share the common data among more companies (e.g. parent and subsidiary companies). The function is in tree menu Administrator - System - Administration of multi company. It is necessary to set the right Set multi company (Administrator - General) to create and delete companies.
After starting the function, the Administration of multi company form will open, where you can insert individual companies with the Insert key or the button![]() . Button
. Button ![]() or Enter key opens the existing record and enables to change it.
or Enter key opens the existing record and enables to change it.
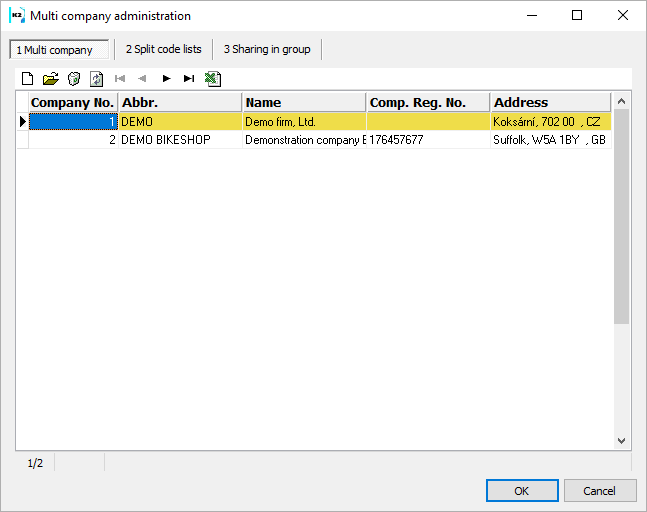
Picture: Multi company settings
Multi company tab
The form for multi companies administration contains two tabs: Basic setting and Users.
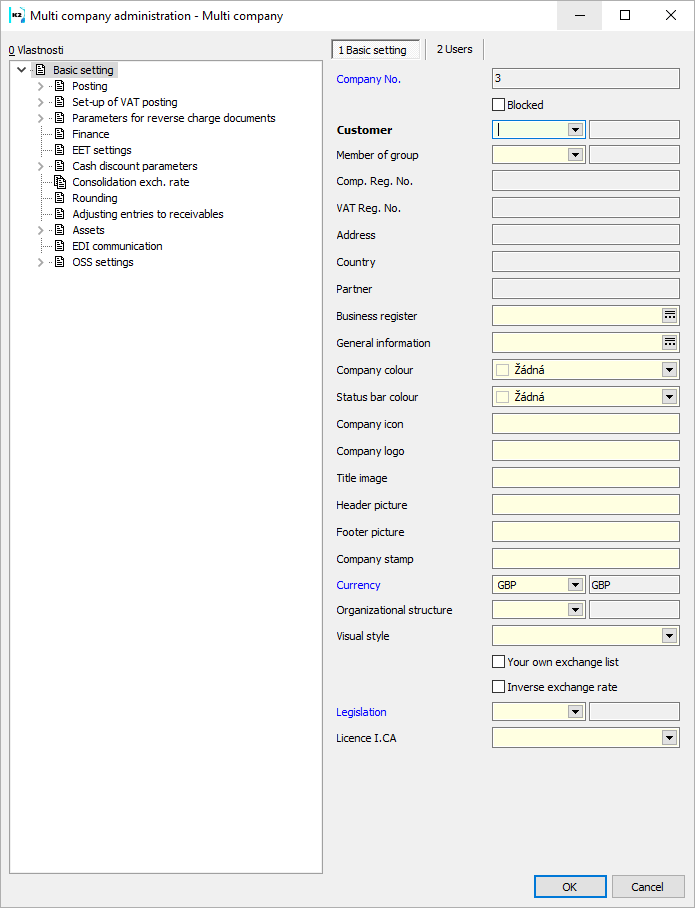
Picture: Form Multi company Administration - Basic Settings tab
Basic Settings
Fields Description:
Company No. |
Automatically generated number of a created record (company). |
Blocked |
The checked field means that the company is not offered at the bottom part of the K2 screen. You cannot switch into. |
Customer |
Selection from Suppl./Cust. book (companies), where you will switch to. |
Member of group |
You can create a group, which includes more companies. E.g. for a case that a company has more branches. |
ID-no. |
Added Company ID-no. from customer card automatically. |
VAT reg.no. |
Added VAT reg.no. from customer card automatically. |
Address |
Address prefilled from customer card automatically. |
Country code |
Displays company country (from a customer). |
Partner |
Number of a partner linked with a customer is displayed. |
Business register |
The possibility to set a text for the business register. It is possible to enter multi-line text after you press the button. |
General information |
It is possible to enter a random text that can be displayed in reports for a purchase and a sale. It is possible to enter multi-line text after you press the button. |
Company colour |
Possibility to set the background colour for a particular company. If the colour is not filled, the company colour is taken. In your own desktop, the colour from your own desktop, if is filled, is overtaken. If the colour is not filled, the colour is taken from this field). |
Status bar colour |
Possibility to set the status bar colour for a particular company. If the colour is not filled, the company colour is taken. |
Company icon |
Path to the image of the company icon for display e.g. in reports, in the menu of this function or on the desktop. |
Company logo |
Path to the image of the company icon for display e.g. in reports, in the menu of this function or on the desktop. |
Header picture |
Path to a picture for report header. |
Footer picture |
Path to a picture for report footer. |
Company stamp |
Path to a picture for the company stamp. |
Currency |
Company currency. |
Organizational structure |
Possibility to choose an organizational structure. |
Visual style |
Possibility to choose an own visual style. |
Own exchange list |
If it is checked, the company uses the own exchange list. If it is off, company uses the common exchange list. |
Inverse exchange rate |
If enabled, foreign exchange rates are displayed in all documents and in the exchange rate list in the ratio "x" of foreign currency units to 1 unit of the base currency (currency set on the 1st page of the client's parameters). If off, foreign exchange rates are displayed at a ratio of "x" base currency units to 1 foreign currency unit. |
Legislation |
To determine the legislation of company. |
Licence I. CA |
Path to the multi-license license file from I. CA registered at "IČO". Without a license, signing is non functional. Licence file can be be per company or per user. A library needs to be available for signing to work AdvICASigner2.dll, which is not supplied with K2, but can be obtained from I. CA. An example of use is in the standard script "HB - Signing the I.CA order" (HB_SignIca.pas). |
In Basic settings you can run these functions:
- Accounting - the description of functions is stated in the Accounting manual,
- Set up of VAT posting and Parameters for reverse charge documents - the description of functions is stated in the Accounting manual,
- Parameters for reverse charge documents - the description of the function is stated in the Accounting manual,
- Set-up of EET service - the description of the function is stated in the chapter Settings of EET service,
- Discount parameters - the description is in the Finance manual,
- Consolidation exch. rate,
- Rounding - the description is in the Rounding.
Users
Here you can select the users, who will have the access to this company. When you press the Insert key or button ![]() the form divides into two parts - Available records and Selected records. In the Available records, double-click the left mouse button or the button
the form divides into two parts - Available records and Selected records. In the Available records, double-click the left mouse button or the button ![]() to select the user. This will move them to the Selected Records section. If you want to put them back intoAvailable records you need to use double click again or
to select the user. This will move them to the Selected Records section. If you want to put them back intoAvailable records you need to use double click again or ![]()
Note: The user with the right Administrator - General - Setting multi companies has always access to all own companies, regardless of this setting. If no user is defined on the Users tab, all users have access to this own company.
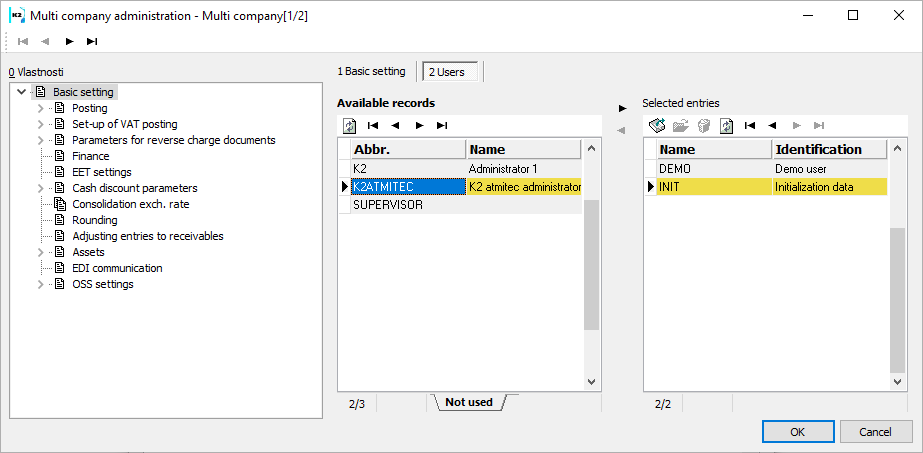
Picture: Multi company Administration - User tab
We switch between individual companies in K2 either in the navigation panel or at the bottom of the screen by clicking the left mouse button on the currently switched on company and selecting the desired company.
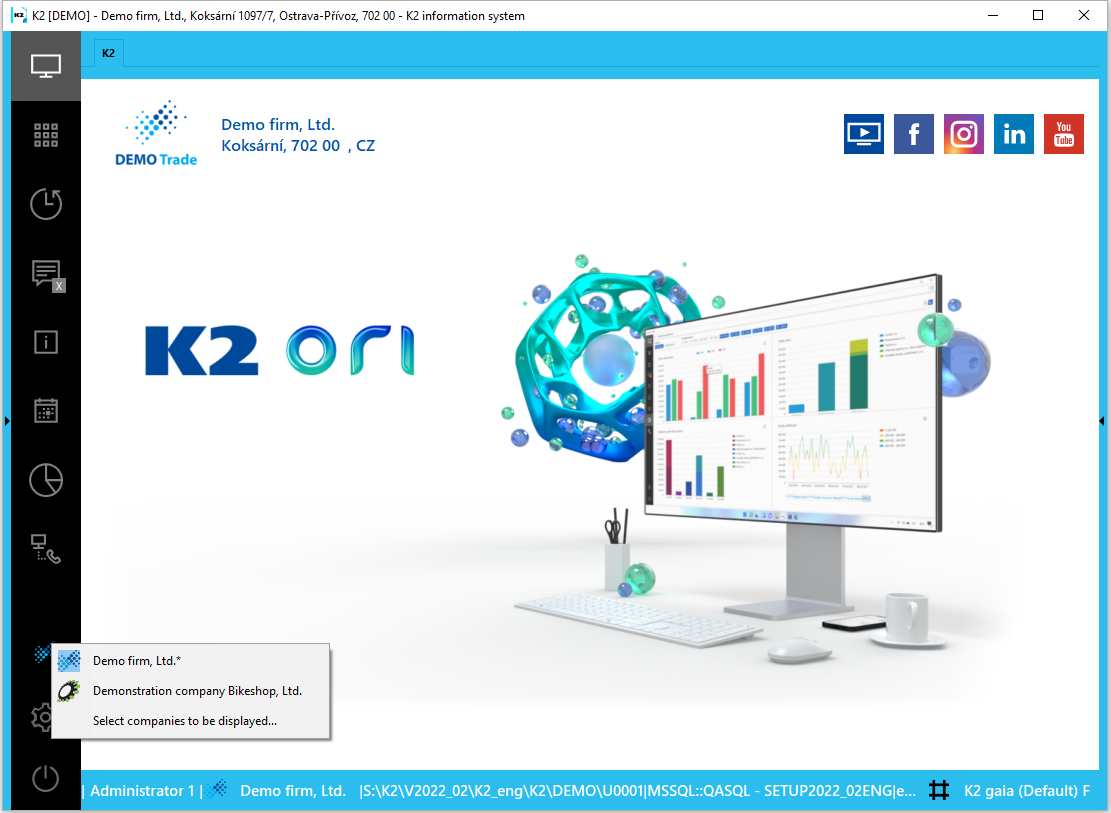
Picture: Switching among companies - navigation bar
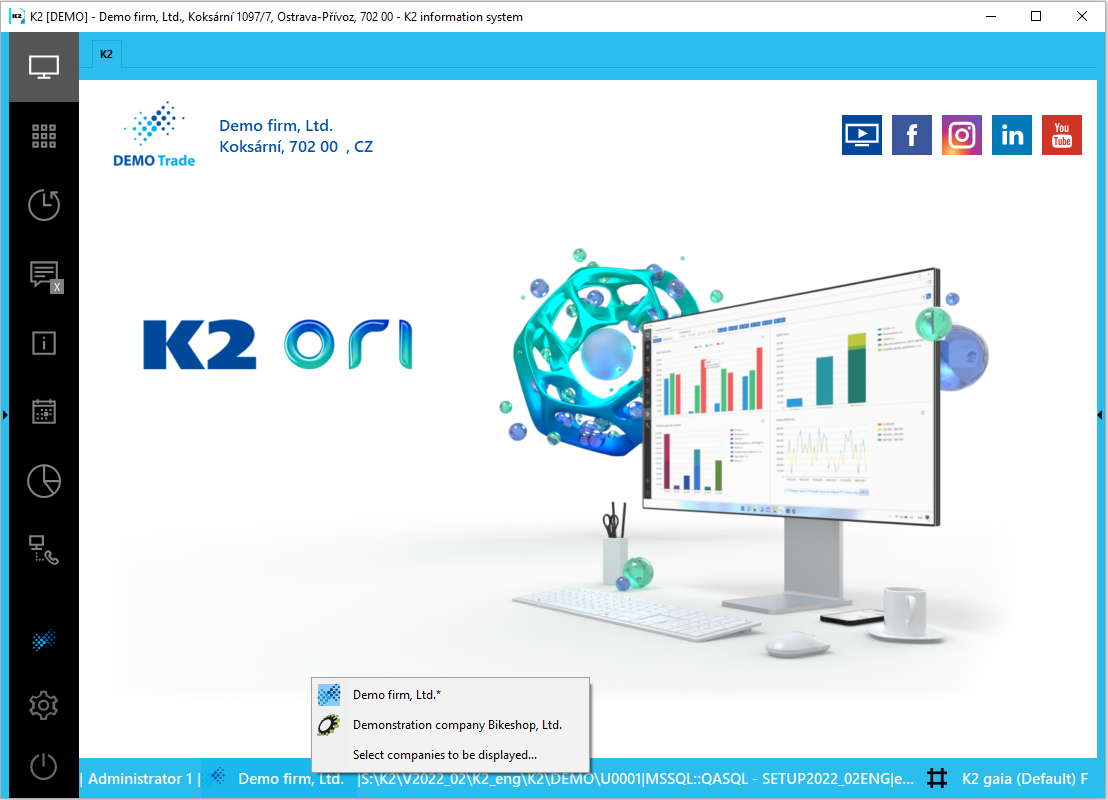
Picture: Switching among companies - the bottom part of the screen
Reports take the company, where you are currently switched.
If you switch to other company, the K2 interface will be updated, all unsaved docked folders will be closed.
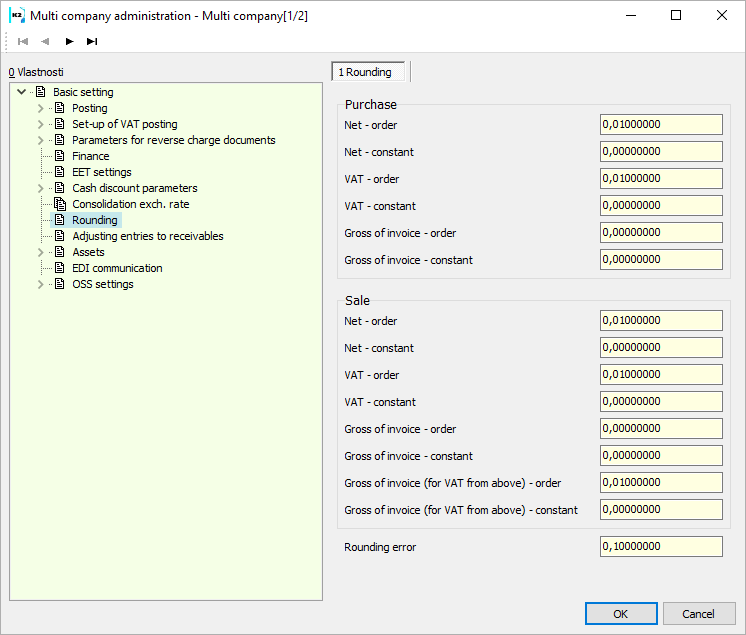
Picture: Multi companies form - Rounding tab
Selected Fields Description:
Rounding constants |
The set value is added or subtracted for rounding purposes to the relevant amount in the tax recapitulation (Net, VAT or Gross) or to the price in the invoice header (Gross only). Only mathematical rounding is applied to the resulting amount. You can achieve rounding up or down by this one. For example, if the tax should be rounded GBP up, then set +0,499 into constant and set value 1 into order. Then the tax amount 3,02 in document with constant will be increased to 3,519, which is mathematically rounded to 4. |
Rounding order |
It rounds the appropriate amounts in Tax summary or in the invoice header to a multiple of the specified value in the parameters. E.g., if the Invoice In Net price equals 100,16 and you have 0,10 value in purchase order, then the Net invoice price will be mathematically rounded to "integer", those to 100,20. |
Gross of invoice |
It evaluates the whole (header) Gross invoice price. We do not recommend this type of rounding, as it rounds just the final amount with tax and that one cannot meet the total sum Net + VAT. We recommend to round by means of Payment method on invoice instead. More about rounding is described in an appropriate documentation. |
Rounding error |
It means a value of the document currency. It is useful either in foreign or domestic currency. In case of payment in foreign currency, it is possible that the paid amount that is different with invoice price (exchange rate change) can change to basic currency after transfer. If this difference is in the Rounding Error tolerance, the payments are considered settled and the payment and invoice amounts will be compared (see Bank statements - Item At the case of payment is in the base currency, Page of invoice follows the Remaining Payout field. If this one if lower than the value of Rounding errors, the invoice is signed as paid (see Payments). |
When creating a new own company, rounding is set automatically:
In purchase:
Net - order of 0.01
Gross - order of 0.01
In sale:
Net - order of 0.01
Gross - order of 0.01
Gross invoices for calculation from above - order of 0.01
The rounding error is set to 0.1 for the CZK currency and 0.01 to the other currencies.
If a new own company is created, the currency of the company is set (before selecting the customer of the own company) according to the currency in the parameters of the client and the rounding is set accordingly. So when there is a currency other than CZK in the client's parameters, the rounding error is set to 0.01.
Settings for Supplier/Customer card
Create reminders - purchase
Create reminders - Sale
If checked, when creating a new Suppl/Cust. the Create reminders check box is set.
Split code lists tab
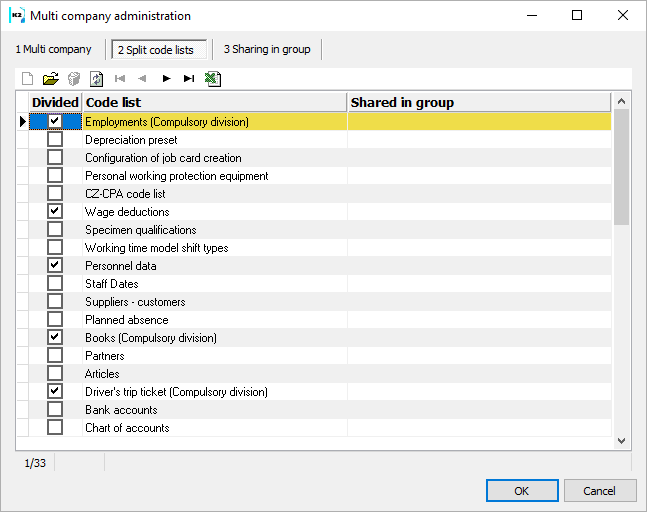
Picture: Administration of multi companies - the 2 Split code lists tab
Some code lists can be divided within companies. Each own company can use a different part of the code list.
After dividing:
- After being split, the selected fields of the code list have a different value in each own company (VAT rate in Articles, Bank Account and Currency in Customer).
- the each own company the code list may have different content, some records may be shared between own companies.
Note: If the Customer code list is split, the Partners for marketing code list will also be automatically split and vice versa. Matching symbols for accounting and Employments code lists are split obligatorily. For the code lists Personnel data of the employee and Deduction from wages, the field "Divided" is checked automatically when creating a new client.
Attention: Before performing the partition, it is necessary to back up the K2 database and set the reinstallation mode. If K2 is not in reinstallation mode, the program will notify us.
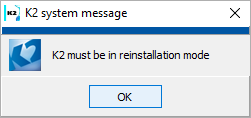
Picture: K2 system message
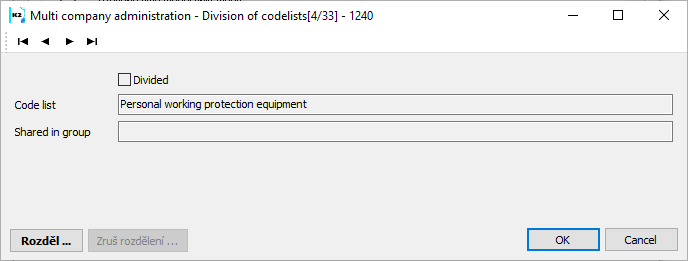
Picture: The record for splitting the Articles code list.
The code list can be split by means of the Split button. On the Divide form, we will select companies, to which the entire content of the existing code list will be transferred. A company that we do not check when dividing will have the given code list empty after the division. To transfer specific records to other companies, you can use the bulk function for assigning records to own company.
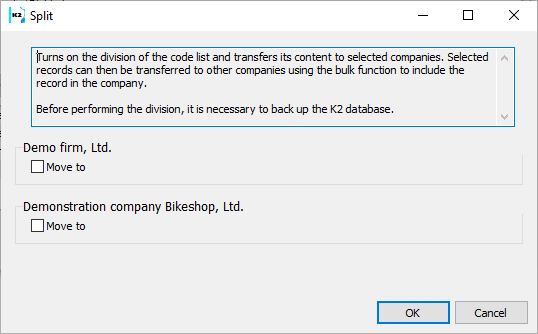
Picture: Divide form
Splitting can then be canceled with the Cancel Split button. A split can be cancelled only if the code list is not shared in a group. When canceling the division, we will select company, whose code list will be retained. The contents of the code list of other companies will be deleted.
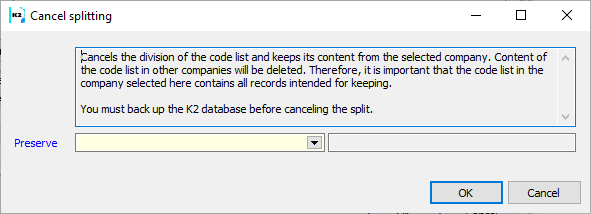
Picture: Cancel dividing form
Note: It is always necessary to restart K2 after making changes in the dividing of code lists.
Attention: If a user is authorized to work in multiple companies at the same time and some code lists are split, it is necessary in order to all data modules used in the scripts and reports set the correct context of the company by using the functions SetDataMContext and ReleaseDataMContext.
Sharing in groups tab
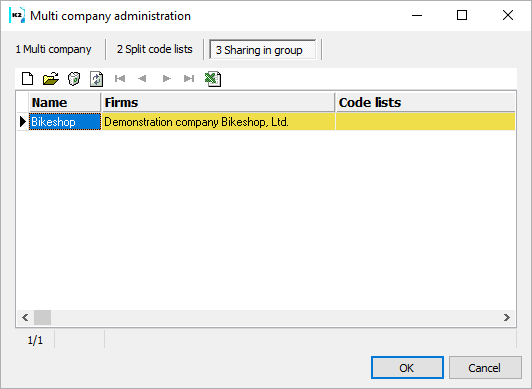
Picture: Administration of multi companies - the 3 Sharing in group tab
On this tab, you can define groups of companies for which the selected code lists will be common, ie when you create an entry in a given code list, a record is created in all companies in the group.
We create new group by Ins key or button  . On the tab 2 companies check all companies for which you want to share the code lists. On the tab 3 Shared Code lists, check all the code lists we want to have in common for the given companies group. There are only code lists, which have been divided in the form Administration of companies, see the Split code lists tab.

Picture: The Group for sharing the code lists form - the 1 Group for sharing tab
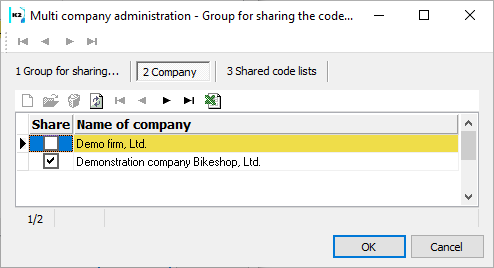
Picture: The Group for sharing the code lists form - the 2 Company tab
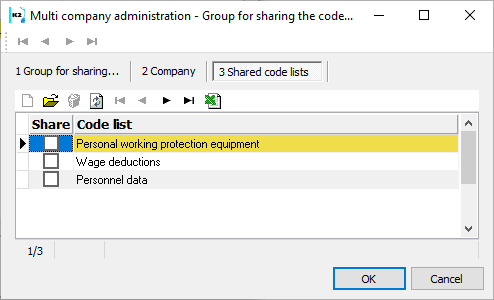
Picture: The Group for sharing the code lists form - the 3 Shared code lists tab
Assigning records to/from multi company
If a code list is split see The tab Split code lists , the marked records from the given code list may be assigned in bulk to the code list of the different own company by using the function Assign record to. The function is available in the Menu - Bulk actions - Assign record to. own companies. In the same way, a share record can be removed from a company by the Exclude record from own company function. Excluded record will be invalidated.
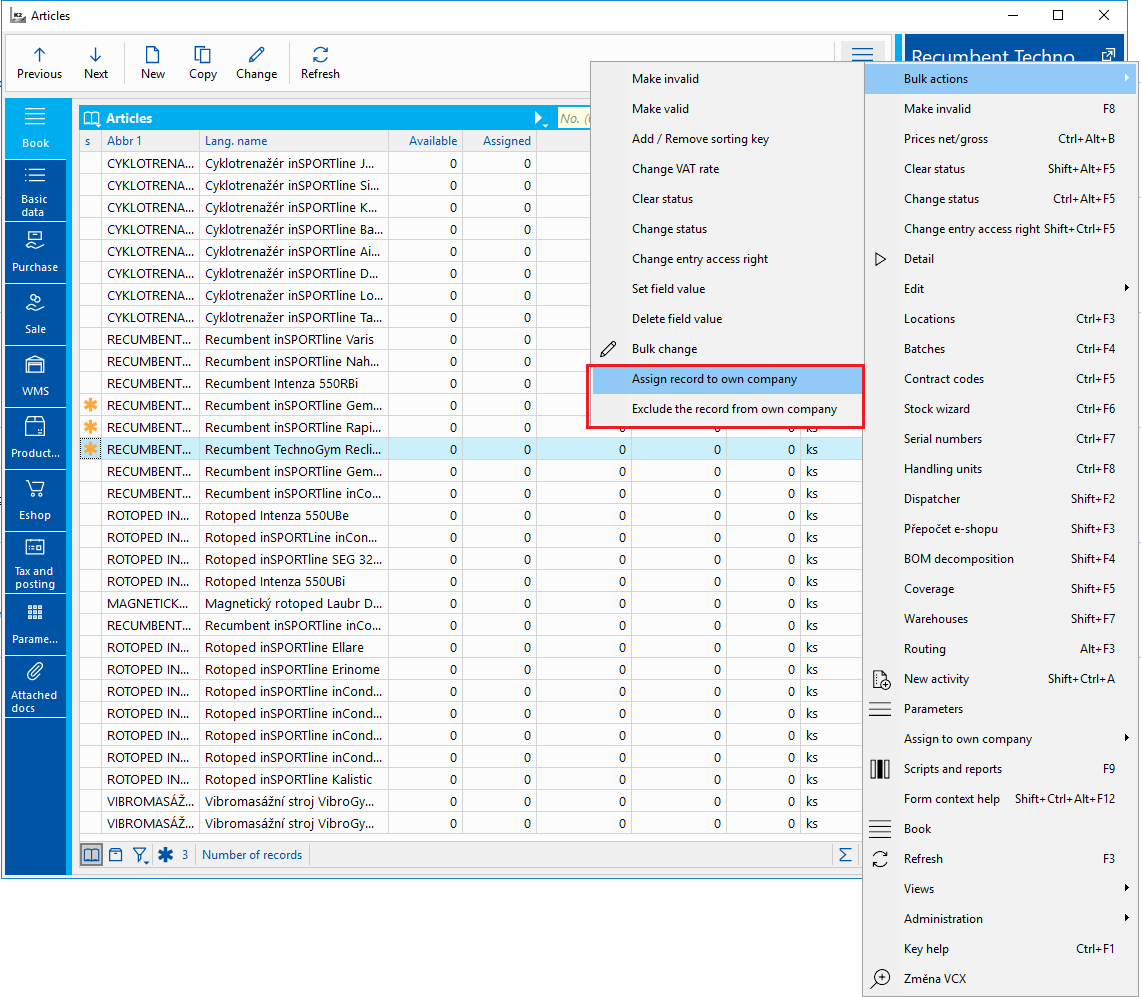
Picture: The Articles code list - the function Assign record to own company
The Companies button shows in brackets the number of own companies in which the record is included. You can display these own companies after clicking the button. You can manually add additional companies here using the Ins key. With the Delete key we can then manually delete the record from individual own companies.
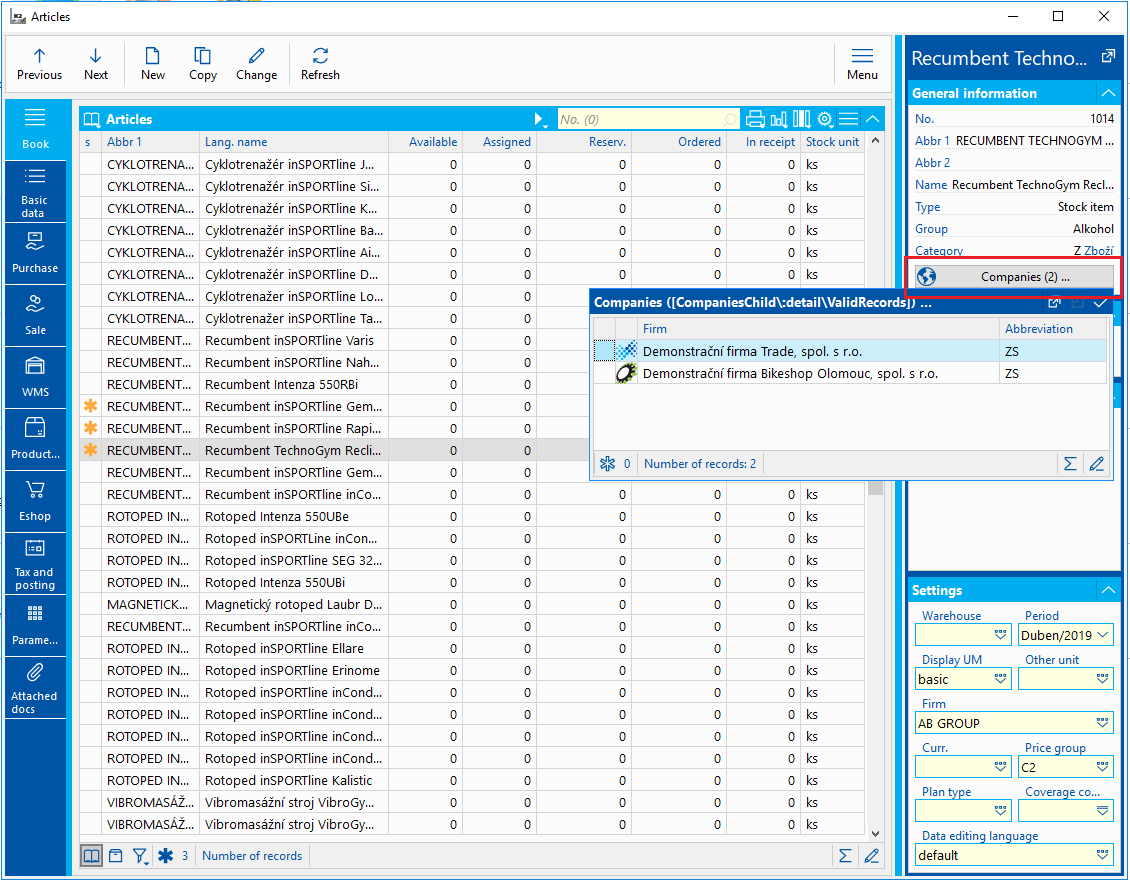
Picture: The Articles code list - Companies button
Discarding a record will invalidate the record in that company's own business. The display of such invalidated records is governed by the user parameter Display inactive records.
Multi companies in different currencies
This document describes the basic specifics and necessary settings of K2 for the possibility to run multi companies with different currencies in one K2.
In K2 there are installation files and setups for Czech K2 (CZ) and Slovak K2 (SK). Both setups contain all standard functions. Different DEMO, INIT, Tree, files in DOC and Support Files. The Support Files are also largely the same (at least the Lang3 and Lang5 folders). Files that are not in LangX are different, such as POST CODETOWN.CSV. These are in the CZ setup Czech and in the SK setup Slovak.
Most of the standard functions, scripts and reports that are common to SK and CZ take into account the state of the company. They can behave differently when the state is CZ and when it is not CZ. differently E.g. The VF_Dok01.AM report for the SK state prints one additional tax number (Slovak VAT number). It prints only 2 tax numbers for the state of CZ. What is VAT in the Czech Republic is called IČDPH in Slovakia. What they call the VAT number in Slovakia has no equivalent in the Czech Republic.
To work With multi company in different currencies, it is necessary to make settings in K2, which will guarantee proper functionality. We will show an example where the currency of the client is CZK and Multi company currency is EUR.
- At first only information about the existence of the parameter in K2.ini COMPANYCURRENCY = 1, which is set by default from version K2 gaia. The parameter ensures correct storage of documents. The company currency is the currency specified in the company settings and not the currency from the Client parameters Exceptions are older modules such as VAT Documents, Intrastat or Reminders. In these modules it is necessary to use a Group Member in which parameters are entered for these modules. Only document books belonging to the same company must be listed in the parameters.
- In the Multi-Company Administration, it is necessary to check Own exchange rate list - it is switched on at a specific company if the given company has a currency other than the client.
- In the Multi-Company Administration, it is necessary to check the Inverted exchange rate display - it is used for strong currencies, where their ratio is expressed in reverse, ie 1EUR = 27.15 CZK and not that 1CZK = 0.0368 EUR. In our example. when the client's currency is CZK and the company's currency is EUR, we will check the option.
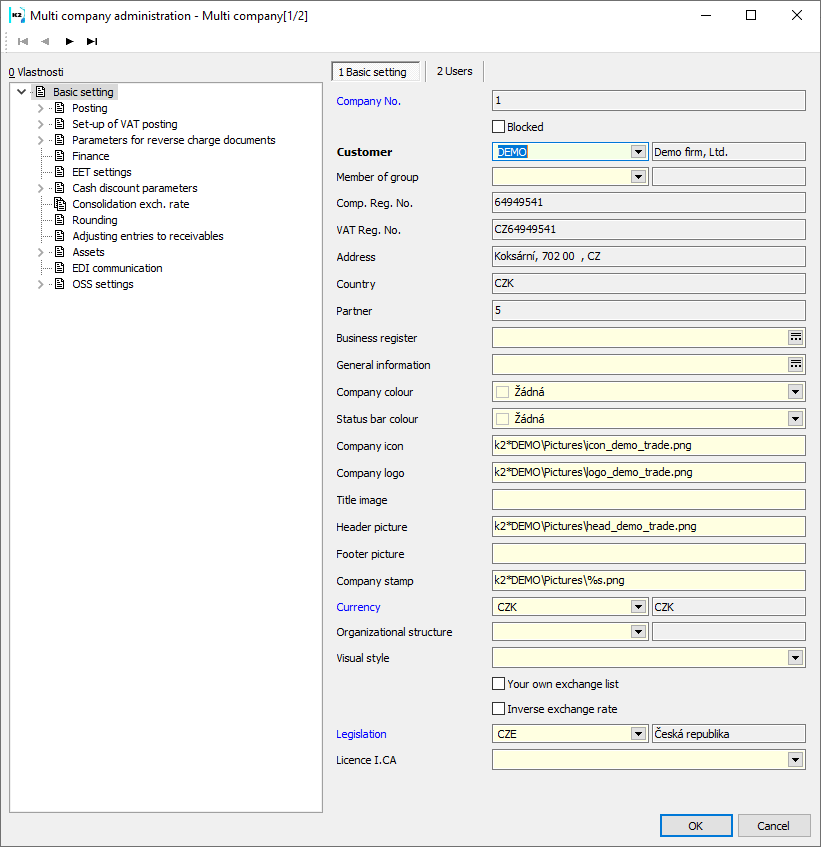
Picture: Setting multi company in Euros if the client's currency is CZK
- It is necessary to set the exchange rate list for the currency EUR and company, where the zero date is entered and ones are filled in the individual fields for filling in the exchange rate.
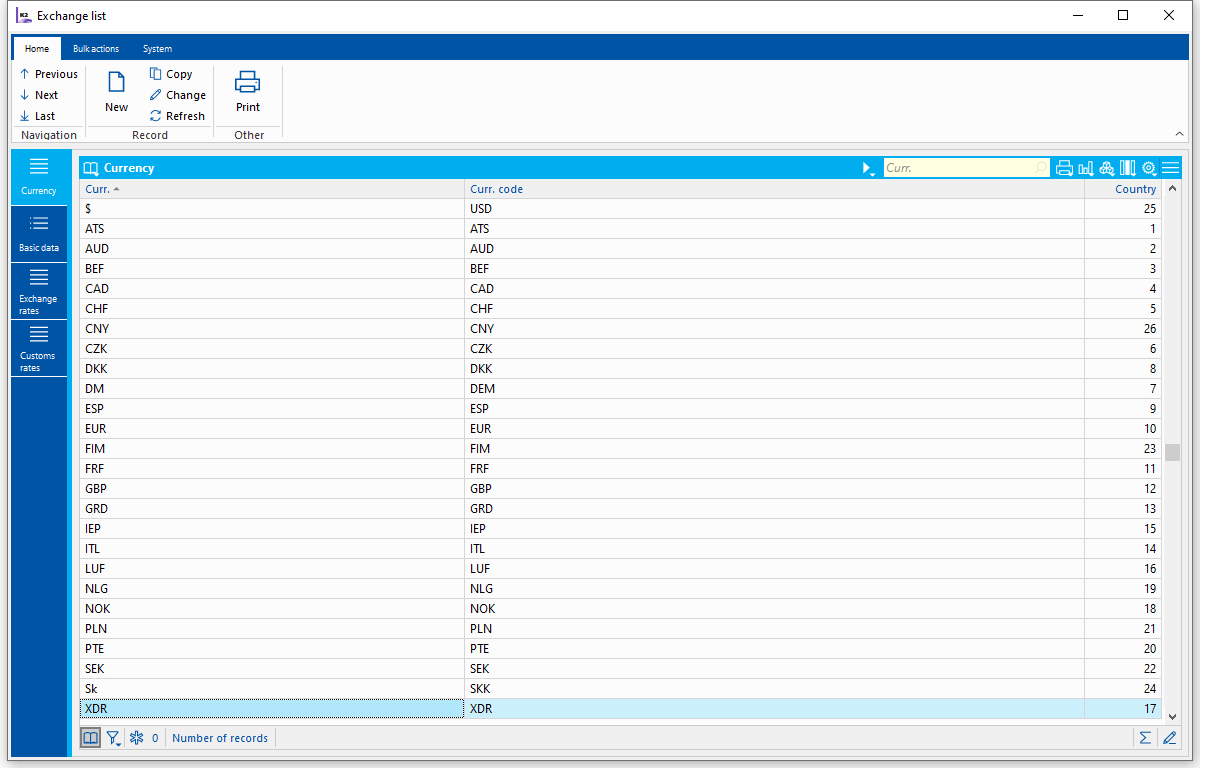
Picture: Exchange rate list settings for EUR and selected company (in EUR)
- Set up an exchange rate list for CZK and selected company
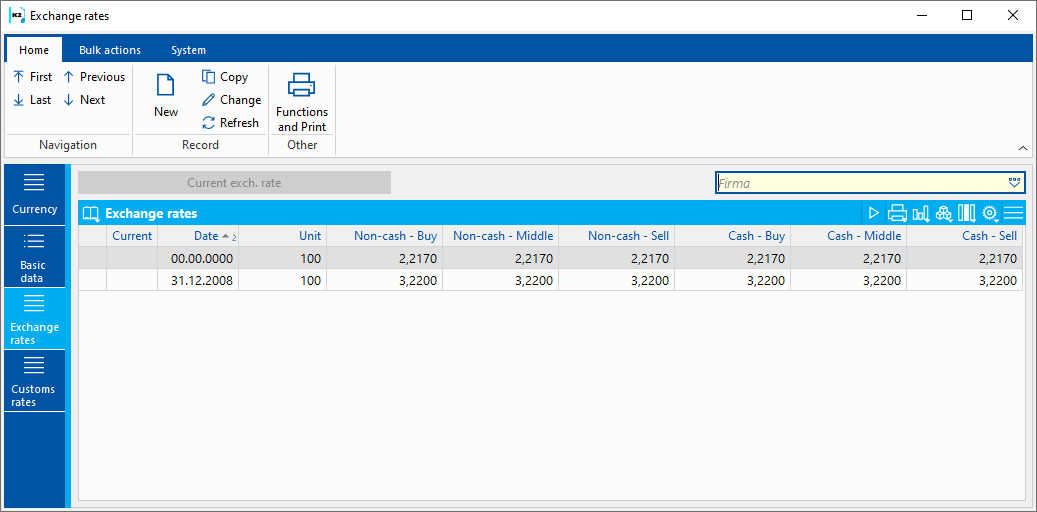
Picture: Exchange rate list settings for CZK and selected company (in EUR)
- It is also necessary to create books for a new company in sales, purchasing, bank accounts and a cash register, where the selected company will be listed.
The division of code lists is generally described in the K2 manual in the Administrator / System / Multi companies administration module. If there are companies with different currencies, it is recommended to divide the code lists:
- Article so that each company can enter its VAT rates.
- Customer so that each company can enter its bank account and currency on the Customer.
- Bank accounts so that each company can mark a different bank account as the default.
When evaluating multi companies with different currencies, the following behavior should be considered:
- It is recommended to always show only companies with the same currency.
- In the administration of multi companies, it is possible to enter the Consolidation Course, which is used in some reports to display totals even through companies with different currencies, e. g. the Openitem report (OpenItemList.AM).
- When filtering in the general ledger, the Book of Accounting must be entered !!!! It is not possible to filter through accounting books with different currencies.
- The book of company accounting is entered in the Administration of your own companies, in the Accounting tab. From versions K2 luna.04 and K2 mia.08, Openitem reports by account (OpenItemList.AM) or Inventory by account (ZB_INV8.AM) will work with this information. In these reports, it is possible to set the Book of Accounting by current own company parameter to display only the balance from the current own company.
- Consolidation in OLAP - data evaluation also for companies conducted in various currencies. The principle of consolidation consists in determining the consolidation rate. It must be entered in the book Administration of own companies on the tab Consolidation rate. This exchange rate is entered on a specific date and is then used to recalculate the values of consolidation rates into the client main currency. Other prerequisites for using consolidation are setting OLAP parameters. It is necessary to set the parameter Show own companies. A new axis is then added to OLAP for evaluation across our own companies. Another parameter that must be set is Accept multiple currencies in the client. Consolidation rates are then included in several OLAP cubes (Invoices out for Sale, Invoices in for Purchase, Contracts, Orders, General Ledger). More about this issue is described in the Management Overviews section in the Consolidation of Own Companies section.
The VAT methodology for a Slovak company is described in Accounting in the Slovak VAT in Czech K2 chapter. Here is given only information about the necessary settings.
- In the Client's Parameters it is necessary to register a script for VAT calculation according to Slovak legislation. In the tree menu Administrator / Parameters / Officer parameters. On the 5th page, after pressing the Registered client scripts button, we will add a new entry to the list of registered scripts - in the field Script enter "SK_RF_K2STD_VATD" and check the Enabled option.
- To code list. Taxes types we will add types of taxes that are different for Slovak legislation and that we will use. The same scripts are used to import tax types as in CZ. The values in the code list are filled in based on the country of company.
- To code list. VAT Rates we will add VAT rates valid for Slovak legislation (if they are not already in the code list). We run code list from tree menu Basic data - VAT rates.
- In code list Member of group create a new record (start the code list from the tree menu Accounting - VAT - Basic settings), press the VAT calculation parameters button and check Slovak VAT in the Czech K2 in the parameters. After agreeing on the parameters, we save the record.
- VAT calculation parameters created on Member of group We filled parameters according to slovak legislation.
- In the tree menu Accounting / VAT / VAT / Slovak VAT in the Czech K2, Slovak forms for VAT are available - VAT Control Report and VAT Summary Report.
- When calculating and setting VAT, it is necessary to select the right selected company. Based on the state of company, it is decided whether SK or CZ VAT will be run.
They use their own reports in letter mail:
- Posting list (SK_PostingList.AM)
- Posting sheet (SK_PostalFilingSheetNew.AM).
They use their own scripts to import the exchange rate list:
- KurzListok_ECB_XML.PAS or
- KurzListok_ECB_CSV.PAS.
They use the exchange rate list history to import
- KurzListok_ECB_CSV_Historia.PAS.
If your company has its Own exchange rate list checked in the administration of multi companies, the scripts for importing the exchange rate list of these companies must be run with the CompanyId parameter filled in.
They use their own function for road tax:
- SK_DanMotoroveVozidlaVypocet.PAS.
They have their own scripts for micro entities:
- Scripts SK_Uct_EA2014.PAS and SK_Uct_Ea2014Muj.PAS.
They are based on the K2 standard for intrastat, they have their own scripts for
- Customs Tariff Import (SK_IST_CSImp.PAS)
- Export intrastat (SK_ISD_EXP.PAS).
For proper operation of companies, it is necessary to use a Group Member in which the parameters for a specific company are defined. It is necessary to list the books of documents of selected company.
To complete the data of the company according to the entered ID number, they use:
- Script (SK_BazPart_FillDataByICO.PAS).
The script also sets the VAT payer's flag. Bank accounts are not imported.
It is possible to use the CZ standard for VAT number verification, because the Slovak VAT number and the Czech VAT number are already in the same fields. In Slovakia they use:
- Auxiliary script to control VIES over Suppl./Cust. or a VAT document (SK_CrpDphCheck.PAS).
For some common standard sets and functions, a slightly different setting is suitable when used for Slovakia:
- List of coins Parameter Currency = EUR
- Script for credit notes Parameter CorrTaxTypes = True
- Discount In Parameters they have on: “Change tax type”.
Task scheduler
Action in Task scheduler runs on application server. User can log in to it from anywhere and without having to run K2. You can check the tasks from any K2.
Standard action
Most shortcuts support running over a record filter. To do this, you need to activate the Process records from filter option. If the Create filter from selection option is no longer activated, then records from the filter of the user under which the application server is running will be processed. If the Create filter from selection option is activated, then it is necessary to select a saved selection on the basis of which the filter will be filled.
Stock recalculation
The Warehouse recalculation function is described in detail in the chapter Recalculations - Warehouse recalculations.
In addition, the function that can be started from the Task Scheduler has the following setting options:
Selected Fields Description:
Period from |
Unlike the standard Stock recalculation form, you can also enter a zero period ("initial state") in the shortcut. This setting ensures that the conversion runs automatically from the first unblocked period. |
Company |
Own company that will be recalculated. If not specified, the current own company is recalculated. |
Maximum level |
If the Recalculate all levels (in production) option is activated, you can limit the scrolling to a certain number of levels (immersion) by entering a number. Default value = 100. Value 1 means only the current level. Example: If the product consists of a semi-finished product and in the article filter we have only the material card from the semi-finished product job card, then for example when changing the input price of the material only the material price is recalculated at value 1,at value 2 the semi-finished product will also be recalculated (the price in the job card header will change) and at value 3 the product card would also be recalculated. |
Minimum allowed period |
Recalculation insurance - documents are never recalculated before the specified period (eg if the blocking period is incorrectly set so that periods already closed are not recalculated). |
Period number - 1. confirmation |
The number determines how many periods the recalculation should look at from the blocking period and look for documents with the first confirmation. |
Fixed batch price |
If the item in the purchase is split, the batch price will not be averaged. |
Batch price - ignore transfer notes |
Transfer notes are ignored when searching for the first batch receipt. |
Cost price is not posted |
If the option is activated, then the conversion does not match the "L" and "Z" flags of the documents in the event of a change in the cost price of the document item. |
Warehouses without check, Article without check, Types without check |
List of stock numbers, articles and types of articles for which negative stocks are not recorded in the conversion protocol (no negative stocks are checked). However, recalculation recalculates items by default. |
Warehouses recalculation -current period
Warehouse recalculation function automatically processes only the current period.
Recalculation of daily balances on warehouses
The function is important for daily states calculation on warehouses from entered period. It is possible to enter even period in blocked periods. The significance of this recalculation is for a one-time calculation of daily balances from the history, which is already in blocked periods. Restarting over scheduled actions is not beneficial because it always runs from a specified period. To actualize daily balances, just use the shortcut Stock recalculations with the active option calledCalculate daily stock levels.
Products recalculation
The function is described in detail in the chapter Form - Actions above the Article database.
Coverage recalculation, Coverage recalculation by definition
A more detailed description of the function can be found in the chapter Bulk actions on job cards and contracts.
Recalculation - ABC analyses
Calculates an ABC analysis of the specified configuration or all configurations.
Shift (days) |
Determines on which day the analysis will be calculated with respect to the launch date in the planned events. Example: In the Scheduler, we have set the analysis to start every day after midnight. A value of "1" then means that the calculation will be performed on the previous day (ie the current start day minus 1). |
All configurations |
By activating, we determine the calculation of all configurations. |
Configuration |
Use the Configuration button (at the bottom of the form) to select specific configurations for the calculation. |
Stock turnover calculation
Calculates the turnover according to the specified configuration or all configurations.
Shift (days) |
Determines on which day the turnover will be calculated with respect to the launch date in the planned events. Value 0 can be also added. Example: In the Scheduler, we have set the turnovers to start every day after midnight. A value of "1" then means that the calculation will be performed on the previous day (ie the current start day minus 1). |
All configurations |
By activating, we determine the calculation of all configurations. |
Configuration |
Use the Configuration button (at the bottom of the form) to select specific configurations for the calculation. |
Recalculate stock prices
The function is described in detail in the chapter Form - Actions above the Article database.
Article prices recalculation
The function is described in detail in the chapter Form - Actions above the Article database.
Recalculation of invoicing
Function is described in detail in the chapter Recalculations - Recalculations.
Recalculation of planning job cards
The function is described in detail in the chapter Form - Bulk Actions above the Job Cards. When assigning an action to the Task Scheduler, it is necessary to select a selection from the Job card book, which defines the content of the recalculation.
Numbers of reserved ordered
Recalculates the values "Reserved" and "Ordered" for the article cards.
Calculation of summation availabilities for e-shops
For warehouses that have set up the summation of article balances for e-shops via the article queue, calculate these summation stocks into a special table. In the function it is necessary to set the Calculation method = "By queue". A more detailed description of the calculation options for warehouses is in the chapter Logistics / Warehouse / Warehouses / Basic data.
Note: The Calculation method setting = "All goods cards" is suitable for manually starting the function and the initial calculation of summation stocks from the current stock levels.
Finance
Recalculations of cash register balances
Function Recalculation of cash register balances is closely described in documentation Finance - Cash register - Functions over cash register documents - Recalculation of cash register balances.
Recalculation of bank account balances
Function Recalculation of bank account balances is closely described in documentation Finance - Bank - Bank statements - Functions over bank statements - Recalculation of bank account balances.
Marketing
ARES
It will start ARES function, which adds or actualises data of a customer or a partner. It will run upon the selection of customers or partners defined in the filter.
Function will run with parameters, which has ARES function set in Administration/Parameters/ARES parameter.
Workflow
New process
Batch creates new process from a procedure, which is defined in the field Procedure. Procedure does not have entered any user interface in the beginning event (definition of variables, filter of users).
Fulltext keys setting
Full-text key settings are used to additionally define keys above tables, similar to adding indexes in file module extensions.
Some standard keys can be defined by running the CreateFullTextIndexes.pas script, which defines indexes on some standard tables.
These keys are then available to create full-text conditions in the selections.
Definition of full-text keys is possible after running function no. 778. A list of tables for which keys have already been defined is displayed. The user can insert a definition for a new table or change an existing setting.
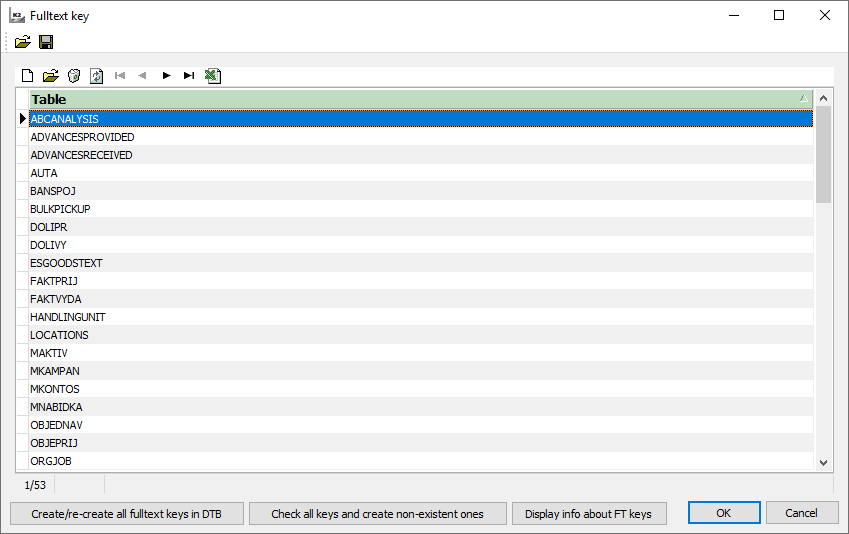
Picture: Fulltext keys setting list
To define a new full-text key, you need to select a table and a unique one-element key.

Picture: Fulltext keys setting
Fields Description:
For table |
The table for which the full-text key will be defined |
Based on a one-element unique index |
A unique single-element key, preferably based on a number |
In the next step, the fields that can be assigned to the full-text key are defined. The system will automatically offer command fields such as string, widestring, clob, xml and dynstring.
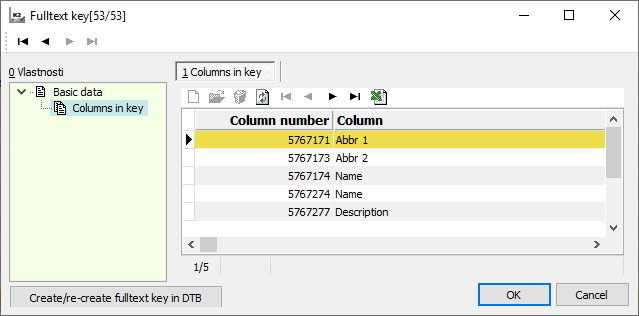
Picture: Fulltext keys fields setting
Reinstallation
If text fields are changed or cancelled during conversions, the full-text key is automatically cancelled to avoid errors during the execution of conversion SQL queries. After the conversion is complete, the version initialization is run. The initialization tries to recover the cancelled full-text keys by definition in K2: Administrator - set fulltext keys, function 778.
Fulltext key recovery can be a time-consuming operation that is performed on the SQL Server background. Keys are therefore available for quering only after the operation is over in the background.
If an error, that can be caused by missing fields in the fulltext or by changing the primary key of the table, occurs during the restoration, the error is written into the log in the SetupLogs\repairfulltext_(client).log. file. These incorrect full-text keys need to be checked and corrected, see. chapter Setting full-text keys.
Set Internet connection
The Internet connection settings function is used to set up an Internet connection (e. g. web services, exchange rate list import) in case we use a proxy server.
Function runs from a tree menu Administrator - System - set internet connection.
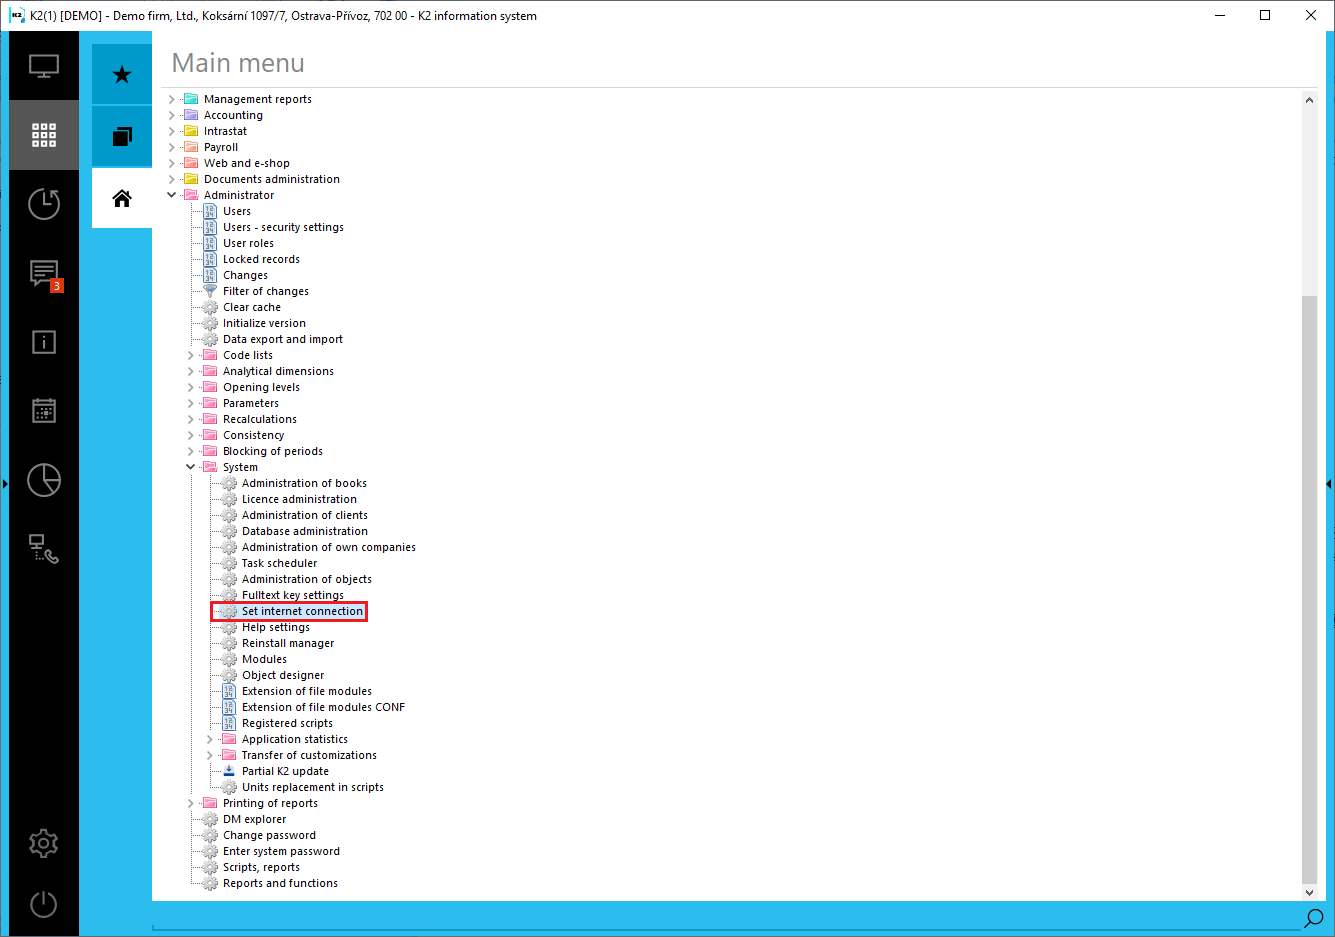
Picture: Tree menu - Set Internet connection
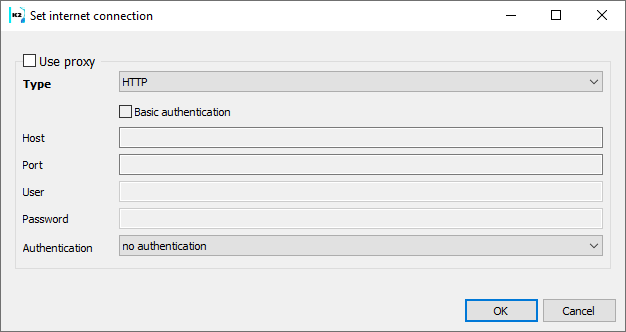
Picture: Form Set Internet connection - proxy
Select communication protocol with proxy server into Type case we use a proxy server. (You can find "HTTP", "SOCKS 4", "SOCKS 4A" or "SOCKS 5" definitions of particular types here on http://en.wikipedia.org/wiki/SOCKS). Authentication field in proxy server enables to select if you use the name and password (value "name and password") for logging or no (value " without authentication").
SOCKS in any variant cannot be used for web services. Web services are: Creditcheck, Octopus, Reliability of VAT payer, PPL and other, for which you can use "THTTPRIO".
Help settings
Here we can choose the language of the help and also the display of the offline help. If the offline help display is not switched on, pressing the F1 key in the relevant module will take you to the documentation pages on the website.
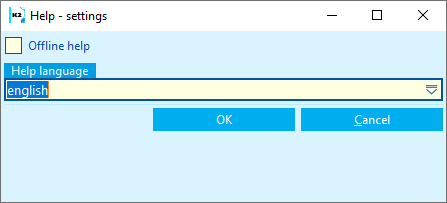
Picture: Help settings
Reinstall manager
The Reinstallation manager is used to ensure the correct reinstallation of the K2 system. The Manager is located in the tree menu in the Administrator - System folder. To work with the Reinstallation Manager, it is necessary for the user to have the Service Interventions right set.
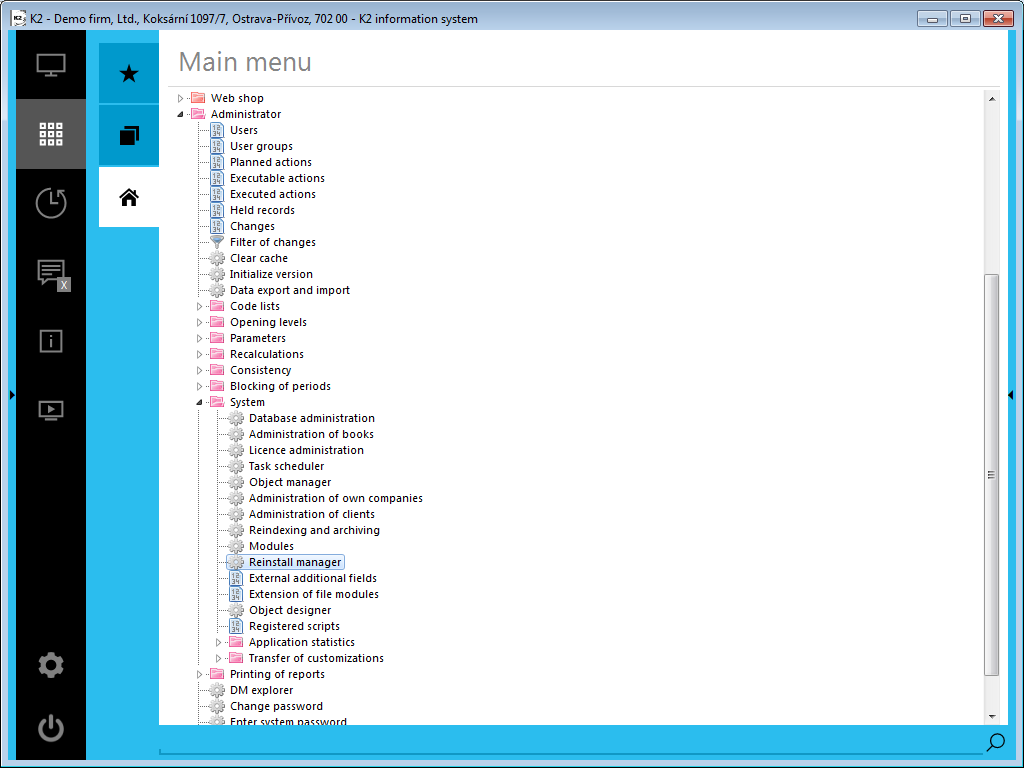
Picture: Administrator - Reinstall manager
When the function starts, the Reinstall Manager form appears.
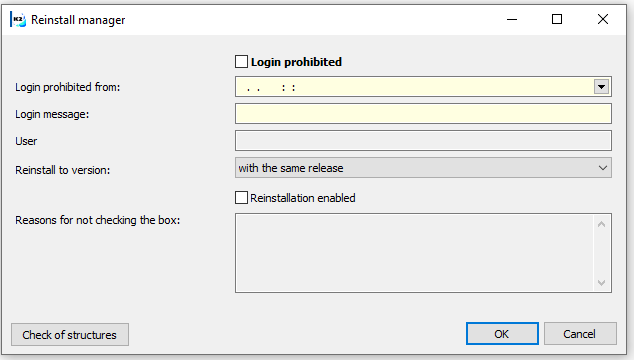
Picture: Reinstall manager
The Checked Login ban check box prevents users from logging in to IS K2, except for the user who has set the login ban. This will ensure that the reinstallation process is not disrupted by the presence of users in IS K2. The Login ban from field allows you to set when users will not be able to log in. If the login time is before the set ban, a message will be displayed that it will not be able to log in to able to log in to IS K2 from the set time. Message is set in Message after login field. The abbreviation of the currently logged in user who performs the settings in the Reinstallation Manager is then automatically added to the User field .
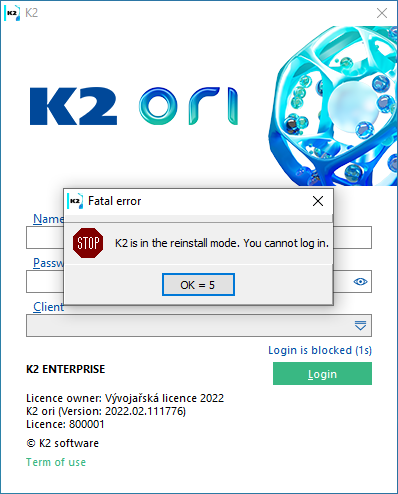
Picture: IS K2 login window - Checked field Login ban.
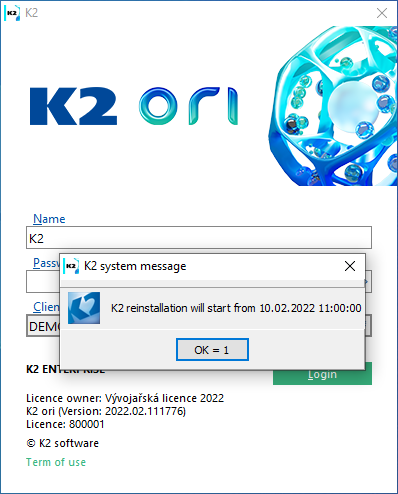
Picture: Login window - after filling in the field Login ban from
When the field Login ban is checked, it is also possible to activate the field Reinstallation enabled. This confirms that the user is not preventing the reinstallation and can take place. To check the box, it is necessary that all users are logged out of K2 and all mandatory initializations in the given version have been performed. If the box is not checked, the installer will not allow us to continue the reinstallation.
If the box is not checked, the reasons will appear in the Reasons for not checking box.
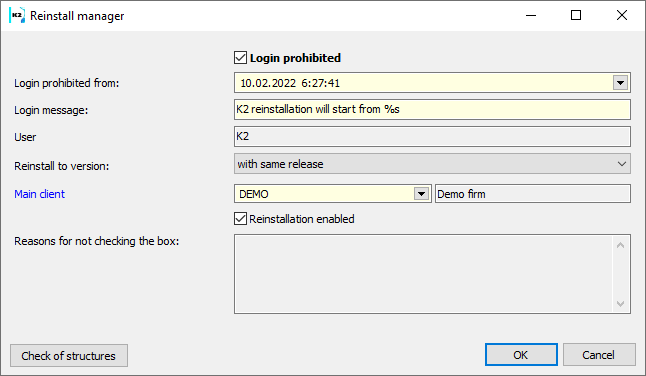
Picture: Reinstall manager
Depending on the type of version reinstallation, the Reinstall on option is selected in the Reinstallation Manager:
- version with the same release eg ori.01.101234 on ori.01.102040,
- Version with higher release eg ori.01.99054 to ori.03.103456,
- version of higher release eg gaia.05.88054 to ori.01.102040.
Depending on the selected reinstallation variant, checks for the completion of mandatory initializations and the necessary steps for the transition to the required version will start.
In the Main client field, the client is selected, under which all reinstallation actions that do not run for each client separately should run.
The Check structures button checks whether the database structures correspond to the definitions in K2. The check can be run at any time because it is not bound to the Checking the fields Login ban and a mandatory Main Client field is added to the reinstallation manager. This field selects the client under which all reinstallation actions should run, which do not run for each client separately Reinstallation enabled. The same check is also performed in preparation of the installer for reinstallation.
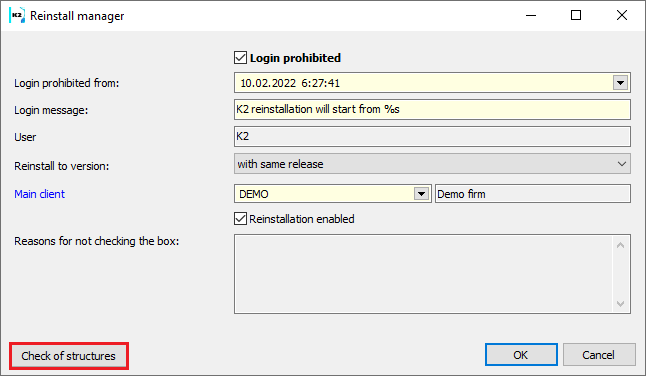
Picture: Reinstall manager - Structure check
If certain actions need to be performed before reinstalling from a lower version, an "Preparing for” version "button will also appear in the Reinstallation Manager, which contains the necessary initializations.
Attention: After the reinstallation is completed, K2 is still in reinstallation mode and you cannot log in to it. The user who made the settings in the Reinstallation Manager must log in to K2 after the reinstallation is completed and uncheck the Login ban field in the Reinstallation Manager. Then it is possible to log in to K2 under any user.
Note: As long as K2 is in reinstallation mode, the user who set the reinstallation mode will be notified when K2 exits with the message "K2 has login disabled. End anyway?” If the user selects Yes, K2 will exit, if No, the user will remain logged in.
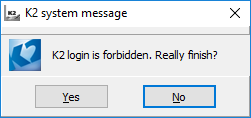
Picture: K2 system message at K2 termination
Modules
All inputs to individual modules are written in the Modules book. The book displays the date of entry, the module number, its name (description), license number, the number of entries into the module (the presence of each user lasts longer than 1 minute) and the Difference column shows the specific value when the user enters module for which it is not licensed. In the book, we can sort the records by date of entry or module number.

Picture: Modules book
Object designer
Object Designer is a tool that aims to speed up and facilitate the development and maintenance of new components for the K2 Information System using newly created classes and library functions.
There can be any number of OD definition definitions in K2. Each such definition has a clearly defined space for creating its structures using a numbering range, prefixes in nomenclature and is completely stored in a separate definition file, which is stored in xml format.
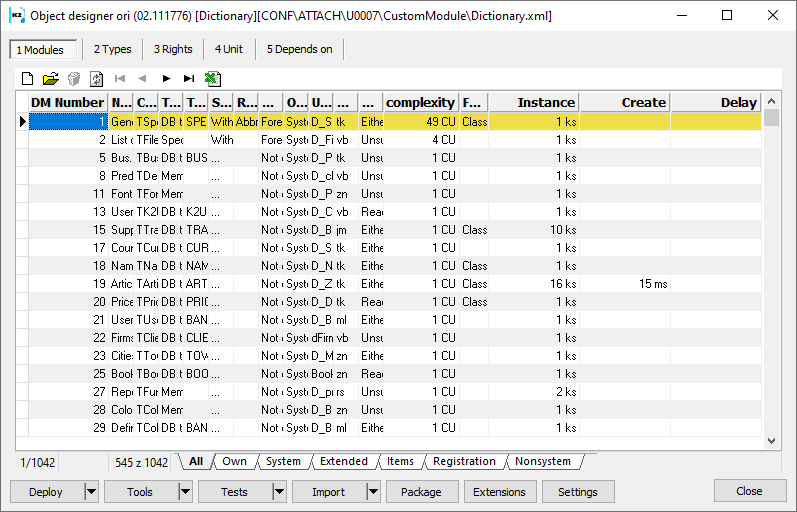
Picture: Object designer
Application statistics
Application statistics enable you to monitor numbers of runs of monitoring actions. A monitoring action can be any transaction, computer action, script or a report. It is possible to monitor how intensive is the use of particular function or system customization. E.g. it is possible to capture all running scripts and reports and thus better prepare for transitions to newer versions of K2. Statistics can also be used to increase the efficiency of investments in the system.
In the evaluation in the form of dashboards, it is then possible to trace who used the function at what time.
By using the application statistics, you also agree to the sending of a certain sample of anonymised statistical data (i. e. data without user identification) to K2 atmitec. In hose data there are no specific or even delicate information, just statistical information about usage of particular functions. This data is further used to optimize K2 applications and related services.
Administration of application statistics
The setting of the Application statistics module is defined in the Administration of application statistics. The function is added in Administrator - System - Application statistics - Administration of application statistics tree menu and is accessible just to users with Statistics settings (Administration - General).
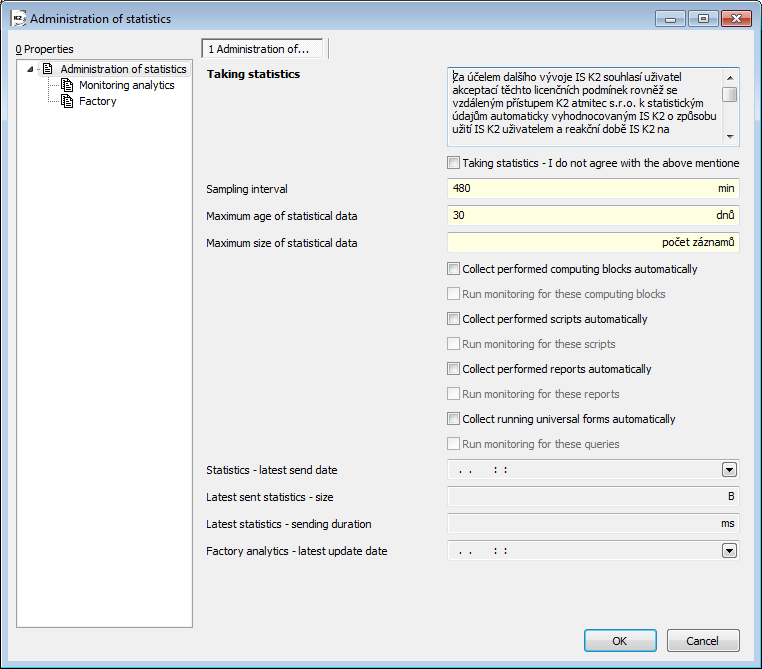
Picture: Administrator - System - Administration of application statistics - folder Administration of statistics
Fields Description:
Taking statistics - I do not agree with the above mentioned terms and conditions |
Unchecked field means that K2, which is set as production, collects statistic information and sends anonymous data in K2 atmitec. In administration of task scheduler a new planned task "Send statistics" will be created and it will send it into K2 atmitec. By default it is set for Saturday. Without the use of the task scheduler, it is possible to invoke the sending of statistics by running K2.exe with the parameter FUNCTION = 779, or to ensure its regular start using Scheduled Windows tasks. Just fabric statistics will be monitored without any other settings. |
Sampling interval |
An interval, after that the statistics are saved from the memory into the database. The value 480 min is set by default . |
Other two fields are important for reduction of the statistics data size. Data can be limited by the time and number of records.
Maximum age of statistical data |
Statistics, which set number of days are surpassed of, will be deleted. |
Maximum size of statistical data |
If the set size of collected statistical data are surpassed, the oldest records will be deleted. |
Standard fabric group for statistics monitoring is set for module monitoring across the whole K2 IS. You can monitor other functions in IS K2 except this group as well. These check boxes are important.
Selected fields description:
Automatically offer to performed calculation blocks to analysts |
Checked field means that you will collect all computing blocks, i.e. not just factory ones. |
Automatically offer to analyst executed scripts |
Checked field means that you will collect all performed scripts, i.e. not just factory ones. |
Run monitoring for these scripts |
A checked field means that we will monitor all executed scripts, ie. we will monitor all scripts in the Statistics Viewer. These scripts are important for the internal purposes and are not sent into K2 atmitec. |
Automatically offer to analyst executed reports |
Checked field means that you will collect all performed reports, i.e. not just factory ones. |
Run monitoring for these reports |
A checked field means that we will monitor all executed reports as well, ie. we will monitor all reports as well in the Statistics Viewer. These reports are important only for the internal purposes and are not sent into K2 atmitec. |
Automatically offer to analyst running universal form |
Checked field means that you will collect all performed universal form, i.e. not just factory ones. |
Run monitoring for these queries |
A checked field means that we will monitor all running universal forms, ie. we will monitor all reports as well in the Statistics Viewer. These universal forms are important only for the internal purposes and are not sent into K2 atmitec. |
Other four fields give the information about the last planned action "Send statistics".
Statistics - latest sent date |
The date and time, when the latest task scheduler was performed . |
Size - latest sent statistics |
Statistics size, which was sent into K2 atmitec last time. |
Sending duration - latest statistics |
Duration, when the scheduled task ran for sending statistics. |
Factory analytics- latest update date |
Date and time of the last factory analytics update. The update occurs when you run a scheduled task "Sending statistic". |
Monitored analytics
Within the Monitoring analytics tab, the performed actions are included in the particular tabs Transactions, Computing block, Scripts, Reports and Uniform.
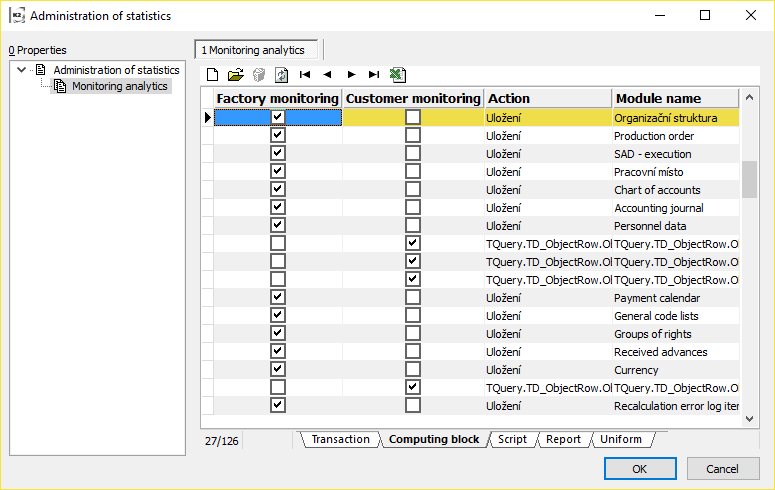
Picture: Administrator - System - Administration of application statistics - the Monitoring analytics tab
Transaction |
Database file of operations when either all operations or no of them will be executed. |
Computing block |
A block of operations that logically belong together and create one step in the K2, e.g. saving document, run selection, run filter etc. |
You can monitor either all of them (by checking the appropriate field on Administration of statistics tab) or just the selected ones. If you want to monitor just some actions, check the field in Factory monitoring column on the appropriate line or Press  on appropriate record on the Administration of statistics - Monitored analytics form and check Factory monitoring field. Those signed actions will be monitored in Local statistics monitoring. Factory monitoring field is checked by the programme.
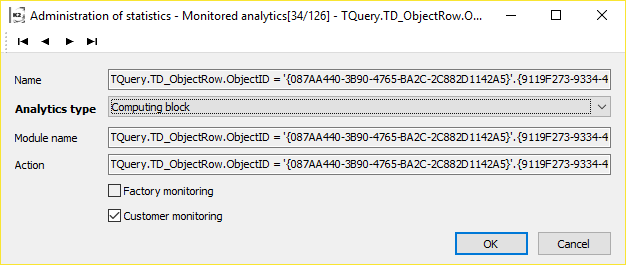
Picture: Setting of Computing block for the Customer monitoring
Button Delete statistics is used to delete all collected local application statistics and analytics for monitoring.
Browser of outgoing statistics
The list of anonymous groups of application statistics, which are sent to K2 atmitec, is places in tree menu in Administrator - System - Application statistics - Browser of outgoing statistics.
Display of Browser of outgoing statistics is conditioned by the right Setting of statistics (Administrator - General).
Browser of local statistics
The list of application statistics, which are monitored just K2 atmitec, is places in tree menu in Administrator - System - Application statistics - Browser of outgoing statistics.
Display of Browser of local statistics is conditioned by the right Setting of statistics (Administrator - General).
Books called Browser of outgoing statistics and Browser of local statistics are important just for check, or for export to excel. OLAP and dashboards works for evaluation of local statistics.
Not used scripts and records
This function is important to generate the list of all not used scripts and reports.
It is a good idea to register scripts and reports before running.
Open the Scripts and Reports book and press F9 to start the report book. Then press Ins key and the list of scripts and records will be displayed. You can run script registration by means of Alt+F3 keys. Now you can run the Not used scripts and reports function.
Transfer of customization
Transfer of customization is consisted of two functions: Export Export ofcustomizations to file and Import of customization from file. The right Service actions(Administrator - General - Service actions) is necessary for the work with these functions.
Function Export customizations to file and Import customizations from file works with .zip file, in which are saved user K2 modification except for the data. They allow you to transfer scripts and reports, form modifications, registered scripts, object designer files, file module extensions, INI files, views, coverage configuration, external additional fields, and annotations.
Export customizations to file
The function is in tree menu in Administrator - System - Transfer customizations - Export customizations to file and is accessible just to a user with the right Service actions (Administrator - General - Service actions).
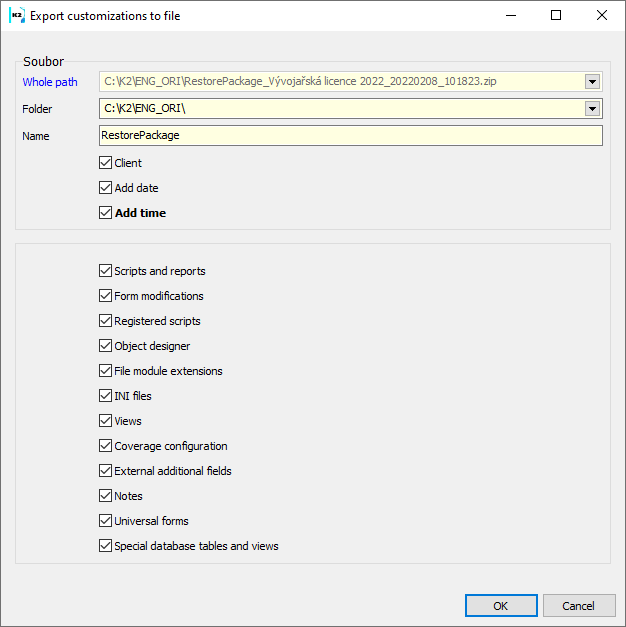
Picture: Function Export customizations to file
An offer, where you sign the modification you want to save, will be displayed after running of function.
Fields Description:
Whole path |
The full path to the file will be displayed. If we check the Client, Add date and Add time fields, the file name is modified according to these check marks. |
Folder |
Selection of way, where you should save the file called RestorePackage.zip with selected modifications |
Name |
File name. |
Import customizations from file
The function is tree menu Administrator - System - Customization transfer - Import of customization from. file and is accessible to user with right Service actions (Administrator - General - Service actions).
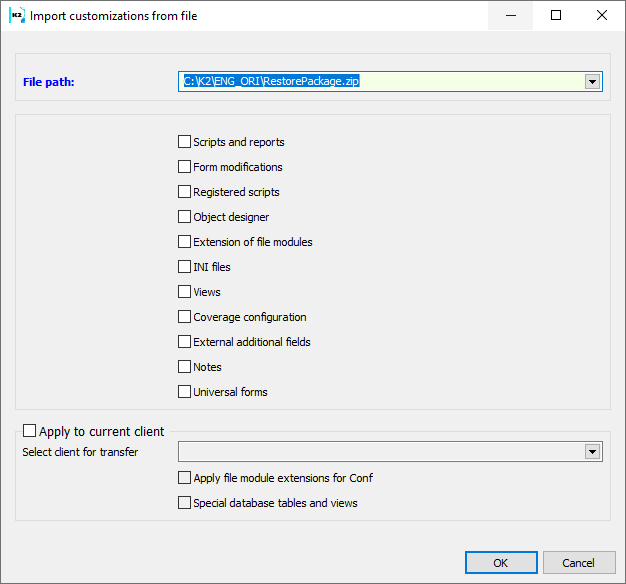
Picture: Function Import customizations from file
After starting the function, a menu will appear in which we will indicate which modifications from the loaded .zip file we wish to transfer to IS K2. After loading the .zip file, all of the possibilities that have been ticked when exporting are automatically checked.
Fields Description:
Path to file |
Select the path, which the .zip file for import should be loaded from. |
||
Apply to current client |
If this option is checked, all extensions and settings (forms, RF_Firm.pas, extension of file modules, etc.) from the selected client in the Select client for transfer field will be applied to the current client in the running K2. If this option is not checked, the folders and files will be created according to the source K2. |
||
|
Select client for transfer |
Selection of the client whose extensions and settings are to be applied to the current client. |
|
|
Apply file module extensions for Conf |
If checked, the file module extension for the Conf database will be applied. |
|
|
Special database tables and views |
If checked, special tables and views of a specific client are imported. |
|
Replacement of units in scripts
The Script Translation Assistant function replaces the prescribed unit names in the selected file in the uses section.
The function is in tree menu Administrator - System - Replacement of units in scripts . To run the function, you need to have the rights Change K2 script (384) and Change coded K2 script (385) (Administrator - Reports and functions (F9)) set.
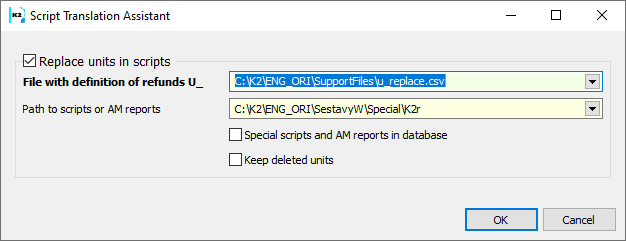
Picture: Script Translation Assistant function
Fields Description:
Substitution definition file U_ |
Individual lines are definitions of what to look for and what to replace. "original unit"; "new unit", Const is automatically added to the name "new unit" at the end. |
Path to scripts or AM reports |
Location where the units are to be replaced. |
Special scripts and AM reports in the database |
According to the right of access, it performs replacement in special scripts in the database. |
Keep deleted units |
If the box is checked, then if the original drive has no replacement, the original name will not be deleted from the script or AM assembly. |
Records print
Changes
Changes in the Document
Process No.: SPR006 |
Report ID: SSPR009 |
File: ZMENY_DOK.AM |
|
Report description: Changes in the Document |
|||
Address in the Tree: [Administrator] [Print Records] |
|||
Report Parameters:
Number Number of a document. |
Type A type. |

Right Statement - User/Group
User rights statement
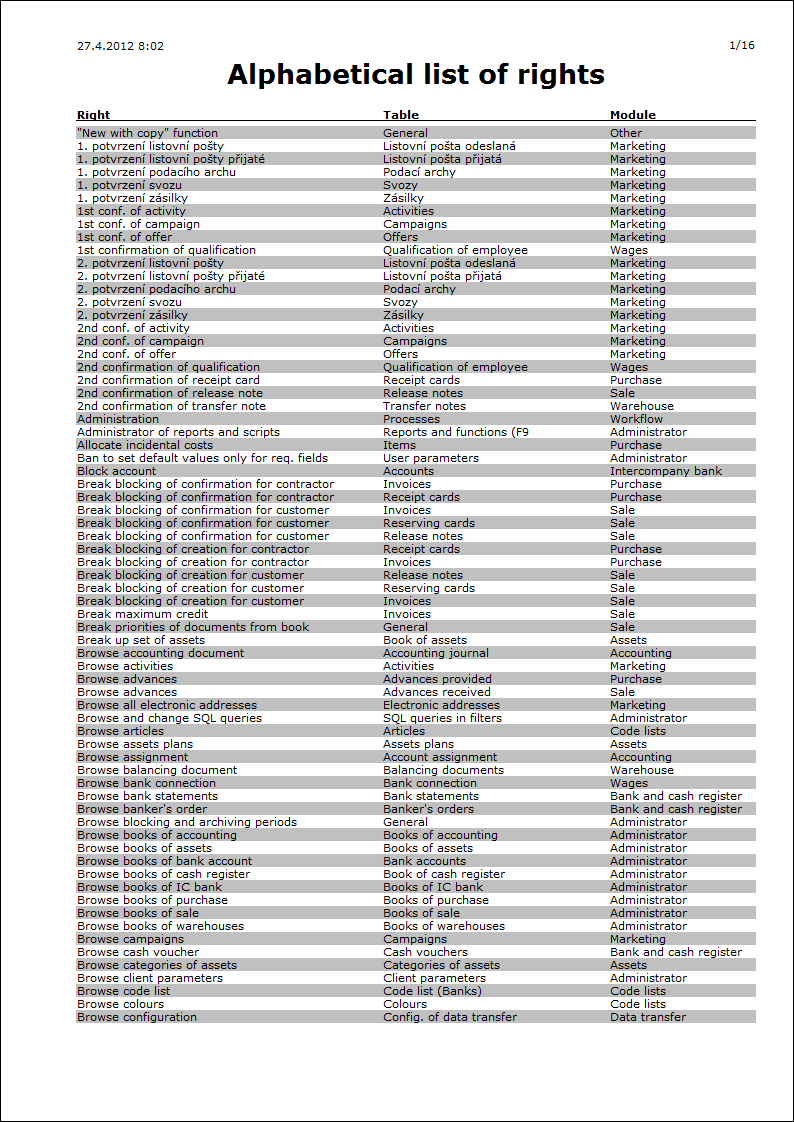
Alphabetical List of Rights
Process No.: SPR005 |
Report ID: SSPR024 |
File: PRAVAABC.AM |
Report Description: Statement of rights. Alphabetical list of rights. |
||
Address in the Tree: |
||
Report Parameters:
Without parameters. |
User with limited access
DM browser
This tool can be used to determine the structure of data modules in the K2 program.
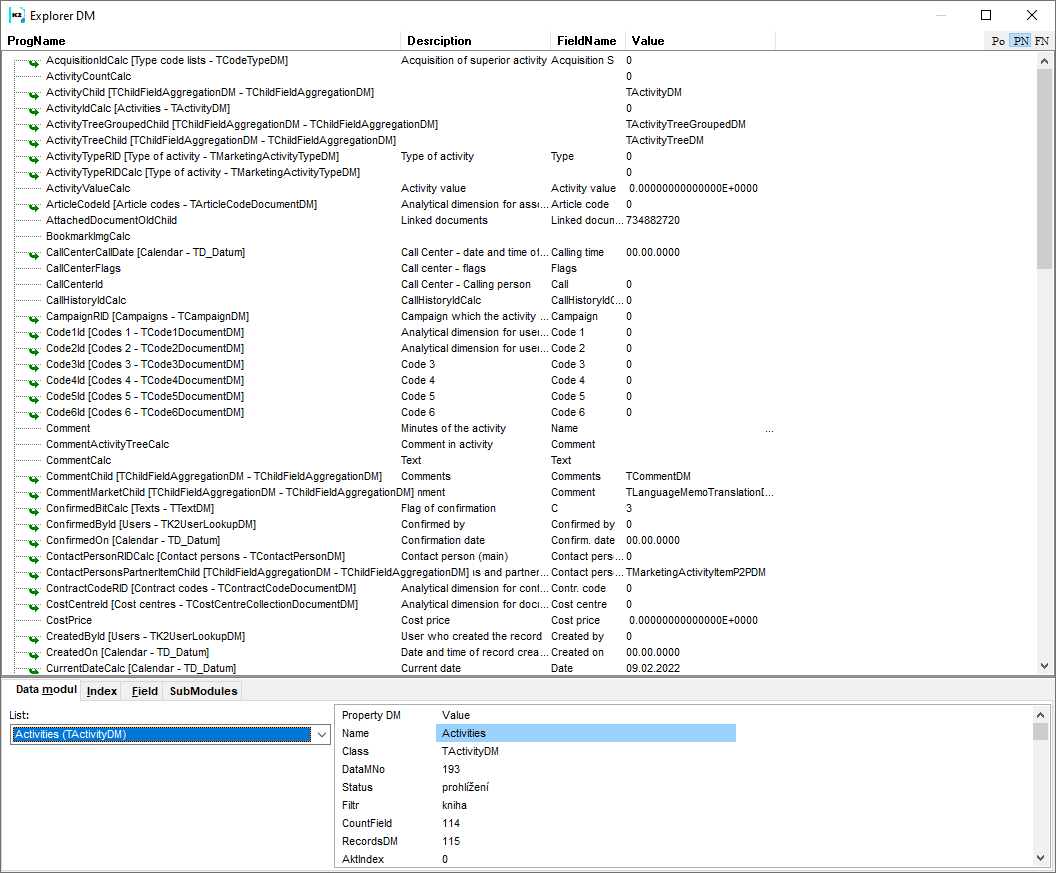
Picture: DM browser