|
|
|
Production Planning and Supply
|
|
|
Calendars
After running this function, the Production Calendars book is called up, in which we define calendars for production resources. Range of calendars is set by Alt+F10 keys.
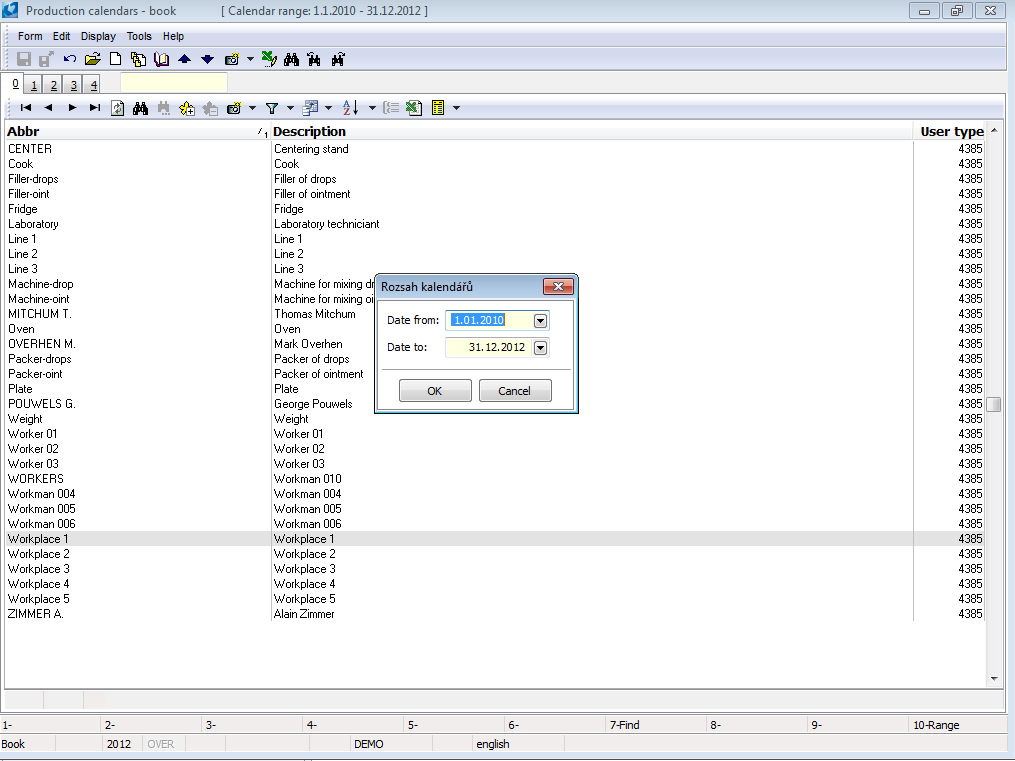
Picture: The Production calendars book
|
|
|
Calendar (1st page)
The header contains the basic data of the calendar.
The main part of the area is occupied by the resource calendar (in the specified range) by days: its capacity, or requirements (see below the description of the Providers offer).
The desktop is composed of 3 panels:
- panel with calendar and list of capacities by days,
- panel with a preview of the selected day,
- panel with windows per individual days of the calendar (it is possible to change the display range and weekend display - day Ctrl+D, week Ctrl+T, month Ctrl+M, weekend Shift+Ctrl+W).
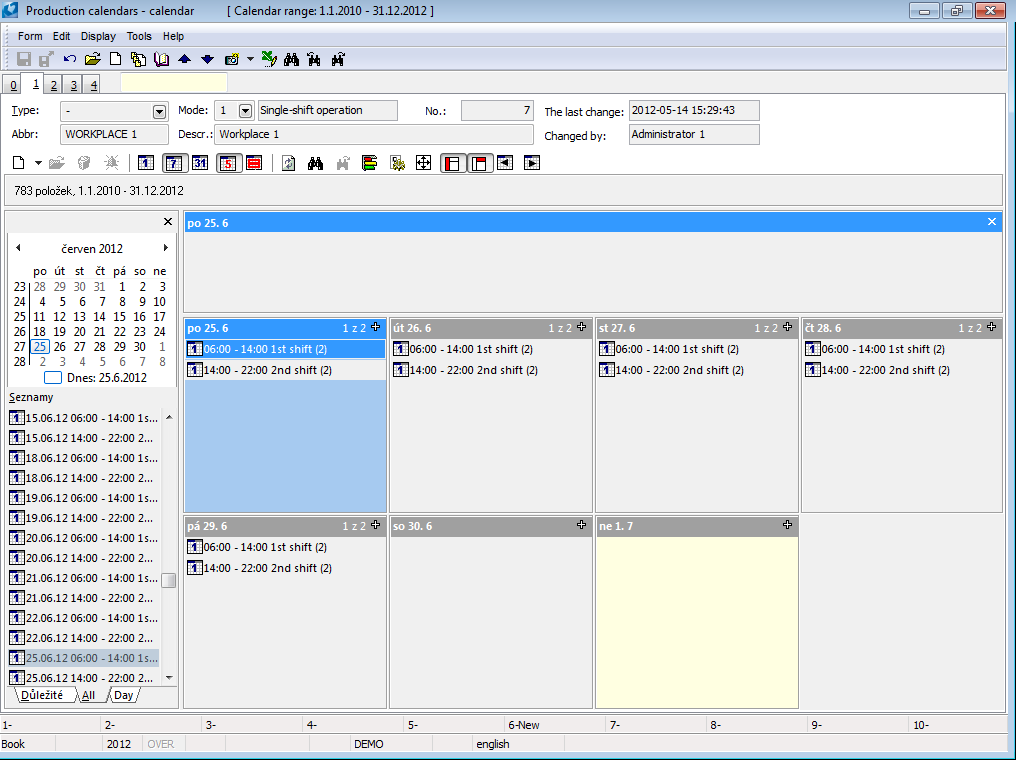
Picture: Production calendars - 1st page
Fields' description:
Type |
Type of a calender. A selection from a user-defined code list. |
Abbreviation |
Unique calendar designation. |
Description |
Description of a calendar. |
Mode |
Selection from the calendar modes code list. The mode can be selected Single-shift operation, Two-shift operation, Three-shift operation, Continuous operation or Other operation. |
No. |
Identification number of the calendar. |
Company |
Setting of the firm of your own. Calendars that do not belong to the currently set user company are not displayed in the book. |
Changed on |
Date and time of the last change. |
Changed by |
The name of the user who made the last change. |
Buttons' description:
|
Create a new item of calendar. When creating, we choose whether we want to create a calendar item - "time period of the day" (used for normal resource capacity) or - "day" (suitable for suppressing all capacities of the day regardless of the Work shift, e.g. "vacation" entry). New items can only be inserted in the Change mode. It can be replaced by Insert key. |
|
Edit a calendar item in Change mode. It can be replaced by Enter key. |
|
Delete an item of calendar. It can be replaced by Delete key. |
|
Switch the range of calendar display to day. It can be replaced by Ctrl+D keys. |
|
Switch the range of calendar display to week. It can be replaced by Ctrl+T keys. |
|
Switch the range of calendar display to month. It can be replaced by Ctrl+M keys. |
|
Display or hide Saturdays and Sundays. It can be replaced by Shift+Ctrl+W keys. |
|
Combine Saturdays and Sundays to one cell. |
|
Reload the content of calendar. |
|
Search the record according to the text. It can be replaced by Ctrl+F keys. |
|
Search another occurrence. |
|
Arrange the items of calendar according to time without overlap. It can be replaced by Ctrl+U keys. |
|
Calendar setting. |
|
Switch calendar to the whole screen. It can be replaced by F11 key. |
|
Show or hide the left panel with calendar and tabular list of capacities. It can be replaced by Shift+Ctrl+P keys. |
|
Show or hide the preview panel for the selected day. It can be replaced by Shift+Ctrl+B keys. |

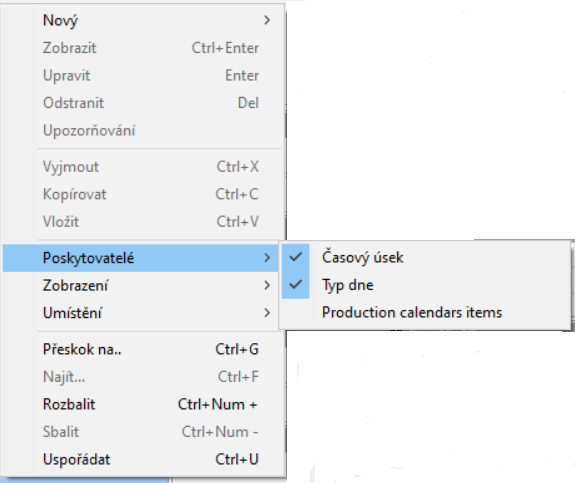
Picture: The menu activated by the right mouse button on a calendar
Description of selected menu functions via the right mouse button:
Cut, Copy, Paste |
It is not used. |
Providers |
Selecting items that are to be displayed in the calendar. Activating the Job cards time items option ensures that requests for a given resource from scheduled job cards are displayed. Requirements from the job cards are displayed according to the Production schedule option (settings in the Resources book). A lock icon ( |
Skip to |
Skip to the specified date. It can be replaced by Ctrl+G keys. |
Find |
Possibility to search for entered text. It can be replaced by Ctrl+F keys. |
Expand |
Display selected day only. It can be replaced by Ctrl+Num+ or by clicking on the "plus" icon located in the upper right corner of the day. |
Collapse |
Returning the calendar to a state where not only the selected day will be displayed. It can be replaced by Ctrl+Num- or by clicking on the "minus" icon located in the upper right corner of the day. |
Arrange |
Arrange items in the day window by time. It can be replaced by Ctrl+U keys. |
|
|
|
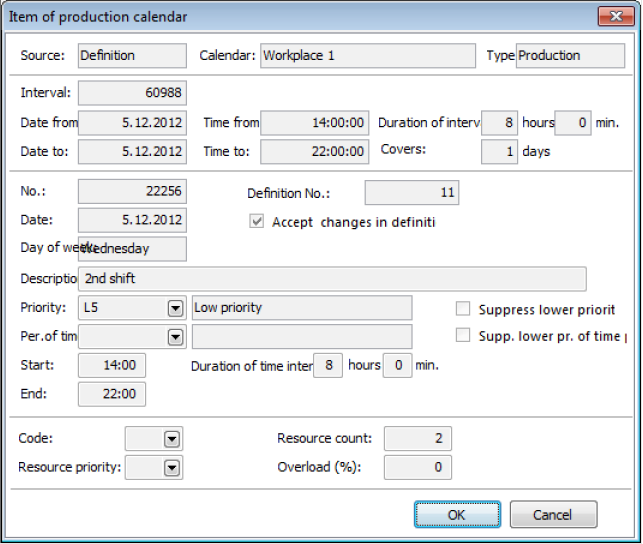
Picture: The Production calendar item form
Fields' Description:
Resource |
Resource can be Definition, Editing or External. Definition means that the item was created using a definition item (3rd page), Editing means that the item was created manually on the 1st page and External means that the item was created by adding an external calendar via the 4th page of the calendar. |
Calendar |
Calendar abbreviation. |
Type |
Type of a calendar (always Production). |
Interval |
Internal identification of the item interval. |
Date from, Time from |
The start date and time of the item interval. |
Date to, Time to |
The end date and time of the item interval. |
Duration of interval |
Duration of an item. It is calculated from the specified start and end of the time period. |
Covers |
Number of days, the period time covers. |
Number |
Unique internal identification of the item. |
Definition No. |
The number of the definition item (from page 3) from which the given daily record was created. |
Date |
The day to which the item relates. |
Accept changes in definition |
Applies to items that were created using a definition item (page 3). This field is automatically turned on when created. If you later change this item on page 1, this field will be turned off. When a definition item is changed, all items that have this field checked are recreated. Items that have this field unchecked will remain unchanged. |
Day of week |
Day of the week. |
Description |
Description of a calendar item. |
Priority |
Selection from code list of priorities. We use priorities to address the superiority and inferiority of items - i.e. capacity suppression. Suppression of items of the "Time period of the day" type is performed only within items with the same work shift (the Work shift field). To suppress all items, it is necessary to add a "Day" record with a higher priority. |
Per. of time |
Selection of the type of time period. The field is for information only. |
Start |
The beginning of a time period on a given day. |
End |
The end of a time period on a given day. |
Duration of time interval |
The duration of a time period on a given day. It is calculated from the specified start and end of the time period. |
Work shift |
Selection from the Work shifts code list. Work shifts are used for production planning per shifts. |
Resource priority |
It is not used in the standard. |
Resource count |
The number of resources we have available, i.e. the capacity of the resource. |
Overload (%) |
Maximum allowed percentage of resource overload. It is used when scheduling with enabled resource overload - a more detailed description in the Job Cards Scheduling chapter. |
|
|
|
Definition Items (3rd page)
It is used to define production capacities for the selected period.
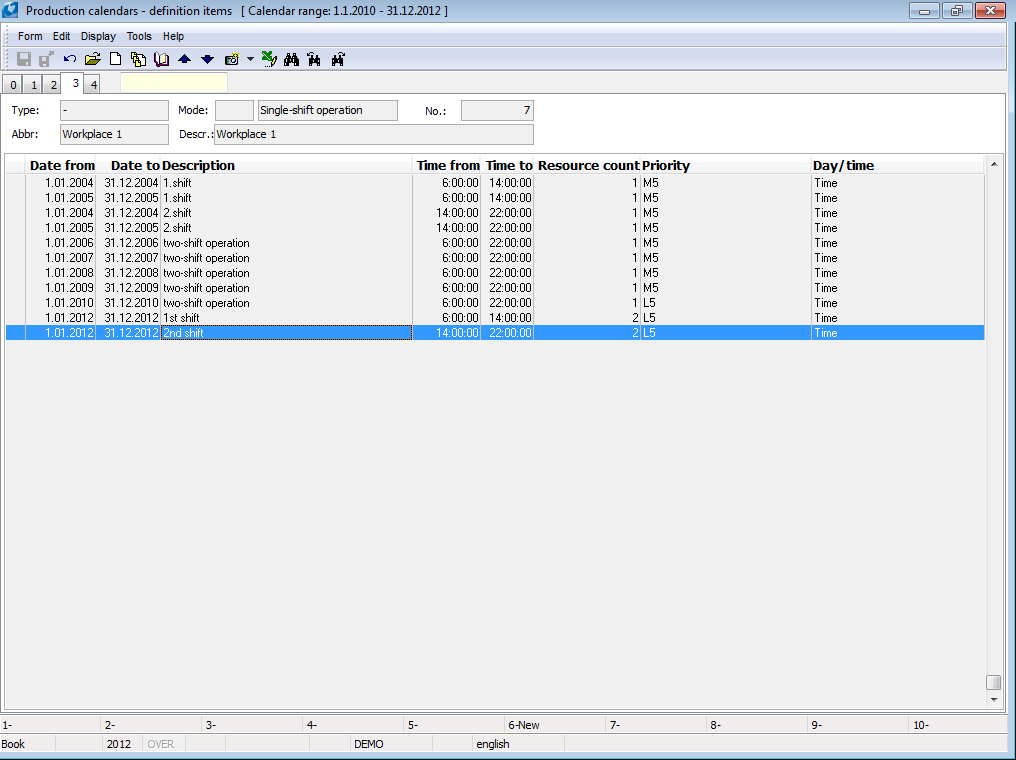
Picture: The Production calendar - definition items - form 3rd page
Insert items by Insert key. The Define resource capacities script can be used as an alternative and more efficient way to define and manage capacities.
Data on the item can be changed (Enter in the Change mode) only if the interval of creating items is within the set calendar range (Alt+F10).
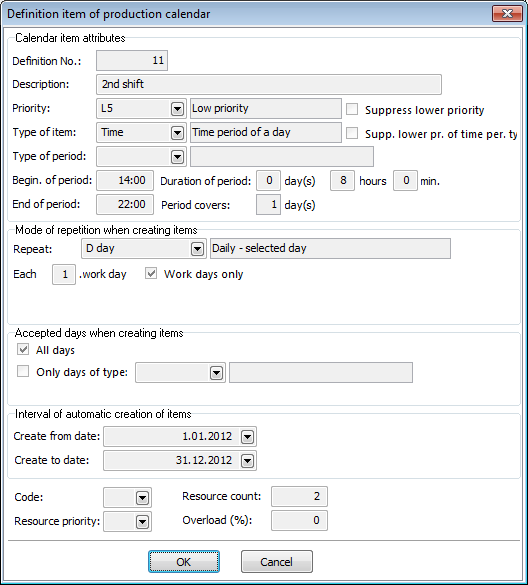
Picture: The Definition production calendar item form
Description of Fields:
Definition number |
Unique identification of item. |
Description |
Description of calendar item. |
Priority |
Selection from the Priority codes list. Use priorities to address the superiority and subordination of items - i.e. capacity suppression. Suppression of items of the "Time period of the day" type is performed only within items with the same shift (The Shift field). To suppress all items, it is necessary to add a "Day" record with a higher priority. |
Item Type |
Select the Item type. The item can be of the type "time period of the day" (used for normal resource capacity) or "day" (suitable e.g. for suppression of all capacities of a given day regardless of the Shift, e.g. record "vacation"). |
Type of time interval / Type of day |
Select the type of time interval or day. The field is only for information. |
Beginning of interval |
Beginning of time interval. |
End of interval |
End of time interval. |
Duration of time interval |
Duration of time interval. It is calculated from the specified start and end of interval. |
The interval extends into |
The number of days that the time interval extends. |
How to repeat when creating items |
In this section, you can define how to repeat a calendar item. How often the item should be repeated in a given range. |
Accepted days when creating items |
Select on which days the items will be created. |
Automatic item creation interval |
Specify the interval at which calendar items are created. |
Shift |
Select from the Shift codes list. Shifts are used for production planning by shifts. |
Resource priority |
It is not used in the standard. |
Resource count |
The number of resources you have available in a given period. A value of 0 means non-existent capacity, the resource request cannot be scheduled. This also applies to planning with allowed collisions. If you want to have zero resource capacity (for capacity preview, for planning without enabling collisions) but at the same time you would like to be able to plan resource requests when enabling collisions, then you can enter the number of resources = -1. I. e. when planning with allowed collisions, it is possible to plan without restrictions in the case of capacity greater than 0 or equal to -1, and it is not possible to plan in the case of capacity = 0. |
Overload (%) |
Maximum allowed percentage of resource overload. Used for scheduling with resource overload enabled - a more detailed description in the Schedule Job Cards chapter. |
Capacities and blocking periods in the workplace
If the workplace to which the resource belongs is blocked by a certain date for capacity planning, then it is not possible to create, change and delete resources of the resource in this blocking period. The scope of the new definition item can be set despite this blocked period, but daily capacities will not be created until this period. When changing a definition item, these changes are only made to the records after the blocking period. When deleting a definition item that partially falls within the blocking period, this definition item is deleted, daily capacities in the non-blocked period are also deleted, but capacities in the blocked period are retained (without reference to the definition item). A definition item that falls entirely within the blocked period cannot be edited or deleted at all.
A definition item partially interferes on the blocked period is indicated by the icon ![]() . The definition item belonging entirely to the blocked period is indicated by the icon
. The definition item belonging entirely to the blocked period is indicated by the icon ![]() .
.
|
|
|
Attached calendars (4th page)
This page contains additional attached calendars. You can attach another production calendar as well as Calendar of public holidays and special days. The most common use of a calendar attachment is to suppress custom calendar items for specific periods or days. For this reason, we most often use the calendar of free days, which contains definition items with zero capacity for official days of public holidays and free days.
Capacity suppression is governed by the specified priority of items. Items with a higher priority override items with a lower priority. Suppression of items of the "Time period of the day" type is performed only within items with the same work shift (the Work shift field). Conversely items of the type "day" override all items with a lower priority, regardless of work shifts.

Picture: The Production calendar form - page 4
Calendar is added by using Insert key.
|
|
|
Dispatcher
The Dispatcher function allows to plan production, create job cards and ensure production supply (create purchase orders issued for missing quantity of materials). The information needed for production is clearly arranged here, e.g. how much product and materials are required, what is available, how much is ordered and on what date, what is the expected production slippage, how much material is missing on a certain date, what is capacity utilization, overview of scheduled operations, etc.
Run Dispatcher
The function is run with Shift+F2 keys from the Sales order, Reserving card, Job cards, Production orders and Sales items books. The Dispatcher can be started only by users with the right Production / Production planning / Run Dispatcher. In all books, running the function behaves the same.
- When you run the function in the Book or Filter mode, the data from the current record (document) are loaded. If there are records marked with an asterisk, the marked records will be loaded.
- When you run the function in the Container mode, all records from the container are loaded.
- Next possibilities of starting exist in Sale when running on the 2nd page of documents (over items). All items of a document are loaded by default. If you want to load only the current item, use Ctrl+Alt+F2 keys to start the function. If you want to load the selected items, marked them by asterisks and run the function with Shift+F2 keys.
- In the Sales Items book, items are loaded according to the following rules:
- in the Book mode, the current record is loaded;
- in the Filter mode, the records from filter are loaded;
- if there are items marked with an asterisk, these marked items will be loaded preferentially;
- When running from the Job cards book, the entire production tree from the current job card is always loaded (including inferior and superior job cards). If you want to load only the current job card and its subtree, run the Dispatcher function using the keys Ctrl+Alt+F2 keys above the given job card.
The Dispatcher automatically creates a production tree also for products and semi-finished products for which a job card has not yet been created (the product / semi-finished product item in the tree has the text "new" instead of the job card identification).
The Dispatcher allows you to create a job card only for sales items that have a reserving card (icon ![]() ). Sales items without the created reserving card will be created into the job cards tree, but they will be of the type of a ordinary item with an icon
). Sales items without the created reserving card will be created into the job cards tree, but they will be of the type of a ordinary item with an icon ![]() , so it will not be possible to create a job card for them. Furthermore, it is not possible to create job cards for the blocked or invalid routing variants.
, so it will not be possible to create a job card for them. Furthermore, it is not possible to create job cards for the blocked or invalid routing variants.
The function can also be run in the Articles book above the product's/semi-finished product's card. The production tree for the default routing variant is automatically loaded and the production quantity is preset to the value according to the Quantity field in the header of a routing variant. Superior documents (sales requirements) can be added to the job card by indicating specific requests by asterisks in the Coverage panel on the 1 - Coverage tab. This also adjusts the produced quantity according to the marked requirements. This procedure can be used if we wish to combine sales requirements into one job card.
The function can also be run directly above a routing variant in the Manufacturing routings book The production quantity is preset to the value according to the Quantity field in the header of a routing variant. Adding superiors documents (sales requirements) is described in the preceding paragraph.
The produced quantity when setting production lots
If production lots are defined in the routing variants (the Lot field on the 1-Basic data tab), then the produced quantity can be rounded according to this lot while creating new job cards. We make the settings by checking the Round to production lots option in the Dispatcher options.
The quantity that is produced to the warehouse due to rounding (there is no superior document for it) is produced on the general contract code (set in the Dispatcher's Options).
Split job cards according to production lots
If the production lots are set in routing variants, it is also possible to ensure the splitting of production into job cards according to these lots. We make the settings by checking the Split to production lots option in the Dispatcher options.
Create job cards with a plan type
A plan type for new job cards is loaded from the superior item (sales order item, job card item). When you start the Dispatcher in the Articles book, the job cards are created with the plan type specified in the Articles book (if a summation plan type is specified, this one is ignored).
Delete tree levels by Delete key
If you want to cancel a certain level of the tree (not produce), mark this level with the cursor and press the Delete key. The link to the superior document is deleted from the given job card. The quantity produced on all inferior job cards shall be reduced by the quantity from the canceled job card or the inferior job cards shall be canceled. The Do not create inferior job cards option is activated on the Semi-finished product item in the superior document. Instead of a deleted job card, a yellow folder icon appears in the tree structure.

Picture: The Dispatcher form
Description of icons in the standard panel:
|
Create new job cards or save changes to existing job cards. Create new job cardsJob cards are created only for nodes (production trees) which are marked by asterisks in the tree. If the Dispatcher is run above the Articles or TPP book, then the newly created job cards will not be reflected in the tree after saving. The user is informed about the creation of new job cards by displaying an error log where the list of new created root job cards is stated. Save changesFor existing job cards, changes are saved in all loaded production trees. |
|
Save records and exit the Dispatcher function automatically. |
|
Refresh/Recovery. |
|
Change planning period for scheduling job cards. The set period is displayed in the upper blue bar of the form. |
|
Export data to Microsoft Excel. |
|
Switch to the Scheduler function. |
|
Schedule job cards tree. Scheduling is described in the Dispatcher/Documents chapter. |
Description of the fields from the form header:
Date of production |
Enter the date until which the production requests will be loaded. Documents after this date will not be loaded. Entering a date does not affect the display of records in coverage (Coverage tab, bottom window). Example: If we have a request for sale (sales order + reserving card) with the date of reservation on 08/10/2011 and enter the Date of production 07/10/2011, this document will not be taken into account, the upper and middle window on the Coverage tab will be empty. |
Contract code |
Restriction of requirements for the selected contract code. After checking and selecting the code, the requirements related to the selected contract code are displayed. |
Warehouse |
Warehouse for requirements cover - values for the In stock column will be taken from the selected warehouse. |
Plan type |
Restriction of requirements according to the plan type. |
Use the Options button to define options for creating new job cards, scheduling job cards, displaying in a tree and covering requirements.
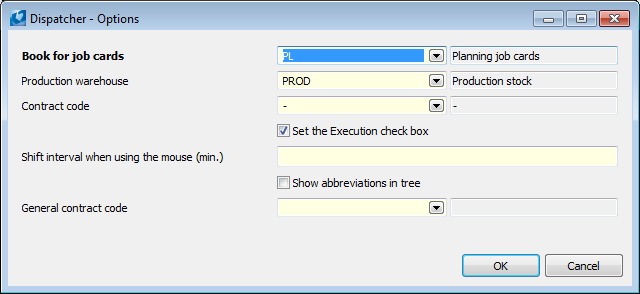
Picture: The Dispatcher form - Options
Description of the fields of Dispatcher - options form:
Book of Job Cards |
Selection of the book, where new job cards will be created. If no selected, job cards will be created into the current set book in job cards. |
Books for production orders |
Selection of the book, where new production order for created job cards will be created. If no selected, production orders will be created into the current set book in Production orders. |
Production warehouse |
Select the warehouse to which the job cards will be created. This is inserted into the header of the job card and items only if the warehouse is not predefined directly in the routing. |
Location |
A location which is inserted into the created job cards. |
Contract code |
Contract code for new job cards. Job cards are created for this code if the contract code is not defined in the request (i.e. it is used only when creating job cards from articles). |
Set the Execution check box |
It activates the Execution option in the new created job cards. |
Reduce subassembly quantity acc. to stock level |
When loading new production trees, the quantity of the produced semi-finished products is reduced on the basis of the existing stock available. Consideration of dispositions respects the current settings of the Dispatcher (warehouse (see the Warehouse of semi-finished products option), free contract code, coverage). If the entire need for the Semi-finished product can be covered by the existing stock, the given job card and the entire inferior subtree of the job cards will not be created. |
Subasssembly warehouse |
It is related to the Reduce subassembly quantity acc. to stock level option. In the field pre-set the warehouse, where the stock level of semi-finished products to reduce the produced quantity while loading new production trees is found out. If no warehouse is specified, then the warehouse specified in the Dispatcher header in the Warehouse field is respected. The use of the field can be for cases where we have a preset summing stock in the Dispatcher, but we always reduce subassembly quantity according to stock level in the specific physical warehouse. |
Combine identical job cards |
It combines the newly creating job cards when loading trees. Job cards producing the same product and the same variant are combined. The combine is made at the product level (main level) and at the level of semi-finished products (subordinate levels). In this combine mode, all loaded production trees are marked with asterisks after starting the Dispatcher. If one combines at semi-finished products level and if not all superior job cards are saved when saving the production trees (a user removed asterisks at some tree levels), then neither the job cards of the semi-finished products will not be saved either (the combined semi-finished product job card needs to know its superior documents). In this case - exclusion of some job cards (levels) from the marking - you can then use the "ChangeTreesBySelection" function (it is necessary to call it in a specially written script and include the script in the user bar, for example) to update the tree and the produced quantities according to marking by asterisks. An alternative procedure to cancel asterisks to remove certain job cards from production is to use the Delete key. Detailed description in the introduction to the chapter. |
Split to production lots |
When creating a job cards tree, the required amount of production is divided into job cards according to the size of the production lot defined in the routing variant. The last job card contains the remaining amount. Note 1: If the Round to production lots option is activated at the same time, then the production quantity in each job card tree is rounded to the entire lot. Note 2: If the Combine identical job cards option is activated at the same time, then the job cards are only merged, splitting is ignored. |
Round to production lots |
When creating a job card tree, the produced quantity is rounded according to the defined production lot (Batch field in the routing variant).
|
Group into production orders |
It offers three options for creating production orders for new job cards:
|
Set reservation date in sale |
When saving a new job card, it sets the Date to from a job card to the reservation date on the sale item. |
Show abbreviations in the tree |
If the option is activated, abbreviations are displayed in the job card tree. This option can be activated simultaneously with the option Names in the tree. |
Name in the tree |
If the option is activated, names are displayed in the job card tree. This option can be activated simultaneously with the option Abbreviations in the tree. |
Show all operations |
If the option is activated, operations, for which no items are displayed due to the settings of the article categories filter (the active Filter categories option above the tree) and due to the settings of displaying the resources and items (the Display resources and Show items options in the Dispatcher options), will always be displayed in the job cards tree. Otherwise, these operations are not displayed. |
Display resources |
If this option is activated, resource items will also be displayed in the job cards tree. Resources are not displayed by default. |
Show items |
If this option is activated, routing items (materials, output items) will also be displayed in the job cards tree. |
Log variants |
While starting the Dispatcher, it is checked whether valid routing variants are loaded into the production trees. Two types of messages appear in the error log:
|
General Contract Code |
Code that is considered a free contract code, from which it is possible to cover the requirements of other contract codes (when the Coverage of sales orders option is active) - see the description of the columns on the Coverage tab in the Coverage - DISPATCHER chapter. |
Compute coverage also for new job cards |
New - non-existent job cards will also be loaded into coverage. These job cards are identified in the coverage by the text "New (number)". The quantity of the requirement from these new job cards is then not included in the column "Routing req." but in the column "Req. qty." as if the job card had already been saved. |
Capacity plan - Online |
It sets the online / offline capacity plan mode. If the option is activated, then after starting the Scheduler, resources and capacities will be loaded automatically, and the table will be updated automatically after changes are made. The timeliness of the data is indicated by the green button of recalculation If the option is off, then the data are not automatically recalculated. The state when the data is not current and does not correspond to the settings is indicated by a red animated button |
Description of buttons in the lower part of the form:
Document |
By means of this button you get on a document on which the light indicator is set. |
Coverage |
Use this button to open the Coverage of demanded article function for the currently selected item. |
Articles |
By means of this button you get to the Articles book. |
Item routing |
It serves for display the 2nd page of a routing of the currently marked item. |
In the left part of the form, a tree of job cards according to the routing of the product is displayed. The tree shows all levels of the product, i.e.. if the item has its own routing, so this routing is also nested in the tree.
The routing variant of the product is loaded according to the following rules:
- If the Dispatcher function is run from the Sales Orders book, a variant from a sales order item is loaded. If this variant is not specified, so the variant defined in a batch in a sales order item is loaded. If no variant is defined, the so-called default routing variant is loaded (i.e. the variant that is defined in the Variant field on the 3rd page of the Article card).
- If the Dispatcher function is run from the Job Cards book, a variant from the header of job card is loaded.
- If the function is run from the Articles book, the default routing variant is loaded.
The quantity of the product in the job cards tree is given by the quantity on the sales item when running the function from the Sales orders book or the Reserving cards book. If we run the function from the Articles book, the tree is loaded to an amount of the default routing variant. In this case, we can change the quantity by marking the requirements in the Coverage table with asterisks.
Description of buttons and fields located above the tree:
Filter categ |
After activating this option, the items of the routing of the product are filtered according to the selected categories. |
Categories |
After pressing this button you get to the Article categories book where you can select the categories you want to filter by Ins key. |
Uncovered |
Uncovered items (item that have non-zero value in the Missing column) will be filtered. |
|
Expands all tree levels. |
|
Collapses all tree levels. |
|
Mark current item. |
|
Marks the current item and all lower-level items on the node. |
|
Cancels marking for the current item and for all lower-level items on the node. |
|
Marks all items that are at a lower level than the current item. |
|
Marks all items that are at the same level within the superior node. |
|
If a routing item or a resource has a defined substitution, or it is a resource of the "group" type, the Substitutions offer form, where you can select a substitution of an item, will be open. |
|
Change routing variant in a job card. After selecting the routing variant, this one is inserted into the job card and the job card items are re-created. It corresponds to the Copy routing function (Ctrl+F3) above the job card. When re-generating the routing items, the already added notes remains on the job card items if the variant has been remained. |
|
Change tree of job cards - allows you to change the current production tree, the change is made at the level marked by the light indicator and in all subordinate levels.
Picture: The Change tree of job cards form |
|
With this button we save the job cards for the marked products or semi-finished products in the tree. |
|
Find items in the tree. The found item, or items will be indicated with the icon |
|
Move to the next matching item when searching. |


Description of the right mouse button menu over the tree
Most of the menu functions of the right mouse button over the tree can be started using the buttons over the tree. The following functions are an exception.
Create container of job cards |
Creates a container from the job cards currently loaded in the tree. |
Add to container of job cards |
Adds job cards loaded in the tree to an existing job cards container. |
Description of icons of tree items:
|
Container - is displayed as the main node if the Dispatcher is running above the document container. |
|
Document of the request over which the Dispatcher is running (sales order, reserving card, production order). |
|
It has two meanings: together with the text "New" behind the icon, it symbolizes a new non-existent job card, with the document number behind the icon it symbolizes an existing job card with the inactive Execution option. |
|
Job card with the checked Execution option. |
|
A job card with the partial release ("r" flag on items on page 4 of the job card). It has meaning only for job cards of "Normal" type. |
|
A confirmed job card. |
|
Operations. |
|
BOM item. |
|
Valuation item. |
|
Resource. |
The main desktop of Dispatcher is divided into 5 tabs (Coverage, Resources, Documents, Gantt, Collisions).
|
|
|
Coverage
The Coverage tab is divided into 3 parts:
- Routing variant,
- Requirements,
- Coverage.
Routing variant items
The upper part of the Coverage tab contains a window with the RV items of the product or semi-finished product to be produced. By default, the requirements of non-stock items (performances) are also read and added here, but these are not covered. You can restrict their display by setting the Filter of cat. option.
Depending on whether the Summation option is activated, either only the items of the currently marked level in the tree are displayed or, conversely, items from all lower routing levels.
The requirements of the current production tree and their possible coverage are summed up for each item.
Note: The records in this window can be sorted according to the required column, but the set sorting is always cancelled when reloading the content (e.g. during the Recalculation actions, marking another level in the tree, etc.).
Picture: The Dispatcher form - Documents tab
Description of Fields:
Filter of cat. |
When this field is checked, only the Routing items according to the selected types (defined by the Categories button) will be displayed in the Routing items window. |
Categories |
After clicking on this button, you can get to the book Article category, where you can use the Ins key to select the types that you want to filter. |
Not covered |
Not covered items are filtered in the Routing Items window. These are the items whose requirements are not covered by the stock and ordered quantity. These items have a non-zero value in the Missing column. |
Summing |
When activated, not only the items of the currently selected node are displayed, but also the items of subordinate levels, i.e. the items from the Routing semi-finished products. |
Marked |
When checked, only items marked with an asterisk are displayed. |
Online |
If this field is off when the function runs, the items will not be loaded into the table. To load items, you need to turn this field on or click the icon Note: When the option is off, only items for which a Coverage Recalculation has been processed in the documents are loaded after startup. Note2: When this option is enabled, the coverage period ("CFCoverageDate") is automatically calculated for items (operations), regardless of whether Coverage Recalculation has been processed for the given Job Card. |
|
The button for coverage setting. By coverage setting you influence records loading in the Coverage of article demanded function. This setting influences requirements loading and their coverage. |
|
Marks or unmarks the item to which the ruler is set. |
|
Marks missing items (items that have a non-zero value in the Missing column). |
|
Cancel markings for all items. |
|
Recalculate, or update Coverage data. It calculates the Coverage date ("CFCoverageDate"), regardless the Coverage Recalculation has been processed for the given Job Card. |
|
Finds the currently selected item in the Job Card tree and highlights it grey. If there is more than one request item at the same time (the documents on which it is located - these can be found in the middle part of the Coverage tab), then it is necessary to mark the required document of the request with a ruler. Otherwise, the first matching record is found for the item in the Job Card tree. |
Columns Description:
Req. RV |
The amount of material or semi-finished product that is needed to produce the required amount of product marked in the Job Card tree. Values from new (not yet existing) Job Cards are loaded into the column. After creating the Job Cards, the value is moved to the Req. qty. However, if the Compute coverage also for new job cards option is activated in the Dispatcher's Options, then requests from non-existent Job Cards are already loaded into the Req. qty. |
Req. qty. |
For a product, the value shows the quantity for which the product is required for sale (Sales Order with Reserving Card). For materials and semi-finished products, the value shows the quantity for which there is a production requirement (unconfirmed Job Card) for the current Job Card tree. However, if the Compute coverage also for new job cards option is activated in the Dispatcher's Options, then requests from non-existent Job Cards are already loaded. |
Available |
The value shows how much of the existing stocks in stock can cover the specific required quantity. It is therefore not the whole layout, but only the part that can be used to cover the requirement. |
Ordered |
The value generally shows how much of the planned or confirmed incomes can be used to cover a specific amount requested. It is therefore not the total existing ordered quantity, but only the part that can be used to cover the request. For items of products and semi-finished products, it therefore shows what quantity will be produced (a Job Card with the Realization flag), for items of materials, what quantity is ordered by the Purchase order. Note: From which documents and record types from Coverage the value is read is determined by the current coverage settings, see the description of the Coverage Settings icon above. |
Missing |
Quantity that is missing to completely cover the required amount. The value is calculated as Req. quantity - In stock - Order. Items that are missing are indicated by an icon in the next column |
Delay |
Item delay in days. This is the difference between the date the item is covered (when the item will be available) and the request date. A positive value means a delay, a negative value in advance. The delay is indicated in the next column by the icon For products, this is the difference between the date of Job Card and the date from the Reserving Card, for semi-finished products between the date of Job Card of semi-finished product and the date of Job Card of the product, and for materials the difference between the planned delivery to the warehouse and the required date of Job Card. For uncovered items (column "Missing"> 0), the Delivery time according to the Supplier price list read from the Articles card is taken into consideration until the delay. If the user needs to display the delay with respect to the current date (not to the date of the request), then it is necessary to activate the icon in the Coverage section. Note: Although the date of the requirement will also visually change to current in the coverage, the original date of the requirement (visible in the middle of the requirement document) is still used to calculate the delay. |
 .
. Requests
The middle part of the Coverage tab displays the request documents for the currently selected item in the Routing Items section. This is decomposition of the summing values from the upper window of the form into individual requirements.
In addition, the values of In Stock and Order. columns they are divided into two parts:
- quantity on the required, so-called Own Contract code (In stock own, Order. own),
- quantity on the so-called general Contract code (In stock gen., Order. gen.).
The general Contract code is a code that can be used in the case of monitoring the coverage of sales orders (see below the description of the option Coverage of Sales orders) to cover other requirements. You can define the general code with the Options button in the header of the Dispatcher form.
The quantity on the own Contract code always takes precedence (despite possible delays) over the general code to cover the request.
If the Sales Orders coverage option is not activated, then the requirements are covered regardless of the Contract code and the quantity values are calculated only in the columns In stock own and Order. own.
By displaying the Days column (program name "DeliveryDays"), it is possible to have an overview of uncovered items (column "Missing"> 0) by the number of delivery days from the supplier price list. The date of item coverage (column Date of coverage, program name "CovDate") is calculated as today's date plus the number of delivery days.
If you set a ruler for a specific request document for the current item from the Routing Items window and press the icon ![]() to find an item in the tree, then you can find this item in the production tree just according to the marked requirement document.
to find an item in the tree, then you can find this item in the production tree just according to the marked requirement document.
Coverage
In the lower part of the Coverage tab, there is the 1st page of the Coverage of demanded articles function, which is described in more detail in the chapter Basic code lists and support modules K2 - Articles- Coverage of demanded Articles. The coverage applies to the Articles on which you have set the ruler (in the tree or in the Routing Items No. window). Use the Coverage button, which is located at the bottom of the form, to open the complete the Coverage of demanded Articles function.
The Job Card coverage loaded in the Dispatcher is read from the memory data module. That is, the saved data is not read from the tables, but the current values from the memory module before being saved into the database. In this way, the impact of the changes just made can be immediately monitored in coverage. Documents read from the Dispatcher are indicated by a black dot icon in the Coverage table ![]() .
.
Selected fields description:
Coverage of Sales Orders |
If this option is activated, then you can monitor the coverage and coverage of requirements according to individual Contract codes. This option affects the calculation of values into the columns In stock own/or. and Order. own/or. in the middle window of the Coverage tab. A more detailed description of these columns is provided in the Requirements section earlier in this chapter. |
Variants coverage |
If this option is activated, then you can monitor the coverage and covering of requirements according to individual routing variants. |
|
Move dates from the past to the current date. A more detailed description is given above in this chapter in the section Routing Items No., next to the description of the Delay column. |
|
Show the date for requirements covered from the availability. Off: requirements covered from availability have a zero date (and are therefore included at the beginning of the list of requirements) On: for requirements covered by the availability, the actual date of the requirement is displayed; however, a zero date is still calculated internally for the calculation of the possibility of reducing the quantity of semi-finished products produced in the Dispatcher! |
|
|
|
Resources
The 2-Resources tab displays the capacity plan of resources from the Job Card tree for the selected display interval and in division according to the selected period. A detailed description of the functionality and settings of the capacity plan is given in the chapter Resources - Capacity plan.
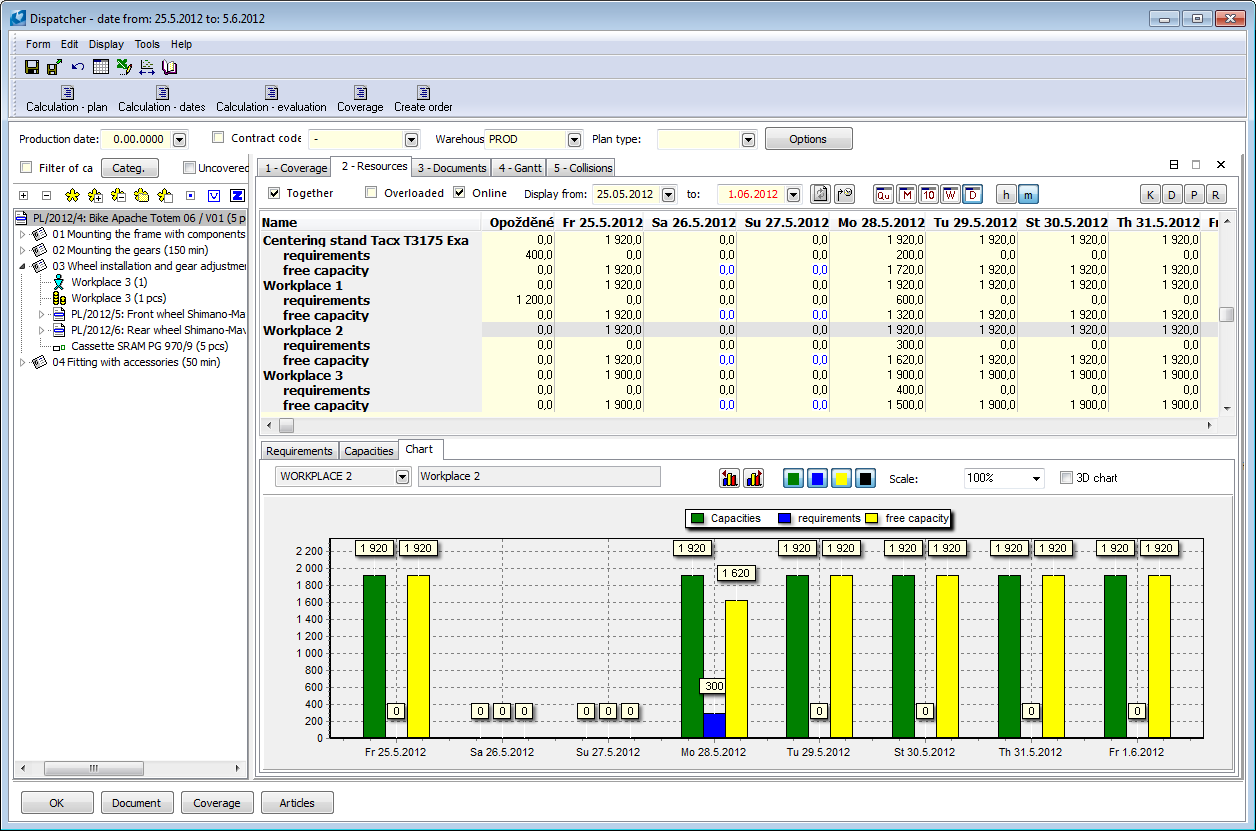
Picture: The Dispatcher form - Resources tab
Selected fields description:
The fields valid for setting and controlling the Capacity plan common to all modules are described in the chapter Resources - Capacity plan.
Summing |
If the option is activated, then all resources for the currently marked level in the tree and all lower levels are displayed. If the option is deactivated, then only the sources from the currently marked level are displayed. |
The lower part of the 2-Resources tab contains three tabs: Requirements, Capacities, Chart. All data is displayed according to the set interval on this tab.
Requests
The Requirements tab displays requests for the selected resource, i.e. documents and operations by which the resource is requested. By activating the Including delayed ones option, delayed requests can also be displayed.
Capacity
Overview of the capacities of the selected resource.
Chart
Represents a graphical display of the capacity plan. The further description is stated in the Resources - Capacity plan chapter.
|
|
|
Documents
The list of the loaded Job cards is displayed on the 3-Documents tab in the upper part. In the case of multi-level trees, there are only the root Job Cards of the products. By default, documents are always sorted by priority and order. Job Cards with no specified priority are listed at the end. In the middle part there is a header of the currently marked Job Card. At the bottom there is the Items tab of the Job Card item (planned values from the 2nd page). On the Superior tab, there is a list of superior documents of a Job Card.
Description of the buttons in the tab heading:
Change sorting |
By the button you can influence the order of Job Cards (production trees) for scheduling. You can determine the order on the base of these data: The first level of sorting can be based on the Priority field from a Job Card. Job Cards without priority have a lower meaning then Job Cards with priority value. If you do not want to determine the order according to the Priority field, un-check the option. (Attention: after restarting the program and loading the Job Card into the Dispatcher, the documents will again be sorted by default according to priority and order.) Then you can determine the Job Cards order according to:
|
Up |
Used to change the order of documents. It shifts a currently marked record up a level. You can also move with the Num - key. |
Down |
Used to change the order of documents. It shifts a currently marked record down a level. You can also move with the Num + key. |
Add to PO |
It adds marked Job Cards and their subordinate Job Cards (the whole production tree) to a selected Production Order. If no Production Order exists yet, create it in the Production Orders book. |
Delete from PO |
It deletes marked Job Cards and their subordinate Job Cards (the whole production tree) from a selected Production Order. |
Show Prod. Order |
Displays the Production Order of the selected Job Card. |
From stock |
It decreases produced quantity of semi-products by existing stock on a stock for all produced trees marked by asterisk. It corresponds to the Quantity of semi-products according to availability option in the Change Job Card tree function (the icon |
Change priority |
Change Job Card priority for planning. The change is made for either the current document or the documents marked with an asterisk. |
Change order |
By the button you can influence the Job Cards order (production trees) for scheduling. You can determine the order on the base of these data: The first level of sorting can be based on the Priority field from a Job Card. Job Cards without priority have a lower meaning then Job Cards with priority value. If you do not want to determine the order according to the Priority field, un-check the option. (Attention: after you restart the program and load the Job Card into the Dispatcher, the documents will be again sorted by default according to priority and order.) Then you can determine the Job Cards order according to:
|
|
Used to change the order of documents. It shifts a currently marked record down a level. The shift can only be done within documents with the same priority. The shift can only be done with the Num -/Num + key. |
A note to change the order of documents: In addition, the Job Card can be moved to the specific required position using the Change Job Card order script (Plan_ChangeSequence.pas), which is included in the user panel with manual input to the "NewSequence" parameter.
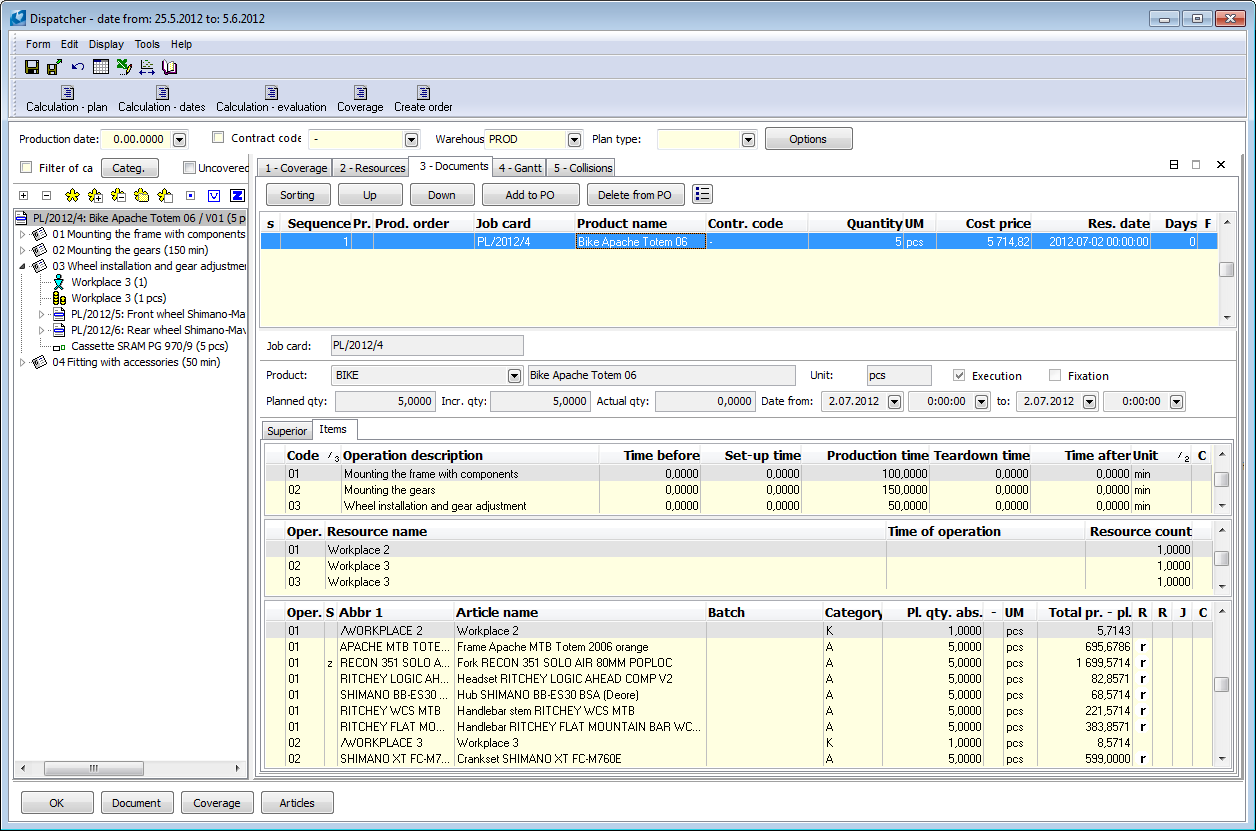
Picture: The Dispatcher form - Documents tab
Description of selected columns in the document table:
Scheduled date from, Scheduled date to |
Current production tree planning dates (minimum and maximum date from the entire production tree). |
Scheduled date from - original, Scheduled date to - original |
The original dates for scheduling the Job Card when loading it into the Dispatcher. Rescheduling does not change. |
Delay |
It expresses the difference between the date when the production will be finished and the Reservation date. A positive number indicates a delay, a negative number in advance. |
Delay - original |
Delay calculated from the original production dates (when loading the Job Cards into the Dispatcher, rescheduling does not change). |
Delay - difference |
The difference between the current delay and the original delay. Expresses the change in delay after rescheduling the Job Cards. |
|
|
|
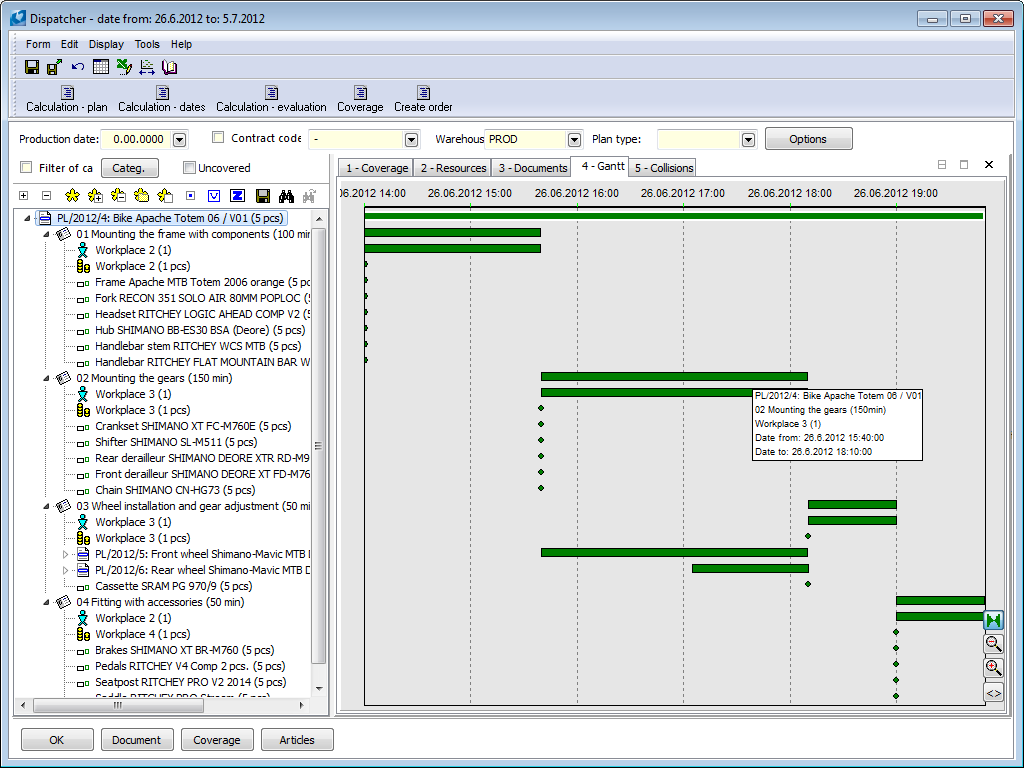
Gantt - DISPATCHER
This tab displays a Gantt chart of scheduled operations. The items that are visible in the tree are displayed (i.e. if you have the tree collapsed, you will not see anything in the Gantt chart). The chart firstly shows the time required for individual Job cards and operations. In addition, the material items are also displayed here (as points, i.e. they express at which point in time the given material is needed).
By default, chart bars are displayed in green. If some items in the tree are marked with asterisks, then the bars are displayed in red.
You can move the chart along the time-line by dragging by left mouse button.
Picture: The Dispatcher form - the Gantt tab
Buttons' Description:
|
Time-line switching: by dates of Job Cards or by specified planning period. |
|
Zoom out. |
|
Zoom in. |
|
Back to 100% zoom. |
|
|
|
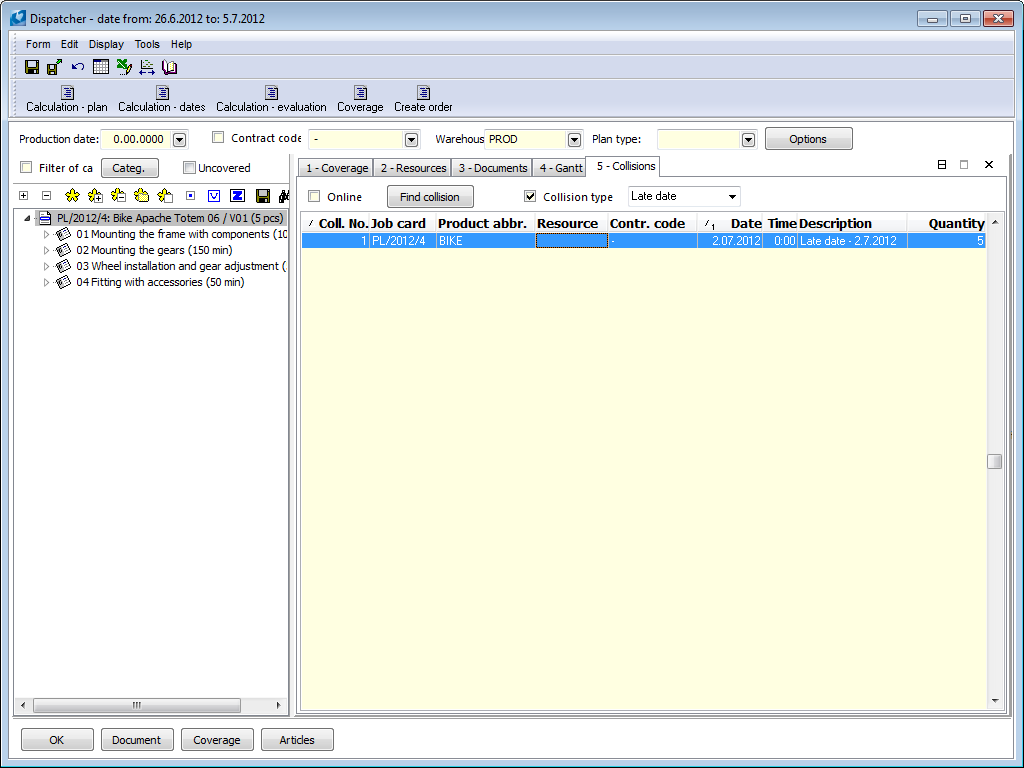
Collisions
On the Collisions tab, you can view collisions that will occur on resources and job cards. The program can display two types of collisions:
- Resource overlap: by this collision we mean a state where the requirements for the resource are in conflict with the capacity of the resource (the requirements for resource is in the chart in Scheduler function in a grey box). For collision-enabled resources, this type of collision is not evaluated. Operations with the active Outage option also do not appear as a collision. The Quantity column shows the number of resources in the collision.
- Late date: by this collision we mean the state when the final date of production is after the date of the reserving card (the date of the reservation is displayed in the columns "Date" and "Time". The collision evaluates not only the date but also the time of the date - however, if the reservation time is zero, only the date is taken into account. The Quantity column shows the produced quantity of the product. The "Delay" column can be added into the table.
The Product abbr. column always shows the product from the root job card.
Use the Document button to display a job card from the selected collision row.
Picture: Dispatcher function - Collisions tab
|
|
|
Schedule Job cards
Before creating or after creating Job cards (order of executing actions has not meaning from the viewpoint of result (of data)) it is necessary to schedule job cards, i.e. requirements on resources are entered to the calendar at the moment and stated number of resources is busy by this production in this time interval. Before scheduling it is necessary to control the period for planning which is visible in the title bar. Planning Job cards must be within the set period range. If a period does not meet, change it by the button ![]() (Alt+F10), which is located in the standard panel of the form. By default, the Date from is always set to the current date after the K2 program is restarted. If the user does not want to always set the Date from to the current one, this can be done by setting it in the Period Definition form, which can be opened in the Resources book, in the bottom panel by the first button after the field for setting the display period. In the given form, activate the Set manually option. The Date from is then changed by the user as required.
(Alt+F10), which is located in the standard panel of the form. By default, the Date from is always set to the current date after the K2 program is restarted. If the user does not want to always set the Date from to the current one, this can be done by setting it in the Period Definition form, which can be opened in the Resources book, in the bottom panel by the first button after the field for setting the display period. In the given form, activate the Set manually option. The Date from is then changed by the user as required.
Use the icon to open the form for scheduling ![]() (Shift+F3) located in standard panel.
(Shift+F3) located in standard panel.
When planning a production tree, the planning is optimized with regard to the need for semi-finished products in individual operations. Appropriate product operations are planned in response to a finished semi-product.
If the planning of the semi-finished product Job Card fails, the planning of further Job Card of the production tree continues. All Job cards Tree that are unsuccessfully scheduled will be displayed in a log. These Job cards stay unscheduled after saving (in the book of Job cards icon ![]() - "BFCalDiffer" field). The maximum planning term is entered into the operations and the heading of unscheduled Job cards. In a production tree, which contains an unscheduled Job card, you can see the term of a production = 31/12/2999 and the number of days = -9999 (Dispatcher, the 3-Documents tab, the "Days" column).
- "BFCalDiffer" field). The maximum planning term is entered into the operations and the heading of unscheduled Job cards. In a production tree, which contains an unscheduled Job card, you can see the term of a production = 31/12/2999 and the number of days = -9999 (Dispatcher, the 3-Documents tab, the "Days" column).
After successful planning, the changes need to be saved.
When you create and schedule a new Job Cards, it is suitable to activate the Calculate coverage of new Job cards option in the Dispatcher options. In this case new (non-existent) job cards will be also loaded into a coverage of requirements and the user can use these information for managing and configuring of a production plan without the Job cards having to be already created.
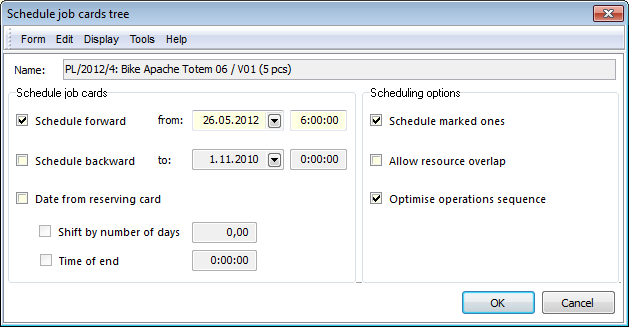
Picture: The Schedule Job card tree form
Description of Fields:
Name |
A description from a line in the tree, which is actually indicated by the light indicator. |
Plan forward from |
By this option the Job cards are planned forward from an entered date. |
Organize themselves according to production orders |
It enables to schedule Job cards consequently from one production order. It applies either for subordinate Job cards of semi-products. That means: as soon as the planning reveals the inclusion of a certain Job Card on the Production order, all other Job Cards from the given production order are subsequently planned after it. If this option is activated, it is not possible to plan with the optimization of the sequence of operations and it is not possible to evaluate the waiting time on resources. |
Schedule backward to |
By this option the Job cards are scheduled back to an entered date. Note: When planning backwards, those production trees that would exceed the planning "period from" are planned forwards from the beginning of the planning "period from". |
Date from a Reserving card |
By this option Job cards are scheduled backward to a date from a Reserving card. For each Production tree, it is determined whether the Reservation date is entered in the Sales item. If so, then the Date is taken from the item. If only the date is entered and the time is zero (00:00:00), then it is planned back from the previous day (so that production is complete on the day of booking). If the Reservation time is also specified, then it is planned from this time of the day. If the Reservation date is not specified in the Sale item, then it is planned according to the date specified in the header of the Reserving card in the Reservation date from field. |
Shift by number of days |
Refers to the Date from Reserving Card option. By entering a positive number, you can postpone the start of the rescheduling by the specified number of days before the Reservation date. The production will be finished in advance. |
Finish in time |
Refers to the Date from Reserving Card option. Used to enter the time by which production must be completed. In this case, the time entered in this field takes precedence over the time of the Reserving card. |
Schedule the marked |
If the option is activated, all nodes (Job Cards) marked by asterisk in the tree will be scheduled. Otherwise a current marked node will be scheduled (including subordinate ones, if they exists). |
Allow resource overlap |
By allowing collisions on resources, you will specify that requirements beyond the resource's capacity can be scheduled for a resource at one point. Which requirements can be planned for collision, or which collisions cannot be planned, are specified in the No collisions area field. If the option is activated, then collisions are allowed on all resources, which you have for scheduling. If the option is turned off, then every resource behaves according settings of the option on an own card. Note: If the resource has a defined capacity = 0, then it is not possible to plan for it even when collisions are enabled. A more detailed description of entering capacity = 0 for collision planning is given in the chapter Production / Production planning and supply / Calendars / Definition items (page 3). |
No collisions area |
In the case of planning with collisions, you can choose in this field between which requests collisions cannot be allowed. The following areas to choose from:
|
Optimize sequence of operations |
During optimization it occurs to try to schedule operations so that their continuity will be ensured. Scheduling is in two passes: at first forward and followed from the latest operation back with target to move previous operations as close as possible. If the option is turned off, scheduling is only in one pass (i.e. the forward). When planning backwards, the procedure is reversed. Note: Sequence optimization is not available for forward planning with grouping according to production orders. Difference in scheduling is displayed in the Scheduling with the Optimize sequence operations option picture. Both situations represent scheduling since 6 o'clock forward direction and in the second case operations 1 an 2 are moved as close to the operation 3 in the optimization process. |
Consider coverage date Plan uncovered production trees as well Consider delivery times |
The activated option ensures that the operation is not scheduled before the date when it is be covered by the material. In order to use this functionality, it is necessary to know the date of covering for materials or operations. There are these ways to have it calculated: a) Coverage recalculation of given Job Cards has been processed, the dates of coverage are saved in the database; b) if Coverage recalculation has not been started, then the coverage dates must be calculated by the Dispatcher: either it is necessary to have online coverage counting activated (tab 1-Coverage, Online option), or to perform the calculation manually (tab 1-Coverage, recalculation button To access the planning of uncovered Job Cards, select the Schedule also uncovered production trees option:
If we plan backwards with respect to the coverage date, and if the coverage date is violated for some operations, then the rescheduling runs to the end, and then the entire production tree is planned forward from the smallest date (determined from the rescheduling). For uncovered items, by default, the date of coverage is calculated from the supplier price list of the optimal supplier, according to the number of delivery days. It thus expresses a possible date when the material could be delivered if it was currently ordered. If we wish to take into consideration the Coverage date calculated in this way when planning, then you can activate the Consider delivery times option. |
Evaluate waiting for resources |
It allows you to evaluate the time by which the operation on individual resources will be completed later compared to the optimal planning. Optimal resource scheduling means collision-enabled scheduling. You can find this data on the 3-Resources and 4-Documents tabs, on the Waiting timesubtab in the right table. In summary, the total waiting time can be evaluated:
The basis is to plan one operation of Job Card.
Note: It is not possible to evaluate waiting on resources during forward planning with grouping according to production orders. |
Max. resource overload (%) |
When planning production, it is possible to count on a larger number of resources than the actual capacity of the resource (e. g. to determine the possibilities and impact on planning). In the resource calendar in the definition item, it is necessary to enable this overload in the Overload (%) field (by setting the maximum allowed overload percentage). When planning production trees, you can then enter the current required overload in this field. When calculating the increased number of resources, a smaller value of allowed overload is taken. The number of resources is rounded down to the nearest whole number. Example 1: You have a capacity of 10 workers. You know that you can add up to 3 extra workers if needed. In the source calendar, enter a 30% overload percentage. You have 12 priority Sales orders, each order is made by one worker. The situation allows you to add two workers. When planning these 12 Job Cards, you enter an overload of 20%. The planning therefore has a capacity of 12 people. All 12 Job Cards are scheduled for the same time, 2 of them will be out of capacity (in the Scheduler in the Resource Chart they will be on a grey background). Example 2: You have a capacity of 10 workers, while the operation time for planning is reduced according to the capacity of the resource in the calendar. Thus, with an overload of 30%, the length of the operation will be divided by 13, not 10. |
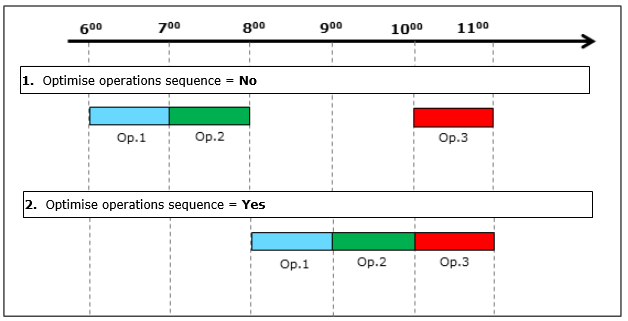
Picture: Schedule with the Optimize sequence operations option
|
|
|
Functions of Dispatcher Module Menu
|
|
|
Functions' description:
Adjust the form |
Restores individual sections of the form (tabs, grids) so as to be adapted and visible at the current screen resolution. |
|
|
|
Scheduler
In addition to the Dispatcher function, you can also use the Scheduler function to plan the production in K2 IS. Among other things, the Scheduler contains a graphical presentation of production planning, both from the point of view of individual resources and from the point of view of Job Cards and their operations.
You can start the Scheduler in the following ways:
- from the Dispatcher function by the button
 or by the Shift+F8 keys;
 - from the Resources book by Shift+F8:
- no resource is marked: the function loads all resources;
- above the resources marked with an asterisk: the function loads resources and Job Cards according to the resource type and the settings of the Load related resources and Load related Job Cards options in the Scheduler Options (described in the Scheduler / Resource Chart chapter, in the Scheduler Options section). The loading principle for all combinations is given in the following table:
Marked resource (resource type) |
Load related Resources = No Load related Job cards = No |
Load related Resources = YES Load related Job cards = No |
Load related Resources = YES Load related Job cards = Yes |
Physical resource not belonging to the group |
Only the marked resource. The requirements in the chart are active. |
Marked resource + related resources from loaded Job cards. If a group is used in the Job card, then only this group. Chart is active only for requirements from Job Cards in which this marked source is (i.e. only Job Cards in which the marked resource is loaded). |
Marked resource + related resources from loaded Job Cards + resources from Job Cards forming the production tree. Chart is active for requirements from Job Cards in which this marked resource is located and for requirements from a loaded production tree (i.e. Job Cards in which a marked resource + attached Job Cards forming a tree are loaded). |
A physical resource belonging to a group with its own calendar |
Only the marked resource. The requirements in the chart are active. |
Marked resource + related resources from loaded Job cards. If a group is used in the Job card, then only this group. Chart is active only for requirements from Job cards in which this marked resource is. |
Marked resource + related resources from loaded Job Cards + resources from Job Cards forming the production tree. Chart is active for requirements from Job Cards in which this marked resource is located and for requirements from the loaded production tree. |
A physical resource belonging to a group without its own calendar |
Only the marked resource. The requirements in the chart are active. |
Marked resource + related resources from loaded Job cards. If a group is used in the Job Card, then all resources belonging to this group (it is necessary to load these resources in order to create a fictitious calendar for the group). Chart is active only for requirements from Job cards in which this marked resource is. |
Marked resource + related resources from loaded Job Cards + resources from Job Cards forming the production tree. If a group is used in the Job Card, then all resources belonging to this group (it is necessary to load these resources in order to create a fictitious calendar for the group). Chart is active for requirements from Job Cards in which this marked resource is located and for requirements from the loaded production tree. |
Group |
The group and its subordinate resources. Chart is active for requirements from Job Cards in which this marked resource is located and for requirements from all subordinate resources. |
Marked resource + its subordinate resources + related resources from loaded Job cards. Chart is active for requirements from Job Cards in which this marked resource is located and for requirements from Job Cards where subordinate group resources are. |
Marked resource + its subordinate resources + related resources from loaded Job Cards + resources from Job Cards forming the production tree. Chart is active for requirements from Job Cards in which this marked resource is located and for requirements from the loaded production tree. |
Summing |
All subordinate resources of summing resources. If the group belongs to the summing source, then also its subordinate resources. Chart is active for requirements of all loaded resources. |
All subordinate resources of the summing resource + related resources from the loaded Job cards. If the group belongs to the summing resource, then also its subordinate resources. Chart is active for requirements from Job Cards in which there are subordinate resources of the summing resource or group. |
All subordinate resources of the summing resource + related resources from the loaded Job Cards + resources from the Job Cards forming the production tree. If the group belongs to the summing resource, then also its subordinate resources. Chart is active for requirements from Job Cards in which there are subordinate resources of the summing resource or group. |
- from the Resources book using the Scheduler button in the user bar (included "TPlanVyr" plugin):
- parameter "AddResLoad" = the parameter meets the Load related resources option in the Scheduler Options;
- parameter "RelatedJCLoad" = the parameter meets the Load related Job Cards option in the Scheduler Options (see the link to the description above);
- from the Job Cards and Production Orders book using the Shift+F8 keys, or using the "RunScheduler.pas" script;
- by the button from desktop (it is necessary to include function no. 1092 Production - Scheduler).
Planning period
You can set the planning period using the button ![]() (Alt+F10) located in the standard Scheduler panel. This setting is also for the Dispatcher module.
(Alt+F10) located in the standard Scheduler panel. This setting is also for the Dispatcher module.
Display period / for Capacity plan
You can set the period either in the Scheduler and Dispatcher (Display from / to field) or in the Resources book (Date from / to field). You can also preset the automatic interval calculation. The period settings is for the Resources, Scheduler and Dispatcher modules at the same time.
- Automatic period settings: You can do it by means of the button located behind the field Display to / Date to. The Period definition form is displayed - here you can enter the Period type and the Number of periods. The Date to is calculated according to the settings. The Date from and to can be changed by the user at any time, this setting is then valid until the program is turned off. The Date from is set to the current date when K2 is started automatically.
- Manual period settings: You can activate the Set manually option in the Period definition form. In this case, the definition of the period is unavailable, the Date from and to is set manually by the user.
Note: Symbols on the button for defining the period: ... : indicates that the Set manually option is activated.
- 1d / 1w / 1m / 1y: indicates the number and type of period in the setting (1 day / 1 week / 1 month / 1 year).
Scheduler options
In the Production planning - Options form you can set the behaviour and characteristics of Scheduler.
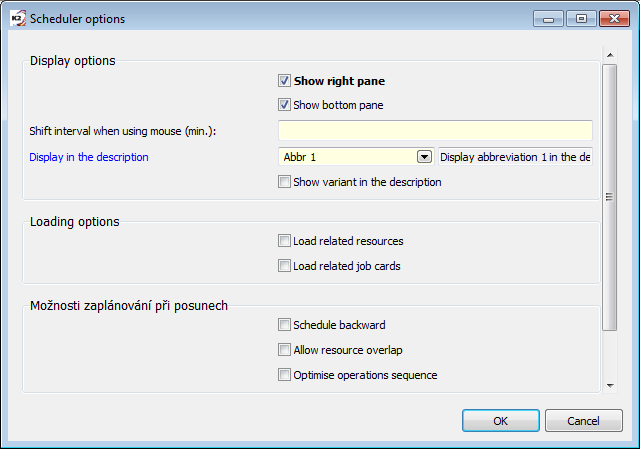
Picture: The Production planning - Options form
Description of Fields:
Resource chart
|
Show right panel |
Enables to display or hide Right panel of the chart. Further description is in the Right panel part in this chapter. |
|
Show bottom panel |
Below the resource chart it enables to display a panel with detailed information about currently selected records (the abscissa of the chart) or about a capacity of resource. The button for step planning of requirements is accessible on the bottom panel - see the section Step planning of production trees below. |
||
Interval shift with the mouse (min.) |
Determines (in minutes) the setting of a time grid, on which the abscissas of a chart can be moved when shifting by using the mouse. Example: When you set the value of 60 minutes you can always shift an abscissa on a full hour by mouse dragging, when you set the value of 30 minutes you can always shift an abscissa so that it would start either in a full hour or in half an hour, etc. |
||
Show lines after operations |
Individual lines of one operation (divided into several days or divided according to the type of operation time) will be displayed as one merged line. Requests that are divided by another request (another line) are not merged. |
||
Task chart |
Show on Y dimension |
Specifies what will be displayed on the Y dimension for each Job card (Document, Contract code, Abbreviation 1, Abbreviation 2, Product name). |
|
Show the variant on Y dimension |
When activating the option, not only the required information will be displayed on the Y dimension (see the settings of the Show on Y dimension field), but also a routing product variant will be there but behind the slash. |
||
Show bottom panel |
Allows you to display a panel below the task chart with detailed information about the currently selected record (chart abscissa). |
||
Description of chart abscissa |
Show in description |
It defines what will be displayed in a description of abscissas (during the Display with descriptions option activation in a context right mouse button menu).
|
|
Display a variant in a description |
When activating the option, not only the required information will be displayed in the description of the chart abscissa (see the setting of the Show in description field), but also a routing product variant will be there but behind the slash. |
||
Loading possibilities |
Load related resources |
Off: Default value. Only marked resources will be loaded to the Scheduler. This mode is suitable for the viewing of the capacities of selected resources. It is not suitable for the document rescheduling - only these loaded resources are scheduled and the other resources on Job Card stay unscheduled (red exclamation). On: Marked resources and all related resources from loaded Job Cards will be loaded to the Scheduler. This mode is suitable for a situation, when the user wishes to reschedule Job cards of the selected resources. The option corresponds to a "AddResLoad" parameter in the Scheduler plugin (submitted as a button in the User toolbar). |
|
Load related Job Cards |
Off: Default value. Superior and subordinate Job Cards to Job Cards loaded according to resources are not loaded into the Scheduler. Production trees will not be created. On: The superior and subordinate Job Cards are loaded to Job Cards from the marked resources as well. Production trees will be created. The option meets the "RelatedJCLoad" parameter in the Scheduler plugin (submitted as a button in the User toolbar). |
||
Shift scheduling options
|
Plan backward |
If scheduling is performed by manually scrolling the selected lines with the mouse or via the Move selected function ( If the field is deactivated, then a forward planning is executed. |
|
Allow collisions on resources
|
By enabling collisions on resources, we specify that requests beyond the resource capacity can be scheduled for a source at one time. When manually shifting and using the (Shift+F4) function Move selected, collisions within one production tree are always allowed. Setting of this option is linked to the Schedule Job Cards tree form. A more detailed description of enabling collisions can be found in the chapter Dispatcher / Schedule Job Cards . |
||
|
|||
Optimize sequence of operations |
During optimization it occurs to try to schedule operations so that their continuity will be ensured. Setting of this option is linked to the Schedule Job Cards tree form. The further description is stated in the Dispatcher / Documents chapter in the Schedule job cards part. |
||
Date and time of the beginning of a production |
When free is activated, the selected operation using the Move selected function ( If the option is not activated, then the last used date and time is preset in the form. |
||
Capacity plan |
Online |
Set on-line / off-line capacity plan mode. If the option is activated, then after starting the Scheduler, resources and capacities will be loaded automatically, and then the table will be updated automatically after changes are made. The data update is indicated by the green recalculation button If the option is off, then the data is not automatically recalculated. The state when the data is not current and does not correspond to the settings is indicated by a red animated button
|
|
The scheduler is divided into six tabs (Resource Chart, Task Chart, Resources, Documents, Collision, Log).
|
|
|
Resource chart
The Resource chart tab contains a Gantt chart showing the requirements for individual resources (resulting from scheduled job cards) in the specified time period. The vertical dimension represents the individual resources and the horizontal dimension represents the time series. The white spaces in the chart show the time when resources are available (resource capacity defined in the calendar). The length of the chart abscissa means the time for which the resource is required by a particular operation. The chart abscissas of individual production trees (job card trees) are color-coded. Colors are assigned automatically, 13 basic colors alternate in the cycle. The abscissa in the chart can visually take the following forms:
|
Standard abscissa of the loaded request. |
|
The marked abscissa of a request. |
|
Inactive abscissa - a request that is not from the currently loaded job cards. |
|
Hatched abscissa - fixed request. |
|
One-way hatched abscissa from right to left - a request that is not from the job cards in the filter. The abscissa has the same properties as the fixed request. This state only occurs if the scheduling module is started using the Dispatcher or Scheduler script with the parameter "UseJobCardFilter" = "Yes". For the detailed description see the Script Catalog document. |
|
One-way hatched abscissa from left to right - request from the job card with manually adjusted schedule. |
Capacities and blocking periods in the workplace
If the workplace, to which the resource belongs, is blocked by a certain date for capacity planning, then the windows of free capacities are not white, but dark gray. Capacities cannot be changed in the blocked period, the job cards cannot be changed or rescheduled in the blocked period.
Below the chart, basic information about the marked record (abscissas of a chart) or the marked resource capacity is displayed (if the Show bottom panel option in the Options is activated).
By the double-click on the resource capacity area (white fields in the chart), you can change the resource capacities for specific days directly on this tab. The changes must then be saved.
Rescheduling by shift
You can change the production scheduling directly in the chart by moving the selected abscissas. Either by moving using dragging the mouse (Ctrl+left mouse button) or via the ![]() - Move marked ones to function (the further description below in the Toolbar part). The range of the selection of abscissas of the chart depends on the settings of Selection type field (the further description below in the Toolbar section). The moving can be performed for the selection type "operation", "job card", "production tree" or "Production order". In the Scheduler options you can set the time grid on which you can move abscissas when shift by dragging the mouse (the further description below in the Scheduler options part).
- Move marked ones to function (the further description below in the Toolbar part). The range of the selection of abscissas of the chart depends on the settings of Selection type field (the further description below in the Toolbar section). The moving can be performed for the selection type "operation", "job card", "production tree" or "Production order". In the Scheduler options you can set the time grid on which you can move abscissas when shift by dragging the mouse (the further description below in the Scheduler options part).
For both shift methods, operations are automatically scheduled when moving. Setting scheduling properties (forward/backward scheduling, allow collisions and the possibility to optimize the sequence of operations) you can execute in Scheduler options (the further description in the Scheduler options part).
If the job card would be scheduled out of the set planning period, the message "Job card is out of the set planning period" will be displayed and the operation will be automatically return back on the last remembered position.
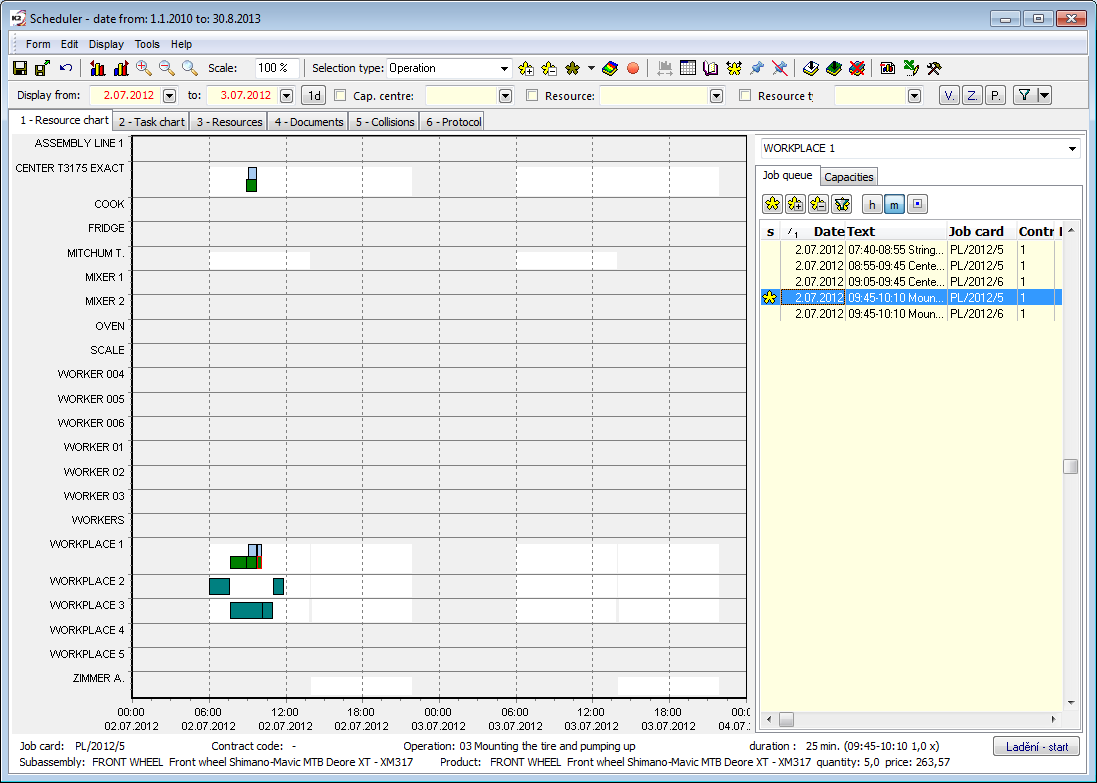
Picture: Scheduler - the Resource chart tab with the displayed Right panel
Toolbar
In the header of the form there is a panel with fields and buttons for basic control and running of the Scheduler functions. Most functions are also available in the context menu called up by the right mouse button over the chart area.
Buttons' Description:
|
Save executed changes. Saving cannot be performed if the Scheduler has been started from the Dispatcher module. In this case it is necessary to save changes after returning to the Dispatcher. |
|
Save records and exit the Scheduler automatically. Saving cannot be performed if the Scheduler has been started from the Dispatcher module. In this case it is necessary to save changes after returning to the Dispatcher. |
|
Refresh/Recovery. |
|
Move chart left. |
|
Move chart right. |
|
Zoom in the chart. You can also zoom in on the desired area by dragging the mouse while holding down the left mouse button from left to right. While holding down the left Shift key, zoom across the entire Y axis; while holding down the right Shift key, zoom across the entire X axis. |
|
Zoom out the scale of a chart. |
|
Restore the scale zoom to 100%. You can also restore by dragging the mouse while holding down the left mouse button from right to left. |
Scale |
Setting the scale of a chart in %. |
Selection type |
By choosing the selection type you determine what range of requirements (abscissas in the chart) will be marked if you click on a concrete abscissa of the chart. The selected abscissas of a chart have red framing.
|
|
On the 1-Resource chart tab: it marks all (currently displayed) items in a chart and also all job cards in the loaded production trees. On the 4-Documents tab: it marks all loaded job cards in the production trees. |
|
Cancel markings (a range of the function is described at a button for marking above). |
|
Indication of a certain group of requirements. Highlighted abscissas of a chart have red framing. The menu contains:
|
|
It colours the requirements according to an affiliation to production orders. Requirements of job cards that are not assigned to any production order will be displayed in white colour. Note: Activation of this button automatically turns off the possibly activated button for colouring the uncovered job cards. |
|
It colours the requirements according to the status of their coverage (by material).
When the requirements are displayed without decomposition on operations on the Task chart tab, then the coloring is according to the state of a coverage of a job card header. Note: Activation of this button automatically turns off the possibly activated button for coloring the requirements according to Production orders. The further description of the function for loading coverage of production items is stated in the Bulk actions over job cards chapter. |
|
It colours the requirements according to the priority. 5 colors are reserved for priorities (in order from the highest priority): 1. Red If the guide does not have a priority assigned, the abscissa is white. |
|
It colours the requirements according to contract codes. |
|
Switch to the Dispatcher function. Note: You can switch to the Dispatcher only if the Scheduler has been run from the Dispatcher. |
|
Change planning period. |
|
Schedule job cards tree. Schedule is described in the Dispatcher / Schedule Job Cards chapter. Note: If the scheduling is run from the Resource chart tab or from the Tasks chart tab and the Schedule marked ones option is not activated in the form for scheduling, then the currently selected job card will be loaded for scheduling (its identification is on the left side in the bottom panel under the chart). Attention: If the production trees were not indicated by asterisks in the Dispatcher function, and the job cards (root job cards, on the 3-Documents page) will be marked in Scheduler, then the lower-level job cards will not be scheduled, but only these root (marked) job cards will be scheduled. Therefore, running the Scheduler function above the Resources book for the process of job cards scheduling is more important only for single-level production. |
|
Move marked ones to - enables to move and schedule the marked operation, job card, job card tree or production order from the entered date and time. If the Schedule backward when movingoption is activated in the Scheduler options, then it is the end date, otherwise it is the start date of scheduling. |
|
Fixate selected items - fixes the dates of scheduling on the selected operations. If all operations of a job card are fixed, the Fixation checkbox is set in the heading of a job card too. Abscissas of fixed operations are filled with a cross pattern (apply hatching). Fixed operations card can not be rescheduled. |
|
Cancel fixation of selected item - cancels fixation on the marked operations. |
|
It adds job cards of selected requirements to a new Production order. |
|
It adds job cards of selected requirements to the selected existing Production order. |
|
It deletes job cards of selected requirements from a production order. Note: Any inferior job cards to the marked job card will also be deleted from the production order. |
|
Export chart to PDF file. |
|
Export data to Microsoft Excel. You can export data from all data grids in the Scheduler. |
|
Scheduler options |
Filtering panel
In the header of the form below the function bar, there is a panel with fields and buttons for setting the display of requests and their filtering.
Description of the filtering panel fields:
Display from |
The date from which the timeline is displayed in the chart. This field does not change the start of the planning period, only the display period. |
to |
A date until which the timeline is displayed in the chart. This field does not change the end of the planning period, only the display period. How many days from Date from should be displayed by default after activating the Scheduler you can set in Options in the The default number of displayed days field. |
Capacity centre. |
Filter of resources according to a capacity centre. |
Resource |
Filter to display a specific resource. |
Resource type |
Filter of resources according to a resource type. |
V. |
Selected production trees - a filter to display only documents (job cards), which are marked by an asterisk on the Documents tab. You can mark only root job cards (the further description in the Documents chapter), but all job cards from a production tree will be displayed. |
Z. |
Selected resources - a filter to display only resources, which are marked by an asterisk on the Resources tab. |
P. |
Show resources with requirements - filter to display only resources on which the requirements exist in the appropriate period. |
|
Standard selection button - it allows general filtering of requirements by using the selection definition. |
Right panel of the chart
The panel contains the Job queue and Capacities tabs, which are used both to browse associated data with resource scheduling and to perform certain functions.
There is a field for a resource selection under the control buttons. The resource can also be loaded by clicking the left mouse button in the resource area in a chart.
Job queue tab (at the Right panel)
The job queue of the selected resource is displayed on the tab. Only records that match the specified display interval are loaded here.
Control buttons of Job Queue tab:
|
Marks the selected item with an asterisk. Requirements from currently unloaded documents (represented by gray dotted abscissas in the chart) cannot be marked (generally it is not possible to work with them). |
|
Marks all resource items with an asterisk. Requirements from currently unloaded documents (represented by gray dotted abscissas in the chart) cannot be marked (generally it is not possible to work with them). |
|
Cancels markings for all items. |
|
Displays only by asterisks marked items. |
h |
Duration of operations in hours is displayed. |
m |
Duration of operations in minutes is displayed. |
|
Performs the substitution of the resource for selected requirements. For the further description see the Execution of resources substitutions part below. |
The context menu called up by right-mouse button on the table also contains functions for creating a job card filter according to the current job queue of the resource. You can use either the Create container of job cards function or the Add to container of job cards function.
In the case of a custom table sort, you can return to the default sort using the Default sorting function.
Capacities tab (at the Right panel)
There are capacities of the selected resource displayed on the tab. You can change these capacities either by opening the Capacity form on the appropriate row by the Enter key, or by changing values in editable columns when the Edit rows option is activated. You can define a new capacity by the Insert key or delete a capacity by the Delete key.
Menu of right mouse button functions over the chart
The setting of a chart and activating some functions can also be executed by the menu of the right mouse button over a chart.
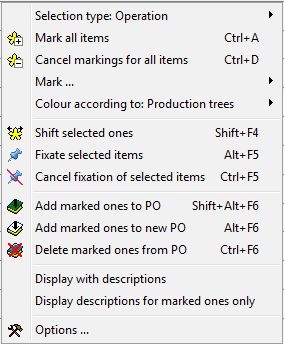
Picture: The menu called up by the right mouse button on a chart
Menu description:
Selection type |
The further description in the Toolbar part. |
|
It marks all items in a chart. |
|
It cancels markings for all items in a chart. |
Mark |
The further description in the Toolbar - button part |
Colour according to |
The selection from the menu determines according to which rules the individual abscissas of a chart will be coloured.
|
|
It enables to move and schedule the marked operation, job card, job card tree or production order from the entered date and time. If the Schedule backward when movingoption is activated in the Scheduler options, then it is the end date, otherwise it is the start date of scheduling. |
Fixate production tree |
It fixes the job cards and cancels fixation of the job cards in a job card tree (job cards of all levels). Abscissas of fixed documents are filled with a cross pattern (apply hatching). The fixed job cards cannot be moved in a chart, i.e. it is not possible to reschedule them. |
Fixate job card |
It fixates a job card or cancels fixation of a job card. Abscissas of fixed documents are filled with a cross pattern (apply hatching). The fixed document cannot be moved in a chart, i.e. it is not possible to reschedule it. |
|
It adds job cards of selected requirements to a selected existing Production order. |
|
It adds job cards of selected requirements to a new Production order. |
|
It deletes job cards of selected requirements from a production order. Potential inferior job cards to the selected job card will be deleted from a production order. |
Display with descriptions |
Descriptions for each abscissas of a chart will be displayed. You can set what will be displayed in the Scheduler options in the Display in the description field. |
Display descriptions for marked ones only |
Descriptions only for marked items of a chart will be displayed. It only makes sense if the Display with descriptions option is also active. |
|
It displays the form for setting the Scheduler options. |
Menu of the right mouse button functions over the resources area (Y dimension)
The menu contains functions to support hiding, resp. displaying only the requested resources.
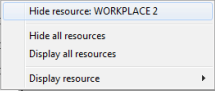
Picture: The menu called up by the right mouse button on the resources dimension
Menu description:
Hide resource: XXX |
It hides the current resource (resource on which the mouse button was pressed). |
Hide all resources |
It hides all resources. |
Show all resources |
All resources will be displayed. |
Display resource |
Selecting from the list of hidden resources determine the resources that will be displayed again. |
The execution of resources substitutions
Tasks scheduled on a resource of the "group" type or on a resource, that has the defined substitutions in a routing, can be transferred to possible substitutions of a resource within the operational specification of the schedule. Substitution of resource for operations can be done:
- by dragging the selected requirements using a combination of the Shift key and the mouse (it can be done among the resources within a group of resources only). In a chart or in the Right panel on the Job queue tab mark the appropriate requirements and these drag (while pressing Shift key) on an appropriate resource in a chart. We always drag operations (abscissas) only to the area of the given resource, but not in time. Abscissas are therefore inserted on the timeline as so as they have originally been scheduled (it means out of a resource capacity too).
- by pressing the button
 - Substitute item, which is located in the heading of the Job queue tab at the Right panel. The substitution can be done in bulk for all marked source operations. The substitution for a resource will be done only for the operations, where the substitution can be done (e.g. with regard to the defined substitutions in a routing).
We must then save the changes in the delegation of operations and reschedule the production.
Step-by-step scheduling of production trees
There is a possibility to schedule the job cards step by step - each production tree separately. This functionality is available by the Debugging - start button, which is located in the Bottom panel of the scheduler. The significance of this procedure is that the user can gradually monitor the scheduling of individual trees and thus more easily detect potential problems or causes of problems (e.g. postponement of requirements, etc.).
Work procedure:
- Mark all requirements.
- Use the Debugging - Start button to start the step scheduling mode. The standard form for defining planning conditions will be displayed, make the required settings and confirm it.
- Scheduling of all production trees will be canceled (only in the Scheduler's memory).
- Use the Schedule next button to start scheduling the first tree in the order (according to the set sorting of production trees). The tree is scheduled: the currently scheduled requests (abscissas in the chart) are marked (red framing) and at the same time the currently used resources are also marked with an asterisk (on the 3-Resources tab). Thanks to this, for easier orientation in the chart, it is possible to filter only the selected resources (button "Z" in the upper panel) - after each step of scheduling we will see only a chart of currently used resources. The lower panel displays information about scheduling: identification of the job card, information about how many resource requests were scheduled, possible reasons why it was not possible to schedule, etc.
- With the Schedule next button, we gradually plan all requirements.
- You can end the scheduling at any time with the Debugging - stop button. Attention: If we do not schedule all production trees in this way (i.e. we interrupt the mode), and then save the changes, the unscheduled job cards remains to be "undoscheduled" - see. point 3!
- Save the made changes.
|
|
|
Task chart
The Task chart tab contains a Gantt's chart showing scheduled production tasks for a specified time period. The abscissas of the charts of particular production trees (job cards trees) have different colours. Colours are automatically assigned, the cycle alternates 13 basic colours. Fixed abscissas are hatched, currently marked abscissas have red framing.
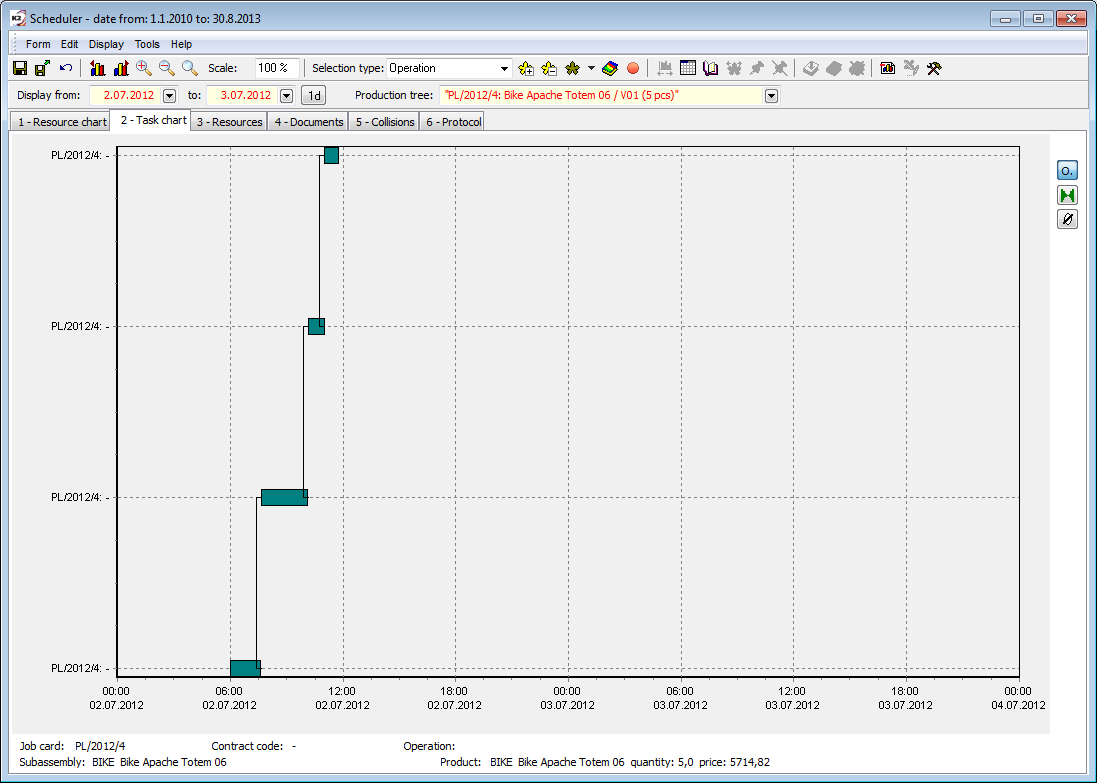
Pict. Scheduler - the Task chart tab
There is an identification of a currently displayed production tree in the Production tree field in the heading of the tab. From the menu, you can easily choose display of the other loaded production tree or of all trees.
The chart display can be changed to a chart according to operations and to display according to job cards. Display according to operations can be activated by the O. button in the right control panel or by the mouse right button on the chart and by the selection of the Display operations option.
Display according to operations
The chart shows the individual operations of job cards in the time. The vertical axis is divided according to the individual root job cards (one root job card can have several inferior job cards), the horizontal axis shows the time series. One abscissa of the chart represents one operation. The length of the abscissa means the time that the operation lasts, i.e.. how many minutes are specified in the routing of the job card for the operation (including Time before and Time after). Operations connected by the thin line are defined in the one job card or in multiple job cards that are linked through the superior documents.
Display according to job cards
The chart shows the individual job cards in the time. The vertical dimension is divided according to the particular root job cards (the one root job card can have multiple inferior job cards), the horizontal dimension illustrates the time series. One abscissa of the chart represents one job card. The length of the abscissa means the time that all operations last, that means how many minutes it is necessary for executing all the operations stated in the routing of a job card. Job cards connected by the thin line are linked through the superior documents and form the tree of job cards together (production tree).
You can display the so-called bottom panel below the chart, via Options button, displaying the basic data about the marked record (chart abscissa).
By activating the button ![]() it is possible to suppress the display of zero abscissas (job cards / operations with zero times).
it is possible to suppress the display of zero abscissas (job cards / operations with zero times).
By this button ![]() you can adjust the zoom according to the height of the abscissas. This is useful if there are more displayed abscissas than can fit on the screen and the abscissas overlap each other.
you can adjust the zoom according to the height of the abscissas. This is useful if there are more displayed abscissas than can fit on the screen and the abscissas overlap each other.
The further description of control elements common with the Resource chart tab is stated in the Resource chart chapter.
|
|
|
Resources
The capacity plan for loaded resources is displayed on the 3-Resources tab. A detailed description of the functionality and settings of the capacity plan is stated in the Resources - capacity plan chapter.
If the Scheduler module is run from the Dispatcher, then it contains resources which are contained in job cards loaded by the Dispatcher function.
If the Scheduler module is run in the Resources book, then it contains resources for which the function has been run. A detailed description of the principle of loading resources is given in the table in the Scheduler chapter.
The resources can be marked by the asterisks by the Shift+Enter keys.
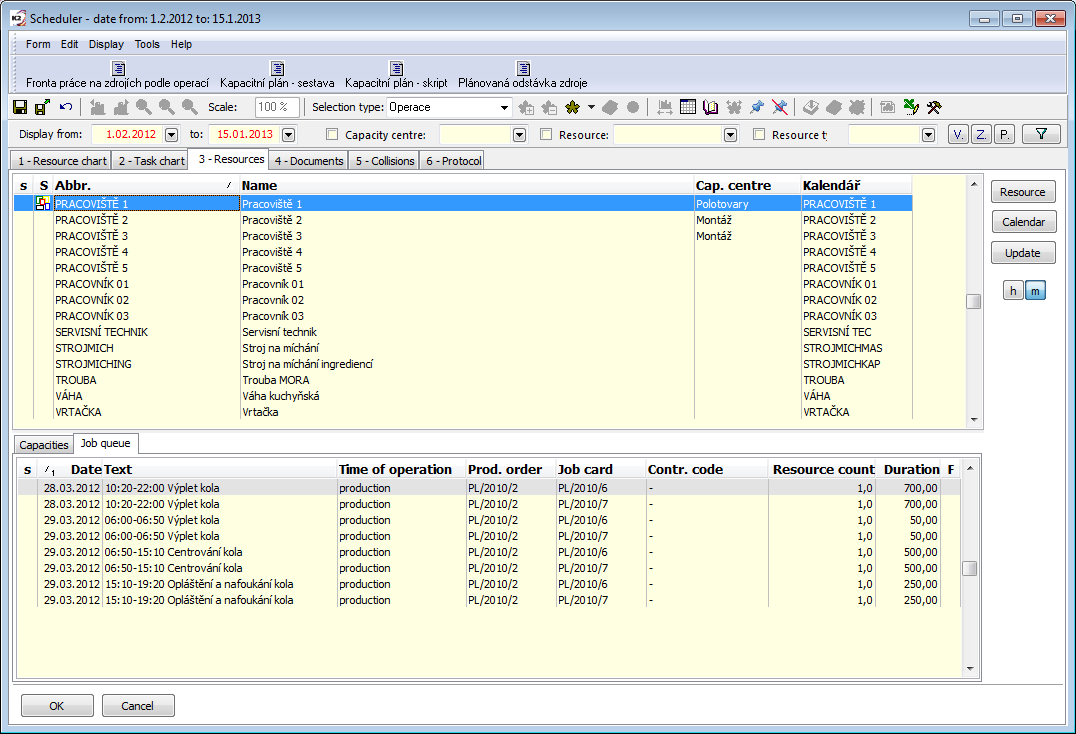
Picture: Scheduler - Resources tab
Selected buttons' description:
Update |
The function loads resource calendars and updates their capacities without reloading the job card trees. |
Calendar |
Button to switch to the resource calendar. |
There are the following tabs in the lower part: Job queue, Capacities, Chart and event. Waiting.
Job queue
Contains a list of resource requirements from scheduled job cards. The context menu called up by right-mouse button on the table also contains functions for creating a job card filter according to the current job queue of the resource. You can use either the Create filter of job cards function or the Add to filter of job cards function.
Capacities
The calendar of the currently marked resource is described here. Particular data of calendar items can be changed by editing values in columns, eventually you can call up the Capacity form by the Ctrl+Shift+Enter keys combination.
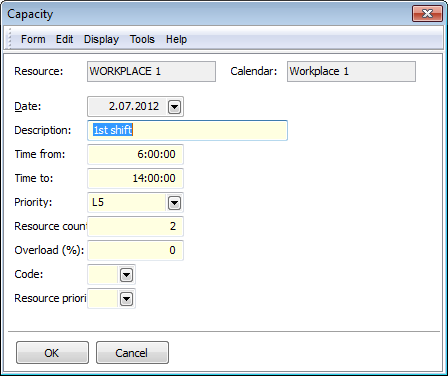
Picture: The Capacity form
The fields description of the Capacity form is stated in the Production - Planning and Production Supply - Calendars chapter in the Fields description of a calendar item part.
Chart
It represents a graphical representation of the capacity plan. For further information see the Resources - Capacity plan chapter.
Waiting
It displays the waiting time on resources. The tab is displayed after scheduling job cards if the Evaluate waiting time on resources option has been activated. The left table shows a summary overview of the waiting time for the currently selected resource per the root job cards of the production trees. The right table then shows details of the waiting time per the individual operations of the job cards of the root job card currently marked in the left table. The total waiting time on resources regardless of production trees can be displayed by adding the "QueueTimeTextCalc" column into the main resource table. For the further information see the Job Cards Scheduling chapter.
|
|
|
Documents
On the 4-Documents tab, there is a table with the loaded job cards in the upper part. If the Scheduler function is run in the Resources book, then it contains job cards which contain a requirement for loaded resources. If the function is run from the Dispatcher, then it contains job cards loaded by the Dispatcher function.
Only root job cards are displayed in a table. Individual documents can be marked by asterisks by the Shift+Enter / Ctrl+Space bar keys. The inferior job cards of the Semi-finished products are displayed in the left bottom part of the form with the Job cards title. The job cards of the production tree can be displayed here as a list of items or as a tree structure (selected with the right mouse button).
Picture: Scheduler - the Documents tab
There are the following tabs in the lower part: Items, Requiremenst and event. Waiting
Items
The items of the currently marked job card are displayed here (in the tree or in the upper table).
Requirements
The requirements for resources of the currently marked job card are displayed here.
Waiting
The waiting time on resources are displayed here. The tab is displayed after scheduling job cards if the Evaluate waiting time on resources option has been activated. The left table shows a summary view of the individual resources for the entire production tree. The right table then shows details of the waiting time for the currently marked resource from the left table per the individual job cards operations of the production tree. The total waiting time on resources regardless of production trees can be displayed by adding the "QueueTimeTextCalc" column into the main resource table. For the further information see the Job Cards Scheduling chapter.
Selected buttons' description:
Change priority, Sorting, Up, Down |
The buttons are described in the chapter Production / Production planning and supplying / Dispatcher / Documents. |
Add to PO |
It adds the marked job cards and their inferior job cards (the whole production tree) to the selected production order. If no production order exists yet, create it in the Production orders book. |
Delete from PO |
It deletes the marked job cards and their inferior job cards (the whole production tree) from the selected production order. |
|
|
|
Collisions
On the Collisions tab, you can display a list of possible collisions. The tab has the same meaning as in the Dispatcher function. Further description is stated in theProduction - Production planning and supplying - Dispatcher - Collisions chapter.
Picture: Production Planning - the Collisions tab
|
|
|
Protocol
The Protocol tab displays a detailed description of what happened in the Scheduler when opening or rescheduling.
Picture: Production Planning - the Protocol tab