|
|
|
Basic Description of K2 Program
|
|
|
Basic Description of Screens
There are three basic types of the screens presented in K2 Information System:
- desktop,
- book,
- form.
Further, there are subsidiary screens that simplify programme operating and will be described in the next text (for example filters, various auxiliary lists on offers etc.)
|
|
|
Desktop
The "K2 move" desktop is the default desktop in the system K2.
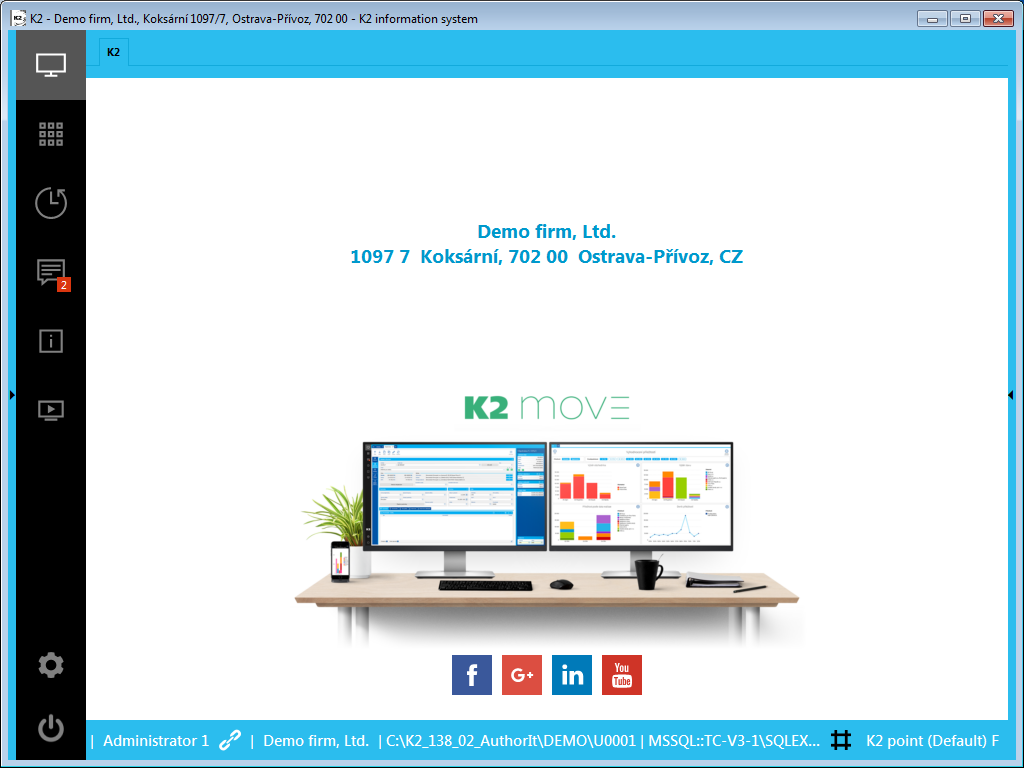
Picture: Desktop Point
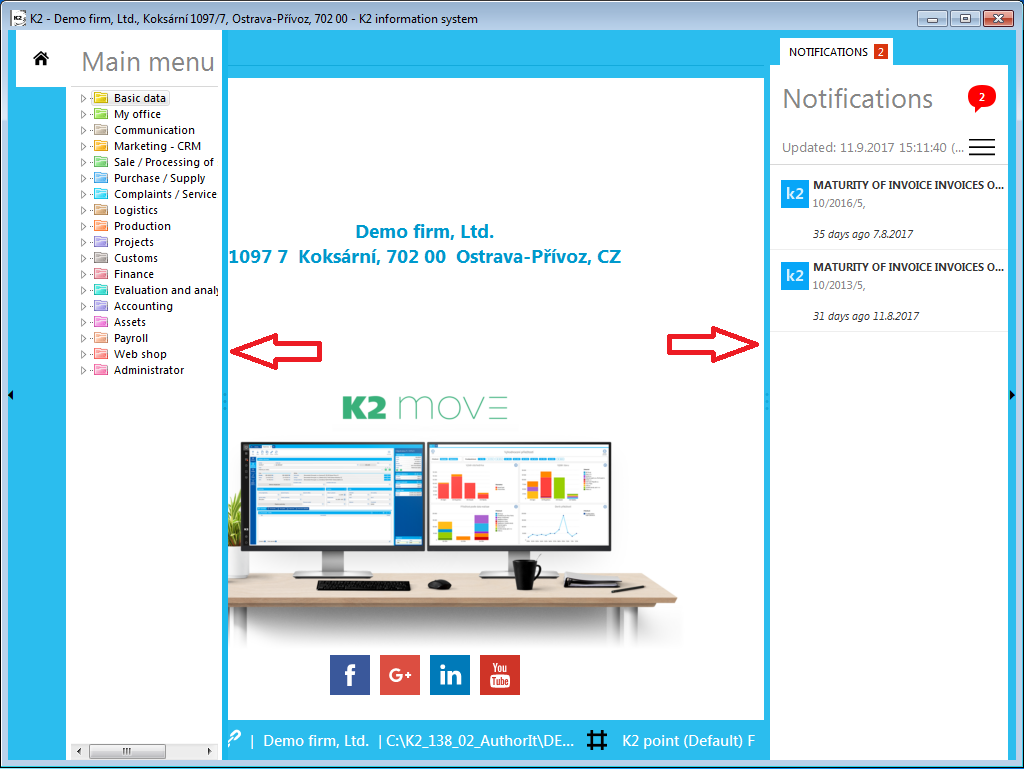
The desktop is divided into 3 parts:
- Navigation panel (left column) - it includes navigation buttons,
- Main area - it displays currently open book, documents, functions etc., which are used right now,
- Notification panel (right column) - it includes the tab with notifications.
Picture: Desktop
Desktop Items:
- Open tab in the main area of the desktop.
- The name of the user currently logged on to the system.
- Name of the Company on whose data we are working at this moment.
- A path to user's directory.
- The currently set desktop.
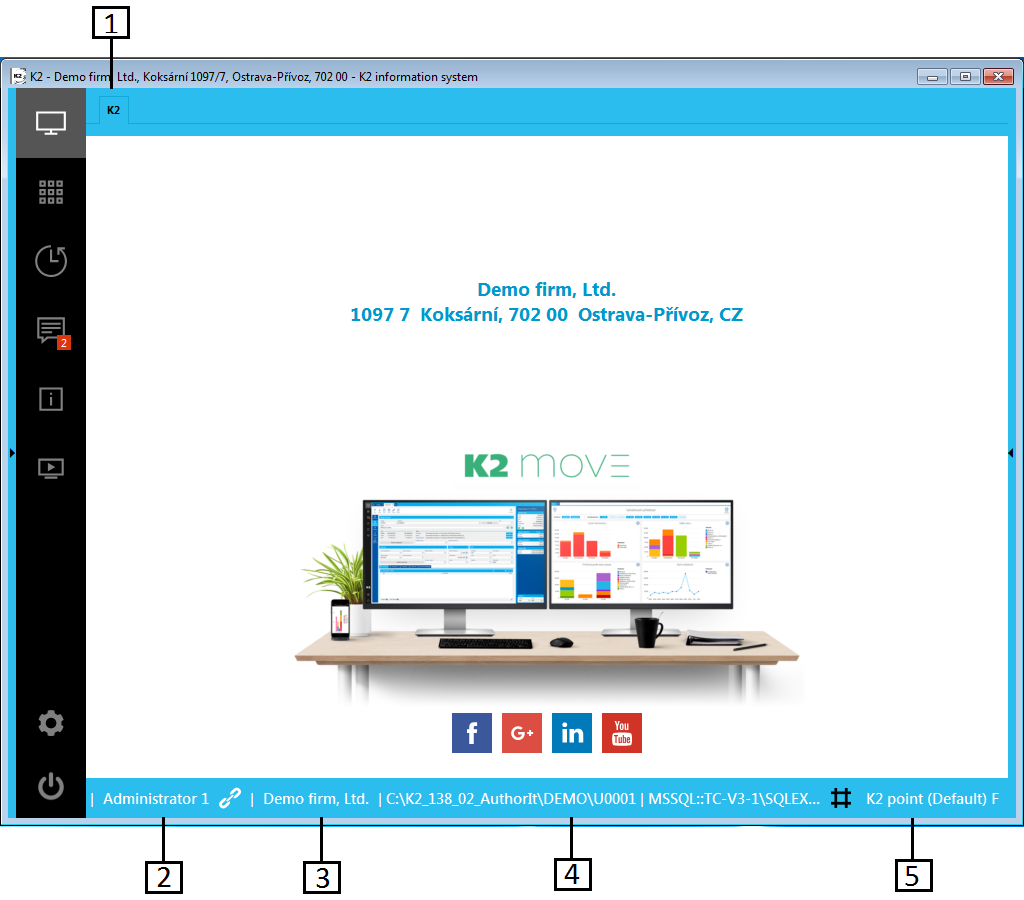
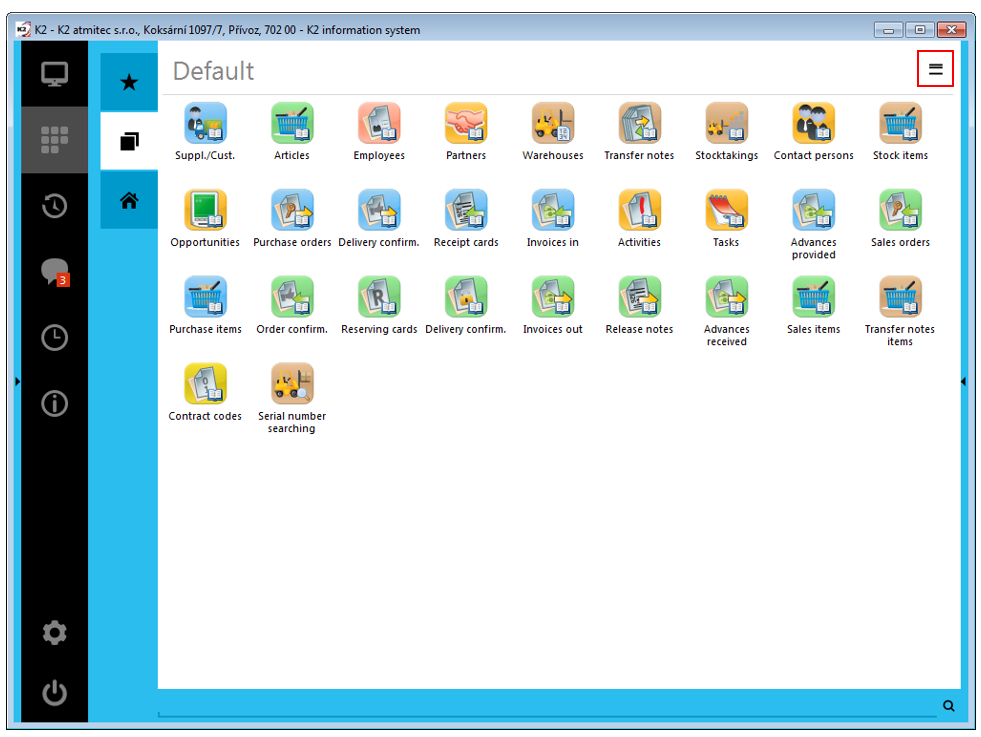
Picture: Desktop - the main screen
You can open individual modules from the desktop (books of modules, code lists). Further, you can run the function of K2 in menu, eventually you can modify the desktop design.
Change of the width of columns
In the desktop settings, there it is possible to add "splitters" to edit the width (height) of individual columns and other components of the desktop. The size can be changed by pressing the left mouse button on "splitter"and by dragging onto the required position.
Picture: Desktop - change of the width of columns
Functions of the system K2 menu
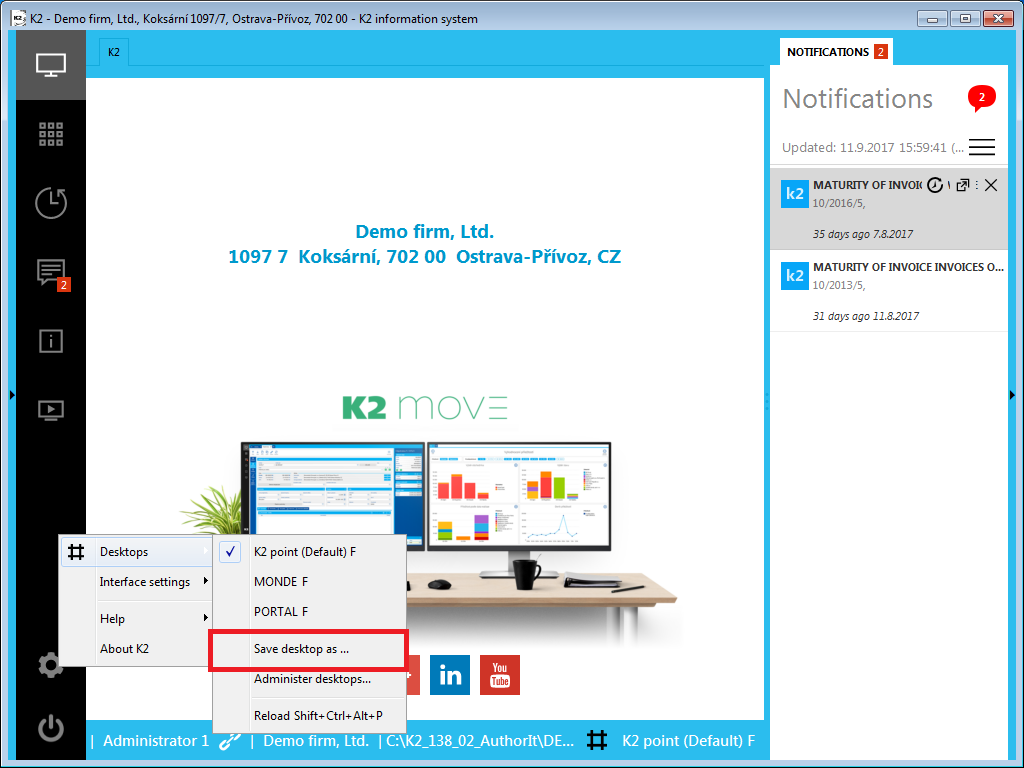
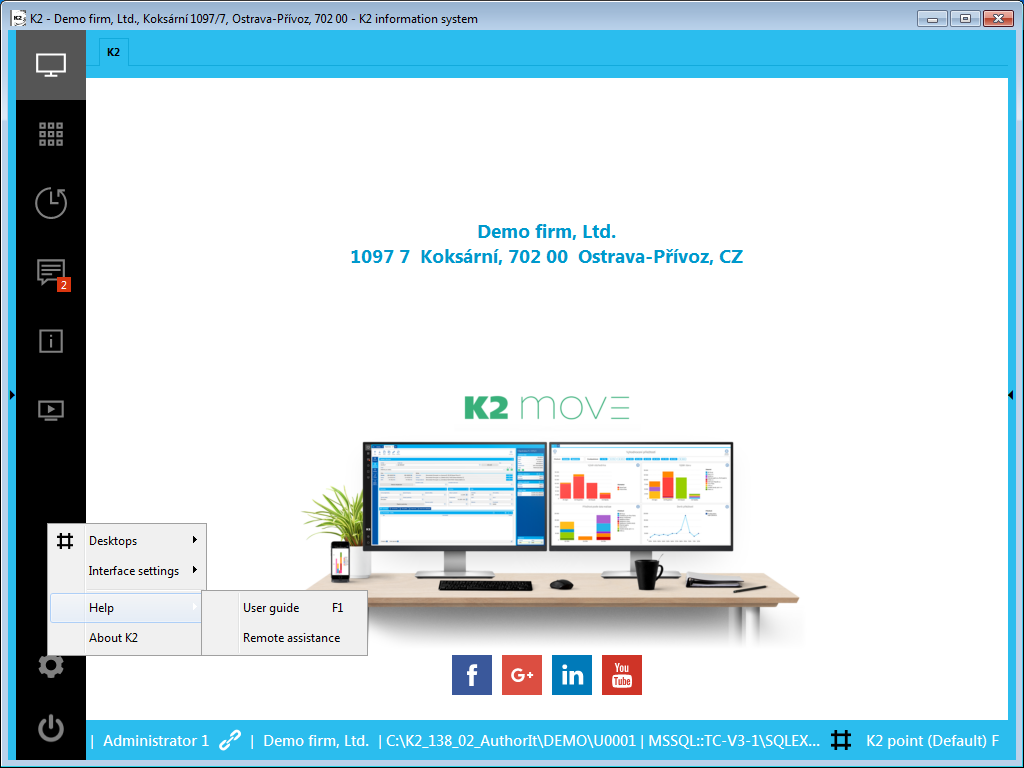
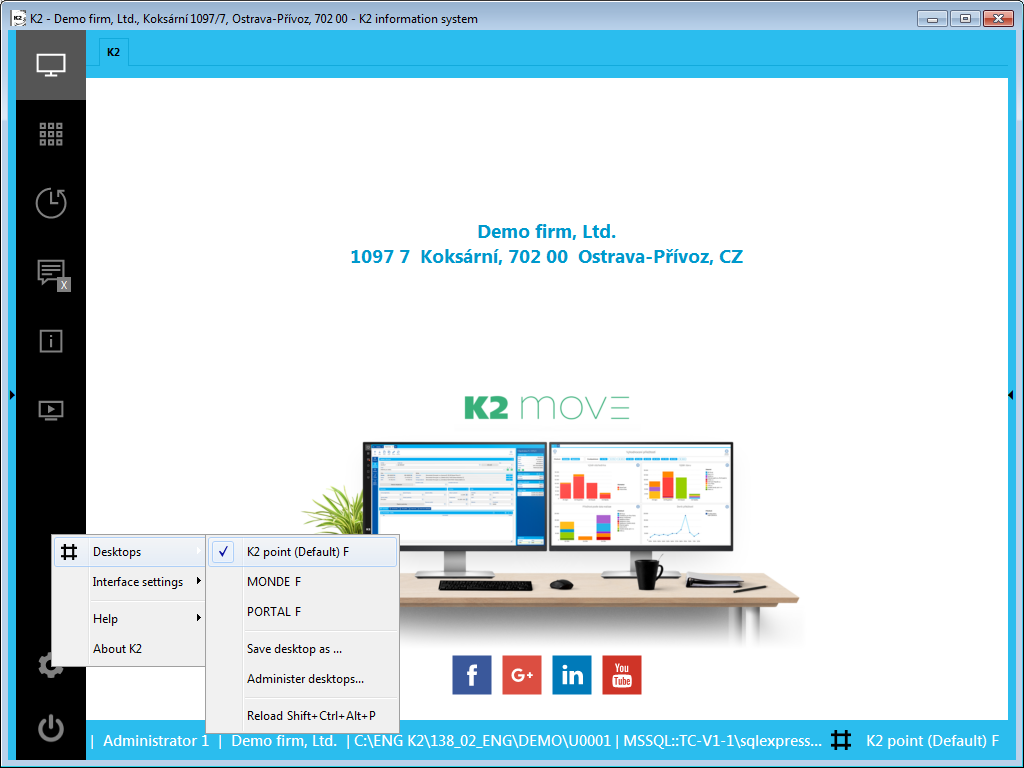
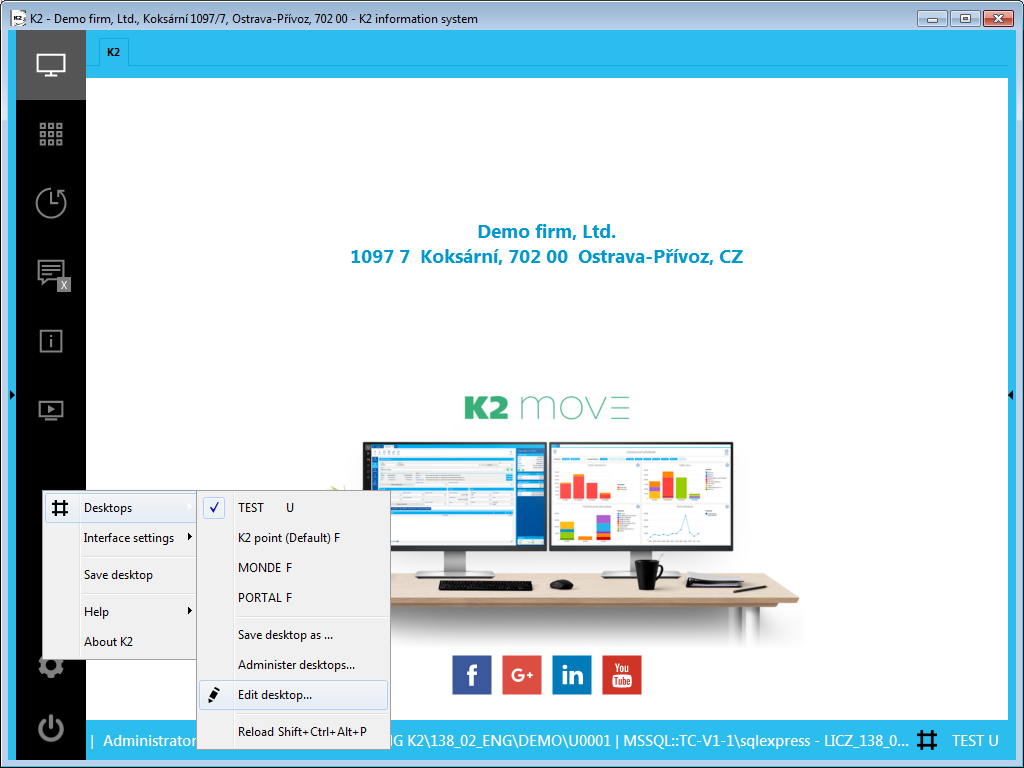
There is also the function About K2, by which you can open the form with basic information about the version, besides the standard functions in the main menu. From the main menu you can also run Remote assistance or the list of desktops under the option Desktops. The individual desktops are either preset or created by the user (the further information about saving desktops are stated in the Desktop administration chapter).
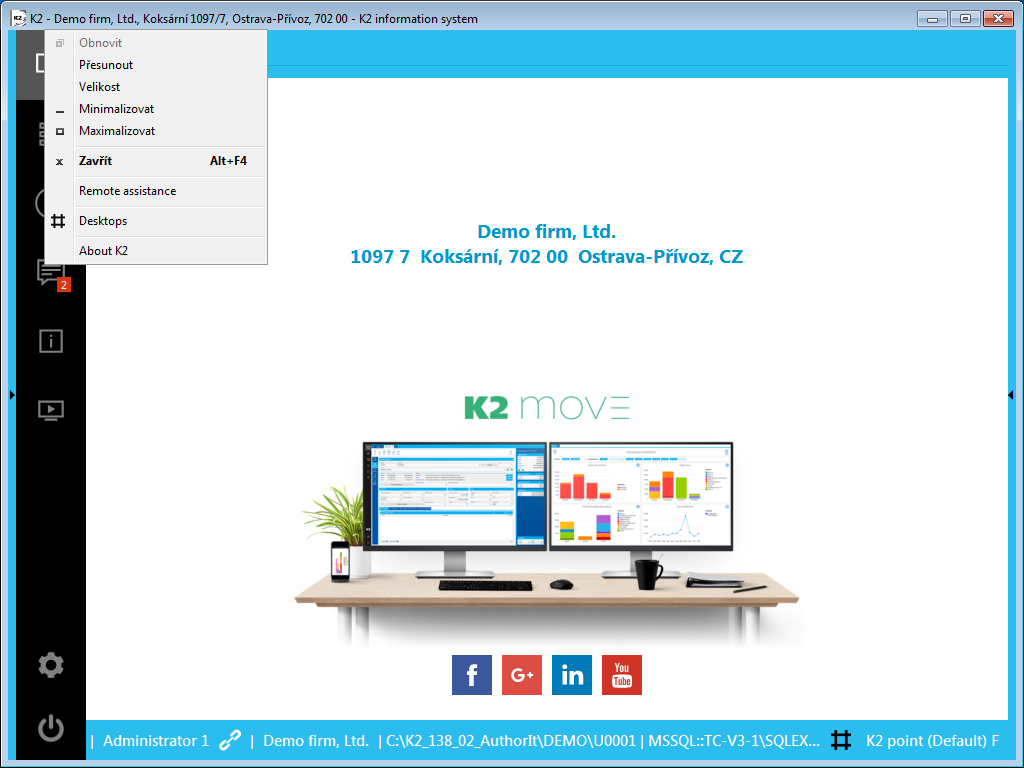
Picture: Desktop - Menu
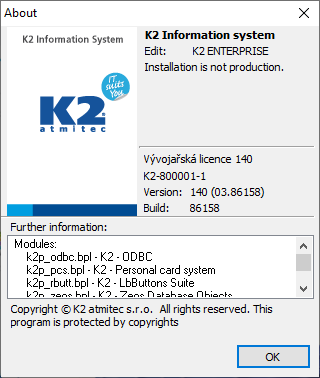
Picture: About K2 form

Picture: The list of desktops after pressing the Desktops option in the K2 main menu
If you select other than preset desktop (your own created desktop), then the option Edit desktop will bedisplayed in the main menu in addition. The further description of this function is described in the Desktopadministration chapter.
Picture: Main menu options after setting "own" desktop
The functions About K2, Remote assistance and Desktops can also be started from the bottom panel K2. Remote assistance is located under the Help and support option. There is also Contents and Index to get help from.
Picture: Desktop - Help
|
|
|
Desktop - navigation panel
The navigation panel serves for quick start of the functions, it contains the following buttons:

Picture: Desktop - navigation panel
Buttons' Description:
1 |
It displays the initial screen in the main area of the desktop. |
2 |
It displays a tab with tree menu, Default tab and Favourites tab. |
3 |
It displays tabs with a list of recently launched functions and the history of the displayed entries. |
4 |
The button displays a number of received notifications (number in the red frame). A notification panel is displayed after pressing this button. |
5 |
It displays the information panel with messages from the Infoservice. |
6 |
Button to switch a company in a client. For more information see the Administrator, the Administration of own companies chapter. |
7 |
Button for desktop settings. |
8 |
When pressed, the button turns red, and when pressed again, the user is logged off and K2 is turned off. (There is a double confirmation here to prevent the K2 from being accidentally turned off.) |
These buttons run functions into the main area of the desktop.
|
|
|
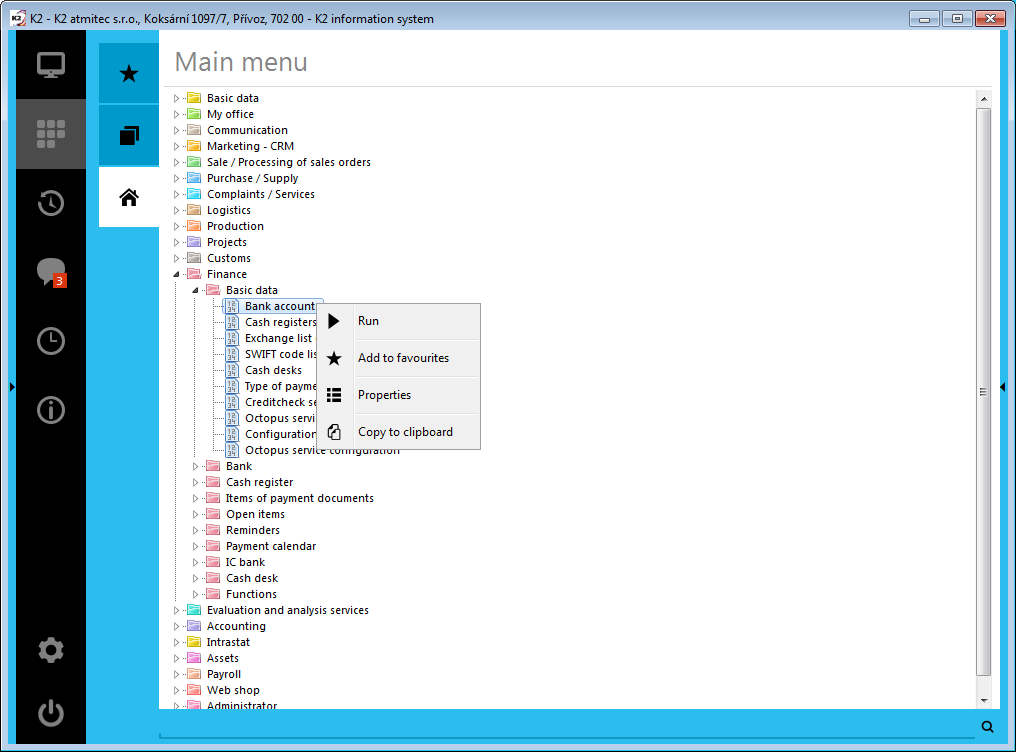
History of functions
This button displays history of books, scripts, functions etc. Only the last 15 records are displayed. The records can be grouped according to a button indicated in the red frame.
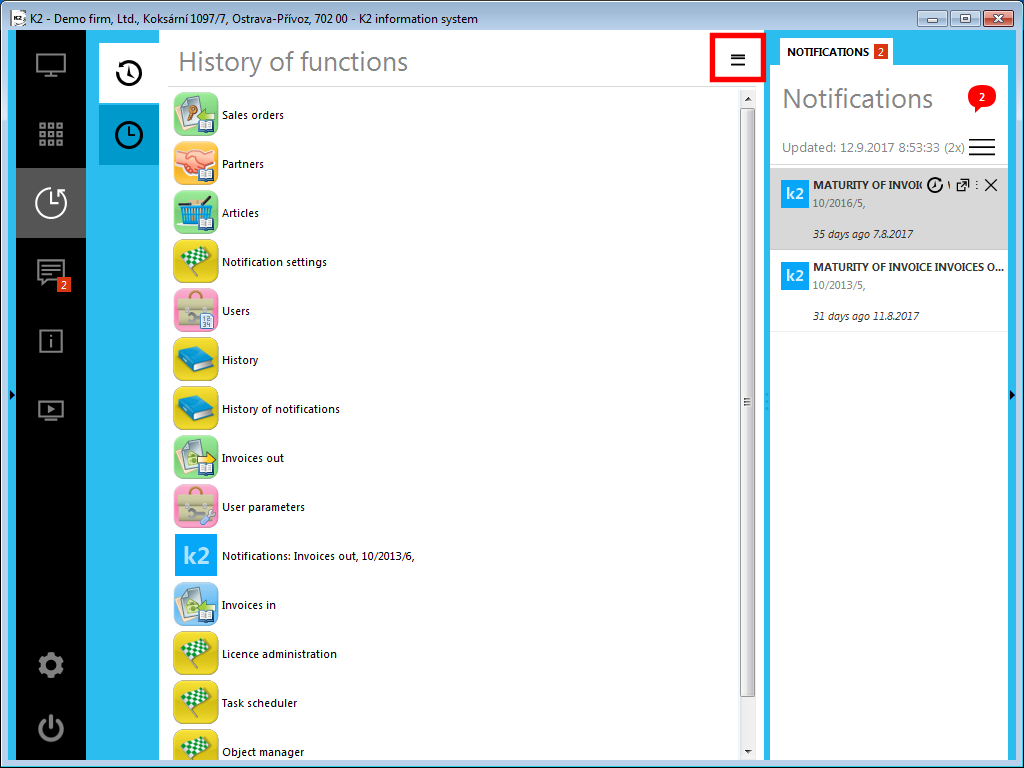
Picture: History of functions - not grouped records
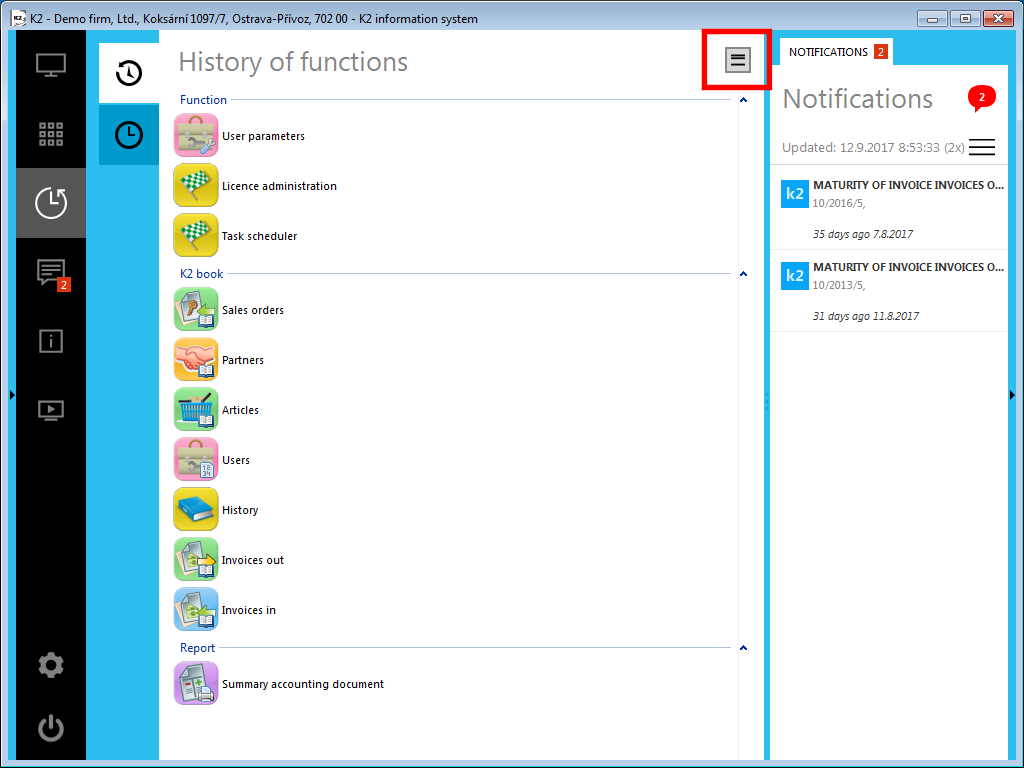
Picture: History of functions - grouped records
You can run the selected function, book, etc. by the double click on the icon.
Next options of the work with the records
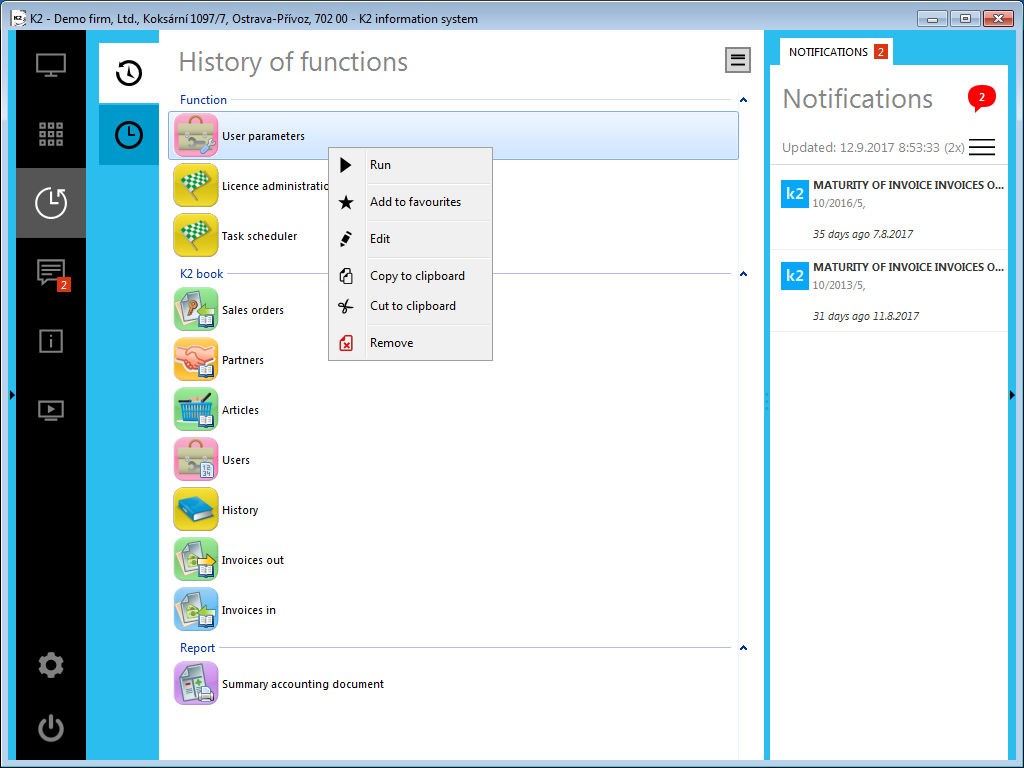
Picture: History of functions - options
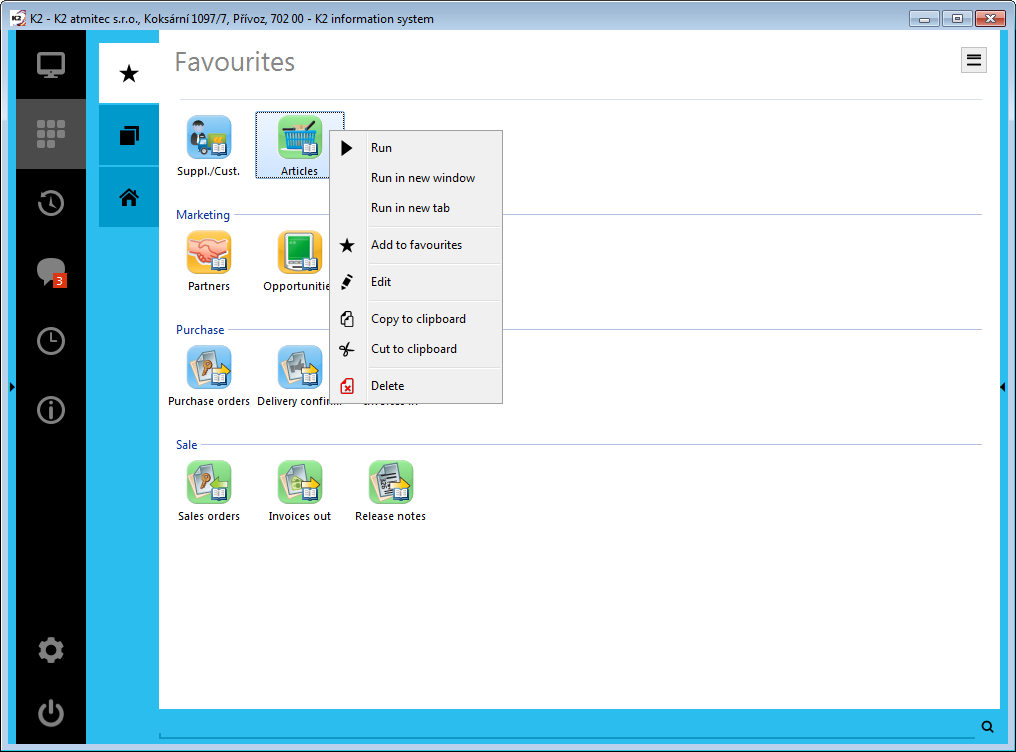
After pressing the right mouse button on a record the same options as on the Favourites tab of the desktop will be displayed. A record can also be deleted by using the option Delete or by the Delete key.
Add to favourites option inserts the record as an icon into the the Favourites tab.
Copying of records
- By using the right mouse button - Copy to clipboard option and after that by using the right mouse button - Paste from clipboard option - you can paste it on the Favourites tab.
- By dragging into the Favourites tab.
- The Ctrl+C (copy) and Ctrl+V (paste) keys shortcuts also work. You can insert it into the Favourites tab.
Note: Records are inserted into the Favourites like icons.
|
|
|
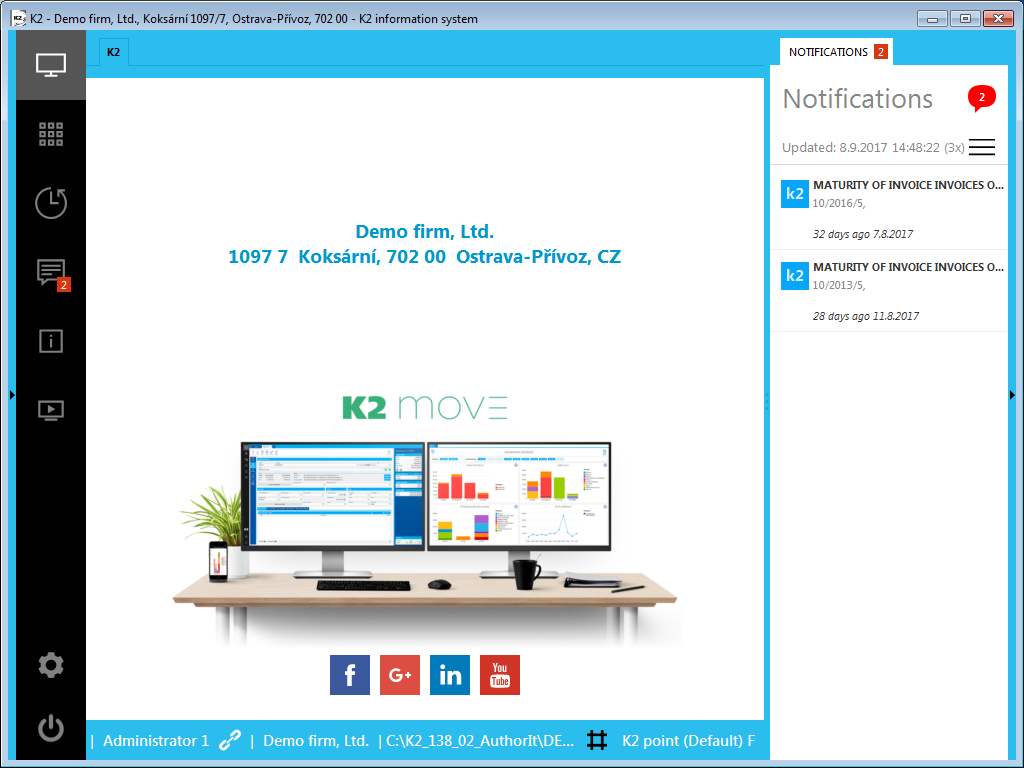
Notifications
The function activates a panel with the incoming notifications in the main area of the desktop. A number in the red frame of the function ![]() informs about a number of incoming notifications. This panel is the same as the notification panel, thus all functions are identical. Description of a notification panel is stated in the Notifications chapter.
informs about a number of incoming notifications. This panel is the same as the notification panel, thus all functions are identical. Description of a notification panel is stated in the Notifications chapter.
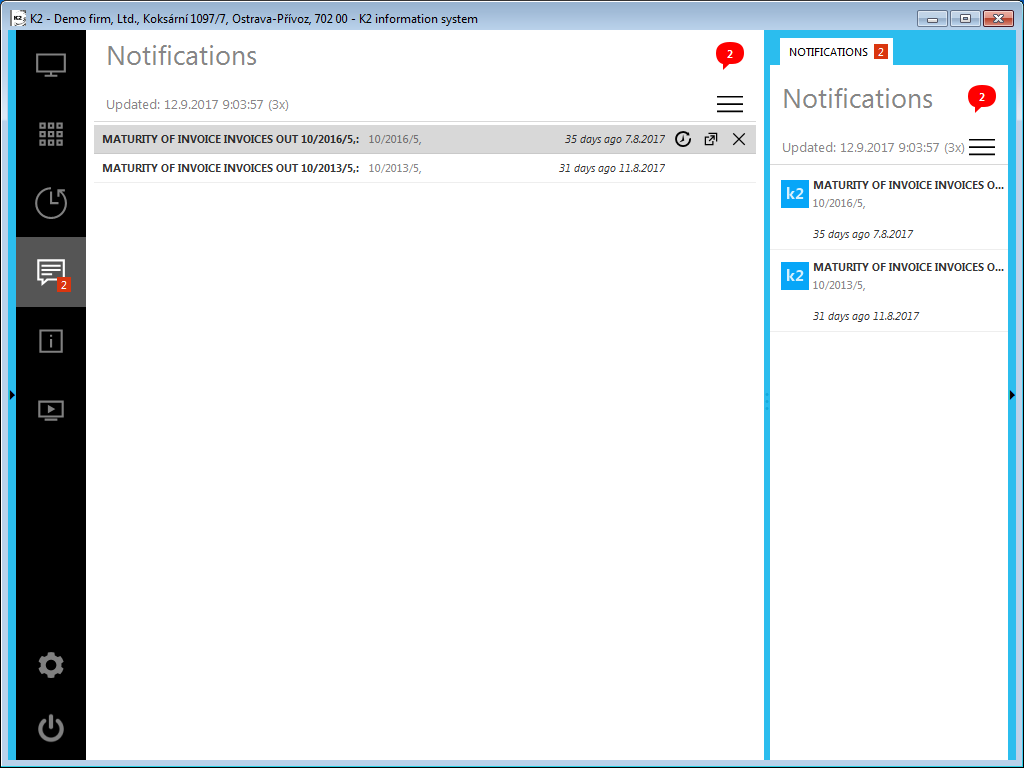
Picture: Desktop - Notifications
|
|
|
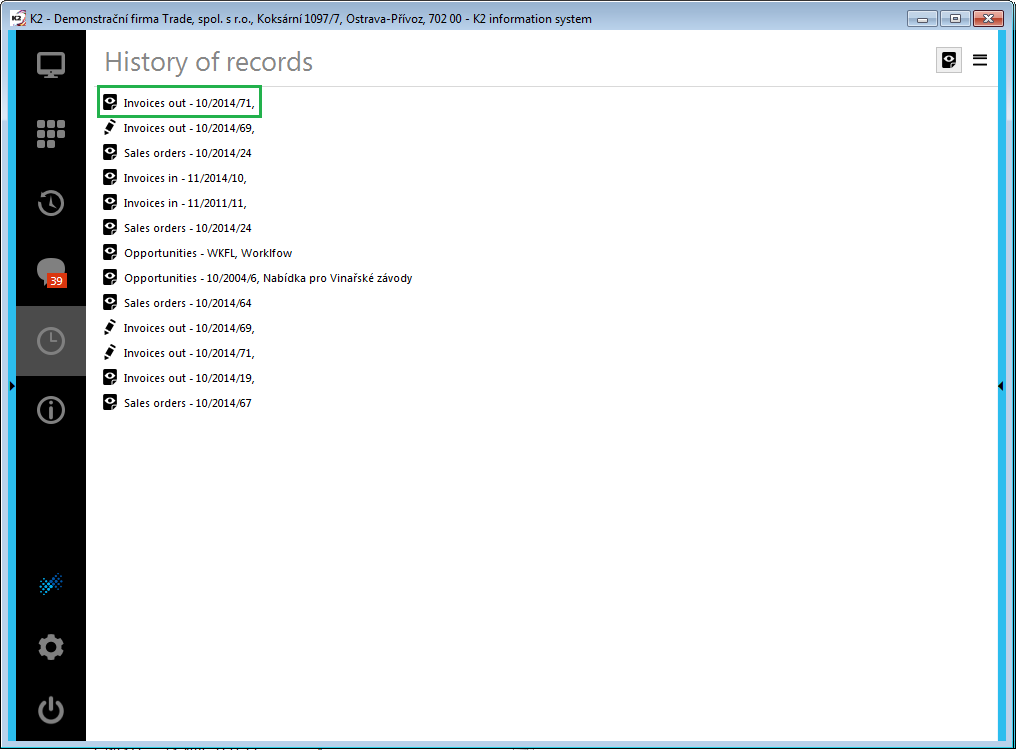
History of records
There is a list of documents that were edited on the History of records tab. If you press the icon Keep also track of visited records (in the red frame), the history of documents that we only visited and did not edit them is also saved.
Picture: Desktop - History of records
History of records is saved for User and Client. In the heading of the history of records, there is a name of the client, who the history is displayed for.
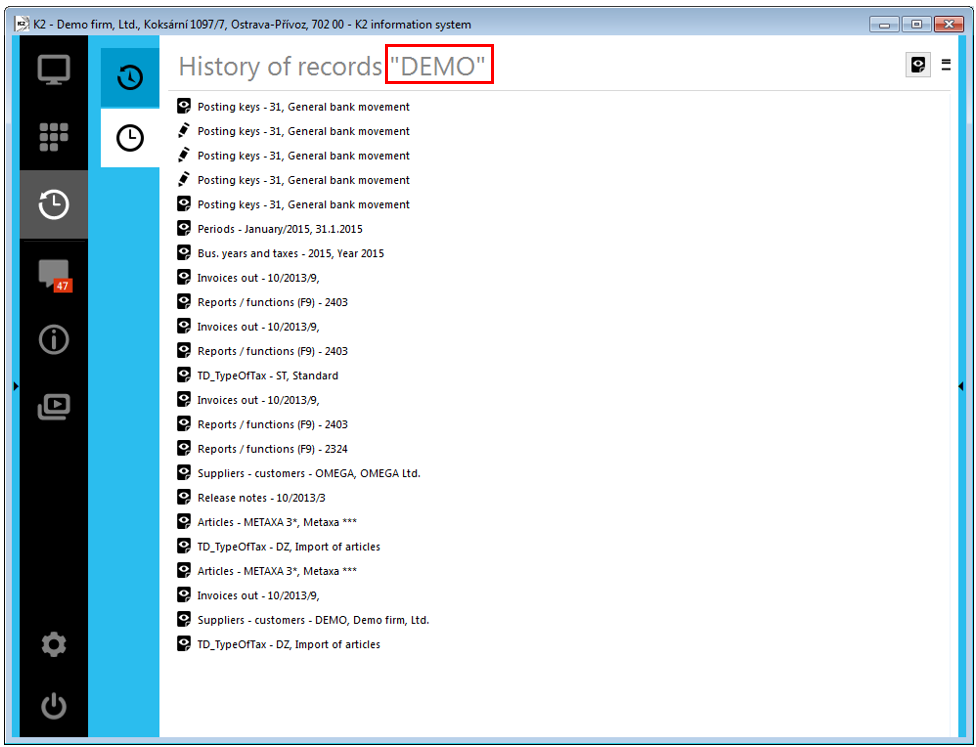
Picture: History of records - display the Client
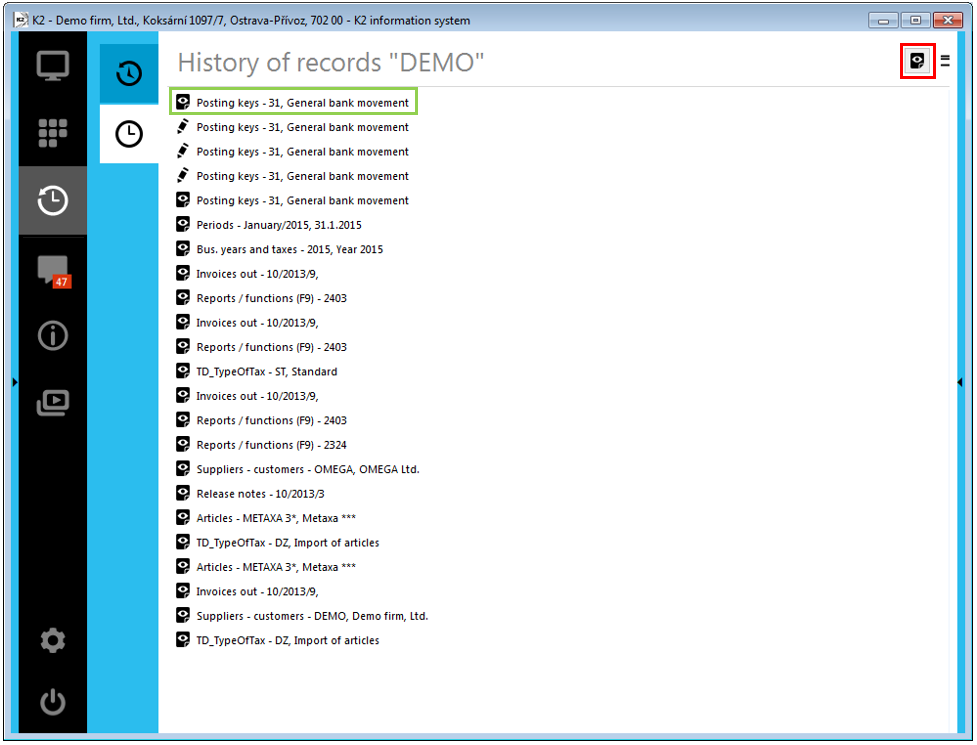
If there is a cursor over the record, a "hint" date and time when the record was displayed/changed is displayed.
Picture: History of records - date and time
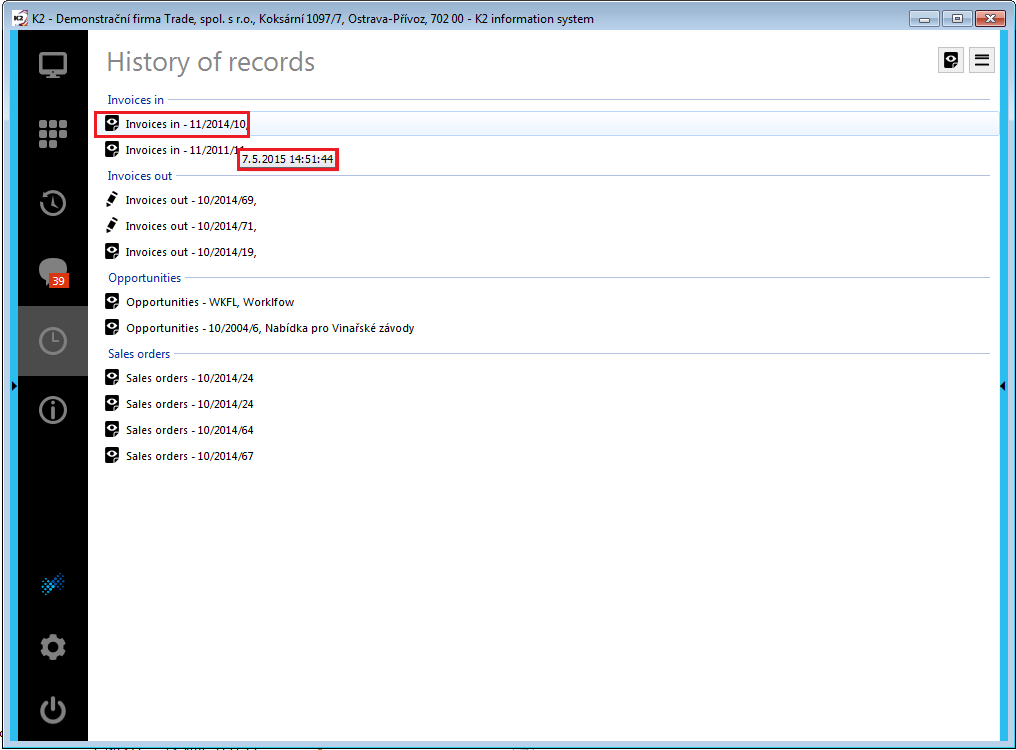
You can switch over the document from history by double click on the left mouse button. E. g. open a sales order that is indicated by a green frame on the picture above.
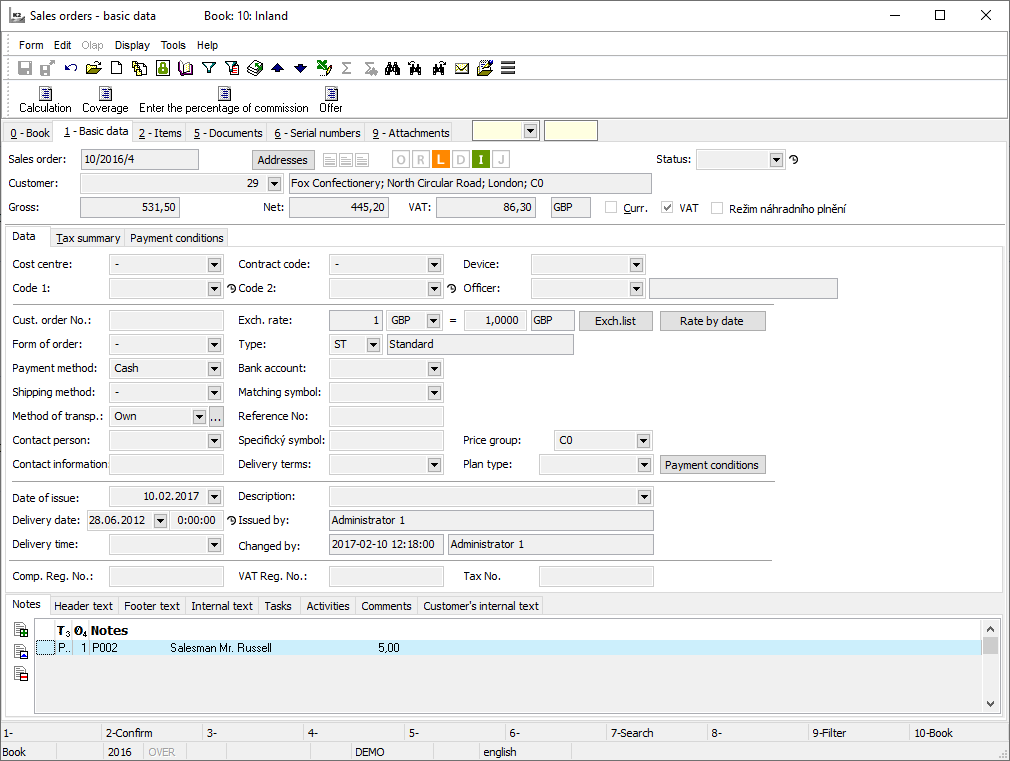
Picture: Open Sales order
If you switch to a document that you did not only browse in the past, but you also edited it, then the symbol ![]() is changed into the symbol
is changed into the symbol ![]() at the document.
at the document.

Picture: Record of modified invoice out
Picture: Open Invoice out
Further possibilities of work with history of records
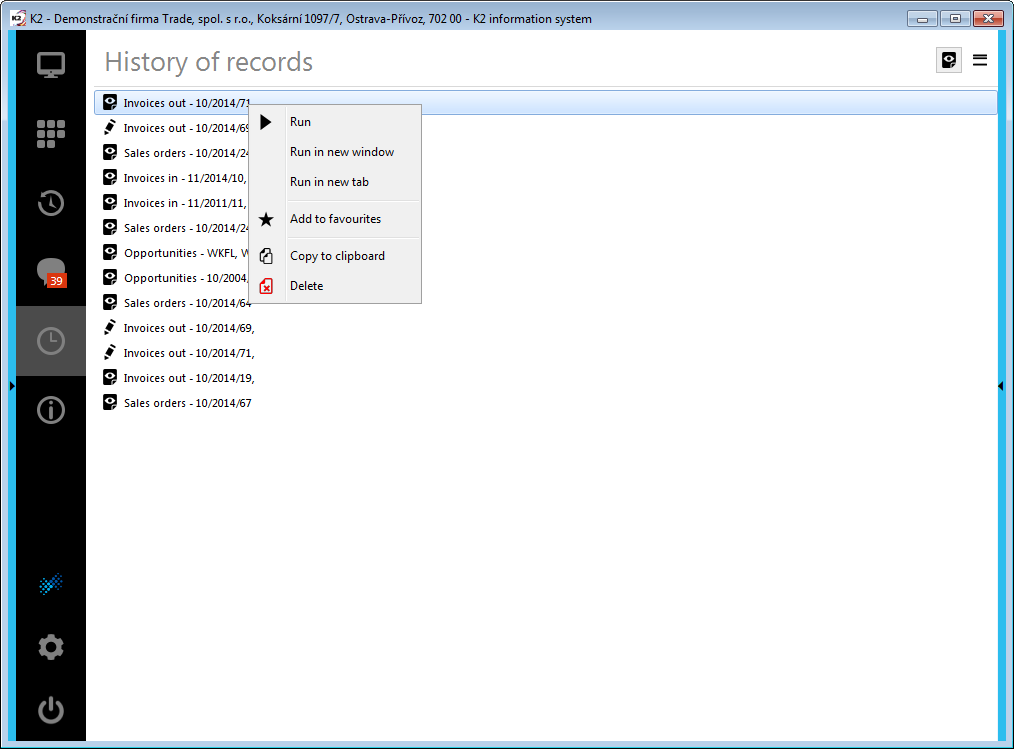
Picture: History of functions - options
After pressing the right mouse button on a record, the same options as on the Favourites tab and the Main menu tab of the desktop will be displayed. Copying is same as for History of functions.
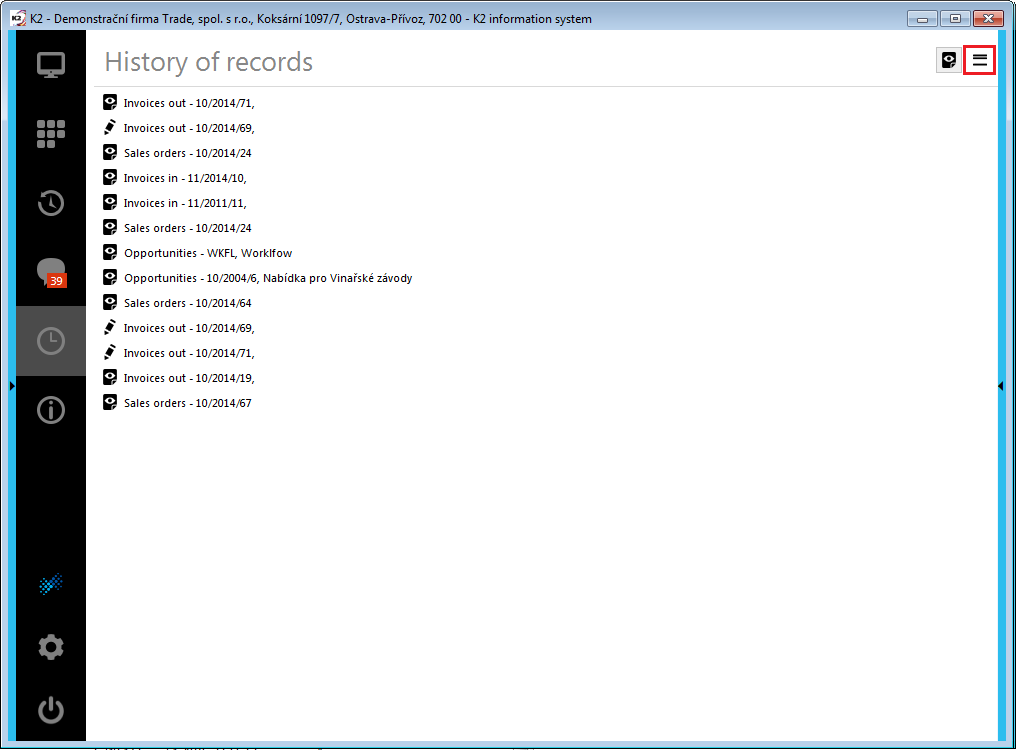
Grouping records
For a better transparency among records you can use the function Display groups (in the red frame). This function groups the records according to a book (data module), in which the record is located.
Picture: Not grouped records
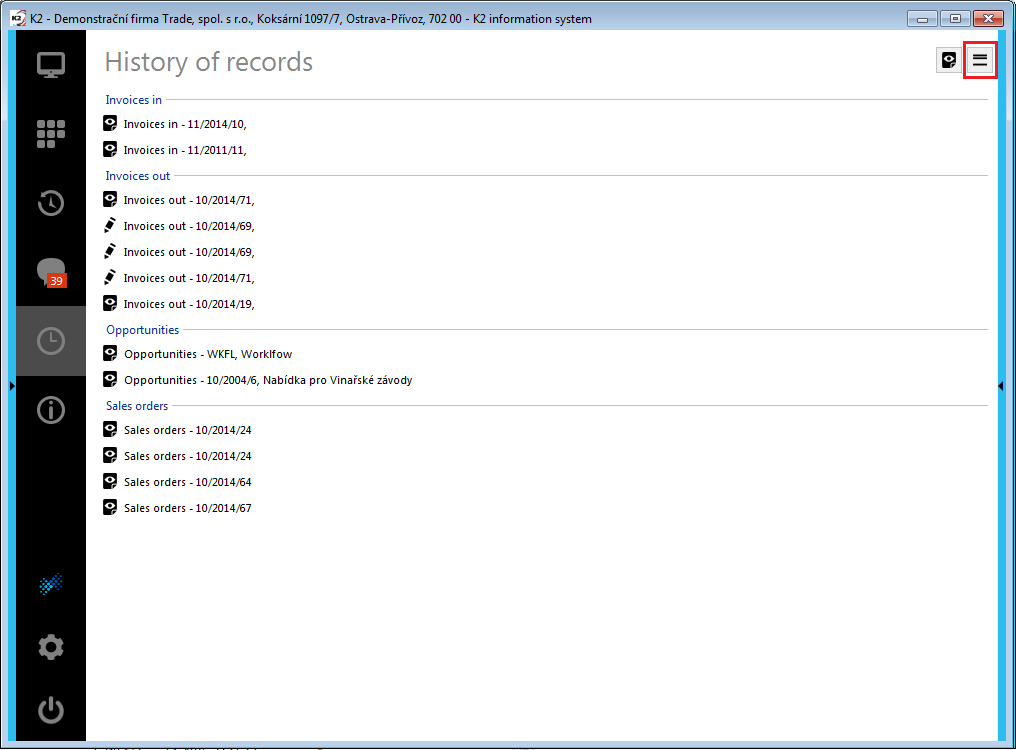
Picture: Grouped records
|
|
|
K2 news and Infoservice
![]() This functions of the navigation panel includes two tabs: K2 news and Infoservice.
This functions of the navigation panel includes two tabs: K2 news and Infoservice.
K2 news
This tab displays the most current information about events of the company K2 atmitec. E.g. information about the impending workshop, about the release of new versions etc.
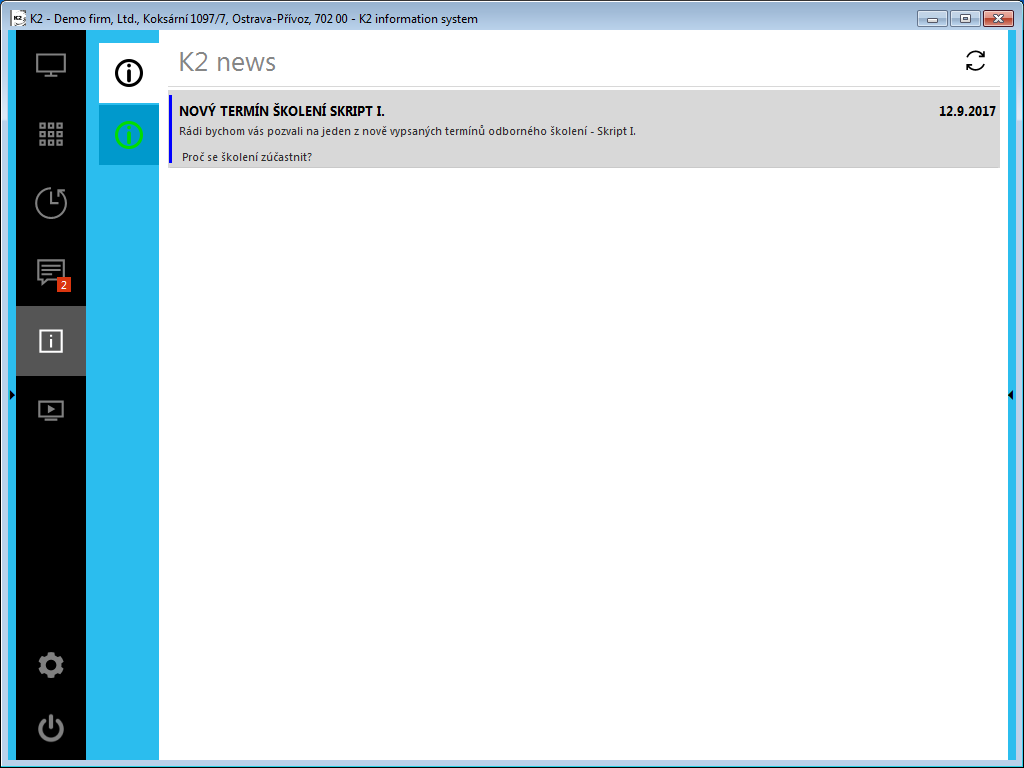
Picture: Desktop - K2 news
Infoservice
The Infoservice tab contains the news and error messages. It is possible to filter individually news and errors. Filter the news by the ![]() button and the errors by the
button and the errors by the ![]() icon in the book.
icon in the book.
![]() - it refreshes the page with infoservice.
- it refreshes the page with infoservice.
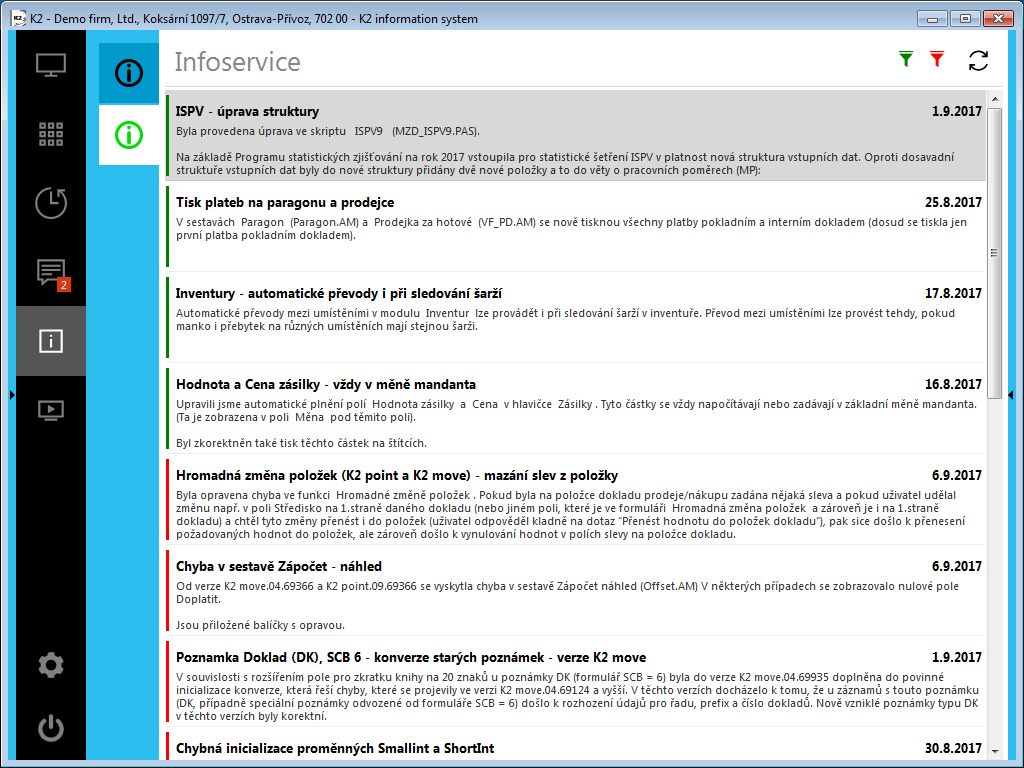
Picture: Desktop - Infoservice
|
|
|
IS K2 enables the users to publish the contributions to Infoservice customer support directly from the desktop. This function is accessible to the user who is linked with a contact person, who has set the appropriate login data into the Infoservice on the page E.
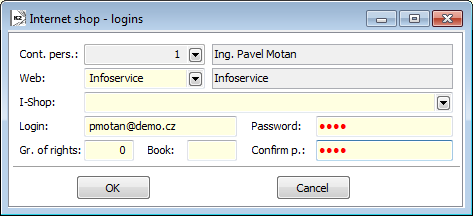
Picture: Login to the Infoservice
In the form for entering login data into the Infoservice, it is necessary to set the option Infoservice in the Web field. According to this setting, the program identifies that it is the login information to K2 Infoservice and makes it possible to enter requests of the customer support from the K2 IS accessible.
If there is no already existing Helpdesk in the Web - Books code list, we can create it by pressing the Ins key. In the new record form, fill in only the Abbreviation and Description fields.
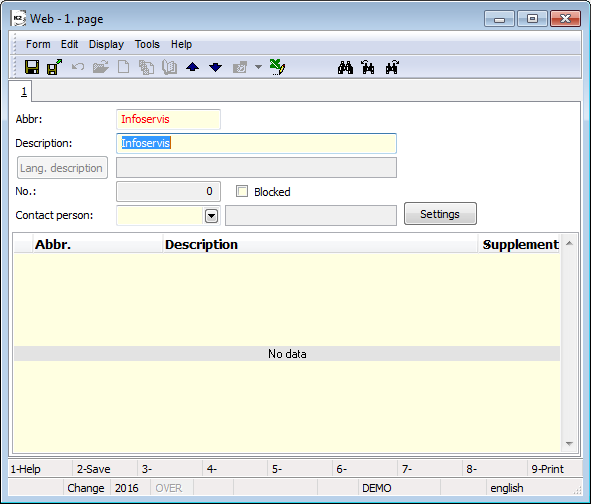
Picture: Web form - new record Infoservice
Save a new record by using F2 key. A message "There is no tree assigned to the web. Do you want to save the record anyway?" appears after saving. Confirm YES, it is not necessary to define any tree.
|
|
|
You can create a new infoservice customer support contribution by using the form, which can be run directly from the desktop K2 IS. By using icon  you display options, where you can display the form by the menu Help and support - New infoservice requirement. This option is available only after the fulfillment of all conditions, it means Interconnecting IS K2 user with a contact person and setting access data on the appropriate contact person. The New requirement form serves to create record in Infoservice and specify its properties.
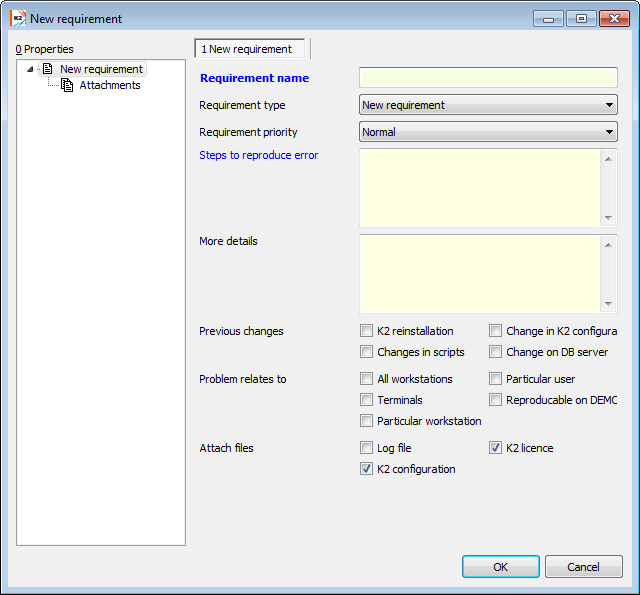
Picture: New requirement form
Fields Description:
Requirement name |
The field for entering a contribution name of infoservice customer support. |
Requirement type |
Customer support requirement type:
|
Requirement priority |
Customer support requirement priority:
|
Steps to reproduce error |
The field for a detailed description of the reproduction of reported error. |
More details |
Field for more details that relate to entering customer support contribution. |
Previous changes |
The checkbox to determine changes, that preceded the reported error. |
Problem relates to |
By using these checkboxes, you can determine, what the reported error relates to. |
Attach files |
By using these checkboxes, you can attach the files to the customer support:
|
Attachments |
The tab for inserting attachments to the customer support. Here, you can paste Print Screen of the screen. |
|
|
|
Webinars
 Information about webinars will be displayed on this tab.

Picture: Webinar
|
|
|
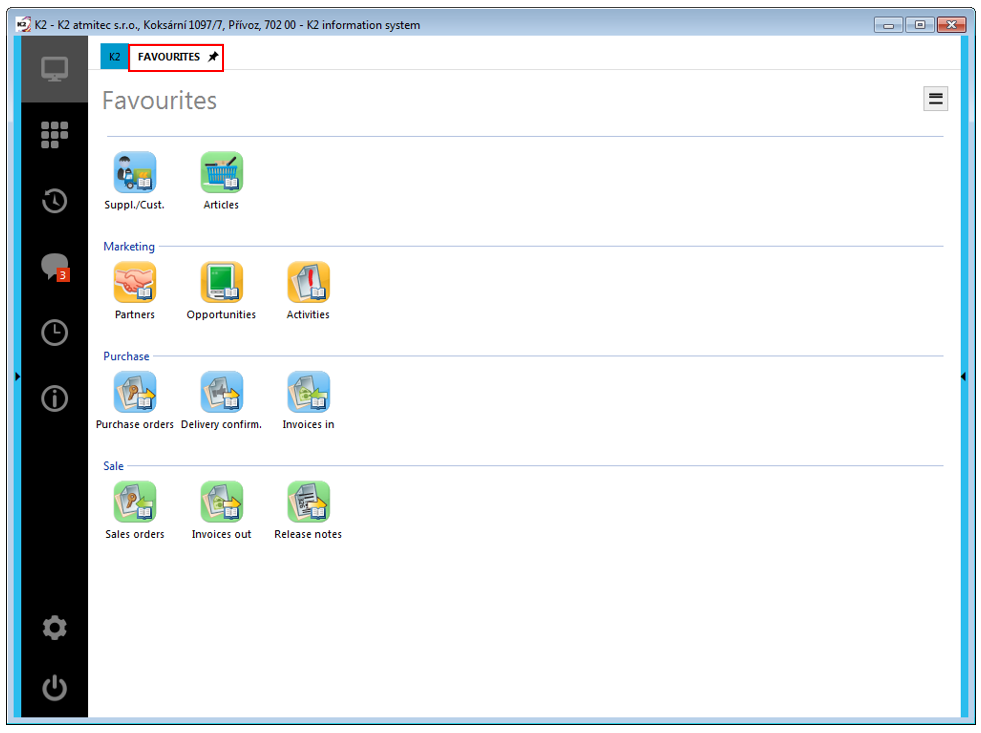
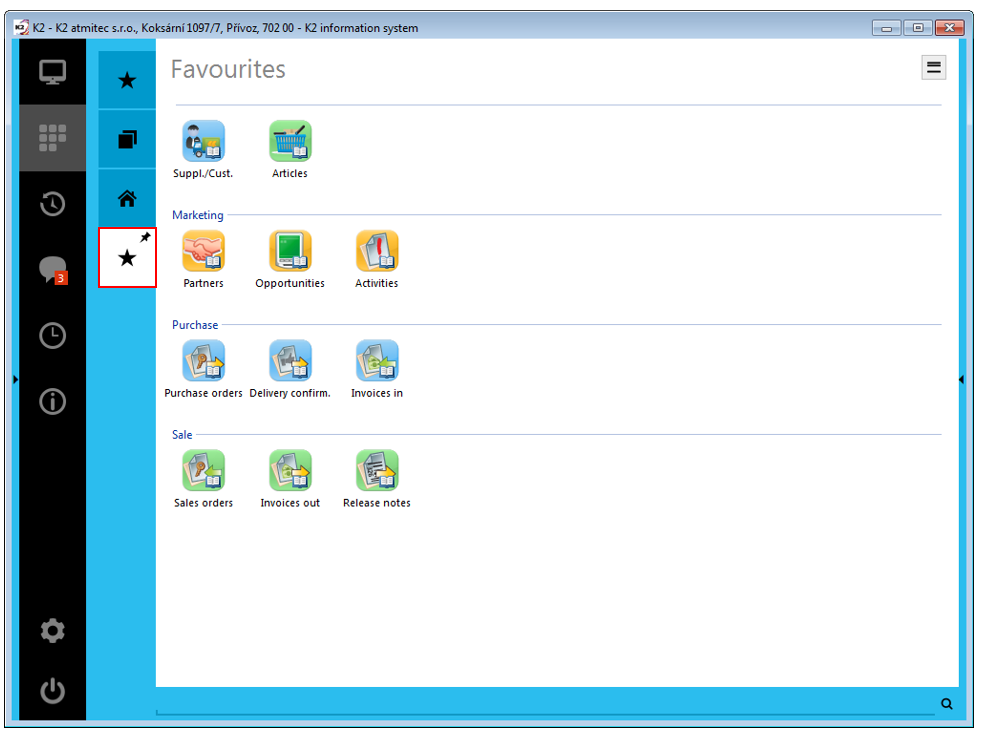
Desktop - main desktop
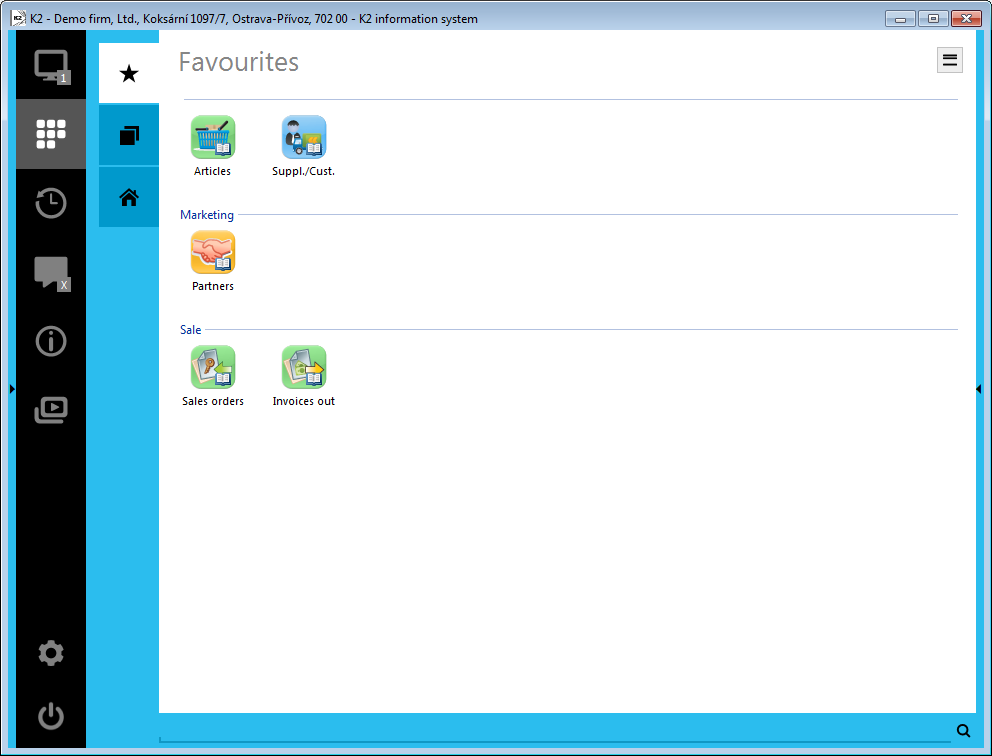
Favourites, Default and Main menu tabs:
- Favourites - this folder is empty by default. There it is possible to add any icons that will be used frequently. Only the user who has created the list of icons sees it. Icons can be added either by pressing right mouse button or by dropping by the mouse from the Default tab. Further description see the Work with icons chapter.
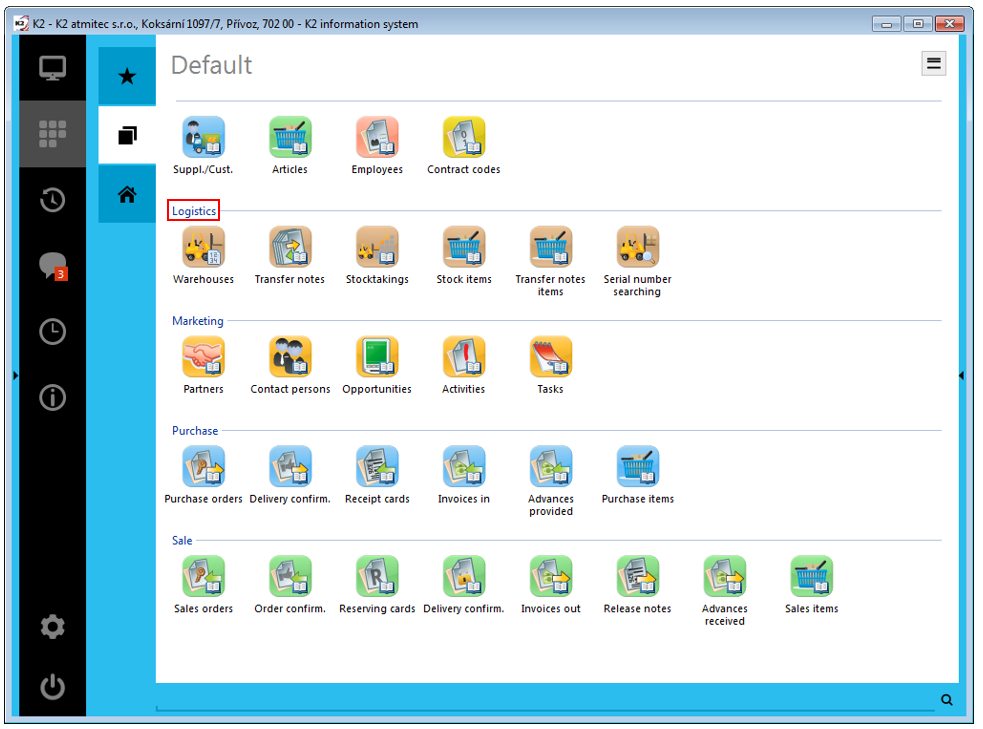
- Default - default list of icons.
- Main menu - tree menu.
Picture Desktop - Favourites tab
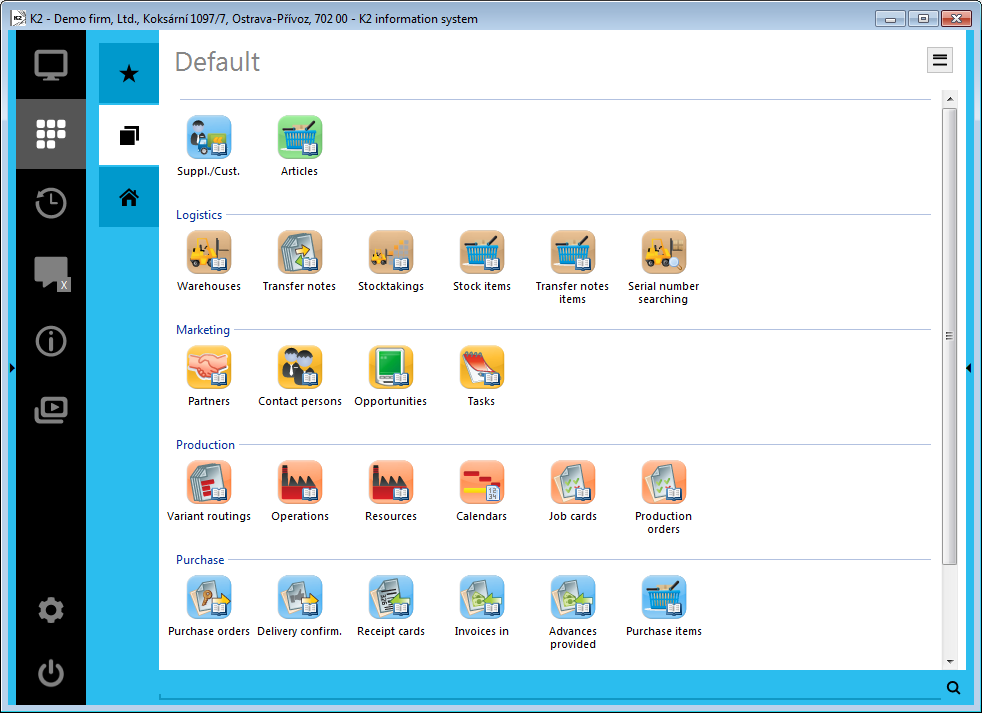
Picture: Desktop - Default tab
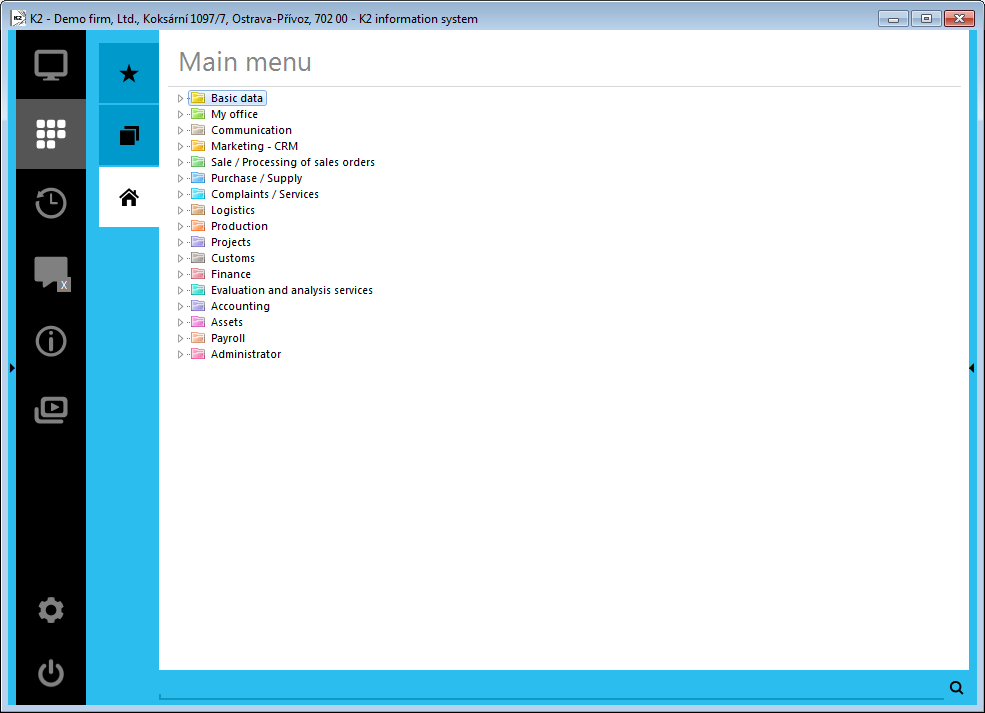
Picture: Desktop - Main menu tab
Description of a work with the tree menu is described in the Introduction - K2 menu System - Tree menu chapter. Principle of the work with items of the tree menu is similar as the work with icons on the desktop, see the next Work with icons chapter.
Displaying icons in groups
On the Favourites and Default tabs you can group icons according to modules, to which the icon belongs. The Display groups button, indicated by the red box on the pictures below, serves for grouping.
Picture: The Display groups button - not grouped icons
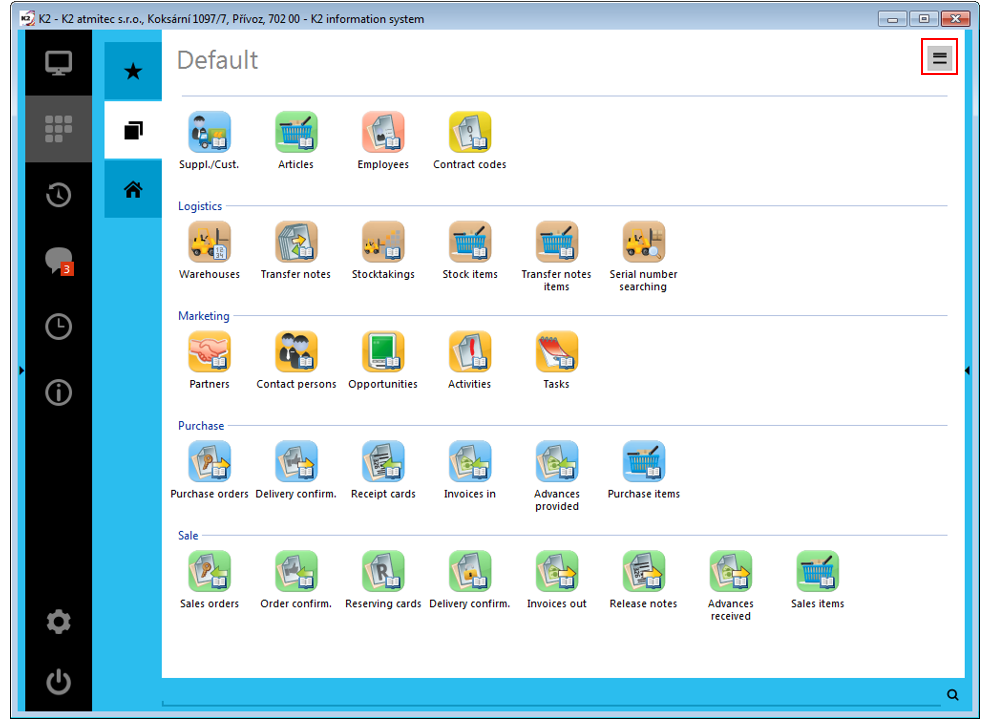
Picture: The Display groups button - grouped icons
Search field (in a red box) is a part of the main area - the further description is in the Searching chapter.
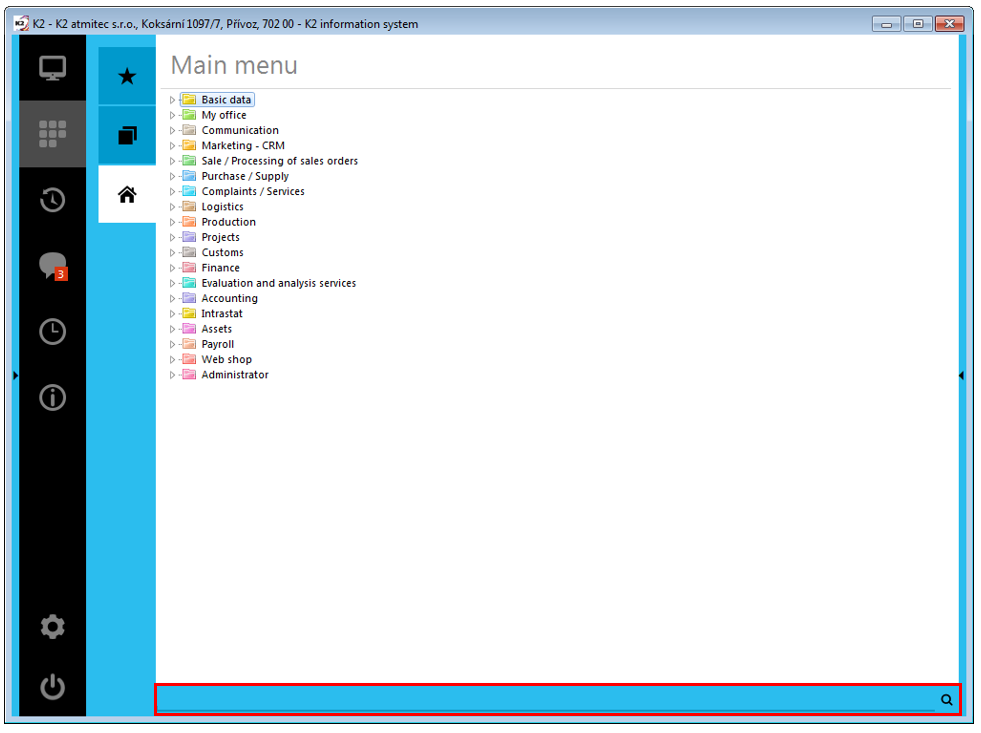
Picture Desktop - search field
|
|
|
Working with icons
You can edit your desktop design according to your requirements. You can set or copy tabs from each part of the desktop within those parts. You can also set Desktop design that was in the elder versions of the K2 IS.
The existing icon on desktop - Default tab
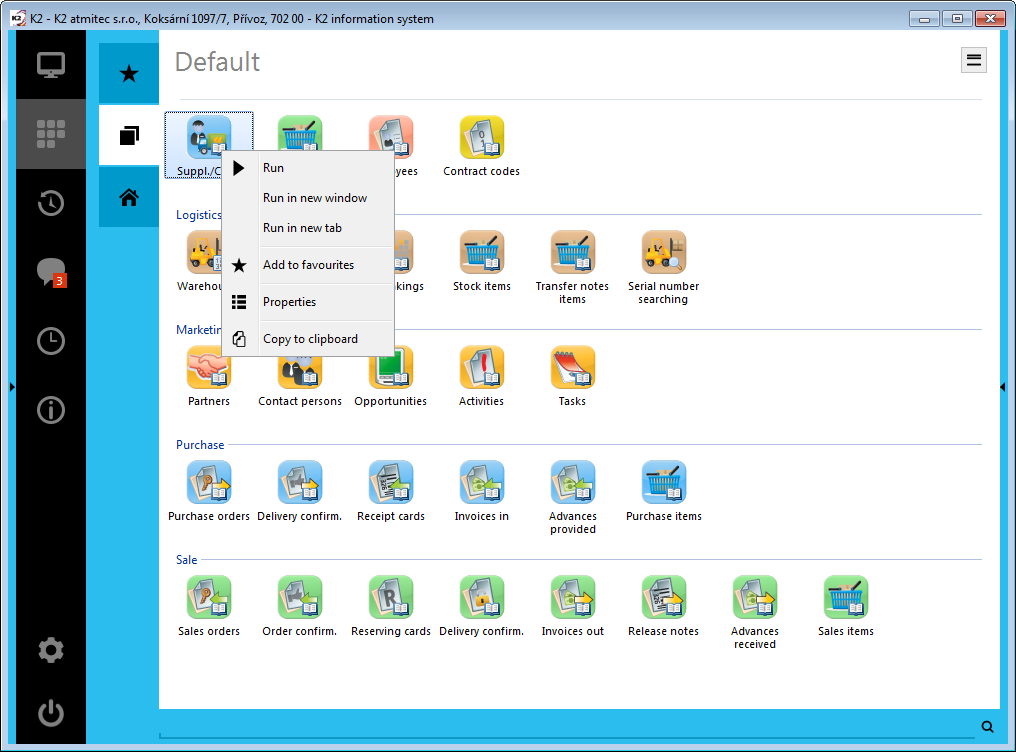
Picture: Desktop - possibilities
Description of functions:
Run |
It runs the function (e. g. It opens the book or it display the report). |
Run in a new window |
It runs the function in a new window. |
Run in a new tab |
It runs the function in a new tab in the middle part of desktop. |
Add to Favourite |
The function is add into the Favourites tab as an icon. |
Properties |
This item displays the properties of the saved icon. |
Copy |
It copies an existing icon from the Favourites, Default or Menu. Then you can paste it anywhere on the desktop in the Favorites tab. You can edit this new created item, e. g. you can edit the name, parameters, view, etc. You can copy this icon by pressing Ctrl+C keys. Further possibility for copying the icons is by the "drag&drop" function from the Default tab or Menu onto the Favourites tab. |
The same book does not open in tabs twice by repeated double-click of the left mouse button - to save space. If you want to open the book more times in the tab, you have to use the function by pressing right mouse button and by selection the possibility Run in a new tab.
The existing icon on desktop - Favourites tab
The Favourites tab is determined only for use of a user, every user can edit it according to his/her requirements. It contains more options than the Default tab.
Picture: Desktop - possibilities - for Administrators
Description of functions:
Edit |
By means of Edit option, it is possible to modify the individual icons setting. |
Note: In case that you have set Your Desktop, see the Setting desktop chapter, the dragging icon means moving it!!! If you want to copy the icon, you have to press the Ctrl key during dragging!
Remove |
The function is similar to copying but the icon is not copied but it is removed. You can remove the icon also by pressing Ctrl+X keys. |
Delete |
Deletes the icon from the desktop and also the item from the tree menu. You can delete also by the Del key. |
The meaning of other functions is the same as in the Default tab.
All these operations with icons can be executed with more icons at once:
- by clicking on heading of "group", e. g. "Marketing" (groups are ordered alphabetically on the desktop),
- by selecting the icons by keeping the left mouse button on icon and parallel moving the mouse indicator through the others icons,
- marking the icons by pressing the left mouse button on icons one by one with the pressed Ctrl key at once,
- marking of icons by means of arrows on keyboard with the pressed Shift key at once.
Picture: Desktop - group on the Default tab
Insert Icon - Favourite tab
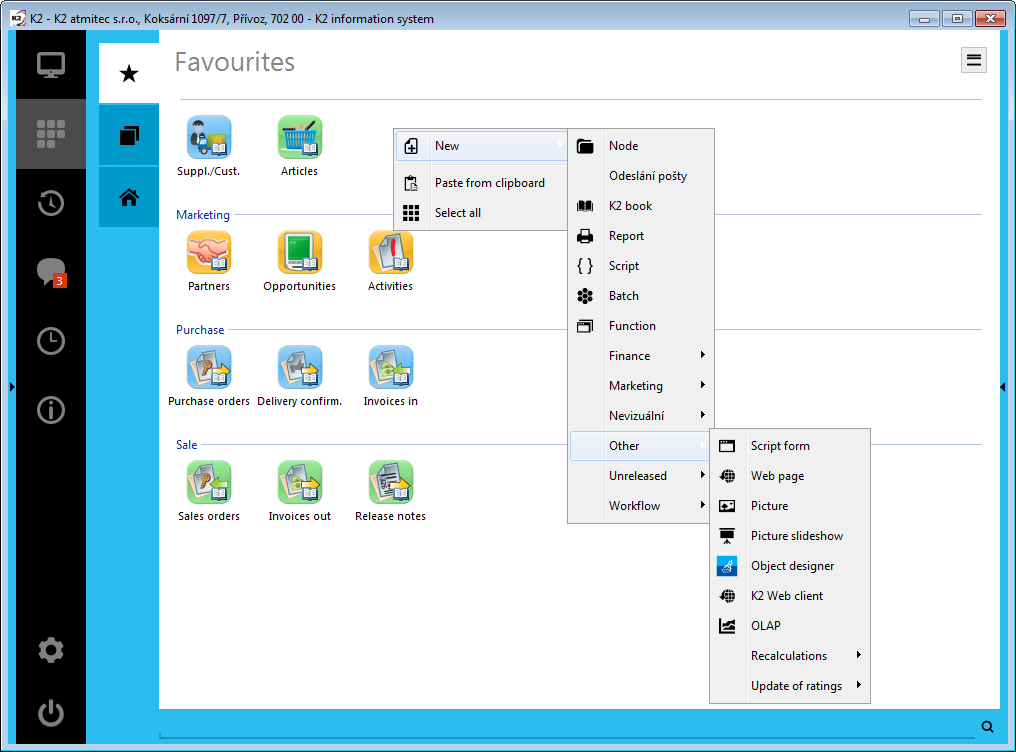
You can insert icons only on the Favourites tab. You can add the icon by pressing Ins key or by pressing the right mouse button on desktop of Favourites tab. If you select the New item, you can choose if you want to insert e.g. a new book or report.
Picture: Desktop - Favourites tab - insert icon by pressing right mouse button
Description of functions:
New |
It inserts new book, report, script, function or picture, etc. |
Paste |
On desktop, you can paste an icon that you have copied or cut from Favourites, Default or Menu. Insert by pressing Ctrl+V keys. |
Select all |
It indicates all icons on the tab. |
After pressing the New or Ins possibility the form for inserting a new function displays.
Description of shared fields of form for all elements of desktop and tree menu:
Name |
Name of item in the tree menu. |
Icon |
Select a bitmap that will be the icon for desktop of the K2. |
Icon for tree |
Select a bitmap that will be the icon for tree of the K2. |
Group |
Name of group in that the icon will be assigned on the desktop of K2. |
Tip |
Into this field, we enter text which will then appear as "hint" at the element. |
Book
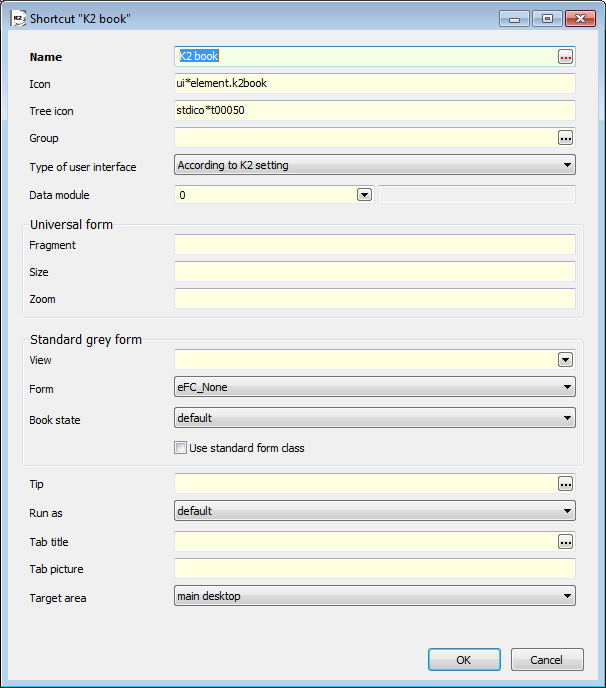
Picture: Form for editing book
Fields of book Description:
Data module |
Select a book over that the function will be run. |
Form |
It is automatically entered after selection of data module, but you can change it by selection from the expanded menu. |
View |
You can select already saved view in data module. The function will be run in this view. |
Book status |
Select the status of book in that the book will be run (in the filter, or over all records or in default setting). |
Run as |
You can run this function either as the tab or as a new window or in a default setting. |
Title of tab |
The name of a new tab in that the function is activated. |
Picture of tab |
Option to select a bitmap that will be represented a new tab. |
Target area |
The part of desktop in that the function is saved (desktop, navigation, notification or default setting). |
Batch
It is used to activate more functions one after another. E. g. firstly, you can set the selection to be run. Next functions will take the selection as a current data module. You can also insert a batch into a different batch. Every report can have it's own data resource.
Batch tab
Picture: The form for batch setting
Fields' Description:
Data module |
Define the data module over which the batch is to be activated. |
After filling in the Data Module field on the form for batch definition, another field Filter will appear.
Filter |
Field for the selection of an existing filter of the selected data module. |
Use superior data module |
This field enables reports and scripts to get current data module either as a data module defined in the Data source or, if possible, the data module that is currently active in book - without edits. |
After expanding the Filter field, a list of filters saved in the given data module will appear. Selecting a filter ensures that the item of a batch (e.g. a book or a report) will be run over the records selected by the defined filter.
Picture: Form for batch settings - Filter field.
Items of batch tab
Picture: Form for setting items of batch - script
When insertion a new item of batch the form opens depending on selection of type of function. E. g. on the picture there is displayed a form for insertion of a script into the batch. The script is identical to the form for insertion of a script onto desktop or into tree menu.
Report
Report tab
Report that is activated from substitute or from tree menu is opened as a new tab. Report that is activated through the Reports (F9) book is opened in a new window. The report is activated on an active data module (on an opened book) that is activated on a middle column.
Picture: Form for inserting report - Report tab
Fields' Description:
Report |
Select report from directory. |
|
Run as |
Way how the report will be activated, e. g. in a new window. |
|
Electronic signature |
|
|
Sign |
Field can obtain the values Never,Alwaysand If signature is entered. |
|
|
Never |
The report is always printed without a signature. |
|
Always |
The report is always printed with a signature. This value is conditional on the certificate being installed and filled-in either in the Signature field or in the report parameter ("Sign"). If it is not, an error message will appear while printing out the report. The report will not be printed out without the electronic signature. |
|
When the signature is specified |
The report is always printed. If the certificate is entered in theSignature field or in the report parameter, then the report will be printed out with signature. If the certificate is not entered there, the report will be printed out without signature. |
Signature |
Select the installed certificate from the file. |
|
Name |
Automatically completed certificate name by filename. |
|
Data source |
|
|
Data module |
Data module over which the batch is to be activated. |
|
Filter |
The field works similarly as in a batch. |
|
Use superior data module |
The field works similarly as in a batch. |
|
Printing settings |
|
|
Printer |
Printer by that the report will be printed. |
|
Copy |
Number of copies. |
|
Sorting |
It works simultaneously as "Completion" at settings printers. When printing more documents, the sheets of paper will be ordered in a row like in individual documents. (First, second, third,... page; First, second, third,... page) |
|
Print on both sides |
The document will be printed on both sides. |
|
Rotated pages |
Report will be printed to enable browsing pages from below to the top. |
|
Paper resource |
Resource of paper that will be used to take paper for printing. |
|
Export settings |
|
|
Target of Export |
Select where you want to print the report, e. g. into the e-mail. |
|
Format |
File type, in that the report will be saved. |
|
File name |
Name of file, under that the report will be saved. |
|
You can send the report by e-mail. Set the e-mail, subject and text of message. |
||
Title of tab |
In case that you open the report in a new tab, enter a name of the tab here. |
|
Picture of tab |
Option to select a bitmap that will be represented a new tab. |
|
Target area |
The part of desktop in that the function is saved (desktop, navigation, notification or default setting). |
|
On the Parameters tab set the parameters of report.
Picture: Report - list of parameters
Picture: Form for setting parameter
Description of fields of the form for setting parameters of report:
Parameter |
Program parameter name. |
Description |
Parameter's description. |
User description for manual input |
The field is meaningful if the User input field is checked. Here you can define the label that will be displayed at the parameter when activating the report. |
User input |
If the field is checked, then when activating the report, the form is displayed to set the values of parameter. |
Value Yes / No |
If it is checked, the value is set on "Yes". |
Expression |
|
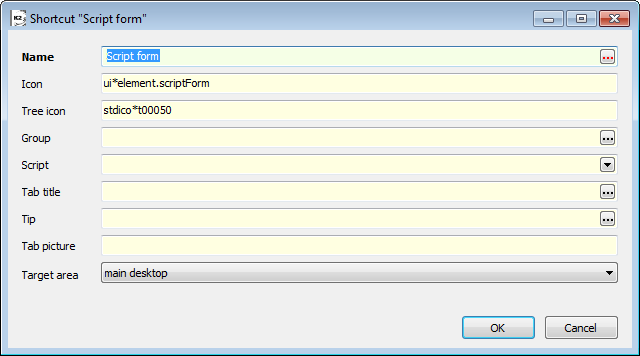
Script
Script tab
Picture: Form for insertion of script - Script tab
Fields' Description:
Script |
Selection of script from directory. |
Data module |
Define the data module over which the script is to be activated. |
Filter |
The field works similarly as in a batch. |
Use superior data module |
The field works similarly as in a batch. |
On the Parameters tab set the parameters of script.

Picture: Script - list of parameters
Picture: Form for setting parameter
The functionality is similar to setting the parameters of report.
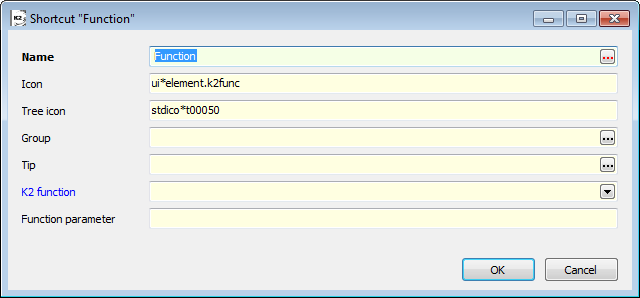
Function
Not all functions are book, report or script. Here you can set the other functions.
Picture: Form to insert the function
Fields of function Description:
No. of K2 function |
Select the demanded function from the code list of registered functions. The number of function is entered. |
NON-VISUAL
This item includes the functions: Batch, Script, Report, Product recalculation, Stock recalculation and Stock recalculation - current period. These functions are run in the background (we do not see their progress). They are used, for example, in Task Scheduler, when they are started automatically at a certain time. The settings of the functions Batch, Script and Reportis identical with the settings of visual functions; see above. The functions Product recalculation, Stock recalculation and Stock recalculation - current period are described in the chapter Standard actions in Task scheduler.
OTHER
Form of script
Picture: Form to insert a form of script
Description of fields of a form of script:
Script |
Path to select file of form of script. |
K2 Web client
- This function also automatically logs the user into the web client after logging the user into K2.
- Web client that is run by this way does not occupy an user license of web clients.
- If the user owns and has set a contact center, he also logs into a contact center by running K2.
- By using web client from K2, you can also display record details directly in K2 .
Picture: Form to insert K2 Web client
Description of fields of a web client:
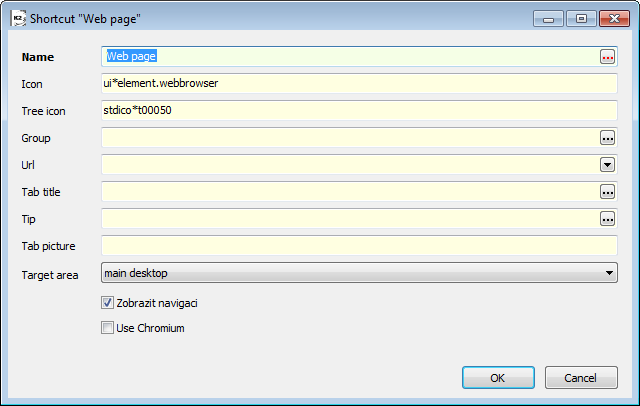
URL |
Domain address of server. Part of a web address is an address, at which the web client is installed. Part "/default.aspx" has to always be given at the end of the address. It displays the default page of a web client. |
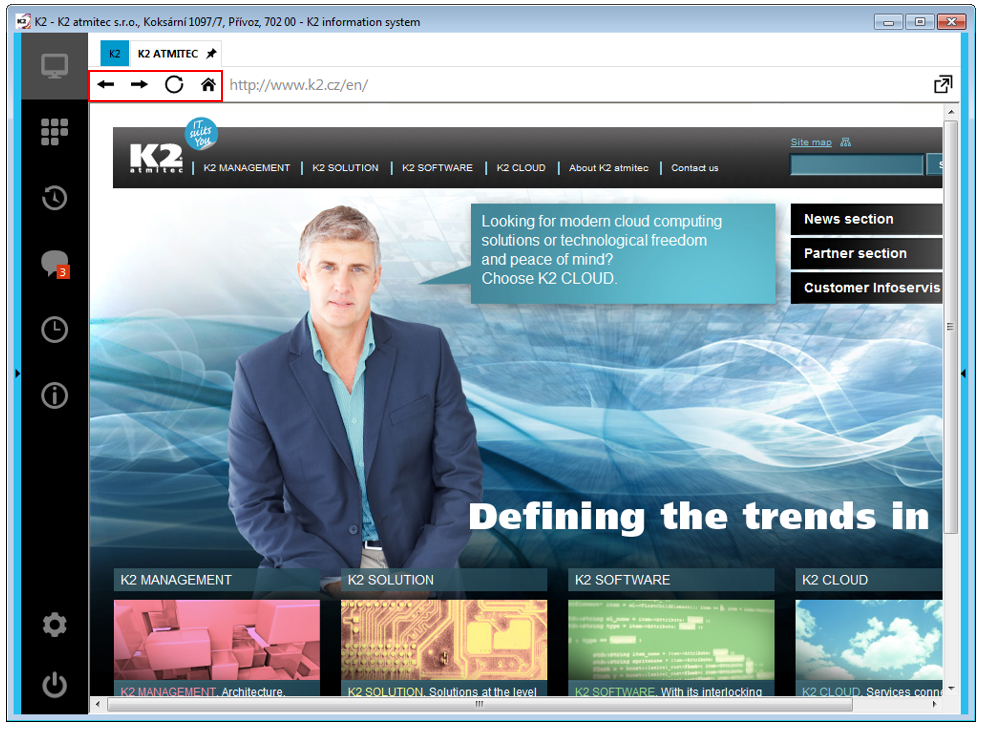
View navigation |
If you check this field, a navigation to switch back and forward between webpages, to refresh the page and to switch on the home page will be displayedin the Internet Explorer browser. Navigation is marked by a red frameon the "Picture: Web page - navigation". |
Use Chromium |
After checking this field, the internet website will open up in the Chromium browser. This is useful if you want to use the Backspace key while working. Internet Explorer uses this key for the action "Back" and opens the last displayed address in the browser. |
Picture: Web page - navigation
Web page
Picture: Form to insert a web page
Description of the fields of web page is identical to the description of K2 Web client.
Picture
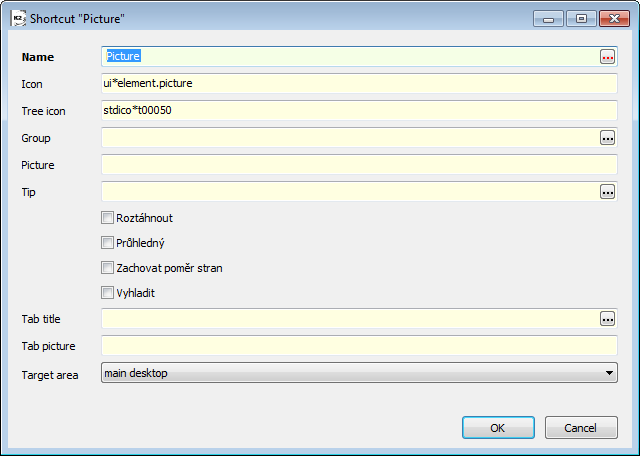
Picture: Form for editing picture
Fields of picture Description:
Picture |
Path to select the picture from directory. |
Picture slideshow
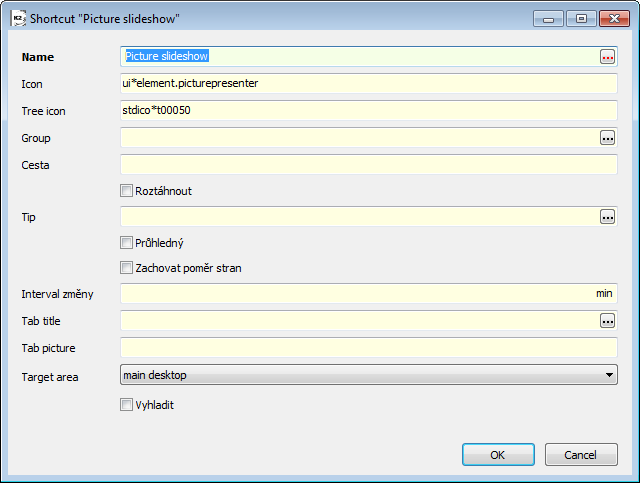
Picture: Form to insert a picture slideshow
Description of fields of the Picture slideshow form:
Path |
Path to select the presentation from directory. |
Interval of change |
Time in that the snapshot in presentation will be changed. |
OLAP
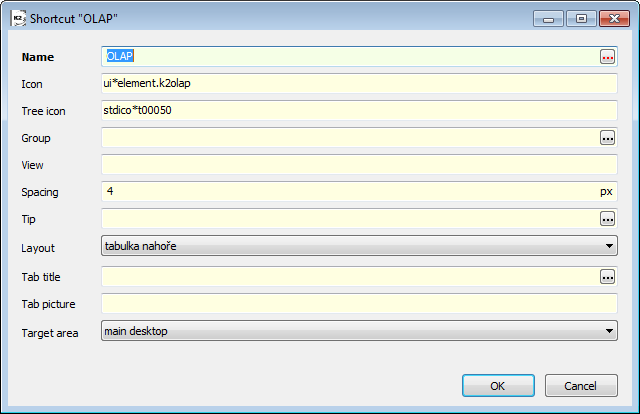
Picture: Form to insert the Olap item
Description of fields of the OLAP form:
Spacing |
When a table and a chart are displayed, we can specify here, how manypixels they will be separated from each other. And either horizontally orvertically in dependence on the settings of the field Layout. |
Layout |
If it is going to be a table or graph and where they are going to be placed (only table, only graph, table left, table right, table up, table bellow). |
Menu tab
Existing folder or function in tree menu
Folder
Picture: Tree menu - options of folder
Description of functions:
Properties |
This item opens the form with properties of the selected node. |
Copy |
The existing node is copied and subsequently you can insert it anywhere on the Favourites tab. You can edit this new created item, e. g. you can edit the name, parameters, view, etc. You can copy this folder by pressing Ctrl+C keys. |
Function
Picture: Tree menu - options of function
Functions work simultaneously like on the Default tab.
|
|
|
Desktop - notification panel
The notification panel displays all incoming notifications (= warnings). Its functionality is described in the Notifications chapter.

Picture: Desktop - notification panel
|
|
|
Desktop tabs
New tab
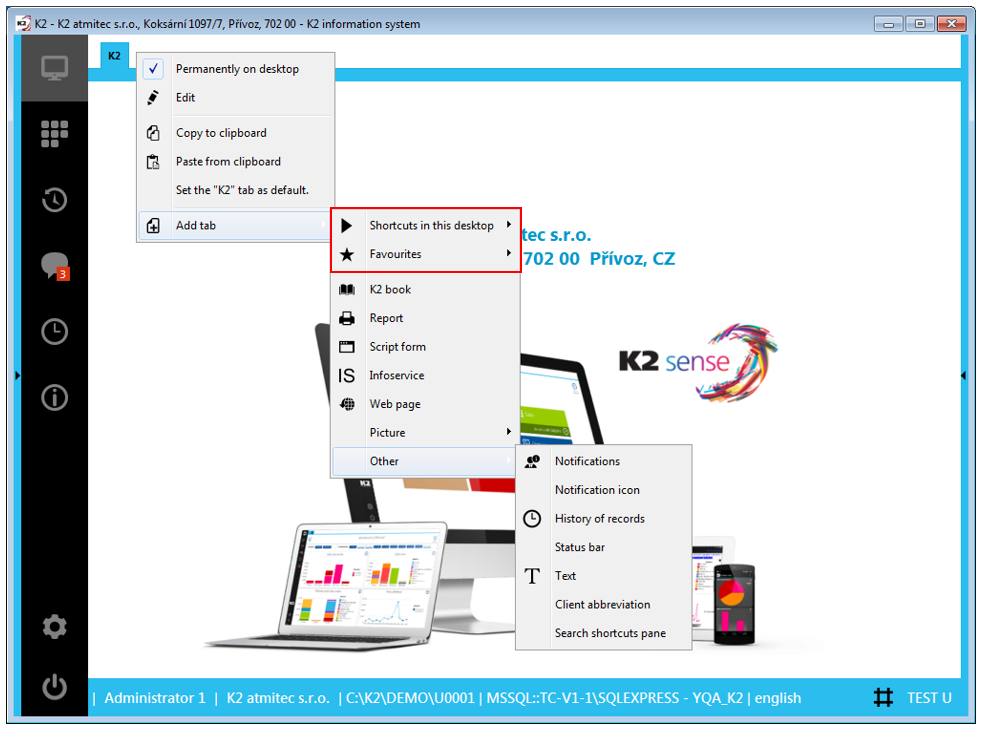
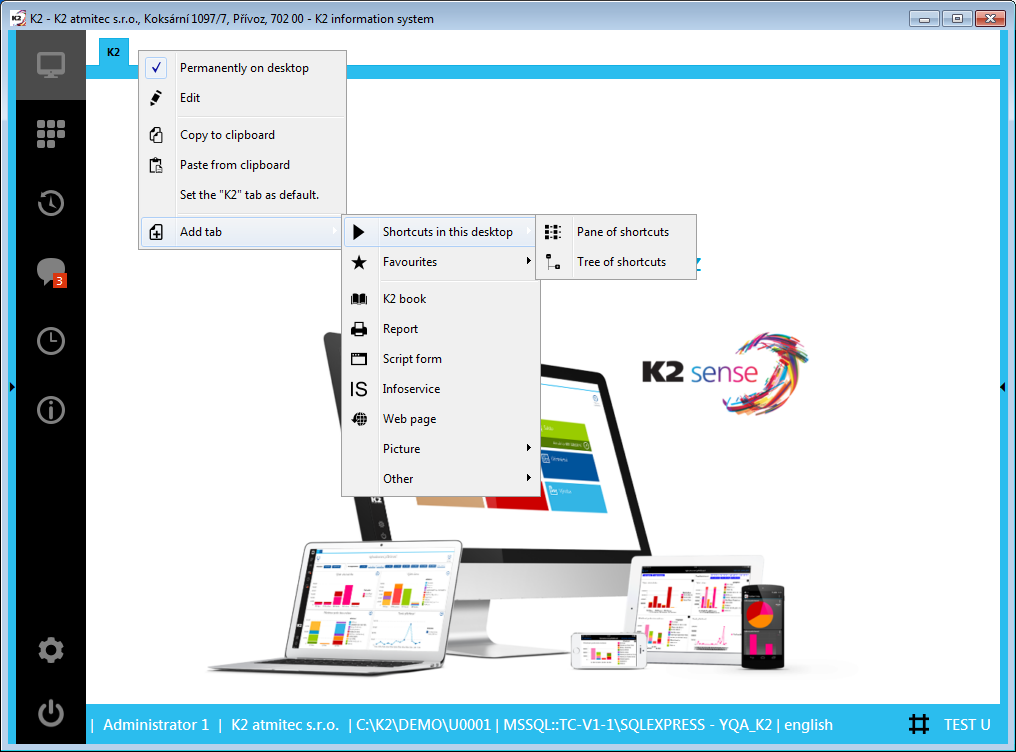
A new tab can be inserted only on the initial screen into the main area of desktop. You can insert it by the right mouse button - Add tab option. As a new tab you can choose e.g. book, report or picture. Options are similar as for inserting a new icon.
New tab can be:
Panel of shortcuts - here you can insert icons and folders which contain icons. The same menu as for inserting new icon on the Favourites tab is expanded after Insert on the tab or by pressing the right mouse button.
Tree of shorcuts - here you can insert functions, reports, scripts etc. in the form of the tree menu. Menu is the same as for inserting new icon on the Favourites tab. In the menu, that is expanded by the right mouse button, you can also find options Expand and Collapse the tree menu.
Favourites - Into this tab you can insert: User shortcuts (only appropriate user will see these shortcuts (icons)), User shorcuts in client, Client shortcuts (icons for an appropriate client), K2 shortcuts and User tree. The tab is shared by more users, eventually by more clients. The administrator also does not have to set the desktop for every user, eventually client individually. All users will have set identical icons. E. g. The icons relates to accounting will be visible only for client that is created for accounting.
Other options are the same as for inserting new icon (shortcut) on the Favourites tab.
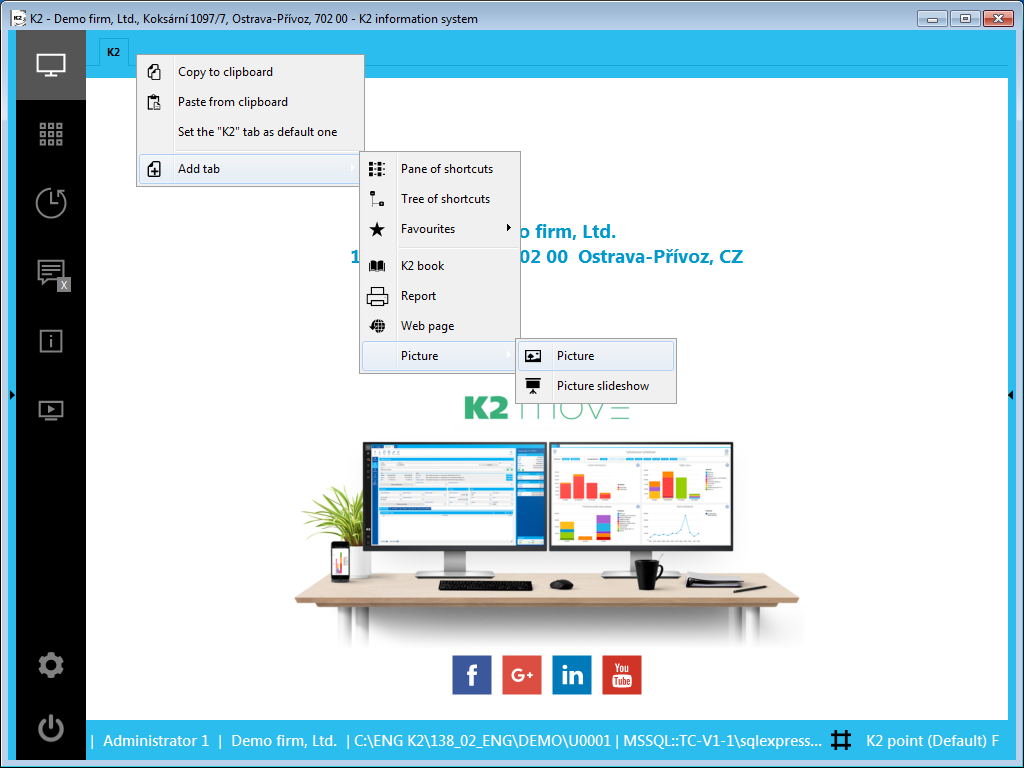
Picture: The possibilities of inserting a new tab
Created tab can be edited by Edit option, which is activated by the right mouse button on this tab.
There is a bitmap ![]() on an inserted tab, what means Display also next time. This option tells us, that the tab will stay on the desktop after switching the mask and also after shutdown and starting the K2. To cancel this action select Do not display next time option by using the right mouse button on the tab. It means that when switching the mask or when you close the K2 and then run it again, the tab will not be displayed. When the option Do not display next time is activated a cross to close a tab is displayed on the tab. The currently opened tab can also be closed by Ctrl+Shift+W key combination or by Esc key (In this case the parameter Close integrated books with Escape key has to be checked. One can find it in the User parameters - 5th page button Other options - the tab Other).
on an inserted tab, what means Display also next time. This option tells us, that the tab will stay on the desktop after switching the mask and also after shutdown and starting the K2. To cancel this action select Do not display next time option by using the right mouse button on the tab. It means that when switching the mask or when you close the K2 and then run it again, the tab will not be displayed. When the option Do not display next time is activated a cross to close a tab is displayed on the tab. The currently opened tab can also be closed by Ctrl+Shift+W key combination or by Esc key (In this case the parameter Close integrated books with Escape key has to be checked. One can find it in the User parameters - 5th page button Other options - the tab Other).
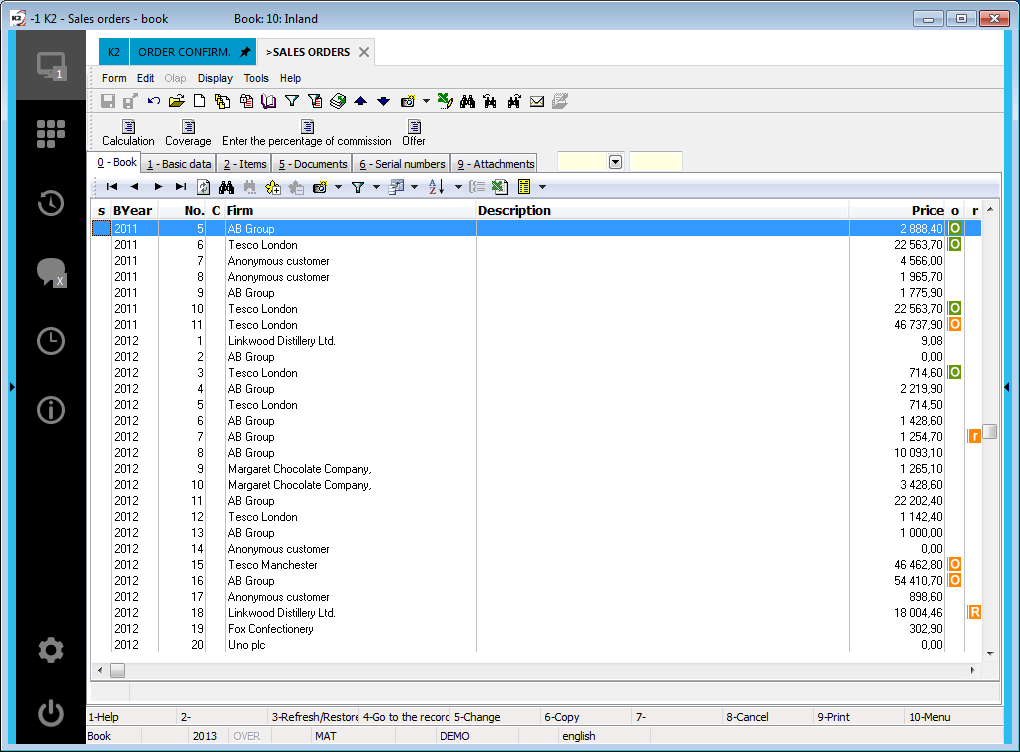
On "switching" tabs, which were open e.g. after you skip from one document to other (from an Order confirmation to a sales order Alt+z), these options are not. On this "switching" tab ![]() is displayed in addition. A skip is executed within one tab, see a picture.
is displayed in addition. A skip is executed within one tab, see a picture.
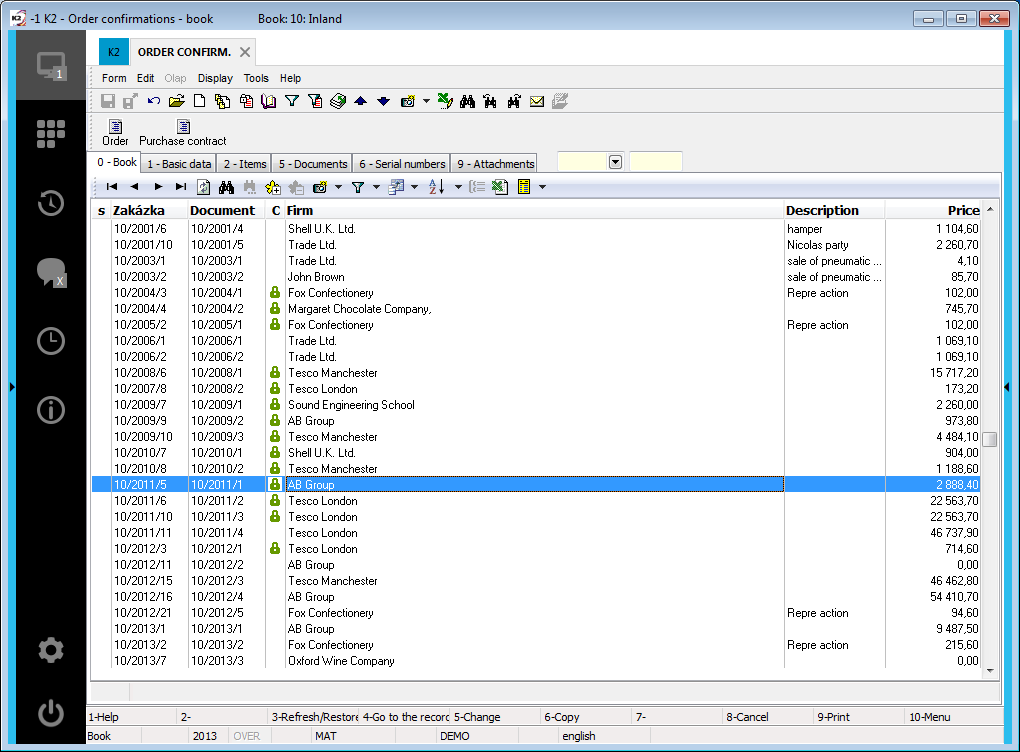
Picture: Opened book Order confirmations
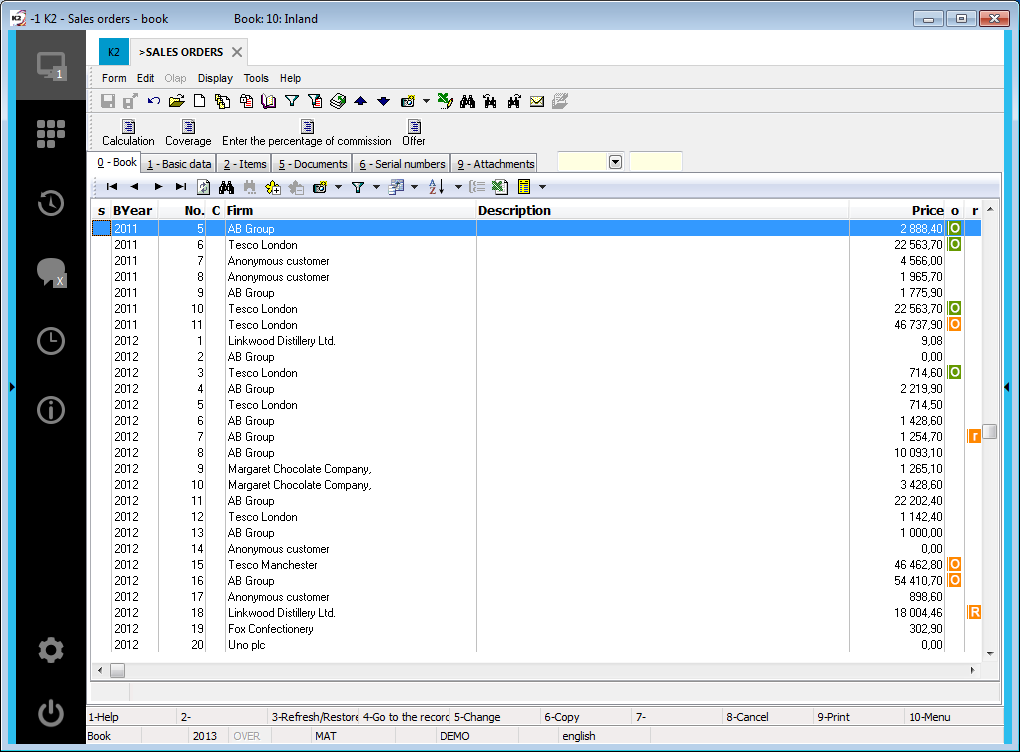
Picture: A skip from an Order confirmation to a Sales order
If you switch among documents from the "pinned" tab, after you switch a new tab will be open and marked as a "switching" (see a picture).
Picture: A skip from an Order confirmation to a Sales order - "pinned" tab
Tabs which are not pinned "permanently on desktop" additionally have the option Move to information area.
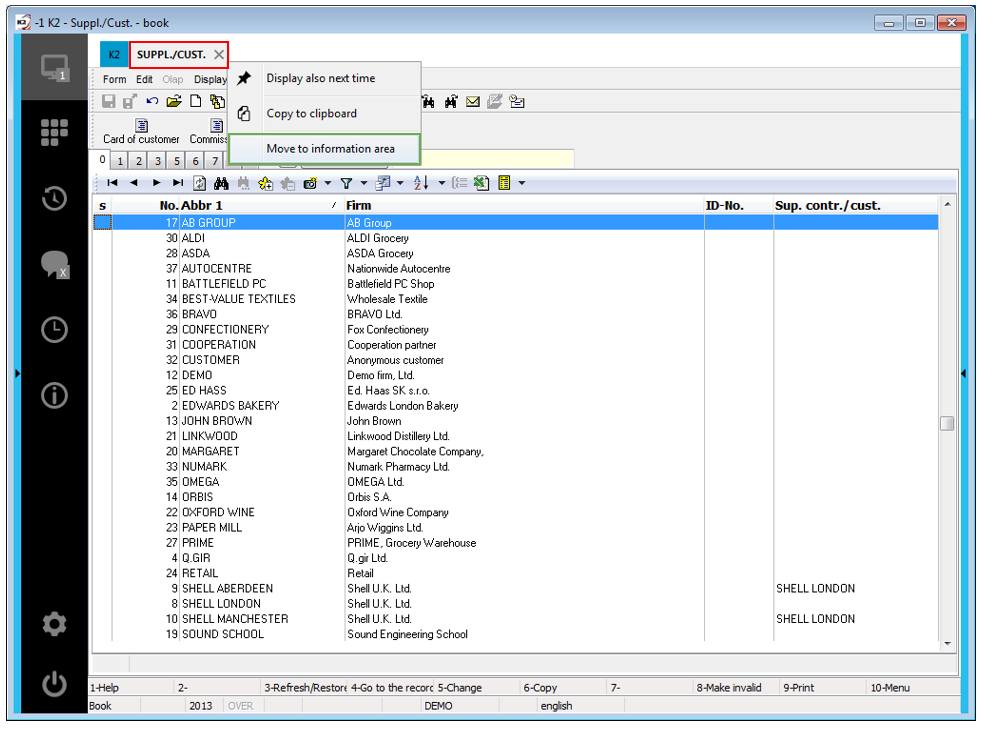
Picture: Menu of the tab Suppl./Cust. in the main area
After a selection of this option the tab is moved into a right column (navigation panel).
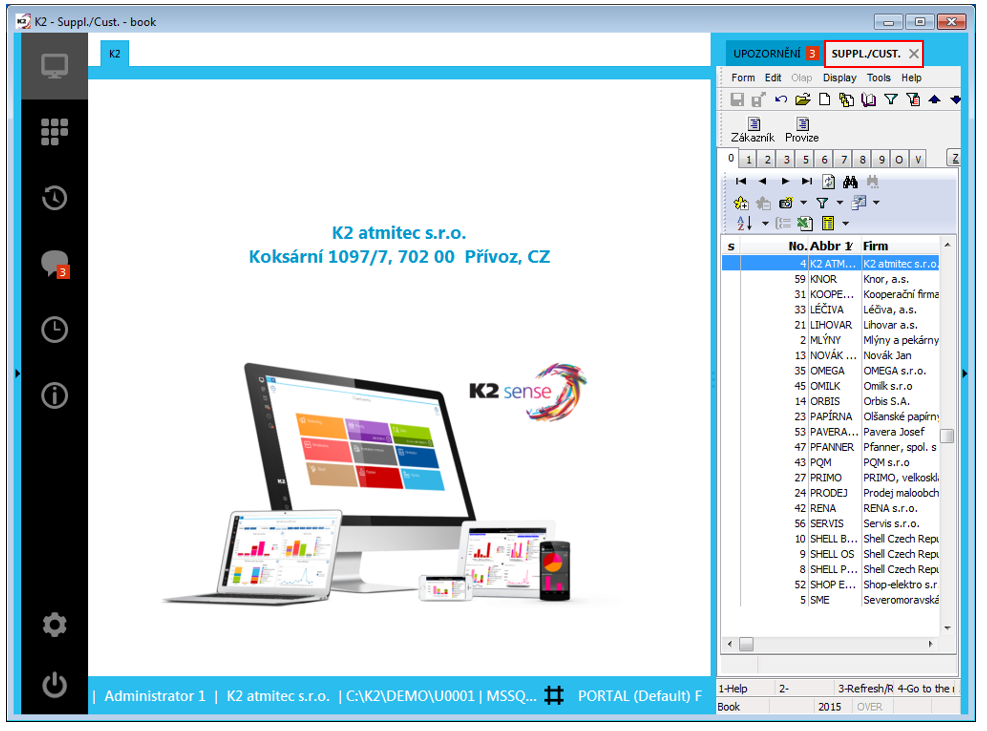
Picture: The moved tab Suppl./Cust.
After moving the tab back from the information area choose the option Move to main area.
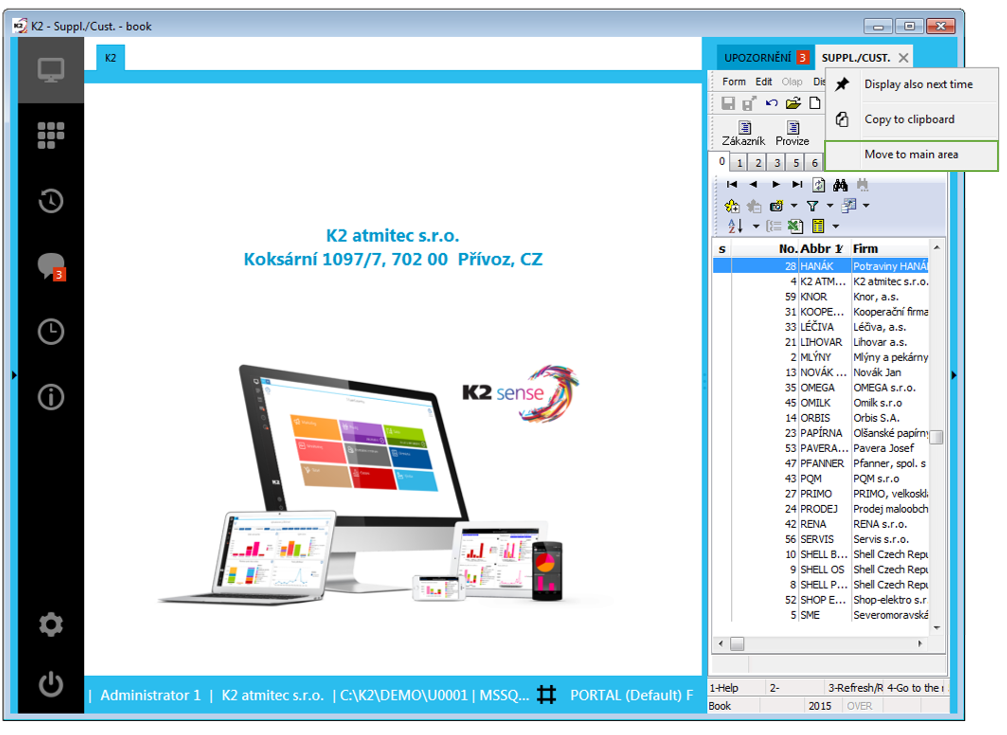
Picture: Menu of the tab Suppl./Cust. in the information area
A tab which is pinned by a "pin" (the option Display also next time) is moved with this "pin".
Set tab as "Default"
There is also an option to set the tab as "default" on the desktop. Settings is executed by pressing the right mouse button into a heading of a columns and by selecting the option Set the tab "name of the tab" as default. A tab which is open and which is currently active is set as default.
Picture: Settings a tab Provided advances as default
A checkmark at the option in the heading of a column informs us, if some tab is set as default. There is a "pin" on a tab which is set in this way.
Picture: Tab Provided advances set as default
This tab will also be automatically open and will be set as active after shutdown and starting the IS K2 again.
Tabs in other columns of the desktop can also be set as default.
Cancelling the option of a "default" tab can be executed by pressing an option in the heading of a column again or by remove a pin on the tab by the option "Do not display next time".
New tab Web page
You can view any website on the tab of this type. By pressing the right mouse button on the tab expand the menu, where by selection of a function Display navigation you can determine, if navigation buttons (indicated by a red frame on the picture below) will be displayed.
Picture: Web page - navigation
Picture: Web page - Display navigation option
Picture: Web page without navigation
Copying tabs
Tabs of the individual columns can be copied. Copied tabs can be inserted on the initial screen or to the tabs Default, Favourites and Main menu.
Picture: Copied Favourites tab
Picture: Copied Favourites tab
Copy by pressing the right mouse button on the tab, Copy to clipboard option. You can insert it through the right mouse button, Paste from clipboard option.
There is a "pin" on an inserted tab for a possibility of permanent attaching in the desktop.
Distinction of tabs
You can recognize a currently active tab according to the fact, that its name is bold and it is highlighted in grey. Other inactive tabs are highlighted in blue. If there is a record that is in the New or Change mode on the tab, a green box is displayed on the tab.
Picture: Marking tabs
Switching between tabs:
By using the hotkeys which are described below one can switch among individual tabs within each column. Switching always works in a column, which is active.
Ctrl+Shift+PgUp |
Skip to the next tab. |
Ctrl+Shift+PgDn |
Skip to the previous tab. |
Ctrl+Shift+Home |
It displays a column with the tree menu. |
Ctrl+Shift+End |
It hides a column with the tree menu. |
Note: A hint is displayed on the tab of a book and report type and on the Notifications tab after pointing the cursor on the tab.
|
|
|
Desktop administration
K2 desktops
When setting desktop you can select a desktop from existing ones (MONDE, PORTAL), or you can switch back on Default - K2 point), or you can save your own settings desktop.
Picture: Settings desktop
If you set the desktop according to your requirements, you can save it. The Save desktop as option is used to do that.
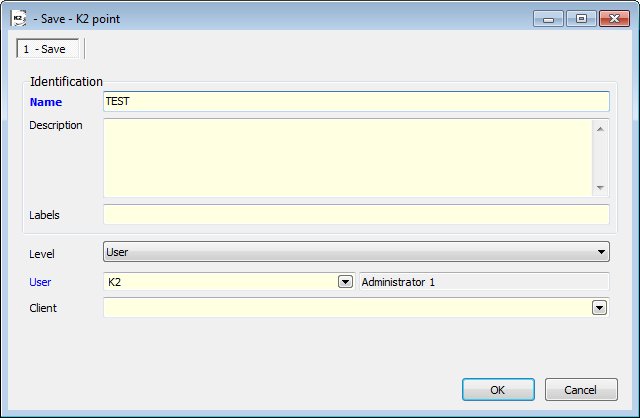
Picture: Save form
Description of functions:
Name |
Name of a new desktop. |
Description |
Description of a new desktop. |
Level |
According to the fact, which level in this field will be selected, one enters information into next fields and tabs:
|
User |
Select name of user from book of users. |
Client |
Select a client for who you want to save the selection. |
Note: Attention, the message, if you want to save changes on desktop, does not appear before you close the K2 IS!!!
You can edit your own saved desktop
Picture: Settings desktop
Change of the default desktop
Whether you chose the pre-set desktop or create your own, the desktop can be set as "default". Change will be executed in menu Desktops - item Save current desktop as default for "DEMO" client. The client, at which you are currently log in, will be automatically entered in inverted commas. You can save as "default" only desktop, that is saved as "factory", "global" or on a client.
Only user, who has set the right Service actions (Administrator / General), can change the desktop.
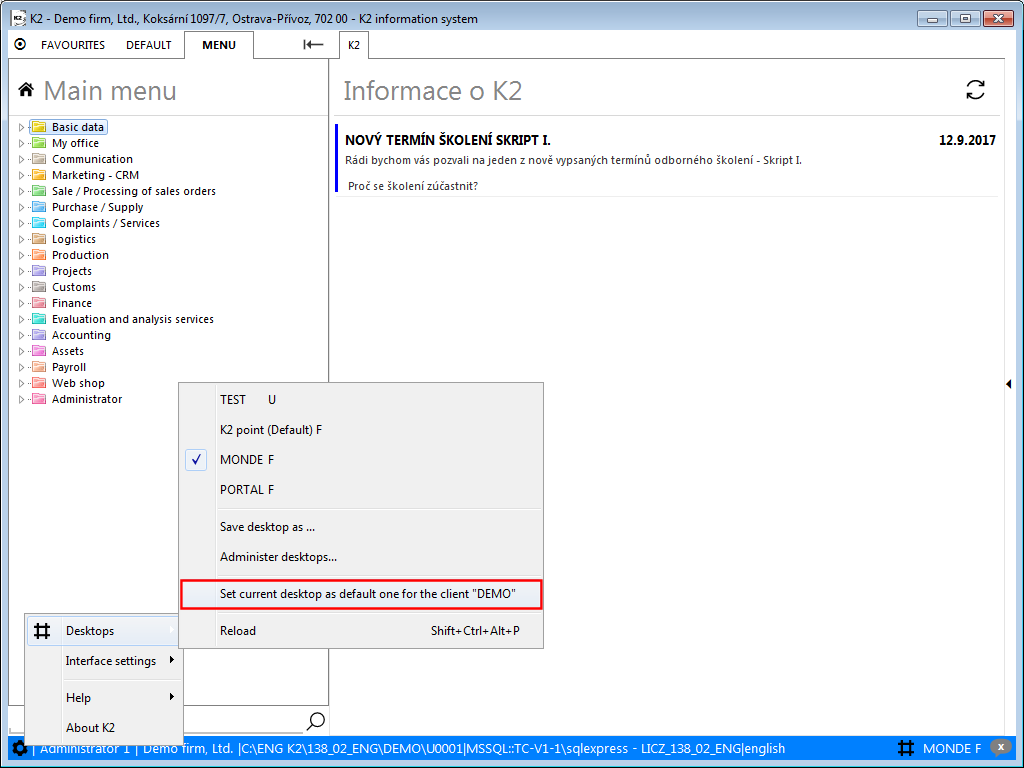
Picture: Set desktop MONDE - possibility to set the desktop as "default"

Picture: Economica desktop set as "default"
Functions description:
Desktops |
List of saved desktops. |
Reload (Ctrl+Alt+Shift+P) |
The Reload function is used for re-loading desktop into the state when it has been saved at the last time. It is important that this function does not change the contain but only the settings. E. g. You added a new icon onto a desktop and changed colour of desktop' background. If you run the Reload function, the icon is not deleted, but the colour of desktop' background is set back into the original setting. |
Save desktop |
Save a current setting of desktop. |
Save desktop as |
Save the current setting of desktop as a new desktop. |
Administrate desktops |
The form is open with a list of all saved desktops. You can edit your desktop after opening it. |
Edit desktop |
The form to edit desktop is open. |
Re-colouring |
Here you can change setting of colours of individual components of desktop. |
Next possibilities of own desktop
The menu for inserting new tab is bigger in the "own" desktop than in the "default" desktop. Into a tab you can insert the same elements as you insert into the shortcuts. Moreover, there are also e.g. a text or a list of notifications, which are displayed in the notifications panel.
Picture: Possibilities of inserting new tabs on the "own" desktop
Shortcuts in this desktop and Favourites
You can insert the tab of a type Shortcut in this desktop or Favourites (indicated by a red box on the picture above) into the "own" desktop. Both types enable to insert Panel of shortcuts or Tree of shortcuts. On the tab Panel of shortcuts you can insert shortcuts (icons) according to your own requirements, either by inserting a new icon by using the right mouse button, or by copying the existing from the other tab. You can also insert a new tree or copy the existing into the Tree of shortcuts like in the Panel of shortcuts.
Shortcuts in this desktop are remembered only on the desktop in the K2, into which you add this shortcuts.
Picture: Shortcuts in this desktop
Favourites serves for sharing contents of bookmarks among other users, clients etc.
Description of the shortcuts types:
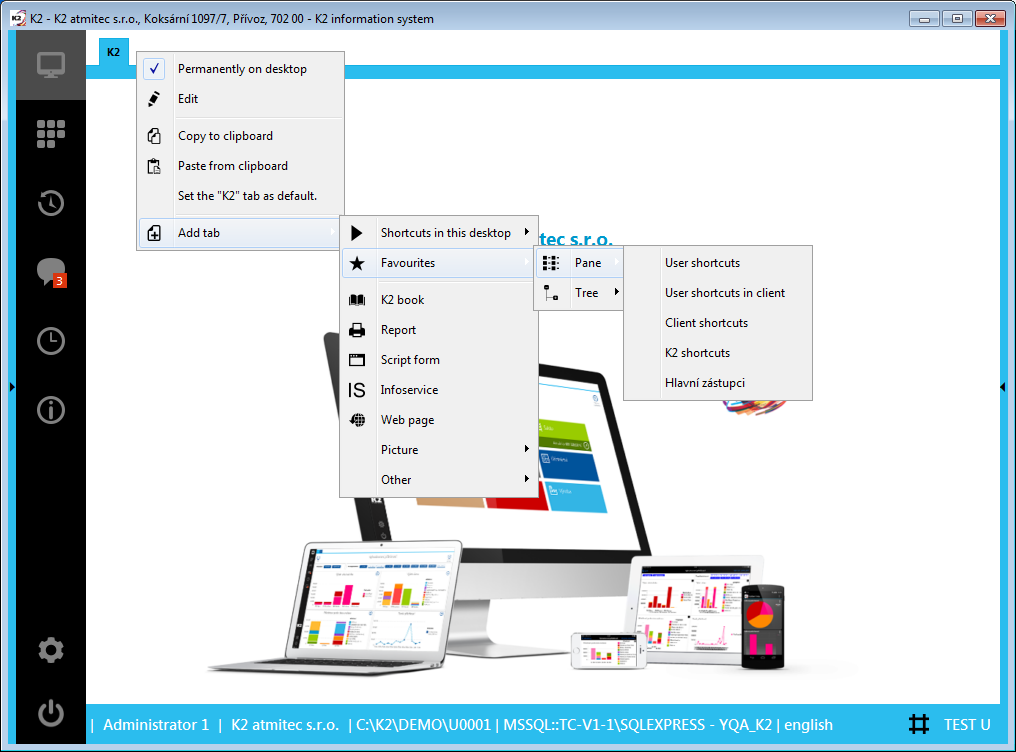
User shortcuts |
Only user, who added this tab, independently of the fact on which client the user is logged, sees the tab and its contents. |
User shortcuts in client |
The tab and its contents are visible only to the user logged in the appropriate client. |
Client shortcuts |
Any user, who logs on to the appropriate client, has access to the tab with a contents. |
K2 shortcuts |
Any user in any client, who logs on to the K2, sees a contents of this tab. |
Main shortcuts |
Its contents is identical to the Default tab that is contained in the left column of the desktop. The tab is remembered only within the appropriate desktop. |
Items of the Tree type have the similar function. The item Main tree has the same contents as the tab in the left column of the desktop Menu.
Picture: Favourites - Panel

Picture: Favourites - Tree
You can also edit the implicitly set tabs on the "own" desktop. E.g. it is the tab K2 on the initial screen of the desktop. The menu to change the displaying of tabs is displayed after you press the right mouse button on the tab (see the New tab chapter, which is described in the Desktop tabs chapter). You can edit, delete, etc. a tab. If you do not save the own desktop, the newly inserted tab with an implicitly setting will be unpinned after closing the K2. The possibility Permanently in desktop performs the similar function as the possibility Display also next time with the difference, that this tab will remain rigidly pinned only in this "own" desktop. (While the Display also next time tab is displayed only for the appropriate user.)
Picture: Own desktop - tab K2
"The pin" is displayed on the tab in the standard desktop. It means, that the tab is permanently pinned for the currently logged in user and when the user next runs the K2 it will be displayed.
Picture: Default desktop - new tab Invoices in
At the "own" and standardly saved desktop you can edit the displaying of the tabs by pressing the right mouse button on the bookmark and by selecting the appropriate option (see the Desktop tabs chapter).
All these functions can be executed in the main desktop or in the notification panel. You can create a similar desktop to which we were accustomed in the earlier versions of the system K2, see picture below.

Picture: Setting "own" desktop
|
|
|
Searching
You can search above the tabs Default, Favourites and Main menu - according to key word. Activate searching either by icon of hand glass in row for searching or by Enter key. Searching is executed through tree menu, through shortcuts (icons) and through history. Searching is also available at word connections without diacritics. A list of the found icons will be open in a new tab, then one can open the book or run the function by double clicking. Close the tab by a cross (in the blue frame on the picture).
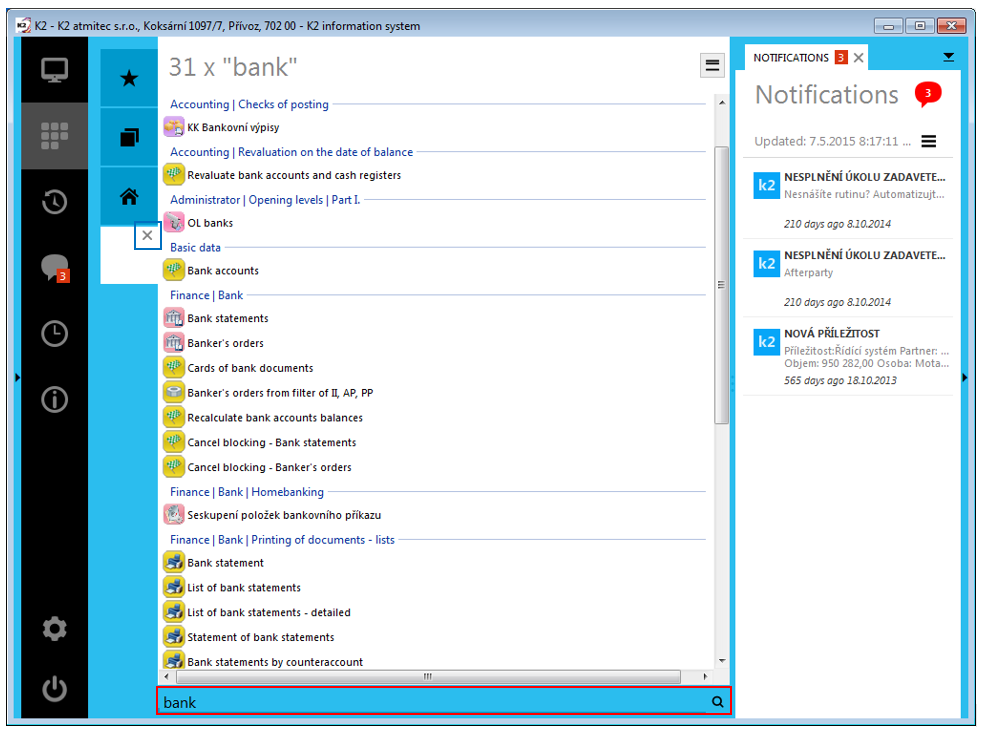
Picture: Desktop - searching
You can also search in reports. From the found value in a report you can switch directly on the document by a mouse.
Into the search box, you can switch from any place in K2, by using the Ctrl+Shift+L key combination.
|
|
|
Classic Forms
|
|
|
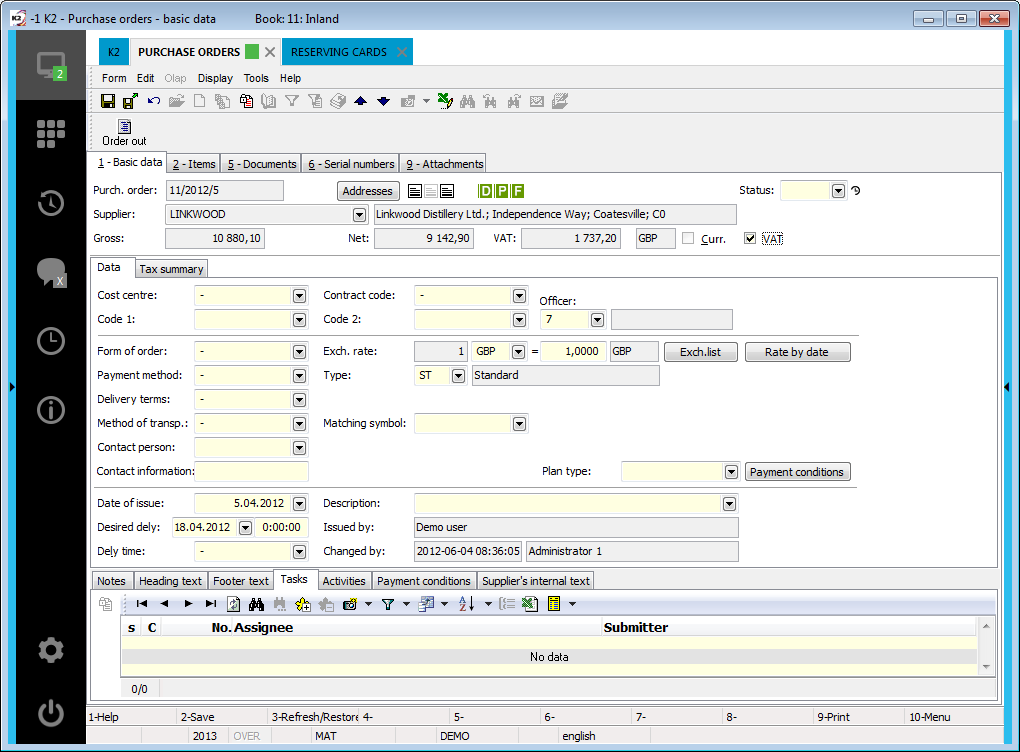
Book
A module table is the "zero" page of a module form. There are many shared properties valid for the form as well as for the table (a taskbar setting, reports setting, etc.). These settings are not separately defined for every form, the table included, but they are defined for the whole module.
Goods database (that is a complete line of user's goods and services that are disposable to customers) and Contractor / Customer database (that is a complete list of all user's trading partners) are the master tables (code lists). Filling-in of these code lists is a condition for usability of the K2 program. Loading the data to those tables is the main condition of K2 Programme applicability.
For an example of other tables see e.g. Book of Invoices, Book of Orders etc.. Every table enables a quick search of the required item and provides basic information about it. (The concept "book" is used in connection with "series" of documents e.g. Book (series): 10 - Inlands).
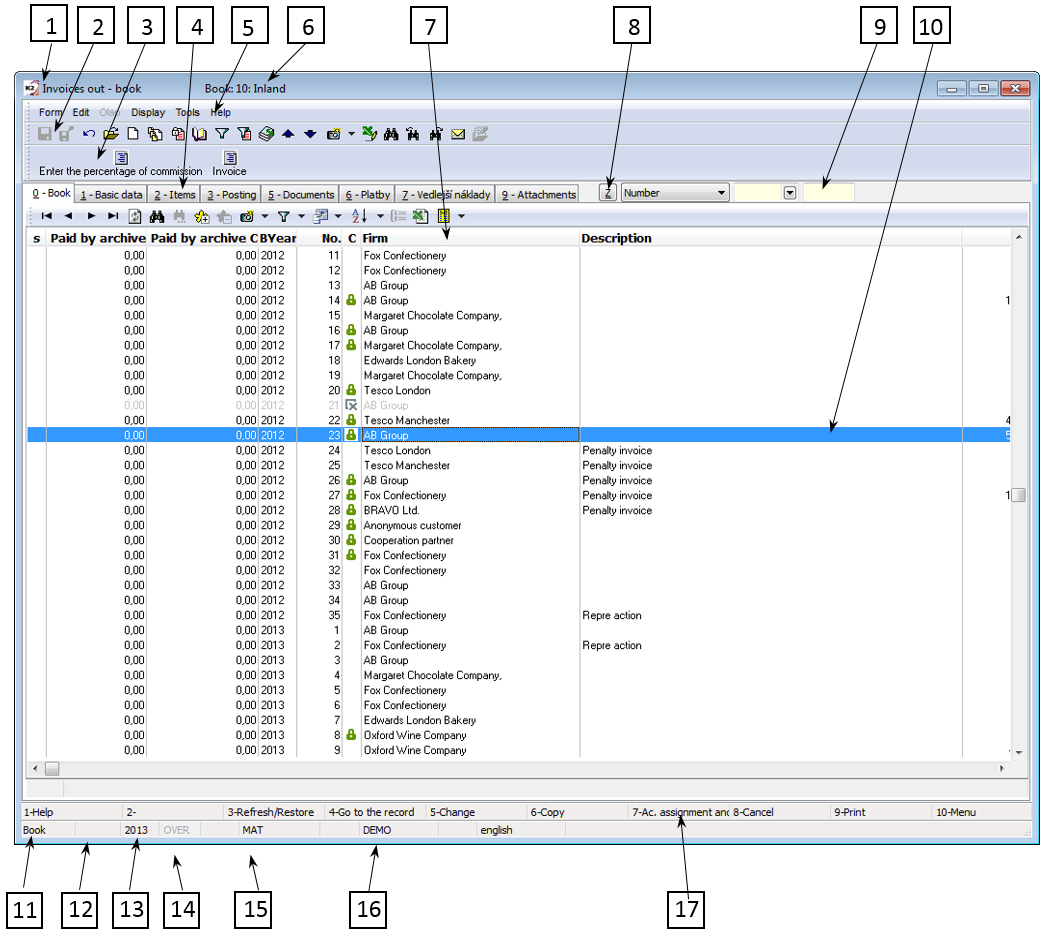
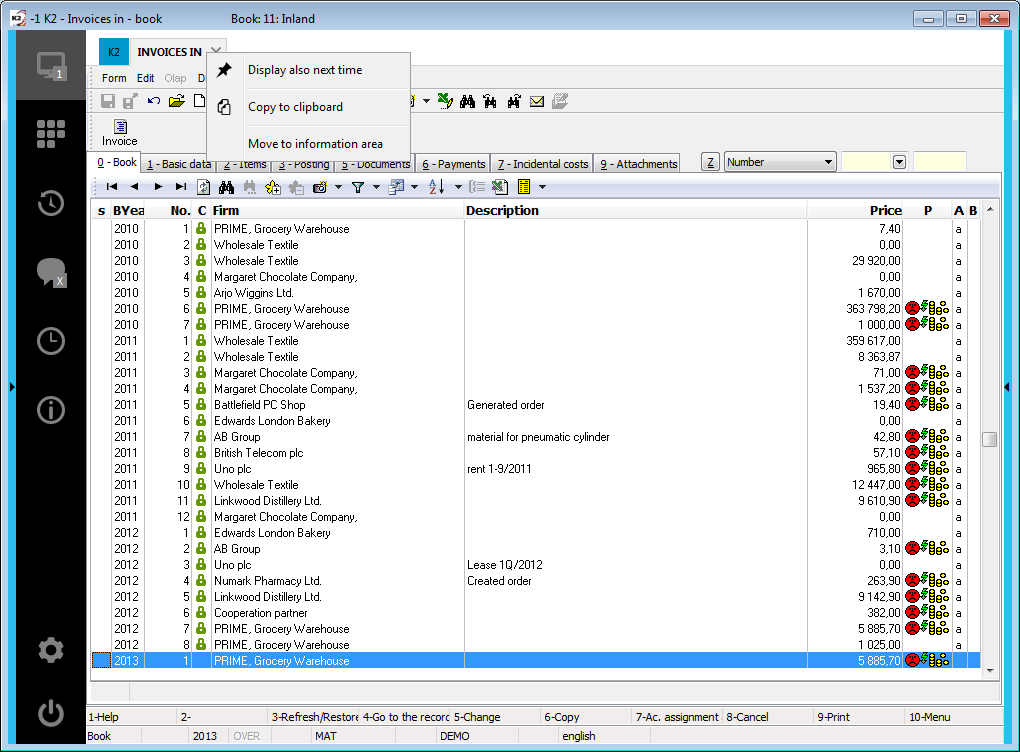
Picture: Invoices Out book
Items Description in Presented Table:
- Information about the current module - in this case, we are situated in Invoices Out book.
- Module Toolbar - some functions of the appropriate module can be activated directly by a button from the toolbar.
- User Toolbar - functions and reports submitted by a user. If all functions and reports don't fit in User Toolbar, then they will display at the end of the toolbar
 icon. After this icon is clicked a list with reports and functions, which don't fit in the toolbar, will open.
 - The so called Cards of a Document - by clicking left mouse button on individual numbers (0, 1, 2, 3, 4 etc.) you will enter browsing of the corresponding "page" of a document . The digits are underlined; it means that you can achieve the identical effect by pressing Alt+0 up to Alt+9 keys, respectively Alt+Right Arrow or Alt+Left Arrow. A Table (a Book) is represented by '0' (zero) page.
- Module Menu - it is possible to activate functions related to the appropriate module through module menu.
- Information about Current Book - in this case, you can see information from the book 10: Inlands.
- Names of Selected Columns with Information about Book Items - e.g. Invoice order number, a number of a sales order which an invoice relates to, a customer name, a description - i.e. an optional additional text, an amount on which an invoice has been issued and so called flags - letters that inform whether the invoice is confirmed, settled or posted.
- Type of Sorting - this defines a function of a search field together with a type of sorting of the items in the book. (Attention: If you enter into the field for selecting a type of sorting, the input field to enter a type of sorting will remain active. When you press some keys, you change the various types of sorting. Therefore, it is necessary to click the mouse on the surface with table content after selecting the type of sorting. Only then the table is active and the search field is working. Therefore, it is much more practical to use the Alt+Z key for the selection of the type of sorting, respectively other keys that are underlined next to the field. In that case, the types of sorting keep changing in serial order all the way round. The types of sorting are changed by Shift+Alt+Z key in the adverse order.)
- Search Field - a field that enables a quick search of the requested item in the table (after entering the required invoice number in the search field and pressing Enter key, a light indicator is positioned on the required invoice). It is also possible to search in the book by Up-Arrow key and Down-Arrow key.
- Table Items - a list of invoices in book. There is a light indicator on the current invoice line.
- Information about the form status - information on the page 0 can be displayed by means of 5 statuses - Book, Filter, Container, All and Quick Filter. If a filter is activated, a displayed list is not complete. (For detailed description of work with filters see the chapter Filters Alt+F9.) Status can be changed by clicking right mouse button in this field and then selecting a different status.
- Identifiers:
- Change - if you change data in a document or its items, Change identifier will be displayed after pressing Enter key.
- Search - if fast search is activated (see the chapter Basic Functions - Search - Fast Search Alt+F7), Search identifier will be displayed at the same place.
- Period - documents are being issued within a currently selected period. The period is set in the module Administrator - User Parameters. The displayed period can be changed by clicking right mouse button in this field in the status bar and selecting a different period from the launched code list.
- OVER has the same function in K2 Information System as in other programmes (e.g. Word); it means that after pressing Insert key you can overwrite the text in a field.
- Abbreviation of the stock which new stock documents will be created for. Likewise, the stock can be changed here in the same way as the period is (see point no. 13).
- Abbreviation of the Client for whom data are processed.
- Control Keys Description - F1 up to F10, Alt+F1 up to Alt+F10, Shift+F1 up to Shift+F10, Ctrl+F1 up to Ctrl+F10 and their combinations.
|
|
|
Form
You will enter a form from the table after you highlight the required record by the blue light indicator (by means of Arrows or the search field) and press Enter key or F4 key. Thus you will get to the 1st page of the form.
The form usually has two or more pages. First page contains basic (general) data; second page contains items related to a document. Third page usually contains assignments and posting of the appropriate document, etc. Detailed data of any item in the table can be browsed in the form; they can be edited, complemented and confirmed.
The pages can contain other bookmarks which can provide additional information. The bookmark which we displayed the last will display with re-open of record. Every form "remembers" its last displayed bookmark.
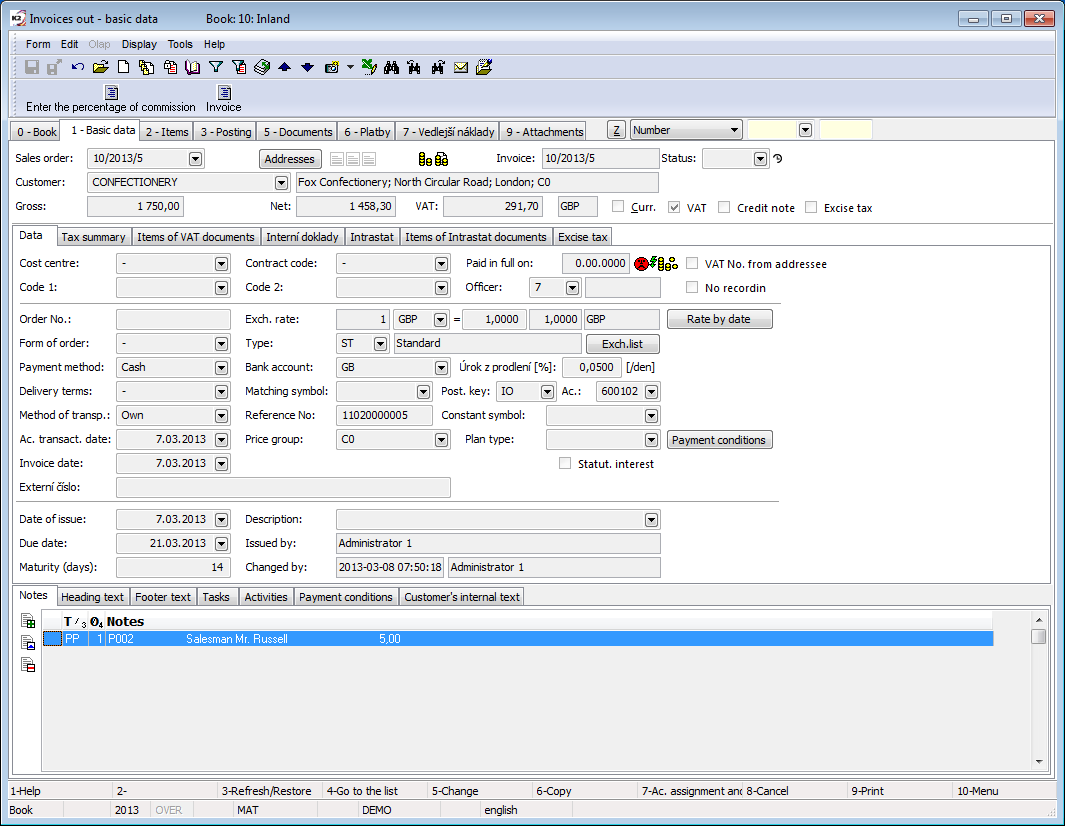
Picture: Invoice Out - 1st page
|
|
|
Universal Forms
|
|
|
The Book - Universal
The functionality and rules of the classic and universal forms are mostly similar. Universal forms are enriched with functionality that could not be further developed in classic forms.
The list corresponds to the Book in classic forms and it is the original zero page of the form. The rules for the List tab are similar as rules for book and a whole range of the common properties valid generally in each data module for List as a form. These settings are not separately defined for every form, but they are defined for the whole module.
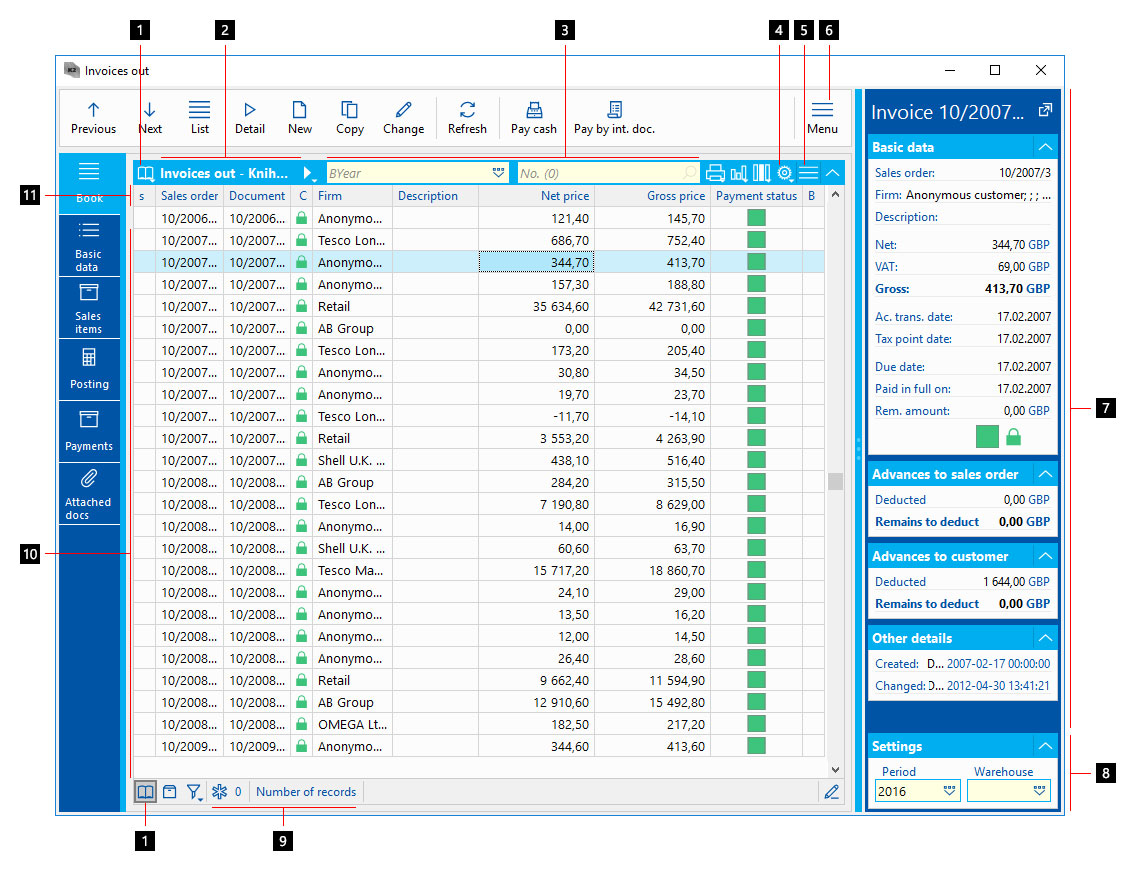
Picture: The Book - Universal
- Information about the form status - information on the page 0 can be displayed by means of 3 statuses - Book, Container and Filter. If a filter or a container is on, the displayed list is incomplete (for the further description of the work with filters see the Filters Alt+F9 chapter.) The status can be changed by pressing left mouse button on the status icon.
- Information about the Current Book and Status - in this case, you can see information from the book number 10: Inlands.
- Search Field - a field that enables a quick search of the requested item in the table (after entering the required invoice number in the search field and pressing Enter key, a light indicator is positioned on the required invoice). It is also possible to search in the book by Up-Arrow key and Down-Arrow key.
- Column Setting - columns names and information about the displayed data.
- List Menu - through the menu of the list, actions related to the list tab can be invoked.
- Module Menu - through the menu of the list, functions related to the given module can be invoked.
- Record Preview - basic information about a record, on which a light indicator is currently positioned, are displayed. When switching to the another record, the information are changing depending on how the records are browsed.
- Setting - a book setting is a part of a record preview. In the Invoices book it is Business Year, in which the documents will be created, and Warehouse. The structure of the setting fields differs in each data module as needed.
- Selected - information about the number of selected records.
- Table Items (Records) - a list of invoices in a book. There is a light indicator on the current invoice line.
- Names of Selected Columns with Information about Book Items - e.g. Invoice order number, a number of a sales order which an invoice relates to, a customer name, a description - i.e. an optional additional text, an amount on which an invoice has been issued and so called flags - letters that inform whether the invoice is confirmed, settled or posted.
- Module Toolbar - there are included basic functions that can be performed with the data module or with a specific record on which the light indicator is positioned. Into this panel, it is possible to add reports and scripts from the Reports and Scripts book (F9) of the given data module. Editing and adding features is possible only by editing fragments.
- The so called pages (cards) of a document - by clicking left mouse button on individual tabs, you will get to browse the appropriate "page" of a document It is possible to switch pages by using Alt + right (left) arrow key. If some letter or character is underlined, it is possible to switch to the appropriate page by pressing Alt + underlined letter or character.
- Type of Sorting - it defines a function of a search field together with a type of sorting of the items in the book.
|
|
|
The form - Universal
You can get from the list to a specific page of the document by means of Alt + right (left) arrow key or by pressing the left mouse button on the specific page. Standard data modules have two or more pages, there are the basic data on the first page and other data, items or the attached documents and ext. documents on the other pages.
Each page may include other pages and different components that differ in the type and nature of the registered information.
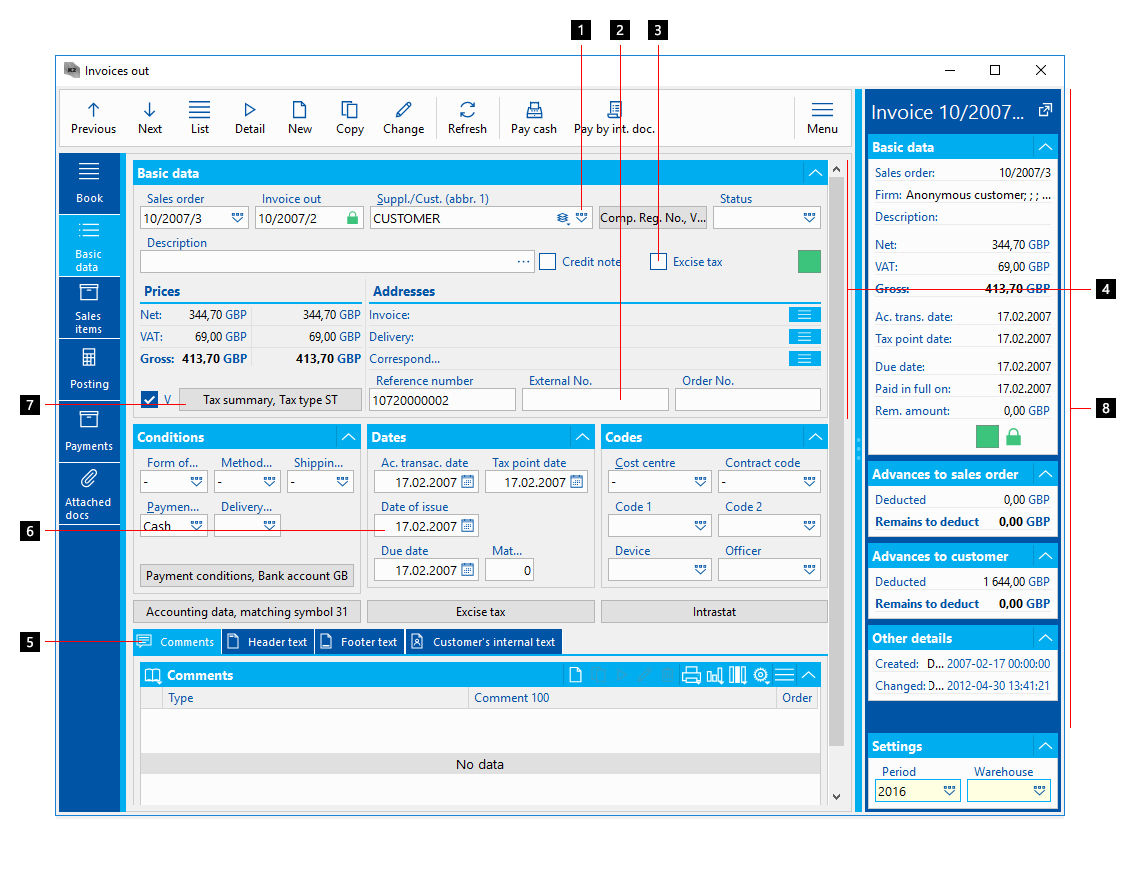
Picture: The form - universal
- Lookup - after clicking on the icon , you will see a list of values that you can fill in. By using the right mouse button in the field and by selecting Search option, you can switch the style of a displayed menu.
- Edit Box (edit) - a field, into which a value of the predefined type can be written (text, number, etc.).
- Checkbox - a field defining YES / NO.
- Drop-down panel (expander) - lets you hide or show other components.
- Tab - the page may contain additional pages (tabs) on which other components may be placed.
- Date field - a field in which it is possible to enter only the date. Simplified filling in
- 1+.+ ENTER - the first day of the current year and the current month is pre-filled
- .+1+ENTER - the current day of the first month of the current year is pre-filled
- .+ENTER - the current day is pre-filled
- Button - after pressing the button, actions can be started, floating form can appear or the other fields can be shown or hidden.
- Preview - summary information about the displayed record.
|
|
|
System of K2 Menu
In K2 Programme there are available various systems of menu that are dependent on a part of the programme you are currently positioned in.
|
|
|
Module Menu
Menu within particular modules is available here. Module Menu functions are accessible within all the forms (the table included) of the appropriate module. The particular functions of Module Menu are described in the chapter Basic Functions - Module Menu Functions.

Picture: Module Menu of Invoices Out
|
|
|
Tree Menu
K2 Information System also supports user's programme control by Tree Menu. The tree menu contains a basic selection of default functions (books, code lists, reports, scripts) available in the programme.
Work in the tree structure is very easy and transparent. The menu is divided into folders according to individual functional areas while each folder is divided into other subfolders which contain the individual functions.
Picture: Desktop K2 with Expanded Tree Menu K2
Meaning of Icons in Tree Structure:
![]() Rolled Node (Module)
Rolled Node (Module)
![]() Expanded Node (Module)
Expanded Node (Module)
![]() Books (Lists) of Appropriate Module (Goods Book, Contractors Book or similar).
Books (Lists) of Appropriate Module (Goods Book, Contractors Book or similar).
![]() Code Lists (e.g. Chart of Accounts, Customs Tariff, etc)
Code Lists (e.g. Chart of Accounts, Customs Tariff, etc)
![]() Documents filter with preset conditions
Documents filter with preset conditions
![]() Print Reports
Print Reports
![]() Functions or scripts creating new data
Functions or scripts creating new data
![]() Searching
Searching
![]() Recalculations of States
Recalculations of States
![]() Statistics, Evaluating
Statistics, Evaluating
![]() Setting of data in the system K2.
Setting of data in the system K2.
![]() Module Functions, Data administration
Module Functions, Data administration
|
|
|
Programme Basic Control
The basic principle of IS K2 control bears upon three basic modes: Browse, Change and entering New records. The mode Delete of records is prohibited because of the data consistency.
|
|
|
Records in Browse Mode
In Browse mode it is possible to browse a document in details but it is impossible to change it. A record will be displayed on the screen after it is selected in the book by pressing F4 key or Enter key. After pressing Esc key it is possible to return back into the book. You can also return from the selected document into the book by pressing F4 key or Alt+0 keys.
Attention: A clicking on the cross for closing the window ends the actions of the whole module; it means it also ends the zero page of the document.
More precise description of possibilities in Browse Mode:
entry to a document from the book |
F4, Enter, resp. Alt+1, ... - page number |
return to the book (from a module) |
F4, Esc, resp. Alt+0 |
switch to the second or next page of the document |
Alt+2, ... or Alt+Right Arrow, by pressing left mouse button on selected bookmark |
scroll among individual documents |
grey plus (numeric keyboard plus) - forward, Grey Minus (numeric keyboard minus) - backward |
confirm a document |
Alt+F2 |
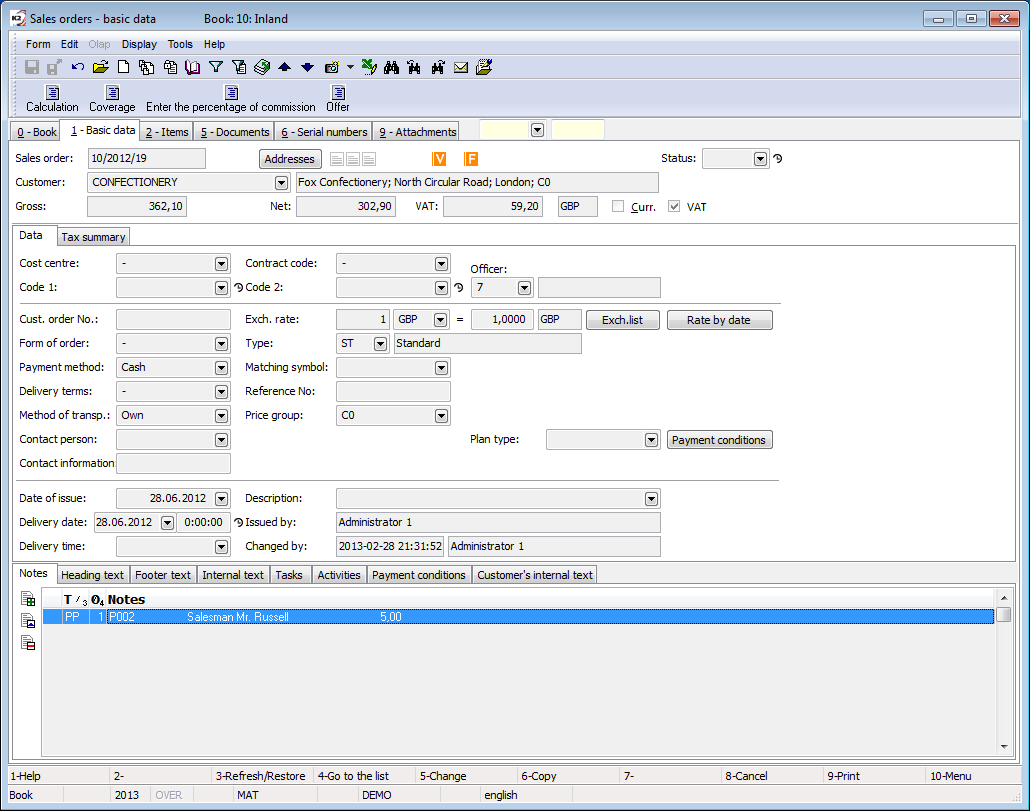
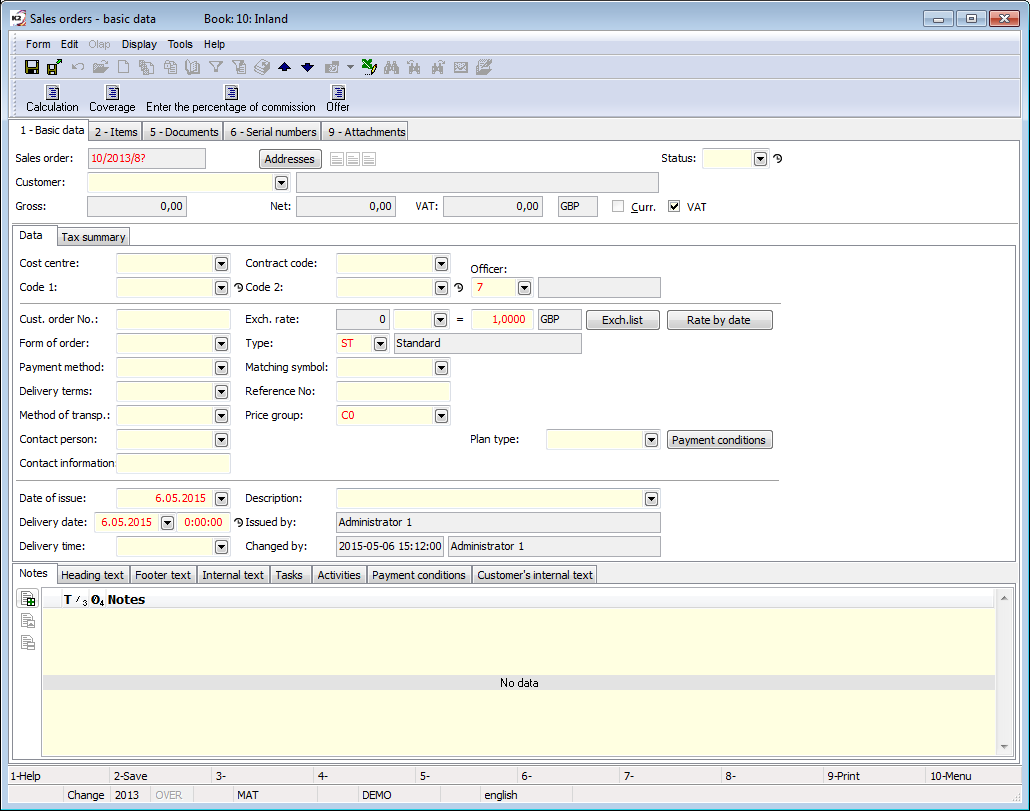
Picture: Sales order - 1st page - document in Browse Mode
|
|
|
Records in Change Mode
It is possible to change the data in Change mode but only for the records that have not been confirmed yet. In the case of the confirmed documents it is impossible to enter Change mode.
More Precise Description of Possibilities in Change Mode:
Enter a document |
F5 - from the book or from document in Browse mode, right mouse button, Change possibility - on the 0th page of document |
return to the book (or to a document in Browse mode) |
Esc |
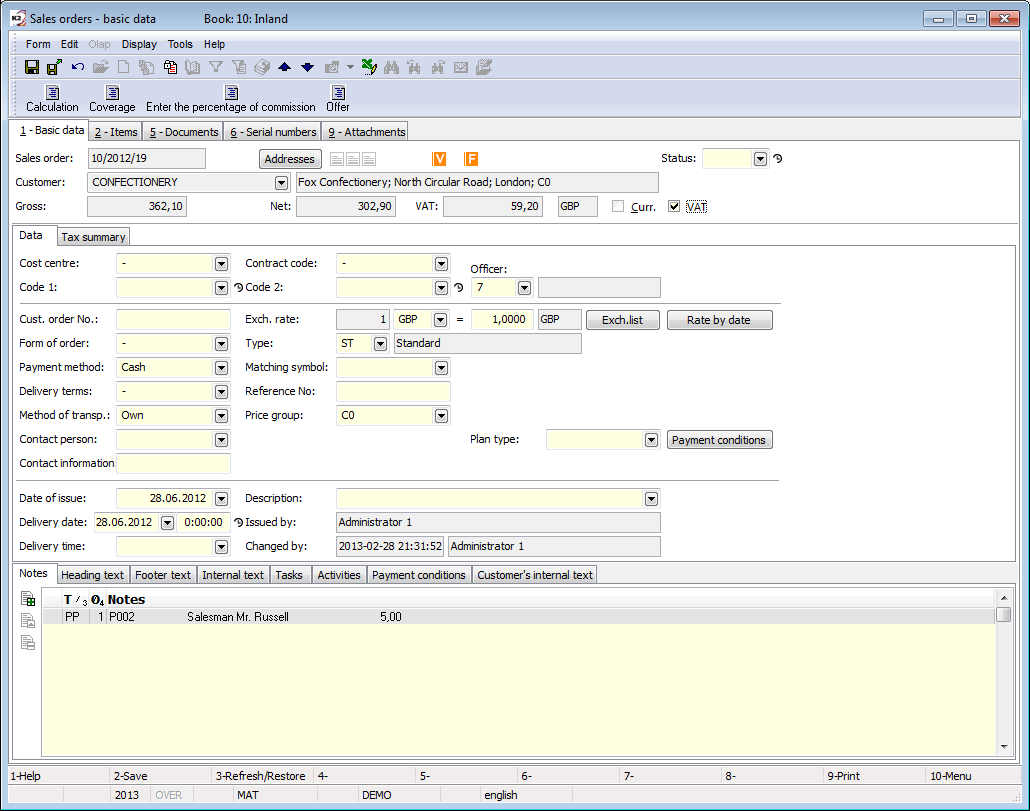
Picture: Contract - 1st page - Document in Change Mode
It is necessary to save the changed document by pressing F2key. It is typical for a document in Change mode that the fields that can be changed are editable (highlighted by white colour). If you change any item, its colour will change to red until you save the changes or restore the document. If you enter a document in Change mode, the zero bookmark will not be displayed and it is impossible to switch to the zero page of the document.
|
|
|
New record creation
Create a New document by means of pressing Ins key (only from a table) or by copying a document created before (by means of F6 key or an icon ![]() from book or from document in Browse mode). You can edit or complement the necessary data in such a created copy. The usage of F6 key is advantageous in those cases when a new document contains most of the data identical with the data in the selected and already completed document. It is feasible to set up a new document also via a specimen by means of Shift+F6 keys.
from book or from document in Browse mode). You can edit or complement the necessary data in such a created copy. The usage of F6 key is advantageous in those cases when a new document contains most of the data identical with the data in the selected and already completed document. It is feasible to set up a new document also via a specimen by means of Shift+F6 keys.
More Precise Description of Possibilities in Setting up of New Records:
Enter a document |
Ins - only from the table if an absolutely new document is created F6, Shift+F6 - from the table or from Browse mode if a new document is copied from the old one. right mouse button, New possibility - on the 0th page of document right mouse button, Copy possibility - on the 0th page of document |
return to the book (or to a document in Browse mode) |
Esc |
Picture: Sales Orders - 1st page - New Document
It is necessary to save a new document by pressing F2 key. It is typical for New Record Mode that document fields that you can paste are highlighted by white colour and document items that you can rewrite are highlighted by red colour. After switching to Change mode (by saving) the letters will change to standard colour (black).
It is possible to create a new document by means of a Wizard for new documents creating (for example in the book of Invoices Out).
|
|
|
Records in Delete Mode
Deletion of some parts of the records (document items) is performed standardly by Del key, resp. F8 key. Because of the fact that deletion of the whole records is in most cases prohibited, F8 key serves for cancellation or ignoring the appropriate record.
|
|
|
Description of Control Keys
The following rule applies throughout IS K2:
In the course of simultaneous pressing of Alt key + an underlined character, the underlined letters and digits enable either to jump with the cursor to the selected field (so called hot key) or to activate a certain function (e.g. to change a type of sorting in the selection menu etc.).
Attention: If you use Czech keyboard QWERTZ (i.e. a sequence of characters corresponds to a Czech typewriter, so 'Y' is located in the lower row and 'Z' in the upper row), you can encounter difficulties in the proper function of some hot keys. Some problems can occur when using a combination of two or more function keys (Alt, Ctrl, Shift) because of the fact that some functions of that keyboard, which are not supported by Windows standard, are preset in its driver.
There is a description of control keys next to individual digits in keyboard help bar (on the lower part of the screen). After pressing typing-aid keys Alt, Ctrl or Shift, the description keeps changing in accordance with the functionality of the pressed key.

Picture: Key Help in the Invoices Out book.
Generally used keys in the IS K2:
Enter |
It means selection or a confirmation of an option. |
Esc |
Return Back. After the executed changes in a document, you might be asked whether to save these changes or not. |
Tab |
It is used for browsing between the items of the changing document. |
Shift+Tab |
The same function as Tab but backward. |
Ins |
Insert key is generally used for switching between typing characters and their overwriting. In K2 System, it is also used for inserting a new document into the table or new items to a document. This key carries out the analogous function as F6 and Shift+F6. |
Del |
Delete key deletes a character hidden by the cursor and then step by step all the characters from the cursor to the right. It also serves to delete document items. In K2 System, it may be used for deleting a record from the database. This key carries out the similar function as F8. |
Shift+Del |
When deleting items (documents), it automatically ensures shifting to the next item. |
PgUp |
Page Up - it browses through the table to a preceding 'page' of the displayed records. |
PgDn |
Page Down - it browses through the table to a next 'page' of the displayed records. |
BackSpace |
It deletes the characters leftwards from the cursor. |
Left-Arrow Key |
It moves the cursor within one position to the left. |
Right-Arrow Key |
It moves the cursor within one position to the right. |
Up-Arrow Key |
It moves the cursor within one position up or to the previous item of the document. |
Down-Arrow Key |
It moves the cursor within one position down or to the next item of the document. |
Ctrl+PgUp |
It shifts the cursor in the table to the first record. On the pages that contain the part of the form with tabs (e.g. Notes, Header Text, Tasks,...), you can switch into next tab in direction from the last tab to the first. |
Ctrl+PgDn |
Shifts the cursor in the table to the last record. On the pages that contain the part of the form with tabs (e.g. Notes, Header Text, Tasks,...), you can switch into next tab in direction from the first tab to the last. |
Home |
It moves the cursor to the beginning of an active row. |
End |
It moves the cursor to the end of an active row. |
Ctrl+Home |
It shifts the cursor in the table to the first record. |
Ctrl+End |
It shifts the cursor in the table to the last record. |
Ctrl+Enter |
It replaces the functionality of 'OK' button in the forms in items. |
Alt+'Character' |
If some letters in the fields' names are underlined, it is possible to jump into the appropriate field, resp. to activate a function related to that field by simultaneous pressing of (left) Alt key and the underlined letter. The same rule is valid for listing between particular pages of a form (the underlined digits). |
Gray Plus (numeric keyboard +) |
It scrolls step by step between individual documents in ascending order. If Searching is on, you can scroll only between selected documents. |
Gray Minus (numeric keyboard -) |
It scrolls step by step between individual documents in descending order. If Searching is on, you can scroll only between selected documents. |
Ctrl+C |
It copies the selected text to Clipboard. |
Ctrl+V |
It inserts text from Clipboard. |
Ctrl+X |
It cuts the selected text to Clipboard. |
Shift+F12 |
It calls a selection menu for the fields where the selection via a button marked '?' is available. |
Shift+Enter |
It puts the first menu item into the fields without displaying the selection menu. |
Function Keys:
F1 |
This key starts the IS K2 help. |
F2 |
It saves the executed changes. This key may be used when you create a New record or change the existing one. If you create or change a large document, we recommend you to save the changes by F2 key continuously to avoid data loss. |
F3 |
Refresh/Restore - it restores the document to the state before execution of changes, it means the reverse function to F2 key. It is also used to refresh the screen (to keep data up to date). |
F4 |
Switching between the table and the selected document in Browse mode. |
F5 |
It switches the book of documents or the document in Browse mode into the document in Change mode. |
F6 |
Switches between the document table or between the document in Browse mode to the document in Change mode with the result that it copies the data from the selected document to the new record. So it carries out the similar function as Ins key. |
F7 |
It posts the document. |
F8 |
It performs the cancellation (undo the cancellation) of documents, invalidation (validation) of records or the deletion of records. |
F9 |
It opens a book of reports which can be displayed on the screen, printed or saved to a file by means of pressing a corresponding button (see the Print chapter). The menu of the reports can be activated either from a book or from a document in Browse mode. |
F10 |
Return to the desktop (or a previous form). |
F12 |
It opens the selection menu on a particular form items (items marked with a triangle) in Change mode or in New record. |
Alt+F2 |
It confirms the appropriate document. It can be done in any mode (Browse, Change, New record). A confirmed document can not be edited (Change mode can not be activated). |
Alt+F4 |
It performs closing of the current book or the form. |
Alt+F7 |
It enables the conditions setting for the Searching. |
Alt+F9 |
It enables the conditions setting for the Filter. |
Alt+F10 |
It activates switching books, Periods, Cash Registers, Banks, Warehouses etc. |
Ctrl+F2 |
It executes Undo the confirmation of a document. |
Ctrl+F5 |
It executes a change of the confirmation date in a confirmed document. |
Ctrl+F9 |
It is used for fast switching on the filter. |
Shift+F6 |
It inserts a new document from the specimen. |
Shift+F9 |
This key combination switches between the book mode and the container. |
Space Bar |
Checks/Clears flags in the documents or setting of filter conditions, in fast search, etc. |
Alt+Ctrl+X |
It performs the program termination. |
Ctrl+Shift+Alt+F5 |
It runs the Change record in bulk function. |