|
|
|
Basic functions
|
|
|
Filters Alt+F9
In K2 Programme, filters mean an important part of the work with data. You will appreciate them in active work (while pasting or editing data) as well as in all evaluations.
The concept Filter generally represents data selection from a database limited according to the defined criteria. It means that if you work directly with data (a filter is not activated), you can see all the records and inserting a new record means physical creating a new document. However, if a filter is activated, the displayed records will be limited to only a certain data selection. Inserting a new record means a selection from the already created records and their inserting to the selected records of the filter.
There are four combinations in K2 Programme in total:
All |
Book In Book mode, data are sorted according to the primary key (for documents Book - Period - Number, for Articles Abbreviation1 etc.). Whether the documents are structured into books, only data from the one book are displayed! Switching between individual books is usually executed by Alt+F10 keys. |
All In that mode absolutely all the data are displayed, it means all the data from all the books. Neither new records into database nor new documents to filter can be inserted. This mode can especially serve to work over absolutely all the data. However, it is not mostly used. |
Container |
Fast Filter It is applied directly on the Book. Fast filter uses only indexes from the appropriate table, so it operates in real time; its activation is immediate but the possibilities of the fast filter options are limited. |
Container The most frequent mode for evaluation. Into this filter, it is possible to select from all the data from the appropriate table according to random criteria. |
Filters basic control:
Shift+F9 |
Switching Book or Fast filter mode over All or Container mode. |
Ctrl+F9 |
Switching between Book and Fast filter mode and between All and Container mode. |
Alt+F9 |
Activating conditions for filtering. |
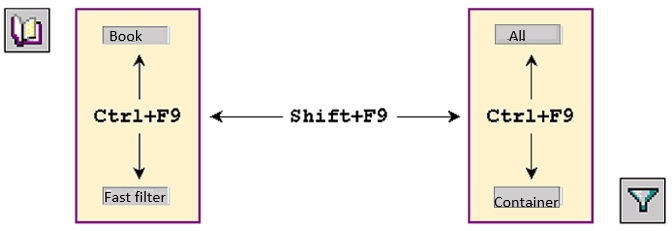
Picture: Schema of Switching between Particular Modes of Filters
Not only function keys mentioned above but also some of following possibilities can be used for work with filters:
- It is possible to switch between individual modes by click the right mouse button in the left bottom corner of the screen (in the status bar) where the current mode of Filter is displayed (Book, Container, etc.). From the activated table, it is possible to select one of the offered filter modes by click on the left mouse button.

Picture: Status bar in the Invoices Out book with an expanded selection menu of filter modes
- The next possibility of working is pressing left mouse button on the icon of a book
 and the filter on
  in the standard toolbar.
|
|
|
Fast Filter
Fast filters are used for a quick orientation in the particular books. These filters operate in real time and their activation is immediate. Simultaneously it means that if another network user creates a new record, which satisfies conditions of our filter, it will be automatically displayed on the screen (upon its restore). When the filter is on, all the table items will not be displayed but only those ones that satisfy the conditions of the filter. Then the programme acts in such a way as there were no other data in the databases but only those ones that satisfy the filter conditions. The Fast Filter note in the left bottom corner of the screen informs us about the filter activation.
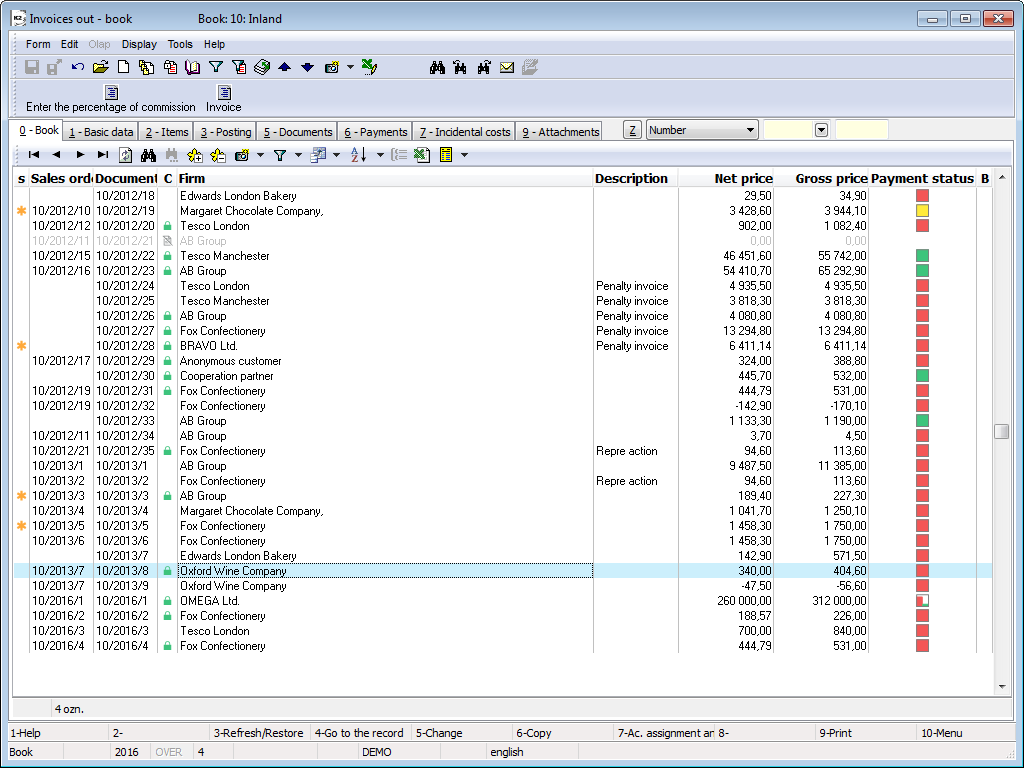
Example: Because the Fast Filter operations are similar in all the modules, for the sake of simplicity, we will explain Fast Filter initialization over the Invoices Outbook, concretely over Inland Invoices (the notice Book: 10 - Inlandsis displayed in the upper blue bar of the screen).
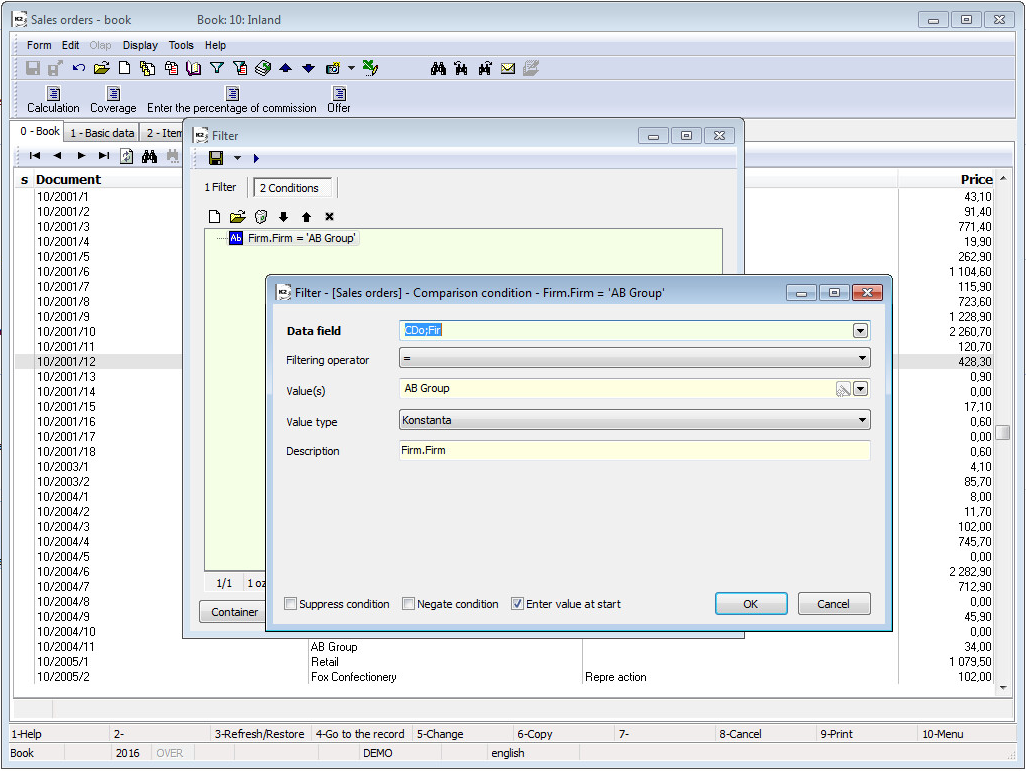
Fast Filter can be activated over the Invoices Out book, that is in Book mode, by pressing Alt+F9 keys. After pressing them, a form with conditions for filtering will be activated. In the form, select the conditions that you are interested in when filtering records and confirm their setting by pressing Ctrl+Enter keys or by 'OK'button. All the records that satisfy the defined conditions and belong to the primarily selected book (e.g. to the Book 10 - Inlands) will be filtered. Fast Filter mode will be displayed in the left bottom part of the screen.
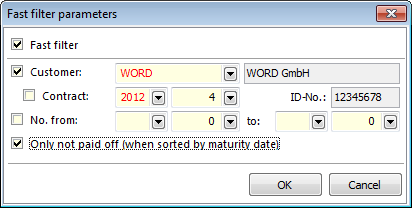
Picture: Conditions of Fast Filter over Invoices Out - Alt+F9
Quick Initialization of Fast Filter:
Fast Filter can be also activated immediately without any filter conditions settings. In a book of documents, that is displayed in Book mode, use Ctrl+F9 keys. The Fast Filter uses the information from the item where the blue light indicator is positioned and activates the certain flags of the setting. Fast Filtermode will be deactivated by pressing Ctrl+F9 keys again.
Another way is to click the right mouse button in the left bottom corner of any module. It is included in the book modes menu.
Example: If you position the light indicator on an invoice of AB Group Company in the Invoices Out book, all the invoices issued for this customer will be selected into the filter after pressing Ctrl+F9 keys.
Fast Filter in Purchase and Sale modules:
- If you select the Supplier (Customer) field in the form for defining the Fast Filter, all the documents of the given supplier (customer) will be filtered.
- It is also possible to check the Purchase Orders (Sales Orders) field in the form and choose one from the offered possibilities. All the documents related to the selected supplier (customer) and the appropriate purchase order (sales order) will be filtered.
- Documents can also be filtered according to the numbers (setting the interval of documents by a selection from the code list).
- If the field Not paid in full only (when sorted by date)is checked in the form, and the option Maturity Date is selected in the book when sorted, all the unpaid invoices from all the books will be filtered. This filtering is executed regardless of the customer (supplier) defined in the form of Fast Filter because this one is filtered when sorting according to the field Number.
- There it is also possible to check the With Ctrl+F9 check also the heading field in the Administrator - User parameters - Purchase and Sale module. The field Purchase Order (Sales Order) will be automatically checked in the form for Fast Filter. The purchase order (sales order) number, which corresponds to a document where the light indicator is positioned, will be automatically pasted to the selection field on the right. All the documents (e.g. invoices) that have the same number of the purchase order (sales order) will be filtered after activating the Fast Filter mode.
Fast Filter of Articles:
In the Articles book you can define Fast Filter conditions according to:
- Group - this field will be automatically checked after activating a form in the book. It enables to filter all the article cards within the selected group, e.g. food products, cars, etc.,
- Category - it will filter all the goods according to the selected category - e.g. material, articles, finished products, semi-finished products, …
- Abbreviation of article,
- Respectively, it displays non-zero amounts in the columns Disposal, Assigned, Ordered and Reserved.
The individual items for the selection of filtering can be combined in various ways.
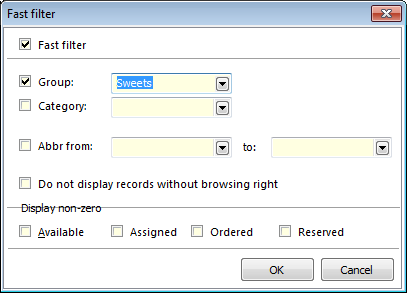
Picture: Conditions of Fast Filter over Articles - Alt+F9
|
|
|
Indicate Records
|
|
|
Asterisks
It is possible to indicate records in the book by asterisks. This function is important for bulk actions (see the Basic Functions - Module Menu Functions - Form chapter) and for a printing.
Conditions for records indication:
- In the module Administrator - User Parameters - General check the Select More Entries field.
- Event. add a column 'S' (Selection) into the book.
Note: In the case, that the option Select More Entries is selected in User Parameters, the column 'S'will be displayed automatically at default setting.
![]() Asterisk icon
Asterisk icon
There are three ways of adding and deleting of asterisks:
- Ctrl+spacebar (cursor will stay on the given record),
- Shift+Enter (cursor will shift on one record down - it is useful for indicating more records one after another),
- Ctrl+left mouse button on the appropriate item (cursor will stay on the given record).
- Shift+mouse click on the last record which you want to mark/unmark (it is useful for indicating more records one after another).
Picture: Asterisks and tabs in the Invoices Out book
![]() an icon to indicate all records by asterisk.
an icon to indicate all records by asterisk.
![]() an icon to deselect the asterisks for all the records (for the bulk deselecting all asterisks we can also use the F3 key).
an icon to deselect the asterisks for all the records (for the bulk deselecting all asterisks we can also use the F3 key).
Current number of asterisks is displayed in the lower part of the screen in the status bar. If no item is indicated, the number is missing.
The asterisks will be automatically deleted after the programme exit.
If you have records indicated by asterisks in the book, in the course of print of RPM or AM report the programme operates likewise under its initialization on the filter.
|
|
|
Bookmarks
To every book you can insert ten bookmarks that remember a position of the certain record. The bookmarks are indicated 0 – 9; the records can be indicated regardless of a bookmark order. Two bookmarks with the same number cannot co-exist. You can add a new column named "Bookmark" to the book for bookmarks display.
Book:
Ctrl+Shift+No. |
Inserts or removes bookmarks |
Ctrl+No. |
Repositions to a line with the appropriate bookmark. |
![]() Bookmark No. 5 Icon
Bookmark No. 5 Icon
It is advisable to use bookmarks in that case when you use a certain record very often. They make a quick reposition among records possible. The same as asterisks, bookmarks will be deleted after the K2 programme exit.
|
|
|
Other Containers
In IS K2, you can make a link between more containers using references from other modules.
Containers
This function is accessible through the module menu Actions (see the Basic Functions - Module Menu Functions - Actions chapter). The menu item Create Other Container creates items to the container selected from the References to Container book. The Add to other container item adds items corresponding to the defined condition to the existing items. The Delete from other container option assures deletion of the selected items from the second container. This option is useful e.g. in the situation when a container of all customers is created, then a container of invoices valid under specified conditions is created and after that all customers, which are presented on the selected invoices, are deleted from the first container. That way you will get all the customers that are not presented on the selected invoices.
Example: We want to filter all the invoices out that are related to the specific release notes.
- Select the specific release notes to the container in the Release Notes book.
- Select a container called Invoices Out from the module menu Actions - Create Other Container in the container mode in the Release Notes book. The control message, whether you wish to create the container, will be displayed on the screen - answer Yes.
That way all the invoices, which are linked with these release notes through the Sales orders, will be selected to the container of invoices out.
Note: There are "Linked documents", that refer to the 9th page of the documents, in the column Items in the References to Container book. So called "Sales items" bind to 2nd page of the documents.
The basic property of this process is especially fastness of the creation of a container from other module. As well, e.g all the customers, who the specified invoices have been issued for, can be selected from the container of invoices into the Suppl./Cust. container, or a container of all invoices, which are paid by these documents, can be created from the container of cash vouchers and bank documents, etc.
The next possibility how to use the container from other module is selection of an other container from the filter conditions (Alt+F9).
Example: We want to find out by which release notes the specific article has been released from a stock:
- Select the articles, releases of which you are interested in, to the container in the Articles book.
- Switch into the Release Notes book, where choose the condition type Submodule condition in the filter definition (Alt+F9), then select 'Sales items' and after that choose the condition type Other container, where select 'Article No.' and press the Run button.
Thus all release notes, which contain an item of the sought article on 2nd page, will be displayed in the filter of release notes.
Filters
Work in filters is due to using SQL query very effective.
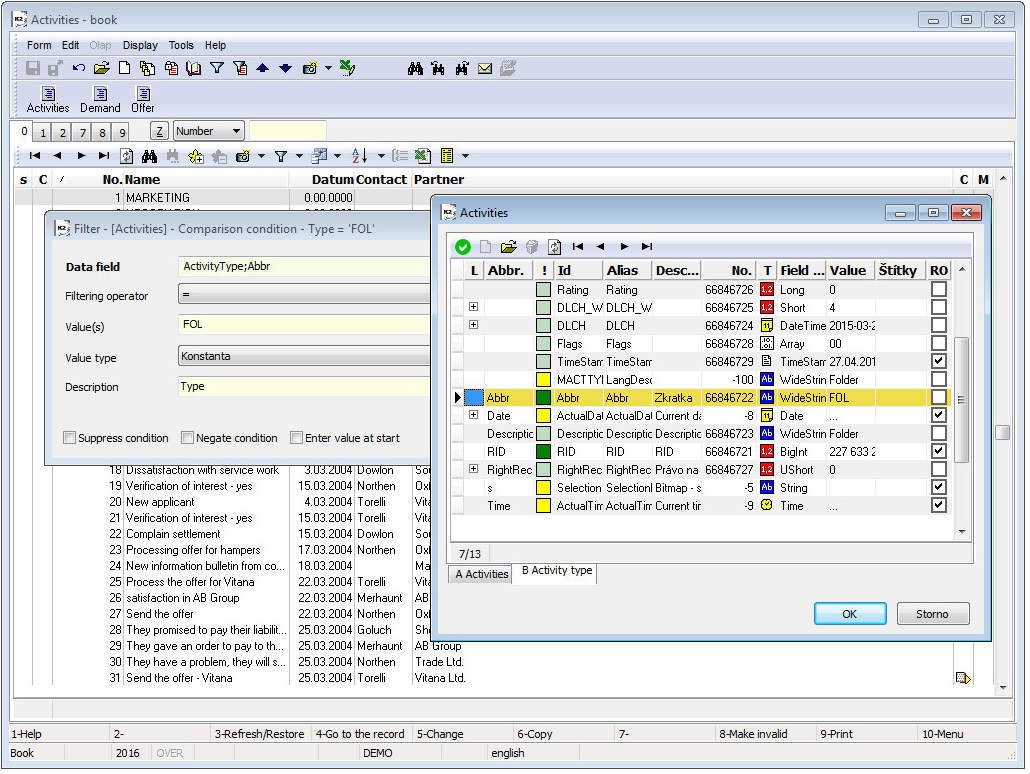
Example: We want to create a filter of all companies from London.
- In the Partners book, select all companies from London to the Container.
- In the Activities book run
 the form to select the filter conditions.
 - By Ins key in the right part of a form (or
 ) open a window to select a type of a comparison condition. By double click the left mouse button select the type Other container.
 - In the form, select the Partner condition (Description column) into the Data field and press OK. Thereby the link to the container of Partners will be saved into a right window.
After pressing OK button, the required filter of all Activities of the selected London companies will be executed.
|
|
|
Save container
Each user can create backups of each container. This is executed over the book of the filtered documents. This function can be activated from the selection menu of the module Form - Container - Advanced - Load/Save Containers. The book Load and Save Container, that contains a list of all accessible backups of containers, is activated.
Saving container is executed by pressing Ins key and by entering an Order number and an eventual container description. The appropriate container backup will be saved by F2 key.
If you want to load a container, select the option from the module menu Form - Actions - Advanced - Load/Save Containers. Select the required container in the table by the light indicator and confirm the selection by pressing Load button.
|
|
|
Filters
There it is possible, in addition to filtering Alt+F9, to create the own data selection, with which you want to work, by a simple way in the program K2. The work with data is much faster, simpler and more variable thanks to using SQL query.
Filters can be created by the 4 ways:
- On the page 0 from the field of a record.
- On the document card from the specific field.
- At the "Grid" tab of the document - filled and empty.
- From a form of conditions (icon
 ).
). - From the filter menu (icon ).
Note: Individual ways of creating filters are described in the Filter Creation chapter (including examples).
The program remembers the defined filter even after leaving the book. If we have the created filter, we can delete random records in it by using the Delete key.
For a work with the filters we can define operations on big tables (for more information see the Client parameters - 1st page the Options button) and in the User parameters set some properties of the forms.
Filters can be included into the window for running reports and scripts (F9) into the batch.
There is a toolbar with the buttons, among others for defining filters, in each module on the page number 0:
|
The light indicator moves to the first record of the list. |
|
The light indicator moves one row up. |
|
The light indicator moves one row down. |
|
The light indicator moves to the last record of the list. |
|
Restore (F3). |
|
Search (Alt+F7) - it displays a form for search in a text. |
|
It marks all records by asterisk. |
|
It cancel markings for all selected records. |
|
It displays a form, in which you can define a name of a view and some of its properties. If you press only |
|
It displays a form to define the filter conditions. By pressing |
|
It displays a form for the columns definition. After pressing |
|
It displays a form to define a filter sortings. After pressing |
|
It groups the records into groups. (This icon is accessible only after selecting filter sorting.) |
|
Export of a filter to MS Excel. |
|
It runs a draft of an automatic report on the book. It is possible to select the printed columns, their sorting or grouping in this proposal. The individual columns can also be added together or it is possible to choose another aggregate function. It is possible to run a final report, to save it or to edit this proposal also in AM editor. |
After expanding the menu by using icon ![]() , these symptoms are displayed for the individual items:
, these symptoms are displayed for the individual items:
|
It indicates a setting that is currently displayed. |
G |
Global filter, it means accessible for all users. |
S |
Filter accessible for the selected user group. |
U |
Filter is accessible only for the given user (for the user who created this filter). |
Adding and deleting records to/from a filter:
Shift+Ins |
In the book in the "filter" mode, this hotkey opens the book once again (in new window) and by using Enter key enables to insert a record from this newly open book into the selection. |
Shift+Del |
In the book in the "filter" mode, this hotkey deletes the record on which a light indicator is set. |
|
|
|
Filters - conditions
If you press only the button with an arrow ![]() at the icon
at the icon ![]() , menu of the saved filters and possibilities of working with these filters will be displayed.
, menu of the saved filters and possibilities of working with these filters will be displayed.
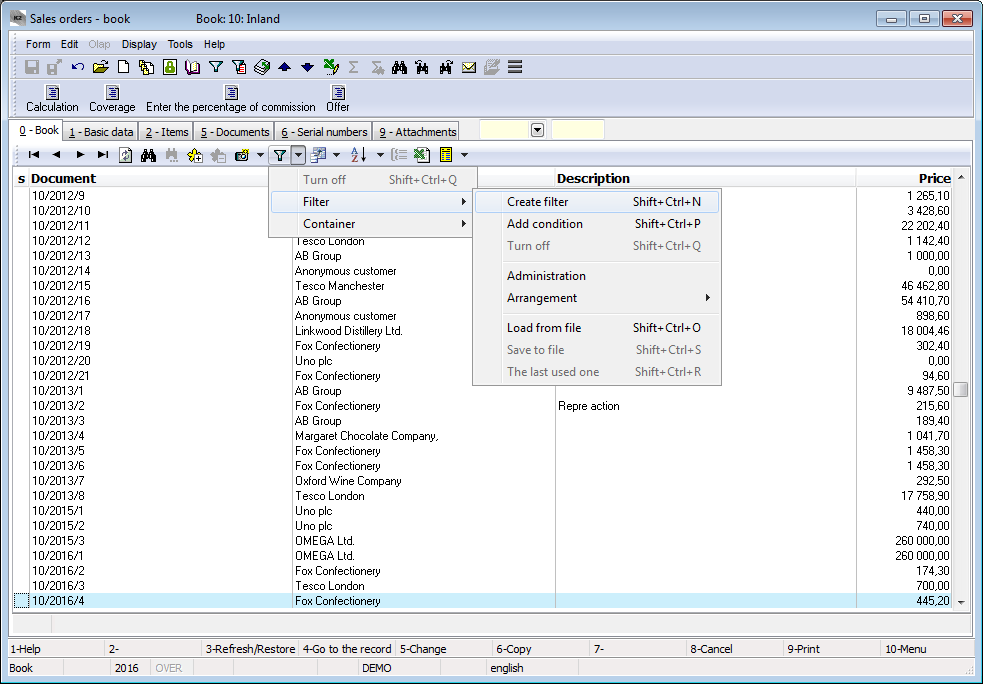
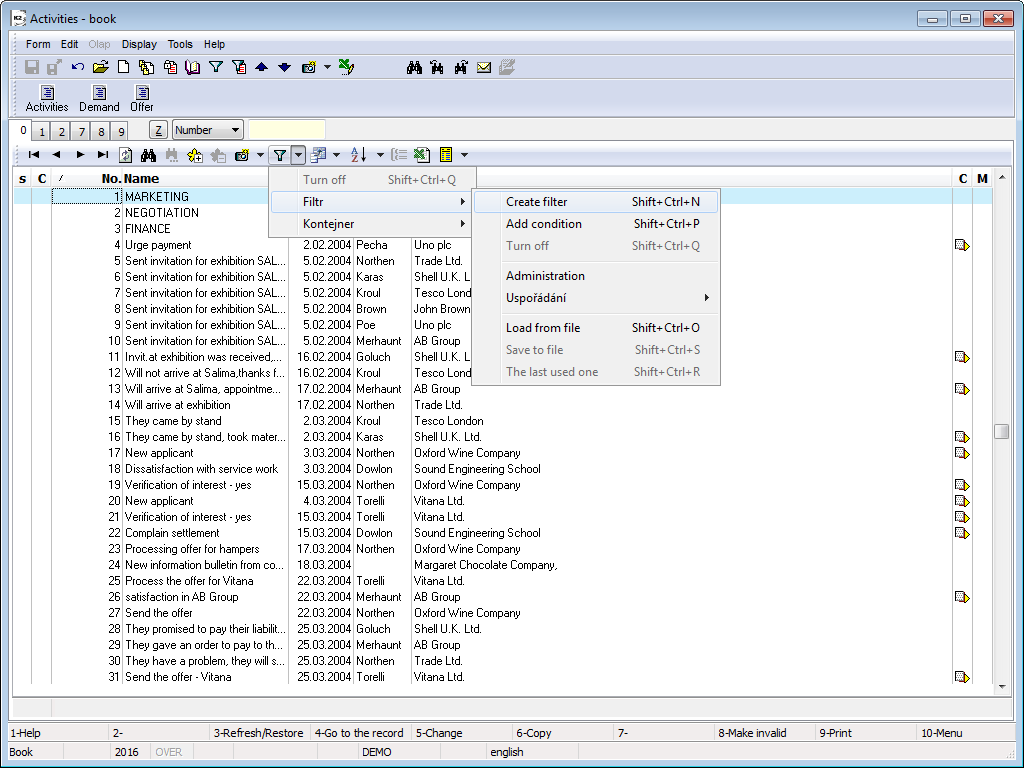
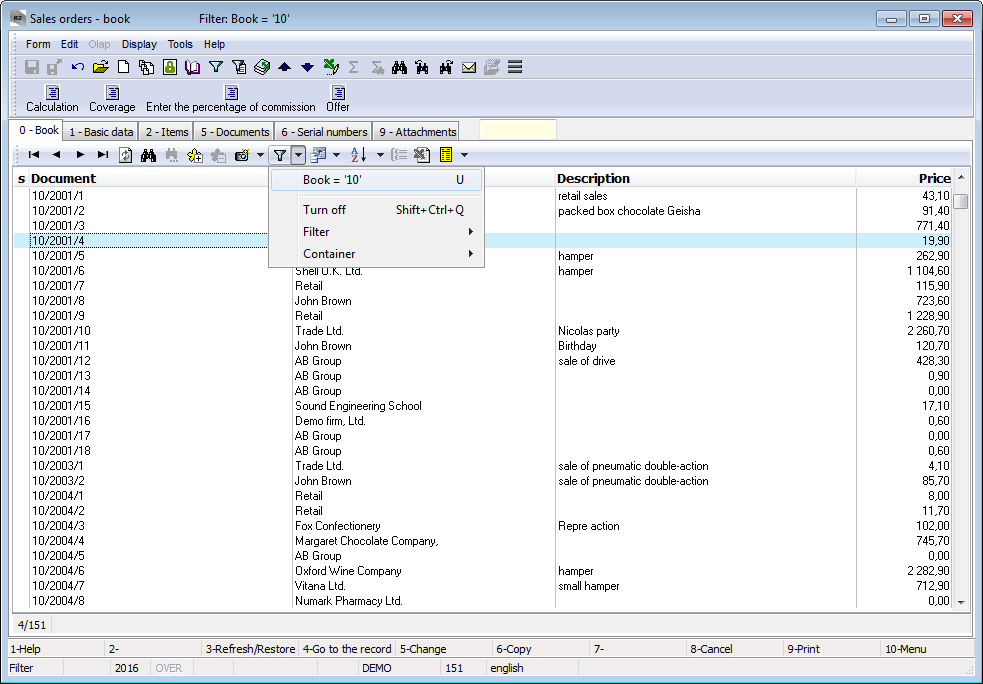
Picture: An expanded menu of filters in the Sales Orders book
Description of Filter menu:
Create filter |
The Comparison condition form will be displayed (see the Conditions tab chapter). |
Add condition |
Next conditions will be added to the current filter to the already defined conditions. |
Turn off |
The filter mode will be switched back to the Book mode. |
Administration |
After opening the menu Administration, the form for Administration of filters will be displayed. |
Load/Save to file |
It saves or loads the saved ".xml" file. |
The last used one |
It filters records according to the last used filter. |
Description of Container menu:
Create |
It inserts records from the current filter into container (a table will be in Container mode). |
Add |
It adds records from the current filter to container. |
Delete |
It deletes records from container (table in the Container mode). |
Note: Create, Add and Delete button have the same functions as the buttons in the Filter form (see the Conditions tab chapter).
Filters - RIGHTS
Level Global, Client, User group |
3 new rights allowing to enable saving the configuration objects (eg. View, filter, columns, sorting, automatic report) have been added to the user. User finds these rights in the Users book on the 5th page: Administrator - Access to settings level. |
|
|
|
Definition of Filter Conditions
After pressing the icon ![]() , the form for a definition of filter conditions will be displayed.
, the form for a definition of filter conditions will be displayed.
|
|
|
Filter tab
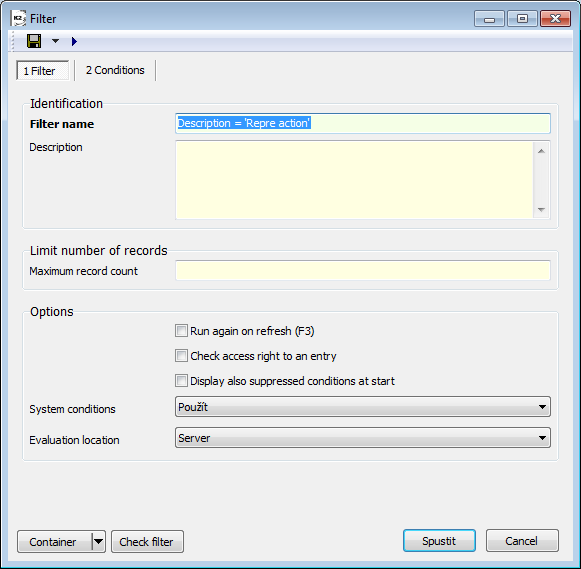
Picture: A form for defining the name of a created filter - the Filter tab
Fields description:
Filter name |
By a user defined name of a filter (it will be displayed in the menu of filters after pressing |
Description |
Further description of a filter. |
Maximum record count |
If you type in a specific number, only the first "x" records (according to the specified value) will be selected. Example:Type in number 10. Only the first 10 found records, that corresponds to the filter conditions, will be selected. |
Run again on refresh (F3) |
If this field is checked, then the filtering according to this filter will be automatically run after pressing F3 key. |
Check access right to an entry |
By checking this field, it is tested whether the user has the right to the selected record. The field is not checked by default. |
Evaluation location |
Information about a place, where there is a query evaluation (on the client, server, or mixed). Note:Evaluation on client is not very effective. |
|
|
|
Conditions tab
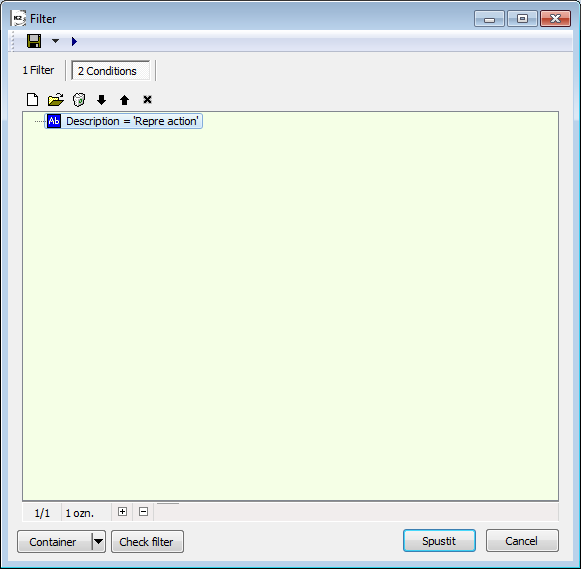
Picture: A form for defining the conditions of a filter - the Conditions tab
The conditions of a filter are inserted on the 2nd page of a form. The conditions are inserted by Insert key. For editing the already inserted condition press Enter key on it. Or it is possible only to suppress a condition, on which a light indicator is positioned, by pressing the icon ![]() or by F4 key (activation of a suppressed condition will be executed by the same way - by the icon or by F4 key). For deletion of a condition press Delete key.
or by F4 key (activation of a suppressed condition will be executed by the same way - by the icon or by F4 key). For deletion of a condition press Delete key.
These icons serve to work with filters:
|
It saves changes in the form. |
|
|
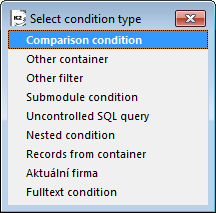
User adds a new condition into a filter. After pressing this icon or Insert key, a form for a selection of a type of condition will be displayed. Picture: The form to select a type of a filtering condition |
|
|
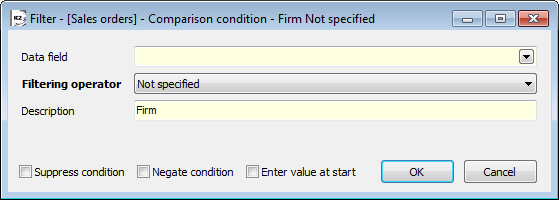
Comparison condition |
By double click of the left mouse button or by using Enter key on the item Comparison condition open the form for a definition of this condition. |
|
|
It restricts documents of a data module on the basis of comparing the value of the specific field(s). |
|
|
|
|
Other container |
By double click of the left mouse button or by using Enter key on the item Other container open the form for a definition of Other container condition. |
|
|
It reduces the result of a filter of one data module according to data from a container of the other data module and a defined condition. |
|
Picture: The form to define other container |
|
|
Other filter |
By double click of the left mouse button or by using Enter key on the item Other filter open the form for a definition of Other filter condition. |
|
|
It selects documents from the item data module of the other data module. Other filters enable to use filters defined for the data module A in the data module B which contains a link to the data module A. |
|
|
|
|
Submodule condition |
By double click of the left mouse button or by using Enter key on the item Submodule condition open the form for a definition of this condition. |
|
|
It selects documents from a data module on the basis of comparing a value of a condition with a value of a field of a item data module. |
|
|
|
|
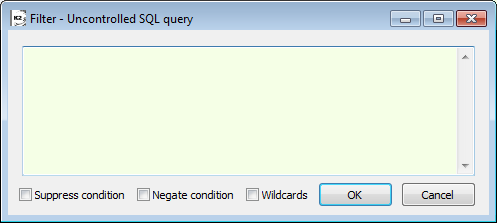
Uncontrolled SQL query |
By double click of the left mouse button or by using Enter key on the item Uncontrolled SQL query open the form for a definition of this condition. |
|
|
It serves to define their own conditions written in SQL language. |
|
Picture: The form to define uncontrolled SQL query |
|
|
|
When manually entering, the user writes a name of his condition and on the second tab inserts SQL code. |
|
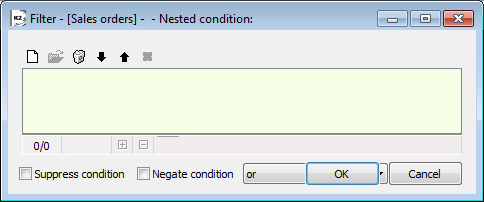
OR condition |
By double click of the left mouse button or by using Enter key on the item OR condition open the form for a definition of this condition. |
|
|
The conditions, between which it is possible to switch the operator "or" and "and", are inserted into a form. Operator "or" means, that the selection will be executed from such records that satisfy at least one of the conditions. Operator "and" means, that the selection will be executed from such records that simultaneously satisfy the inserted condition. |
|
Picture: The form to define OR condition |
|
|
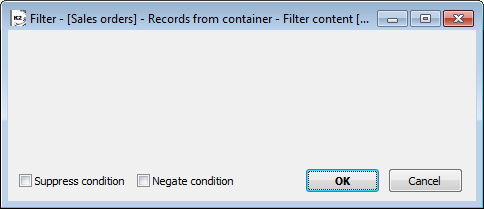
Records from container |
By double click of the left mouse button or by using Enter key on the item Records from container open the form for activating the container. |
|
|
It reduces the already existing container in the same data module as the created filter. |
|
|
|
|
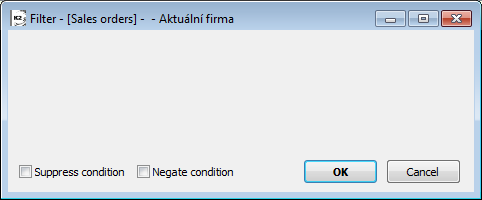
Current company |
By double click of the left mouse button or by using Enter key on the item Current company open the form for a definition of this condition. |
|
|
It "filters" the records which relate to the currently set company in thesystem K2. |
|
|
|
|
It deletes a condition on which a light indicator is positioned. |
|
|
It performs test of a filter. |
|
|
It moves a condition, on which a light indicator is set, one place forward in a filter. |
|
|
It moves a condition, on which a light indicator is set, one place backward in a filter. |
|
|
It suppresses a condition, ie. this condition will not be taken into account when filtering. (A condition will be crossed until you press this icon again to become a condition active again.) |
|


Some buttons are accessible in the bottom part of a form:
Container - it contains these buttons:
Create |
After pressing this button, it inserts a filter according to the defined conditions into container (a table will be in the Containermode). Start can also be executed by using Alt+V keys. |
Add |
Records according to the defined conditions in a Filter will be added into container (Container mode) by pressing this button. Start can also be executed by using Alt+P keys. |
Delete |
Records, which correspond to the defined filter conditions, will be deleted from container (a table in Container mode) by pressing this button. Start can also be executed by using Alt+O keys. |
Reduce |
All the records, which do not correspond to the defined filter conditions, will be deleted from a container (a table in Container mode) after pressing this button. Start can also be executed by using Alt+E keys. |
Empty |
All records will be deleted from the container by this button. Start can also be executed by using Alt+Z keys. |
Check filter |
If you press this button, the form, which displays the results of a test of a filter, will be displayed. On the basis of this test, we can determine how effective a defined filter is. |
The Container button is also available in the form of an "Enter value at start" condition.
Buttons for filter:
Run |
The defined filter will run after pressing this button. Start can also be executed by using Ctrl+F9 keys. |
Cancel |
By this button you can close a form. If some changes are made on the form that have not been saved, you will be asking whether you want to save the changes or not. It is also possible to use Esc key to cancel a form. |
List of data fields
When defining conditions select fields from a list of data fields. If there is an icon ![]() in the "V" column, then a link to some other table and its fields exists for this field. If you press this icon, a list of this fields will be displayed and the next tab will be created in the bottom part of the form Filter. A new tab will be displayed upon every next nested level. (When there are more nested levels, the scroll arrows will be displayed next to the tabs.) If you click on the other node, the nested level will be changed and the tabs will also be changed according to the new selected one. All nested levels will be cancelledup to current level by pressing Backspace key.
in the "V" column, then a link to some other table and its fields exists for this field. If you press this icon, a list of this fields will be displayed and the next tab will be created in the bottom part of the form Filter. A new tab will be displayed upon every next nested level. (When there are more nested levels, the scroll arrows will be displayed next to the tabs.) If you click on the other node, the nested level will be changed and the tabs will also be changed according to the new selected one. All nested levels will be cancelledup to current level by pressing Backspace key.
If a light indicator is positioned on one of the fields, the specific item in the list can also be found by typing the beginning of the name of the field and the light indicator will move according to it to the nearest possible one. A name of a field is searched in a column, in which a light indicator is set. (Nested field are not taken into account when searching!)
The icons in "T" column identify what type of field it is and which value it can assume (see e.g. the field Date or Time).
The individual data fields are colour coded in a column "!":
|
Calculated field. It is evaluated on a client. |
|
Physical field. It is evaluated on a server. |
|
A physical field with an index and therefore the most appropriate field for searching. It is evaluated on a server. |
It is best to use a condition on a physical field with an index (dark green), resp. a condition on a physical field (light green). And if you want to apply a condition for a calculated field (yellow), then preferably in the combination with one of the previous ("mixed condition"). The Evaluation location field on the Filter tab is filled on the basis of the selected condition.
|
|
|
By double click of the left mouse button or by using Enter key open the condition which is inserted into Filter.
Picture: The open item in a Filter - the Conditions tab
Selected fields' description:
Filtering operator |
Besides mathematical operators ("equals", "greater than", etc.) you can filter by other comparison operators: |
|
|
Depending on the selected operator, the fields or their accessibility are changed in the form. |
|
Where |
Field is displayed when the field Filtering operator is filled with the value "Contains". In this field select, in which part of the name of the compared data field, a string of the field Value(s) will be contained. |
|
|
|
|
Value(s) |
Write a "value", according to which the condition should filter the records, in this field. If the string of a value does not contain an asterisk (as a wildcard), the records, that exactly correspond to the specified value, will be added into the filter. |
|
Value type |
Select a type of a defined value in this field: |
|
|
|
|
|
|
|
|
|
|
The check field is changed according to the selected data field or filtering operator: |
||
|
Suppress condition |
By checking this field, this condition will not be accepted when filtering. |
|
Negate condition |
If this field is checked, then all the records, which do not contain the defined value, will be saved into a filter. |
|
Enter value at start |
If you check this field, then a form, where it is possible to edit a condition (e.g. the date from - to), is always displayed when running filter that contains a condition with this check. For the value types "Constant" and "Expression", it is possible to: 1. edit a parameter value which will be used when running a filter. For the value type "Constant", the adjusted value will be remembered and it will be offered the user even when you next start. For the value type "Expression", a value obtained by evaluation of the expression will be always offered. 2. "Suppress" (or "Allow") a condition at start, by using F4 key For a value type "Data field",it is only possible to "Suppress" or "Allow" a condition, by using F4. |
|
By reference |
If we choose the option "<>", "=" or "in the list" as a filter operator, you can switch (in fields where it is possible, e.g. book, period etc.) the method of definition between a direct (number, ID) and a reference (Abbreviation) value, which is more efficient in performance. Entering by reference requires an existing value, it is possible to enter neither a non-existent abbreviation nor a number / ID. If this occurs, the parameter is complemented by the suffix "<--" indicating an invalid value, and the condition can not be saved. |
|
Wildcards |
If the "contains" filtering operator is selected, it is possible to use wildcards (e.g. if you want to filter according to the Description field) when entering a value in Parameter, if you do not know the whole name. This field is automatically checked, if the Use wildcards field in the User parameters - Environment - Other options button - Search field is checked. |
|
Case Sensitive |
When you check this field, case sensitive is taking into account in the filter conditions. It means, if a description, which does not exactly correspond to the searched text, is entered into a condition, the records will not be saved into a filter. |
|
Compare including time |
The field is available if the data field of the type "DateTime" is selected. If this field is checked, the values are compared including time, if it is not checked, only date without time is compared. |
A button is accessible in the bottom part of the form:
Container
|
This button contains the option Create (Alt+V). After pressing this button, the entries corresponding to the specified conditions are inserted into the container (the table will be in the Container mode). Start can also be executed by using Alt+V keys. |
Note: If you are creating a filter, by means of which you will select records, where a text begins with "_" underline, you have to put an underline into [_] (see the picture below) in the Value(s) field in the definition of the condition.
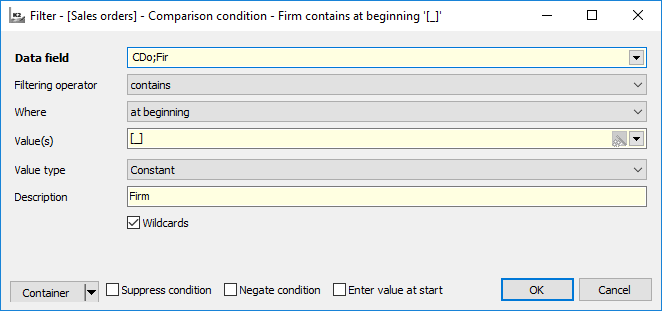
Picture: Definition of a condition to search a text beginning with "_"
|
|
|
Creating filter
On the page 0:
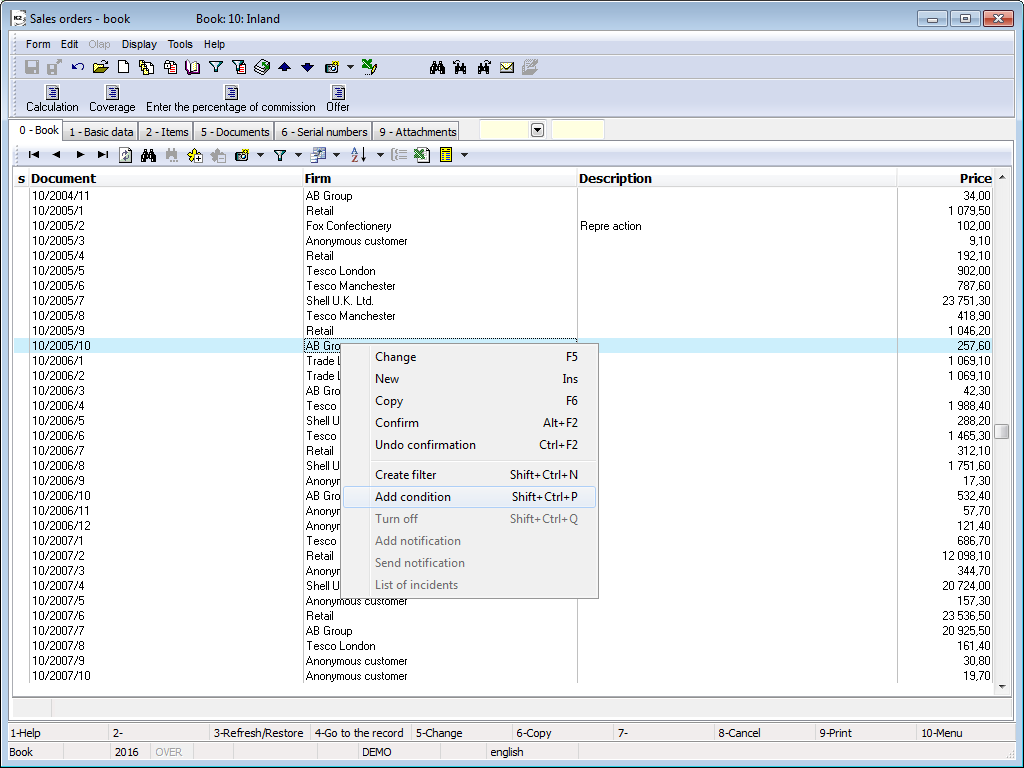
- By pressing the right mouse button in a field of a record, we will call up a menu from which you can create filters or add conditions to existing filters. (The options in the selection menu have the same functionality as the menu options after pressing
 an the icon . (For more information, see Administration of conditions.))
 - After choosing one of the options, the Comparison condition form will be displayed (for further description see Condition).
- After completing the fields of a Comparison Condition and after pressing the Run button, a filter according to the specified conditions will be created in the book.
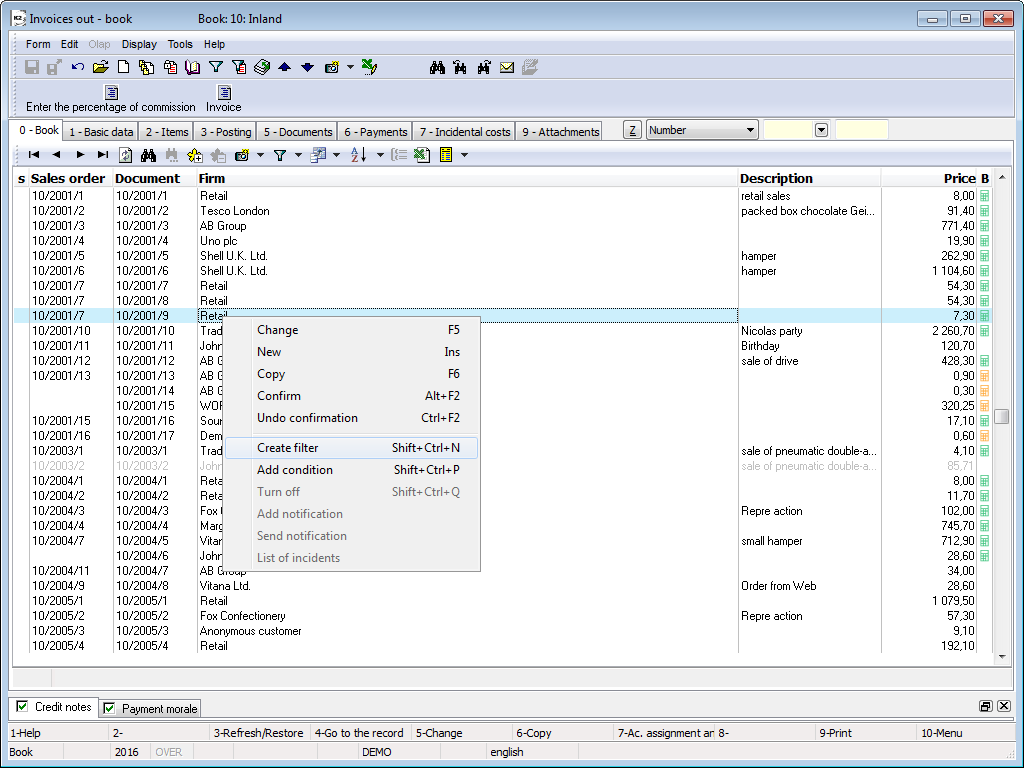
Picture: The open selection menu after pressing the right mouse button
From a document card:
- By pressing the right mouse button in any field, we will call up a menu from which you can create filters, add conditions to existing filters or add selected fields to the columns displayed on the page 0.
- After choosing one of the options (Create Filter or Add Condition), the Comparison condition form will be displayed (for the further description see the Condition).
- After completing the fields of a Comparison Condition and after pressing the Run button, a filter according to the specified conditions will be created in the book.

Picture: The open selection menu after pressing the right mouse button - the Create filter option
From an item form:
Filter from an item form works in the same way as a filter from a document card. The filter is run by pressing the right mouse button on any field of an item form. For most forms, the menu includes Create Filter and Add Condition. For some forms, the menu also contains the option Add to Columns.
From "grid" of a document card:
To create a filter or add a condition on "grid" of a document press the right mouse button on the item in the required field and select the Create Filter or Add Condition option. In the same way you can create a filter or add a condition on "grid" that does not contain any item. Pressing the right mouse button is done anywhere on the "grid". Then a condition to the field, whose column is currently active, will be pre-filled into the filter definition.
From a condition form:
- By pressing the icon open a form with a list of fields of the given data module, where define filtering conditions (for the further description see Conditions tab and Condition).
- By OK button, a filter according to the specified conditions will be created.
From a filter menu:
- By pressing at the icon open a filter menu and select Create filter.
- A comparison condition form will be displayed (see the Condition).
- By pressing
 open the offer of the Data field conditions.
 - By double click of the left mouse button (or by Enter key) insert the selected condition into the Data field (further description of the work with conditions see in the Condition tab).
- Select a filtering operator or check other options.
- After pressing the Run button, a filter according to the specified conditions will be created.
|
|
|
Example - Filter from page 0
We want to create a filter of articles, which has the value in the Available column greater than 150.
- Press the right mouse button on the record, which has the value "150" in the Available column, in the Article table.
- Select the Create filter option in the open menu.
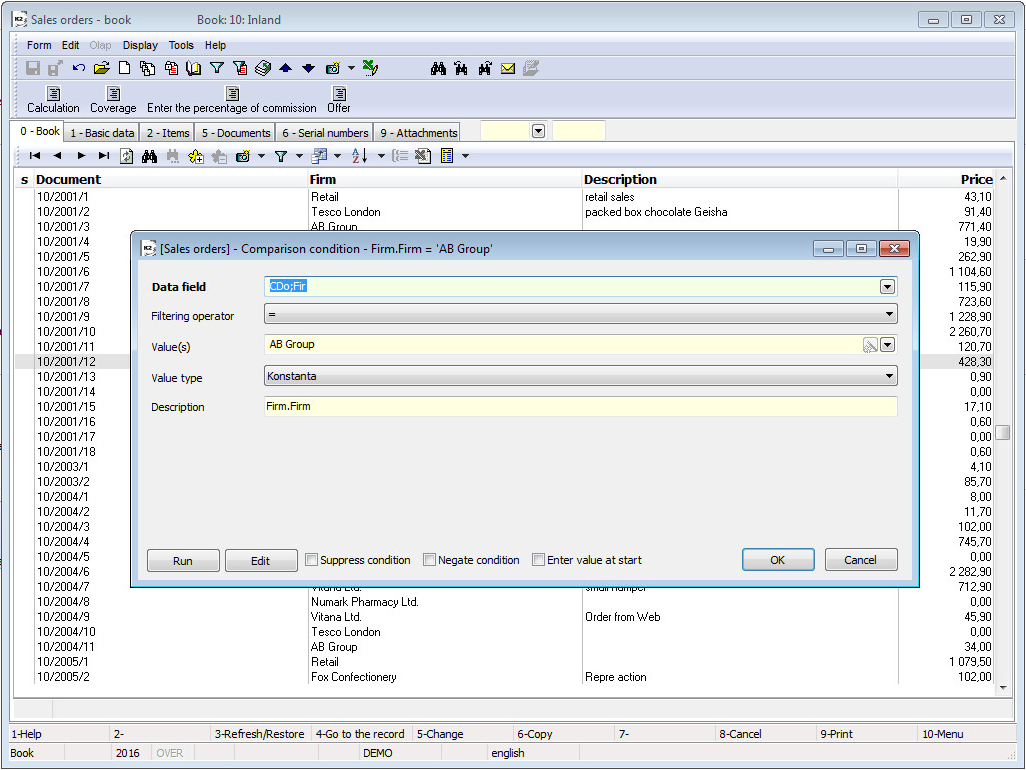
- A form of a Comparison condition with the predefined values according to the selected record will be displayed.
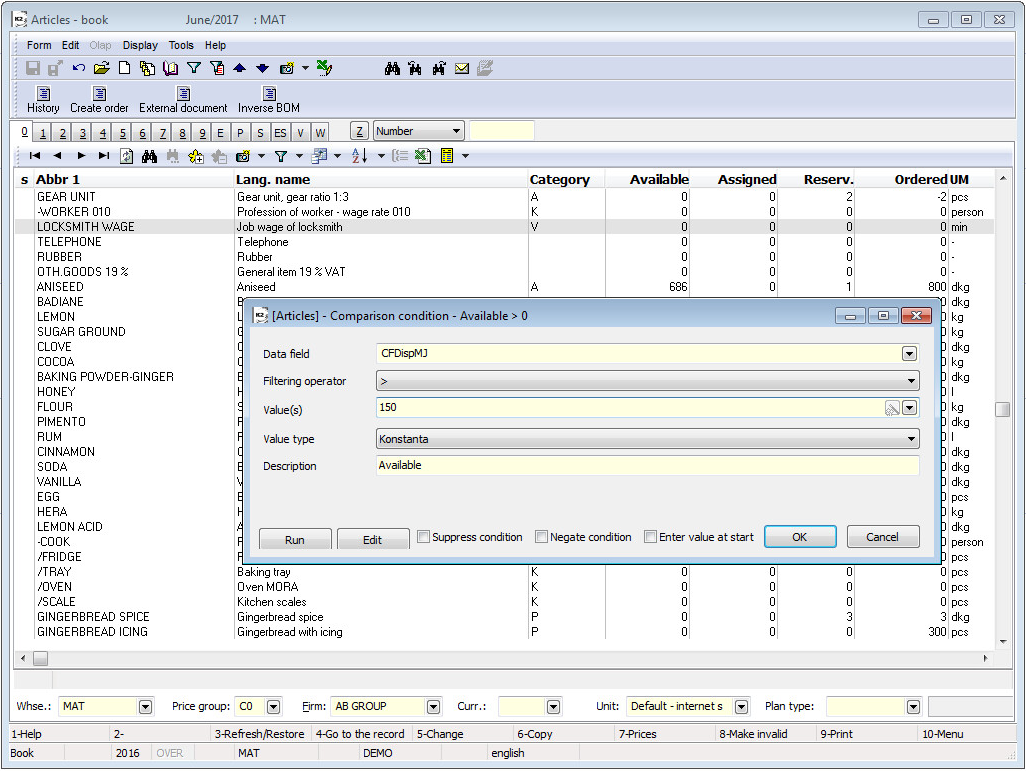
Picture: The comparison condition form with the predefined values
- Filter according to the defined conditions will be crated by using Run button. (If you press OK button, the entered condition will be only added to the list of conditions for filter.)
|
|
|
Example - Filter from the card of a document
We want to create a filter of reserving cards which have the end date of a reservation of an article on the date 27/02/2009.
- Open the Reserving cards book where you want to create a filter.
- Press the mouse right button on the Reserv. Date to field on the 1st page of a reserving card.
- Select Create filter in the open menu.
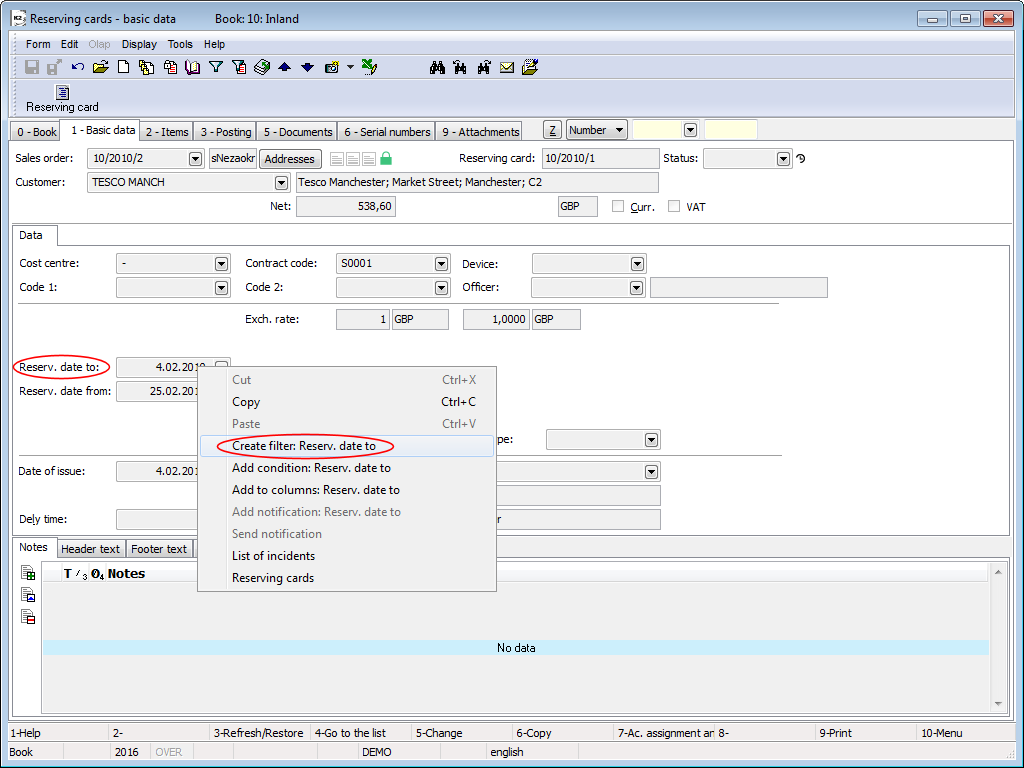
Picture: The open table menu of the field after pressing the right mouse button
- A form of a Comparison condition with the predefined values according to the selected record will be displayed. Because we need to select documents with the reservation date 27/02/2009, included, change a filtering operator on " <=".
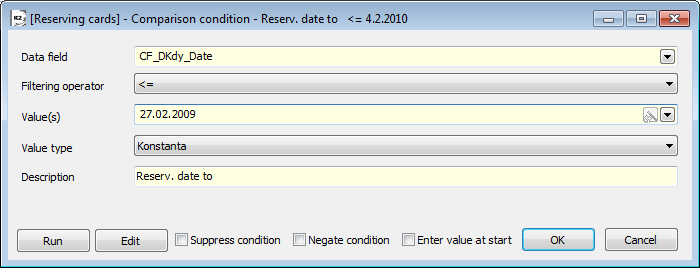
Picture: The completed form of a Comparison condition for an end reservation date
- Filter according to the defined condition will be crated by using Run button. (If you press OK button, the entered condition will be only added to the list of conditions for filter.)
If you want to create a filter from the reserving cards, which end date of reservation is e.g. in the range from 14/06/2010 until 25/06/2010, select " between" as the filtering operator in the Comparison condition and write the required data into Parameters.
|
|
|
We want to create a filter of Purchase orders which have been created during last fortnight.
- Open the Purchase Orders book in which a filter will be created.
- Switch over the 1st page of a document and by pressing the right mouse button on the field Date of issue open a drop-down menu and select the option Create filter in it: Date of Issue.
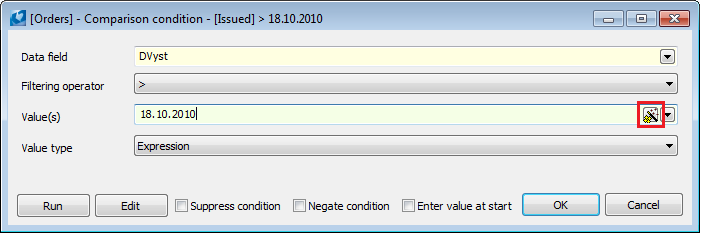
- In the form of Comparison condition:
- select Expression into Value type field,
- as a Filtering operator choose "greater than",
- in the Value field open a window and write an expression "DATE -14" into it.

Picture: Filling the fields of a Comparison condition for a filter of Purchase orders issued in the last 14 days
- The defined expression will be added into Parameter field after pressing OK button.
- Filter according to the defined condition will be crated by using OK button.
By pressing the button Compile, the program checks the syntax of the specified script expression (in our example "DATE -14").
Example - Filter with Expression for a date condition
When selecting a date condition, there an expression written in Script K2 (Value type = "Expression") can be entered. The expression can be written directly to the Value field, or the user can use the drop down arrow in this field to bring up the window with the script editor. To make it easier to compose the expression used new Wizard button which can compile the most commonly used expressions.

Picture: The form for entering the value of a condition of the "Expression" type
Wizard can also be activated by using the button, which is placed in the form of a condition definition in the Value field next to the drop down arrow.
Picture: The Wizard button on the form for a condition definition
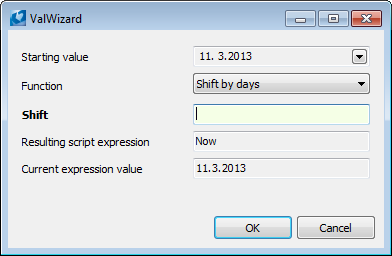
Picture: The form after pressing the Wizard button
E.g. if you want to compile an expression returning the date of issue of an invoice on the last day of the following month, fill in:
- Function: 'End of the month',
- Shift: '+1'.
There are a required expression in the Resulting script expression field and its current value under it. The expression will be transferred to the editor and then also to the condition after pressing OK.
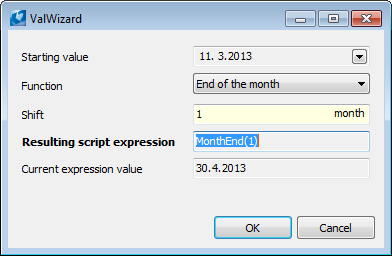
Picture: The form after pressing the Wizard button - a defined condition

Picture: The form to complete the value of condition of the "Expression" type - the defined condition
|
|
|
Example - Filter from the item form
We want to create a filter of invoices out which contain items of the Grocery type.
- Open the Invoices out book where you want to create a filter.
- Open a sales item on the 2nd page of an invoice out and press the right mouse button on the Article field.
- Select Create filter in the open menu.
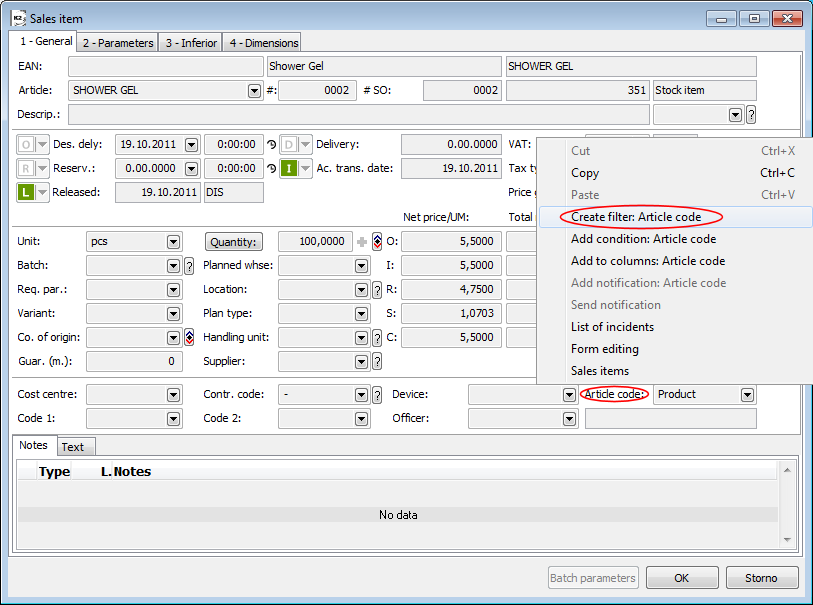
Picture: The open table menu of the field after pressing the right mouse button
- A form of a Comparison condition with the predefined values according to the selected record will be displayed.
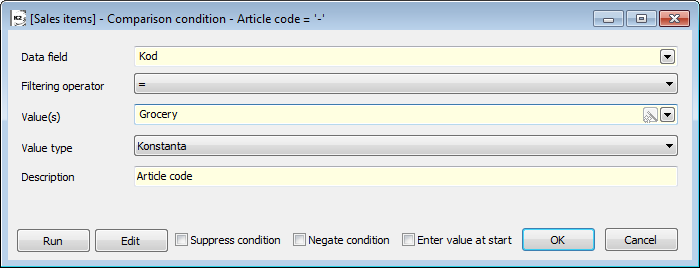
Picture: The completed comparison condition form for an Article code
- Filter according to the defined conditions will be crated by using Run button. (If you press OK button, the entered condition will be only added to the list of conditions for filter.)
|
|
|
Example - Filter from the conditions form
We want to create a filter from the release notes issued from 11/01/2017 to 31/01/2017 for the OMEGA Ltd.company.
- Open Release notes book where you want to create a filter.
- Open the form for condition definition by pressing the icon. Insert a new condition, select a Comparison condition type. In a condition form open an expanded field Data field (see Condition Tab and Condition).
- In the list of fields find:
- Created on (in the Description field) and open the form of a Comparison condition by double-click of the left mouse button:
|
|
|
|
|
|

Picture: A conditions form with the open Comparison condition (filter of OMEGA Ltd. company)
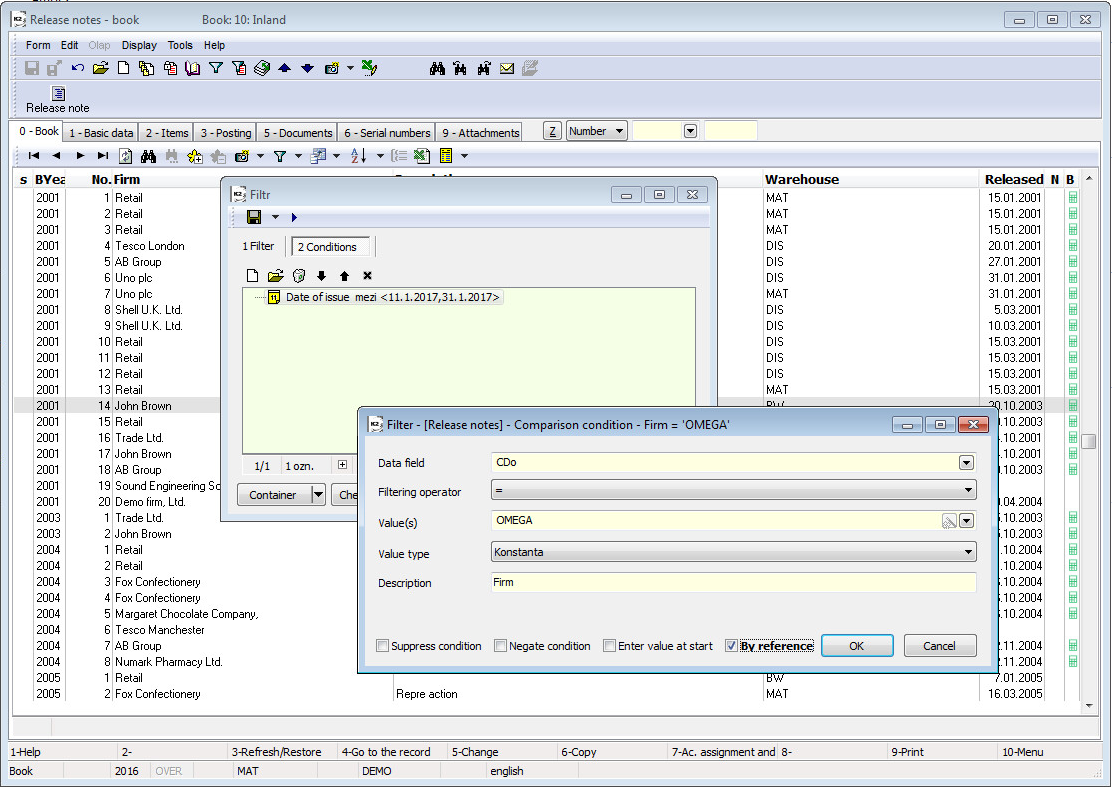
Picture: A conditions form with the open Comparison condition (filter of OMEGA Ltd. Company) with the checked By reference option.
- Filter according to the defined conditions will be crated by using OK button.
|
|
|
We want to filter all invoices of the selected customers where no payments have been executed (so invoices, Paid in full onof which is zero).
- Open the Suppl./Cust. book where create a container of a specific customers, non-paid invoices of which we will filter later (the table in Container mode).
- Switch into Invoices out book and press the icon .
- The Conditions tab of the Filter form will be displayed.
- Other container of a customer - by pressing icon open the form in which select the option Other container. Open Data field menu and select the CDo(Firm) condition. Other container will be added into Filter after pressing OK button.
- Other container of a customer - by pressing icon
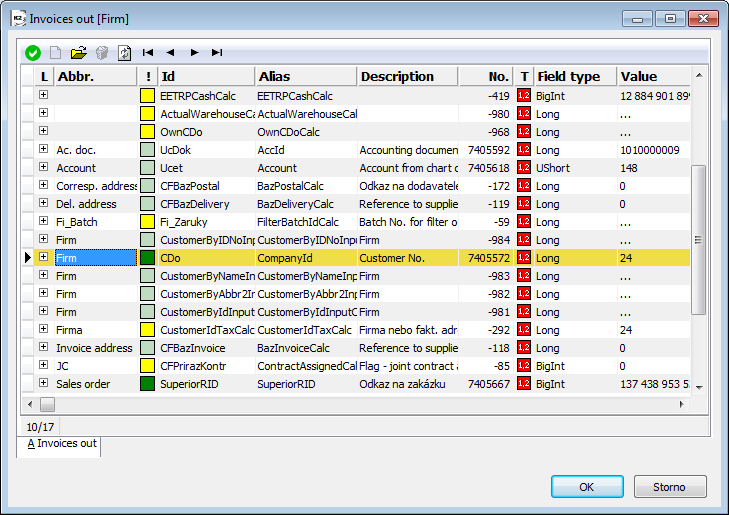
Picture: The open menu of a possible other containers of invoices out
- Filter of unpaid invoices- insert the Comparison condition on the field Payment (in the column Name). Select the option "empty" as a Filtering operator and save the condition to Filter by the OK button.
Note: If you are not sure what is the name of the field, you can elicit this name by pressing the right mouse button on the searched field (see definition of a condition for the filter of addressee in the example of filter).
- After pressing Run button, the required filter will be performed.
The created filter can be printed by the standard way (in our example by using the report Invoices List sorted according to the supplier/customer).
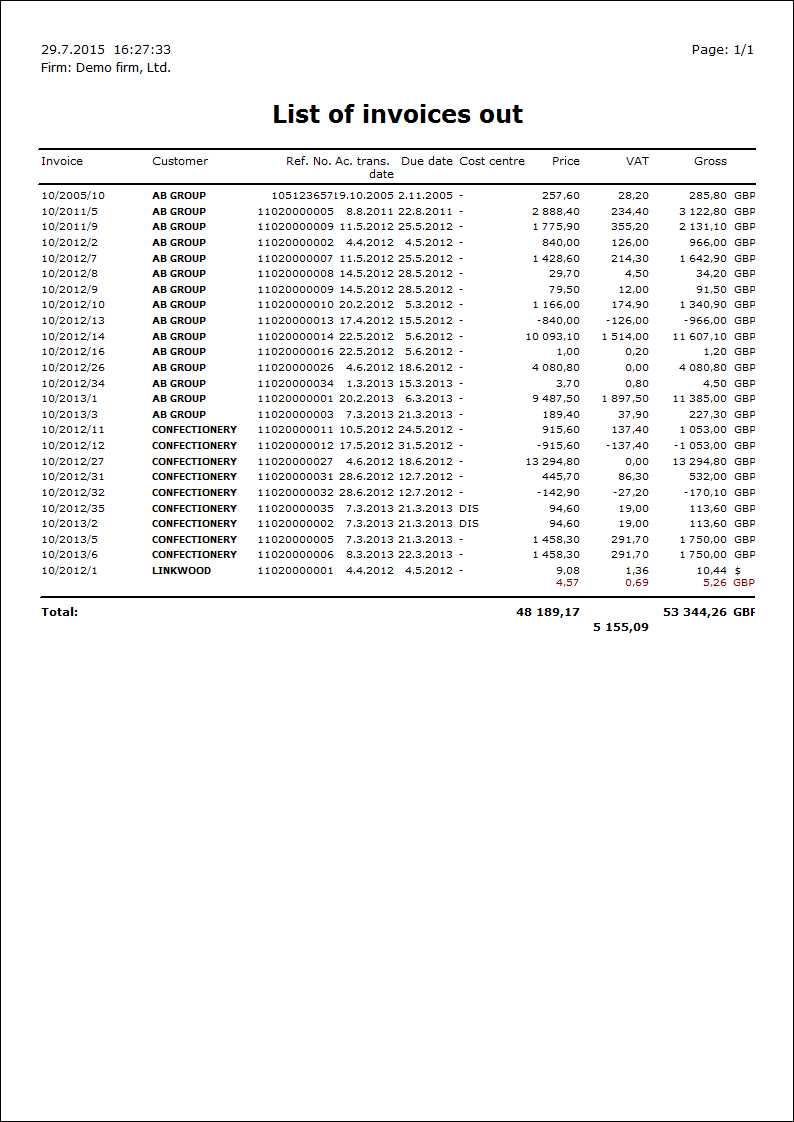
Picture: The list of the non-paid invoices out sorted according to the customers from a filter
|
|
|
We want to select all sales orders, customer of which contains "Tesco" in an abbreviation.
- Switch into Customers book and press the icon .
- The Conditions tab of the Filter form will be displayed.
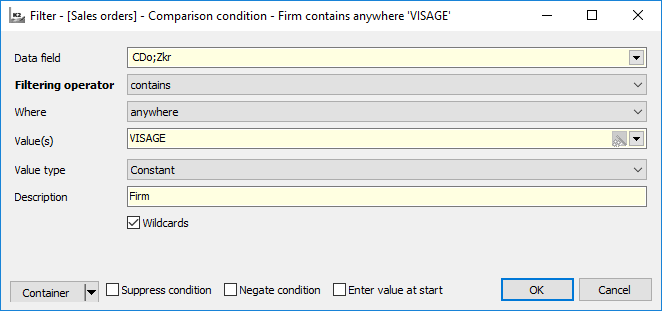
- Comparison condition for an customer's abbreviation - by pressing an icon open the form in which select the option Comparison condition. The form with a list of Data fields will be displayed. Select a field with the name 'Abbreviation 1'. In the condition definition select 'contains' in the Filtering operator. Write 'tesco' into the Value(s) field. Press the OK button. Save a filter as 'Abbreviation Tesco '.
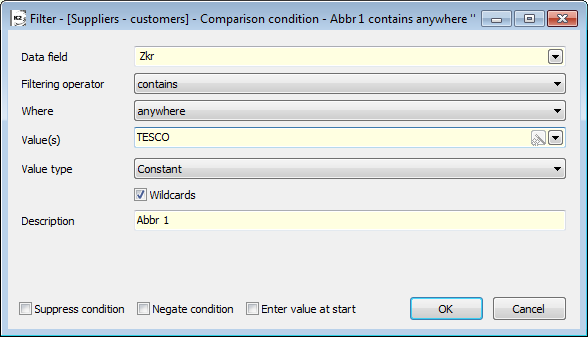
Picture: Defined condition for a filter Abbreviation Tesco
- Switch into Sales order book and press the icon .
- The Conditions tab of the Filter form will be displayed.
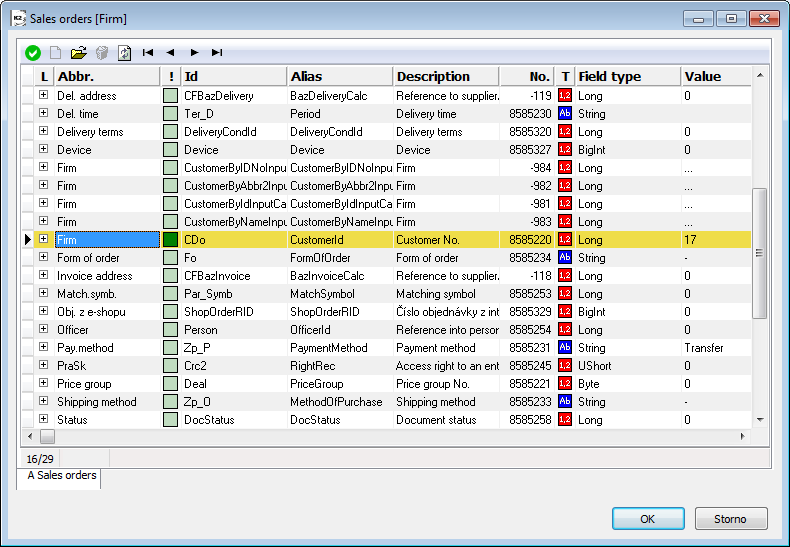
- Other filter on Sales Orders - by pressing an icon open the form in which select the option Other filter. A form with a list of fields with links, which other filters support, will be open. Select the data field CDo (Firm). After pressing OK button, the program offers a list of filters, which are saved in customer.
Picture: The open menu of possible other filters of sales orders
- Select the filter 'Abbreviation Tesco '.
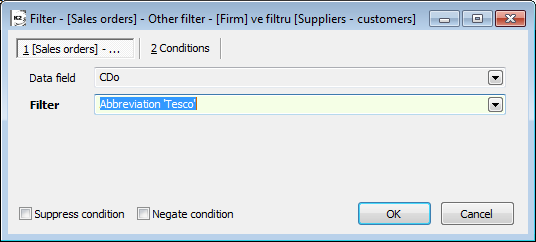
Picture: Other filter in filter - Suppliers - customers
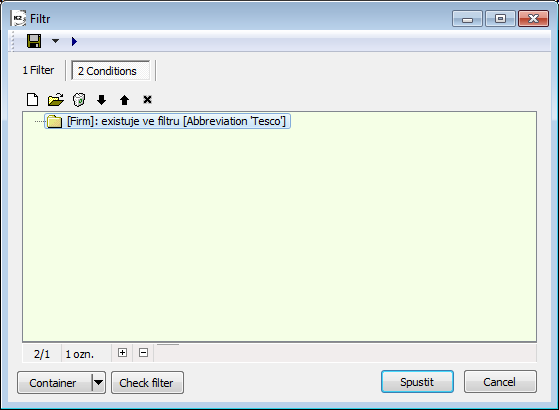
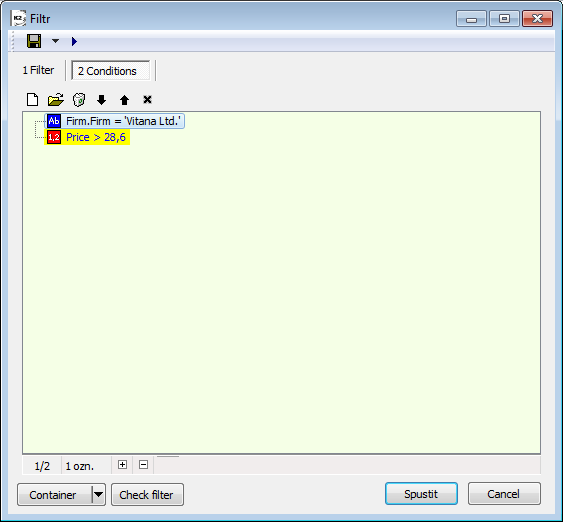
Picture: A form of filter conditions with defined conditions
- After pressing Run button, the required filter will be performed.
|
|
|
We want to create a filter from sales orders, which have the Gross amount higher than 50,000.00 EUR and a customer is located in any part of Ostrava.
- Open Sales orders book where you want to create a filter.
- Press the icon .
- The Conditions tab of the Filter form will be displayed.
- By pressing the icon open the form in which select the option Comparison condition:
- To filter the amount - you can first sort conditions in the Description column and then you can find a condition with the description of "Gross of document" by scrolling. By double click of the left mouse button (or by using Enter key), open a form for a definition of a Comparison condition. In the Filtering operator field select '>'. Write '50000' into the Value(s) field. Leave the form for a condition definition by OK button.
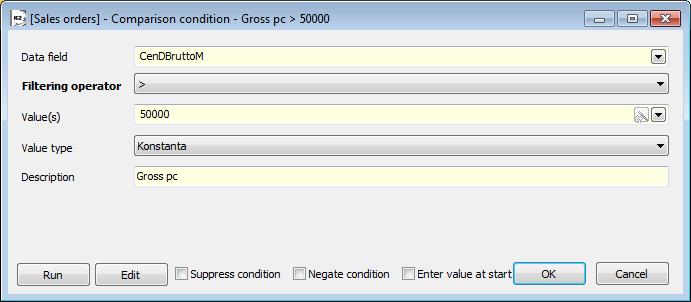
Picture: Defined condition for a filter of gross amount
- For the filter of an addressee in Ostrava - insert a Comparison condition, find the field with the description "Customer No.". By pressing
 next to the "Customer No." data field set the binding to "Address". Further set the binding to "TownPartID (Address)" for this field by pressing . Expand this field and find a field with a description "Municipality". Display the form of a Comparison condition by Enter key. Select the option 'contains' in the Filtering operator field. Write "Ostrava*" into the Value(s) field. Leave the form for a condition definition by OK button.
Picture: The defined condition for a filter of all parts of the town Ostrava
|
The created filter can be saved into a filter menu. A filter can also be printed by a standard way (e.g. by using the List of Sales Orders report).
|
|
|
We want to select all invoices out on which an advance has not been deducted yet.
- Switch into Invoices out book and press the icon .
- The Conditions tab of the Filter form will be displayed.
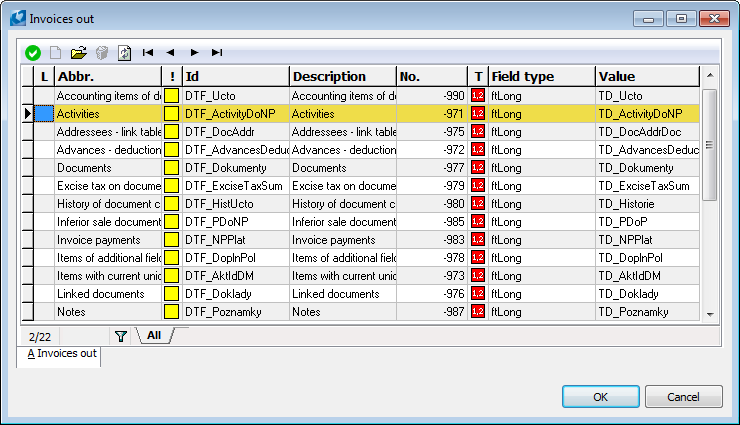
- Submodule condition for a Deduction - by pressing an icon open the form in which select the option Submodule condition. Open the Data field menu and select the Advances - Deductioncondition. Press the OK button. A window for selecting a condition type will be activated.
- Submodule condition for a Deduction - by pressing an icon
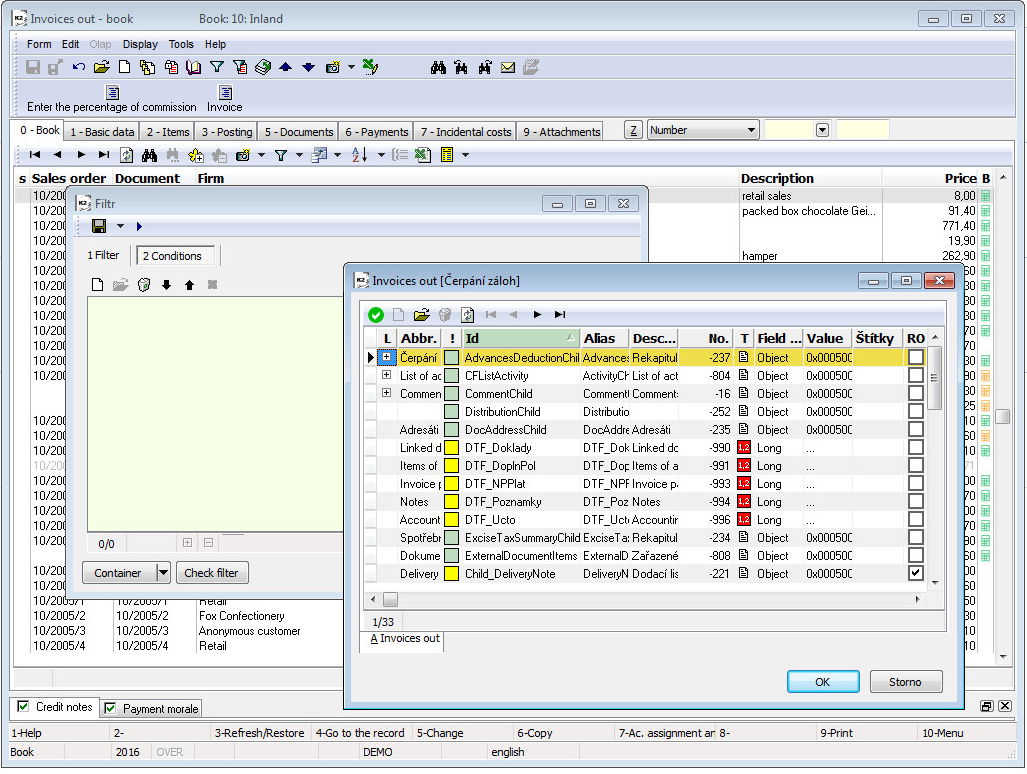
Picture: The open menu of the possible Submodule conditions of invoices out
- Comparison condition for the deduction amount - continue by inserting Comparison condition. Open the Data field menu and select the Deducted condition. In a condition definition in the Filtering operator field select '='. Write '0' into the Value(s) field. Press the OK button.
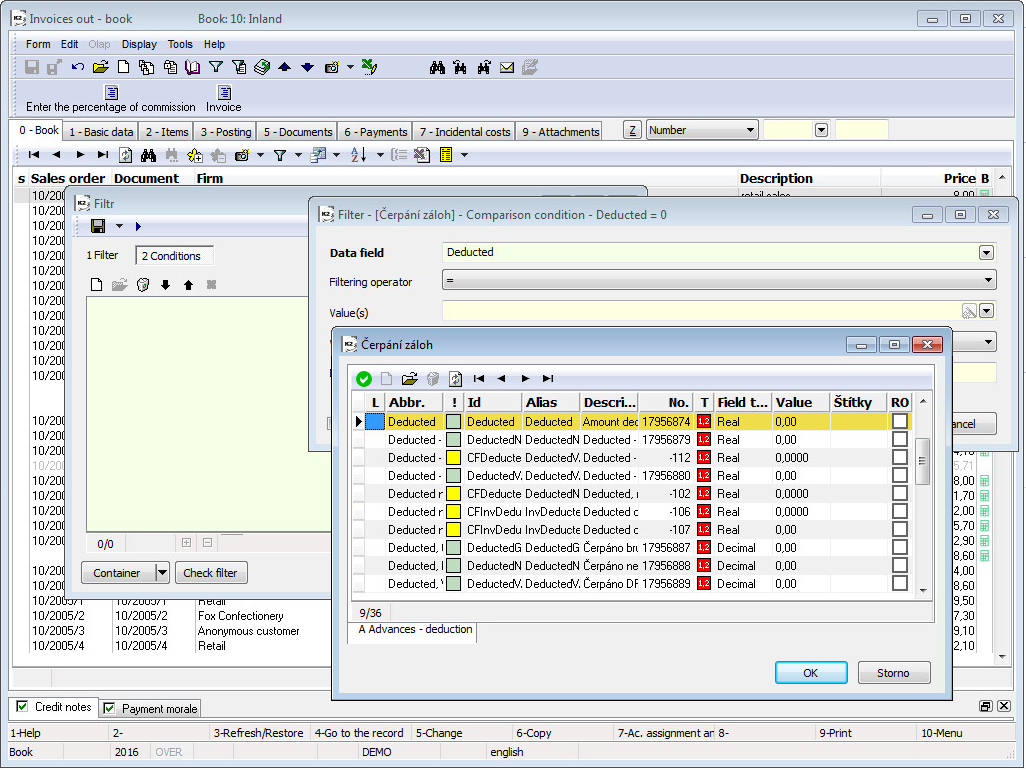
Picture: The open menu of the possible Comparison conditions of the submodule Advances - Deduction (Deduction)
- After pressing Run button, the required filter will be performed.
Independent Submodule conditions
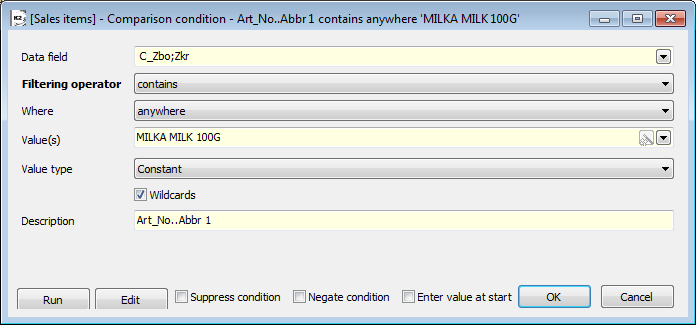
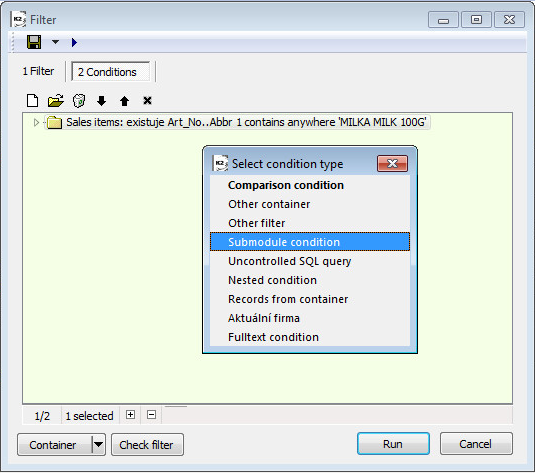
We want to select all sales orders which contain an item with the "MILKA" article and no item with the "WINE" article.
- Switch over the Sales Orders book and find a sales order with the article e.g. "Milka bila 100g".
- Comparison condition for the article "Milka" - press the right mouse button on the "Milka milk 100g" on the 2nd page of a sales order and choose Create filter. In a condition definition edit a Filtering operator '=' on 'contains'.
Picture: The defined condition of the filter of article containing "Milka"
- Submodule condition for the article "Wine" - because we immediately want to add next condition, press the button Edit. Insert a Submodule condition by using Insert key. A form with a menu of supported submodules will be opened. Select 'Sales items'.
Picture: A filter conditions form with the defined condition, selection of Submodule condition
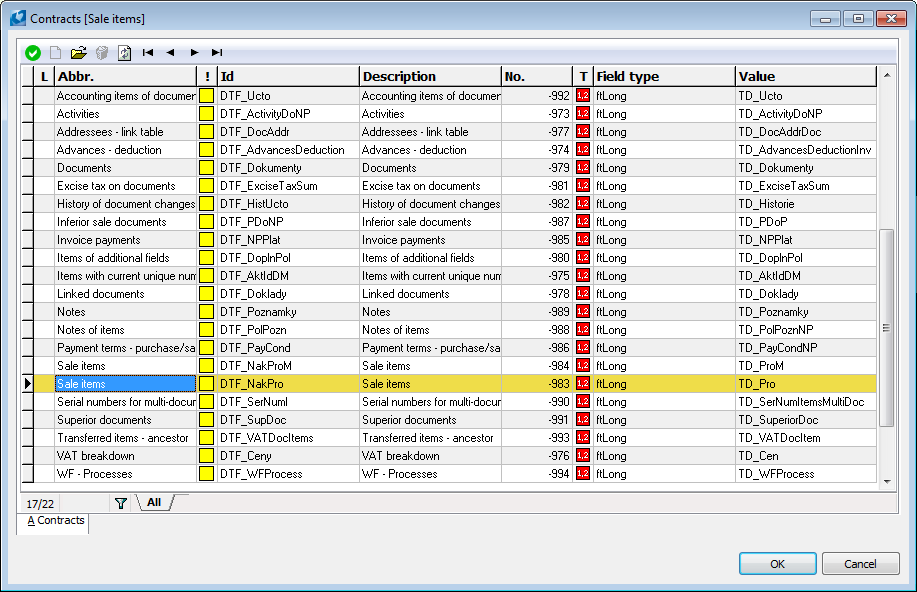
Picture: A form with a list of the item data modules of sales orders
- A form with a selection of a condition type will be offered after selecting 'Sales items'. Select a comparison condition.
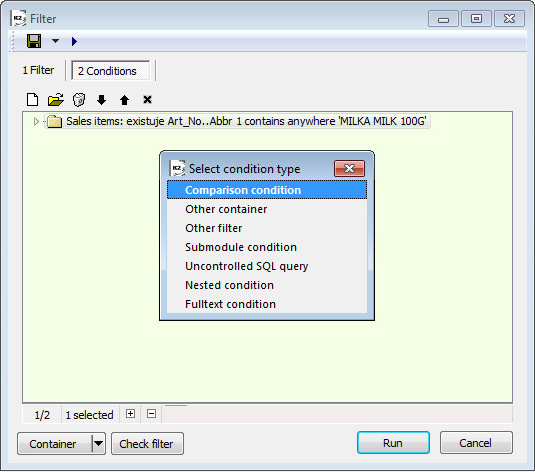
Picture: A filter conditions form with the defined condition, selection of Submodule condition
- Open the field Data field, expand the field C_Zbo and then choose Abbreviation 1. Into a definition of Comparison condition add Filtering operator: "contains" and Value(s): "WINE". Set negate condition.
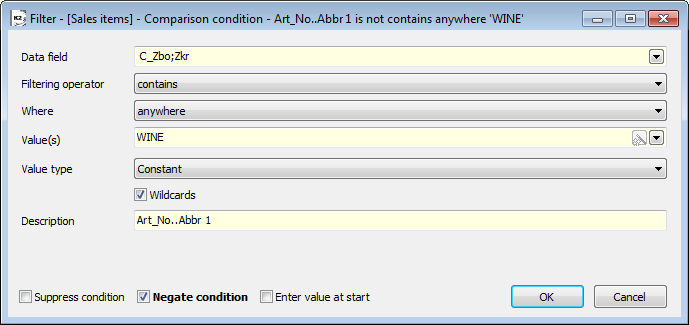
Picture: The defined comparison condition for an article containing "Wine"
- A form with the defined filter conditions will be displayed after pressing OK button.
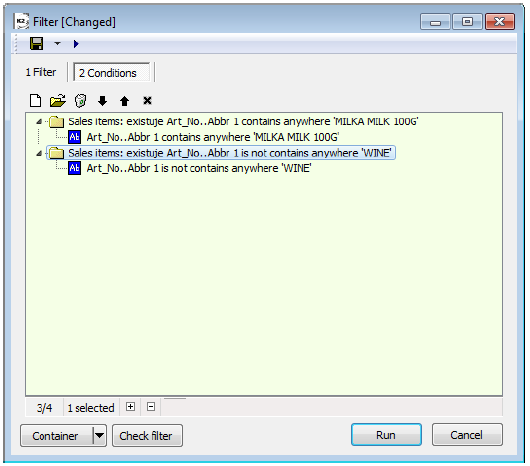
Picture: A form with the defined filter conditions for Articles
- After pressing Run button, the required filter will be performed.
|
|
|
We want to select all the items of payment documents of the type "bank statement" or "cash voucher", items of which are of the type Invoice In, Invoice Out, Advance Received or Advance Provided.
- Open the Items of payment documents book in which a filter will be created.
- By pressing the icon a form to define conditions will be open. Insert a new condition, select the Nested condition type. By Insert key or by icon insert 2 conditions of the Comparison condition type.
- To filter the type of cash voucher item - open the drop-down menu of the field Data field in the condition form. Arrange the records according to Description and find the field Type of payment document item. Select the field by double click of the left mouse button (or by Enter key). Select the option "in the list" in Filtering operatorfield and expand the field Value. Check the fields 'II', 'AR', 'IO', 'AP'. Save the form for a condition definition by OK button.
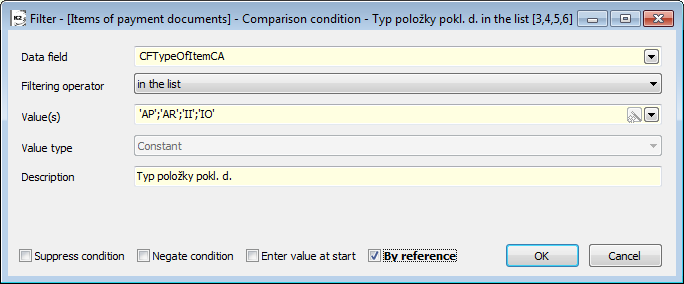
Picture: The defined condition for a filter of the type Cash voucher item
- To filter the type of bank statement item - open the drop-down menu of the field Data field in the condition form. Arrange the records according to Description and find the field Type of bank statement item. Select the field by double click of the left mouse button (or by Enter key). Select the option "in the list" in Filtering operator field and expand the field Value. Check the fields 'II', 'AR', 'IO', 'AP'. Save the form for a condition definition by OK button.

Picture: The defined condition for a filter of the type Bank statement item
- OR condition will be saved into a form for a filter condition definition by pressing OK button.
- After pressing Run button, the required filter will be performed.
Note: Conditions in filters are organized into a tree structure, conditions on the same level belonged under the same node are evaluated either "AND" (necessary conditions) or "OR" (sufficient conditions). On the top level, the conditions are always evaluated ""AND". Next level (nested level in the tree) can be created by means of a condition of the type "Nested condition", in which it is newly possible to set a way of evaluation either "AND" or "OR".
|
|
|
We want to select all the sales orders of 2009 from the container of sales orders for the customer AB Group.
- Open the Sales Orders book, create a container of the documents for the customer AB Group in it (table in the Container mode).
- In the Sales orders book press the icon .
- The Conditions tab of the Filter form will be displayed.
- Comparison condition for a business year - by pressing the icon open the form in which select the option Comparison condition. Open the Data field menu and select the Business Year condition. In the Filtering operator field select '='. In the Value(s) field select '2009 '. It is possible to switch the display in the field Value(s) between direct and reference value by checking the field By reference. The condition will be added into Filter after pressing OK button.
- Comparison condition for a business year - by pressing the icon
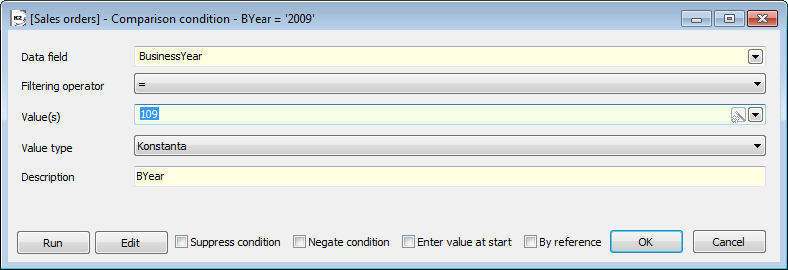
Picture: Defined condition for a filter of a business year
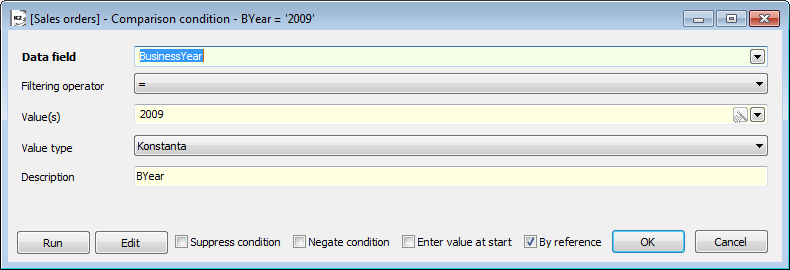
Picture: The defined condition for a filter of a BusYear with the checked option By reference
- Records from a container of sales orders - by pressing the icon open the form in which select the option Records from container. The condition will be added into Filter after pressing OK button.
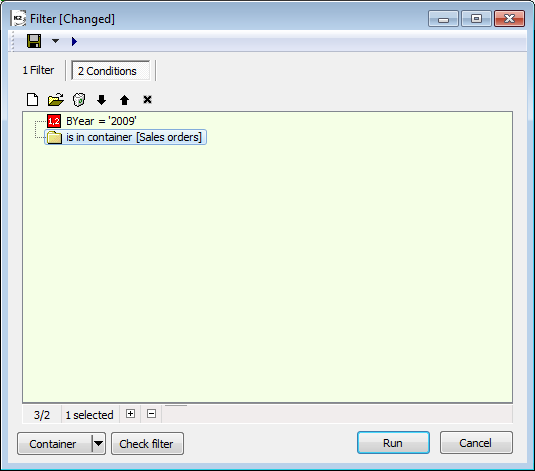
Picture: A form of filter conditions with defined conditions
|
|
|
We want to create a filter of the sales items where the cost price of sales items is greater than the cost price in articles.
- Open the Sales items book where you want to create a filter.
- Press the icon .
- The Conditions tab of the Filter form will be displayed.
- By pressing the icon open the form in which select the option Submodule condition.
- In the list of fields find: SkC ('Stock price' in the Descriptioncolumn) and by double click of the left mouse button paste the field into the Comparison condition form (stock price from the sales items has been defined),
|
|
|
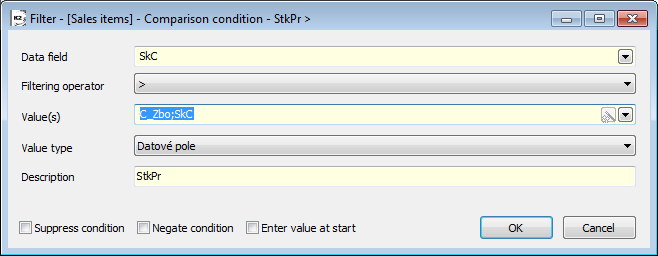
Picture: The defined condition for comparing a stock price in article and in sale
|
|
|
|
|
We want to create a filter of sales orders for the period 2010 - 2014 created for the "Bikeshop" company. This company is defined in the 'BS' book.
- Open Sales orders book where you want to create a filter.
- Press the icon .
- The Conditions tab of the Filter form will be displayed.
- Comparison condition - by pressing the icon open the form in which select the option Comparison condition. To select the business year, you can first sort conditions in the Description column and then you can find a condition with the description of "Business year of document" by scrolling. By double click of the left mouse button (or by using Enter key), open a form for a definition of a Comparison condition. In the Filtering operator field select "Between" and into the field Value(s) write "2010" and "2014". Leave the form for a condition definition by OK button.
- Comparison condition - by pressing the icon
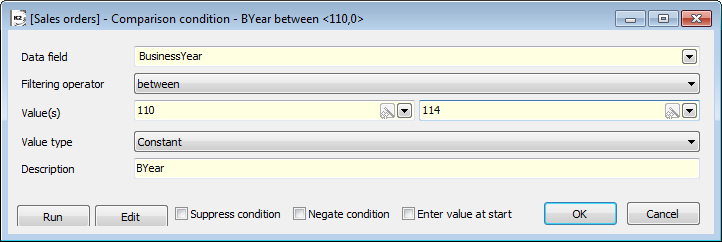
Picture: The defined condition for a filter of a period
- Comparison condition - by pressing the icon or by Ins key, open the form in which select the option Comparison condition again. To select the book, you can first sort conditions in the Descriptioncolumn and then you can find a condition with the description of "Book of document" by scrolling. By pressing for condition "Book of document" set a link to Abbreviation. By double click of the left mouse button (or by using Enter key), open a form for a definition of a Comparison condition. In the Filtering operator field select "=" and into the field Value(s) write "BS". Leave the form for a condition definition by OK button.
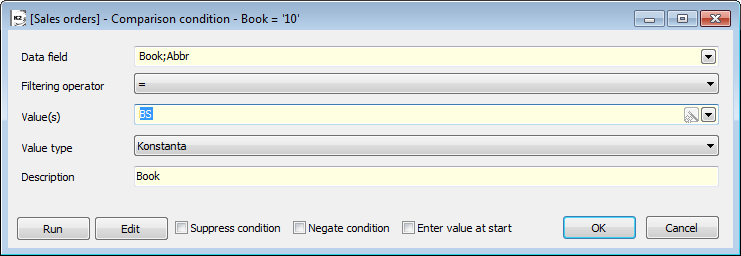
Picture: The defined condition for a filter of a book
- Current company - by pressing the icon open the form in which select the option Current company. Confirm the form.
|
Note: Documents in books that do not have define one's own company are always included into the created filter when using this condition.
|
|
|
Example - Filter from menu
We want to create a filter of all the activities of the 'Reminder' type, for which 'Barbora Cerna' is a responsible person.
- Open Activities book where you want to create a filter.
- Press at the icon , whereby a filter menu will be expanded.
- Select Create filter in Filters.
Note: If there are already some conditions in the form of conditions, then activities depending on the earlier defined conditions will be filtered after selecting the option Create filter.
Picture: The Activities book with the open filter menu
- If the light indicator has been directly set in the Type column on Reminder, fields in the displayed form of a comparison condition will be pre-filled. Otherwise we have to define field conditions ourselves:
|
|
|
|
Picture: Selection of the field Type in Comparison condition
- Press again next to the icon and select Add condition in Filters:
- If the Resp. person column is set in the table and the light indicator has been set directly on the esp. person "Barbora Cerna", fields in the displayed form of a comparison condition will be pre-filled. Otherwise we have to define field conditions ourselves:
|
|
|
- The filter according to the defined conditions will be performed by pressing Run button.
|
|
|
Expanded menu (Context menu)
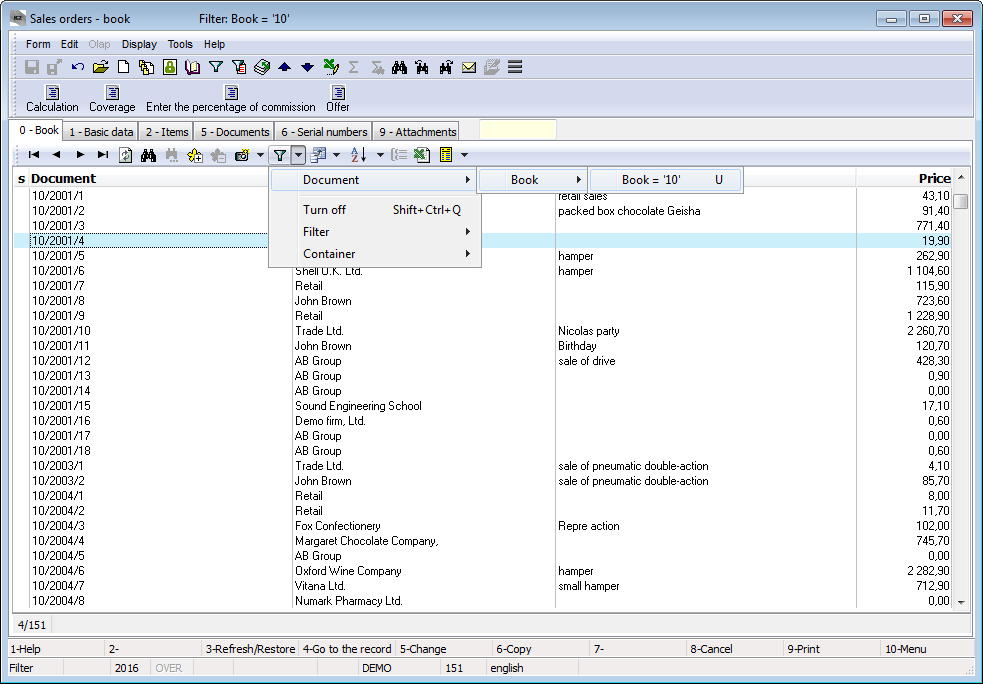
Some fields keep a contextual offer at disposal of the individual parts, from which the value is composed, when creating filters. A typical example is the field Document which shows the number of documents e.g. In the format 10/2015/45. If you press the right mouse button in the Document column and select Create filter option on the 0th page of sale, purchase and stock documents, the expanded menu for creating filter from the field Document will be displayed and it will be possible to select Document, Book, Business year and Number from the menu.
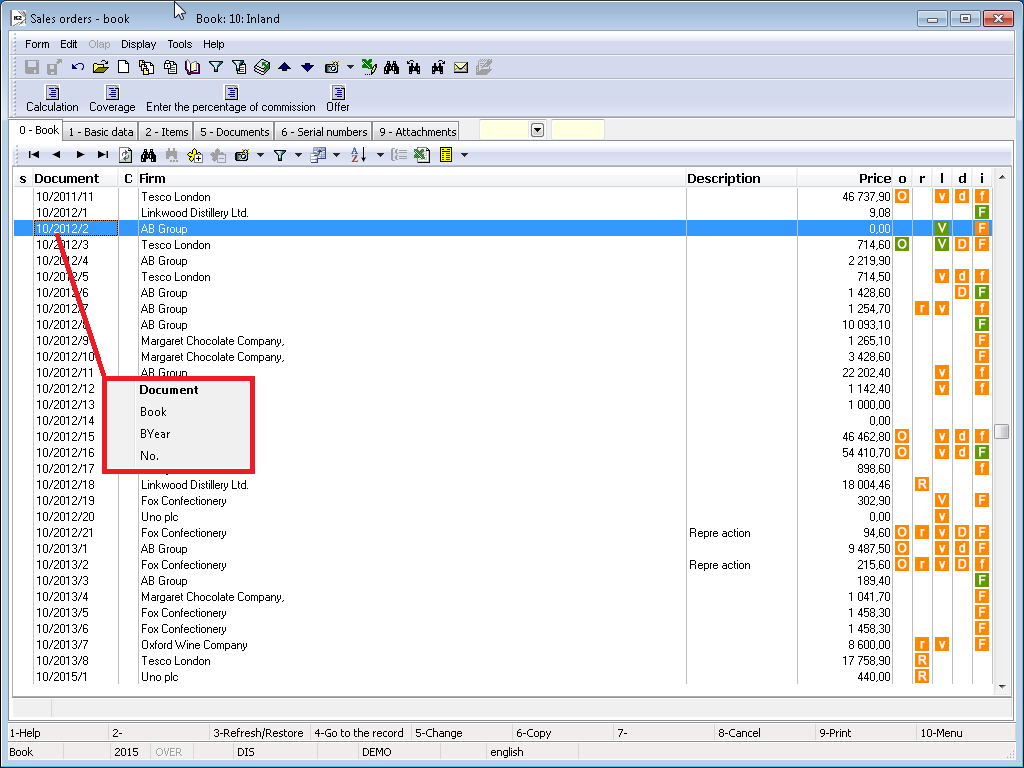
Picture: Expanded menu in creating filter from the Document column
|
|
|
Saving filter
If you want to save a filter definition, press the icon ![]() .
.
- The Filter form will be displayed. Complete the required fields on the Filter tab and press the icon
 . There are further these possibilities when saving:
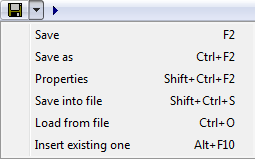
Picture: The form for saving filter
Save |
It saves the form changes in a new filter, but the filter will be cancelled after closing the form. It saves changes in the already created filter. You can also use the F2 key. |
Save as |
It saves a filter under the selected name, label, user, level... The filter can be activated at any time again. You can also use the Ctrl+F2 keys. |
Properties |
It saves contingent changes in the setting of a filter. You can also use the Ctrl+Shift+F2 keys. |
Save into file |
It saves a filter into by us selected location into '.xml' file. You can also use the Ctrl+Shift+S keys. |
Load from file |
The saved ".xml" file will be loaded. You can also use the Ctrl+O keys. |
Insert existing one |
The already created filter in K2 will be inserted. You can also use the Alt+F10 key combination. |
- 2. The form Filter - Save, in which the fields Level, User, Client can be filled as necessary, will be open.
3. The defined filter will be saved after pressing OK button on the both forms.
The saved filters are displayed in a filter menu.
Saving filter
- Switch to the Filter tab.
- In the Name field, enter a name of a created filter.
- Press the icon and on the form Filter - Save press OK.
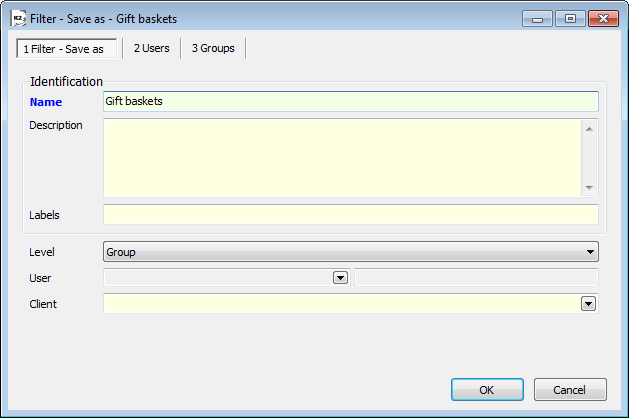
Picture: A form for saving filter
Selected fields' description:
Level |
Depending on the level which has been selected in this field, information are entered into next fields and tabs:
|
User |
Select the name of a user from book of users. |
Client |
Select a client who you want to save the selection for. |
2_Users and 3_Groups tabs are displayed only for the Group level. So that we could save filters for various levels, it is necessary to set rights "Global", "Client", "Group" in the 5th page of Users Administration - User - Description of Individual Rights - Administration - Access to settings level.
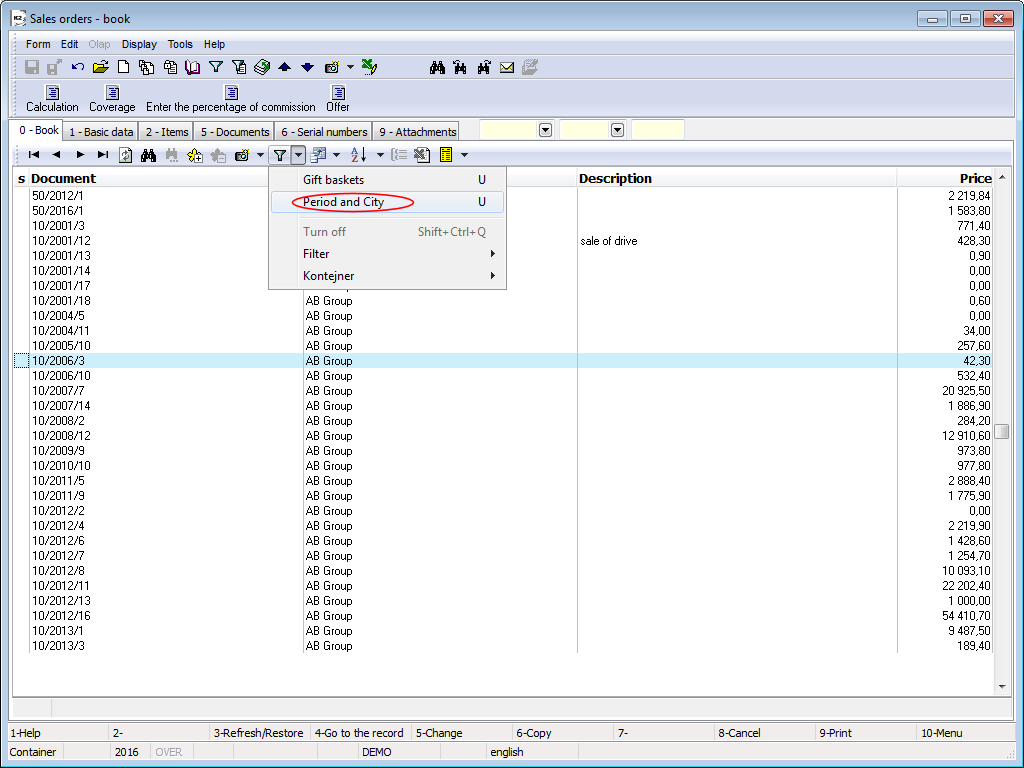
Picture: The saved filter Period and City in the menu of filters
|
|
|
Arrangement of filter into tree
It is possible to arrange filters into a tree (folders) for the better view.
For filters (TxFilter class), the arrangement in the menu is activate by default, but the user can deactivate the tree view for the selected module (e.g invoices out, receipt cards, sales orders, etc.) at any time in the menu Filter\Arrangement\Activate and then use an disarranged filter list.
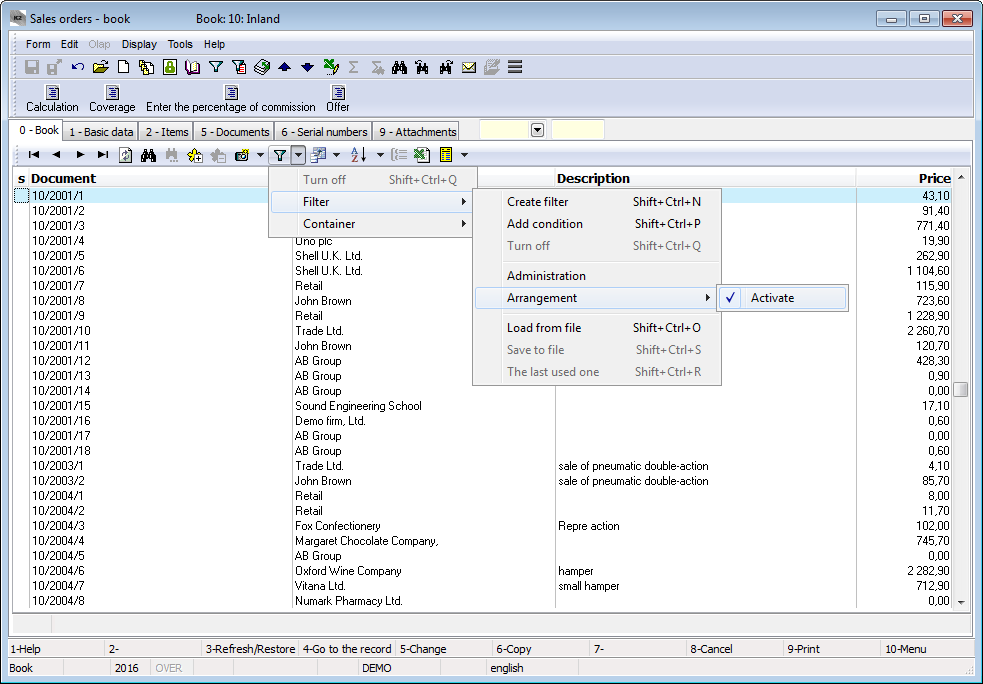
Picture: Sales orders book - the activated option Activate
Folders are created by using Labels. The field Label can be filled in the form Filter - Save as when saving a filter. This field can contain:
a) simple name (also compound name), e.g. Fast, Favourite, Slow filters
b) name of the backslash to create multilevel menus, e.g Food\Meat, Food\Dairy products etc.

Picture: A form for saving a filter - the completed field Label - multi-level menu
By pressing at the icon a menu of the saved filters arranged in folders will be displayed.
Picture: The Sales Orders book - the arranged filter menu
Picture: The Sales Orders book - the disarranged filter menu
Filters in the tree (folders) are sorted in alphabetical order except the "Factory" folder, which is always arranged as the last one in the list. Factory folder contains all factory filters set by the producer.
|
|
|
Run filter
It is also possible to run filter by using Ctrl+F9 key combination, from the following places:
- in the form of a filter definition by using ,
Picture: The form of a filter definition
- adding condition via right mouse button in the form,
Picture: Adding condition via mouse right button
Picture: The form of a condition definition after pressing right mouse button in the form
- when entering value at start.
Picture: A form of a condition definition - Enter value at start
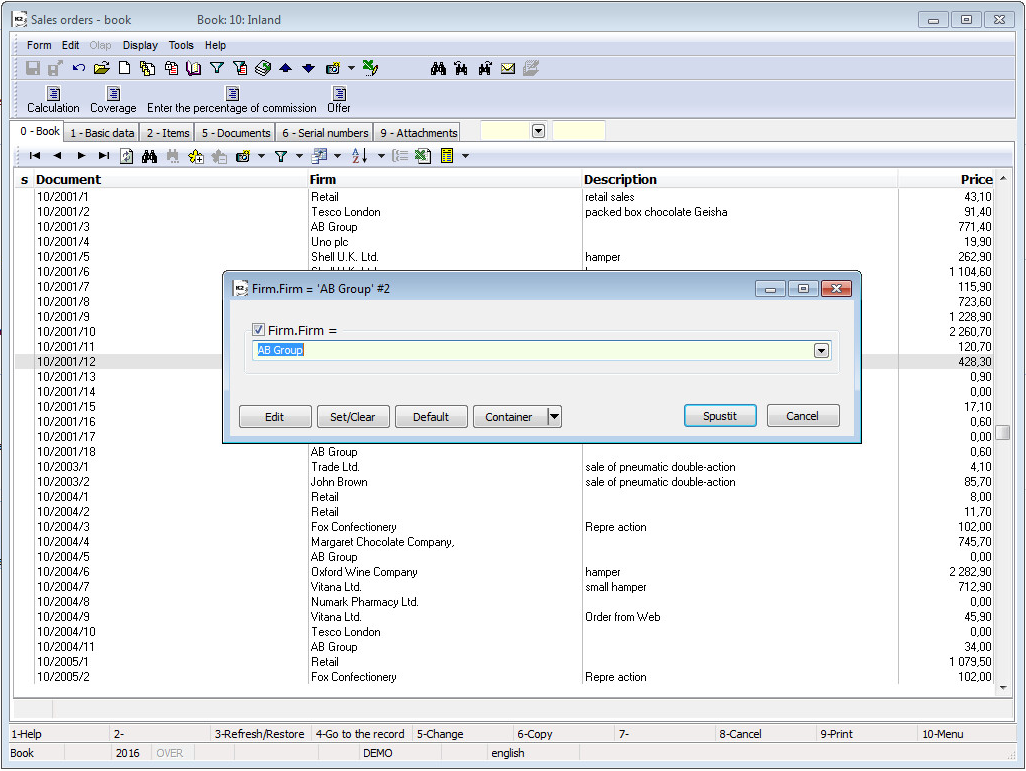
Picture: The form of a running condition with the set parameter Enter value at start
|
|
|
Administration of conditions
After opening the menu Administration, the form for Administration of filters will be displayed. There it is possible to create new filters, delete the saved one and make further modifications in this form. All the saved filters are displayed in a filter menu.
Picture: A form for a filter administration
Icons description:
|
It opens a conditions form, in which it is possible to define new filter conditions. |
|
It opens a form with the definition of conditions on which a light indicator is currently positioned. Here it is possible to edit the defined conditions of the selected filter. |
|
It deletes filter, on which a light indicator is positioned, from a list of the saved filters. |
|
Restore (F3). |
|
The light indicator moves to the first record of the list. |
|
The light indicator moves one row up. |
|
The light indicator moves one row down. |
|
The light indicator moves to the last record of the list. |
|
|
|
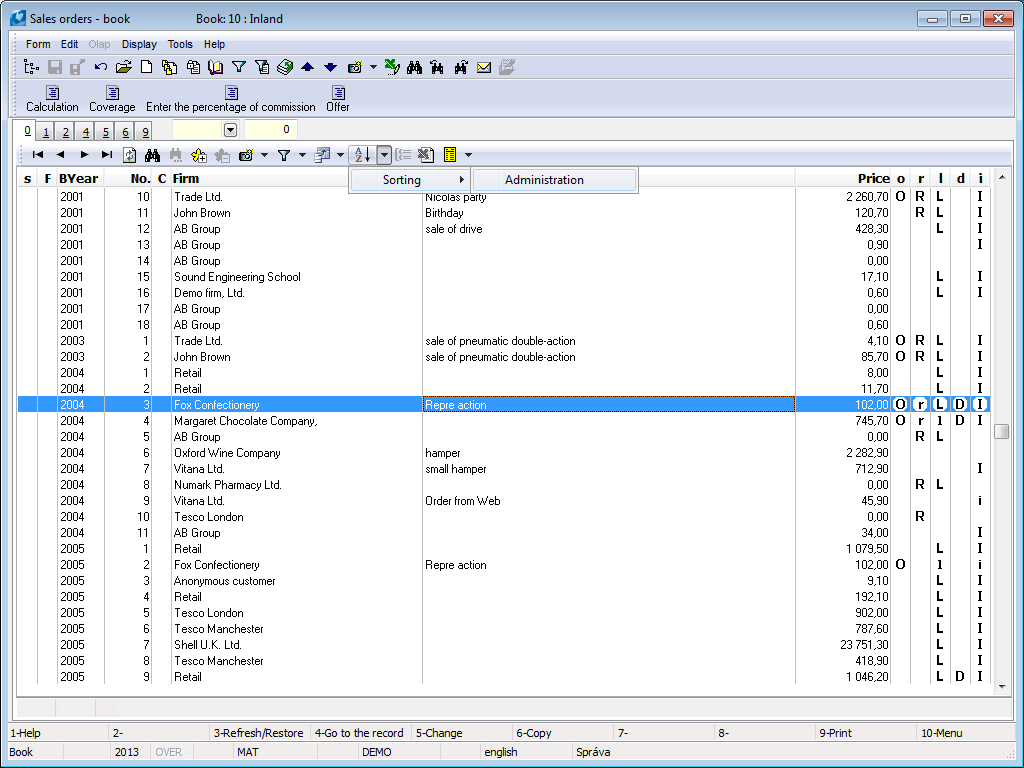
Columns of filters
If you press, next to the icon ![]() , only the button with an arrow
, only the button with an arrow ![]() , the menu for displaying the columns and the menu for their administration will be displayed. There it is possible to select the displaying of def. columns without fitting, default columns, all columns or original columns in expanded menu.
, the menu for displaying the columns and the menu for their administration will be displayed. There it is possible to select the displaying of def. columns without fitting, default columns, all columns or original columns in expanded menu.
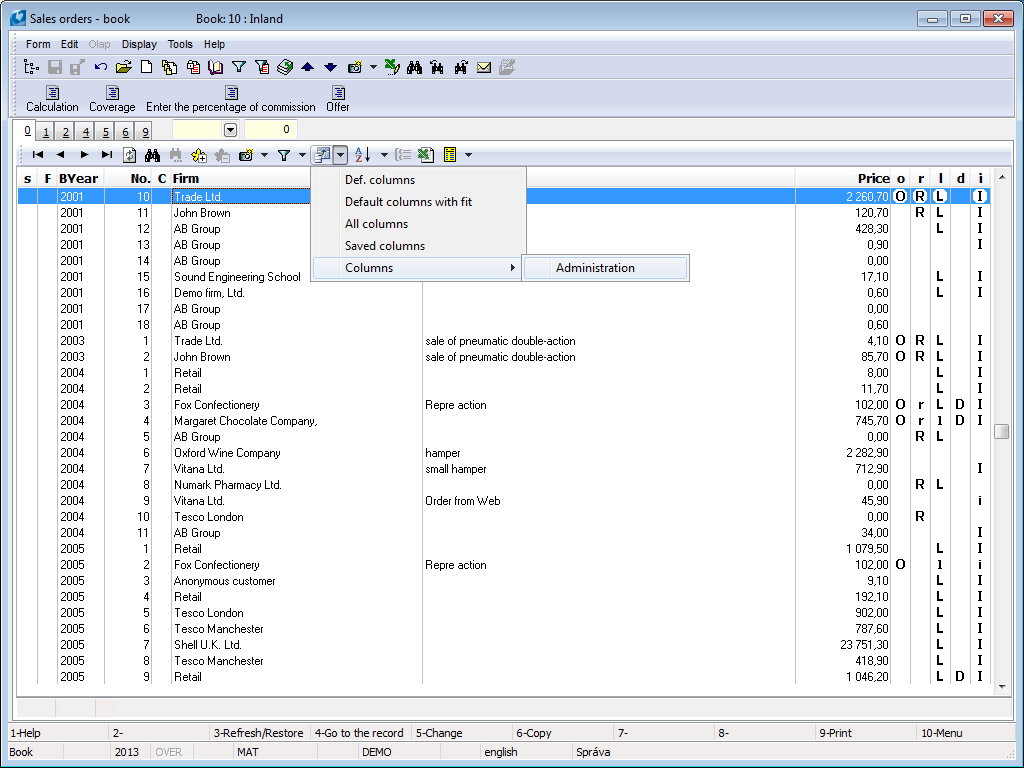
Picture: The expanded menu for columns in the Sales Orders book
|
|
|
Define columns in filters
After pressing the icon ![]() the form, where you can define a columns setting, will be displayed.
the form, where you can define a columns setting, will be displayed.
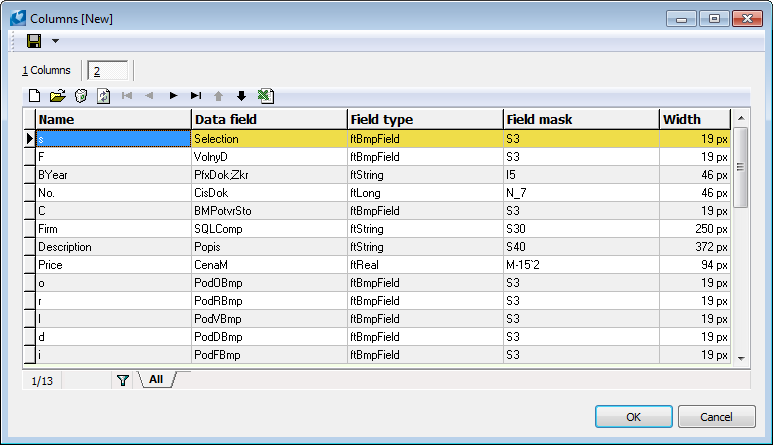
Picture: The open form for the columns definition
Icons description:
|
It opens a form to define a new column. |
|
It opens a form to define a column on which a light indicator is positioned now. Here you can edit the given setting. |
|
It deletes a name of a column, on which a light indicator is positioned now, from the list. |
|
Restore (F3). |
|
The light indicator moves to the first record of the list. |
|
The light indicator moves one row up. |
|
The light indicator moves one row down. |
|
The light indicator moves to the last record of the list. |
|
A data field, on which a light indicator is positioned, moves up. |
|
A data field, on which a light indicator is positioned, moves down. |
The Columns tab
On this tab, you can define, or save (by using the icon ![]() ), a name of a column definition specified on the second tab. Possible ways of saving are the similar as in Chapter Basic Functions - Filters - Filter Conditions - Saving Filter.
), a name of a column definition specified on the second tab. Possible ways of saving are the similar as in Chapter Basic Functions - Filters - Filter Conditions - Saving Filter.
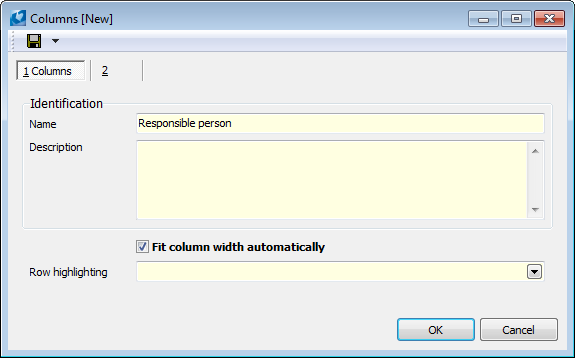
Picture: A form to define a name of a columns definition - the Columns tab
|
|
|
Arrangement of define columns of filters into tree
Possible ways to arrange define columns of filters into tree are similar as they are in the Arrangement of filter into tree chapter.
For columns of a filter (TxGridColumns class), the arrangement in the menu is deactivated by default, but the user can change this setting for the selected module (e.g invoices out, receipt cards, sales orders, etc.) at any time in the menu Columns\Arrangement\Activate and then use an arranged list.
|
|
|
Administration of columns in filters
A form for the columns administration will be displayed after opening the Administration menu. There it is possible to create new columns definitions, delete the saved one and make further modifications in this form. All the saved settings are displayed in the columns menu.
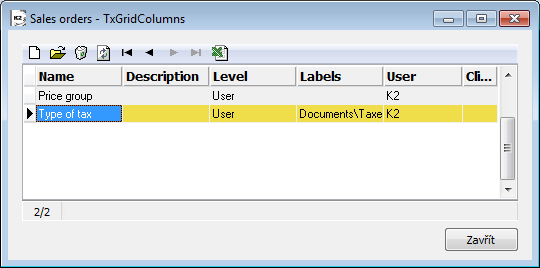
Picture: A form to define columns
Icons description:
|
It opens a form to define a new columns settings. |
|
It opens a form to define a column on which a light indicator is positioned now. Here you can edit the given column definition. |
|
It deletes a saved column settings, on which a light indicator is positioned now, from the list. |
|
Restore (F3). |
|
The light indicator moves to the first record of the list. |
|
The light indicator moves one row up. |
|
The light indicator moves one row down. |
|
The light indicator moves to the last record of the list. |
|
|
|
Filter sortings
If you press, next to the icon ![]() , only the button with an arrow
, only the button with an arrow ![]() , list of the saved sortings definition and menu of sortings administration will be displayed. Sorting filter means sorting records in the book according to the selected fields.
, list of the saved sortings definition and menu of sortings administration will be displayed. Sorting filter means sorting records in the book according to the selected fields.
Picture: The expanded menu of sortings in the Sales Ordersbook
By pressing Shift + left mouse button on the column header,the given column will be add into the definition of the current sorting.
|
|
|
Define sortings
After pressing the icon ![]() the form, where you can define sorting of records in the book, will be displayed.
the form, where you can define sorting of records in the book, will be displayed.

Picture: The open form for defining a filter sorting
Icons description:
|
It opens a form to define a new sorting of records. |
|
It opens a form to define a field on which a light indicator is currently positioned. Here you can edit the given setting. |
|
It deletes a name of a sorting, on which a light indicator is currently positioned, from the list. |
|
Restore (F3). |
|
The light indicator moves to the first record of the list. |
|
The light indicator moves one row up. |
|
The light indicator moves one row down. |
|
The light indicator moves to the last record of the list. |
|
A record, on which a light indicator is positioned, moves up. |
|
A record, on which a light indicator is positioned, moves down. |
The form with define sorting will be displayed after double clicking of the left mouse button (or by using Enter key) on the item.
Picture: The form to define sortings
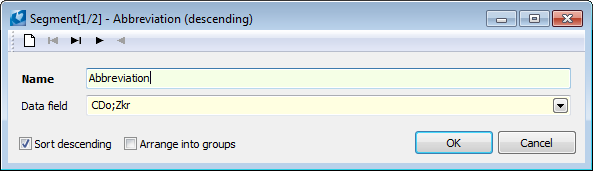
Fields description:
Sort descending |
By checking this field, the grouped records will be sorted in descending order. |
Arrange into groups |
Checking in this form is accepted only if the field Arrange into groupson the first tab of Sortingis also checked and checking in the all previousfields of the selected sorting exists at the same time! In this case, the records will be sorted by this field within the previous field. If these conditions will not be fulfilled, the check will not be accepted. Example:Entries in the book will be sorted by Abbreviationand in each record grouping with the same abbreviation they will be sorted by Description. |
The Sorting tab
On this tab, you can define, or save (by using the icon ![]() ), a name of sorting specified on the second tab. The possible ways of saving are the same as in the chapter Basic Functions - Filters - Filter Conditions - Saving Filter.
), a name of sorting specified on the second tab. The possible ways of saving are the same as in the chapter Basic Functions - Filters - Filter Conditions - Saving Filter.
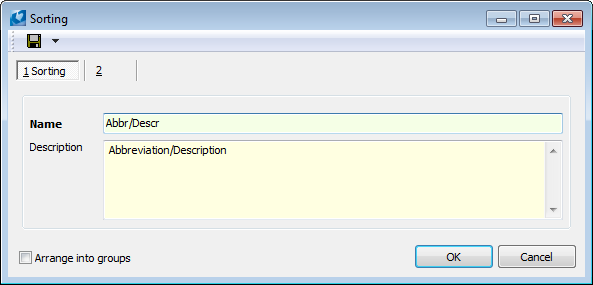
Picture: A form to define a name of sorting definition - the Sorting tab
If the Arrange into groupsfield is checked, the records in the book will be sorted according to the setting of the entered fields. If this field is checked on the first tab and no fields are checked in the fields specified on the second tab, then the records in the book will not be grouped.
|
|
|
Arrangement of define sortings of filters into tree
Possible ways to arrange define sortings of filters into tree are similar as they are in the Arrangement of filter into tree chapter.
For sorting of a filter (TxOrderBy class), the arrangement in the menu is deactivated by default, but the user can change this setting for the selected module (e.g invoices out, receipt cards, sales orders, etc.) at any time in the menu Sorting\Arrangement\Activate and then use an arranged list.
|
|
|
Filter Sorting Administration
A form for the administration of records sorting in the book will be displayed after opening the Administration menu. There it is possible to create new sorting, delete the saved one and make further modifications in this form. All the saved settings are displayed in a sorting menu.
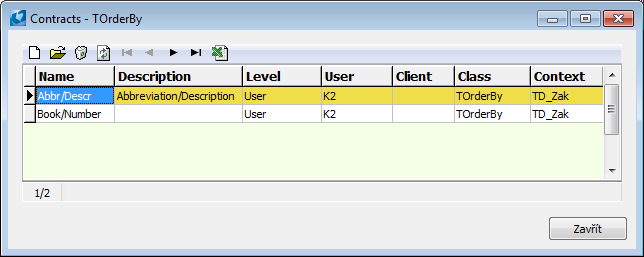
Picture: A form to define sorting
Icons description:
|
It opens a form to define new sortings. |
|
It opens a form to define the sorting on which a light indicator is positioned now. Here you can edit the given sorting definition. |
|
It deletes the saved sorting, on which a light indicator is currently positioned, from the list. |
|
Restore (F3). |
|
The light indicator moves to the first record of the list. |
|
The light indicator moves one row up. |
|
The light indicator moves one row down. |
|
The light indicator moves to the last record of the list. |
|
|
|
Grouping
By selecting a sorting, records in the book will be sorted according to the selected sorting (at least on one record the Arrange into groupsfield must be checked) and the icon ![]() for grouping records will be available. If you press this icon, records will be arranged into groups according to the defining for individual fields of sorting.
for grouping records will be available. If you press this icon, records will be arranged into groups according to the defining for individual fields of sorting.
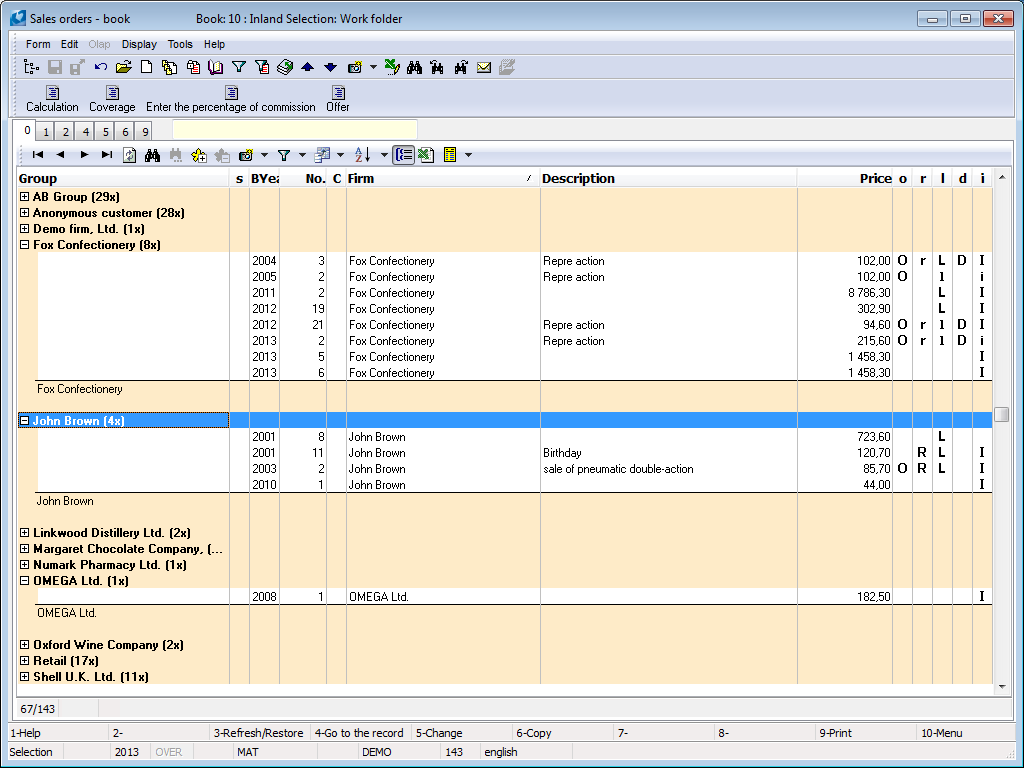
Picture: Grouped records in the book of activities according to the defined sorting "Abbreviation/Description"
The records will be displayed as a filter according to the specified sorting again by turning off the Groupingfunction.
|
|
|
Views
By the term Views, we mean a combination of the saved filters, columns and sortings.
By pressing ![]() (bottom toolbar) the form for saving view will be displayed; it is possible to define its name and its other properties.
(bottom toolbar) the form for saving view will be displayed; it is possible to define its name and its other properties.
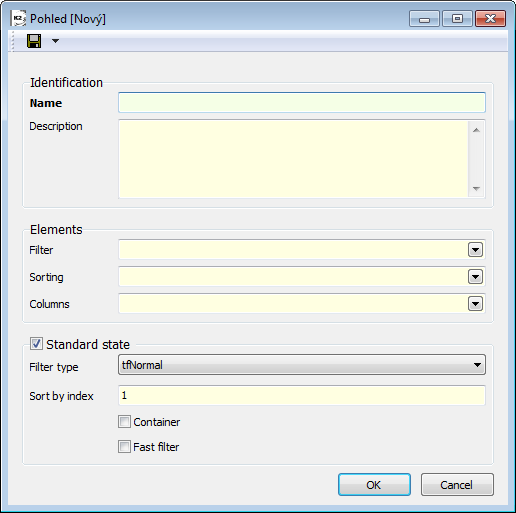
Picture: Form for saving a new view
Selected fields' description:
Name |
Name of a view. |
Description |
The further description of a view. |
Filter |
It is possible to select one of the already saved views from the selection menu. |
Sorting |
It is possible to select one of the already saved define sortings of columns - sortings - from the selection menu. |
Columns |
It is possible to select one of the already saved columns settings from the selection menu. |
Standard state |
It is checked by default. The user defines in which mode a form will be open after activating the view by checking this field and by setting the option Filter Type. If the user saves e.g. only columns and sorting (no filter) into a view, he may influence whether a form is open in Container, Book, Filter mode etc. |
Save the defined properties of a view by using icon ![]() . Possible ways of saving are the same as in Chapter Basic Functions - Filters - Filter Conditions - Saving Filter.
. Possible ways of saving are the same as in Chapter Basic Functions - Filters - Filter Conditions - Saving Filter.
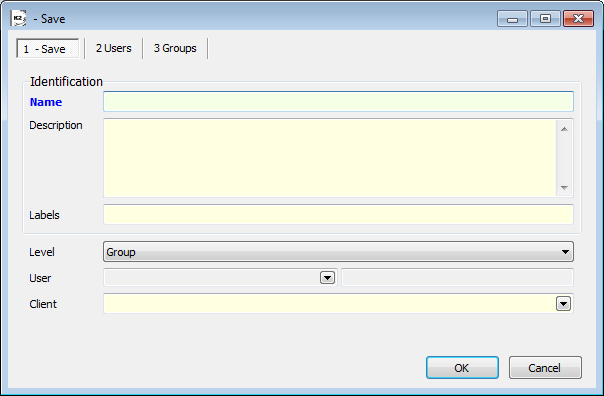
Picture: The form to save the view (F2 or Ctrl+F2) - the Save tab
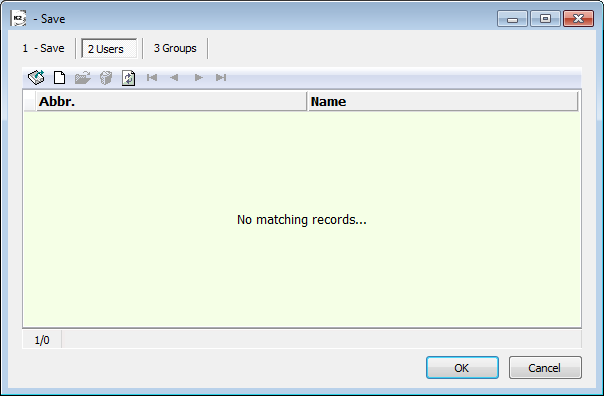
Picture: The form to save the view (F2 or Ctrl+F2) - the Users tab
If you press the icon ![]() (Style) on the Users or Groups tab, a list of users (incl. groups), which are defined in the Users book (Administration - Users - page number 0), will be displayed on the form on the side Available entries.
(Style) on the Users or Groups tab, a list of users (incl. groups), which are defined in the Users book (Administration - Users - page number 0), will be displayed on the form on the side Available entries.
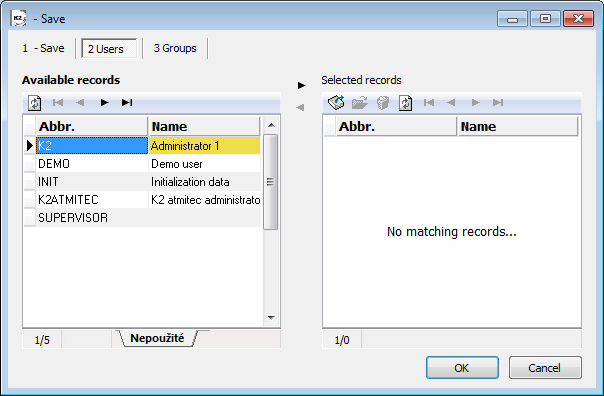
Picture: A form displayed after pressing the Style icon
There are all items of the Available entries on the All tab, incl. items which have eventually been added into the Selected entries. Only entries which are not inserted into the left part of the form (Selected entries) will be displayed on the Unused tab.
|
|
|
Administration of views
If you press on the icon ![]() only button with an arrow
only button with an arrow ![]() , a menu of saved views and a menu for its administration will be displayed.
, a menu of saved views and a menu for its administration will be displayed.
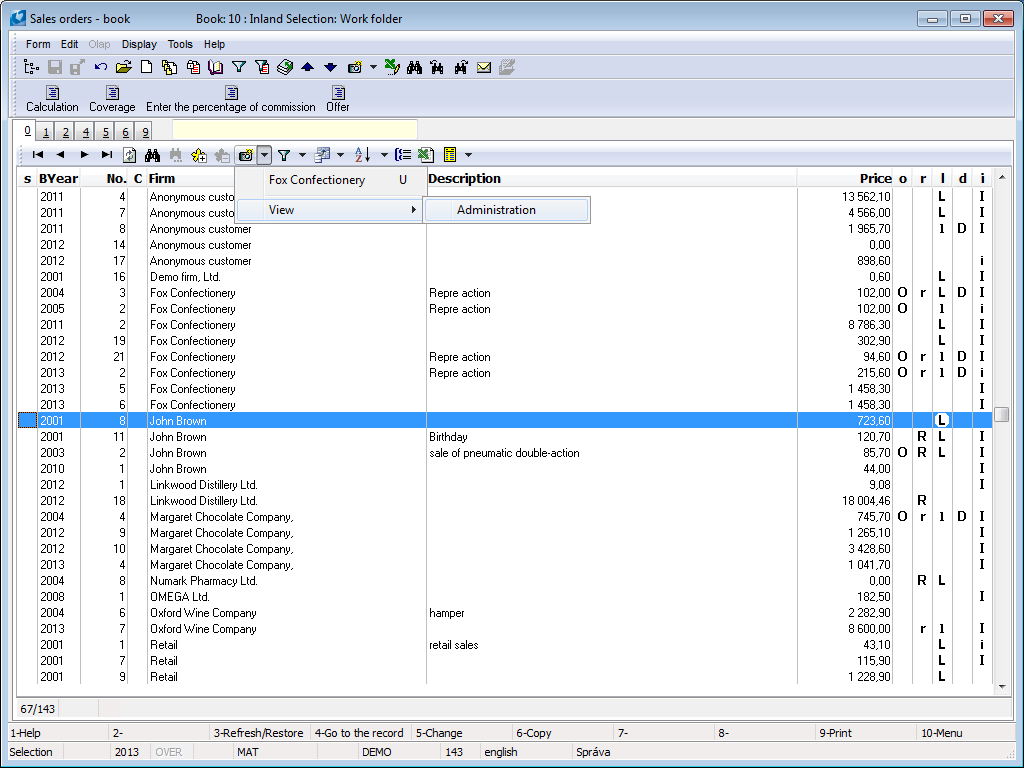
Picture: Expanded menu of the views in the Book of Sales orders
After opening the menu Administration a form with defined saved views will display. In this form you can define new views, delete saved views and do other adjustments. All saved settings are displayed in the views' menu.
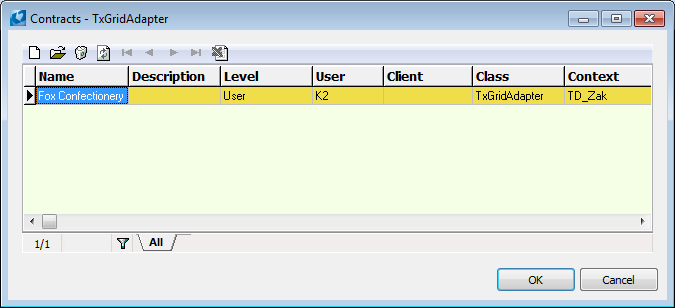
Picture: Form for administration of saved views
Description of icons:
|
Opens a form for definition of a new view. |
|
It opens a form for definition of views' settings where currently the light indicator is. After that here you can edit appropriate settings. |
|
It removes a saved view from the list where currently the light indicator is. |
|
Restore (F3). |
|
Moves the light indicator on the first record in a list. |
|
Moves the light indicator within one line up. |
|
Moves the light indicator within one line down. |
|
Moves the light indicator on the last record in a list. |
|
|
|
Selection Menus
If you paste documents (cards), a selection menu can be activated by F12 key or by combination of Alt+Down_Arrow keys within some items. A list of the items that you can use upon the selection is displayed in the selection menu. You position the light indicator on the required item by Arrows and by pressing Enter key you paste the item to the document.
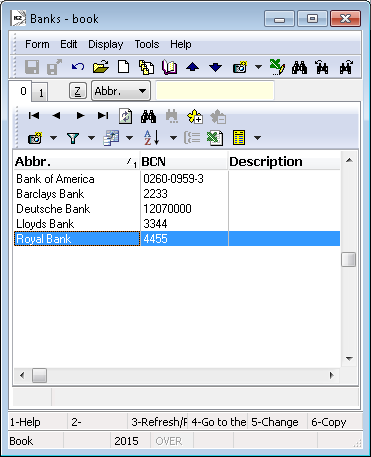
Picture: Selection Menu of Banking Institutions
The selection menu will be displayed automatically if the item has to be pasted compulsorily. The selection menu will be displayed also in such a case when you paste an item to the field that exists neither in database nor in the selection menu. You are not allowed to continue until you correct the mistake.
It is possible to add another item to the selection menu. After pressing Ins key a form for a new item definition will be activated. You paste the required data to it and when you finish pasting, the new item will be added to the selection menu by Ctrl+Enter keys.
Note: It is possible to authorize selected users to edit or amend selection menus in Administrator module (see the rights description in the chapter Administrator- Users- Authorize).
Graphically the selection menu has not been different from the standard book of documents. It is even possible to execute the identical actions as in the book of documents itself.
Elementary code lists are special types of selection menus (they are saved in SpeStr database). There are the different codes, the cost centres etc. Every detail in code list consists of Abbreviation and Description. The abbreviation length cannot exceed twelve characters (letters and digits). That abbreviation is pasted to documents. Only the description can be updated in the code list (by F5 key) but NO abbreviation. For a current user it is impossible to delete a record.
|
|
|
Searching
There are a few possibilities how to search a needed document, or more documents, in the programme. The advantage is a possibility of search both in the table of documents and upon browsing in individual documents and all that on a random page of the document.
|
|
|
Scroll
Grey Plus key (numeric keyboard plus) is scrolling in ascending order in particular documents, it means forward.
Grey Minus key (numeric keyboard minus) is scrolling in descending order in particular documents, it means backward.
Upon activated filter the scroll will be executed only in the documents that correspond to the filter setting.
Upon activated Search the scroll will be executed only over those documents that correspond to conditions defined in the search (for example in invoices of the only business partner), respectively not only over the documents but also over the table of documents. The function Search is described hereinafter.
PgUp and PgDn keys enable to scroll page by page up and down over the table.
Ctrl+Home keys position the light indicator in the table on the first record, Ctrl+End keys on the last one.
Note: In the books of modules and on some of their pages it is possible to scroll by a vertical scroll bar (a small quadrate in the right vertical bar). Because the total number of records even the position in the cumulative table are unknown upon scrolling, the scroll bar always returns to its stable position in the middle of the vertical bar. So it cannot be repositioned as in other programmes. The Mouse Wheel can be used for scrolling in the table too.
|
|
|
Search Field
Search field (an empty field with blinking cursor in the screen heading) is used for easy search of selected items both in the table and directly in documents in Browse mode.
Search field types:
- Numeric – the search is executed according to a document number. It starts after pasting a number to the Search Field and pressing Enter key. The essence of it is sorting within the numeric key - 1, 2, 10. Example of numeric search is table of invoices, orders and so on. Numeric search field is not a list of Post code, a list of banks according to their bank code, a list of invoices by the variable symbol etc.
- Character – the search is executed according to document characters (abbreviations, initial letters of name). It starts immediately within the process of characters pasting. It is not necessary to paste all the characters but only a part of them and then you finish the search by arrows. Example of character search fields are article database, Suppl./Cust., Post code, chart of accounts, cost centres etc. The essence is sorting by alphabet - 1, 10, 2.
Sorting:
In some cases it is possible to sort the items in the selection by various keys. A typical example is a selection from the code list of Post codes. Here it is necessary to search cities either by post codes or by their names. It is possible to switch among particular types of sorting either by Alt+Z hot key or by pressing 'Z' button.
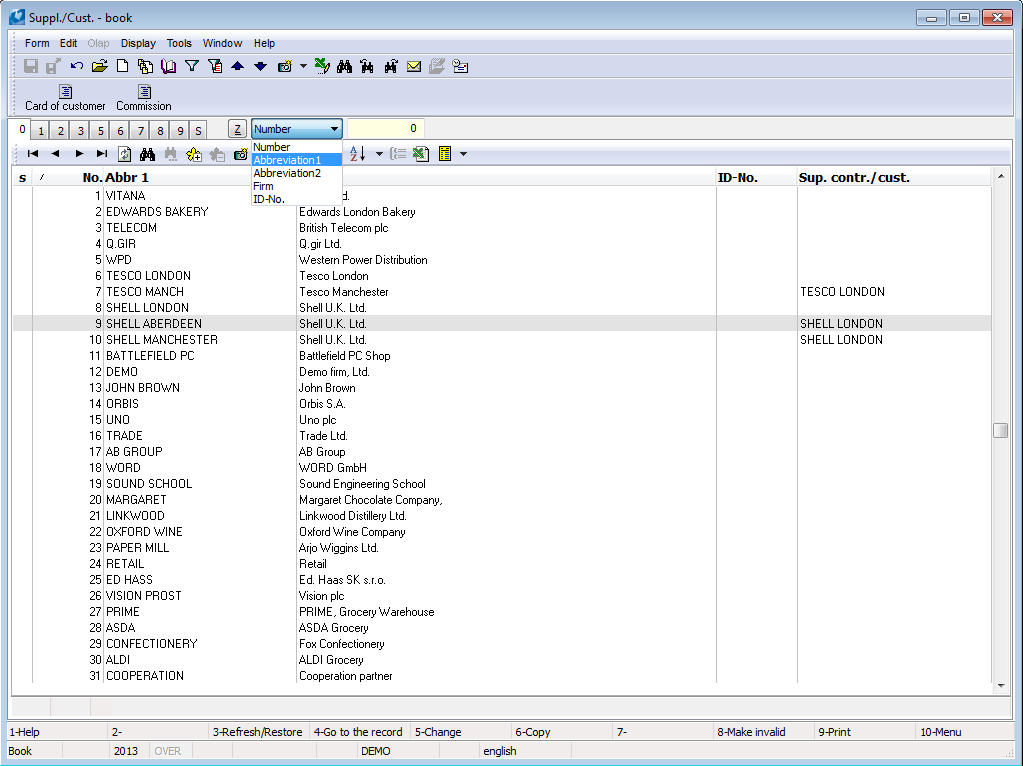
Picture: Sorting the book Suppl./Cust.
Attention: The programme stores the last selected type of sorting even if you "exit" the appropriate book. This rule has not been valid in that case when you activate the code list from editable fields. In this fields the sort will always be what it is default for that field. E.g. in purchase or sale item open the code list of contracts code, in which you set the sort according describe. Upon another item inserting the type of sorting will be again according to the abbreviation.
|
|
|
Fast Search Alt+F7
You can activate the search function by pressing Alt+F7 keys. The form to define conditions will be open. After defining the conditions and pressing the Search button, the first selection will be executed. That way the fast search has been activated (the actual search is marked in the status bar of the screen).
Fast searching returns the corresponding records according to the user selection in the form of a marked text directly in the Book or in the Container mode. It is possible to browse the filtered books by means of Ctrl + grey plus (forwards) and grey minus (backwards) keys, but in the table it is also possible to look into the document by means of F4 or Enter key regardless of the searching is turned on. (It is possible to return back into the table and keep searching by means of Esc key.)
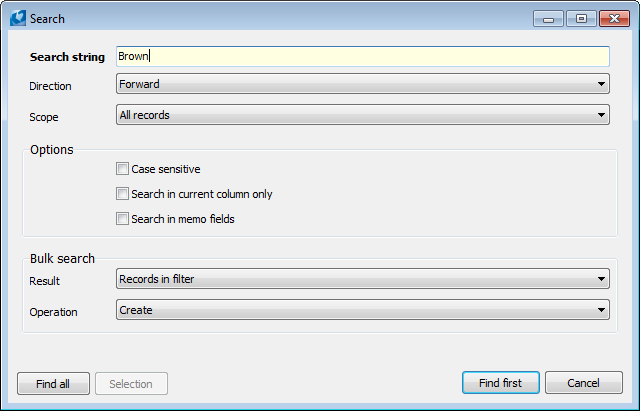
Picture: Searching menu in the Sales orders book - ALT+F7
Fields Description:
Search string |
Type the search string into this field. |
|
Direction |
|
|
|
Forward |
Search is executed forwards. |
|
Backward |
Search is executed backwards. |
Scope |
|
|
|
All records |
The whole range of records is searched. |
|
From current record |
The searching starts from the record on which the cursor is currently set. |
Options |
|
|
|
Case Sensitive |
The search is case-sensitive. |
|
Search in current column only |
The search executes only over the column which the cursor is set on. |
|
Search in memo fields |
If a "Memo" type field is being searched, the whole field is searched. |
Result |
|
|
|
Update container |
Existing container is deleted and records corresponding to the defined search parameters are inserted to container. |
|
Mark records |
If some records are already marked |
|
Create filter |
The records selected by using the Find all or Filter button are inserted into a filter. |
Operation |
|
|
|
Create |
The result will contain the currently searched expression only. |
|
Add |
Additional searching. It is added to the already found records. |
|
Remove |
Additional searching. It is removed from the already found records. |
Buttons Description:
Find all |
When you press this button, all the records available in the given data module state are gone through and those, that correspond to the search parameters, are marked with |
Filter |
The button is enable if the field Search in current column only is checked and if this column is of a string or widestring (characters) type. The button searches for the required string in the currently selected column. Matching records are inserted into the filter. |
|
|
|
Search at Notes
Another possibility of the conditions upon the documents selection is a test according to notes that have been attached to appropriate documents. The search according to the notes as well as according to other conditions (e.g. document items) is identical with the conditions definition of the evaluating filter according to the items.
|
|
|
Reducing search
Reducing search is used for fast text searching. The advantage of the reducing search is that the search filter records, and that only the filtered records remain displayed in the form. It is used for generated form.
Reducing search:
- searches in all the columns form,
- substring searches (in the middle of the word too):
- one world,
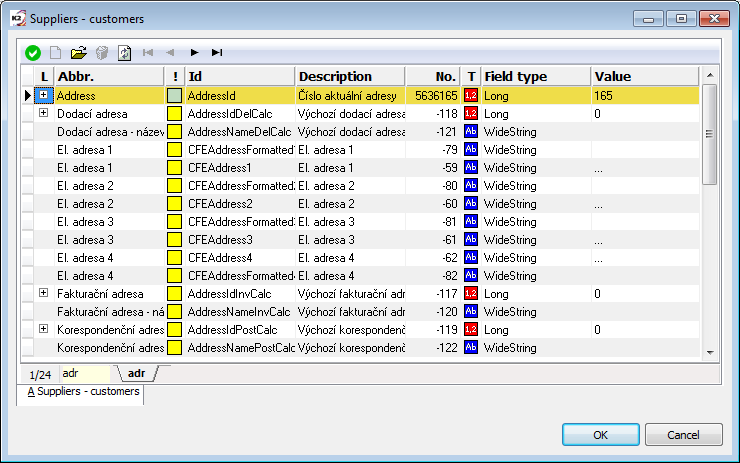
Picture: Reducing search - substring
- more words, but only one within the column,
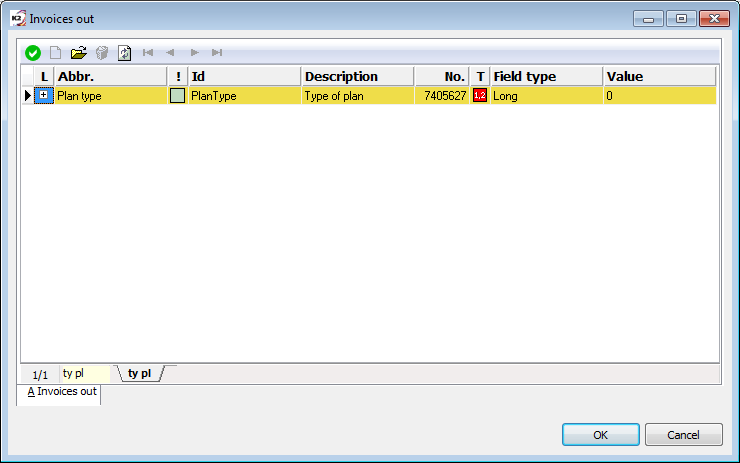
Picture: Reducing search - substring - more words
- It allows the use of wildcards:
- *- for multiple characters in a word,
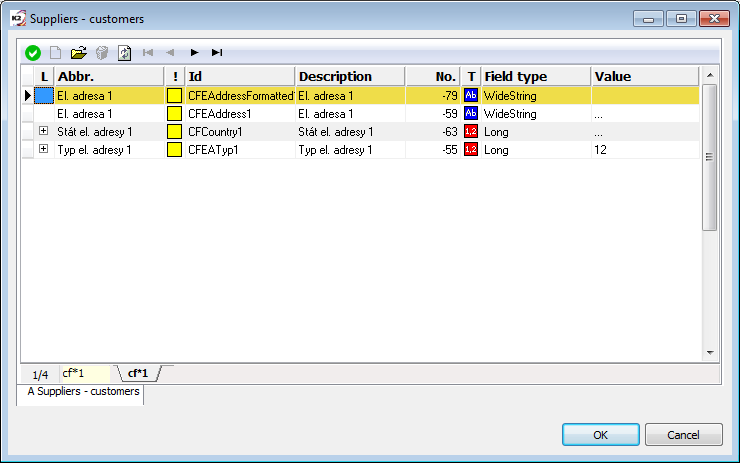
Picture: Reducing search - wildcards "*"
- ? - for one character in the word.
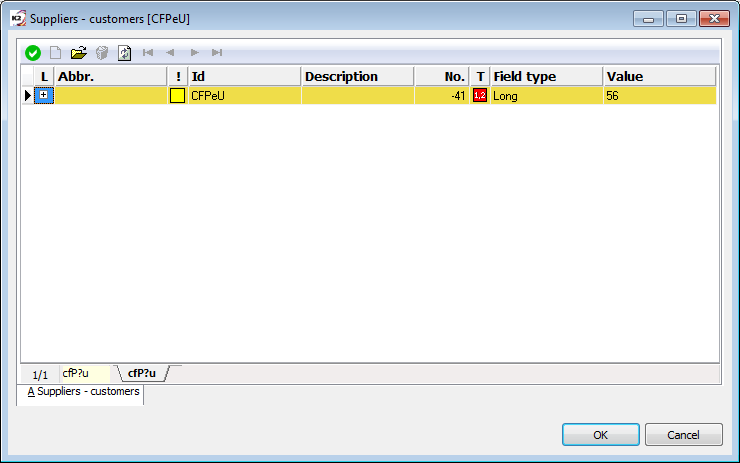
Picture: Reducing search - wildcards "?"
|
|
|
Search in dropdown menu
In the generated form with fields, which contains dropdown menu (combobox) now search works. Functionality will use for example when entering a new shortcut on the desktop K2 - in the form to insert new book is a field Form.
Search works this way:
- You can search the full text or just part of it.
- If the dropdown contains more records with the same searched text, then we move between these records up and down arrows.
- If is add next character by searching, it completed on the end of searching chain and the search is done again.
- Delete key erases text, which was seeking.
- Backspace key deletes the last letter of searching text.
|
|
|
Self-produced internal programme AM is used to display print reports. It also serves as a tool for creating these print reports.
Types of Print Reports:
- Standard Reports – files with *.AM extension that are saved in the K2 database. Those reports are standardly supplied together with K2 Programme. In the case of K2 IS reinstallation the whole subdirectory is deleted and substituted by a new content.
- User Reports – have the same importance as in the case mentioned above with the only difference that masters are saved in the subdirectory REPORTSW\SPECIAL. Those reports are custom-made for every user; or rather a user can create them himself/herself. Upon K2 IS reinstallation they will stay untouched.
K2 Script
It deals with a proper program interpreter. It is based on Pascal programming language. Sources are in *.PAS files:
- the standard ones are saved in K2 database,
- the special (user) ones in database or in the subdirectory REPORTSW\SPECIAL\K2R.
K2 script can be used for random computations, local design schedules creation, respectively for direct writing to K2 data. It can be also used for activating random K2 functions and at the same time for initializing random alternative programmes. K2 Script can use OLE for communication with other programmes. Thus, by this tool comparable operations can be realized as for example with Visual Basic product with such a difference that hereby the support of K2 environment with all program objects has been built-in automatically what means substantially more flexible programming and then also the program running than if all K2 functions would be activated by OLE from Visual Basic, or rather from another development tool. However, also this way is possible.
|
|
|
Classic forms
|
|
|
Activate Output Reports
Output reports can be activated in following ways:
- print by F9 key,
- print form the standard user menu,
- print from the tree menu.
|
|
|
Print by F9 Key
Print reports and scripts can be activated by pressing F9 key over a book or over a document. After pressing the key a selection menu will be activated that contains inserted output reports. In the picture you can see reports separation into so called Themes that are the folders where the appropriate report is inserted. Double click by Mouse or Enter key expand (roll) the menu of the individual folders.
If you want to change the themes order that is displayed on the screen in the book, you position the light indicator on one of the themes and press Alt+Grey Plus keys (numerical keyboard +). Thus the whole folder (including all submitted reports) will move downstream. By simultaneous pressing of Alt+Grey Minus the folder will move upstream.
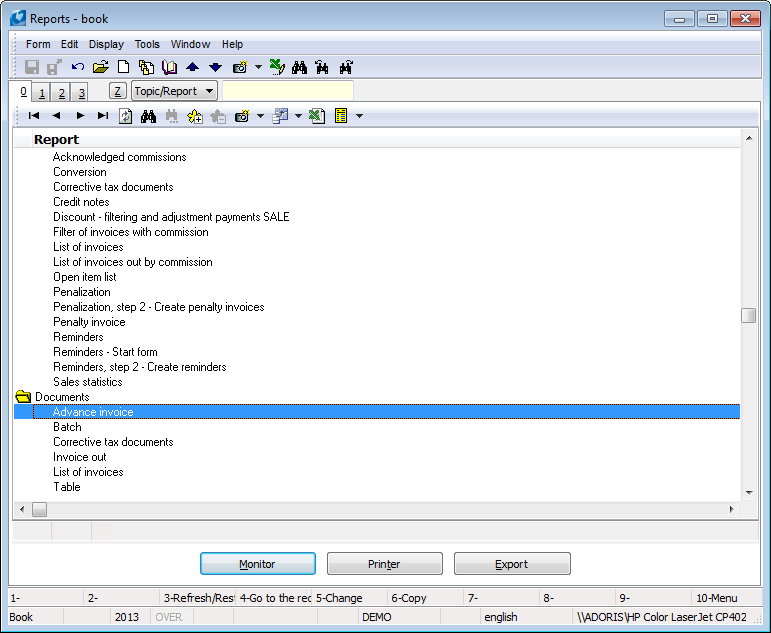
Picture: Book of Submitted Output Reports – F9
You can select the required report by Up and Down Arrows and confirm the selection by Enter key. Standardly, a report can be displayed on the screen, printed on a printer or written to a file. You execute the selection of the output by a click on Screen, Printer or Export buttons. The report creating can be aborted by Esc key.
Note: After an output report initialization queries can follow that deal with other input parameters which must be defined for the appropriate report.
|
|
|
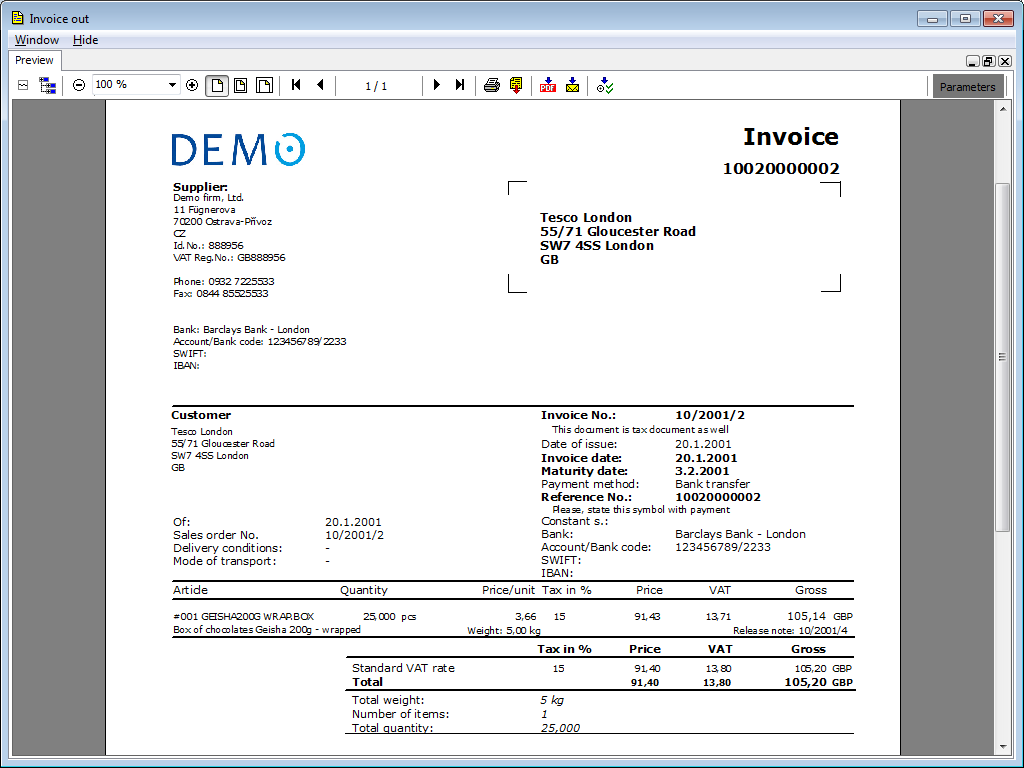
Picture: The form for browse of Print Reports
|
|
|
Print from Standard User Toolbar
Standard user toolbar menu is another possibility how to initialize an output report or a script. Reports and functions that can be activated over a certain book are included to that toolbar. Alongside every included report an icon and a report abbreviation have been displayed. The report will be activated by a mouse click on its icon.
Note: Closer description of the user toolbar including new functions submitting is stated in the chapter Module Menu Functions - Display - Define Toolbars.
|
|
|
Print from Tree Menu
Basic print reports for every module are included in the tree menu. These reports are marked by the icon ![]() or
or ![]() (for statistics and evaluation). Print of the selected report starts by a mouse clicking on the icon. For the print, the same rules apply as for the print by F9 key or user toolbar. If you start printing outside the data module of the report (e.g. from the basic desktop), first of all the form to enter filter conditions is displayed.
(for statistics and evaluation). Print of the selected report starts by a mouse clicking on the icon. For the print, the same rules apply as for the print by F9 key or user toolbar. If you start printing outside the data module of the report (e.g. from the basic desktop), first of all the form to enter filter conditions is displayed.
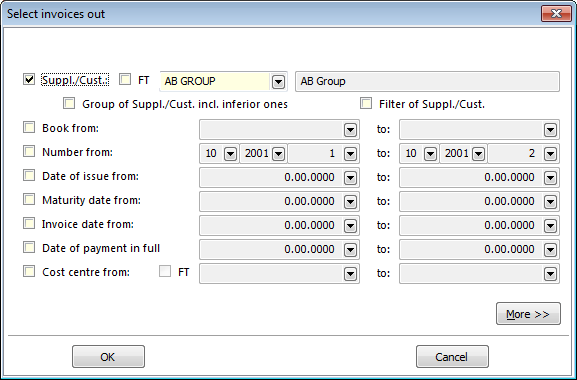
Picture: Form Conditions setting - Filter of Invoices Out
In the form of a filter, select the conditions that we are interested in when printing the report. After you enter these conditions, the report will be printed.
Example: Choose the report Invoice Out from the tree menu (Sale - Invoices Out - Printing of documents - Lists). The form for filter conditions setting will be displayed after pressing the icon. Set e.g. "AB GROUP" company to the field Suppl./Cust. and after a click on OK button, the report will be printed on the screen.
It is also possible to run scripts or functions from the tree menu.
|
|
|
Add New Report
If the current selection menu of the selected output reports is displayed on the screen (either by pressing F9 key or by activating from the user toolbar), it is possible to add another output report to this table. After pressing Ins key you will display the list of all existing reports and scripts. These are loaded from the database and also from directory [K2]\SESTAVYW\SPECIAL, if the selection Run database scripts only is not set in the Client Parameters.
Fields with individual types of output reports and scripts are stated in the header of this table. Menu in the lower part of the table keeps changing in accordance with the field that is checked. After checking all the fields the reports menu (further the reports menu) is complete.
Items in Reports Menu:
- Name – the name of a report, or rather of K2 script. A name indentation corresponds to the appropriate report structure. So called Key Word of the report, respectively K2 script, which is used for reports search, is stated on the first level. Further, the report (script) name submitted underneath the appropriate key word follows.
- S – If there is a check mark symbol next to the file name, it means that it deals with a special report or script.
- Definition – a source file name *.PAS, *.BK2, *.AM. Particular source files are also distinguished by icons that are displayed in the first column of the table:
K2 Script |
|
*.PAS |
Form for saving a new view |
|
*.AM |
K2 Plug in |
|
|
Packages |
|
*.BK2 |
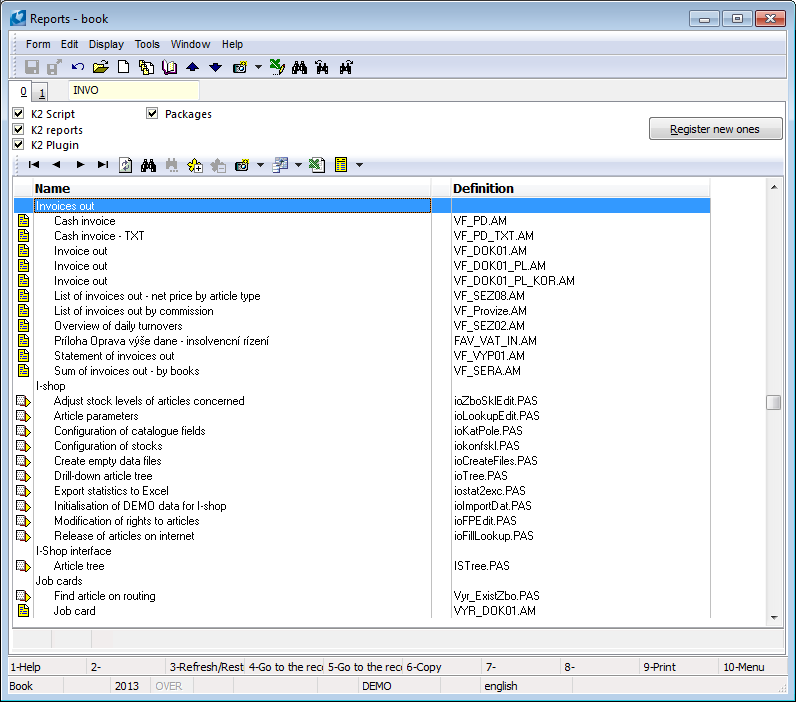
Picture: Table of All Defined Output Reports – Ins
Note: After K2 Programme reinstallation the reports menu is empty. After the first log-in of any user to the programme, so called reports registration will be automatically processed and by that the list of reports will be loaded.
If new reports were created and loaded to database or SPECIAL directory, it is necessary to actualise the reports menu by Registration of New button. That way, the selection menu will be updated by the new submitted reports. Alt+F3 keys can also be used for the selection menu actualisation; that way, a deletion of all the reports from the menu and a subsequent creation of the new menu will be executed. The reports and scripts that were previously deleted from directories STANDARD or SPECIAL will be deleted from the reports menu.
Selection from the reports and scripts menu you execute either by Arrows or by Search Field (search by a key word). If a record is found (and indicated by the light indicator), you confirm it by Enter key.
|
|
|
Report Configuration (1st page)
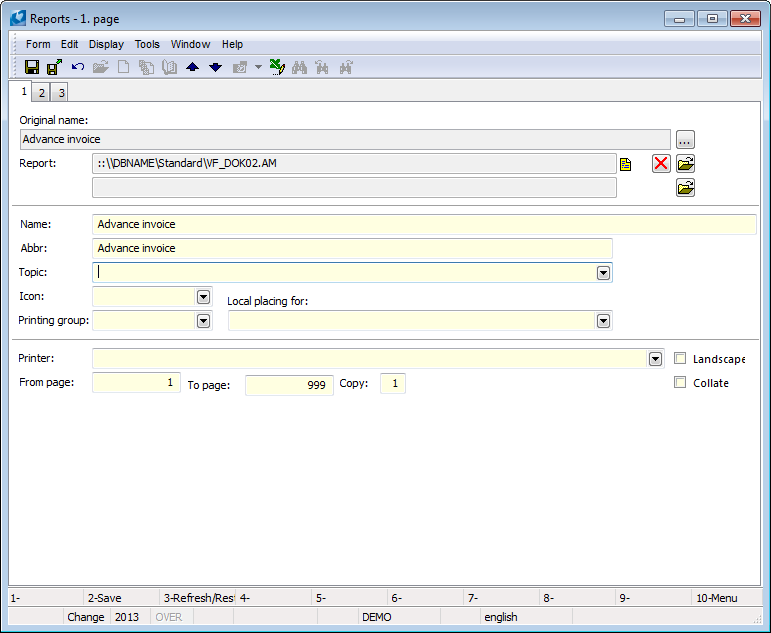
Picture: Report Configuration Form – 1st page
After pasting other output parameters (described in following text) you confirm the selection by Enter key. Thereby the new output report will be displayed in the current table (reports menu).
Fields Description:
Original Name |
A selected report, resp. K2 script, name assigned by the producer. |
Report |
A name of a report/script or "Plug-In" (the field is then called a Class), which will be run. |
Name |
A name of a selected report that will be displayed in the table of submitted reports. We recommend so that this name was as short as possible with regard to adding the report to the user toolbar. After the report submitting you can change that name; it means the name will be different from a description in the field Original Name. That change will be valid for the whole firm. |
Abbreviation |
An abbreviation of the submitted report. |
Topic |
In this field you can select a theme (folder) where the report will be included in the course of report submitting. This theme will be displayed on 1st page of the reports menu. Another item can be added to the list of themes that are available by Ins key. |
Icon |
In this field it is possible to assign an icon to the appropriate report. That possibility is useful if you want to add reports to the user toolbar because the icons help for easier orientation among the reports that were added to the toolbar. |
Printing group |
You can select a report from the selection menu and assort it to a group of users; that way it is possible to restrict the access to this report. If there is no group of prints defined, the appropriate report will be accessible to all the users who have access to the appropriate module. Note: Registering a user to the group of prints is executed in the module Administrator – Users on 3rd page. |
Local placing for |
In this field it is possible to assign a report to only one concrete user. The user icon will be displayed on zero page of the form in this report. If you do not select any user, the appropriate report will be available to all the users who have access to this module or who have been authorized Administrator– Reports and Functions (F9) – Display Local Items. |
Printer |
Presetting a printer where you require printing a report. The field can be left empty. |
Pages, Copies |
You can define a range of printed pages, resp. number of copies. Definition of these parameters is not necessary. |
Landscape |
Landscape format of paper setting. |
Collate |
Check this flag if you want to print the whole copy of a document all at once and then print another one. If all the copies of the first page are to be printed at first and then consequently copies of the next pages, do not check that field. |
|
|
|
Report parameters (2 page)
On the second page we can enter report parameters. These are divided into groups:
- General parameters - parameters common to all reports.
- Script parameters - parameters for his own script.
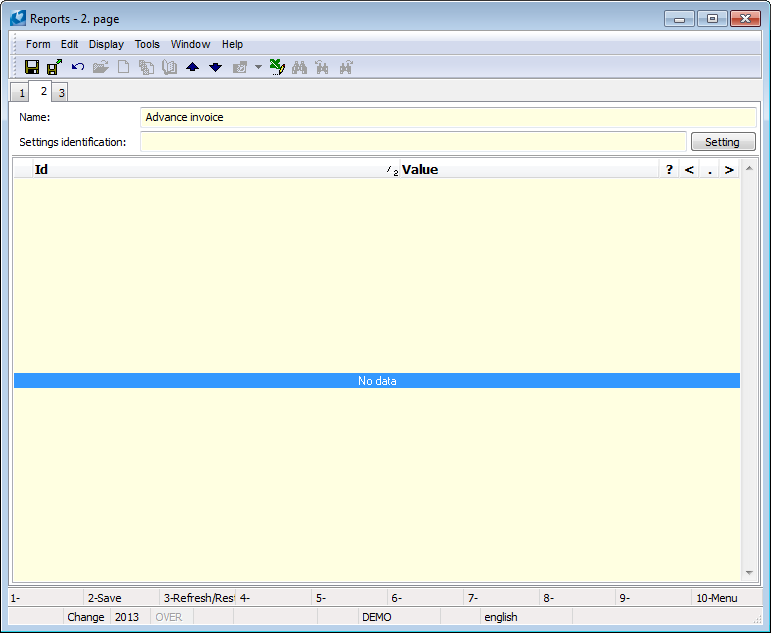
Picture: Parameters of report – 2nd page
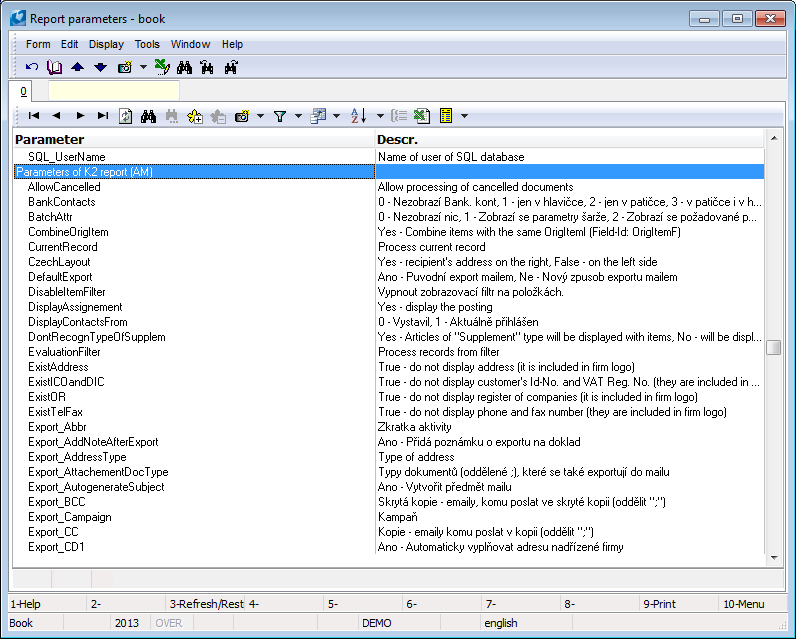
Picture: List of all parameters to report - Ins
General parameters of report:
Action_AplicAfter |
Run application after report - manually type in the text of the application, including the path to be run after the calculation report. |
Action_AplicBefore |
Run application before report. |
Action_AssocApplic |
Run associated application with export file - if the exported file is included in the report, this parameter can specify its opening, or print the associated Windows applications (e.g.. open MS Excel etc.). |
ESign_ThumbPrint |
Certificate (ThumbPrint) |
ESign_ToSign |
Sign, do not sign, by certificate |
F9_ExpDestin |
Export destination ( File, Mail, Outlook, ...) - this parameter is specified way to export. |
F9_NotRun |
Do not run report - this parameter can be done that only carry out the attached action (starting applications before, after, opening a file, sending mail, etc.) without running its own report, or script K2. |
F9_Overwrite |
Overwrite the file with a new export Yes/Not - this way you can define in advance the protection of overwriting files without having to enter each time you run a report. |
F9_HideLeft |
Hide the left button Yes/No - to start, there are 3 buttons with standard outputs - Monitor, Printer and Export. You can reduce the number of buttons and assign them a different meaning. This command hides the left button. |
F9_HideRight |
Hide the right button Yes/No. |
F9_HideMiddle |
Hide the middle button Yes/No. |
F9_File |
File name with export - will be used in case of export options file. |
F9_TextLeft |
Text of the left button - changed description of the left button. |
F9_TextRight |
Text of the right button. |
F9_TextMiddle |
Text of the middle button. |
F9_ButtonOnEnter |
Button, pressed on ENTER - this can be pre-set button that will implicitly started by pressing Enter. |
F9_Type |
Export type ( DOC, HTM, TXT ....) - this is about an export formats. |
F9_SenceLeft |
Function of the left button - assigning significance of each button. This command changes the meaning of the first button. |
F9_SenceRight |
Function of the right button. |
F9_SenceMiddle |
Function of the middle button. |
Language_Fields |
Language of additional fields in RPM reports. |
Language_Report |
Language of texts in RPM reports. |
Mail_Address |
E-mail address. |
Mail_BCC |
Addresses of further hidden copies. |
Mail_CC |
Addresses of copies. |
Mail_Password |
Password for log-in to mail functions. |
Mail_Send |
Send directly without mail dialogue Yes/No. |
Mail_Profile |
Profile for log-in to mail functions. |
Mail_Subject |
Brief description of the mail. |
Mail_Message |
Message sent by mail. |
Preview_GridName |
Grid No. for subview. |
Preview_K2FormLook |
Form mode, in which the subview is displayed (Lookup/Book). |
Preview_K2FormMode |
Form mode, in which the subview is displayed (Change/Browse mode). |
Preview_PageNames |
Pages displaying the subview. |
Script_RestoratPosit |
Restoration of the position after the script. |
SQL_DatabaseName |
SQL database name for SQL tables in report. |
SQL_Password |
Password of user of SQL database. |
SQL_ServerName |
SQL server name for SQL tables in report. |
SQL_UserName |
Name of user of SQL database. |
|
|
|
We can set a default value for each selected parameter, or specify or limit the entry of permitted value.
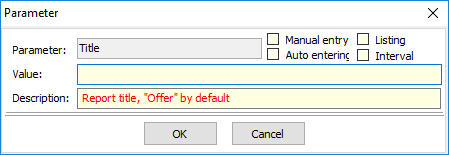
Picture: The Parameter form
Value |
Set the parameter value with which the inserted report will be run. For the parameter of Boolean type select the value Yes/No. For numeric parameters, enter numerical values. For string parameters, enter the required text (e.g. Title parameter for standard purchase and sale documents). |
Description |
The description of a parameter. It can be customized. |
Manual entry |
If it is checked, the Parameter form, where the required parameter value can be selected, is displayed every time you run the report. Typically, it can be used if the parameter value is different for each running (e.g. customer selection, article ...). |
Auto entering |
The parameter value is generated according to the defined formula. |
Listing |
It can be used if it is allowed to enter values separated by semicolon into the parameter. (e.g. stocktaking for specific warehouses). |
Interval |
It allows you to limit the list of allowed values to a specific interval. |
|
|
|
Edit Report Parameters
If you need to change output parameters in the already submitted report (e.g. set a number of copies, change report parameters or similar), you select this report from the selection menu of output reports. By means of Arrows you will designate the report with the light indicator and press F5 key - you will enter Change mode. On 1st or 2nd page of Reports book you can execute the changes. The executed changes will be saved by pressing F2 key.
|
|
|
The possibility of export reports
The printed report can be e.g. exported to the desired file format or send e-mail.
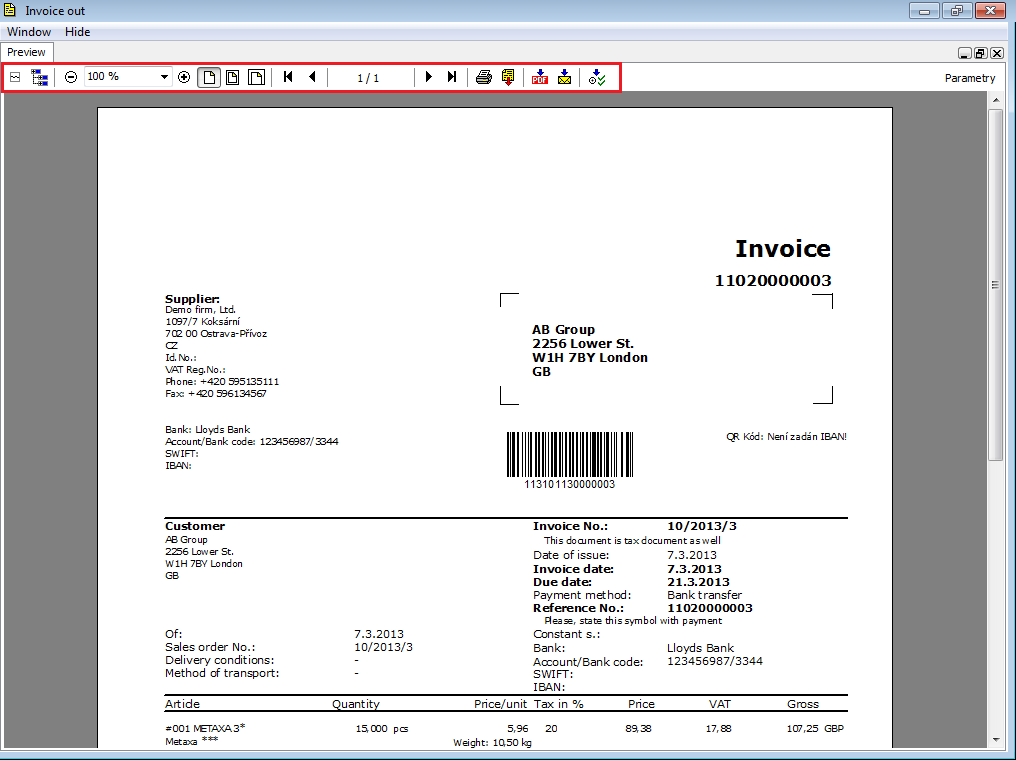
Picture: Report options
Description of functions:
|
Clicking this button opens a menu where you choose to view the report.
The possibility Undistributed is the default. Means that it is always displayed one side of the reports. The possibility Next to each othervertically splits the window into two parts. Under both sections are then displayed the same report. Above option works similarly to themselves as the previous option, but the window splits horizontally. The last two options are used for better overview when checking the values between the upper and lower parts of the report. Each half has its own window scrollbar. |
|
Pressing this function display tree of group ,which is divided report. We can see it on the left part of screen. Groups are displayed for all pressed reports.
|
|
Reduce the report zoom in. In the field with percent value we can set ourselves a more exact report zoom in. |
|
Increase the report zoom in. |
|
Print the page in 100% size. |
|
Displayed whole page of report. |
|
Increase report on entire width of the screen. |
|
Go to the first page. |
|
Go to the one page back. |
|
Go to the one page forward. |
|
Go to the last page. |
|
Print report. |
|
It allows export report to file, application, or send an e-mail. Report can be exported into the following formats: *.MHT, *.HTM, *.XLS, *.XLSX, *.ODS, *.SLK, *.RTF, *.PDF, PNG picture. |
|
The report is exported in * .PDF into applications that support this format. |
|
Exports the report into * .PDF and then allow it to send e-mail. |
|
Export options are turned on/off. If is export option off, the form for setting export does not appears, e.g.. by export into *.PDF, e-mail. |
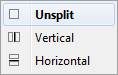
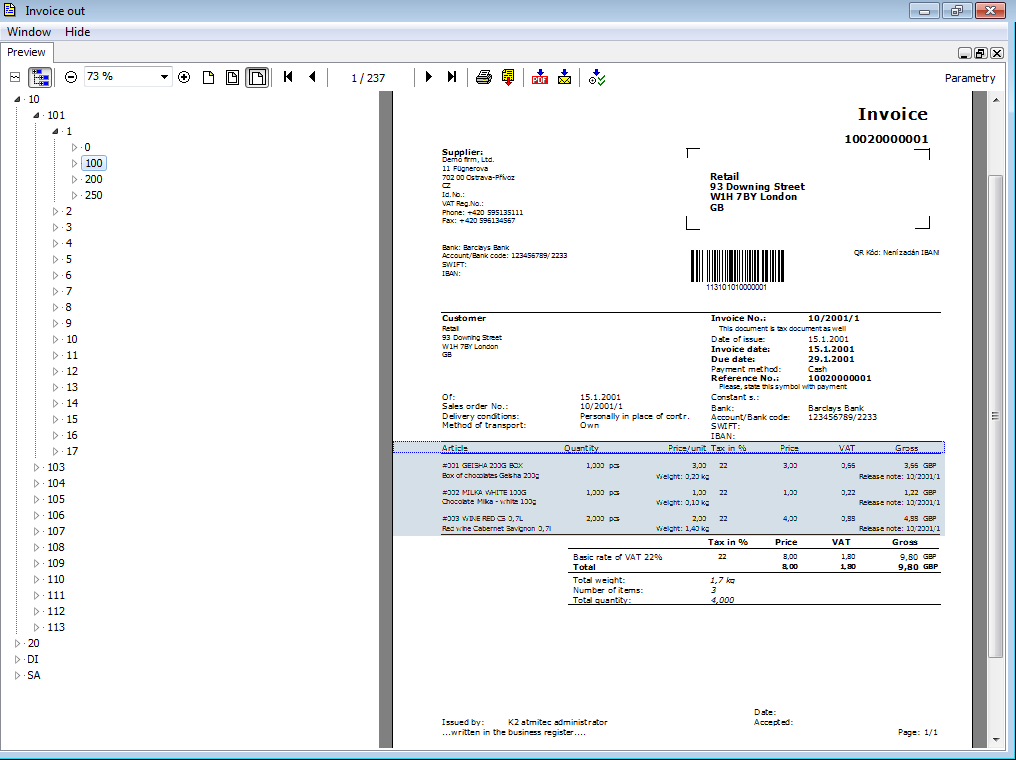
|
|
|
Remove Report
You have to mark report which you want to remove from the selection menu by arrows and press Del key. After the positive answer of the query in the dialog box, the report will be removed from the selection menu.
|
|
|
Start Batches of Prints
Start batches enable, within a report submitting to the selection (by F9 key), to define directly a sequence of activating of filters, scripts and reports. For simple sequence of steps it is not necessary to define a separate script or similar. Another advantage of this procedure is the absolutely simple control that is intended also for current operators.
Example: For better understanding we will explain a batch assorting procedure over invoices out. We want to include the List of Invoices report into the print reports menu and we want to run this report over filter of invoices at the same time.
Procedure upon Start Batch Assorting:
- Press Ins key on the print reports menu (F9 key). Program report (Plug-In) is assorted with the Batch name to the menu of all the reports. Select this report (by Enter key) and paste your own batch name into Name field (e.g. List_IO (Book/Number)). You can also overwrite Abbreviation field. By F2 key, you will save the executed action.
- Press the Possibilities button in Browse mode of the new created batch (on the 1st page). The form Batch Configuration will be displayed here.

Picture: Input Form for Batch Assorting
- You open the book Batch of Reports in the form Batch Configuration by Reports button. Hereby you will define the sequence of reports, functions or scripts that are to be activated.
Note: Reports that are defined in the batch are activated gradually in way they were defined. Because inserted reports and scripts are sorted in the alphabet order according to their names, it is necessary to customize their names adequately (for example by numbering of the items) so that the particular functions are to be activated in the correct order. |
- By Ins key you open the book of Reports where you select Filter of Invoices Out item. If you insert this script on the 1st page of the Batch of reports book, edit the name of the script, e. g. on the 01. Filter of invoices out format and save the changes by pressing F2 key.
- Further, define a table over which the report will be activated into the book Batch of Reports. In your case it deals with Invoices Out. After pressing Ins key select the item with assigned name of Table from the book of Reports. Edit it's name again (e.g. 02. Table) and save the changes by pressing F2 key.
Now you have to define the data module over which the batch is to be activated. Over the item Table, on 1st page, use the Possibilities button and select the required data module Invoices Out. Leave the flag checked next to the Activated Evaluating Filter field. |
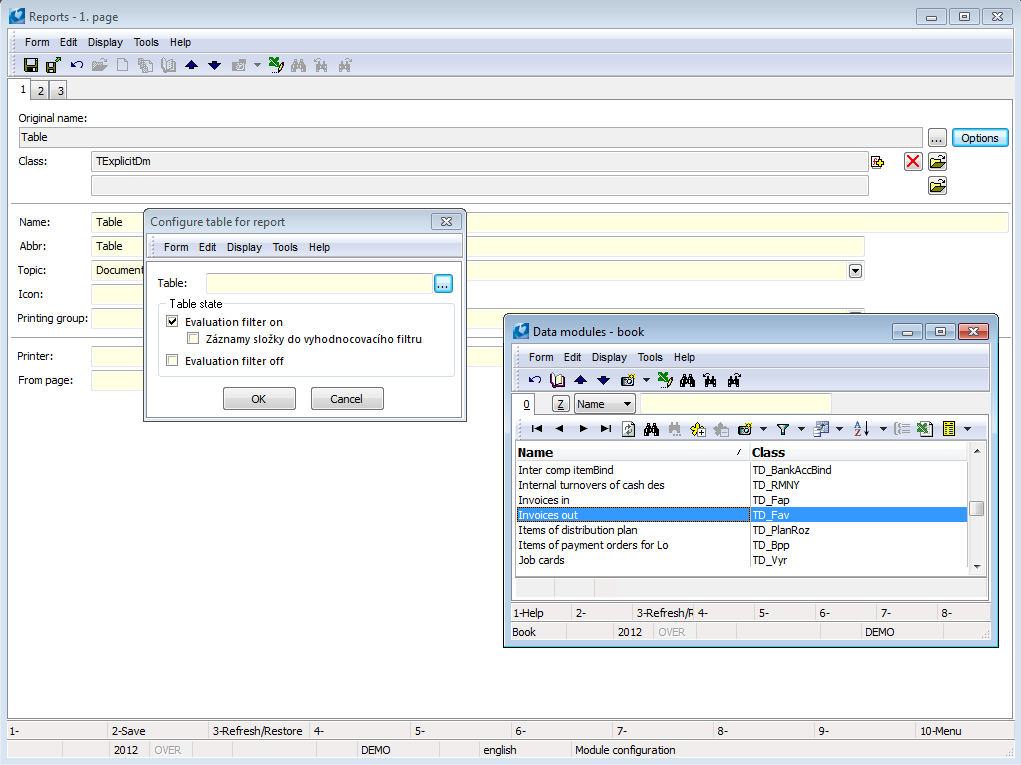
Picture: Data Module Selection for Batch Assorting in "Table" Item
- As the last phase you have to assort a report that will be activated over the filter of invoices out to the batch. Press Ins key again in the Batch of Reports book and select the List of Invoices Out report from the menu of reports. Customize the report name by numbering once again and save it by F2 key.
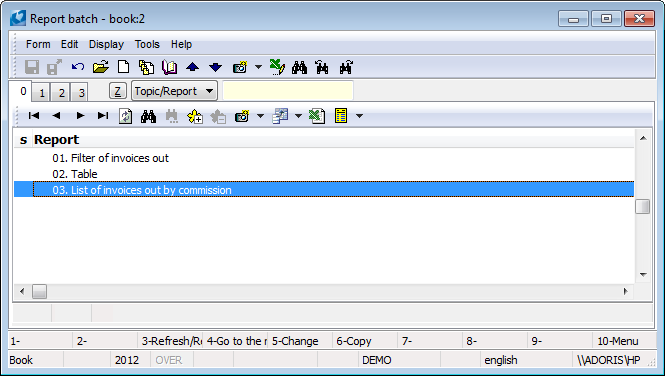
Picture: Defined Batch of report
- When you finish the definition of the batch of reports, return to the Batch Configuration form by Esc key and save the assorting by OK button.
- Now the batch is assorted into the menu of reports F9. After its initialization a form is to be activated where you set sorting conditions. After you complete the form, a report will be printed on the screen.
Note: By the same procedure it is possible to assort a start batch of print to the standard user toolbar and then to activate it from it by a button.
Simultaneously you can insert also selection (TQueryED) into the batch. instead of filter. In the form for configuration of selection there the Run in batch on a current data module is checking field. This field is not checked by default.
If the flag is not checked, then the selection is run over data module that is defined by setting. And the further classification in the batch overtakes this data module (analogous to the Table plugin).
If the flag is checked then the selection is run over a current data module or over module that is specified previously in the Table plugin (TExplicitDm).
If the selection is not inserted in batch, then this flag is not taken into consideration.
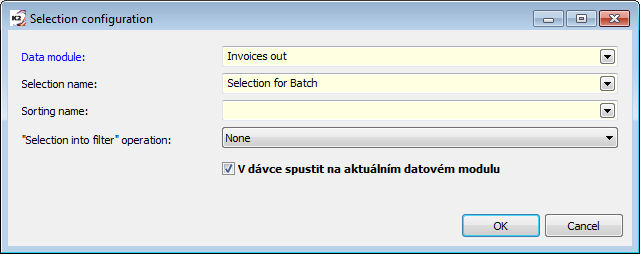
Picture: Configuration of selection
|
|
|
Report logging
IS K2 offers to register every activating reports and documents processed by this report. It also allows archiving the output for printing, to block print of documents that have been previously printed at least once. Information about document are saved, who, when or where have activated this report.
In the Reports book on 3rd page it is possible to log print and export records, or display of all reports on the screen.

Picture: Reports book - 3rd page
Fields description
Report |
It is indicated in this field which report will be logged. In the Report logging book approaches to appropriate reports will be registered according to the definition. |
Group |
If the fields are loaded to a specimen by means of a script, a message about successful loading appears. After pressing the Display records button the Report logging book will be opened. This book will display filtering records according to the group which is selected at the moment. |
Printer |
The operations related only to activating the reports on printer and that directly from F9 or from report preview by icon for print will be executed. |
Export |
The operation related only to export into applications or file and that directly from F9 or from report preview by icon for export will be executed. |
Screen |
The operation related only to display on a screen will be executed. |
Archive |
By checking the field Archive the system will archive the data into "*.pdf" document. This document will be in the Report logging book on 1st page by available record. Directory REPARCHIVE serves for physical disk storage for these ".pdf" documents in a directory of firm. |
Record for each processed document |
By checking this field every record that is to be processed by this report will be saved in the Report logging book. |
Blocking |
The field offers the possibilities how to prevent print of a concrete document more than once. If any other selection than Not blocked there is chosen, the checking fields Archive and Record for each processed document will be inaccessible for user and the system work with them as if they were checked. |
Rights
Only user, which has got right Change logging parameters of reports and functions on 5th page of the book of Users in the section Administrator/Reports and functions (F9), can edit 3rd page of the book Reports.
AM reporting
If you want that a record for Report logging will always create for one report, it will possible to set the attribute "Required" on "True" in properties of a report (after opening a design by Ctrl+F5 keys (Object Inspector) in the section "Logging"). This property ensures that a report will be opened only in case that there is the field Record checked on the 3rd page. After leaving a book the user will stay on his/her desktop (page).
Options of the field Blocking
Activated report (on the zero page), that has got some of the values "Archives", "Archives or run" or "Block" entered on the 3rd page of the book Reports in the field Blocking, runs by standard way. At the beginning this menu are Master Data followed by Marketing, Sale etc.
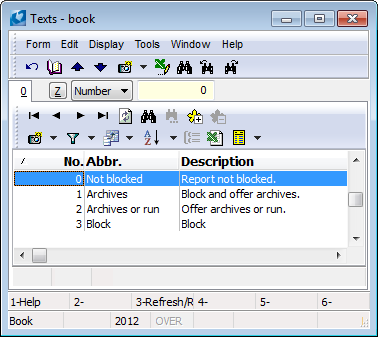
Picture: The selection for the field Blocking
Archive
The form, which will display all actually processed documents of this report, will open after report activating. These documents which were activated at least one have displayed a graphic symbol "Ban" in the appropriate column. By the button Archive you can open an archived report with documents that are now blocked.
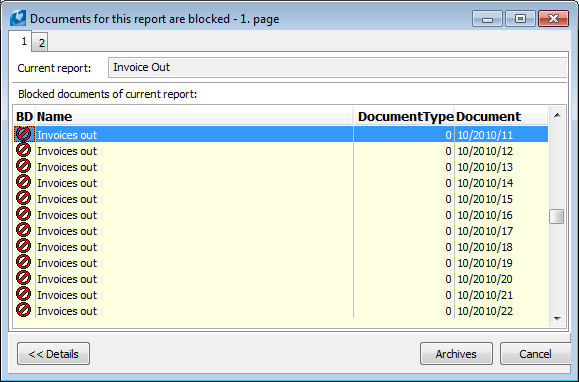
Picture: Blocking "Archives" - 1st page
2nd page of blocking form will display detailed data of report activating. This page is the same for all blocking states.
Left tab displays a report that was activated and to which blocking is bound. Right window displays documents that are to be processed by this report.
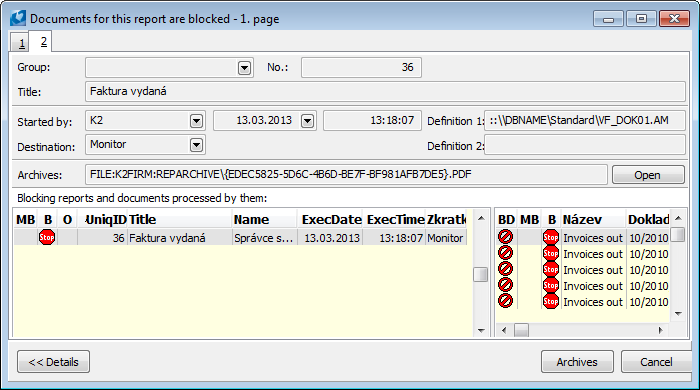
Picture: Blocking "Archives" - 2nd page
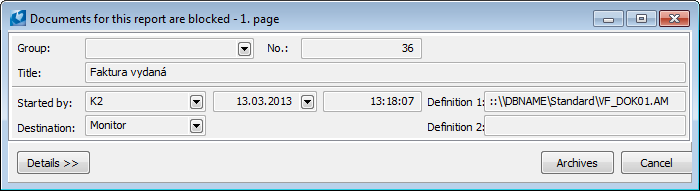
Picture Blocking "Archives" - Without detail
Archive or activate
By the button Continue this form offers next activating report or by the button Archive you can open archived report with documents which are blocked now.
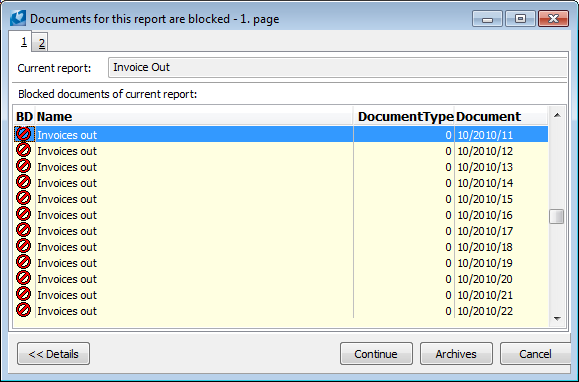
Picture: Blocking "Archives or run" - 1st page
Blocking
The form does not offer any operation, only display of detail of blocking.
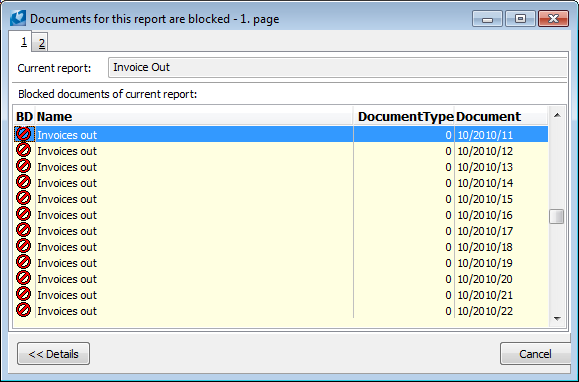
Picture: Blocking "Block" - 1st page
Book Reports Logging
Display of the Reports logging book in the Reports book is possible by Ctrl+F4 key in Reports book or by the button Show records on 3rd page.
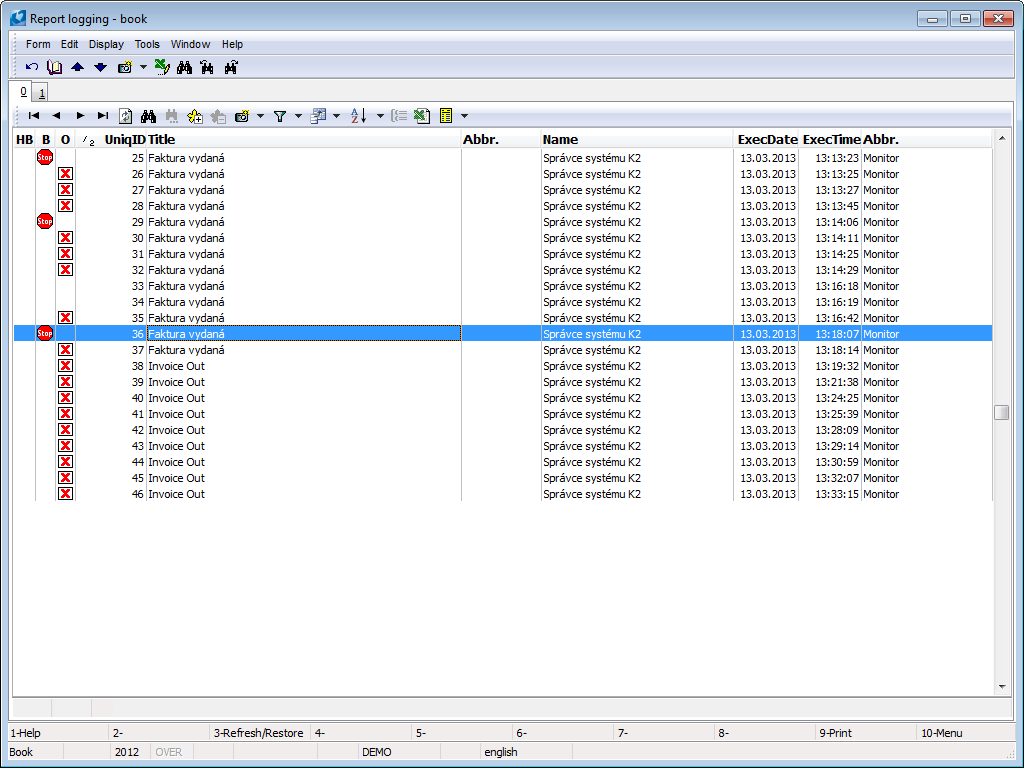
Picture: Book Reports Logging
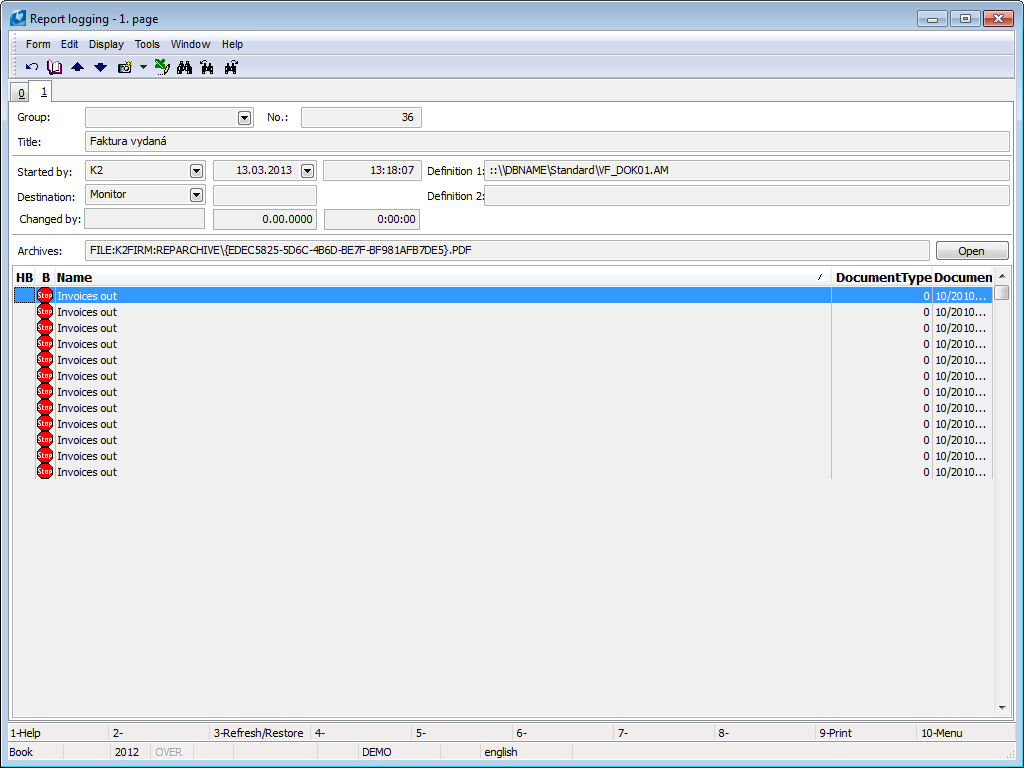
Picture: Book Reports Logging - 1st page
Fields Description:
Group |
Selected group that is set on 3rd page of Reports book will be displayed, see above. |
Number |
Record number under which the event is stored in Reports logging book. |
Name |
Name of a report. |
Started by |
The name of a user who activated the report. Date and time when the report was activated. |
Destination |
The field displays how user wanted to display report - on monitor, export, print. |
Definition 1 |
Name of report or support script on disc. |
Definition 2 |
Name of report or support script on disc. |
Archive |
Name of ".pdf" document which archives an output of a report in a state a user, listed in the field Started by, activated in appropriate date and time. By pressing the button Open an archived document will open. |
Meaning graphic symbols:
|
Report is blocked (column B). |
|
Output state - rejected (column O). |
|
Output state - allowed, e.g. at blocking "Archives or run", after running the button Continue (column O). |
|
This exclamation mark alerts that the appropriate record was changed. If the user want to edit record from state blocking to allowed, he will press F8 key or Del and thus he will unblock record for the starting a report (the symbol "Stop" will disappear from the column B). By these keys a system records a handling and the symbol "Exclamation mark" remains in the column MB also after return of record to original state (column MB). |
|
|
|
Automatic Report
The advantage of an automatic report is the simple ability to create an output report without a proposal in the editor of AM reports, the look of which is based on the form of the currently running and configured book. You can find the icon for printing automatic report in the bottom toolbar. If you press next to the icon ![]() only the button with arrow
only the button with arrow ![]() , menu of the saved automatic reports will be displayed.
, menu of the saved automatic reports will be displayed.
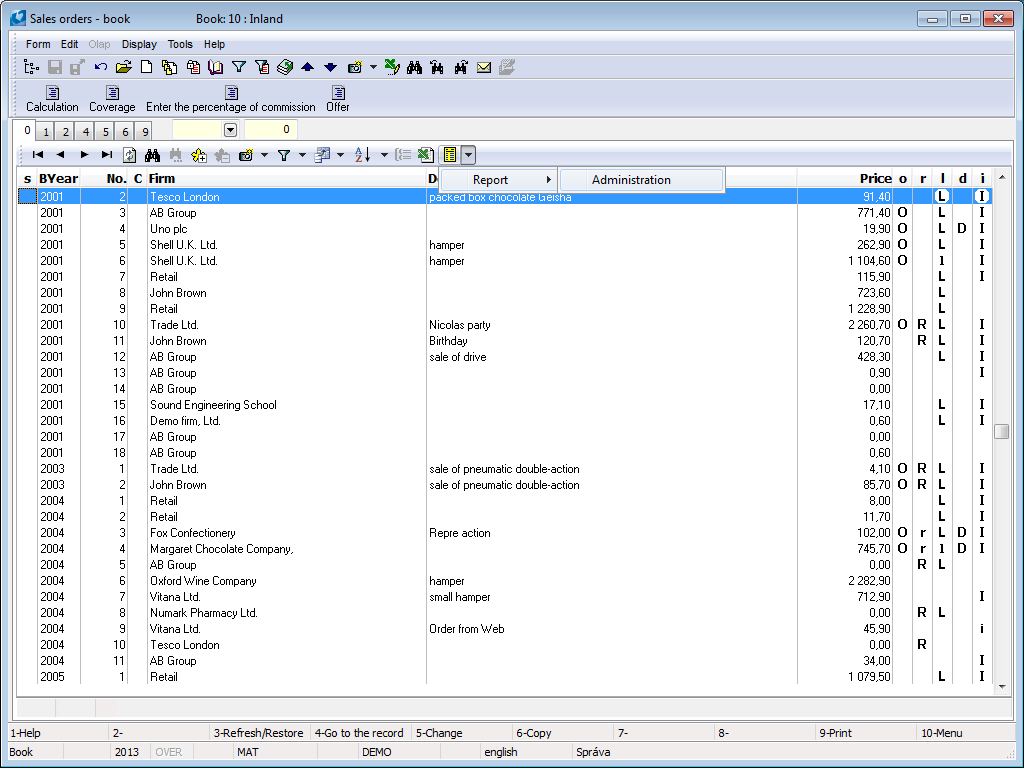
Picture: The expanded menu of automatic reports in the Sales Orders book.
Description of the automatic report menu:
Administration |
After opening the Administration menu, the form for administration of automatic reports will be displayed. Working with a form for automatic report administration is analogous to filters, see the Save filter chapter in the Basic Functions documentation. |
After pressing the icon ![]() , the form for an automatic report definition will be open in the bottom toolbar.
, the form for an automatic report definition will be open in the bottom toolbar.
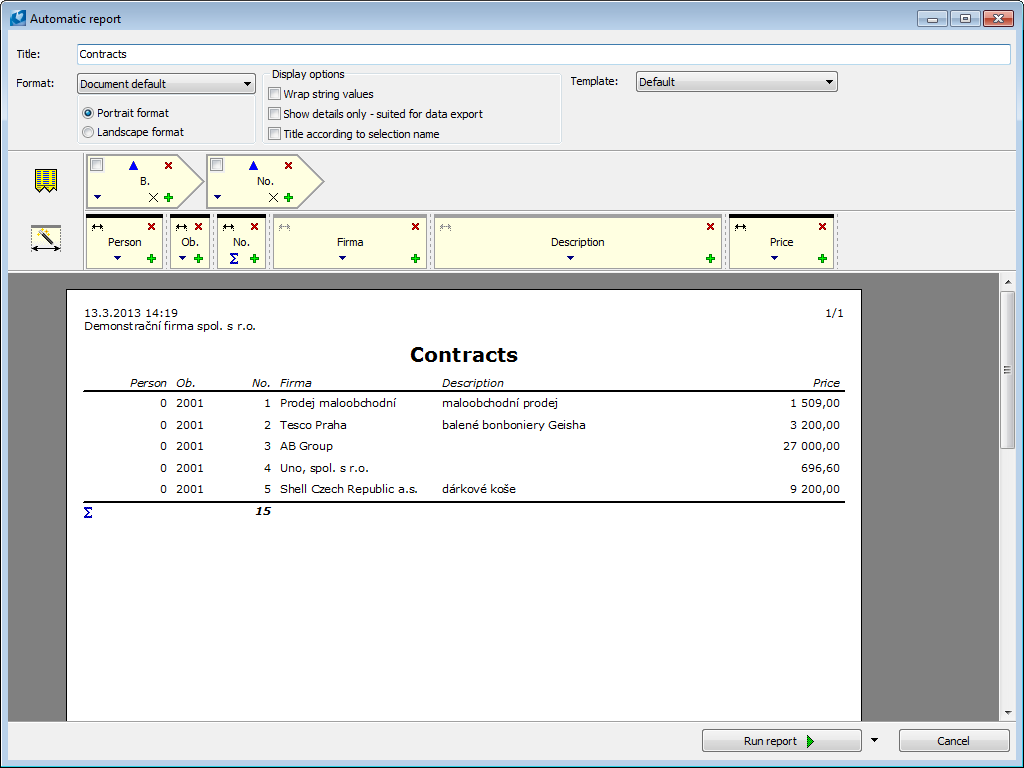
Picture: Automatic Report
Fields' description:
Title |
Title of report. |
Format |
Here select the paper size for which the report will be created and whether it will be printed in portrait or landscape format. |
Display options |
Here we can choose if we want to wrap the text, display only data for the data export or whether we want to use the name of the filter for the report title. |
Template |
This drop-down field contains a list of predefined templates. It is possible to create a new template or edit an original one. |
Description of functions in the sorting/grouping bar:

Picture: The sorting/grouping bar
In this proposal, you can choose according to which field the records will be grouped by means of the checkbox for grouping. E.g. when the field "Book" is checked, records are grouped according to the book. The icon ![]() allows you to sort records in ascending or descending order.
allows you to sort records in ascending or descending order. ![]() performs sorting by an aggregate value. By means of the icon
performs sorting by an aggregate value. By means of the icon ![]() it is possible to add a column according to which you will sort and group. The icon
it is possible to add a column according to which you will sort and group. The icon ![]() removes an inserted column. After pressing the icon
removes an inserted column. After pressing the icon ![]() each group will be printed on the new page. The icon will be changed to
each group will be printed on the new page. The icon will be changed to ![]() . After pressing it again, printing to the new page turns off.
. After pressing it again, printing to the new page turns off.

Picture: Automatic report - book and sales order number display
Description of the other functions of picture:
You can select printed columns in the proposal. By the icon ![]() you can add a next column which will be printed on a report. The icon
you can add a next column which will be printed on a report. The icon ![]() removes an inserted column.
removes an inserted column. ![]() runs an aggregate function (Sum, Average, Maximum, Minimum, Number). If an automatic report has been started by using the tool
runs an aggregate function (Sum, Average, Maximum, Minimum, Number). If an automatic report has been started by using the tool ![]() and a numeric field is selected in the grid, then the sum aggregation will be automatically created on this field. By clicking on the icon
and a numeric field is selected in the grid, then the sum aggregation will be automatically created on this field. By clicking on the icon ![]() the minimum column width will be set. The minimum width is indicated by a black line. In the fields' bar, it is possible to adjust the columns width by dragging the divider between the fields. If the Ctrl key is pressed when the width is changed, the width adjusts only within the overall width of the report. Columns can also be moved between each other by dragging the entire field. Columns can also be moved into the sortings/grouping bar. If you hold Ctrl key when moving the column, then the column will not be moved but copied into the sorting/grouping bar. After clicking on the column name, it is possible to change this name.
the minimum column width will be set. The minimum width is indicated by a black line. In the fields' bar, it is possible to adjust the columns width by dragging the divider between the fields. If the Ctrl key is pressed when the width is changed, the width adjusts only within the overall width of the report. Columns can also be moved between each other by dragging the entire field. Columns can also be moved into the sortings/grouping bar. If you hold Ctrl key when moving the column, then the column will not be moved but copied into the sorting/grouping bar. After clicking on the column name, it is possible to change this name.
Button Short / complete report
A report in short variant prints only 5 records. It is displayed aligned with the fields' bar. This is the default state of an automatic report proposal that saves the time needed to display the report, e.g. after adding the field.
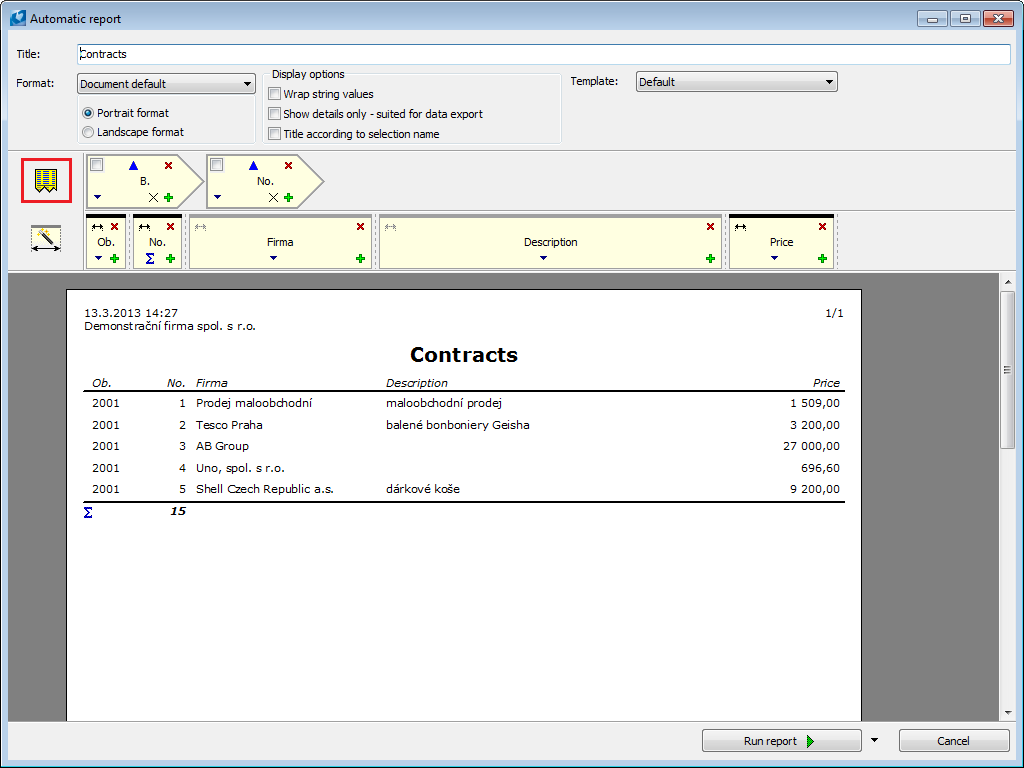
Picture: Automatic report - the Short / complete report button - short report mode
The Complete report mode displays all the data as the resulting report will be displayed (it does not actually need to run it). The disadvantage of this mode is the longer formatting of the report when changing the automatic report definition.
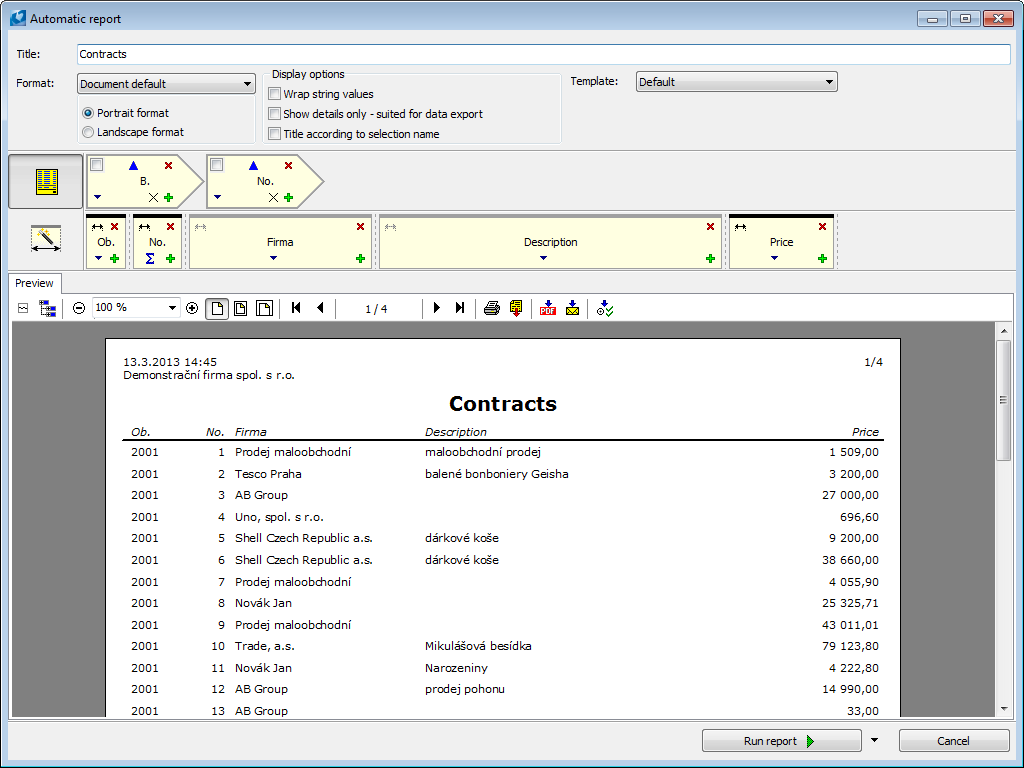
Picture: Automatic report - the Short / complete report button - complete report mode
Button Adjust columns width
It serves to adjust the width of the fields exactly to fit the width of the used format. Recalculation preserves the mutual proportions of widths of individual fields.
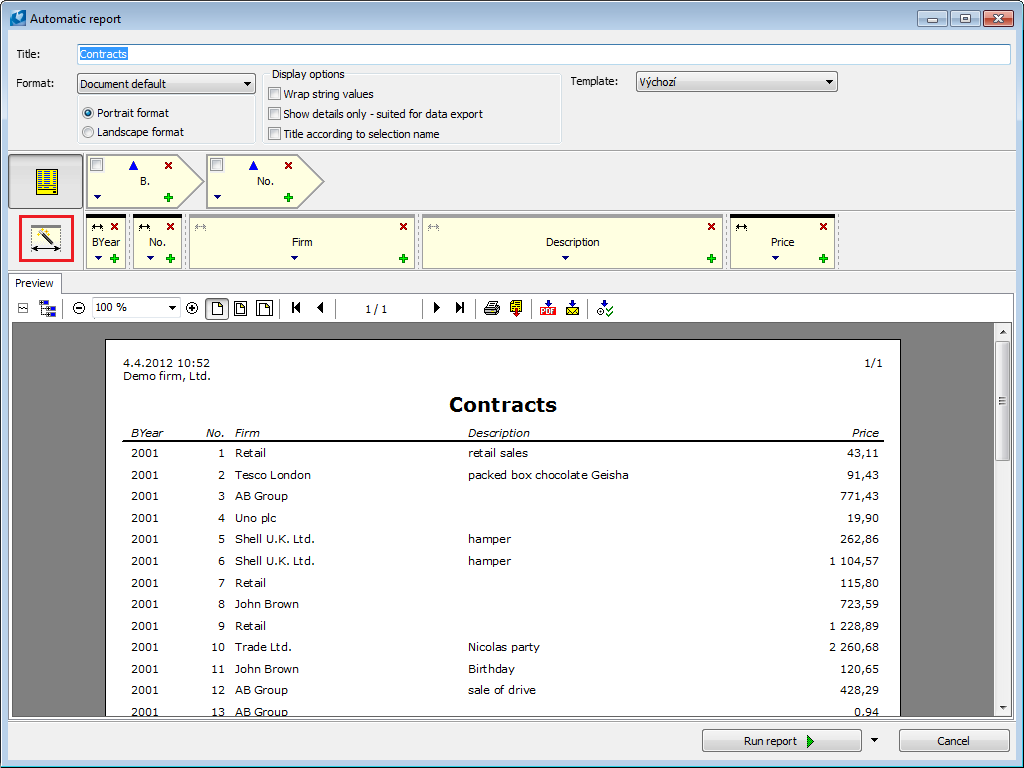
Picture: Automatic report - the Adjust columns width button
The defined report can be run, saved or it is also possible to edited this proposal in AM editor.
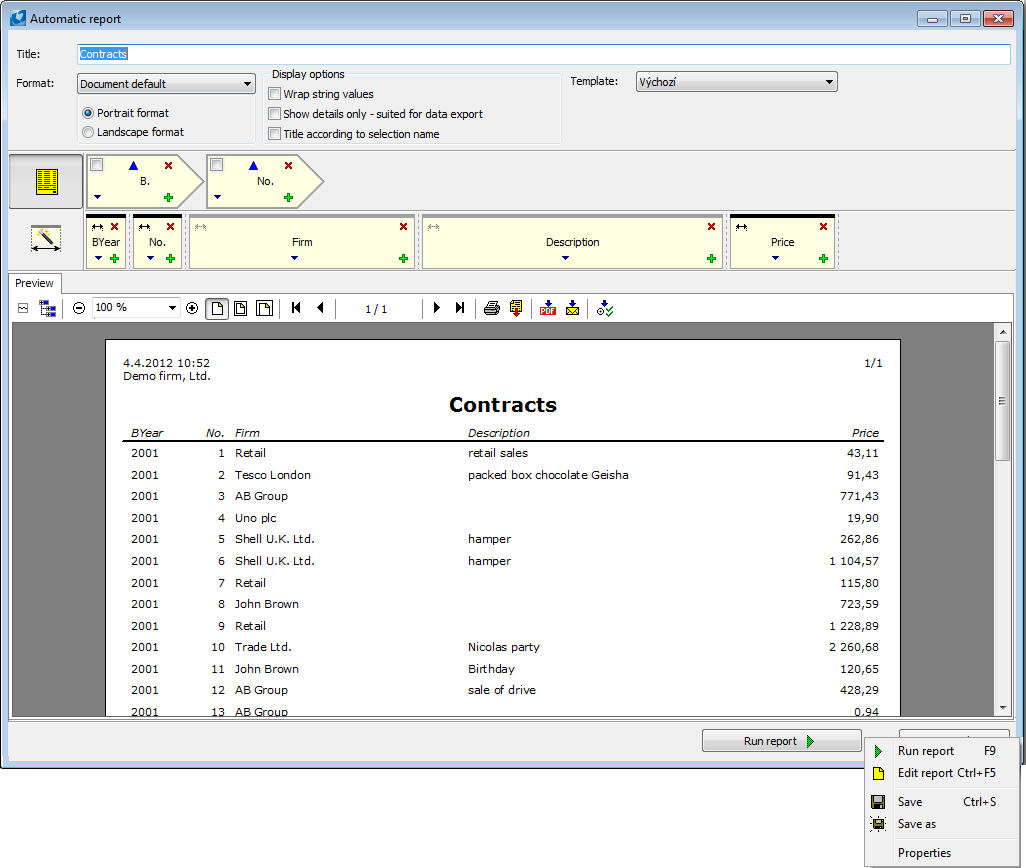
Picture: Automatic report - menu of actions over report
Actions Description:
Run report F9 |
A report is run in a common AM report preview. |
Edit report Ctrl+F5 |
A report is generated and the AM editor is run on it. This report can be saved as a common AM report and it can be included into F9 or a user bar. |
Save Ctrl+S |
The report definition can be saved for a later starting. This saving is similar to saving e.g. filters and is subjects to the same rules. In this case, not a report but its definition is saved. Reports are executable in the bottom module toolbar by using the icon |
Save as |
It saves a filter below us selected name, user, level... The filter can be activated at any time again. |
Properties |
Properties of the saved definition of report. Data can be adjusted here. |
|
|
|
Subview window
The subview window allows to view reports and scripts for the data module without having to run by F9 key from Reports book. The subview window can be set for any data module and for any side. The subview window uses a specially created reports and scripts. Their settings are better left to consultants.
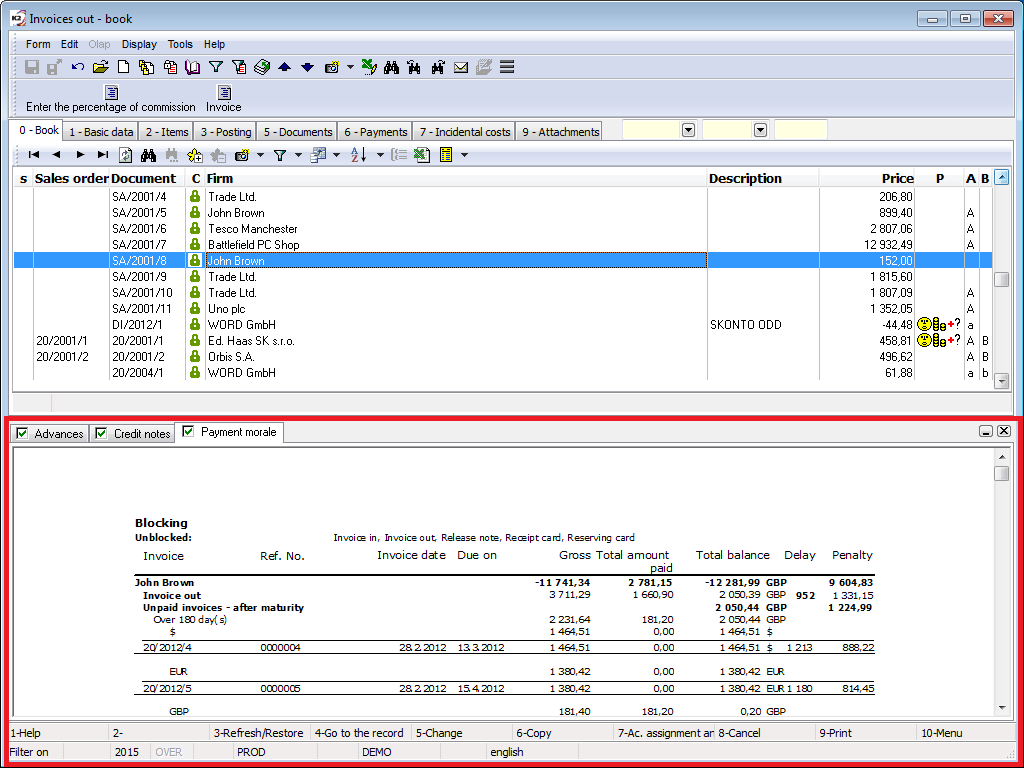
Picture: Invoices Out - the subview window
Displaying the sub view pane requires activating the parameter Show subview window, which can be found in the Users parameters on page 1. This ensures that the sub view pane can be displayed in any data module. To view in the specific data module we still have in menu of the data module to tick the option Show subview window, see the picture below.
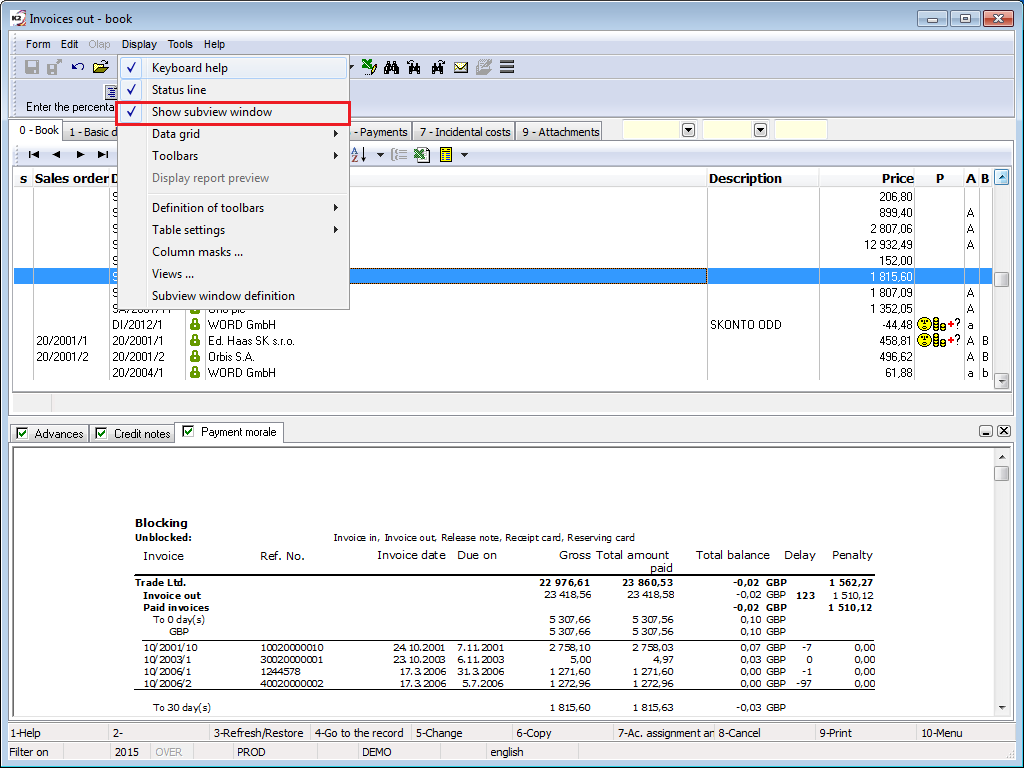
Picture: Invoices out - option Show subview window
Appearance sub view pane provides consultant on the basis of specific requirements. We can set where the sides or under what conditions it will run. Setting is performed in menu moduleSubview window definition.
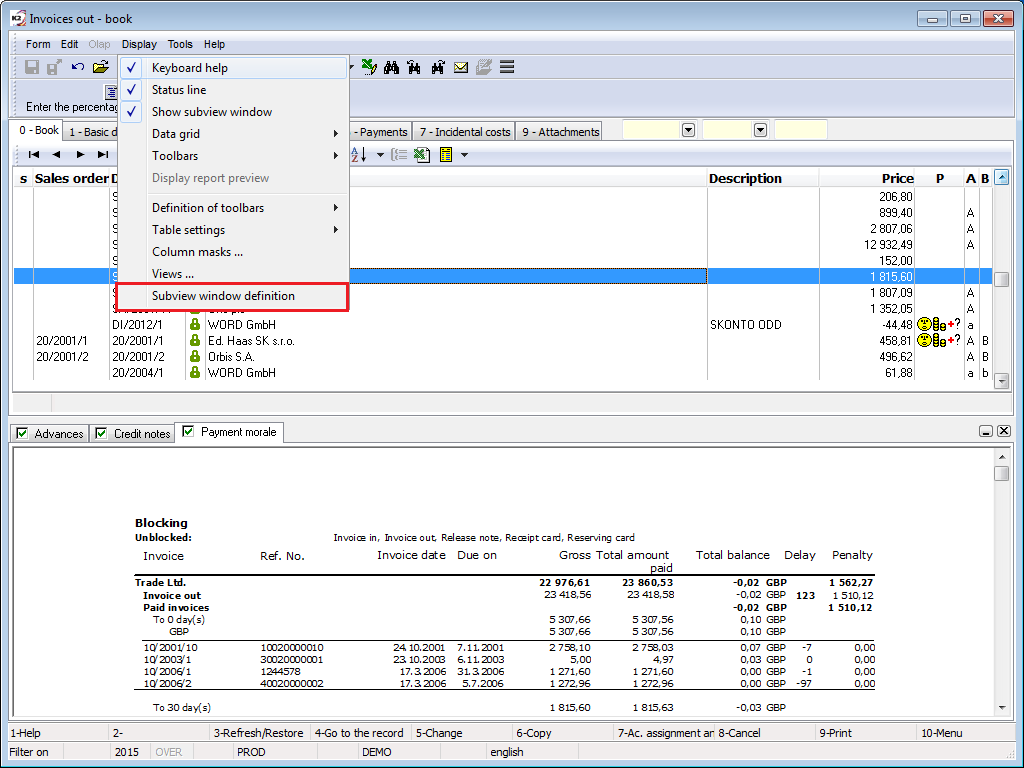
Picture: Invoices out - option Subview window definition
Selecting this option opens the Reports book. By Insert key we put a report or script the same way as in F9 (see the chapter Basic function - Print - Add new report). In the sub view pane, you can not set the parameters belong only to a particular script or report, but only general parameters.
To work with the sub view pane can report or script set the following parameters:
Preview_GridName |
Grid number in which data will sub view pane respond. For example: "FGrid0" - sub pane will display data from grid on the zero page (book), "FGrid21" - sub pane will display data from grid on the second page (items). |
Preview_K2FormLook |
This parameter select the mode in which form will sub pane appear(Lookup - menu table, Book or in the book and lookup together). |
Preview_K2FormMode |
Option in which state will display sub view pane (Browse mode or Change mode or Browse mode and Change mode). |
Preview_PageNames |
The page number on which it will run the sub view pane. We can enter more pages, e.g. "Page0, Page1" - sub view pane will display on page 0 and 1. |
The parameter settings can be performed by pressing the right mouse button on the report/script in the sub view pane (see picture below). In the Report book we go to the 2. page and continue as in the Subview window definition.
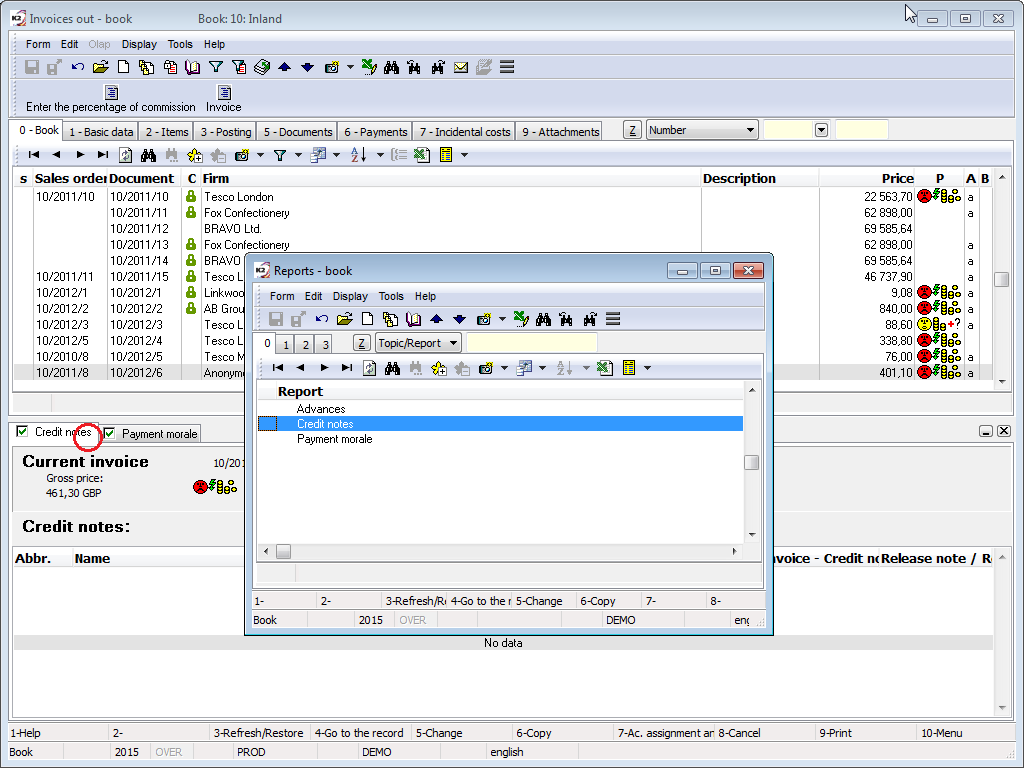
Picture: Sub view pane - the setting reports/script
Sub view pane can contain more scripts or reports. If we currently do not want to appear a data report/script (for faster work with the form) to cancel the "check mark" in the check box on the tab report/script. The tab apply hatching. For restart mark the field again.
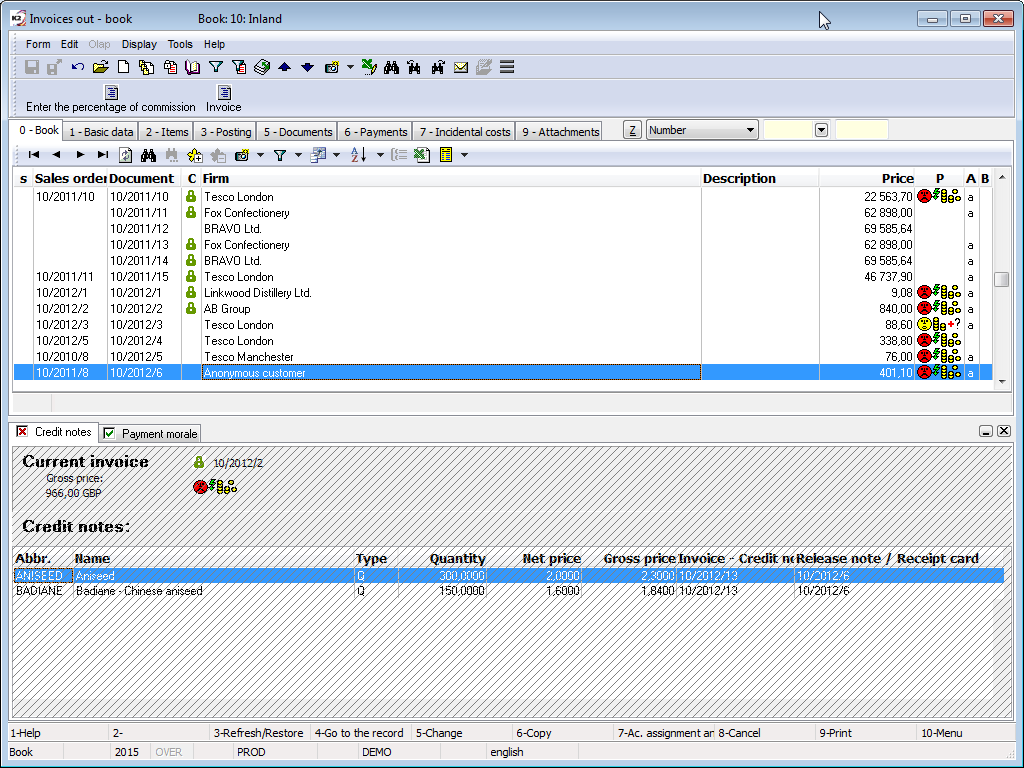
Picture: Sub view pane - inactive tab
The sub view pane can also be minimized or completely closed (the button in the red box in the picture below). When we close the sub view pane, the "check mark" is cancelled in option Show subview window in menu module. The sub view pane is turned on by checking the option.

Picture: Sub view menu - minimizing and closing
Minimized window can maximize re-using the buttons in the picture below. Also in minimized state can cross sub view pane closed.
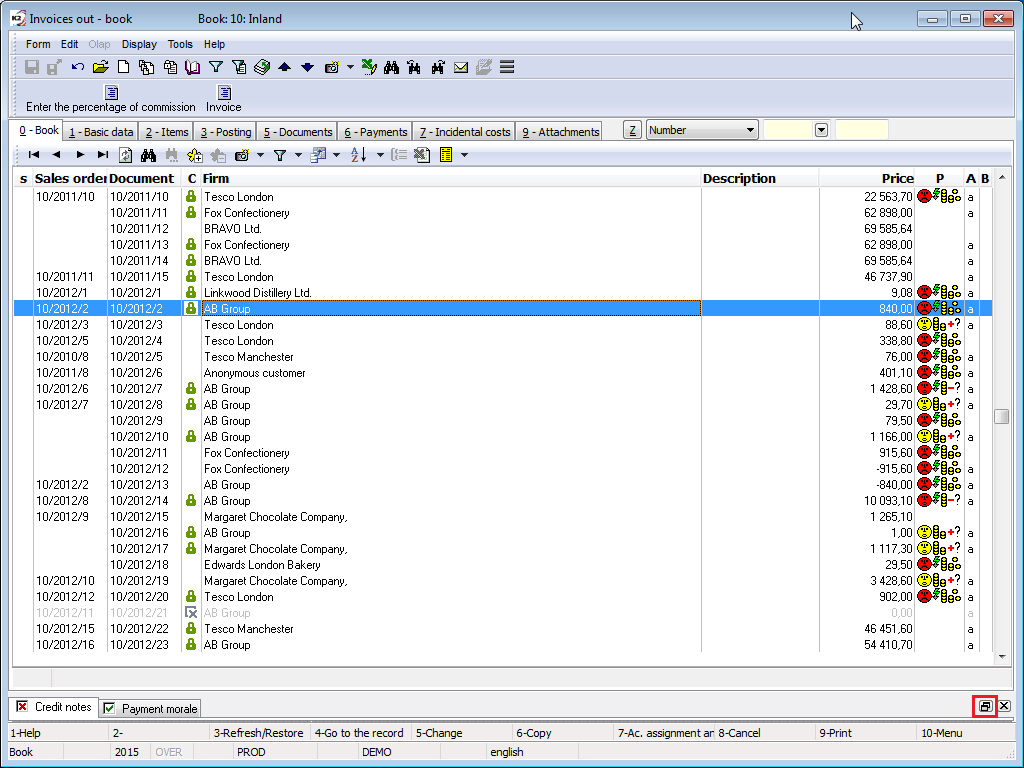
Picture: Sub view menu - maximize and closing
|
|
|
Universal forms
|
|
|
Import reports and scripts from the classic forms into the universal forms
Placing for scripts and reports in F9 in the classic forms is not identical to the placing for the universal forms. By using the function no. 1230 - Import reports and scripts, it is possible to import the placing in bulk from the classic forms.
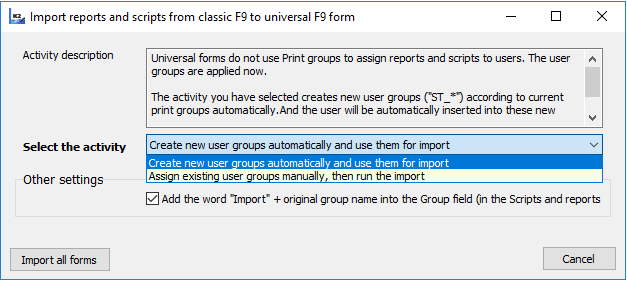
Picture: Import reports and scripts
"Printing groups" are not used for placing in Universal forms, but "User Groups" are used newly, that's why it is necessary to manually match original Printing groups with User groups within import of placing or enable automatic creation of new User groups. If the user chooses the option Create automatic groups, then new User groups accordant with Printing groups will be created in the User groups book by the system and they will begin with "ST_". Import of placing according to the selected action will be executed by using the button Run import of all forms.
Importance of activities:
Create new users groups |
The option creates new groups in user groups ("ST_ *") according to the current print groups automatically. It automatically assigns user to these new groups if he had assigned a given print group. And these new groups will be used in the blue F9. |
Manual mapping of user groups |
This option displays a tab of mapping where it is necessary to assign Printing groups to User groups and then the Universal F9 will use these one in the form. |
|
|
|
Print by F9 Key
Print reports and scripts can be activated by pressing F9 key on a book or on a document. Selection menu, which contains inserted output reports, will be activated after pressing this key. In the picture you can see the reports separation into so called Topics that are folders under which the appropriate report is placed. It is possible to expand (collapse) menu of the individual folders by double click of the mouse or by using Enter key.
A report or a script from the Reports book will be added to the list by using Insert key. A new report, script or batch from the database or from a file can be added to the list by using the option New in the module toolbar. For editing a script or a report you can use Alt+F5 or Shift+F5 key combinations or you can use right mouse button.
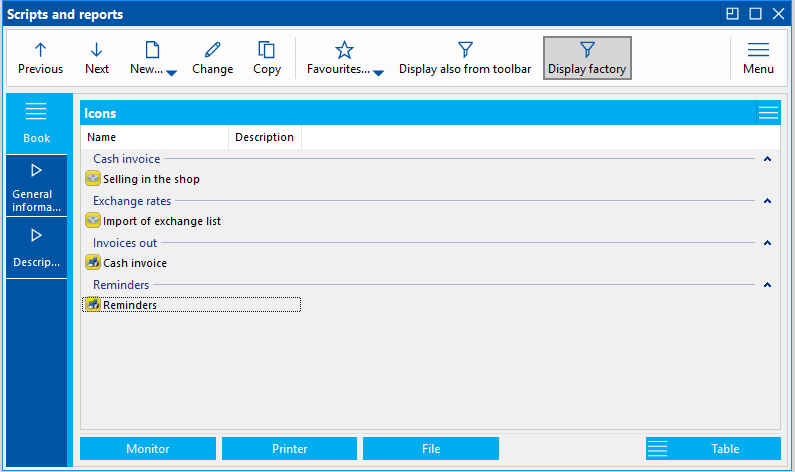
Picture: Display as an icon
Available functions:
Previous |
The light indicator moves to the previous record of the list |
Next |
The light indicator moves to the next record of the list |
New Ins |
It opens a book of reports and enables to select a report, script or other function from this book. |
New - report |
It opens a form to insert and define a new report from the database or a file. |
New - script |
It opens a form to insert and define a new script from the database or a file. |
New - batch |
It opens a form to insert and define a new batch from the database or a file. |
Change |
Change Record |
Copy |
Copy of a record |
Favourite - add to the bar |
It adds a report, a script or a batch, on which a light indicator is positioned, into the module toolbar |
Favourites - add to the bar into group |
It adds a report, a script or a batch, on which a light indicator is positioned, into the module toolbar into a group. A group, into which it will be added, is defined in the detail of a record. The tree structure of folders can be created in detail in the Group field and "/" can be used to separate the tree levels e.g. Documents/FVOstrava |
Favourites - not to display on the bar |
It cancels a placing of report, script or batch from the module toolbar |
Show also from the bar |
It displays/hides reports, scripts and batches, which are placed in the module Toolbar, in the list |
In the table view, you can see clearly the path to the file, placing into group and the level of classification.
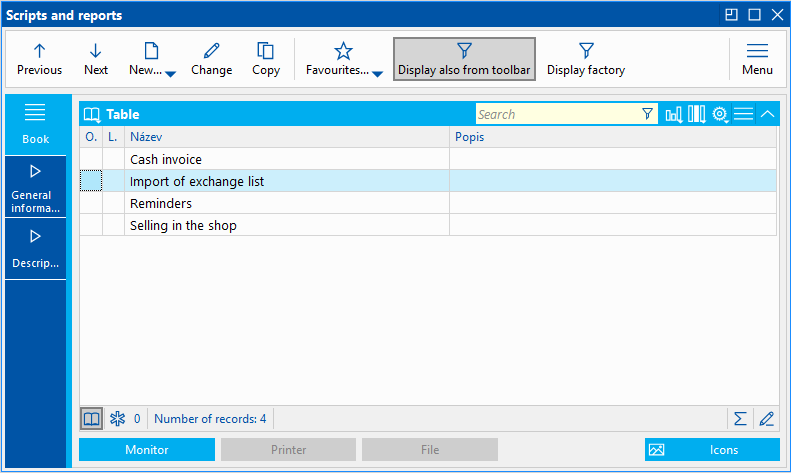
Picture: Display as a table
|
|
|
Confirm Alt+F2
The term document confirmation does not appear in standard accounting practice, but in the case of a program installed on a network with multi-users that have access to the documents, it means that it is impossible to make additional changes and adjustments in the documents. A confirmed sales order has the status of a definitely concluded business agreement; a confirmed invoice is available only in Browse mode but not in Change mode, etc...
Properties of the unconfirmed documents:
- They can be freely changed.
- They can not be settled and posted.
- In the case of release notes and credited receipt cards the article is only blocked on the stock but it has not been released. The same applies to transfer notes items with the release flag and to positive job cards items with the release flag.
- Receipt items of stock documents are not received to stock.
- Collective payment orders are not credited to the payments of invoices, etc.
Properties of the confirmed documents:
- They cannot be freely changed.
- They can be settled and posted.
- In the case of release notes, transfer notes and credited receipt cards the article is released from the stock. The same applies to positive job card items.
- In the case of receipt cards and credited release notes, the article is received to the stock. The same applies to transfer note items and negative job card items.
- Collective payment orders are credited to the payments of invoices, etc.
In the entire K2 system, the documents are confirmed by Alt+F2 keys and by pressing the right mouse button - Confirmation option on the page 0 of the document. Once a document has been confirmed, it is impossible to change it. The confirmed documents are marked by a special confirmation icon, i.e. they can be distinguished from unconfirmed documents at first sight.
![]() icon of confirmed document
icon of confirmed document
![]() icon of the first confirmation of stock document
icon of the first confirmation of stock document
Undo confirmation of documents can be done by pressing Ctrl+F2 keys or by selecting Undo confirmation option by the right mouse button on the page 0. The user has to be authorized to undo cancel. For undo confirmation of a document, confirmation date of which is older than the current date, the user must also have the right to change the confirmation date.
When the document is confirmed again (i.e. when confirming a document that has been undo-confirmed), the document is automatically confirmed on the original confirmation date. If a negative stock level should occur in the stock documents or the original confirmation date falls into blocked periods, the user can confirm the document at the current date - this action requires the right to Change the confirmation date of the relevant document.
Change confirmation date can be done by Ctrl+F5 key combination. For changing confirmation date the user must be authorized.
|
|
|
Restore - F3
Pressing F3 key over a table actualises that table. It means it restores a screen. It is possible to set a time slice for an automatic restoration in User Parameters. That way displaying the current states on the stock can be continually ensured without any action to the programme from the keyboard.
Pressing F3 key over a document results in the document restoration; it means putting the data in items to the same state as before the change executing.
|
|
|
Books Alt+F10
Books (rows) serve to documents separation to groups (e.g. in the case of contracts, orders, invoices, delivery notes, etc.) where they are individually numbered. The documents separation to the books can be liken to their structuring into "paper folders", where inland, foreign, internal documents, complaint etc. can be submitted separately.
When you expand Master Data in the tree menu, you can see all the books that can be set in K2 IS. Before you start work in K2 IS, it is necessary to set at least one book in every module and its numbering in order that new documents will be created correctly. Books properties can be also defined directly in the appropriate module menu, respectively in a part Master Data – Setting...
Information about the current opened book is displayed in the upper blue bar of the appropriate document. If you open e.g. the book of Invoices Out, then upon the activated Book mode, the current book (binder) description is displayed in the upper blue bar - for example Book: 10 - Inlands (It means the book abbreviation and the book description). Thus all inland invoices are displayed in the table.
If you need to switch between individual books; it means to display documents from another binder (for example foreign invoices), you press Alt+F10 keys. Thus you activate the selection menu with defined books where you indicate the selected book by Arrows. After the selection confirmation by Enter key, documents form of the new book (binder) will be displayed and the light indicator will be positioned on the last record in the menu.
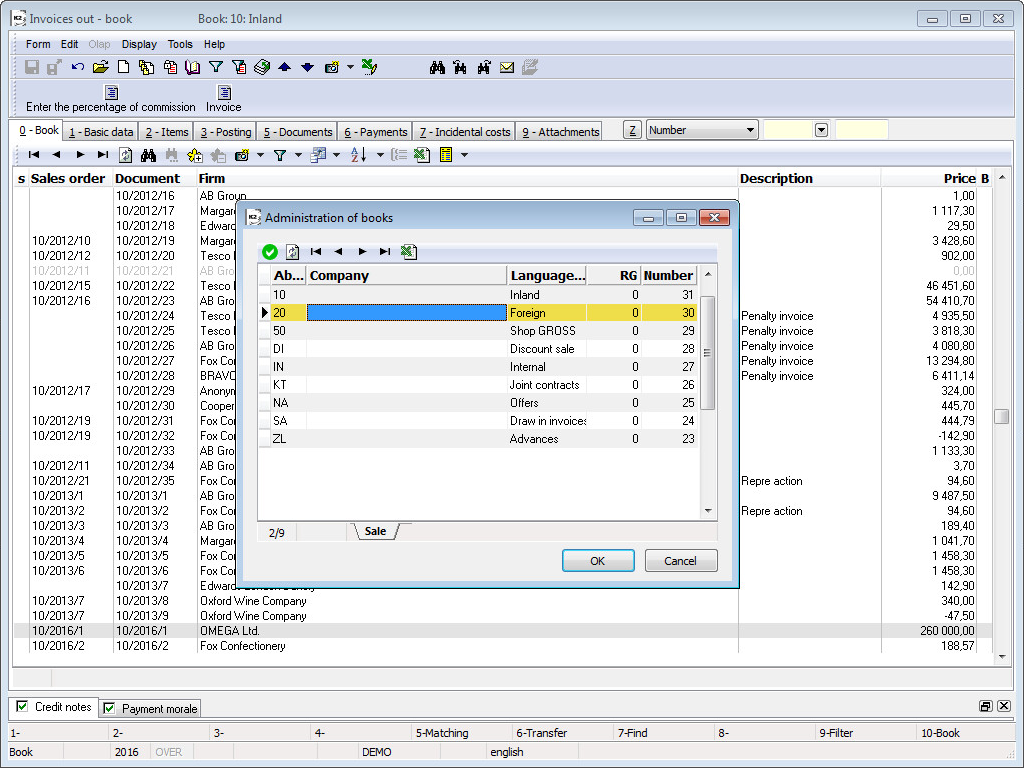
Picture: Book Selection over Invoices Out book – Alt+F10
Documents’ numbering in particular books is delimited. The numbering can be set in individual books definitions (tree menu Master data) where you can define new books and set numbers of the last documents in the appropriate book. For the documents that are filed from the calendar year beginning, you start numbering from the number "one".
Correspondingly if you start documents issuing in the middle of the year (e.g. in the course of changeover to K2 IS from another system), in books it is possible to set the documents numbering from a concrete number and thus to establish connection with the documents numbering from the previous system.
|
|
|
Business year
Business year used to define the year in which the documents are to be issued. We define business year in module Basic data - Business year, where each year uses a new record. Zero business year is always required.
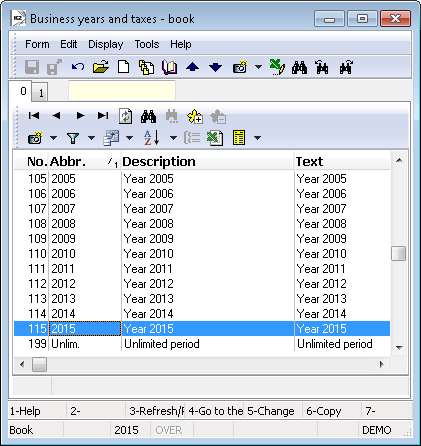
Picture: The Business year code list
On the 1st page of record we can in the fields Date from and Date to enter a range of business year. When you save a new document is then checked whether the document date falls within the interval period that the user has set (check applies to documents that are accounted for).
Picture: Code list Business year - 1st page
Setting numerical series of documents:
In the books caused the tree menu Basic data - Books ... for each business year sets new numbering of documents as if it was a new book, only the label of the book is the same for all business years. In individual books we can specify the interval business year. This means that one numbering may be continuous over multiple business years. If no book with a business year (only the zero) are in this book documents issued continuously regardless of the user setting period.
Creation of documents in business year:
Each user choose actual business year in module Administrator - User parameters. This business year is always displayed in the status bar (at the bottom of the screen). According to the current business year is setting up in what numerical series will be a new document created.
For every user, you can set up in which the numerical series will be create new documents. One user can issue new invoices in the new year, while someone else may have some sort of new invoices to the previous year, or account for to the old year and so on.
Superior document (Sales orders) can be opened in one year and then create sub-documents in the coming years. Although these documents will be created at different times, but in one book, so they will be connected to a superior document (sales order).
The business year need not only change in the User parameters, but also press the right mouse button on a business year in the status bar. From the displayed code list we choose by pressing Enter key desired business year. Selected period is automatically put into the User's parameters.
Attention: Setting business year in the status bar does not function as a filter, i.e.. after the election of business year, the screen displays all the documents not only for the selected year.
|
|
|
Periods
Periods serve to evaluations of various states in determinate periods of time. Monthly slices are the most often defined periods. A longer slice is not suitable especially because of the accounting when it is necessary to execute subtotals of the general ledger at the very latest in the monthly intervals.
The periods are defined in the module Administrator – Code Lists – Periods. In the course of definition of new periods they can be created automatically by Ctrl+F6 keys. After pressing the keys mentioned above, a system notice will be displayed whether you wish to create periods for the next year. After the affirmative confirmation of the query the periods will be created automatically.
Following evaluations are made after the periods:
- Goods sales and purchases turnovers.
- Goods receipts and releases turnovers.
- Withdrawals turnovers from individual suppliers.
- Turnovers of individual customers.
- Stocktaking the articles on stocks.
- Movements of the articles on stocks.
- Turnovers on accounts (Preliminary Balance Sheet).
- Economic analysis.
All the evaluations made in a selected module then refer only to the data from the preset period.
The selection menu for periods setting can be activated e.g. in accounting in General Ledger, on 2nd up to 4th page of Cont./Cust. card, or in Goods book (and further also on 6th up to 8th page) etc... In all the cases mentioned above, Alt+F10 keys serve to activating the selection menu. Set interval of periods is always displayed in the upper blue bar of the screen. Only the data that refer to the selected periods can be seen in the table (form).
Set Periods over Goods Book:
The selection menu over Goods book enables to select a random period and thus to display the state on a defined stock at the end of the selected period. If you choose an actual period to the current date, current states on the stocks will be displayed.
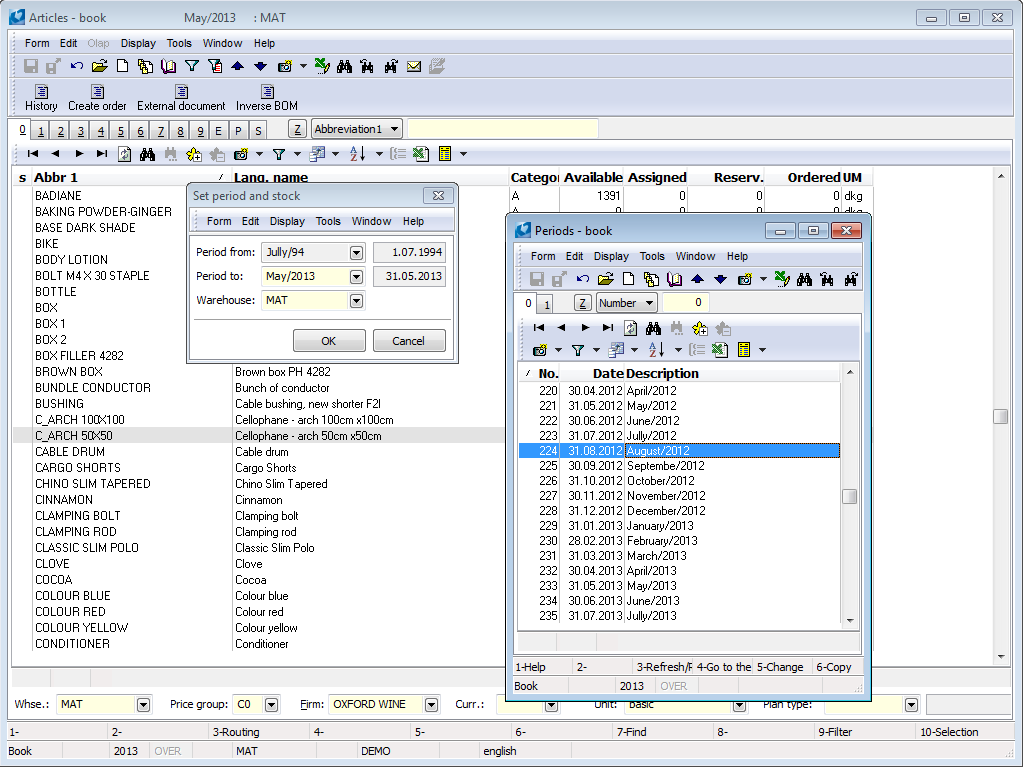
Picture: Selection Menu for Period and Stock Setting over Goods Book – Alt+F10
Set Periods over General Ledger:
The selection menu over General Ledger and in analysis enables to set a monitored period duration. In the field Period From you set the month when, on its first day, the period starts; in the field Period To, you set the month when, on its last day, the period ends. Further, it is possible to set a book from which the data are to be displayed.
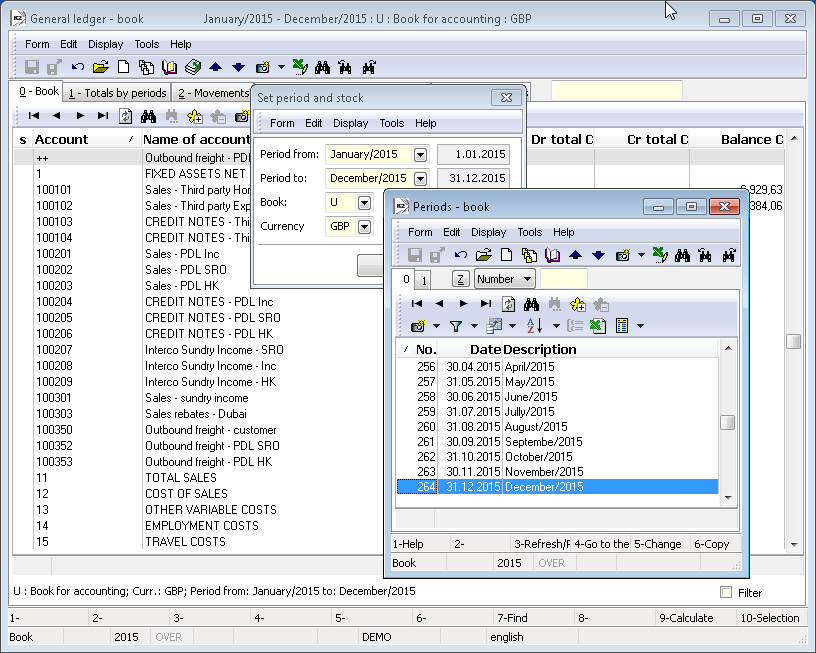
Picture: Selection Menu for Interval of Periods and Book Setting over General Ledger – Alt+F10
|
|
|
Addresses
For example, entering an customer address. We use an address form. It is used in these modules:
Suppl./Cust., Contact persons, Service orders, Warehouses, Personnel data, Internal documents, Cash documents, Letter post, documents purchase and sale, Consignments.
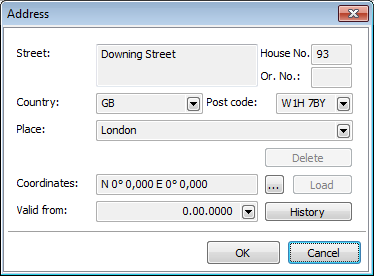
Picture: Address form
Note: If you select a Post Code from menu, a Place is automatically entered according to the code list. Simultaneously if you select a Place from menu, the Post Code is entered. You can also add an arbitrary Post code to a Place. Then the Post Code is highlighted in red. Next possibility is to fill the Place and Post Code manually without selection from a code list.
Buttons Description:
Delete |
Delete all the data on the form. |
... |
The button opens a web page "maps.google.com", and if is the address already saved, locates the specified address on the map. |
Load |
Loads the coordinates for the entered address. |
History |
Recording the history of addresses, see below. |
History of address
History button serves not only to outline changes to the data in history, but also for the setting of saved records. After pressing the button opens the form History of the address.
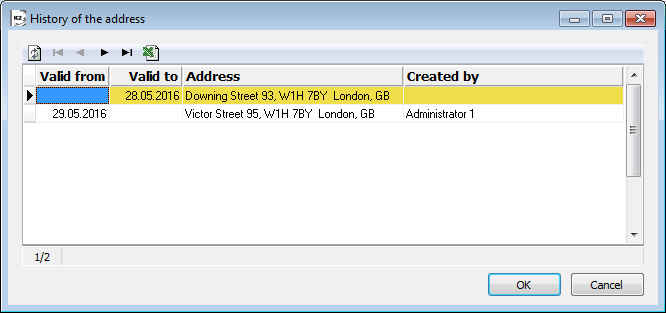
Picture: The form History of the address
Validity addresses can change at any time. If we change the field Valid from, field Valid to on the previous record will automatically adjust, and vice versa.
Note: When we creating a new address, every time we fill in the fields Valid from. If we leave the zero date, changes the last saved record.
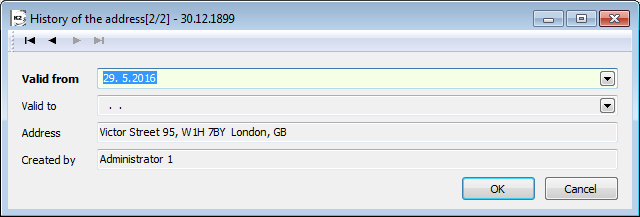
Picture: Form for change records validity
|
|
|
Documents Specimens
For any document types you can create so called documents specimens that are used for quick pasting and creating new documents. Because of the fact that the specimens are created for every book separately, every book has to contain at least one defined document that can be used for a specimen creation. (In case there is no record in the book, a whole new document can be created by means of script. Very good knowledge of the script is expected!)
Note: Specimens are saved as "xml" files to "Samples" client directory. Each record has its own unique number upon which single "xml" files are named.
Note: For better understanding a specimen and a document creation procedure from the specimen will be described over invoices out.
If you press Shift+F6 keys in the book of documents, a menu of general specimens appears. Then from the book of specimens select a certain existing (offered) specimen by Enter key, and thus create a new document.
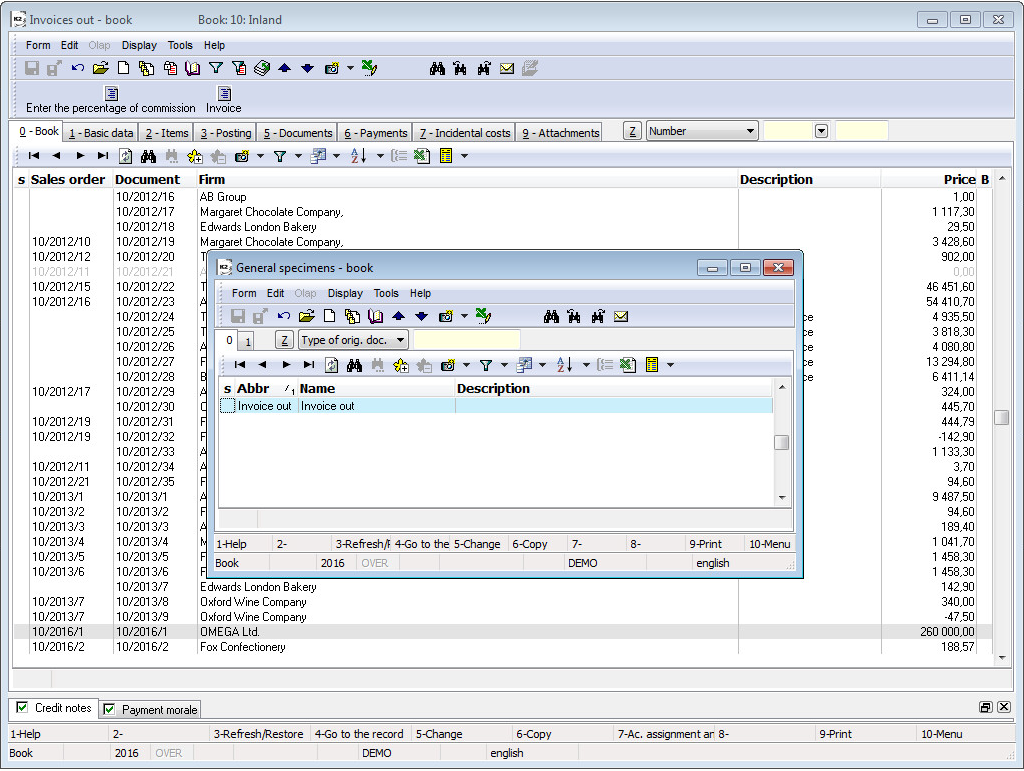
Picture: Book of Invoices Out Specimens
|
|
|
Create New Specimen
In the book set the cursor on a document which serves as a basis for specimen. Book of specimens is recalled by pressing Shift+F6 keys. For the creation of a new specimen, press Ins key and fill in the 1st page of the future specimen.
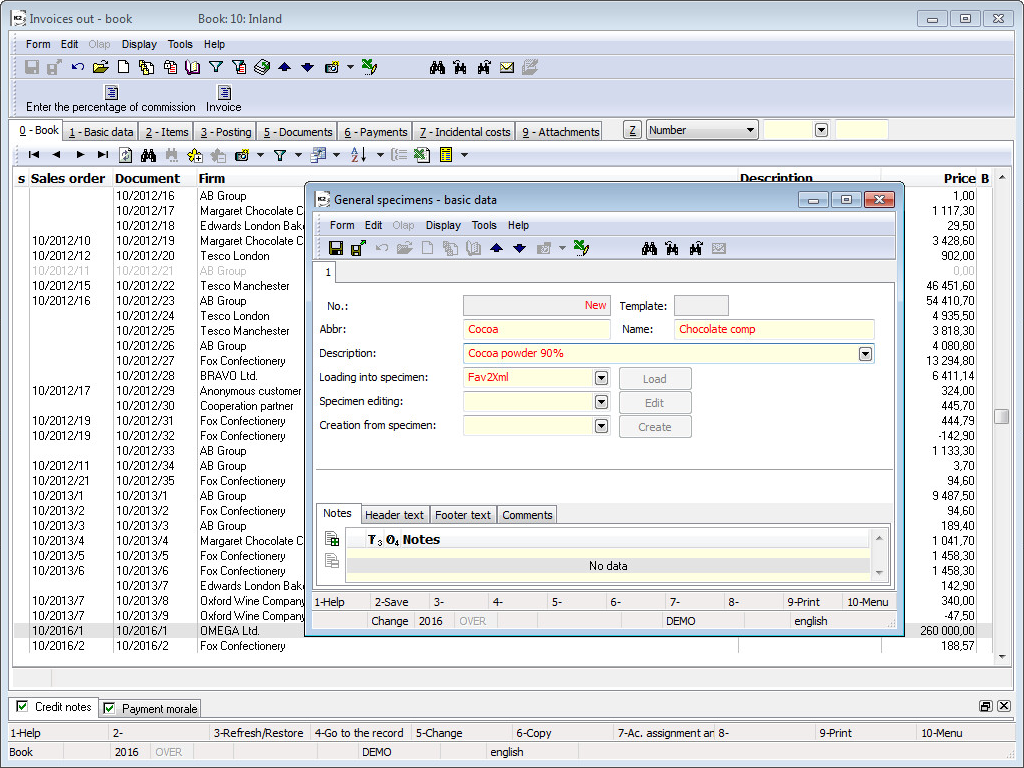
Picture: Creation of a new specimen for Invoices out
Fields Description:
No. |
Automatically assigned ordinal number of specimen. |
Abbr |
Abbreviation of specimen. |
Name |
Name of specimen. |
Description |
Further description of specimen. |
Load to Specimen |
Start the book of Scripts, Reports by means of F12 key or the button next to the field. You can select the script, which defines the document fields to be loaded in the specimen, from this book. In the book of scripts and reports, specimens for all standard documents are included. These preset scripts are searched according to the key word "specimens". If no script is selected in this field, the heading of the document, which the cursor is set on, is saved as a specimen to the book of General Specimens. |
Edit Specimen |
Edit only specimens that have been created by a special script by this button. This operation requires very good knowledge of the script. (A new specimen cannot be edited by this button. However you can re-save an existing specimen by the Load button.) |
Save from Specimen |
If a concrete script is selected in the Load from Specimen field from the book of Scripts, Reports, the loading of fields from the specimen can be influenced by this script. If the field remains empty, only the document heading is loaded. |
The fields of a selected document are loaded and saved to a specimen by means of Load button. If the fields are loaded to a specimen by means of a script, a message about successful loading appears. If no script is selected in the Load to Specimen field, the operation will be executed, but the message will not appear.
Note: It is not possible to create original specimens. It is only possible to change and to edit them.
The Save Button has the same meaning as pressing Enter key on a selected specimen - it will create a new document from specimen.
|
|
|
Create a document from the specimen
By Shift+F6 keys in a book of the documents you can switch to a book of the specimens. You get the light indicator on an appropriate specimen and then you confirm a selection by Enter key. This way a document form opens on the 1st page in Change with data preset from the specimen. The user must complete other obligatory fields which are not entered.
Note: In User Parameters – General it is possible to mark the option Substitute Keys Insert / Shift+F6. That way the substitution of those functions will be executed – it means that after pressing Ins key the book of specimens will be activated and by pressing Shift+F6 keys a new document will be created.
|
|
|
Module Menu Functions
If you are located inside of a module, it means in the module table or in a document page, you can see Module menu of K2 System in the grey upper bar. It can be used for opening of the menu functions Form, Edit, Display, Tools, (Window) and Help. You can get to individual module menu functions by pressing Alt key or by a click by the left mouse button on the appropriate menu function. Further you move by Arrows (or the mouse) forward. Back to the table you can get by Alt key or by double click on Esc key.
Module menu functions over individual modules are similar. Common properties are stated in the following text, specific module menu functions will be described in corresponding chapters of the appropriate modules.
|
|
|
The Form

Picture: The Form of the Invoices Out module menu
|
|
|
Bulk Actions
Bulk actions are used when you need to execute the appropriate action (function) over more records (documents) all at once. Menu of bulk actions is in various modules partly different. Some actions included in this menu perform the same function as shortcuts that are commonly used.
Bulk actions can be activated by the following way:
- if a container has been created (and records are not marked), all records in the container are processed
- if some records are marked with asterisks, the bulk actions are executed on the marked records.
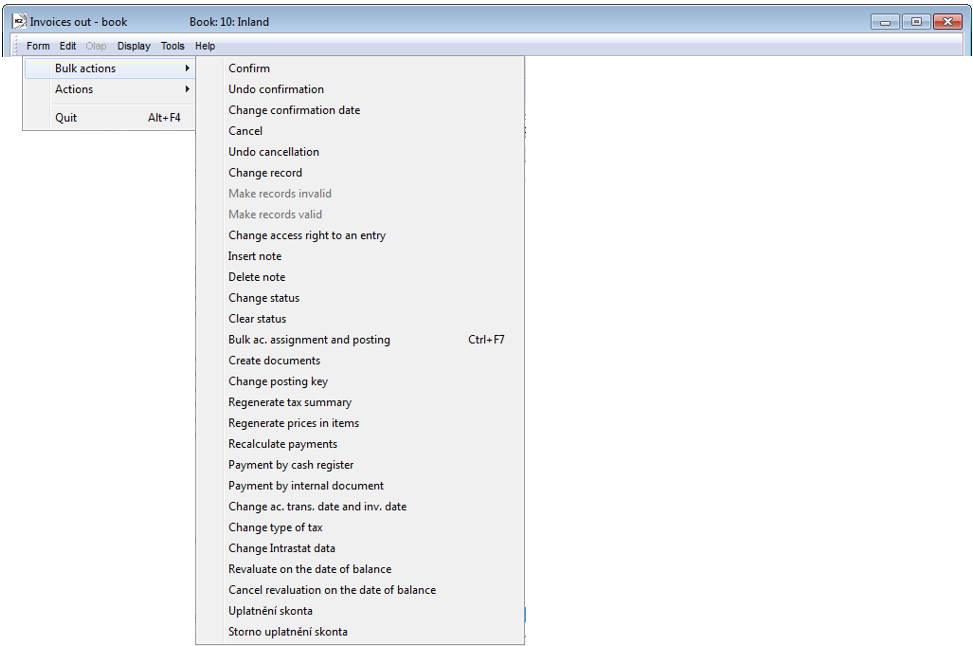
Picture: Bulk Actions - The form of the Invoices Out module menu
Actions |
Description of an action |
Confirm |
Document confirmation (lockout) (analogous function to Alt+F2). This function sets an icon of a document confirmation and the date of confirmation of a document. The documents will be removed from the container after the performed action. |
Confirm without Remove |
Document confirmation (analogous function to Alt+F2). The selected documents will remain in the container after the performed action. |
Undo confirmation |
Undo confirmation of a document (analogous function to Ctrl+F2). This function cancels a flag and the confirmation date of a document. |
Change Confirmation Date |
It enables to change the confirmation date in the confirmed documents (analogous function to Ctrl+F5). |
Cancel |
Bulk cancellation of the selected documents (analogous function to F8) for which an icon of cancellation will be set. |
Undo cancellation |
It removes the cancellation of the cancelled documents (analogous function to F8). The icon of cancellation will be removed from those documents. |
Change Record |
It enables a bulk change of the selected items in records of the individual modules (see the menu of each form). |
Make records invalid |
It makes record invalid (analogous function to F8); it means that it forbids to use the record for the other work. This function is used e.g. for articles cards or for suppliers/customers cards. |
Make records valid |
Making an invalid record valid again (analogous function to F8). The record can be used after the performed action. |
Change access right to an entry |
Assignments of the group of rights for browsing and changing for the selected cards. Those cards can be browsed and changed only by those users that have been assigned to the appropriate group of rights. Other users see only crosses instead of cards. The record rights can be granted on 4th page of the Users book. |
Insert Note |
A note of the same type will be inserted to the selected records. |
Delete Note |
The bulk deletion of notes from the selected records. The form Delete Notes in Bulk, where you can define a type of note to be deleted, will be activated after running the function. If you complete the field Form, notes with the same input form will be deleted. It is also possible to set an order of a deleted note. But, if the field Line is not filled, the first note of the selected type will be deleted. In this form it is also possible to set whether the records will or will not remain in the container after the executed action. |
Change Items |
Items, which a user specifies in a form, will be changed. The user can Add, Update, Remove the items. |
|
|
|
Actions
Additional functions, which can be activated directly over the given module, are included in the selection menu of the module Action. Some of the functions can be suppressed over the module. For a clarity, actions are classified into particular groups:
- Basic - basic simple actions, e.g. save changes, restore, change, ...,
- Advanced - confirmation, undo confirmation of a document, ...,
- Container - functions over containers.
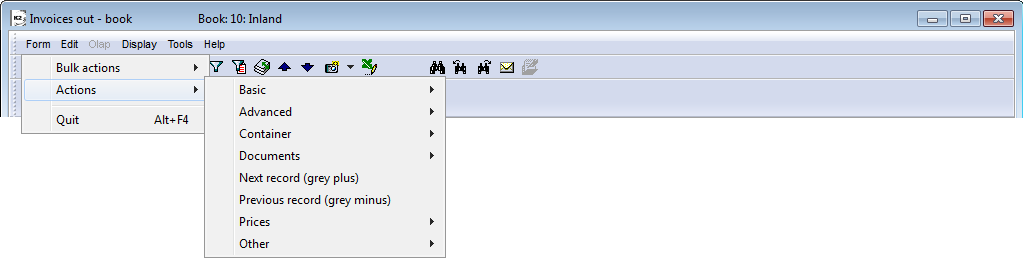
Picture: Actions - Form of Invoices Out Module Menu
Other specific function for the given module may be included in the action menu, such as switching prices, switching between Purchase and Sales documents, recalculations over the Articles book, etc. For the sake of clarity, an overview of the actions above the Invoices Out book is given below.
|
|
|
Basic
Basic actions concern simple functions, for example save changes, restore, switch between a book and record. For each action, shortcut key is given by means of which it is possible to activate this function.
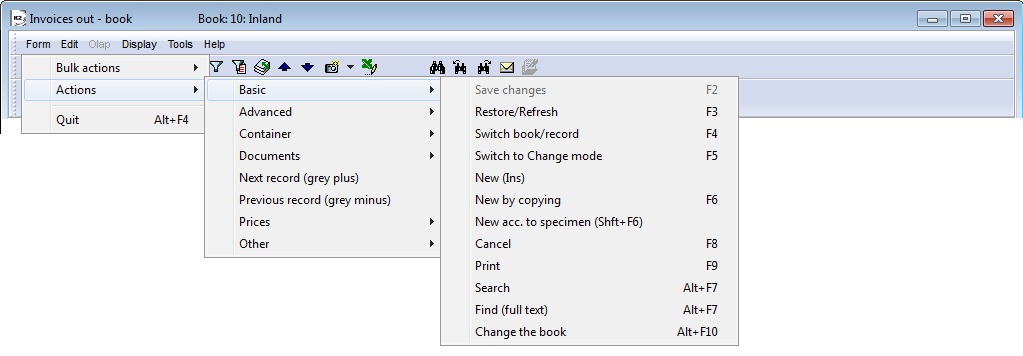
Picture: Basic actions – Form of menu module Invoices out
|
|
|
Advanced
Functions, which are related to confirmation (undo the confirmation) of documents, switching between containers, setting of conditions for containers etc., are included with advanced actions. Shortcut keys are given for particular functions.
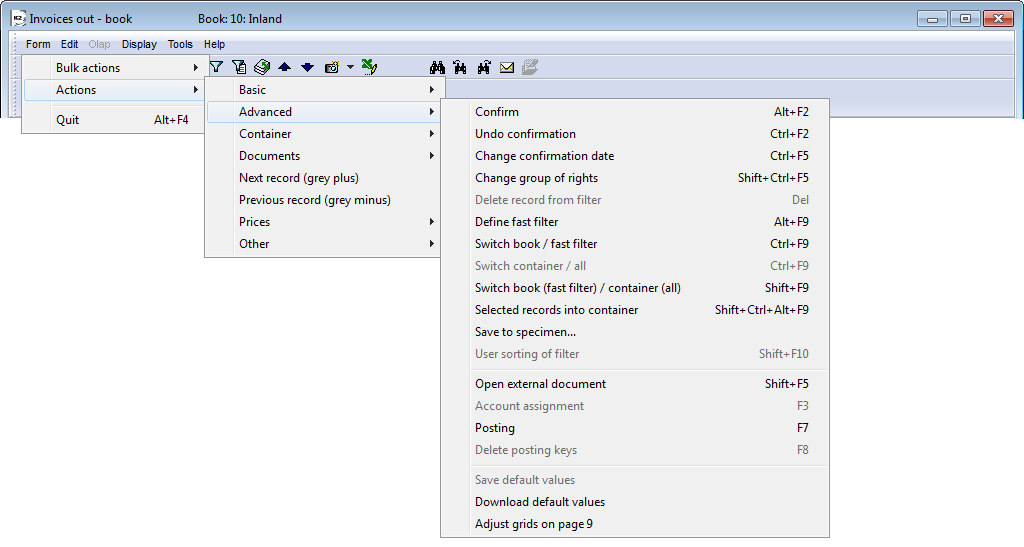
Picture: Advanced Actions - The form of Invoices Out Module Menu
Note: Description of the specific functions is stated in following text.
Actions Description:
Save to specimen |
The General specimens form to save the specimens of documents will be open by means of this action. (For the further description see Create New Specimen chapter.) |
Open External Document |
It is possible to attach various external documents to every document on the 9th page. By means of this menu, it is possible to open the external document. Further description of the work with external documents is stated in the Basic Code Lists and Supporting Modules K2 - 9th Page chapter. |
Close External Document |
It follows up on the function Open external document. If an external document is open from IS K2, it will be closed by the function Close External Document after you finish work in it. |
Open External Document without |
An external document is open on 9th page. When running this function, it is not necessary to close the previous external document. |
Save Default Values |
Some items are preset as default by the programme; it means that a user or the administrator preset a specific value to them. If you activate this function in New record or in Change mode after entering the individual items to the document or to the code list, the items values will be saved as default. From the book or from the Browse mode it is possible, by loading default values (the Load Default Values function), to create a new document where the pre-set default values will be copied to the fields that are forbidden for the user. The forbidden fields for a user can be defined on 6th page of the Users card (in the Administrator module). |
Download Default Values |
This action is analogous to F6 key (a new document). By activating the Load Default Values action, the default values (but these must first be saved) will be automatically pasted to the forbidden (inaccessible) fields in a new form. In User Parameters it is possible to set if only obligatory fields or also other preset default fields (flag Default values only by requested fields) will be pasted. |
Adjust layout of page 2 |
This action is available for invoices out only. Starting an action will set the default layout of the 2nd page of invoices out. It is recommended to run if the K2 program is running on an atypical monitor resolution or when the layout of the 2nd page of the invoice out have been customized. E.g. height adjustment of the advances section on the 2nd page of the invoice out. |
Restore form layout |
After starting the function and reopening the form, the form is defaulted. Suitable for use by K2 users, where e.g. parts of the forms are overlapped, or some part of the form is not available for unclear reasons. |
|
|
|
Filter
Other actions, which you can activate over the module, are accessible in Container menu. It is work with containers of documents.
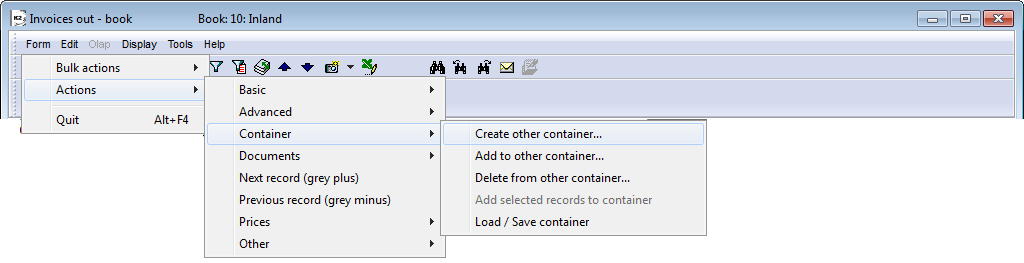
Picture: Container - Form of the Invoices Out module menu
Create other container:
Some document items have also links to the other databases. Thanks to this fact, it is possible to get information by using other containers (see the Basic functions - Filters Alt+F9 - Other containers chapter). By using this function you can find out e.g. which articles from the invoices out have already been invoiced.
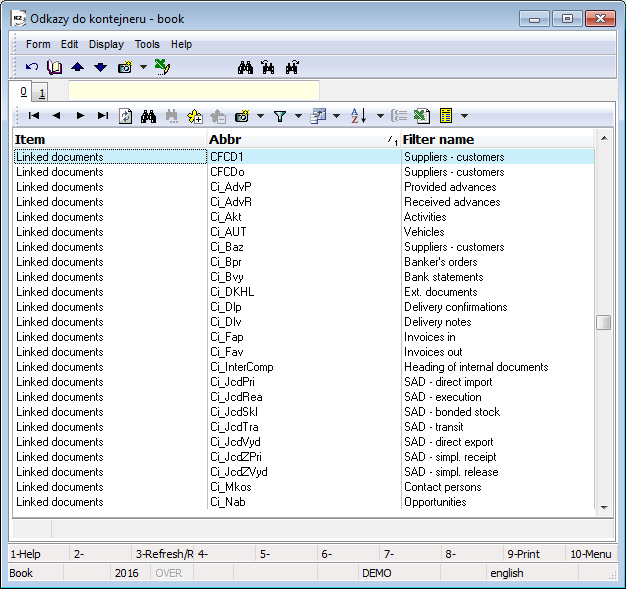
Picture: References to Container code list
Procedure how to create this container is as follows:
- Select the invoices out, invoiced goods of which you are interested in, to the container.
- From the Actions module menu select the option Create Other Container.
- In the References to Container book search the item Sales Items - Articles, position the light indicator on it and confirm the selection by Enter key.
- A control report will be activated. Answer it in the affirmative.
- After the action executing, the container of the invoiced goods has been created in the Articles book.
Description of Other Actions:
Add to other container |
The other items can be added to the already created container by using this function. E.g. if you need to add other invoiced items to the other container of articles, add another document to the container of invoices out. Then select the function Actions - Add to other container over the container of invoices, select the item marked Sales Items - Articles again and confirm the selection. After positive approval of the query, the items from a new invoice will be added to the container of articles. |
Delete from other container |
This event works in a similar manner as the previous one except that the corresponding records will be deleted from the created container. It means if you run this function over container of invoices out, all cards, which have been assigned on the appropriate invoices out, will be deleted from the container of articles after selecting an item indicated Sales Items - Articles. |
Add selected records to container |
Via this action it is possible to add records indicated by asterisks to a container. So it performs the similar function as the hot key Alt+Ctrl+Shift+F9 (however, this one also serves for creating a new container that contains only the selected records). Example: If you need to add e.g. other documents to the container of invoices out, indicate them by asterisks (e.g. by using Ctrl+SpaceBar keys) and select the action Add selected records to container. After positive approval of the query, the new records will be added to the container. |
Load / Save container |
It is possible to create backups of each container when working with containers. This action can be executed over the book of filtered documents when you activate the function Load / Save container. This opens the Load and save filterbook, where all the existing backups of containers are displayed. It is possible to add a new record to this book by Ins key where you enter an ordinal number and a description of a container. The backup is saved by F2 key. The newly created record will be assigned to the book. If you want to reload the container, select the option from the module menu Actions - Load/Save Container. Select the required container in the table by the light indicator and confirm the selection by pressing Load button. If you wish to remove a saved container, then position the light indicator on it in the Load and Save Filter book and press the Delete button. Thus the container backup will be removed. |
|
|
|
Documents
Switching among modules is default executed via K2 Main menu. Menu Documents speeds up switching of related modules via hot keys directly from the form.
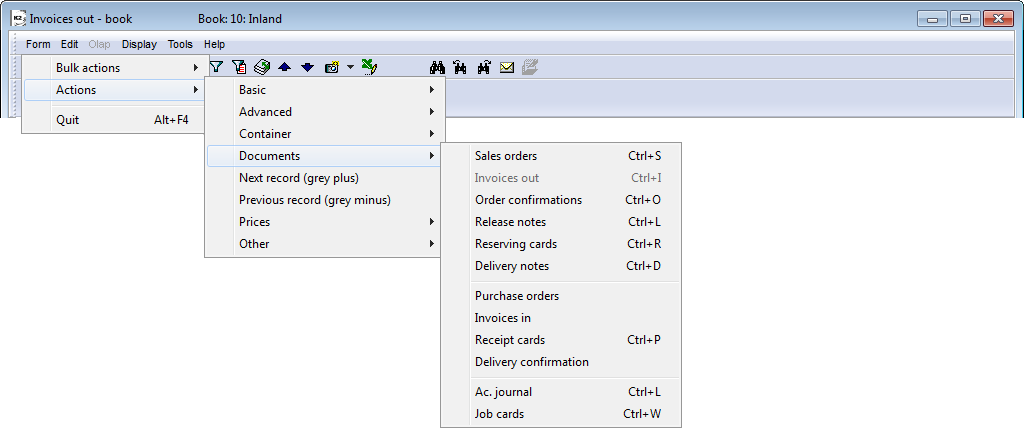
Picture: Documents - Module menu form Invoices out
|
|
|
Next record
The function Next record enables switching to next record in the table. When browsing through a document, you scroll between individual documents in ascending order. Scrolling between individual records in ascending order enables also Grey plus key.
|
|
|
Previous record
The function Previous record enables switching to the next record in the table. When browsing through a document, you scroll between individual documents in descending order. Scrolling between individual records in descending order enables also Grey minus key.
|
|
|
Prices
Prices deal with all the modules that work with purchase or sale items. Switches for the display of different prices in the table of items on 2nd page of those documents are displayed here.
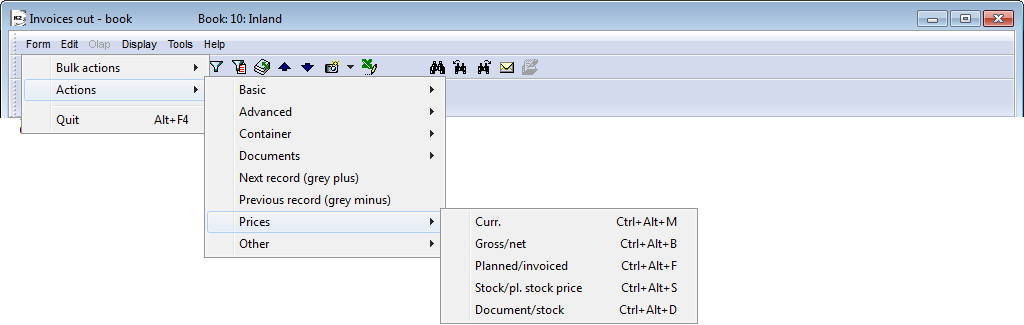
Picture: Prices - Module menu form Invoices out
Functions overview:
Ctrl+Alt+M |
Switch between currencies. |
Ctrl+Alt+B |
Switch between Gross/net price. |
Ctrl+Alt+F |
Switch between Planned/invoiced price. |
Ctrl+Alt+S |
Switch between Stock/planned stock price or Stock/by-costs price. |
Ctrl+Alt+D |
Switch between Price/Stock price. |
|
|
|
Other
Other additional functions are submitted in the menu Other. In the case of Invoices out it deals with a transfer to partner's card and further with items decomposition according to cost centres and a contract code.
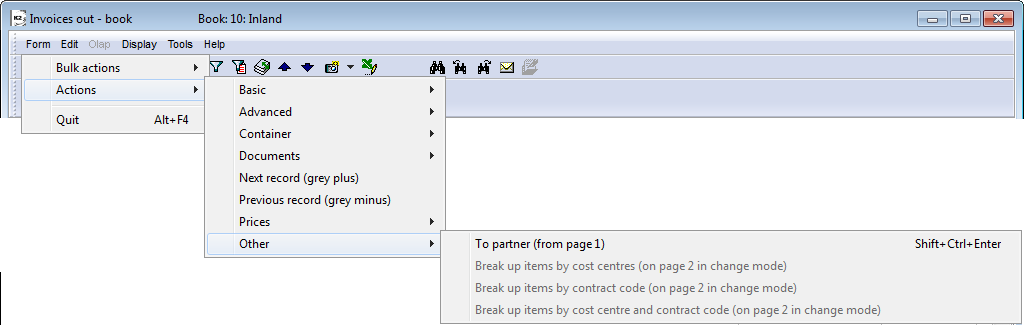
Picture: Others – Module Menu Form of Invoices out
|
|
|
Exit
Activating of this function will close the current book or form. You can make use also of Alt+F4 keys in order to close it.
|
|
|
Edit
Hot keys that can be used for work with text are listed in the menu Edit. Keyboard abbreviations and their assigned functions are identical to Windows environment.

Picture: Edit - Module menu of Invoices out
Description of functions:
Ctrl+X |
An abbreviation for cutting of the selected text and putting it on the Clipboard. |
Ctrl+C |
It copies the selected text and puts it on the Clipboard. |
Ctrl+V |
It inserts the Clipboard contents. |
Note: The same menu will be displayed after clicking by right mouse button, in Change mode of the forms, in the area of fields which are editable (they are white lighted).
|
|
|
Display
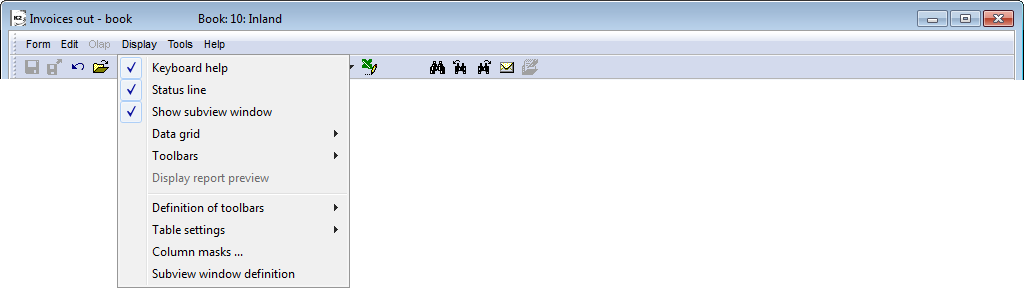
Picture: Display - Invoices Out Module Menu
|
|
|
Keyboard Help Bar
Activating or deactivating the bar display in the lower part of the screen. Digits with serial numbers 1 up to 10 correspond to the functional keys F1 – F10; a short description of the activated function is displayed next to every digit. After pressing the typing-aid keys Alt, Ctrl or Shift, the description keeps changing in accordance with the actually pressed key.

Picture: Keyboard Help Bar over Book of Invoices Out
|
|
|
Status Bar
Turning on or turning off the status bar display at the bottom part of the screen with information about a module status. The status bar is divided into several parts.
![]()
Picture: Status Bar
Description of status bar´s fields:
Part |
Function |
Example |
See the chapter |
1 |
Book status information |
Book, Container, All, Fast Filter, Filter |
|
2 |
Search Change documents (*) |
Search Change |
Fast Search Alt+F7 Programme basic control |
3 |
Current Business Year |
2004 |
Business Year |
4 |
Active/Inactiv overtyping |
OVER |
Book |
5 |
Number of selected records |
5 |
Marking records |
6 |
Abbreviation of warehouse selected in Articles book |
MAT, PROD |
Articles Book |
7 |
|
|
|
8 |
Abbreviation of client where you are currently working |
DEMO |
|
9 |
Number of records in file |
12 |
|
10 |
Toolbar button help |
Change (F5) |
Toolbars |
(*) Change will be displayed at status bar at the time of the change of every documents item.
|
|
|
Toolbars
Activating or deactivating the display of toolbars with icons (buttons) for basic functions of a module. From this menu it is possible to set the display of standard and user toolbars. If no user function is defined, the display of the user toolbar cannot be activated.
|
|
|
Define Toolbars
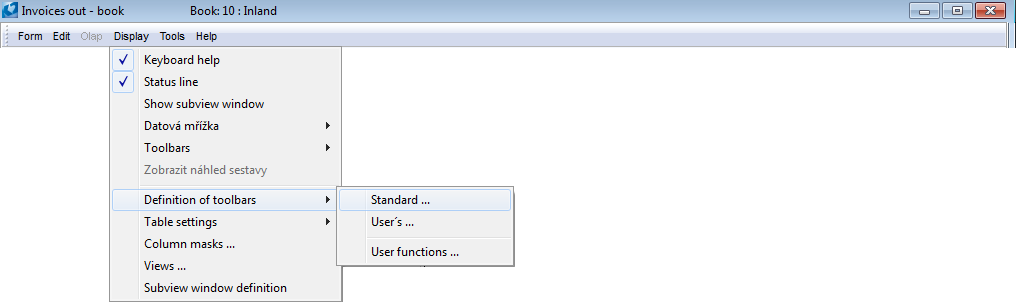
Picture: Define Toolbars – Display - Module Menu Invoices Out
Individual toolbars definition is activated in Display module menu or by double clicks by the left mouse button on the appropriate toolbar. A form serves for the selection of functions for particular toolbars. The functions can be added to the toolbar or removed by buttons Add, Add All, Remove, Remove All. Functions configuration is set by buttons Up and Down.
|
|
|
Standard Toolbar
Functions defined by K2 Programme producer are stated in Standard Toolbar. As examples there are for example functions Save, Restore, Change, Confirm, the functions for work with documents.
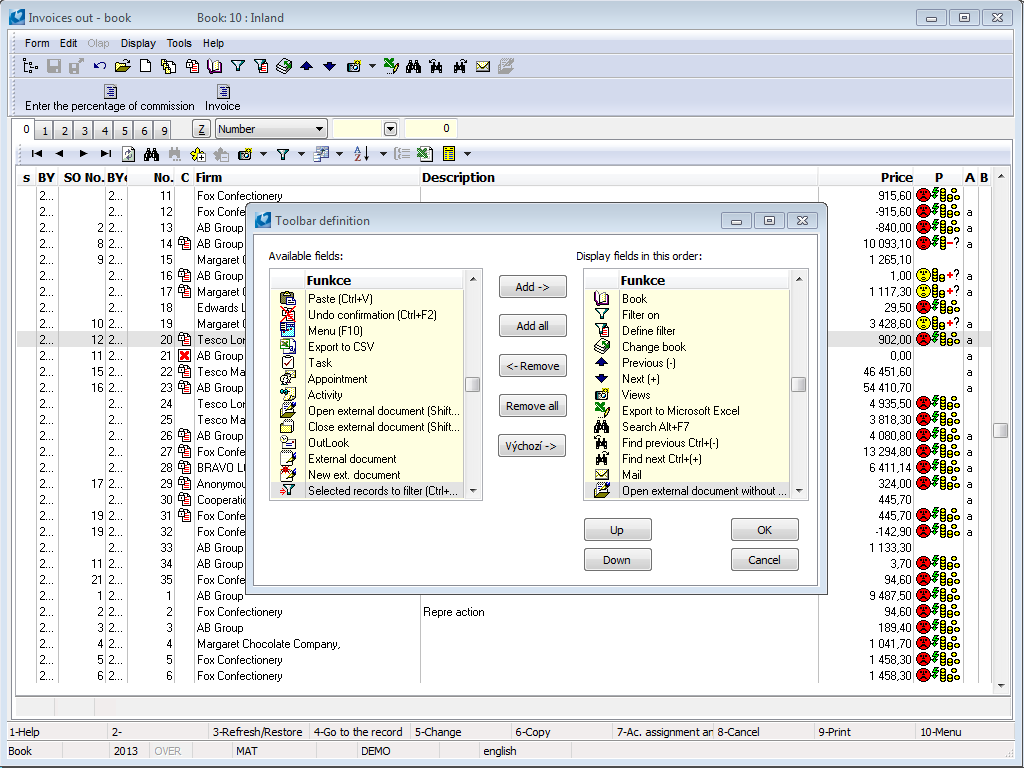
Picture: Standard Toolbar Definition
If you click by the mouse right button on the standard toolbar, all offered functions will be displayed that can be directly activated by it.
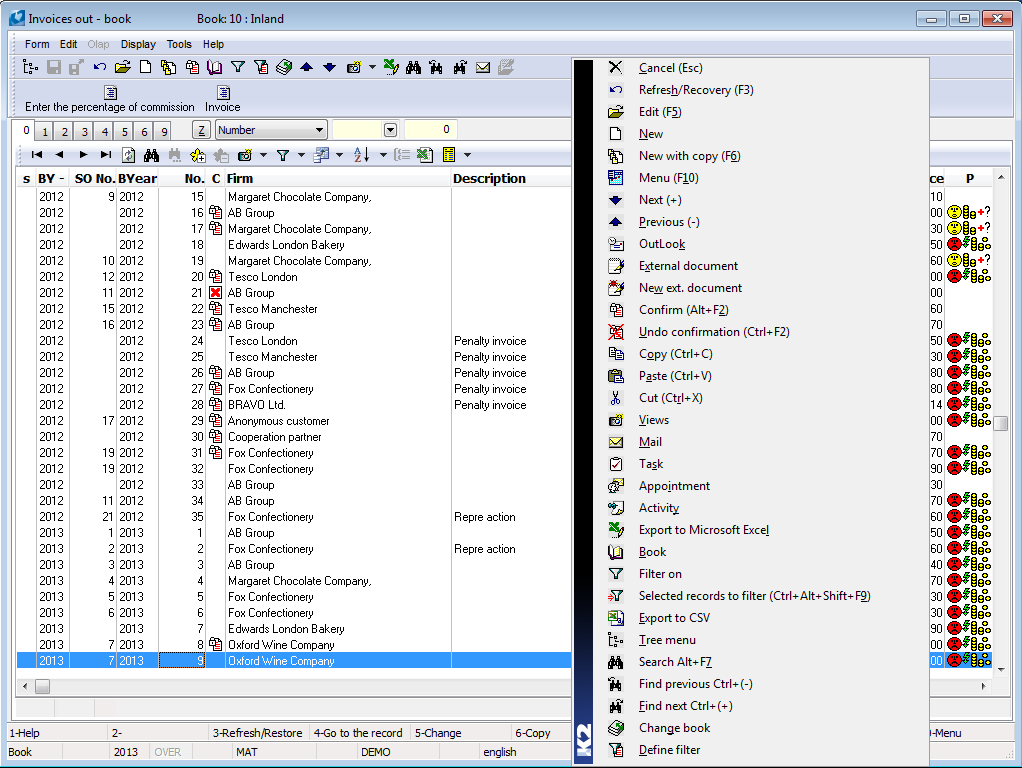
Picture: Functions Selection by Mouse Right Button on the line with icons (Standard Toolbar)
|
|
|
User Toolbar
In the user toolbar functions that were predefined in the book User Functions are stated.
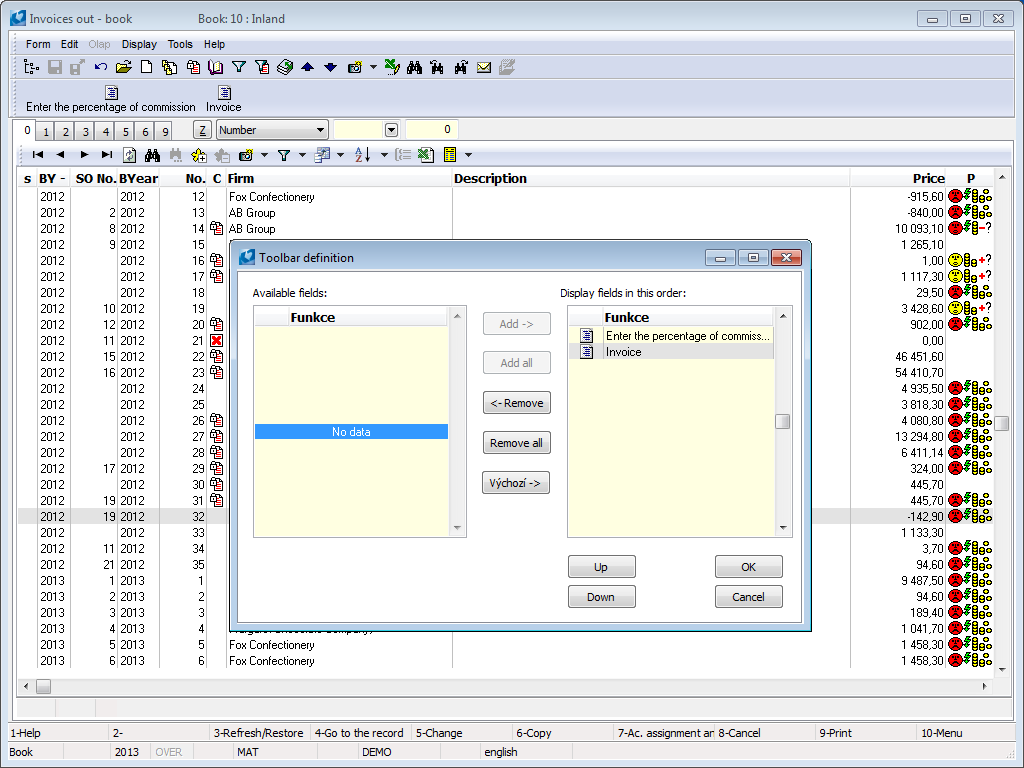
Picture: User Toolbar Definition
In the user toolbar definition you designate those user defined functions that will be displayed on the user toolbar.
|
|
|
User Functions
The book of User Functions will be activated in Display module menu or by a click by the mouse right button on the user toolbar. The standard control of F9 key will be displayed. A user function means a report or a script.
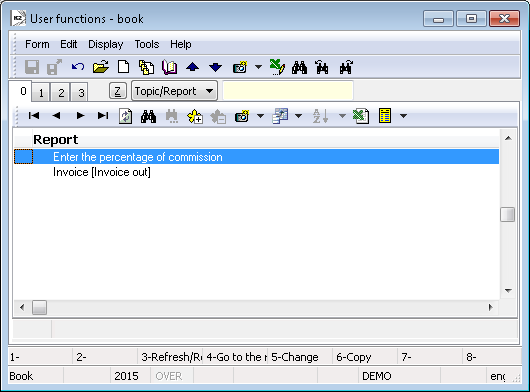
Picture: User Functions Book
|
|
|
Set Table
This function enables to define a book design and columns configuration in this Book. The function will be activated in Display module menu or by a click by the right mouse button in columns headers.

Picture: Set Table – Display - Module Menu of Invoices out
Description of functions:
Select Columns |
Selection of columns will affect user settings in the book. By adding or removing of the columns the required items can be set. Detailed description is mentioned below. |
Column parameters |
A selected column format is set by this option. Detailed description is mentioned below. |
Default columns |
This setting of the columns is defined by K2 IS producer and when you select this function the default columns setting will be restored. If you change a window format, the columns width will be automatically modified. If you decrease a window, you can see permanently all the columns but the items are displaced by dots because of the insufficient space. |
Default columns without fitting |
A minimum width is defined for every column independently on the window size. If you decrease the window, the columns will be hidden in turn. The table items will stay unchanged. |
All Columns |
All possible columns of a data module are displayed upon the selection of this option. The module fields can be as follows:
|
Default Columns |
If you execute changes in the columns configuration of the Book, all the changes will be aborted and the columns configuration will be put to the same state as after log-in the programme. The executed changes can be saved either by correct exit from K2 Programme or by activating of the function Clear cache in Administrator module. |
Fit columns |
Upon this field checking the columns width is fitted according to the changes in the window size. In the opposite case the columns width does not change. If you decrease the window, the columns will be hidden in turn and in the lower part of the screen you have a scroll bar available. |
A column width can be edited as needed. In the column header you position the mouse to the boundary line between two columns and you fit the width by dragging of the boundary line. Columns order can be changed by dragging of the whole column in the Book. The order can be defined either in the form Select columns (described below) or by the mouse dragging.
Example: You set the default columns in the book of Invoices out. You want to insert the column Number at the beginning of the table and the column Firm behind it. You position the column Number by the mouse, press the left button and by dragging you move the cursor on the column Pr.Z. By the same procedure you move the column Firm. New columns order will be as follows: Number, Firm, Pr.Z, Sale order etc...
From the table it is possible to remove a column in the following ways:
- by pressing the right mouse button on the column header and select Remove column,
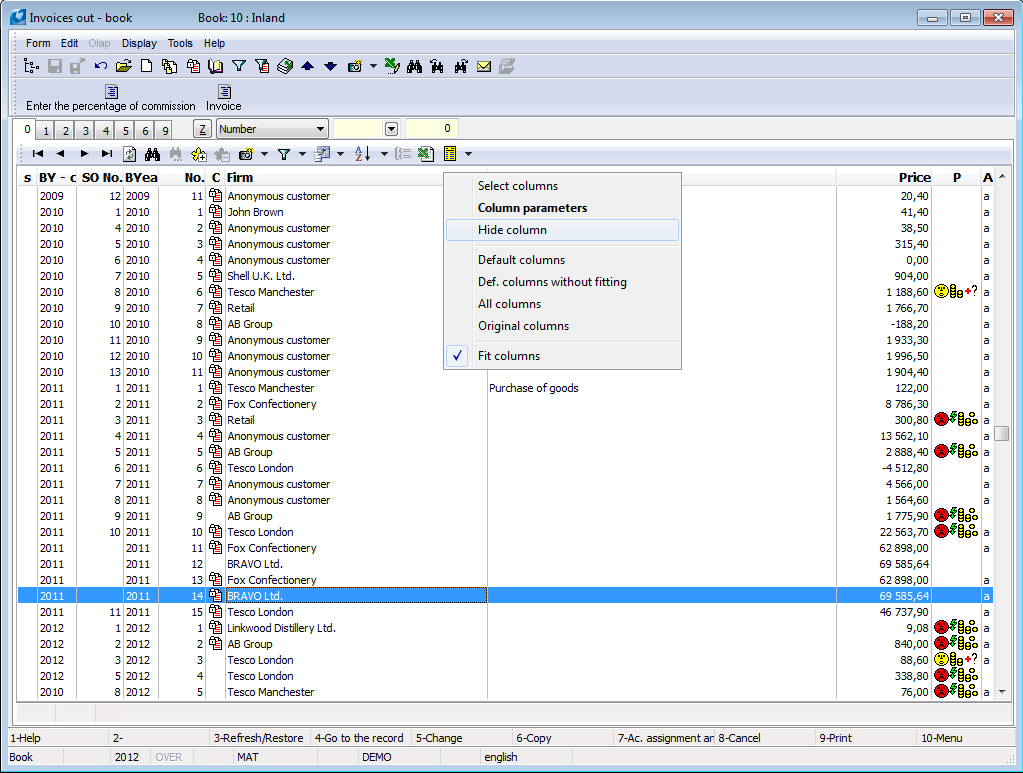
Picture: The book Invoice out - the right mouse button on the column Firm
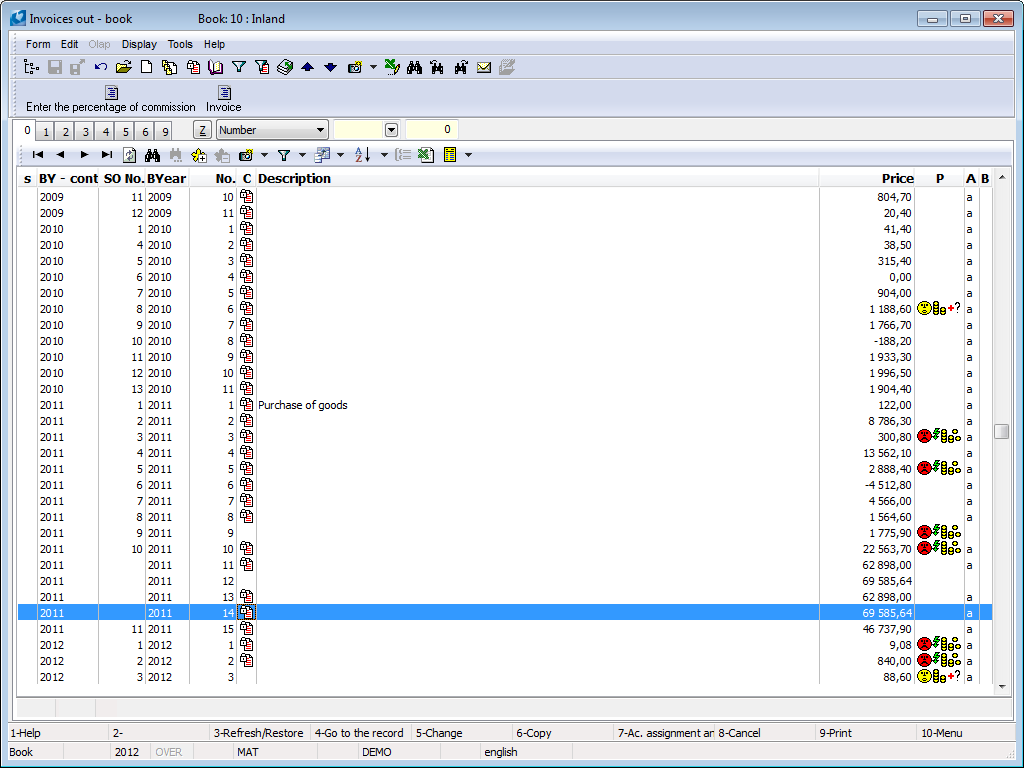
Picture: The book Invoice out - after select Hide column on the column Firm
- column moving outside the table - moving the mouse perform after column heading.
Export to Excel or CSV file:
The set table can be exported to an Excel or CSV file. Thus in the table, the user can select the columns he is interested in, and then export the data from the columns to other applications. Buttons placed in the standard user toolbar are used for the export – see chapter Module menu functions – Display – Standard Toolbar - page .
|
Export to Microsoft Excel application
|
|
Export to CSV
Note: The button is not placed by default in the standard toolbar. |
|
|
|
Select Columns
It affects user setting the data displayed in the table. Only required items can be displayed by adding or removing the columns.
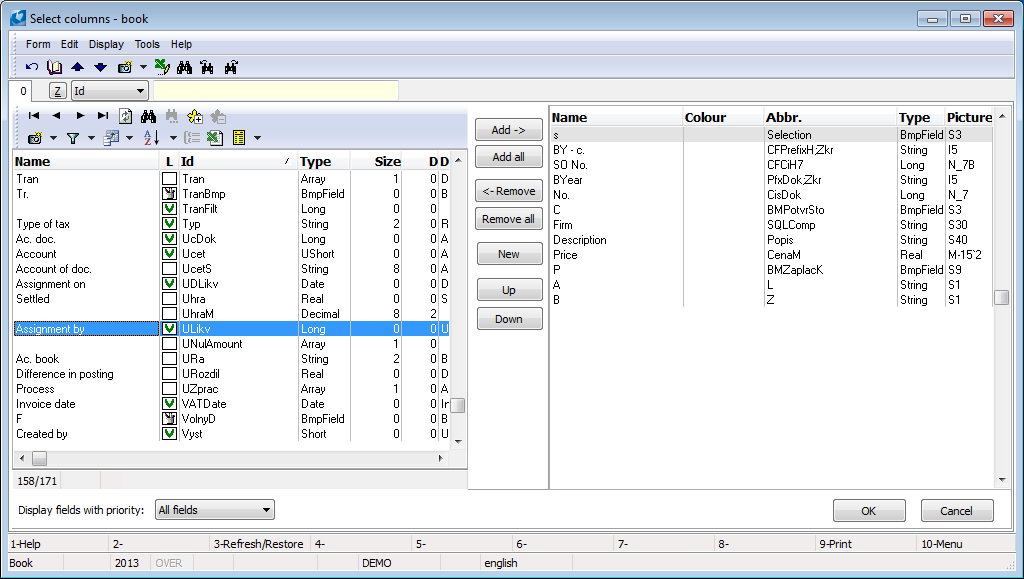
Picture: Select Columns Form
In the form Select Columns you select the columns that will be displayed in the book. The fields of the appropriate data module that are available will be displayed in the left part. The fields that you want to display in the appropriate order are available in the right part of the table. The fields from the left part and from the right part can be randomly moved by buttons Add, Add All, Remove, Remove All. The columns configuration is selected by buttons Up and Down in the right part of the table.
Next to every field there is stated the Name, the column with the Icon, Abbreviation and or rather Description.
Signification of Fields Icons in Data Module:
![]() Icon "Picture" – deals with a field with a picture (bitmap). E.g. 'P' field (icons about payments).
Icon "Picture" – deals with a field with a picture (bitmap). E.g. 'P' field (icons about payments).
![]() "Green L" icon - this icon is displayed at the fields that have a link with other data modules, it means that can be further merged.
"Green L" icon - this icon is displayed at the fields that have a link with other data modules, it means that can be further merged.
Create New Column:
Example: You want to add a new column with "Customer Abbreviation 1" to the book of Invoices Out.
- You activate the function Set Table in Display module menu or click by the mouse right button on a column header.
- You select the item Select Columns and here you click on the button New.
- The form Column Properties will be displayed where you click on the button Field.
- You select the field CCN (Cont./Cust. No.) that will be pasted to the form Select Columns. Because there is a possibility of further merge for the field CCN, you click on the button 1st Link in the form.
- Now the table of the data module Cont./Cust. is displayed where you select the field Abbreviation.
- Thus in the form Column Properties the name of the field in CCN;Abb format is stated.
CCN |
The selection of the field from the current data module - in our case from the module Invoices Out - Cont./Cust. No. |
; |
Indicates another merge. |
Abb |
The field selection from another data module - in this case from the module Cont./Cust. – Abbreviation 1. |
- The new inserted column will be automatically submitted to the right part of the form Select Columns where you can change its position by Up and Down buttons.
- The definition of the new column will be finished by Ctrl+Enter keys (or by OK button).
- In the book of Invoices Out the new column with Customer Abbreviation is displayed now.
Example: You want to state a customer city in Invoices Out Book.
- At the beginning you act in the same way as in the case mentioned above.
- In the table of the data module Cont./Cust. you select the field City that merges further to the code list of Cities. Because you do not want to select a field from this code list but directly from the data module Cont./Cust., you will leave the button 2nd Link aside.
- Thus the new field CCN; City has been created.
- After finishing work with the form, a new column City will be displayed in Invoices Out book.
|
|
|
Column parameters
A selected column format is set by this option.
Ways of column parameters setting:
- A mouse cursor will be positioned on a selected column header and then you double click by the mouse left button.
- In the selected column header you click by the mouse right button and execute the selection from the displayed table.
- The column can be selected by marking of a cell in the light indicator by a box with edged dots. You can move this box either by Arrows to the right and left or by a click by the mouse left button on the appropriate cell. You select Columns Parameters in Display module menu by the function Set Table. A form for parameters setting of this column will be displayed where the box has been positioned.
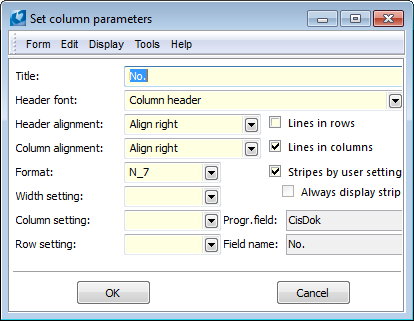
Picture: Column parameters setting form
Fields Description:
Title |
Setting of a column title in the header. |
Header font |
Font setting for the column heading (see the chapter Administrator – Code Lists – Headings – Fonts). |
Header Alignment |
Left, right or centre alignment of the heading. |
Column alignment |
Left, right or centre alignment of the column data. |
Format |
There are pre-set column format patterns in the menu. Detailed description is mentioned below. |
Set width |
You can define formatting of the appropriate column width. There is the column width with the required number of characters defined by yourselves displayed. If you extend a column, the number of characters will increase. For width setting it is possible to use all format types. The most often used formats are 'S' or 'W'. You select again from pre-set possibilities. Example: In the column City you set the width 'S10'; Usti nad L will be displayed and after the column extension, the whole name Usti nad Labem will be displayed. |
Column setting |
Setting is valid for the only column. Detailed description is mentioned below. |
Column parameters |
User can set column parameters and colouring by using Alt+F5 in Column setting - book. Colour evaluation is set up according to the level, higher level is coloured more above.
|
Row setting |
Setting is valid for all the columns in the table. Detailed description is mentioned below. |
Lines in rows |
After checking of this option horizontal line will be displayed. |
Lines in columns |
After checking of this option vertical line will be displayed in the table. |
Stripes according to |
Even rows will be (will not be) highlighted by different colour in the table if the flag Display even stripes in grid by different colour in User parameters is (is not) activated. |
Always display stripes |
If the flag is checked in the table, even rows will be always displayed by different colour regardless of activated/deactivated flag in User parameters. |
Progr. field |
Display of field abbreviation from the data module. |
Field name |
Display of field name from the data module. |
|
|
|
Format
At this place you set a type of formatting that is different for every column. Various types of characters are used for numbers and texts.
Review of Format Characters:
Character |
Description |
||
S |
It is used for texts and stated in combination with digits. (The total width is defined as a product of the average width of characters of the appropriate font and the number of characters.) 'S' means a string of characters and digit means a number of characters spaces included. If you extend the column, the characters setting will stay without any change. |
||
T |
The character is used for the time setting; as the most often setting 'T4' has been used. h. is displayed. - min. - sec. |
||
D |
The character used for the date; the current setting 'D6'. In the column the date will be displayed in the order Day – Month - Year. |
||
M, N |
The characters are used for formatting numbers. They are used in combination with digits (total number of characters) and special characters. |
||
|
|
'M' |
Serves to the reduction of delimiters in the case of shortage of the number of characters; it has been used upon the display in Book mode. |
|
|
'N' |
Displays all the characters. In the case of shortage of the number of characters, it changes to hashes; it is used in a form. |
|
Special Characters: |
||
|
|
'-' |
A number is not displayed in its absolute value; it means that positive as well as negative numbers have been displayed. |
|
|
'_' |
A number is shortened within its number of characters; spaces (commas) has been left out (It has not been written 1 284, but 1284). |
|
|
'0' |
The needed number of characters has been amended by zeros from the left hand side. |
|
|
''' |
Usage of decimal point; thousands has been separated by a comma. Characters display corresponds to Windows settings. |
|
|
'.' |
Decimal point has been used instead of decimal comma. |
W |
It is similar to 'S', a calculation of the column width according to the widest letter (the most often 'W'). |
||
I |
It is similar to 'S', a calculation of the column width according to the width of the number character. |
||
P |
A special character for notes; aside from it also 'F' and other 9 characters have been used (it is more complicated). |
||
Examples:
Format |
Display |
Format |
Display |
S30 |
„Usti nad Labem“ |
S10 |
„Usti nad L“ |
D5 |
„11.05.99“ |
D6 |
„11.05.1999“ |
T1 |
„9:53“ |
T4 |
„09:53:41“ |
Example: Display of amount "-1 234 567,89" in the column Price. Total number of characters including commas and the sign is 13.
Format |
Display |
Format |
Display |
N15 |
1.234.568 |
M15 |
1.234.568 |
N8 |
##### |
M8 |
1234.568 |
N-15 |
-1.234.568 |
M-15 |
-1.234.568 |
N_15 |
1234568 |
M_15 |
1234568 |
N-_15 |
-1234568 |
M-_15 |
-1234568 |
N-15.2 |
##### |
M10`2 |
1234567.89 |
N-15'2 |
-1.234.567.89 |
M-15'2 |
-1.234.567.89 |
N_15'2 |
-1234567.89 |
M_15'2 |
-1234567.89 |
N015 |
000000001234568 |
M015 |
000000001234568 |
N-015.2 |
-00001234567.89 |
M-015.2 |
-00001234567.89 |
N-15.2 |
-1.234.567.89 |
M-15.2 |
-1.234.567.89 |
|
|
|
Set Column and Lines
It is possible to highlight selected columns or lines in Book mode. Conditions setting are the same in both the cases. Data in the field Set Column are valid for the appropriate column and data in the field Set Line are valid for all the columns.
By pressing F12 key you will enter the book Procedures for Colours where a list of procedures is stated. Abbreviation and Description will be edited by current keys (Insert, F5 and F6) and from the code list you will select a Function. Proper conditions of the function will be defined by Alt+F5 keys in Browse Mode. A form with the name History - fields comparing will be activated that is divided into two parts. In the upper part of the form validity conditions of the appropriate function will be defined and in the lower part colours and fonts will be set.
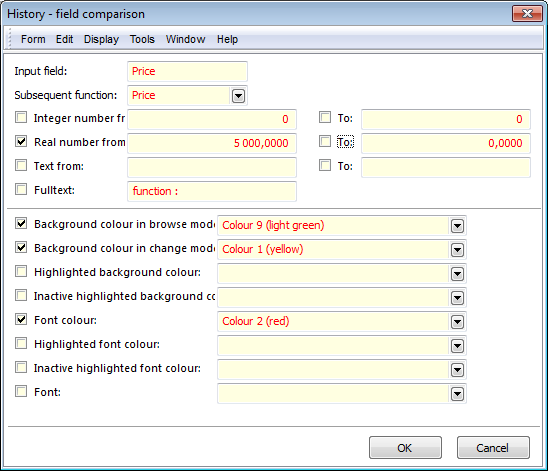
Picture: The Form History - fields comparing - Alt+F5
Form Items:
Input Field |
Input field for testing a condition. It must be pasted in the case when you complete the form for the field Set Line. If the field is not completed, the function is analysed for every column separately. Upon pasting the form Set Column, it does not have to be pasted; then the conditions are valid for the value of the field in the selected column. If the Input Field is completed, the function will assume the same value regardless of a selected column. |
|
Next Functions |
If your defined condition has not been satisfied, it is possible to define a condition that will be analysed as the next. That way it is possible to create a string of conditions that will be tested one after the other. If a column does not satisfy the condition, the next condition will be tested. If the column does not satisfy NOR the last condition, the standard colour will be displayed. |
|
Integer Number |
Conditions setting for numbers testing in the interval From To. |
|
Real Number |
Conditions setting for numbers testing in the interval From To. |
|
Text |
Conditions setting for text string testing in the interval From To. |
|
Full Text |
Conditions setting for text testing. Special characters have been used: |
|
|
'.' |
The obligatory character at the first position; it is case sensitive (Distinguishes between small and CAPITAL letters.) |
|
'^' |
The obligatory character at the first position; it is not case sensitive (Does not distinguish between small and CAPITAL letters). |
|
'*' |
Substitutes a random number of characters (it can be located at the beginning, in the middle, at the end). |
|
'?' |
Substitutes the only character. |
The lower part of the form serves for setting and selection of colours and fonts in the tables. You distinguish a few colour types in documents. Font colour and background colour are the basic resolutions. These colours can be different in Browse mode and Change mode. Highlighted colour of the background corresponds to the light indicator position.
Background Colour in Browse Mode. |
Basic background colour in Browse mode is grey upon the standard Windows setting. |
Background Colour in Change Mode. |
Basic background colour in Change mode is white upon the standard Windows setting. Apart from the documents in Change mode it deals with all the tables on zero page. After another colour setting the background of all the items that correspond to the defined conditions has been changed. |
Highlighted Background Colour |
Highlighted background colour corresponds to the light indicator position - basic colour is blue upon the standard Windows setting. After the colour change in this field the background colours will be changed on the items of the light indicator. |
Inactive Highlighted Background Colour |
This colour corresponds to the light indicator position in the moment when you click on the search field in the upper part of the screen. Upon the standard Windows setting it is light grey. |
Font Colour |
Font Colour Change in Change Mode and Browse Mode. Upon the standard Windows setting, the basic font colour is black in Change mode as well as in Browse mode. |
Highlighted Font Colour |
Change of the font colour in the light indicator items. Basic font colour upon the standard Windows setting is white. |
Inactive Highlighted Font Colour |
Inactive highlighted font colour corresponds to the colour on so called "grey light indicator" that is black. |
Font |
In this item you can select various fonts from the Font Book. |
Colours and fonts defined in the form Parameters Greater Than have higher priority than colours and fonts defined in Font and Colour Books.
|
|
|
Columns masks
For simplification of the display setting, especially for more users, you can use the function Columns masks and create your proper setting (mask) in accordance with your needs. These settings will be saved upon a concrete name that will serve for the mask reactivating for a random user.
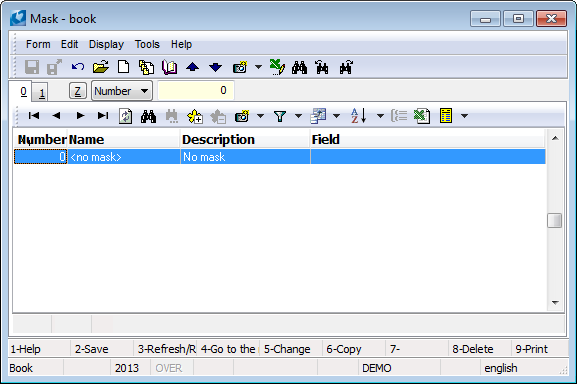
Picture: Code list Masks
Columns masks function will be activated through Display module menu. A new mask is inserted by Insert key. Mask name and Description will be pasted in the form; an Icon can be also assigned to it. These columns that are displayed in the Book will be automatically set up to the mask. If you change columns setting in the Book, you can execute the same change also in the Mask book. You position the light indicator on the mask, you want to change, and after pressing F2 key the new setting will be saved. Mask can be from masks book delete. You position the light indicator on the mask, you want to delete and press F8 key.
If the mask is deactivated, the programme stores the columns configuration for every sorting and for every filter setting separately. After a proper mask selection the columns configuration is the same for all the types of sorting. If you deactivate the mask (setting Without mask), the setting for every type of sorting will be restored; it means to such a state that has been valid before the proper mask selection. If the display in accordance with a mask is set and you change it in a type of sorting, after any change of the type of sorting or after the programme exit, the display in accordance with the selected mask will be restored. If you have setting without mask, the display will not be restored.
|
|
|
Tools

Picture: Tools - Invoices Out Module Menu
Description of functions:
Desktop |
If upon the work in K2 IS you run this function in any module from its module menu, the desktop will be opened in accordance with the current setting (see the chapter Administrator - System - Desktop Masks). On this newly opened desktop a notice "2nd inst." will be displayed behind the client address in the upper blue bar. It is impossible to edit tabs appearance in this display. |
Form editing |
By means of this function, options for editing a form are available for the user. It is a specific function for which a special right exists. |
Number of Records |
The number of records in the table will be displayed. Attention: A number that indicates the number of records does not have to correspond to the displayed number of items.
|
|
|
|
Help

Picture: Help - Module Menu Invoices out
Description of functions:
Content and index |
Will activate this user guide. |
About … |
Informs about K2 System. In the activated form you can find among others also the license number and the number of the programme release that you use at the moment. |
Picture: Form About K2
In the form About you can copy by using keyboard shortcuts Ctrl+C the number of version. Version is copied in the form X.XXX.XX.XXXXX. Keyboard shortcuts Ctrl+Shift+C can copy detailed information about K2 system.