|
|
|
Purchase and Sales Items (2nd Page)
The items of articles and services, which are the content of the sales order (purchase order), are entered on the 2nd page of the document. Inferior documents are created for these items here. The items are displayed in the rows one underneath another. We can change their display order by clicking on the column header according to which the items are to be sorted. More information about the order is described in the Re-Sorting of Document items chapter.
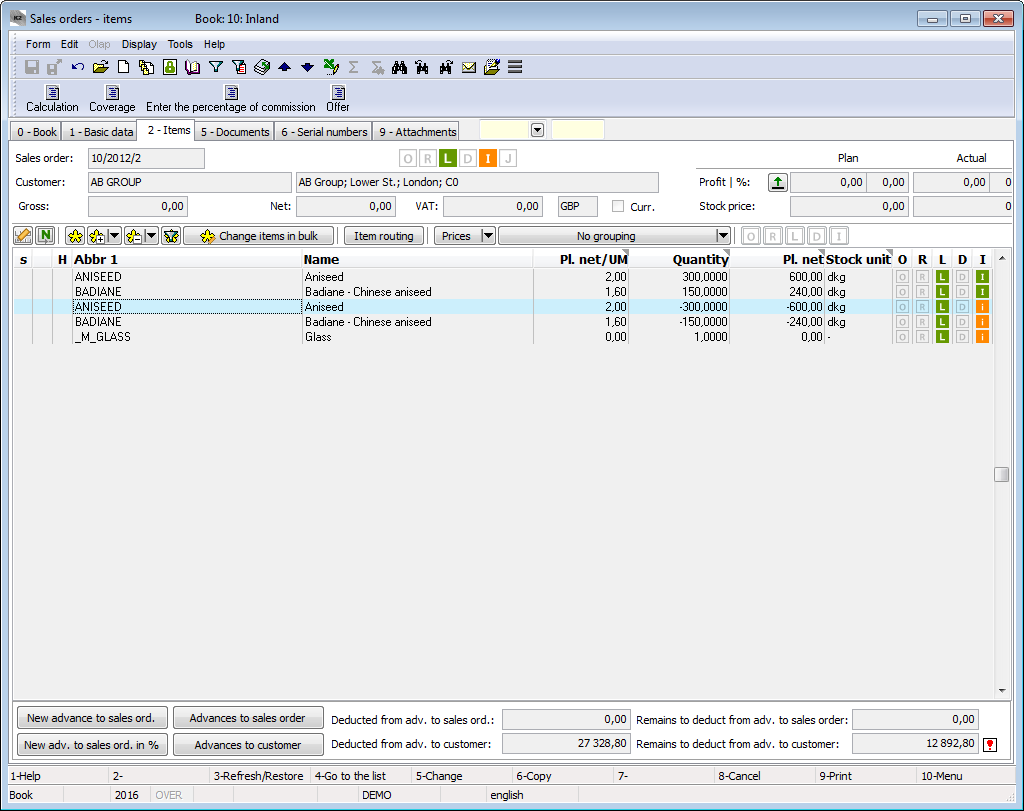
Picture: Sales Orders - 2nd page
Description of elements from the panel for the work with items
|
Button to activate the Edit rows function. The Edit rows mode enables to edit the values directly in the rows of items without the necessity to open the form of the item. You can change values in the columns with the dark filled upper right corner of the heading. The editing is executed in the Change mode by pressing Enter key in the field that you want to change. Press the Enter key again to enter the executed change. If the Edit rows mode is active, you can open the item form, when necessary, by pressing the Ctrl+Shift+Enter key combination. |
|
The button to activate the Repeat inserting of items option. Pressing the button can speed up your work by automatically appearing a new form to insert a new item after each saving a new item. It is not possible to press the Ins key repeatedly. Note: The functionality is independent of the value of user parameters Repeat inserting of items. This parameter does not apply to purchase and sales documents. |
|
Button to mark an item. |
|
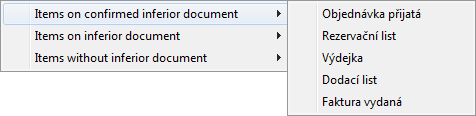
Button to (cancel) marking of all items. When pressing the button
Picture: the criterion of selecting an item with a list of sales documents
|
|
The button to display only the marked items. |
Change items in Bulk |
It allows you to change data in the document items in bulk, including applying a set discount from the Customer card. The further description of this function is stated in the Change document items in bulk chapter. |
Item routing |
It serves to display a routing variant of a marked item of a product or of a semi-product. |
Prices |
Switching prices.
|
Grouping |
Items may be grouping in the Browse mode. Items can be grouped by these criteria:
Note: When grouping items, the grouping is cancelled when switching between documents. |
Buttons to create documents (e.g. |
Buttons to create / cancel inferior documents for items. |
 ,
, 
If a discount is entered in the item of Purchase or Sale Document (to the planned or invoiced price), its flag ![]() is displayed on the 2nd page of the document in the "S" column. A discount of a negative value means a surcharge (the flag
is displayed on the 2nd page of the document in the "S" column. A discount of a negative value means a surcharge (the flag ![]() is displayed in the "S" column). The entered discount is automatically copied into the another inserted item.
is displayed in the "S" column). The entered discount is automatically copied into the another inserted item.
From the 2nd page of documents (which have a Tax summary) it is possible to switch to the Tax summary tab on the 1st page by using the Alt+T key combination.
Re-sorting Items of Document
Re-sorting items is executed in Change mode on the 2nd page of the documents. Following keys are used for the re-sorting:
Grey Plus and Grey Minus |
By the light indicator scroll between the selected items up and down. Items with the identical ID ("OrigItem" field; incurred of item split) are moved together, it is not possible to either change their order nor insert another item between them . |
Shift+F3 |
The Sorting of items form, that offers the re-sorting any of the linked documents, appears after pressing the keys. Select the document and click on Sort items by selected document button. Flags for change are created at the re-sorted items. New sorting has to be saved. |
field # |
Changing the order of items can also be done by writing the desired number into the field # on the form Purchase / Sale item. |
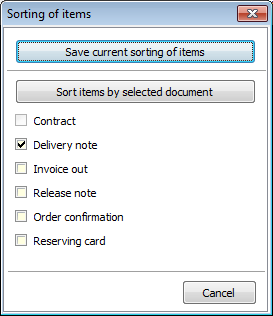
Picture: Sorting of items
The document items can also be sorted according to any column by clicking on its header. If you are in Change mode, you can saved thus sorted items by using the Save current sorting of items button in the Sorting of items form which is called by Shift+F3 key combination.
|
|
|
Data of Purchase and Sale Items
Call the Purchase (Sales) Item form on the 2nd page of the Purchase and Sales Document by pressing Enter key on an existing item. The identical form is also called when inserting a new item into a document by using Ins key.
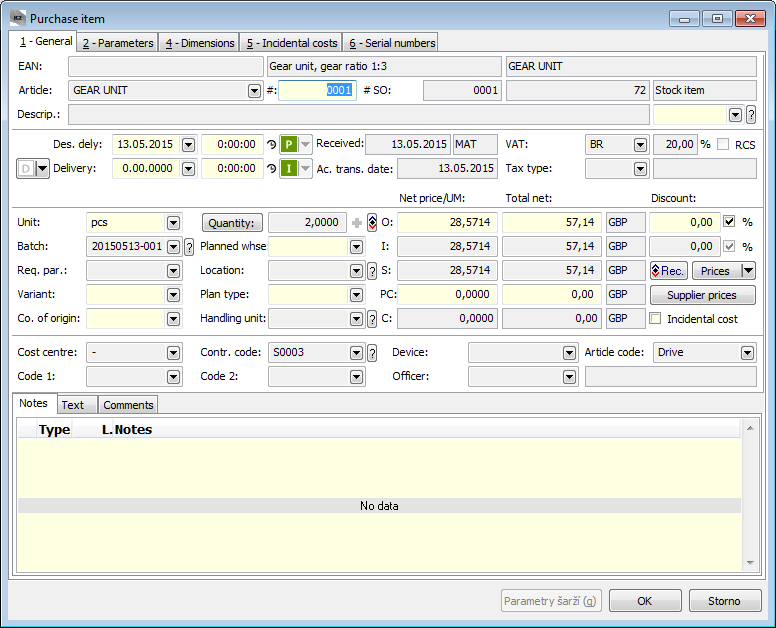
Picture: The Purchase Item form - General tab
GENERAL tab
Fields' Description:
EAN |
Field for an additional bar code. If you enter it, an article name and the next data from an Article card including a unit relating to the EAN will be automatically entered to the form. |
Article |
The content of this field varies depending on the type of sorting in the articles table. Sortings can be: Abbr 1, Abbr 2, Number and Name. The sorting can also be switched by using Z1 (Z2) button in this field. The button appears if in the purchase and sale documents, the icon |
Description |
An additional name (from the Language supplements book). It enables to assign a different supplement to each document item. Note: Content of the field is displayed in the Name of Item and is printed on documents if the Do not display names of articles option is checked on an Article card that is selected on an Item. |
# |
An item order number on the given document. This number can be derived from the superior document, but it can also be changed according to the current or any other document (by the Re-sort items function Shift+F3). Number can also be changed by typing directly in the item form. |
# Sales order # Purchase order |
Number of item in the superior document. |
Des. dely (Purchase) |
A date from the Delivery Date field in the header of a document is copied into the fields for date and time. If this entry is changed in the item, it takes precedence over the heading entry. The date can be changed until you confirm the Delivery confirmation for the given item. |
Delivery (Purchase) |
The field contains by supplier confirmed delivery date of the goods. It is filled from the Required field when creating Delivery Confirmation. |
Des. dely (Sale) |
A date from the Delivery Date field in the header of a document is copied into the fields for date and time. If this entry is changed in the item, it takes precedence over the heading entry. The date can be changed until we confirm the Order confirmation on the given item. |
Reserv. (Sale) |
The fields (Date and Time) express the inner date on that a Reserving card (RC) is created. When it is created, the data from the Required field is copied here, but it can be changed until you confirm this Reserving Card. |
Ac. trans. date |
Acc. trans. date from the invoice. |
Unit |
To enter a stock unit from anArticle card. The stock unit, where the Default unit option for the selected module (e.g. Default unit for Sale) is checked, is automatically set for a new item. |
Batch |
The field serves to enter the batch of the received or released goods. The field is accessible if the batches are recorded for an article (Batch records option on the Article card). |
Req. par. |
Requested batch parameters. The field is accessible only if the Article card has defined at least one parameter with the set Value from Batch option (internally the Batch type exists for the card). In the Requested Parameters book, we create then the so-called requested parameters (header) and define them specific parameters with values. |
Variant |
In this field you can enter a routing variant of the product or semi-finished product. When creating the job cards from the Sales Order items by using the Dispatcher function, the job cards are created on this routing variant. (If it is not set, they will be created for the default routing variant). After confirming an inferior document Reserving Card, the variant of an item cannot be changed any more. In Purchase, the variant is blocked by confirmation of an inferior document Delivery confirmation. |
Co. of origin |
In Sale, the value is copied from theArticle card. In Purchase, it is necessary that the user enters it himself. |
Guar. (m.) (Sale) |
The warranty period stated in months. The field serves to take account of the type of service (Guar./Post-warranty) in the case of creating service sheet on the sale item. |
Price group (Sale) |
The input field to enter a price group of an item. This entry is copied from the source item or from the header of a document depending on the setting in the User Parameter when creating an item. Also, depending on the parameter, the price group according to which the result price of the item has been searched, or the result price (when using the Base price) can be displayed. There are icons for easier orientation in the origin of the selling price on an item next to the Price Group field. The icons, like the data in the Price group field, are directly related to the use of price creation options. The Price creation is described in the 5th page of Article card chapter, eventually in the Creation of prices in the K2 IS methodology.
|
Quantity |
To define the quantity in the selected unit. It is set on 1 for a new item. You can enter the negative quantity by the minus key or by the If the selected Article card includes the multidimensional quantity (see the methodology), then pressing the Quantity button calls the Multidimensional quantity form to enter the requested values. |
Planned whse |
A warehouse for which a receipt/release of the selected item is planned. A stock document will be created later for this warehouse. |
Location |
It serves for a more detailed inventory records on the stock (e.g. a location in racks). The field is accessible if a location is recorded for an article (the Location records option is checked on the Article card) and if a warehouse is known for an item (the warehouse from the stock document header or the Planned whse entered on an item). |
Handling unit |
The field serves to define the handling unit of the received or released goods. A handling unit is one of the dimensions of an auxiliary stock record (batch, location, contract code, handling unit). The field is available if the handling units are recorded in the given warehouse (the Handling units record option in the Warehouse card). Obligation of a handling unit in the case of the handling unit records in the stock: when saving the stock document, the blank unit is considered an undefined (ie. article blocking regardless of the handling unit); when confirming the document, the blank unit is considered a non-entered (movement without a unit). |
Supplier (Sale) |
Selection of the supplier from whom we buy the goods. It serves mainly for business companies. By using the question mark next to this field, the list of suppliers, whom the price is assigned on the 4th page of an Article card, is displayed. |
Plan type |
Selection from the Plan type code list. The field takes the value from the heading, it can be edited there. |
VAT |
The VAT rate that can be changed until the Invoice is confirmed. |
RCS |
The flag is checked on items for which a Tax type with the active Reverse charge system flag is valid. Such an item is taken as an item excluding VAT, even if the VAT flag (with the exception of tax invoices) is checked in the document header. The field can not be edited. |
Tax type |
A tax type which can be changed until the Invoice is confirmed. It is completed from the Article card (even if it is empty on the Article card). The tax type of the item takes precedence over the tax type in the document header. |
Prices |
Prices enable to enter a unit or a total price of an item. When changing one price, the other price is changed automatically. The price per unit does not contain the sign. The total price contains the sign according to the Credit Note. The Ctrl+Alt+B key combination switches between the Net (excl. VAT) and Gross (incl. VAT) price. Ctrl+Alt+M keys allows you to display / disable the foreign currency selected in the document header. |
Net price/UM |
The price for a selected stock unit. |
Total net |
The total price of an item. |
O (Purchase) |
The Purchase Order and Delivery Note price. If the Invoice is not confirmed, the price will also be copied to the Invoice price. When inserting an item, either Last or Purchase price is pre-filled according to the settings in the User Parameters. It is automatically blocked by confirmation of the Delivery confirmation document. |
I (Purchase) |
The Invoice price. |
S (Purchase) |
Price of a Receipt card - Net Stock Price. When inserting an item, the Planned stock price from the Article card without any purchase costs, that can be defined on the Article card, or a price from the supplier's price list is entered here. It corresponds to the 'I' price after confirmation the Invoice. In the case of release on a Receipt card, the appropriate price is set according to the valuation method of the warehouse when confirm a Receipt card. When confirming a Receipt card on a warehouse that is kept at fixed prices, this price is updated according to the planned stock price on an Article card. Note: Actual stock price (Actual stock price with incidental costs - in the case of the activated Stock price with incidental costs client parameter) can be displayed as a column on the second page of documents. |
PC (Purchase) |
The planned incidental cost. A potential value of the acquisition cost defined in the Article card in the Purchase cost field is inserted here after inserting an item. If there are no real incidental cost on an item (the C field) and a user has the right Purchase / Items / Change planned incidental costs, then the field can be manually edited. The planned costs can also be allocated into items by means of the Allocate incidental costs function. If the real incidental costs do not exist (the C field), a stock price (SkC) is calculated as S+PC. |
C (Purchase) |
The actual incidental costs. These incidental costs can be assigned to an item by using the Allocate incidental costs function only by allocate the amount from the source document. The further description is stated in the Allocate Incidental Cost in Purchase chapter. If the item contains actual incidental cost, the letter "C" is shown in bold. For the calculation of a stock price (S+C) the actual incidental costs take precedence over the planned incidental costs. |
O (Sale) |
The price of a Sales Order, an Order confirm. and a Delivery Note. If the Invoice is not confirmed, the price will also be copied to the Invoice price. When entering, changing quantity or price group, it is filled in according to the selling price form the Article card. It is automatically blocked by the confirmation of a Delivery Note or an Order confirmation. |
I (Sale) |
The Invoice price. |
R (Sale) |
Price of a Reserving Card - Planned Stock Price. When inserting an item, the stock price from the Article card is entered. |
S (Sale) |
Price of a Release Note - Actual Stock Price. When inserting an item, the planned stock price from the Article card is entered. When confirming the release note, it is entered for releases according to the Stock Valuation Method (sliding price, fixed price, price according to batches). The price can also be updated by the Stock recalculation function (in the case of a Sliding price, the Sliding price valid to the release date is filled in). |
C (Sale) |
The Catalogue Price, i.e. the currently valid selling price from the 5th page (upper part) of an Article card at the time of a document creation. Its display can be suppressed by the user parameter. |
Discount (planned) |
Option to quantify the planned discount in absolute or percentage terms (by ticking the '%' field). |
Discount (invoiced) |
Option to quantify the invoiced discount in absolute or percentage terms (by ticking the '%' field). |
Rec. |
By pressing the button The identical icon is used for the State of Origin field, where also reloads the value of the field from the Article card. |
Prices |
The button acts as a toggle to display the prices in the gross and net values, or to view the original prices (before discount) and prices after discount. |
Gross/Net |
Switch to display prices in Gross and Net values (Ctrl+Alt+B). |
Orig. prices / Prices with rebate |
Switch to display original prices (before discount) and prices after discount (Ctrl+Alt+O). |
Supplier prices (Purchase) |
Entry to the Supplier prices - book form. The records are filtered for the suppliers from the heading of a document by default. The price list data can be loaded into the purchase item by selecting from the records and confirming the selection with the Enter key. The supplier price will be entered into all prices of the item. Records in the supplier prices can be edited, copied or created new (data from the purchase item are offered). See the detailed description in the Supplier prices (4th page) chapter. This button works only in the Change mode. |
Incidental cost |
The activated option indicates an item that is considered as an Incidental cost. You can predefine it for the specific article items in the Article category. The option is important for the Allocation of Incidental Costs in Purchase function. |
Contr. code |
The selection from the Contract codes code list. The field is obligatory. Its value is automatically entered from the heading of a document, eventually from an Article card if it is filled in there. |
Article code |
Selection from the Article codes code list. For a new item, it is entered from the Article card. |
Cost Centre |
Selection from the Cost Centres code list. The field is obligatory, its value is automatically entered from the heading of a document, eventually from the Article card if it is filled in there. |
Device |
Reference to the Devices book. In the first item it is copied from the Article card if it is specified in the Article card. If not specified, the value from the document header is taken. In each other item, it is copied from the Article card. If not specified there, then it is taken from the item on which the light indicator is set when opening the form. |
Code 1 |
Another additional code. In the first item it is copied from the Article card if it is specified in the Article card. If not specified, the value from the document header is taken. In each other item, it is copied from the Article card. If not specified there, then it is taken from the item on which the light indicator is set when opening the form. |
Code 2 |
Another additional code. In the first item it is copied from the Article card if it is specified in the Article card. If not specified, the value from the document header is taken. In each other item, it is copied from the Article card. If not specified there, then it is taken from the item on which the light indicator is set when opening the form. |
Officer |
Reference to the Officers book. In the first item it is copied from the Article card if it is specified in the Article card. If not specified, the value from the document header is taken. In each other item, it is copied from the Article card. If not specified there, then it is taken from the item on which the light indicator is set when opening the form. This field can be changed until the Invoice or stock document is confirmed. |
Items ID |
Item number on the selected document. This number can be derived from the superior document, but it can also be changed according to the current or any other document. The direct transcription of this number directly in the Purchase / Sale Item form is dependent on the Lock Items ID field on the 2nd page of the document (it must not be checked). On the printed document, this number is displayed in the format #xxx (e.g. #001). |
ID of sales / purchase item |
Number of item in the superior document. |
It is possible to add notes to the purchase and sale items but only in the Change mode or in a New record. Press the Alt+* keys to activate the Notes tab. The light indicator will be set directly in Notes. Press the Alt+- keys to switch over to the Text tab. Use the Alt+/ keys to switch over to a following tab (eventually from the last tab to the first one). For further description of the work with notes see the chapter Basic Code Lists and Supporting Modules K2 - Notes.
It is possible to add comments to the purchase and sale items. For further description of the work with comments see the chapter Basic Code Lists and Supporting Modules K2 - Comments.
The Batch parameters button serves to filter batch parameters of the selected article. Detailed description is stated in the Function for batches over the Article database chapter.
|
|
|
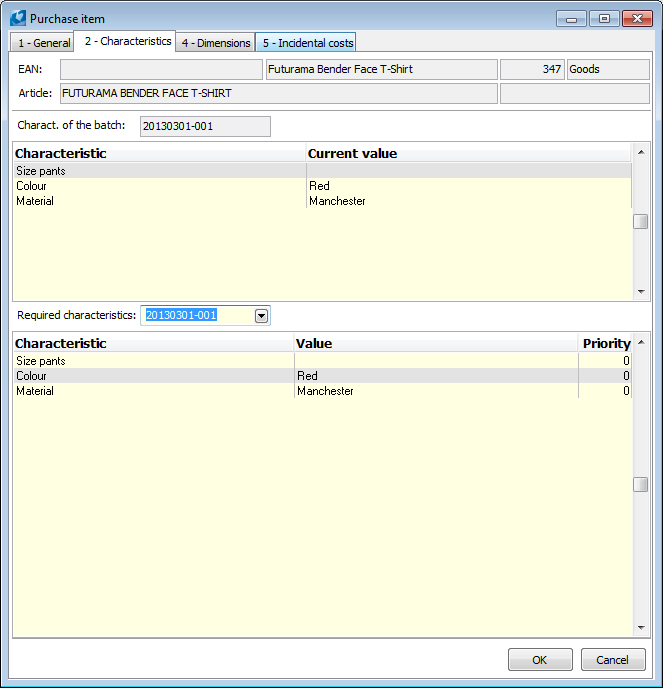
PARAMETERS tab
This folder tab serves to overview the batch parameters and required parameters of a given item.
Picture: The Sale Item form - Parameters tab
In the upper table there are defined the parameters (real) of a batch of an item (the batch abbreviation is displayed in the Parameters of a selected batch).
At the bottom of the table there are stated the required parameters of an item (a record of required parameters is entered in the Required parameters field).
Example: On the picture there is displayed that you have required the bottoms for an ordered trousers however the real delivery (batch) contains the "zipper" value for the "Closure" parameter.
|
|
|
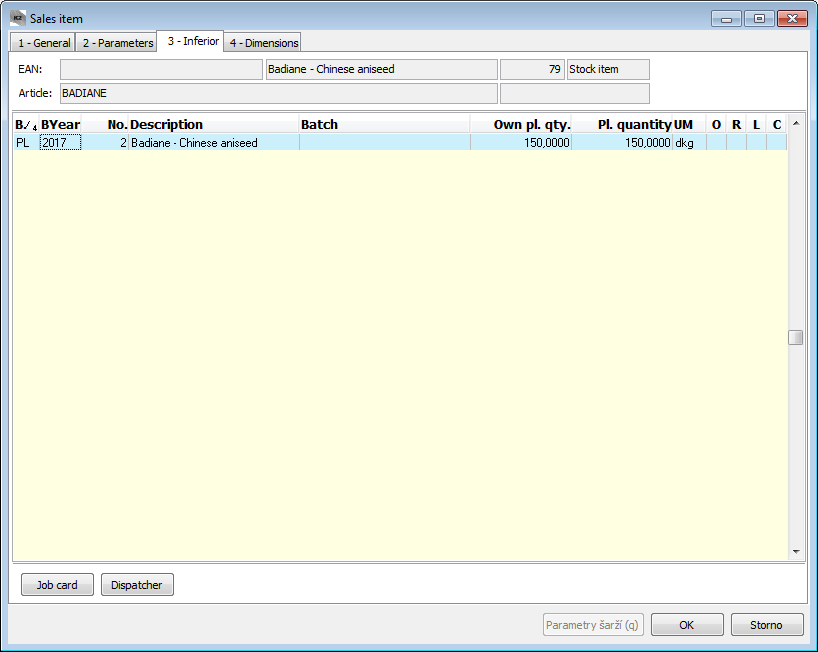
Tab INFERIOR
If there is a job card issued for certain goods, it will appear in this folder tab window.
Picture: The Sales item form - the Inferior tab
Switch to the Job cards book by pressing the Job card button with the light indicator positioned on this concrete job card. Get to the module for production planning by pressing the Dispatcher button. (Get back to the tab by pressing Esc key.)
|
|
|
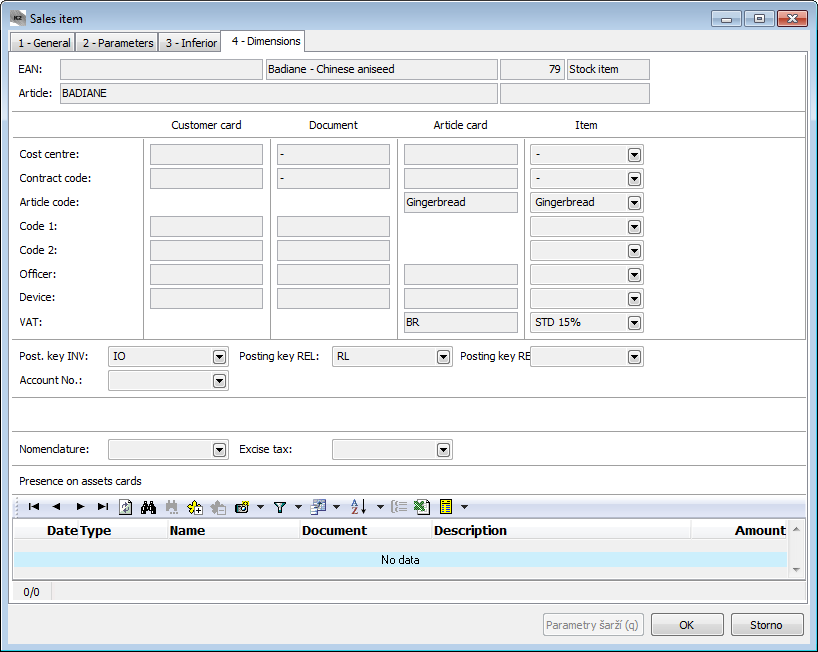
The DIMENSIONS tab
This tab serves for the overview of the selected information about the certain item, just as are specified at those places - on a customer card, in a document header and on an article card. (The fields for the item available for editing are linked with data on the General tab.)
Picture: The Sales Item form - the Dimensions tab
Into the Posting key INV, Posting key REL and Posting key RES select a posting key for the type invoice, release note and reserving card from the Posting keys book. In the Account No. field, you can select a required account number from the Chart of accounts and in the Matching symbol you can select the matching symbol to which the selected item will be booked. The Nomenclature and Excise Tax fields have to be filled in, if the given item liabels to Excise tax.
The check mark Document for deduction is preset in a purchase item in the case, that the Employs disabled persons check mark is checked on the 1st page of the Suppliers card. Checkmark was used to create attachments to substitute payments in Complience with the mandatory share for disabled people - since the end of 2018 not used, complience is reported by provider.
Substitute payment mode checkmark on the sales item is on in case that the payment is in substitute mode.
In the Presence on assets cards part, there are the assets cards linked with the given item.
|
|
|
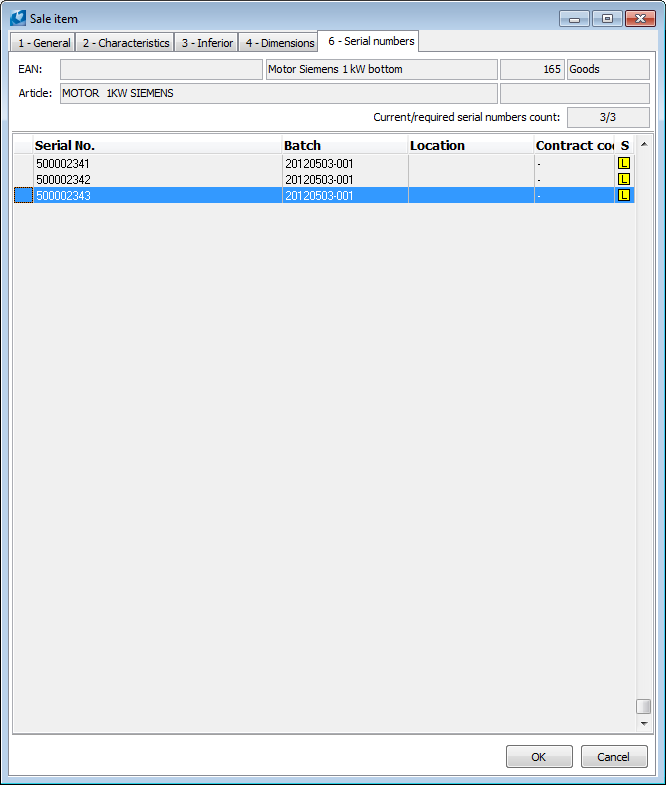
Tab SERIAL NUMBERS
Serial numbers of the item are inserted on this folder tab. The tab is displayed only for the articles that use the Serial Numbers record.
Picture: The Sale item form - the Serial numbers tab
|
|
|
Tab INTRASTAT
This tab is used to register information for reporting Intrastate. The tab is accessible only in invoices out and invoices in, if the document haven´t activate the check box Do not include into Intrastat.
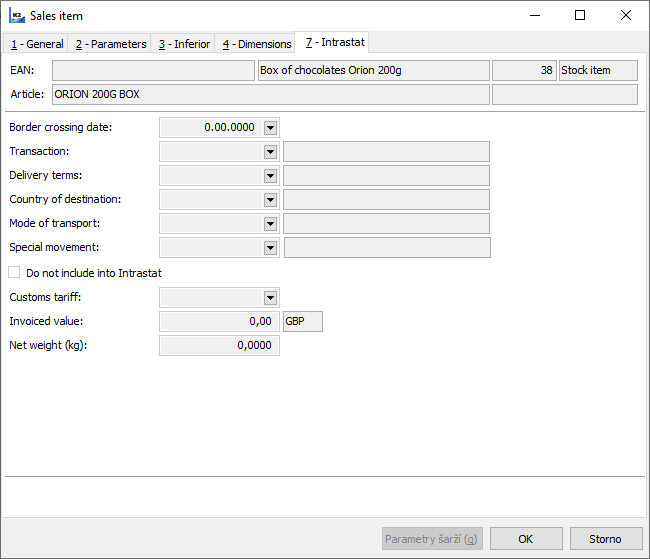
Picture: The Sales item form - tab Intrastat
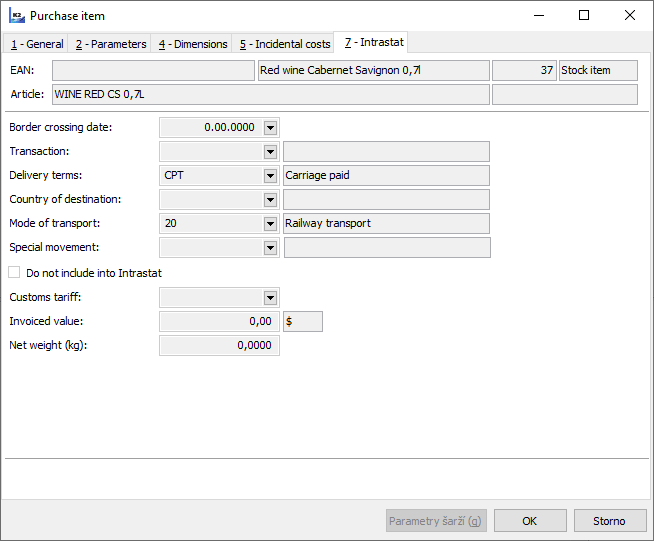
Picture: The Purchase item form - tab Intrastat
Fields description:
Border crossing date |
If the item should have different date of crossing the border than is specified in the header of the invoice, date is entered here. The value have priority before the value of the same named field in the header of invoices out (in). |
Transaction |
If you have an item with a different transaction code than are specified in the header of the invoice or than is the value in Intrastate parameters, the value is entered here. |
Delivery terms |
If you have an item with a different delivery terms code than are specified in the header of the invoice or than the value in Intrastate parameters, the value is entered here. |
Country of destination |
If has the item a different Country of destination (invoice out), than is country in invoice address, the country of destination is entered here. If has the item a different Country of destination (invoice in), than is country in invoice address, the country of destination is entered here. |
Type of transport |
If you have an item with a different type of transport than are specified in the header of the invoice in code list Method of transport or than the value in Intrastate parameters, the value is entered here. |
Special movement |
Special movement code. |
Do not include into Intrastate |
If the check box is activated then the item of document does not not enter the Intrastate. |
|
|
|
Define and Change Items in Superior Document
|
|
|
Insert New Items
New items, which are inserted into the superior document by Insert key, are selected from the Articles book. That way you insert an absolutely new item into the sales order (purchase order).
Ways of inserting new items may be different, depending on the user configuration in the User Parameters (the further description see the User Parameters chapter).
- If the Open book of articles when inserting an item parameter is set, the Articles book appears directly after pressing Insert key and only after a selection you can fill the other data of the Purchase/Sale items form.
- The Repeat inserting of items parameter automatically opens the Purchase / Sale item form again after closing this form. Press the Esc key to exit the Article selection.
- The Edit rows option in a document header allows to select an article by Ins key and return to the document. The Quantity column, where you can enter the required quantity of item, is automatically accessed. By pressing the Enter key and typing a value, it is possible to edit all the other columns that allow manual entry. These columns have the small triangle in the upper-right corner of the header. By Ctrl+Shift+Enter key combination you can open a total Purchase / Sale item form for for the necessary editing the other values. This option, combined with the Repeat inserting of items parameter, greatly simplifies and accelerates entering items into the document.
- Further, you can use the Insert items to sales order in bulk parameter. After its activation, the Article form (bulk insertion) is displayed after pressing the Ins key. The form is divided into two parts: the upper part represents the Articles book, where the item are selecting, and the bottom part represents the 2nd page of a document, where the selected items are displayed. In the upper part of the open form select an item, press Enter key (this will activate the Quantity column), type the requested quantity and confirm it by the Enter key. The item is inserted into a document in the requested quantity (it is also displayed in the bottom part of the form). Items can be inserted from the Articles book into documents also by bulk insertion of the records from container, resp. records marked by asterisks. To do this, use the button Insert from container in the lower panel. The quantity of article is set on the value 1. If the Release entire avail. quantity option is set in addition, items will be inserted in the quantity of the total disposal in stock. At the same time the items will broken-up according to the contract codes. The form for a bulk insertion can be closed by using the Close button, Ctrl+Enter key combination or Esc key. These entries will be copied into a sales order.

Picture: Insert items in bulk on the 2nd page of the document
- The Insert items in bulk function may be used even without turning on the parameter by using the Shift+F6 keys.
- Special inputs are modified by means of the registered functions according to individual users" requirements.
If any of these options is set, the Sale (purchase) item form appears after pressing Insert key. In this form, the details for the new item are entered. The same form is displayed on the 2nd page of all purchase and sale documents, if you set a cursor on the selected item and press Enter key.
When inserting a stock or a non-stock item into the superior document, the VAT is automatically copy to every article from the Articles database. When trying to paste an invalid article, the system asks you whether you really want to paste an invalid article. The VAT rate from the Article card according to the date on the document will be copied into the new item (taking into account on which document it is creating):
- sales order - VAT rate is filled in according to the Delivery date field.
- purchase order - VAT rate is filled in according to the Des. dely field.
|
|
|
Change Item
Items data of the superior document can be changed and adjusted in the Change mode at any time. Press Enter key to get to the Sale/Purchase Item form.
A change of some fields can be banned depending on the inferior documents confirmation. If e.g. any inferior document is confirmed, it is impossible to edit the Article, Article code, Cost centre, Code1, Code2 and Officer fields. If the invoice is confirmed, the 'I' price can not be edited.
If no inferior document has been confirmed, it is possible to change the quantity of the appropriate item to a random value (also to increase it) and this quantity will be changed on all the inferior documents.
If the VAT rate or the Tax type is changed on the item, the Tax summary of an invoice and the VAT and Gross amounts on the inferior documents are recalculated.
|
|
|
Delete Item
By Del key it is possible to delete an item form the Contract (Order). The item will not be deleted immediately but it will be checked by a red checkmark at the beginning the line. The real deletion will be executed no sooner than the Contract (Order) is saved by F2 key. If you press Del key before saving at the same checked item, the checkmark disappears and the deletion will not be executed.
If you delete the item from the superior document, the real deletion will be executed and thus the item will be deleted from all the inferior documents. If at least one inferior document has been confirmed, the deletion will not be executed.
|
|
|
Define and Change Items in Inferior Document
|
|
|
Insert new items
We also insert items to the inferior document by Insert key; however the Heading items table will be activated after its pressing. This table contains all the items corresponding to the Sales order or Purchase order for which the appropriate inferior document has not been created yet. However the system does not enables to insert such items which have this option banned by means of Article category - for further information see Article categories, when selection from a superior document these items are not displayed at all.
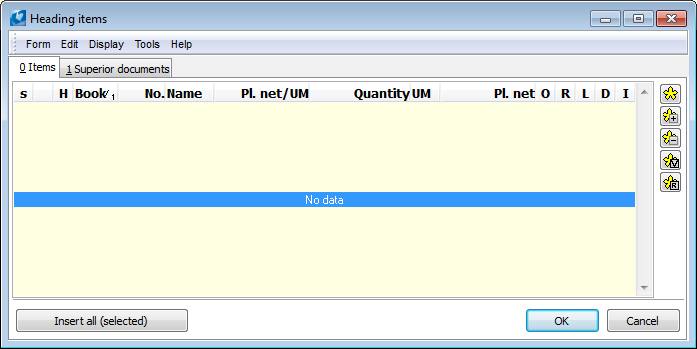
Picture: Heading items book
A new item can be inserted to an inferior document by pressing F6 key and such item is automatically inserted in the superior document as well. On the new item is filled VAT rate from the Article card (according date on the document (with respect to it, on which document is formed):
- order confirmations, delivery notes or delivery confirmations - VAT rate is filled according Delivery date,
- invoice out, invoice in - VAT rate is filled Account transaction date,
- release note, receipt card, reserving card - VAT rate is filled according Invoice date.
It is also possible to use bulk insert using Shift + F6 described in chapter Inserting new items to a superior document. Thus the inserted item are automatically added into the superior document.
|
|
|
Change Item
By pressing Enter key over the selected item in Change mode it is possible to change individual data dealing with this item identically as in the case of the item change in the superior document.
Upon an inferior document issue you can not define higher quantity of the articles than the one that has been defined in the superior document. It is possible to reduce the quantity at the inferior document whereby the original item of the superior document will be split into two new items. The first item will be issued for the quantity of the appropriate inferior document and the second item will contain the rest of the articles without any indication of the appropriate inferior document.
Example: You have ordered 25 pcs of chairs. The contractor will deliver only 15 pcs that will be immediately invoiced. A Receipt Card is issued for those 15 pcs. Later the contractor will send other 5 pcs by post together with the additional invoice issued for 5 pcs. The rest of the chairs will remain recorded in the Order as non-delivered. Three new items under the same name will be stated in the Order instead of the original one but with different flags.
|
|
|
Delete Item
An item deletion from an inferior document can be executed by Del key withal the item will be deleted immediately. This item will remain in existence in the Contract (Order), only the flag of the appropriate inferior document will be changed.
|
|
|
Change Article card on Document Item
After changing an Article card on a purchase and sale item, the confirmation message 'Do you want to maintain the original data for the item?' is displayed:
- 'No' - Cost centre, Contract code, Article code, Device, Code 1, Code 2, Officer, Alternate unit, Prices, Country of origin are filled into an item from the newly entered Article card.
- 'Yes' - values of the fields mentioned above are not updated.
Other fields like e.g. Item name, Batch, Guarantee, VAT rate, Tax type, are always updated on an item when changing Article card.
|
|
|
Change items of documents in bulk
If you want to edit a value in several items at once, you can use the button Change items in bulk on the 2nd page of all purchase and sale documents. Change you can performed in the Change mode. Except invoices in and invoices out, on which you can change the values in Intrastate items and in the Browse mode (also on confirmed invoices).
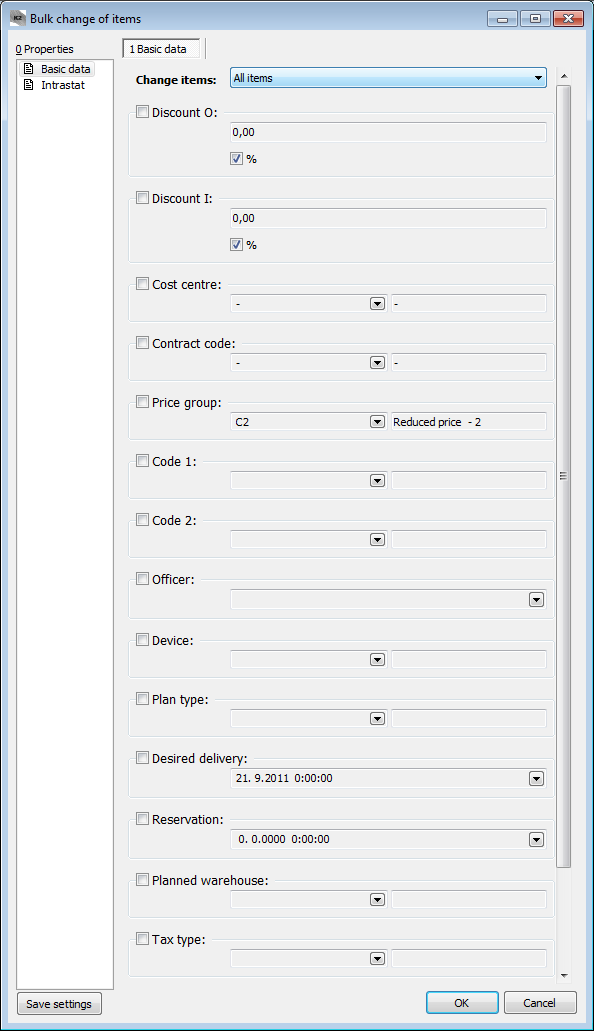
Picture: The Bulk change of items form
In the upper part, the user can set range of items, which he wants to change (all items, current items, marked with an asterisks, etc.). Choice "Non Filled-In" means empty value, i.e. change will performed only on items, which have relevant changed field empty.
It is always necessary to check the fields to be edited, thus the values to be inserted will be accessible. For frequent edit of the same fields, make use of Save settings, which upon the new start of the form always sets the checkmarks the way they were saved. The edit of items is started by OK button, further it is necessary to save the changes in the document. By pressing Cancel button, the form will be closed without saving any changes. Only the changes the user is allowed to will be carried out indeed.
Note: When you start the form, in the values of individual fields fills value of the currently selected item. The fields Rebate O and Rebate I, are filled with the value entered in the field Percent. rebate from the specific customer.
If you activate the form over invoice in or invoice out in the Change mode, it contents two tabs: change Basic data and change Intrastate. If you activate the form over the invoices in browse mode, it offers the form only for data changing of Intrastate.
|
|
|
Multi-documents
This is the possibility of attaching multiple superior documents to one inferior document in the purchase and sale module. An inferior document can be an invoice in, a receipt card, an invoice out, a release note etc. For example, several sales orders can be paid by one invoice out.
In Client parameters on the 2 - Shop tab, you can check the Allow to add superior document from other book and Allow to add superior doc. with different suppl./customer parameters. Their meaning is clear from the title.
It is possible to create multi-documents only on an inferior document with a linked superior document. Furthermore, there cannot be the same inferior document, from which you want to create a multi-document, on the items that you want to attach from another superior document. For example, it is not possible to attach items from any another sales order to a release note, if these items are already in another release note (either confirmed or unconfirmed). Also, you can not create a multidocument from documents with a different VAT calculation method.
To create a multidocument, follow these steps:
- In Change mode, press Ins key on the 2nd page of an inferior document. This calls the Heading items form with two tabs.
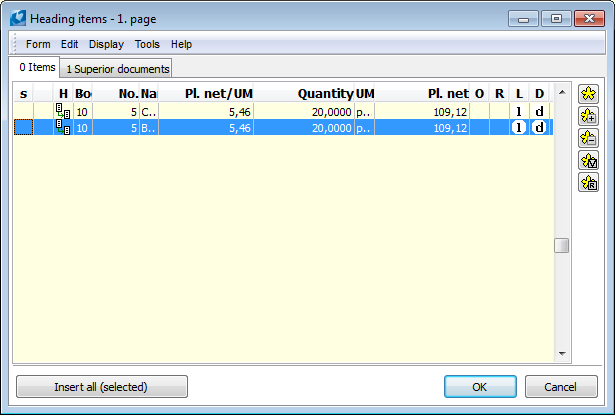
Picture: The Heading items - 0 Items form
- On the 0 Items tab, there are all items of the superior documents displayed on the 1 Superior documents tab (see below) that do not have any created inferior documents yet. Individual items can be entered without marking using the OK button. If you want to enter more items, use the Insert all (selected) button. If no items are marked, all of them are entered to the document. If you want to insert only some of them, mark them by means of the so-called asterisks, where there are also extra icons
 and
and  besides the usual buttons in the Sale module. These icons serve to mark all the items with the confirmed release note, or reserving card. In the purchase we find a similar icon for items with confirmed receipt card.
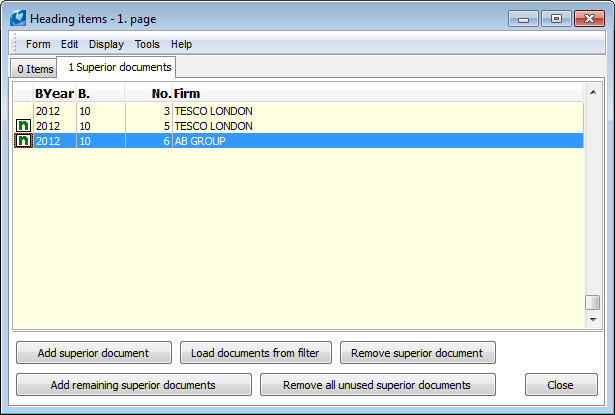
Picture: The Heading items - 1 Superior documents form
- The main superior document linked with the inferior document and the superior documents, which you add here, are displayed on the 1 Superior documents tab. Inserting a new superior document can be executed by using Ins key, or by the Add superior document button. The book with the superior documents appears and then you can select a document, which you want to add, by means of Enter key.
Meaning of the other buttons in the form:
Remove Superior Document |
It removes the superior document from the form and at the same time cancels a link between the removed document and the inferior document. However, in advance, items belonging to the superior document must be removed from the inferior document (by Delete key and then it is necessary to save the executed change). |
Remove All Unused Superior Documents |
It removes all the superior documents that do not have any of their items attached to the given inferior document. It cancels unused links. The function is available in the saved document. |
- After inserting items from the another superior document into the inferior document, the 'H' flag will appear next to the each of these items.
 This flag indicates that the item is from the other than the original superior document. On the inserted item you can change a quantity, a price, etc. If e.g. a note has been entered on the item and if the smaller quantity has been entered on the invoice, this note remains maintained on the both items (on the invoice and on the superior document too). The programme behaves to this item in the same manner as to any other item.
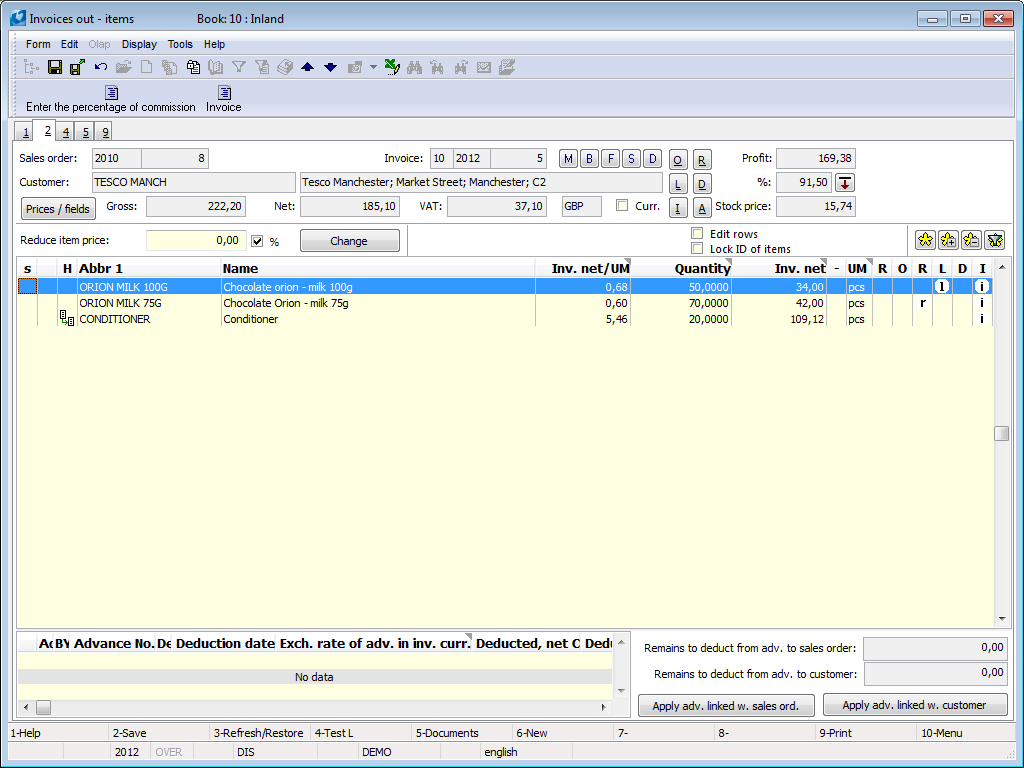
Picture: Invoice out with multiple Sales orders
Note: In Multi-documents, when the parameter Prefer sorting of inferior documents is off, the items are sorted according to ID from the superior document. This order can not be changed other than by sorting according to some column and by saving items by using Shift+F3 keys.
|
|
|
Excise tax
The data needed to calculate the excise tax on the Purchase and Sale documents, i. e. 6 - digit code for tax returns and excise tax, is copied from the Article card into Purchase and Sale item when choosing Article card. Both figures you can found on the tab Dimensions and you can change it.
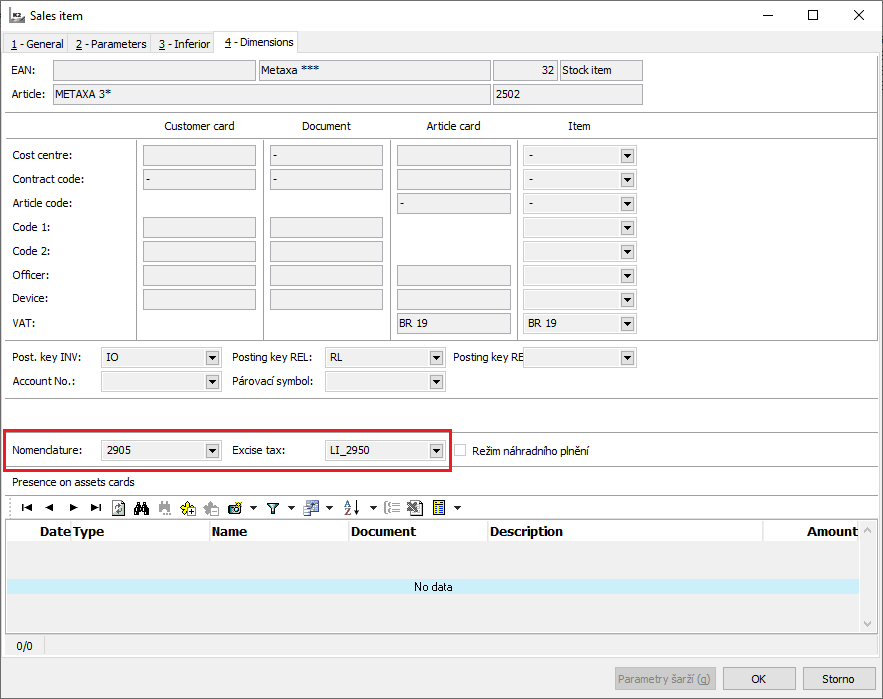
Picture: The form Sales item - tab Dimensions - the data necessary to calculate excise taxes
Individual types of excise taxes you distinguish with Abbreviation of excise tax rate. Always the first two characters of Abbreviation determine the type of excise tax, additional characters are free. When entering a new excise tax rates you create an Abbreviation as follows:
type of excise tax |
first two characters of Abbreviations of excise |
mineral oil tax |
MO |
alcohol tax |
LI |
wine and intermediate tax |
VI |
beer tax |
PI |
tobacco products tax |
TV |
The amount of excise tax is calculated on Invoices out, Invoices in and Release note, and only if the document has checked the box Excise tax on 1st page. When you save a document to calculate the amount of excise taxes, according to data given on items Purchase and Sale(the number on the General tab and the rate of excise tax in the Dimensions tab), and the Articles card (concentration). The amount of the excise tax is saved in the recapitulation of excise tax, which can be displayed on the 1st page Invoices out, respectively Invoices in on the tab Excise tax.
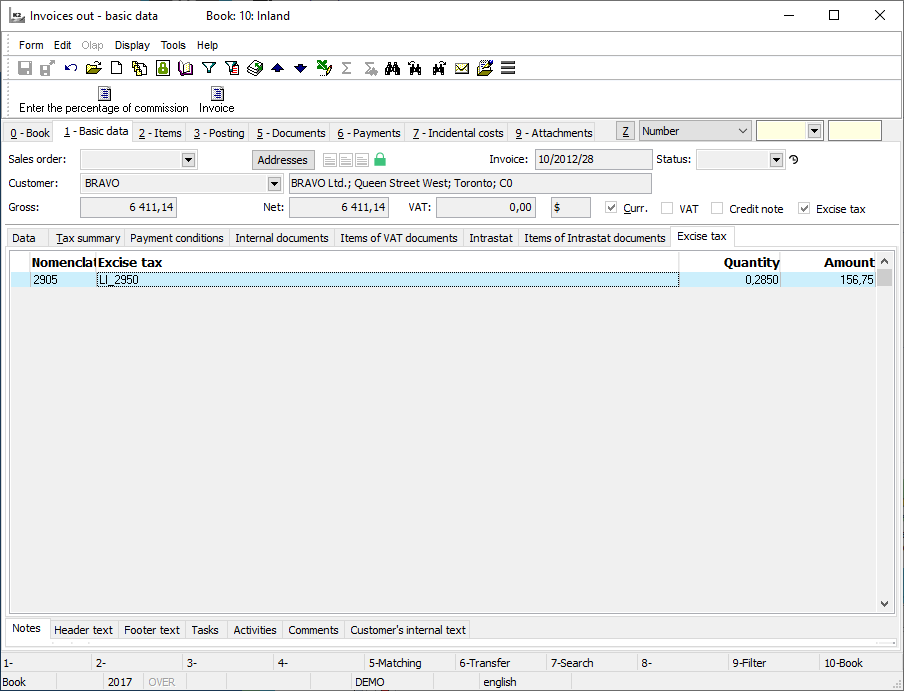
Picture: Invoice out - tab Excise tax - recapitulation of excite taxes
|
|
|
Additional Functions
Functions Description:
F4 |
In Sale you can test possibilities of the item submitting to the Release Note, resp. Reserving Cards (for the Sales Order and the bound inferior document). The key is functional in Change as well as in New record modes. If you indicate items of a sale order to the Release Notes, after pressing F4 key the test of articles will be executed. The present item splits into two new items - for the articles that are on the stock the Release Note will be created and for the rest of articles the Reserving Card will be created. You can use this function e. g. for copy of a sales order that had the items with the release flags - flags of items are copied, you can correct it by the test of availability of articles. |
F5 |
In Change mode, it serves to enter items in bulk to selected inferior documents or to delete items from such documents. |
F6 |
For the bound inferior documents in Change mode it inserts a new item. |
Alt+F10 |
In Change and New record modes it selects stocks for stock documents. |
Ctrl+Enter |
Over the purchase (sale) item it activates the browsing form of article for the appropriate item. |
Shift+F3 |
It enables to rewrite the numbers (ID) of items according to the current classification or according to the order in another document (corresponding to the same superior document). |
Shift+F4 |
Same as F4 - the testing is functional for the only one item. |
Shift+F5 |
Coverage of articles per a customer. |
Shift+F6 |
Bulk insert of items to documents. |
Ctrl+Shift+F8 |
From sales item allow to create a new service sheet together with a new service contract, or this new service sheet may be attached to an existing service contract. The condition is setted module Complaints / Service. |
Other documents can be created in documents in Change mode if you press Alt+Letter of Document Flag keys over the selected item. The flags can be activated and deactivated by the mouse, it means byclicking on the appropriate buttons in the document heading. If the flag in the inferior document is deactivated, the appropriate item is aborted.
Document Flags:
I |
Invoice |
D |
Delivery Note (Delivery Confirmation) |
P |
Receipt Card |
L |
Release Note |
R |
Reserving Card |
O |
Order |
Those flags can be also activated directly in Purchase (sale) item form.