|
|
|
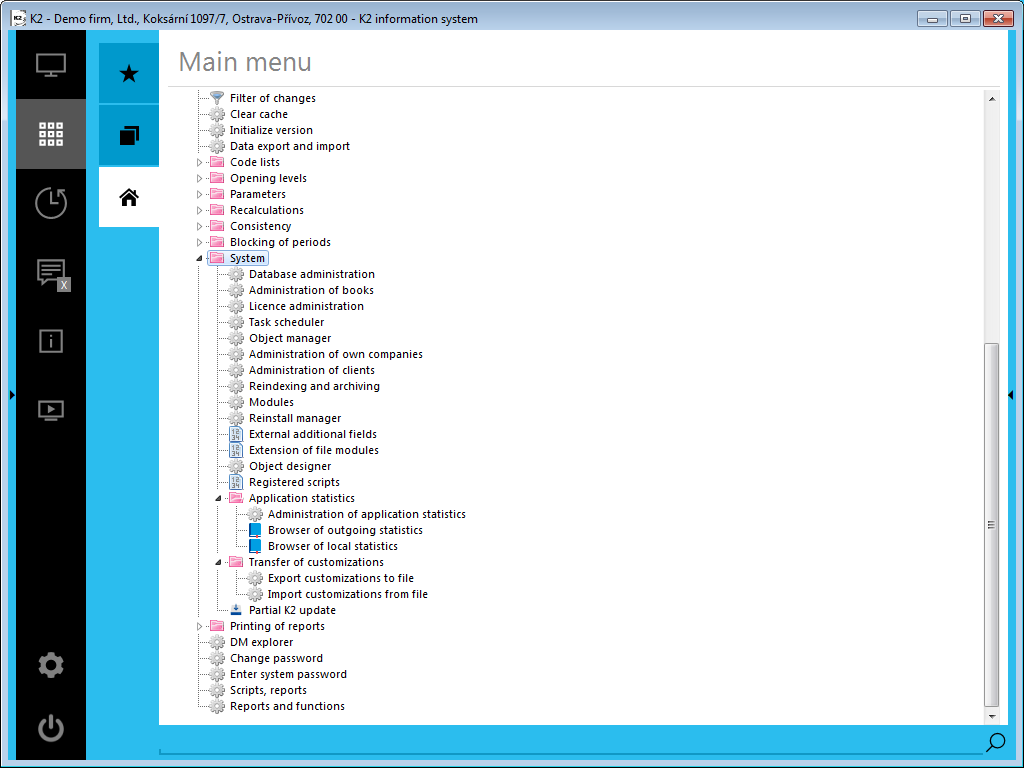
System
It is able to run the function for database administration, books of modules, task scheduler administration from System offer in Administrator module.
Picture: Open menu module Administrator - System
|
|
|
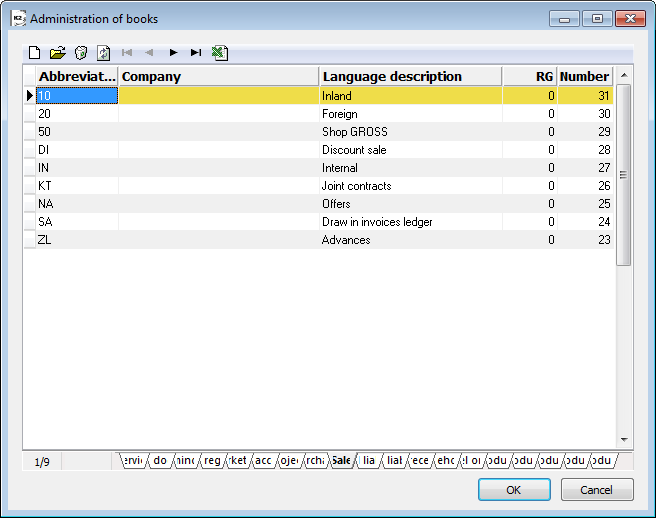
Administration of books
Administration of books is a new created module, which is important for books inserting of particular data modules. It has been created for better clarity and easier entering of particular data modules. In present days it is able to create the modules Service, Internal documents, Reminders, Cashes, Marketing, Bank accounts, Projects, Purchase, Sale and Payroll payables in administration. The function is in tree menu Administrator - System - Administration of books.
For the work with Administration of books it is necessary to have the right Service administration, which you find on the 5th page of user Administration / General.
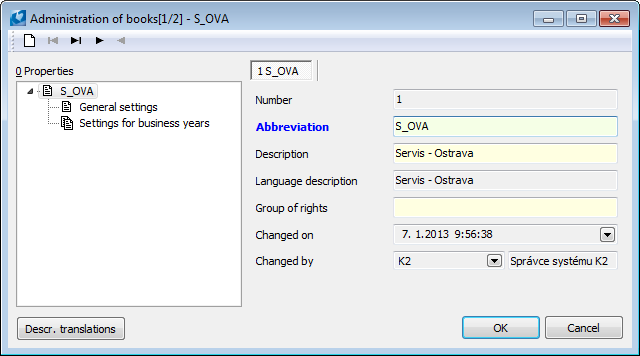
Administration of books has compared to "old" book (Books of warehouses, Books of assets) the advantage that you can create books with the abbreviation longer thank 2 signs. You can distinguish the books according to partner office (e.g. firm "Service - Ostrava" and "Service - Prague" (see picture)).
Picture: Administration of books
Example of "old" and "new" books usage.
Picture: Document Transfer note - old
Picture: Document Invoice Out - new
Administration of books contains module books, which are divided in lower folders of the form (Service, Internal documents, Reminders, etc.). Use either Ins key or icon to create a new book ![]() . Enter the book by means of Enter key, by double click of left mouse button or by button to adjust current book
. Enter the book by means of Enter key, by double click of left mouse button or by button to adjust current book ![]() . It is forbidden to delete records. Arrows
. It is forbidden to delete records. Arrows ![]()
![]()
![]()
![]() are important for ruler shifting one record after the other.
are important for ruler shifting one record after the other. ![]() are important for exporting of table contents into Excel. These buttons have the same function on other forms Administration of books as well.
are important for exporting of table contents into Excel. These buttons have the same function on other forms Administration of books as well.
Form description for a record inserting or editting
Administration of books
Picture: Administration of books - folder Administration of books
Fields Description:
No. |
Generated number of book automatically. Numbering goes through all books created in administration of books (through all modules in folders in lower part of form, see above). |
Abbr |
Abbreviation of a new created book. Max length is 6signs. |
Firm |
Choose company from Own companies form (the list of companies defined for current logged-in client). Just users of this company in term of the set client can work with this book. If field is not filled, then book will be for all firms in that client. |
Description |
Description of book is closely specified that particular book. |
Lang. description |
Description of book, which you can set in the book Language fields(the button Descr. translations). The number of records will be displayed in the table. |
Changed |
Date and time, when the book was created and changed last time. |
Changed |
Abbreviation and name of a user, who has created the book and has made the last change. |
Descr. translations |
After button pressing the book Language fields, where you can save Description of book for various languages (field Language in User parameters). |
Group of rights |
After pressing this button or Ctrl+Shift+F5 keys the book Group of rights will be opened and you can select the group of rights that the created book is accessible for. Group of rights are described in the chapter Administrator - Group of users. |
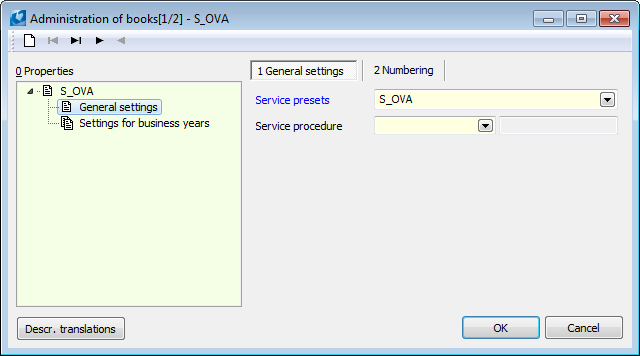
General settings
Folder General settings is different for each module. Description of this folder is in particular part in documentation.
Picture: Administration of books - General settings
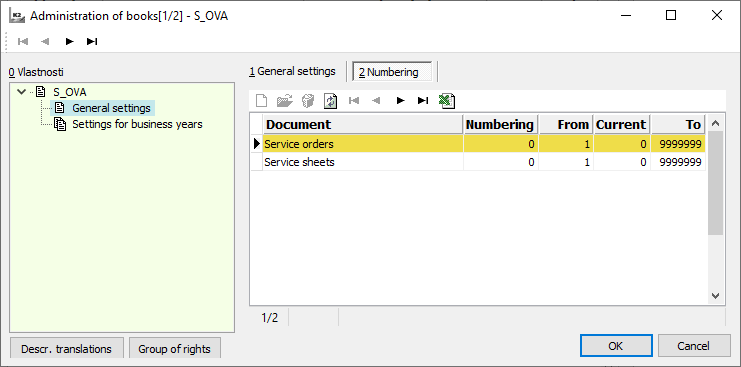
Numbering folder
Numbering does not differ from numbering in "old" books (Books of warehouse, Books of assets).
Picture: Administration of books - the Numbering tab
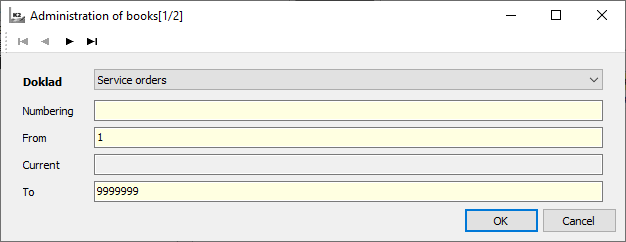
Insert a new record of numbering
Picture: The form for inserting a new record of numbering
Fields Description:
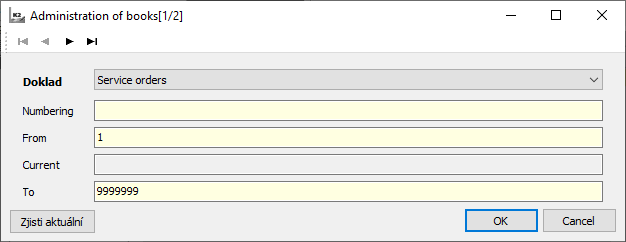
Document |
Drop-down field to select a type of document, where you set the numbering. |
Numbering |
In this field you can set your own numbering. E.g. "1", which is numbered e.g. from 2000. |
From |
You can set here, which number the documents will be numbered from. If you do not enter the field, documents will be numbered from 1. |
Current |
Automatically entered number according to the last created document. |
To |
Set max number, which you will be numbered to. Default value - "9999999". |
Settings for business years
It is the same for all periods by default. It means that the setting in General setting folder will be valid for all periods. You cannot enter settings for each period separately as in "old books". If you want to set other conditions for particular period, you need to create the period in Settings for business years folder. (E.g. Period for 2012 has been created on the picture.)
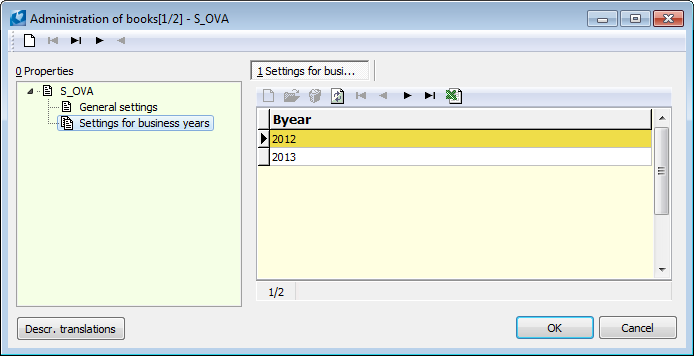
Picture: Administration of books - Settings for business years
Insert new period
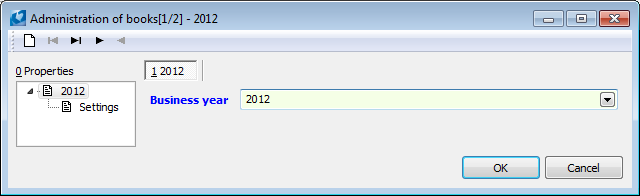
Contrary to original books (Bank accounts, Cash registers) in new books the period is set just for stated year. (Period from, to has not been set any more.) You need to choose particular year from Period book after you open drop-down menu Period.
Picture: Period - Administration of books
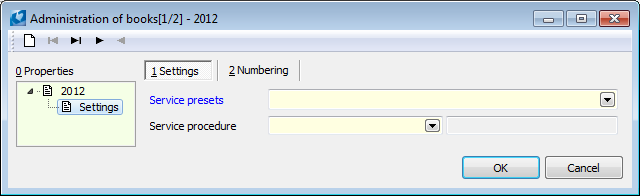
Settings for business years
You can set parameters for particular period in this folder. Fields are the same as in the form Administration of books - General settings.
Picture: Period - Settings
In Numbering folder in the form for new period inserting there is a button Find current. After you press it, number of the last record will appear in Current field.
Picture: The form for inserting a new record of numbering
|
|
|
Licence administration
The function offers detailed information about K2 licence including overview of licence modules and currently signed users. The function is tree menu Administrator - System - Licence administration.
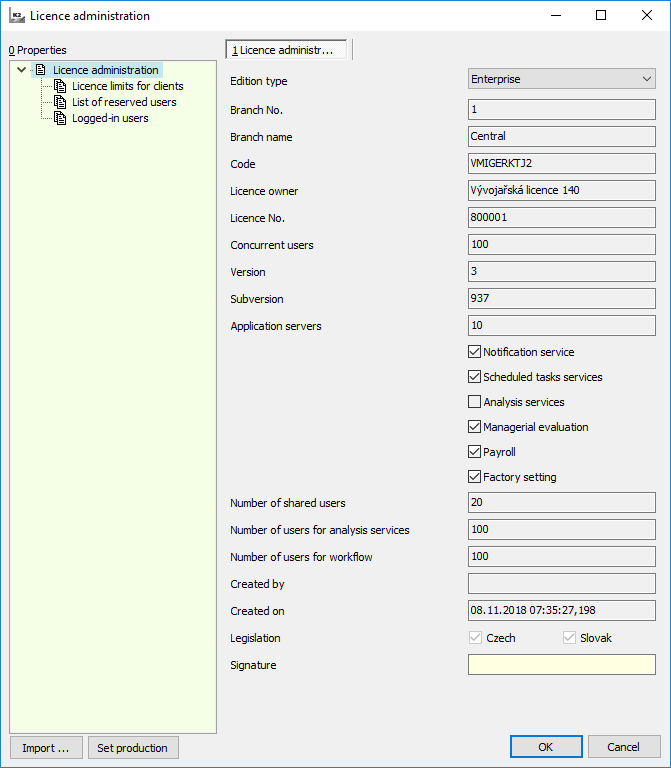
Picture: Administrator - System - Licence administration - folder Licence administration
Fields Description:
Edition type |
Type of bought program edition (Business, Professional, ...). |
Brach No |
Brach No. |
Branch Name |
Name of particular branch. |
Code |
Safety producer code. |
Licence owner |
Name of licence owner (company). |
Licence number |
Licence number (see contract of sale). |
Concurrent users |
The number says the amount of signed users in total. |
Version |
Generation number of version. |
Subversion |
Second part of version number (e.g. 129, 130, 132 etc.). |
Application servers |
Number of application servers. |
Notification service |
If this field is checked, it means that the user has bought the licence for Notification service. |
Scheduled tasks service |
If this field is checked, it means that the user has bought the licence for Scheduled tasks service. |
Analytic services |
If this field is checked, it means that the user has bought the licence for Analytic services. |
Managerial evaluation |
The checked field means that the user has bought the licence for Managerial evaluation. |
Payroll |
If this field is checked, it means that the user has bought the licence for Payroll. |
Factory setting |
User with this licence is able to administer the setting specified just for administrators. |
Number of shared users |
Number of computer connection used by a server of web services. Specified for internal usage. |
Number of users for analysis services |
Number of bought module licence Analytic services. |
Number of users for workflow |
Number of bought module licence Workflow. |
Created by |
User who has created the licence. |
Created on |
Date and time of licence creating. |
Legislation |
Within one K2 it is possible to keep several own companies with Czech or Slovak legislation. A checked box indicates what legislation the user has purchased. |
List of reserved users
Users with reserved licence for logging. The number of (reserved) "users" is free. It is included into the whole number of accessible licences (see Concurrent users field). This way you can take licences for users or for running planned automatic tasks.
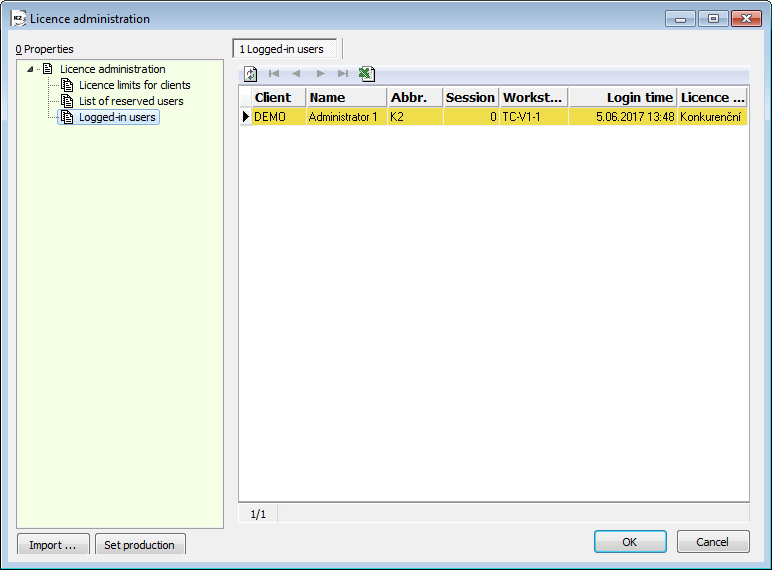
Logged-in users
The list of users currently logged-in K2 program is displayed in Logged-in users folder. For each logging-in there is a client that the user is signed as. Then you can find there name, additional information, workstation, session, login time and licence type. You can find the total number of logged-in users (used licences) in the total number of records in table - the number in lower left corner (no. of record / total number of records).
Picture: Administrator - System - Licence administration - Logged-in users folder
Licence limits for clients
You can limit the number of logged-in users for clients. In the book Administrator in Basic data (1st page) chapter you can set with whose clients are the users logging as.
The Import button is important for import of licence file into database. The button has the same importance as Licence import upon finishing program installation. In this form you can use this button for e.g. licence changing.
Button Set production is important for setting the K2 installation as production. The button has the same importance as Production upon program installation.
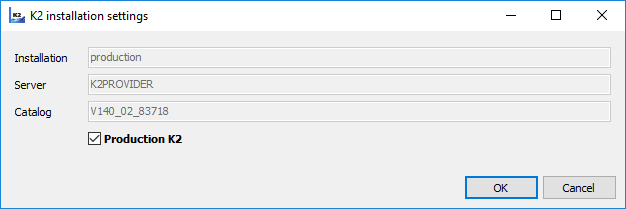
Picture: K2 installation settings
K2 installer and K2 application send on-line information about usage of licence into K2 atmitec company. Among these information is Name, version and K2 edition, server name, catalogue and client, number of users and identification of database platform.
These information is important for efficiency improvement for another plans of K2 development and for prevention of possible incompatibility. For differentiation if K2 installation is production, it is necessary to use the possibility of installation registration as production in K2 installer or right away in K2 application (Administration - System - Licence administration).
Non-production K2 are understood as testing, their function is limited. If K2 program is set as "Production", red line with "Test Test Test Test" text will be displayed on the main form. This text is displayed as watermark in reports as well. K2 icon will get grey in non-production state.
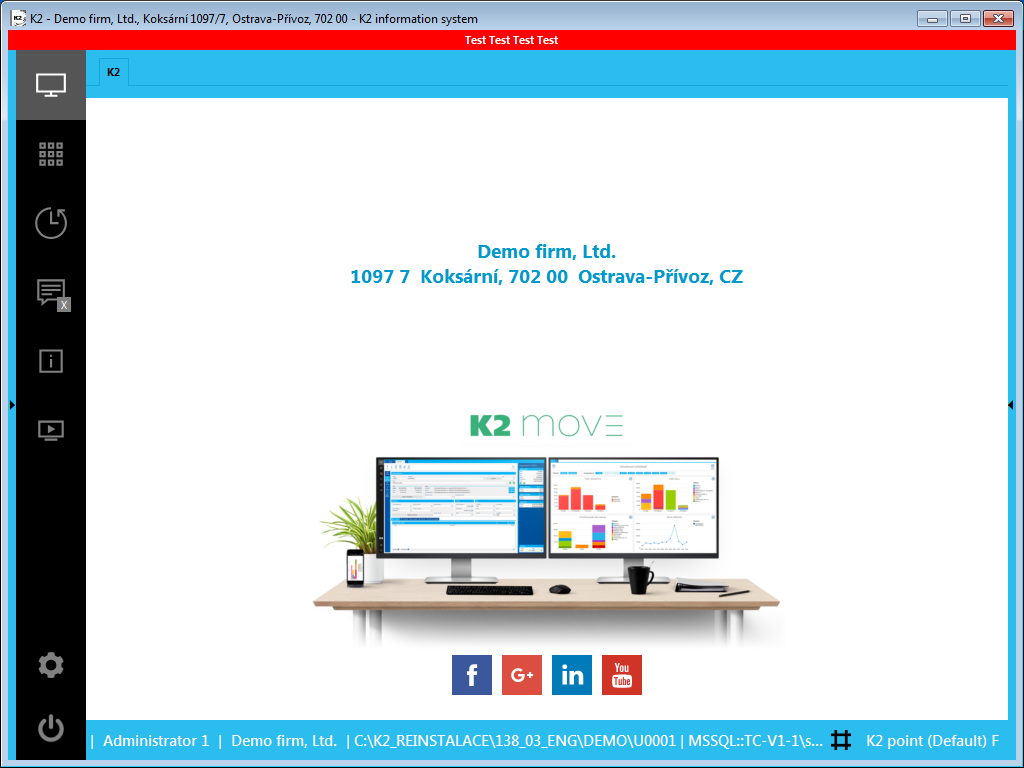
Picture: K2 Desktop - "Non-production" K2
![]()
Picture: Main Task-bar of Windows Operating System, icon shortcut "Non-production" K2
|
|
|
Administration of clients
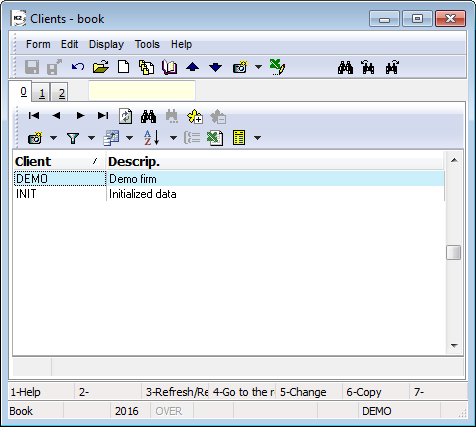
There are two clients preset in the program, these are DEMO client and INIT client. In the DEMO client, there are introduced the demonstration data for individual K2 modules, where the user can practice the K2 functionality. The client INIT does not contain data, because it serves to create a new client. Administration of clients serves for creating new clients and for maintenance of the existing databases by means of K2.
The list of clients you can see on the page 0.
Picture: The Administration of clients form - book
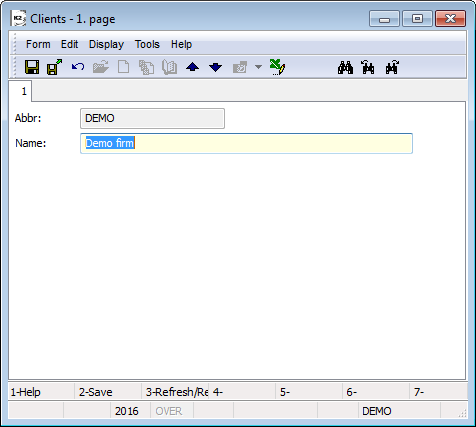
The first page of the form is different for editing an existing client and another for creating a new client by using the Insert key. When editing the existing client, only the description can be changed (the abbreviation must remain the same, because the databases and directories are named by it).
Picture: The Administration of clients form - page 1 in Change mode
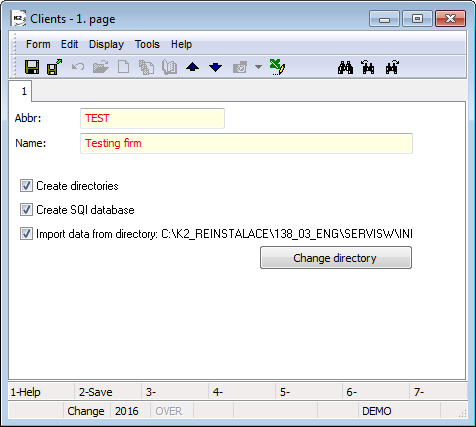
When inserting a new client, the check boxes are displayed on the form. They can be checked arbitrarily. Users who work and manage K2 only from K2 must check all fields.
Picture: Inserting a new client - Ins
Selected fields description:
Create directories |
If this checkbox is checked, a directory with the same name as it is specified in the Abbreviation field is created in the main K2 directory. |
Create SQL database |
If it is checked, the database is created on the server. A name of the database consists of the master database name and the client abbreviation. [Database K2 entered at installation] _ [Client abbreviation]. |
Import data from directory |
If it is checked, the data from the selected directory will be imported into the created database. All "*.des" and "*.hes" files of all data tables must exist in this directory. The files for creating INIT and DEMO databases are delivered with the K2. INIT serves for the creation of a new real company, DEMO can be used for testing on data which are prepared by the company "K2 atmitec s.r.o." All "*.des" a "*.hes" files has to be placed in one directory. The directory can be changed by using Change directory button. |
After pressing F2 key, the changes are saved and actions selected by the user are executed. The user is informed on currently running actions by means of dialogue boxes with the client creation progress. It is not possible to work in K2 during this time.
|
|
|
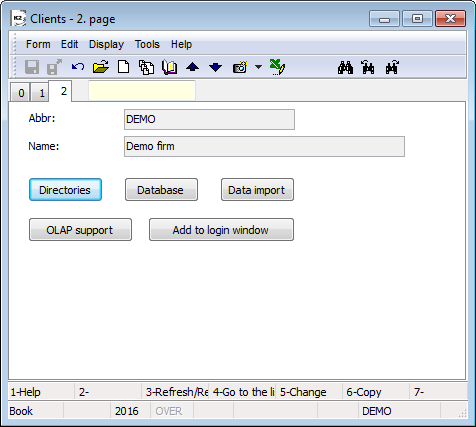
Clients - 2nd page
The buttons for presetting directories and databases of the given company are available on the 2nd page of the Clients form. This buttons are started when creating a new client.
Note: To work with this page it is necessary to set the right Administrator - Clients - Client, page 2.
Picture: The Administrator of clients form - 2nd page
This page is accessible in the Browse mode only. It can be used, for example, when you create a new client by means of Insert key, enter the Abbreviation and Name fields and save the changes. On the 2nd page in Browse mode you can set the required data, i.e. the first line of buttons (Directories, Databases and Data Import) has the same meaning as check boxes on the 1st page.
Buttons Description:
Directories |
After pressing the button, a subdirectory DATA, which is saved in the directory called "CLIENT ABBREVIATION", will be created. |
|
Database |
After pressing the button, the empty tables will be created on SQL server. After only creating the SQL database, the client is not working. |
|
|
If you want to import the data to a new client, a database must be firstly created by means of this button and then the import can be carried out. |
|
|
Note: To create the SQL database, the user logged onto Windows must have the rights of SQL administrator. |
|
Data import |
Data are imported from the set directory to the client, providing that the data exist in "*.DES" and "*.HES" files format. |
|
|
When creating a new client, it is recommended to use data from the INIT directory. If you need to change the set directory, use the Change directory button and select another data source. |
|
OLAP support |
The database called FIRM_DM will be created on SQL server. The database will serve as OLAP support. |
|
Add to login window |
After pressing the button, the client name will be added into the options of Client drop-down menu in the login window of K2 system. |
|
Procedure of data copying from one client to another:
- In the original client, enter into the Database Administration book in the Administrator module and indicate the files, which you want to copy, by means of asterisks (Shift+F2 keys indicate all the files).
- From the Database Administration module menu select the function Form - Bulk Actions - Database Export.
- The data are exported to the directory "CLIENT"/DATA in "*.DES" and "*.HES" format.
- In the Change client form, enter into the 2nd page of the new client and press the Data Import button. In the offered form select the path, which the files are to be copied from, and press OK button.
Other recommendations:
K2 IS presupposes rather that users are assigned to a client which they will work with. If one user is to work with data of more clients, it is recommended to enter the user with more names. The main advantage is that the different rights can be assigned to a user for each client.
It is important to prohibit users from Administration of Users right what prevents from changing users' rights, and Switch over the client right to prevent them from logging into a different client than that is preset for the users.
Note: If you have any ambiguities about the definition of the client, please, contact your consultant.
|
|
|
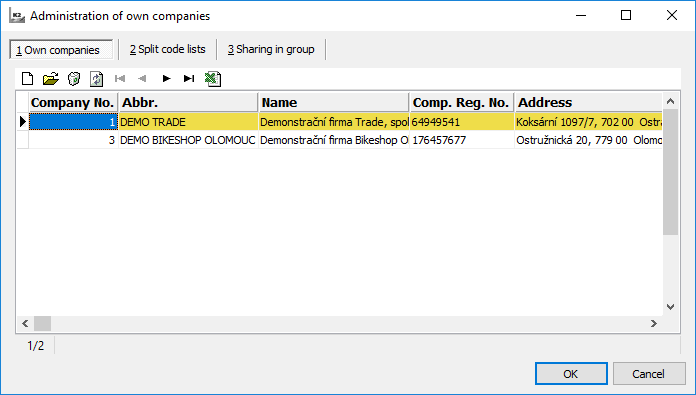
Administration of own companies
By means of this function Administration of own companies it is possible to share the common data among more companies (e.g. parent and subsidiary companies). The function is in tree menu Administrator - System - Administration of own companies. It is necessary to set the right Set own companies (Administrator - General) to create and delete companies.
After running the function, the Administration of own companies form will be displayed where by means of Insert key or by means of the button ![]() you can add the individual companies. The button
you can add the individual companies. The button ![]() or Enter key opens the existing record and enables to change it.
or Enter key opens the existing record and enables to change it.
Picture: Setting of own companies
|
|
|
Own companies tab
The form for the own companies setting contains two tabs: Basic setting and Users.
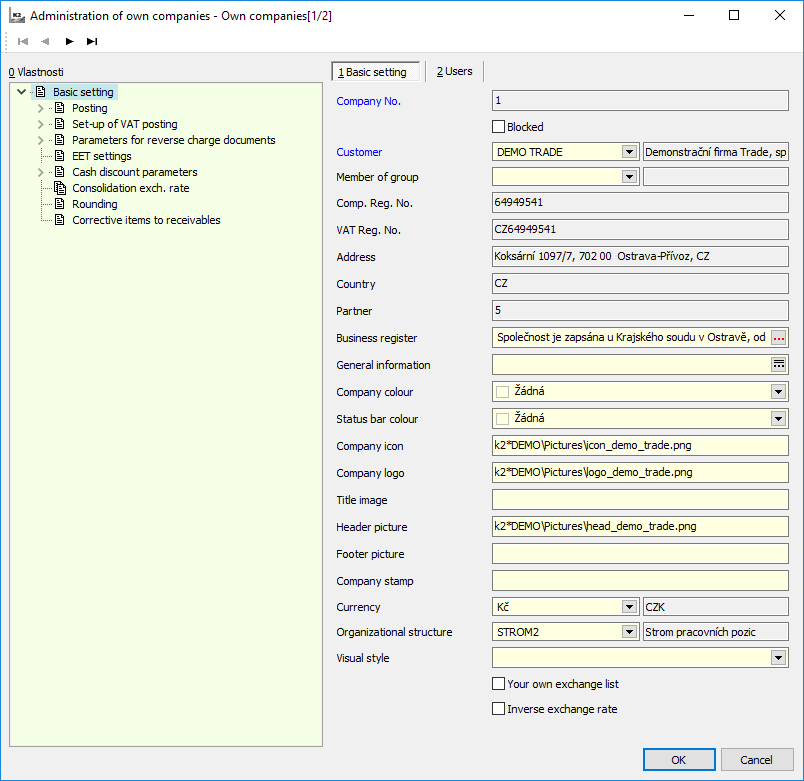
Picture: Own companies form - Basic setting tab
Basic settings
Fields' Description:
Company No. |
Automatically generated number of a created record (company). |
Blocked |
The checked field means that the company is not offered at the bottom part of the K2 screen. You cannot switch into. |
Customer |
Selection of a customer from the Suppl./Cust. book (companies), where you will switch to. |
Member of group |
You can create a group, which includes more companies. E.g. for a case that a company has more branches. |
Company ID-no. |
Added Company ID-no. from customer card automatically. |
Tax ID_No. |
Added VAT reg.no. from customer card automatically. |
Address |
An address pre-filled from a customer card. |
Country code |
Displays an own company country (from a customer). |
Partner |
Number of a partner linked with a customer is displayed. |
Business register |
The possibility to set a text for the business register. It is possible to enter multi-line text after you press the button. |
General information |
It is possible to enter a random text that can be displayed in reports for a purchase and a sale. It is possible to enter multi-line text after you press the button. |
Company colour |
Possibility to set the background colour for a particular company. If the colour is not filled, the company colour is taken. In your own desktop, the colour from your own desktop, if is filled, is overtaken. If the colour is not filled, the colour is taken from this field). |
Status bar colour |
Possibility to set the status bar colour for a particular company. If the colour is not filled, the company colour is taken. |
Company icon |
Way to picture of company icon to be displayed e.g. in reports, in menu of this function or in desktop. |
Company logo |
A path to a company logo for displaying in e.g. reports, in the menu of this function or on the desktop. |
Header picture |
The path to a picture for report header. |
Footer picture |
The path to a picture for report footer. |
Company stamp |
The path to a picture for the company stamp. |
Currency |
Currency of the own company. |
Organizational structure |
Possibility to choose an organizational structure. |
Visual style |
Possibility to choose an own visual style. |
Own exchange list |
If it is checked, the company uses the own exchange list. If it is off, company uses the common exchange list. |
Inverse exchange rate |
If on, rates of foreign currencies are in either all documents or an exch. list displayed in ratio of "x" units of foreign currency to 1unit of basic currency (the currency is on the 1st page of client parameters). If off, exchange rates of foreign currencies are displayed in ration "x" units of basic to 1 unit of foreign currency. |
In Basic settings you can run these functions:
- Accounting - the description of functions is stated in the Accounting manual,
- Set up of VAT posting and Parameters for reverse charge documents - the description of functions is stated in the Accounting manual,
- Parameters for reverse charge documents - the description of the function is stated in the Accounting manual,
- Set-up of EET service - the description of the function is stated in the chapter Settings of EET service,
- Discount parameters - the description is in the Finance manual,
- Consolidation exch. rate,
- Rounding - the description is in the Rounding.
Users
Here you can select the users, who will have the access to this company. After you press Ins key or the button, ![]() the form will be displayed into two parts - Available records and Selected entries. You can select the users by left mouse double click
the form will be displayed into two parts - Available records and Selected entries. You can select the users by left mouse double click ![]() you can select a user. This way the selected records will move into Selected entries. If you want to put them back into Available records you need to use double click again
you can select a user. This way the selected records will move into Selected entries. If you want to put them back into Available records you need to use double click again ![]() .
.
Note: The user with the right Administrator - General - Configure own companies has always access to all own companies, regardless of this setting. If no user is defined on the Users tab, all users have access to this own company.
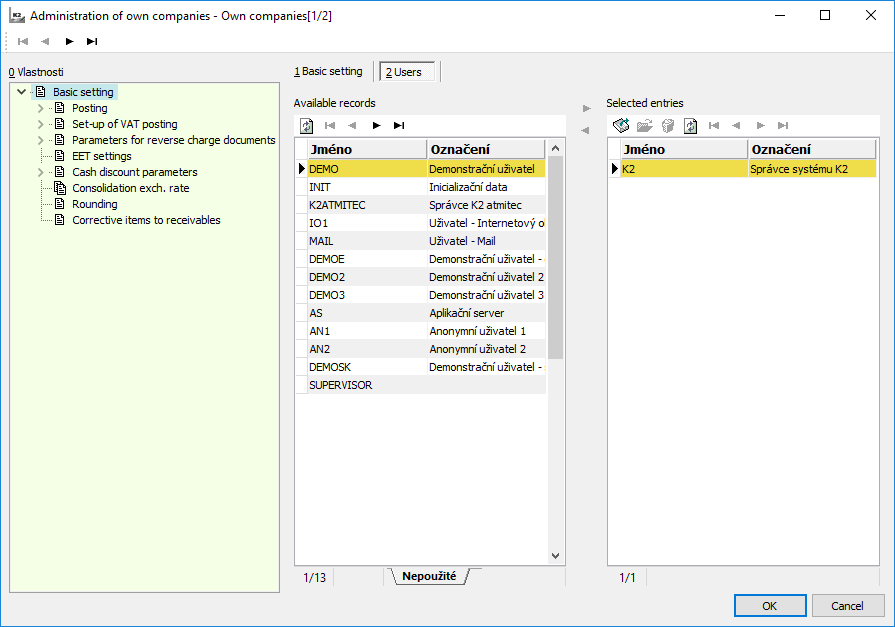
Picture: Own companies - Users tab
In K2 you can switch among companies either in navigation bar, or in bottom part of the screen by pressing the left mouse button on the currently active company and by selecting the requested company.
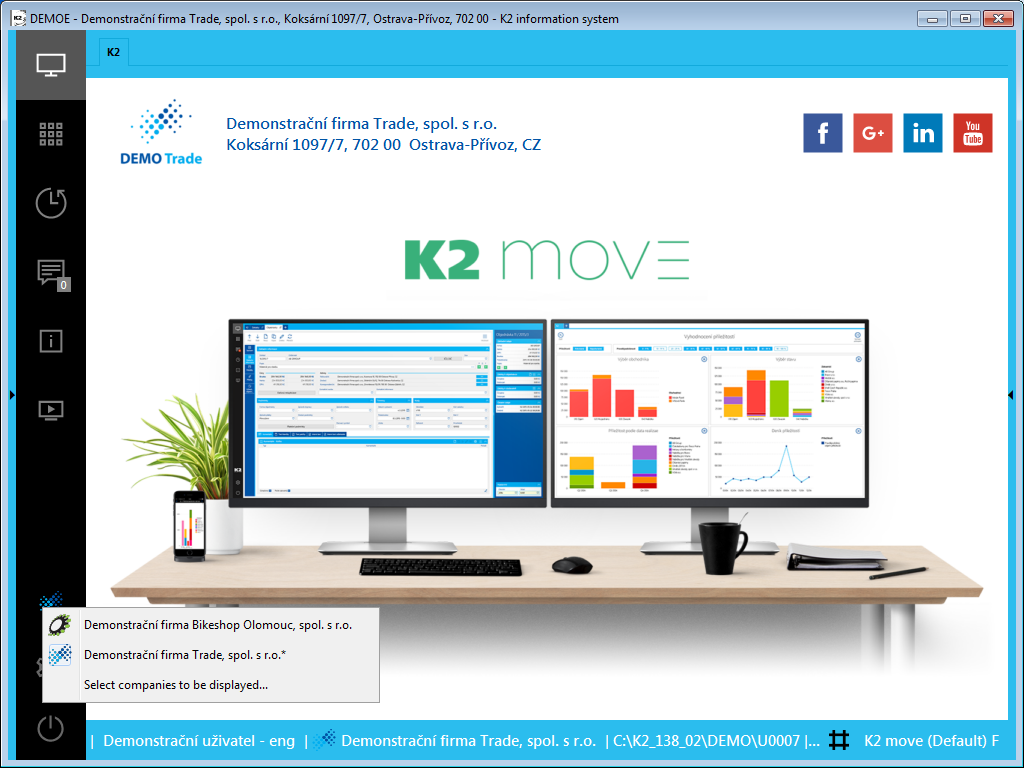
Picture: Switching among companies - navigation bar
Picture: Switching among companies - the bottom part of the screen
Reports take the company, where you are currently switched.
If you switch to other company, the K2 interface will be updated, all unsaved docked folders will be closed.
|
|
|
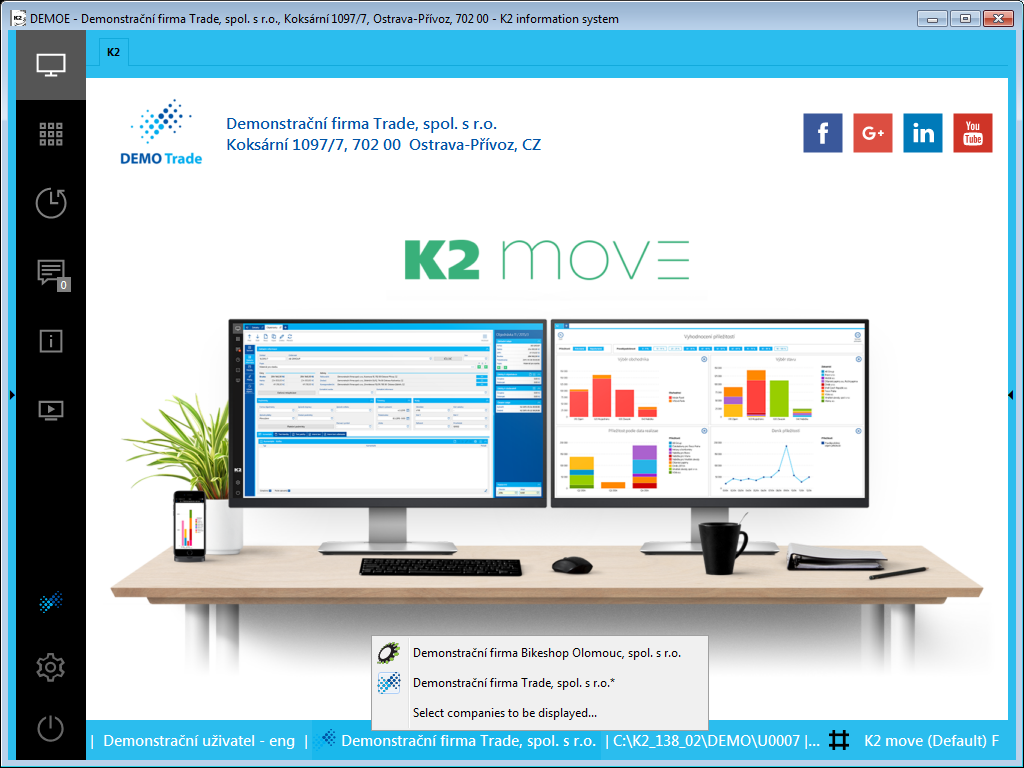
Picture: Own companies form - Rounding folder
Selected fields description:
Rounding constants |
Set value will be either figured or subtracted to an amount in tax summary for rounding purposes (Net, VAT or Gross) or to a price in a heading of invoice (just Gross). Only for the final amount the mathematical rounding will be then used for. You can achieve rounding up or down by this one. For example, if the tax should be rounded GBP up, then set +0,499 into constant and set value 1 into order. Then the tax amount 3,02 in document with constant will be increased to 3,519, which is mathematically rounded to 4. |
Rounding order |
It rounds the appropriate amounts in Tax summary or in the invoice header to a multiple of the specified value in the parameters. E.g., if the Invoice In Net price equals 100,16 and you have 0,10 value in purchase order, then the Net invoice price will be mathematically rounded to "integer", those to 100,20. |
Gross of invoice |
It evaluates the whole (header) Gross invoice price. We do not recommend this type of rounding, as it rounds just the final amount with tax and that one cannot meet the total sum Net + VAT. We recommend to round by means of Payment method on invoice instead. More about rounding is described in an appropriate documentation. |
Rounding error |
It means a value of the document currency. It is useful either in foreign or domestic currency. In case of payment in foreign currency, it is possible that the paid amount that is different with invoice price (exchange rate change) can change to basic currency after transfer. If this difference is in tolerance of Rounding errors, the payments are considered as arranged and the amounts of payment and invoice will be compared (see Bank statements - Items (1st page)). In case of payments in basic currency, the field is monitored on the 6th page of invoices. If this one if lower than the value of Rounding errors, the invoice is signed as paid (see Payments 6th page). |
|
|
|
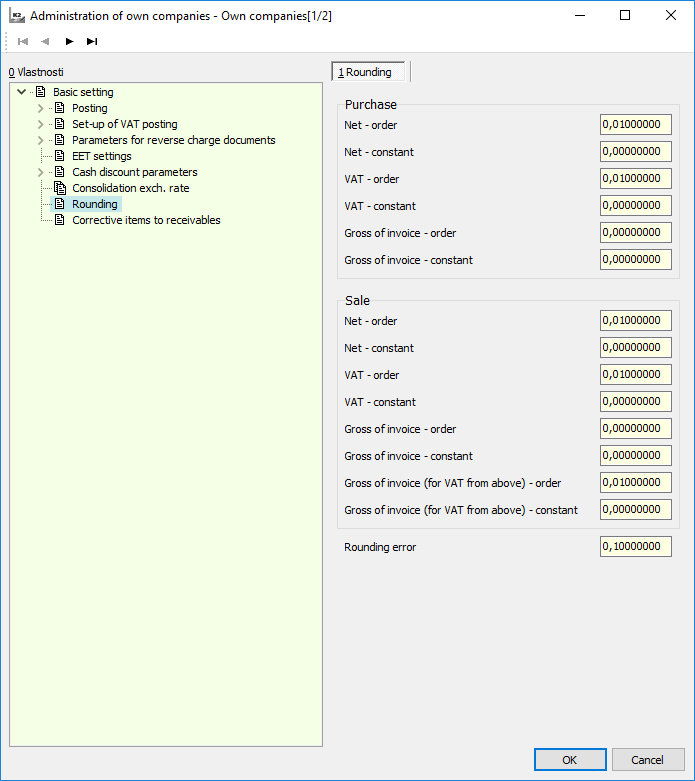
Split code lists tab
Picture: Administration of own companies - the 2 Split code lists tab
Each own company can use a different part of the code list. After being split, the selected fields of the code list have a different value in each own company (VAT rate in Articles, Bank Account and Currency in Customer).
Note: If the Customer code list is split, the Partners for marketing code list will also be automatically split and vice versa. Matching symbols for accounting and Employments code lists are split obligatorily.
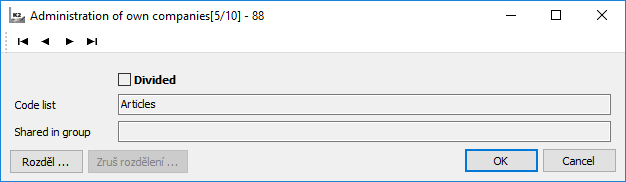
Picture: The record for splitting the Articles code list.
The code list can be split by means of the Split button. Splitting can then be canceled with the Cancel Split button. A split can be cancelled only if the code list is not shared in a group.
Note: It is always necessary to restart K2 after making changes in the dividing of code lists.
Attention: If a user is authorized to work in multiple companies at the same time and some code lists are split, it is necessary in order to all data modules used in the scripts and reports set the correct context of the own company by using the functions SetDataMContext and ReleaseDataMContext.
|
|
|
Sharing in groups tab
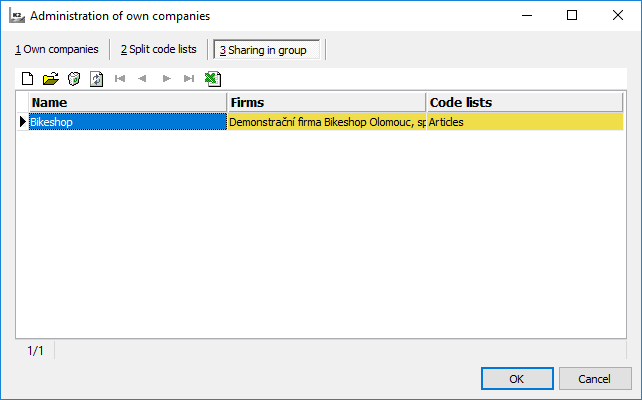
Picture: Administration of own companies - the 3 Sharing in group tab
On this tab, you can define groups of own companies for which the selected code lists will be common, ie when you create an entry in a given code list, a record is created in all companies in the group.
By Ins key or by means of the button  create a new group. On the tab 2 Own companies check all own companies for which you want to share the code lists. On the tab 3 Shared Code lists, check all the code lists we want to have in common for the given companies group. There are only code lists, which have been divided in the form Administration of own companies, see the Split code lists tab.
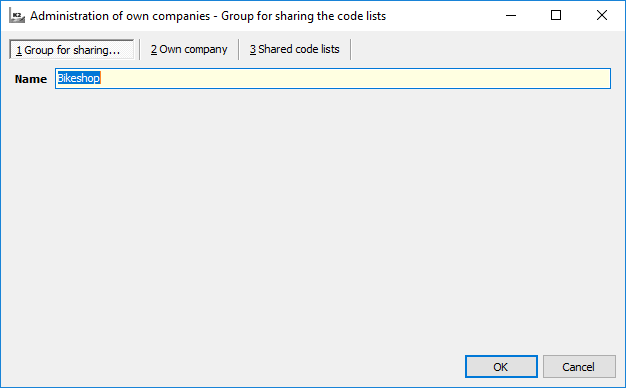
Picture: The Group for sharing the code lists form - the 1 Group for sharing tab
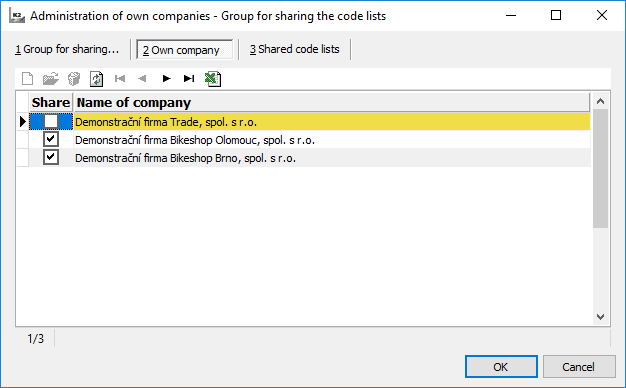
Picture: The Group for sharing the code lists form - the 2 Own company tab
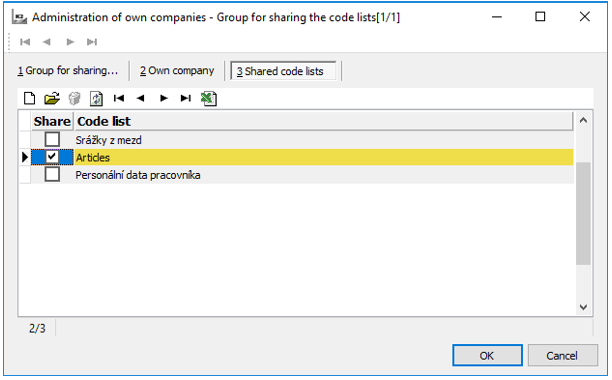
Picture: The Group for sharing the code lists form - the 3 Shared code lists tab
|
|
|
Function of Splitting Code Lists in Universal Forms
If a code list is split see The tab Split code lists , the marked records from the given code list may be assigned in bulk to the code list of the different own company by using the function Assign record to own company. The function is available in the Menu - Bulk actions - Assign record to own company. By the same way, the common record can also be removed from some own company by using the function Exclude record from own company.
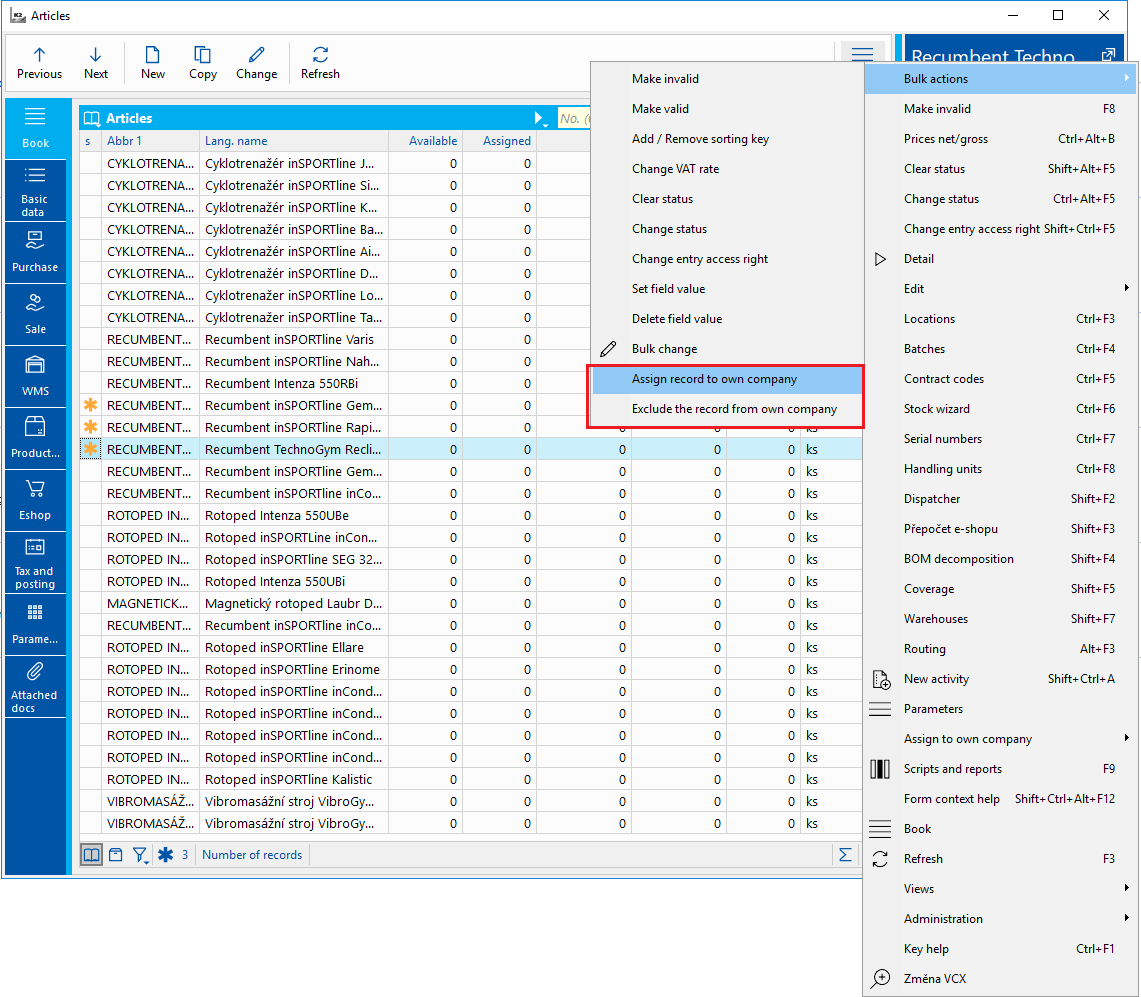
Picture: The Articles code list - the function Assign record to own company
The Companies button shows in brackets the number of own companies in which the record is included. You can display these own companies after clicking the button.
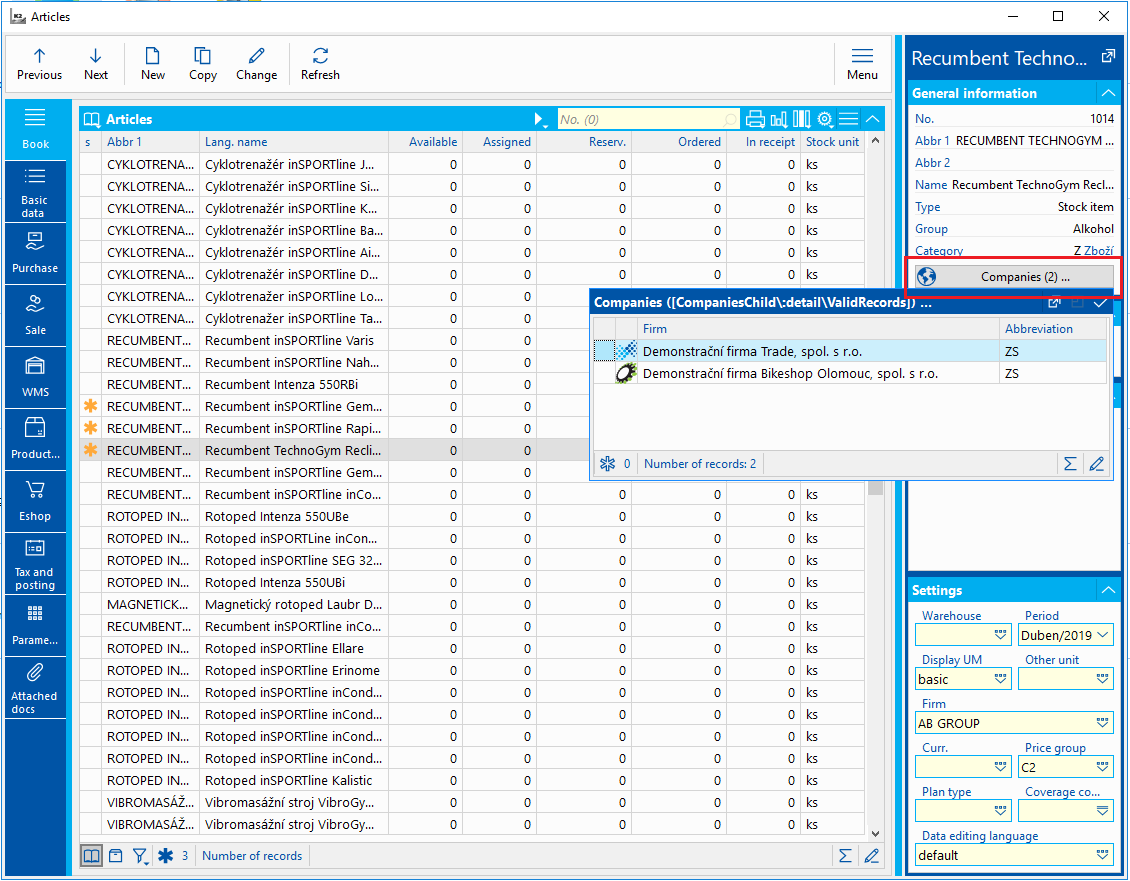
Picture: The Articles code list - Companies button
|
|
|
Task scheduler
Advantage is that the actions in Task scheduler run on application server and so the users can sign to it from any place and without K2 running. You can check the tasks from any K2.
|
|
|
Scheduler settings
It is necessary to have the AS installed. Then the Task scheduler will work. (Description about installation is in the document K2 Setup - chapter IS K2 Application server.) You can find "K2.ini" in the file of installed AS and then you need to enter "SCHEDULESERVICE" parameter, or "SCHEDULESERVICE=1" (1 - ON, 0 - OFF). Then you can run appl. server and log into K2 system.
In Licence administration in Logged-in users folder you can check if you are connected with application server (see red frame on the picture).
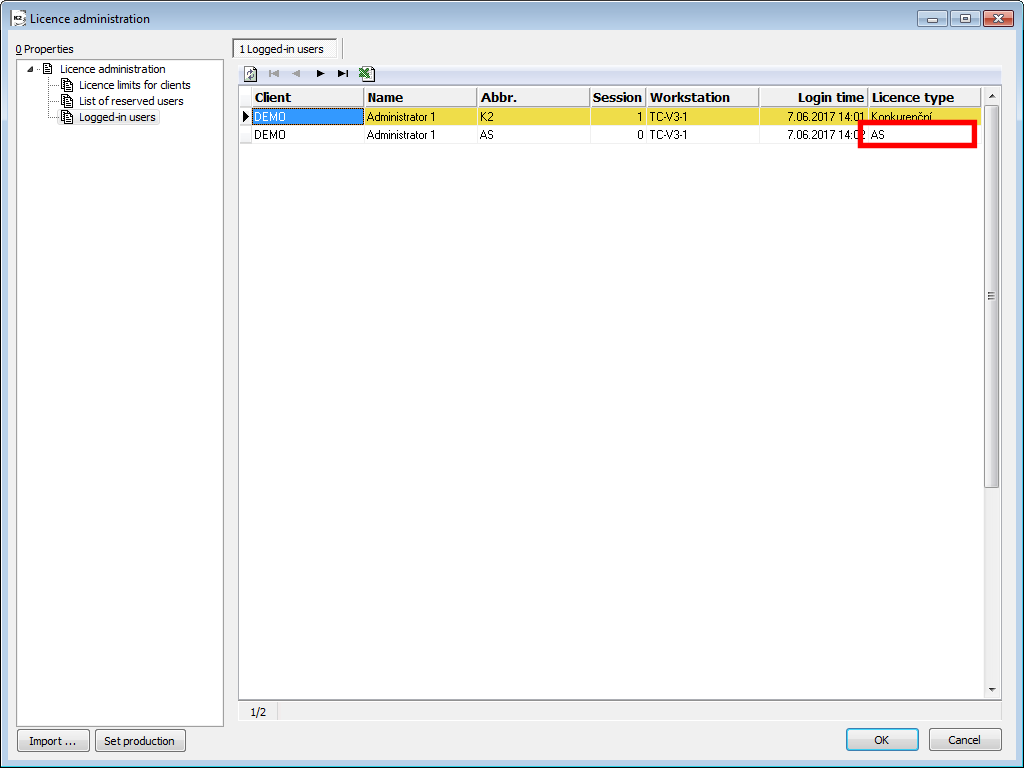
Picture: Licence administration - users logged on to the application server
Another condition is to have the licence for Task scheduler service in K2. You can check if you have it in the Administrator - Licence administration, Licence administration folder. Task scheduler service field must be checked.
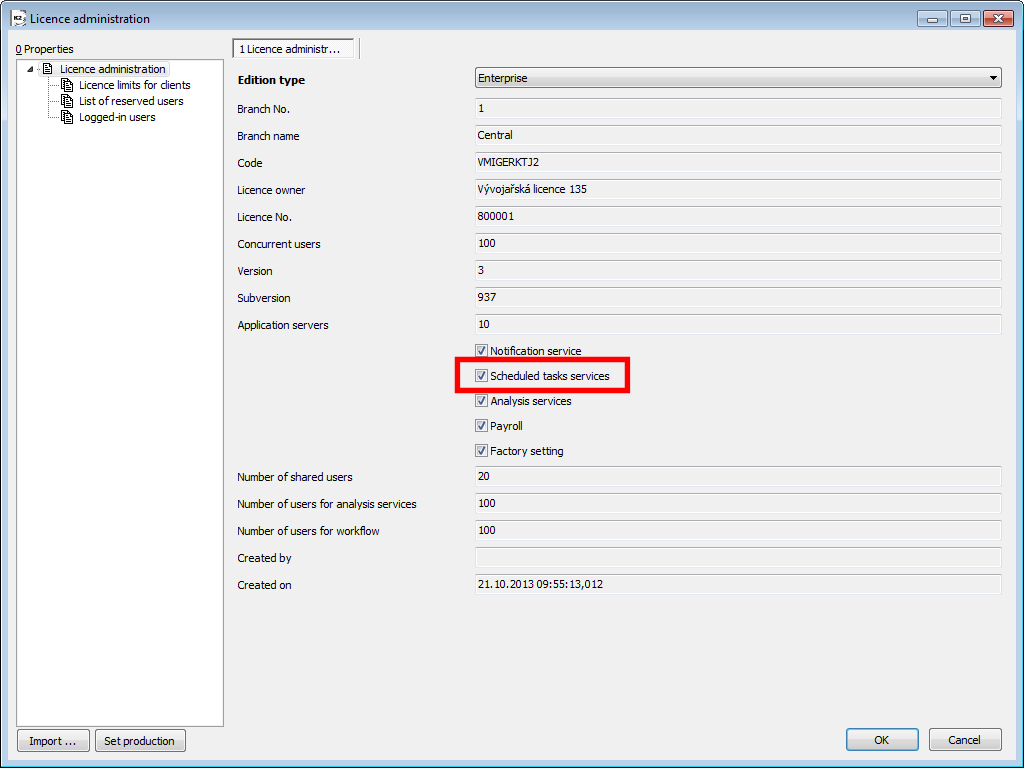
Picture: Licence administration - Scheduled Tasks Services
The right Service actions is necessary for the work with the Task scheduler. The right is on the 5th page of Users - Administrator / General.
Task scheduler function runs from the tree menu Administrator - System - Task scheduler administration.
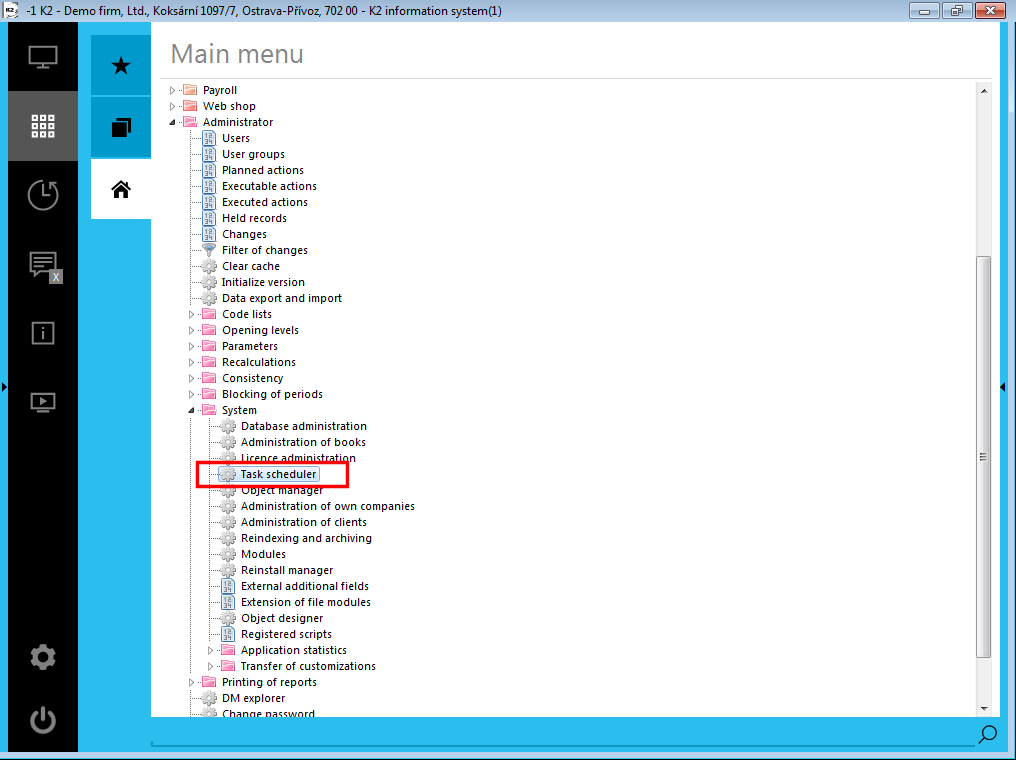
Picture: Tree menu - Task scheduler
The form Task scheduler will be displayed. In the lower part of the form there are two folder tabs Enabled and Forbidden, you can switch between them. The record display is conditioned by Enabled checking field, see below. Records that have not checked that field will be displayed on Forbidden folder.
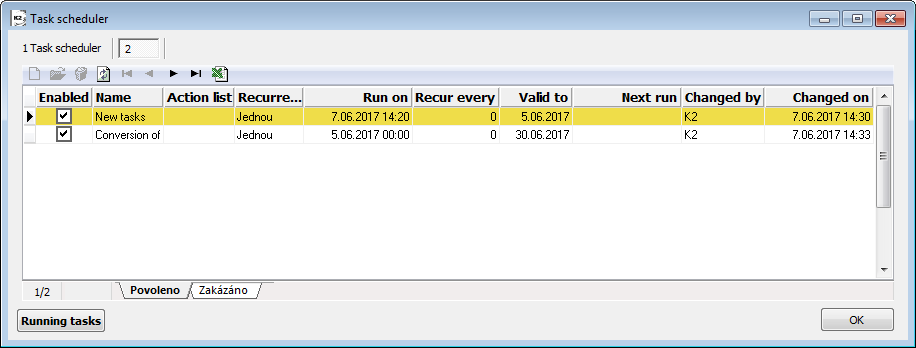
Picture: Form with preset tasks
Column "S" values (last run status) and "Last run" (date and time of the last run) will be loaded up from the last start of that task.
"S" column is a graphic view:
|
the task not run yet |
|
the task has finished successfully |
|
the task has finished with error |
|
Log in error |
|
The task was interrupted |
|
OK, error in data |
|
OK, warning in data |
There is the Running tasks button on the form. After you press it, the form, where are all currently running task, is displayed. The "Relation" column contains the user login (user ID/session ID) under which the task runs on K2_AS. "Was running" column displays time of task run in application server.
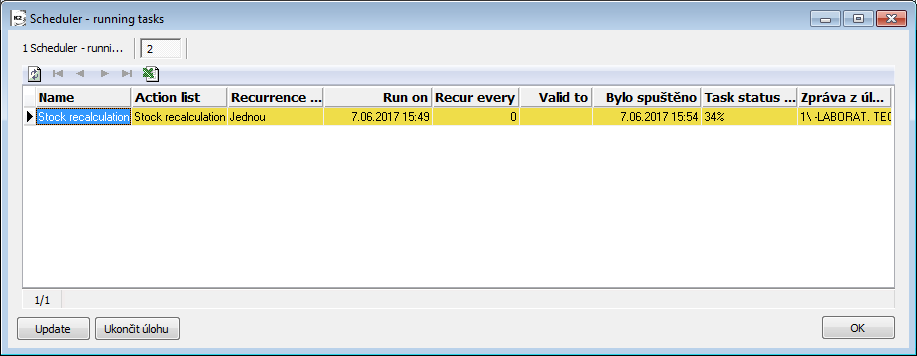
Picture: The form with the running tasks
The form is actualised each 5sec automatically. The actualization can be executed any time by Refresh button manually.
You can stop the running tasks by means of Finish task button. This termination is forced, opened files and connections will be closed immediately. This function should be used just in the distress, not as a common way of finish.
New task
In the Task scheduler form, you can create a new record by Insert key or by ![]() button. The Task scheduler form opens.
button. The Task scheduler form opens.
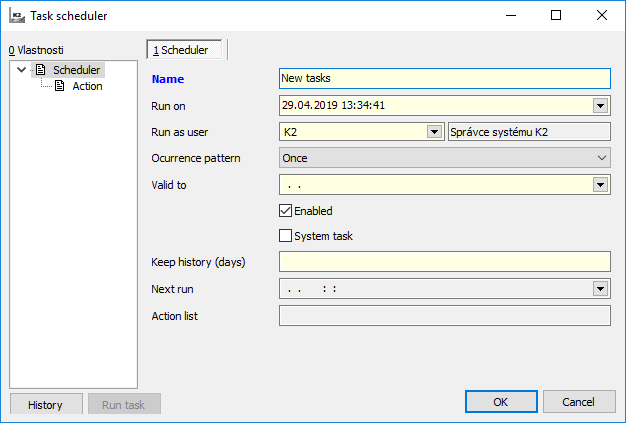
Picture: New task - folder Scheduler
Fields Description:
Name |
Task name. |
Run on |
The date and time, when the first task will be calculated from. |
Run upon the user |
The user abbreviation, which the task is going to run with. |
Recurrence pattern |
Frequency of task running - Once, Daily, Weekly, Monthly, Hourly, Minutely. |
Recur every |
Frequency of recurrent task in entered time interval. E.g. If you have Weekly recurrence pattern and 3 recurrence entered, then the task will run every 3rd week. |
In days |
Restriction of days in week, when the task should run. E.g. if you check Monday, Tuesday, Wednesday, Thursday and Friday, the task will run just in work days. |
Valid to |
The date until which the task will run. If this field is filled just in one-time action, then the action after all will be deleted automatically. Other actions follow the period time. |
Enabled |
The checked field means that the task is set as an active and will run. If this field is not checked, this task stays in the list, but will not run. |
Next run |
The date and time of the first run. |
Actions list |
List of actions set on Action folder. |
In case the field Recurrence pattern will be entered with the value Weekly, Daily, Hourly or Minutely, checking fields for days in week will be displayed. Here you can select just those days when you want to run the task.
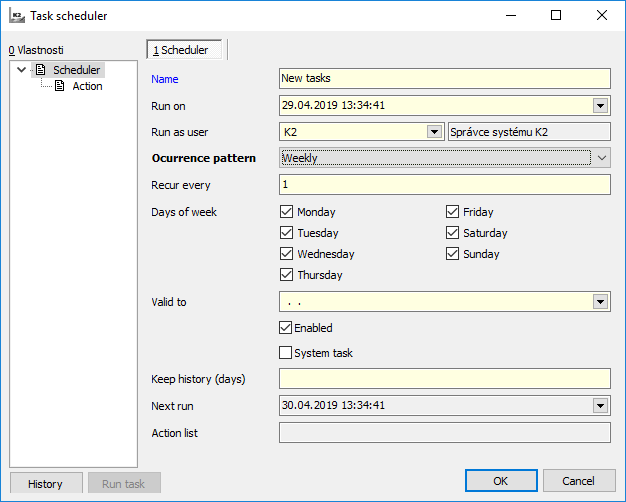
Picture: New task Recurrence "Weekly"
You can check months and days in the month if you select Monthly.
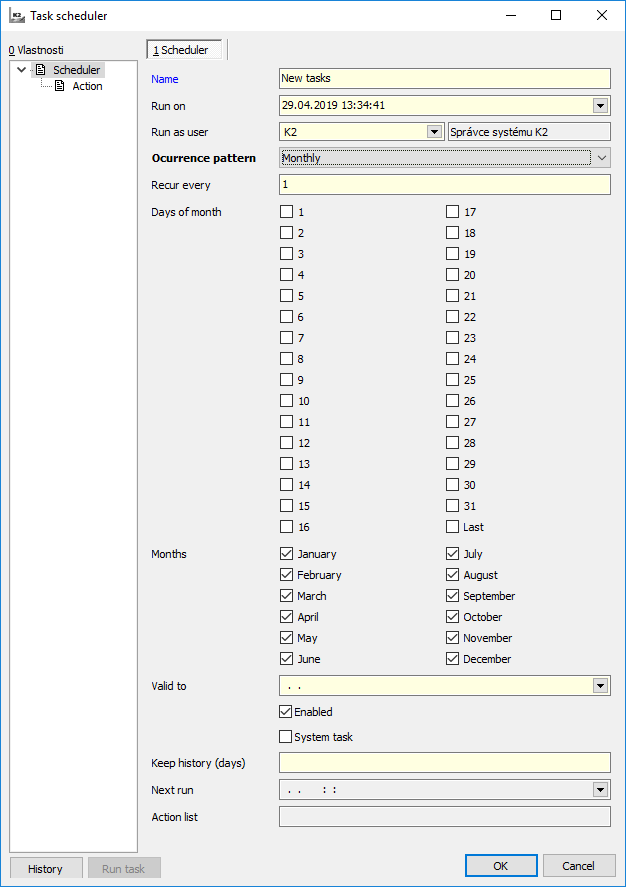
Picture: New task - Recurrence pattern "Monthly"
In case that the Recurrence field will be filled by Minutely or Hourly value, besides days in week, the field In hours from and In hours to will be displayed as well. This field is important to limit the time, when the task should run (e.g. from 1 to 16hr).
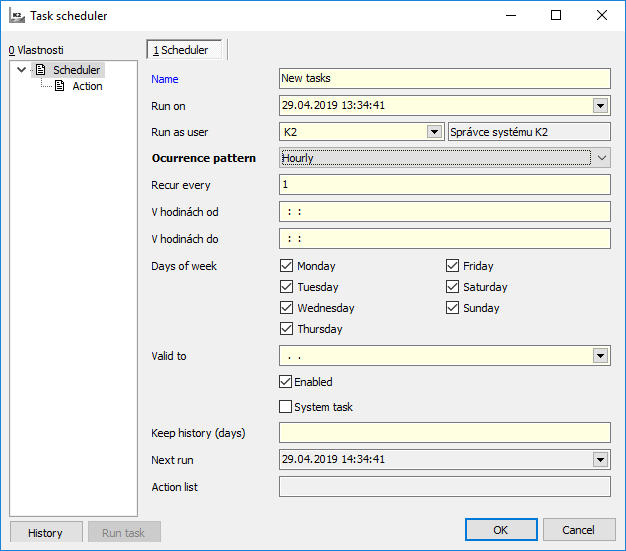
Picture: New task - Recurrence pattern "Hourly"
On the Service settings for task scheduler form there is another folder called Action, where you can set particular reports, scripts or functions.
Action folder tab
As the Stock recalculation script does not need data module, the examples of filling the Action folder are in the script called Penalization.
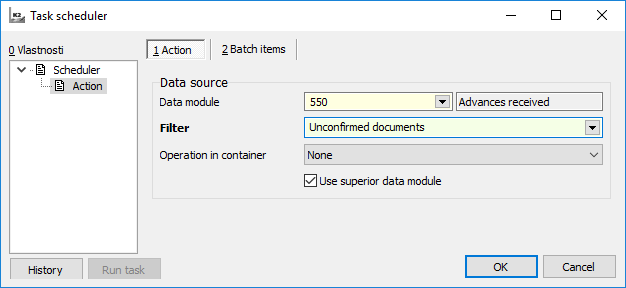
Picture: Action - the Action tab for the Penalization script
Fields Description:
Data module |
The data module, where a script, a report or a function will run (batch items). |
Selection |
Possibility to choose the existing selection in the selected data module. Batch item will run upon this selection. |
Operations on filter |
Records selected in selection can be inserted, added, deleted, ...from filter by means of function in this drop-down field (the function is the same as in selections - chapter Conditions Tab). |
Use superior data module |
The field serves so that reports, scripts and function get as the current data module either data module defined in Data resources or, if it is possible, the data module that is currently active in the book - without adjustments. |
Batch Items folder tab
Picture: Action - Batch items folder tab
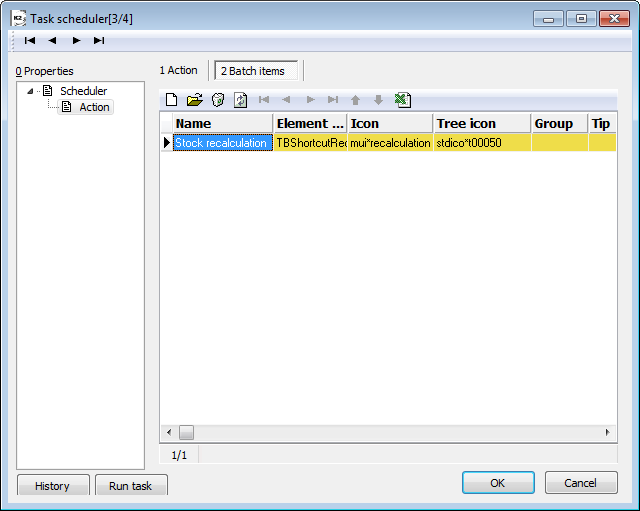
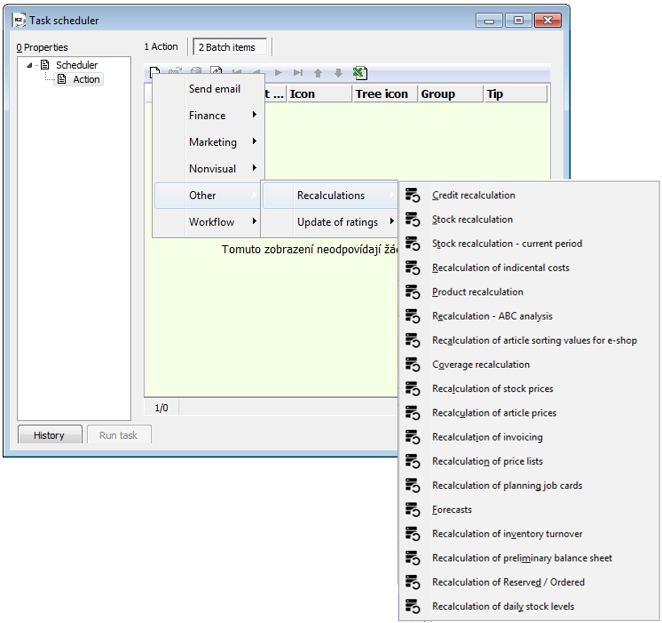
By means of Ins key or button ![]() you can insert a new record. As a batch item, you can insert a report, a script or a function. The procedure how to insert report or script is the same as in inserting on a desktop (see the chapter Work with icons). The functions Products recalculation, Stock recalculation and Stock recalculation - current period are described in the next chapter called Standard actions.
you can insert a new record. As a batch item, you can insert a report, a script or a function. The procedure how to insert report or script is the same as in inserting on a desktop (see the chapter Work with icons). The functions Products recalculation, Stock recalculation and Stock recalculation - current period are described in the next chapter called Standard actions.
Picture: Batch item
It is possible to edit just the tasks that are not currently running.
The advantage of Task scheduler is that you can see the changes immediately, without necessity of K2 restart.
Buttons Description:
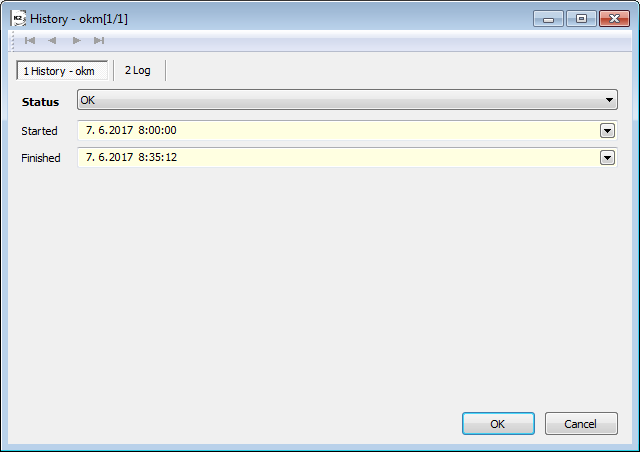
History |
History of task execution - start time, end time, and the result of running ("OK", "Error", "Forced shut down"). |
Run task |
This button enables to run the task immediately, independently on the settings. |
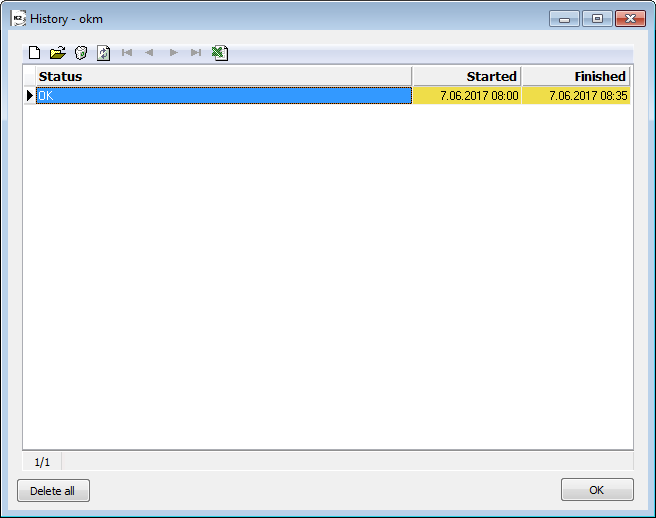
Picture: The Stock recalculation history form
By this button  you can remove one or more marked records.
Buttons Description:
Delete all |
Use this button to quickly delete all records in history. |
Picture: The Stock recalculation history form - History tab
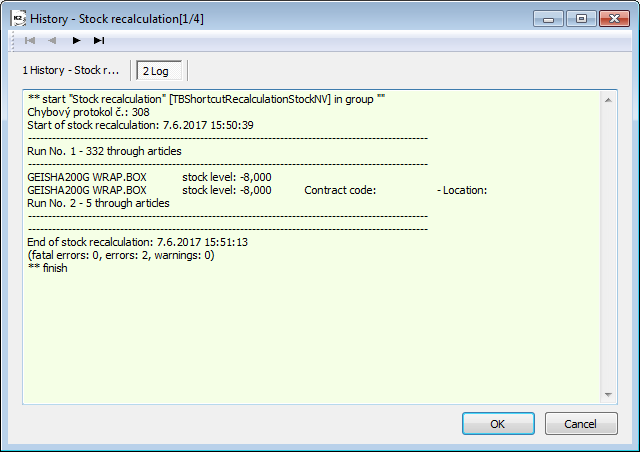
Picture: Form Stock recalculation history - Output folder
You can let inform yourself by notifications. You need to create the condition for the Task scheduler in notification settings. Closer description of notification conditions is described in documentation My office, Notification settingschapter.
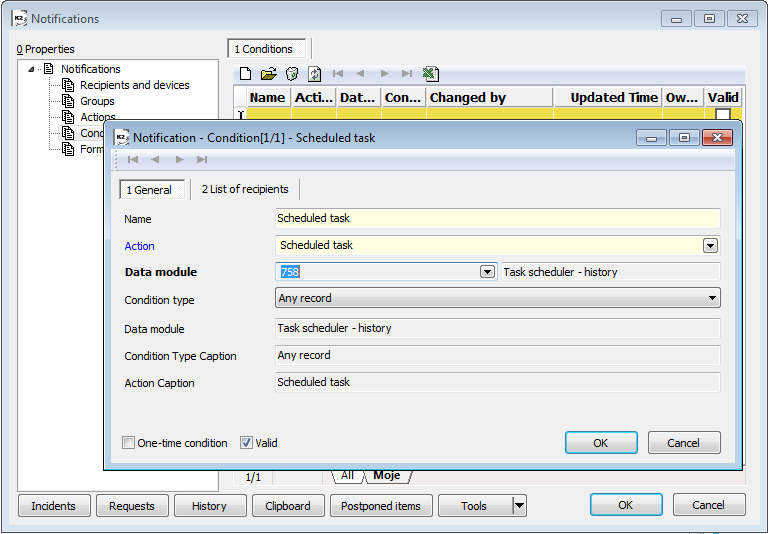
Picture: Notification settings - the condition for Scheduled task action
After you run the task, the notification will appear in the notification's panel.
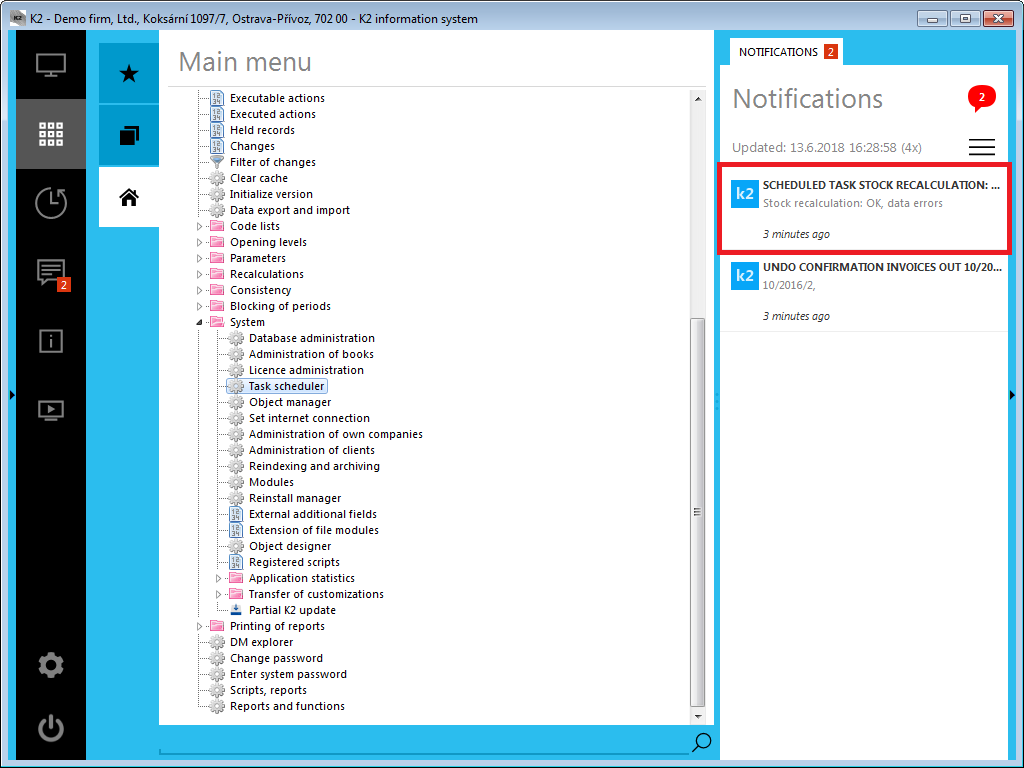
Picture: Notifications - Scheduled Task
The window with the information about running the task will be opened after you click on the notification.
Picture: Notifications - the log with a result
|
|
|
Standard actions
The majority of shortcuts supports the run on the filter of records. It is necessary to activate the selection Process records from filter. If the Create filter from selection selection is not activated, then the records will be processed from user's filter, where the application server runs in. If the option Create container from filter is activated, then it is necessary to choose a saved filter on the bases of which a container will be filled.
Stock recalculation
The Stock recalculation function is described in the Recalculations - Stock recalculation chapter.
This function executable from the Task scheduler also has these possibilities:
Selected fields description:
Period from |
Unlike the Stock recalculation standard form, you can also enter a zero period ("starting period") in a shortcut. By this way you can ensure that the recalculation runs from the first unblocked period automatically. |
Firm |
The own company, which will be recalculated. If it is not defined, the current own company is recalculated. |
Maximum level |
If you activate the selection Recalculate all levels (in production), entering the number can limit the going through the specific number of levels. Default value = 100. Value 1 means the current level only. Example: In case the product consists of semi-finished product and there is only a material card from a job card of semi-finished product in the article filter, then e.g. if you change the initial cost of material and the value is 1, only a material price will be recalculated. If the value is 2, a semi-finished product will be recalculated too (a price in a job card header will be changed) and if the value is 3, even a product card will be recalculated. |
Minimum allowed period |
Fuse for recalculation - the documents before the entered period will never be recalculated (e.g. to avoid recalculating already closed periods if the blocking period is set incorrectly) if the blocked period is set incorrectly, the closed periods will not be recalculated). |
Number of periods - 1st confirmation |
The number says how many periods the recalculation should take under consideration from blocking period and look for documents with the first confirmation inside. |
Batch fixed price |
The batch will not get average if you divide the item in purchase. |
Batch price - to ignore transfer notes |
If you look for the first batch income, the transfer notes are ignored. |
Cost price is not counted |
If the selection is activated, the recalculation does not give away "L" and "Z" flags of documents in case of cost price change of doc item. |
Warehouses without the control, Articles without the control, Types without the control |
The list of warehouses, articles and kinds of articles, for which the negative statuses are not written into protocol (there are no controls for negative statuses). Recalculation already recalculates the items. |
Stock recalculation - current period
Stock recalculation function processes just current period automatically.
Recalculation of daily balances on warehouses
Important to calculate daily states on warehouses from entered period. It is possible to enter even period in blocked periods. The importance of this recalculation is for once calculation of daily balances from history, which is in blocked periods. Repeated running through task scheduler is not advantageous as it runs from entered period. For common actualization of daily balances is better to use shortcut Stock recalculation with active selection Count daily balances on stocks.
Recalculate products
This function is described closely in the Form - Action chapter in Articles database.
Coverage recalculation
The closer description is stated in the chapter Bulk actions in job cards and sales orders.
Recalculation - ABC analysis
It calculates the ABC analysis of the entered configuration or all configurations.
Shift (days) |
It specifies, on which date the analysis will be calculated relative to the date of running in the task scheduler. Example: We have set to run the analyse every day after midnight in the Task scheduler. Then value "1" means that the recalculation will be done to previous day (i.e. current day of running minus 1). |
All configurations |
By activating, we determine the calculation of all configurations. |
Configuration |
By means of Configuration button (in the lower part of the form) you can select the particular configuration necessary for calculation. |
Inventory turnover calculation
It calculates the inventory turnover by entered configuration or all configurations.
Shift (days) |
It specifies, on which date the inventory turnover will be calculated relative to the date of running in the task scheduler. You can either enter 0 value. Example: We have set to run the inventory turnover every day after midnight in the Task scheduler. Then value "1" means that the recalculation will be done to previous day (i.e. current day of running minus 1). |
All configurations |
By activating, we determine the calculation of all configurations. |
Configuration |
By means of the Configuration button (in the lower part of the form) you can select the particular configuration for the calculation. |
Recalculation of stock prices
This function is described closely in the Form - Action chapter in Articles database.
Recalculation of article prices
This function is described closely in the Form - Action chapter in Articles database.
Recalculation of invoicing
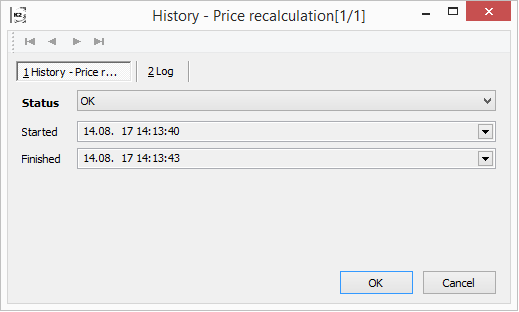
The function is described in the Recalculations - Recalculation of invoicing chapter.
Recalculation of planning job cards
This function is described in the chapter Form - Bulk actions in Job cards. When you add the action into the Task scheduler, it is necessary to choose the selection from the Job cards book, which defines the recalculation contents.
Calculation of Reserved - Ordered
It recalculates values of "Reserved" and "Ordered" for article cards.
|
|
|
Finance
Recalculations of cash register balances
Function Recalculation of cash register balances is closely described in documentation Finance - Cash register - Functions over cash register documents - Recalculation of cash register balances.
Recalculation of bank account balances
Function Recalculation of bank account balances is closely described in documentation Finance - Bank - Bank statements - Functions over bank statements - Recalculation of bank account balances.
|
|
|
Marketing
ARES
It will start ARES function, which adds or actualises the data of a customer or a partner. It will run upon the selection of customers or partners defined in the filter.
Function will run with parameters, which has ARES function set in Administration/Parameters/ARES parameter.
|
|
|
Workflow
New processes
Batch creates a new process from a procedure, which is defined in the field Procedure. Procedure does not have entered any user interface in the beginning event (definition of variables, filter of users).
|
|
|
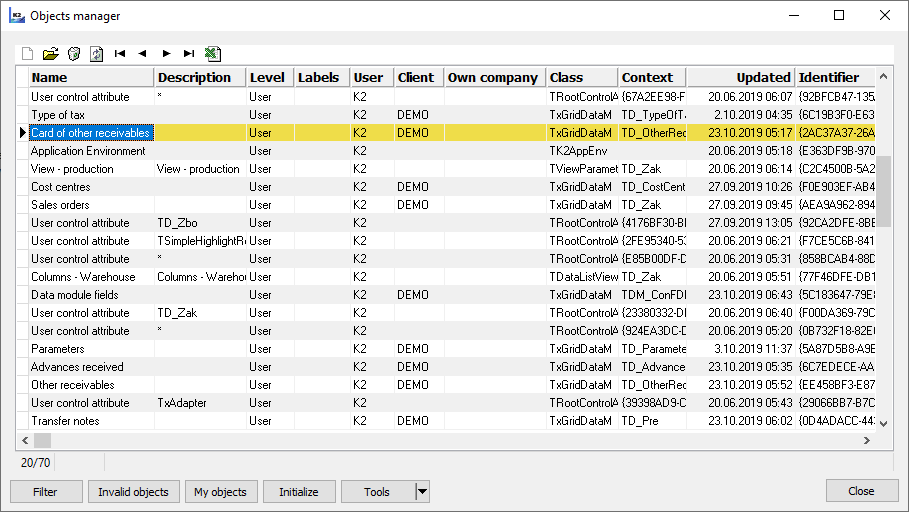
Administration of objects
Function Administration of saved objects is determined mainly for work with Filters (Class TxFilter). The main purpose of this function is display of invalid filters and their editing. In addition to filters, other objects that can be deleted, edited, moved among levels and checked are also loaded here. The function is in tree menu Administrator - System - Administration of objects.
If a user has set the right Service actions (Administrator - General), all objects available for that user will be loaded and displayed here. In case a user does not have the right Service actions, program usually uses container for a current user upon default list of all objects loading. The buttons Invalid objects, Initialize and the functions Remove inconsistencies and Conversion rules under the Tools button are approachable just for the users who have the right Service actions.
After you run the function, the form Saved object manager, where (in dependence on set right Service actions) all accessible objects will be displayed.
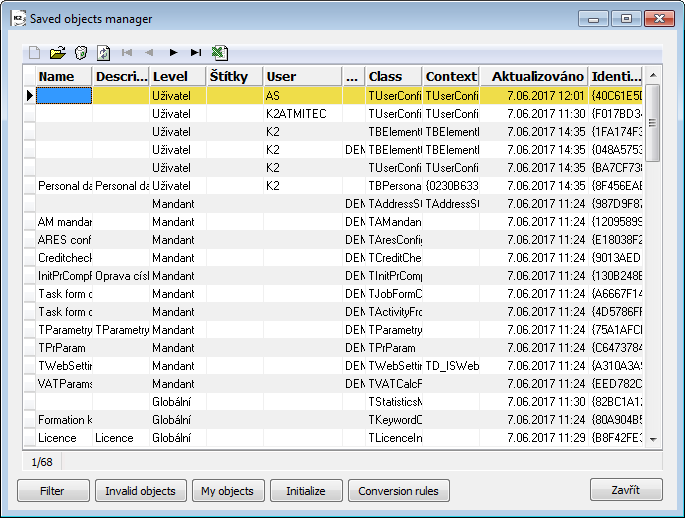
Picture: Saved object manager - set the right Service actions
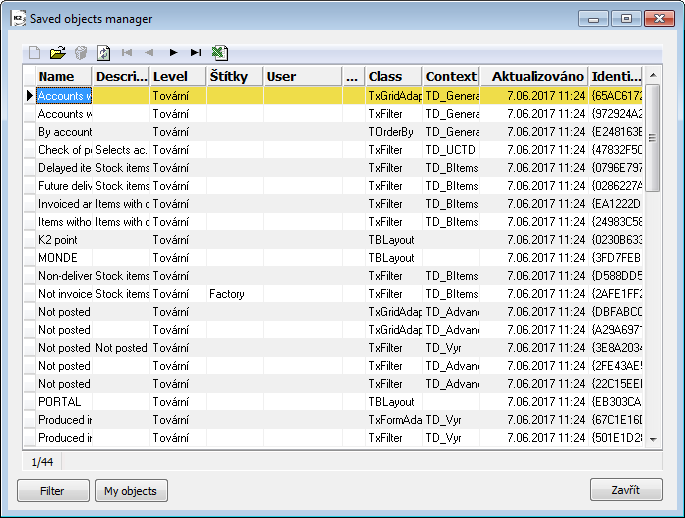
Picture: Saved object manager - set without right Service actions
Filter button
After pressing Filter button the form for setting filter conditions will be opened.
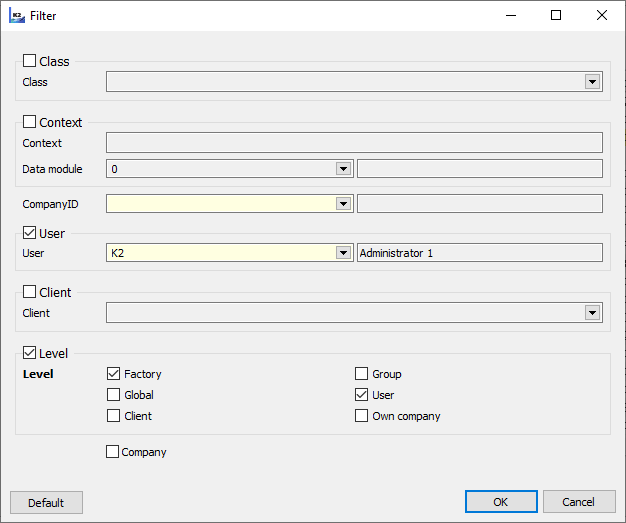
Picture: Setting of conditions for filtering saved objects
Fields Description:
Class |
Select classes from Filter - Class, where you run the filter over. E.g. class TxFilter represents a filter. |
Context |
Select classes from Data modules, where you run the container over. |
User |
Select the user from the book Users, whose objects you want to be displayed. This field is just for reading and could not be changed for users without Service actions right. |
Client |
Select the client from the book Clients, whose objects you want to be displayed. |
Level |
Selection of a setting objects level, which you want to be displayed: Factory, Global, Client, Group and a User. |
Button Default gives the filter back, it means to delete set conditions.
After confirmation of filter conditions by means of OK all objects meeting the set conditions will be displayed.
The button Invalid objects
If there are invalid objects (e.g. selections),, their list will be displayed after pressing Invalid objects button. Invalid object can be deleted or edited in Saved object manager. Button is approachable just for those users who have the right Service actions.
Invalid "Factory" objects can be deleted in the case of:
1. The user has the right "Administrator / Access settings level / Global"
2. The object is marked as invalid, it is a part of a result " Invalid actions"
Picture: Saved object manager - button Invalid objects
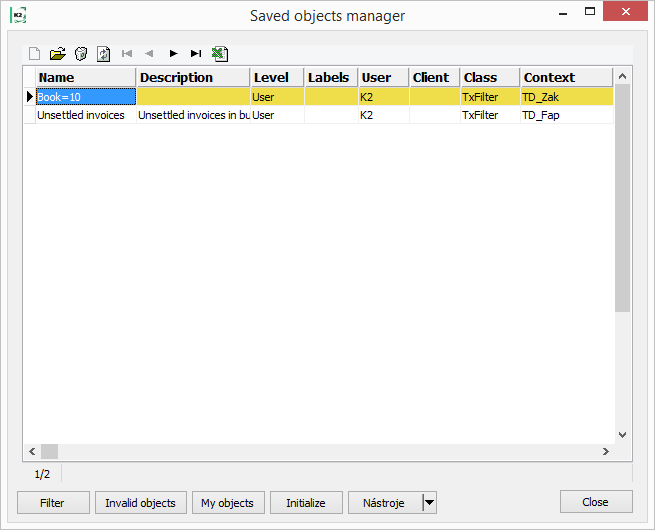
The button My objects
Deals with special case of filtering, when the parameters are set in the way all objects are entered with a log-in user. The same result is also achieved by means of general filter.
Picture: Filter of objects of currently signed user "K2" - the button My objects
Button Initialization
The Initialize button runs the function Initialization, which is a part of required K2 initialization after re-installation. Function Initialization makes the control and automatic correction of invalid objects of some classes. The button is accessible to user with Service actions right.
After pressing Initialization button, the file AlterFields.unknown.xml will be created in user directory. Unknown fields as (OldFields) and their data modules (DataMClass) are placed here. This file can be re-named, copied into {MainPath} and used as a base for Conversion rules.
Tool button
There are 4 functions under the Tools button: Remove inconsistencies, Conversion rules, Export and Import.
Remove inconsistencies
After reinstallation to the higher version, it is possible, through the action Remove inconsistencies, to find and remove invalid records from the tables ObjRow, ObjStorage and ObjAssign, in which the configuration objects (eg. filters, columns) are stored.
When the action is complete, a log containing a log about the found problems is displayed. Each object, that is evaluated as an invalid or unnecessary object, is saved into a directory, which name is specified in the log, before deletion.
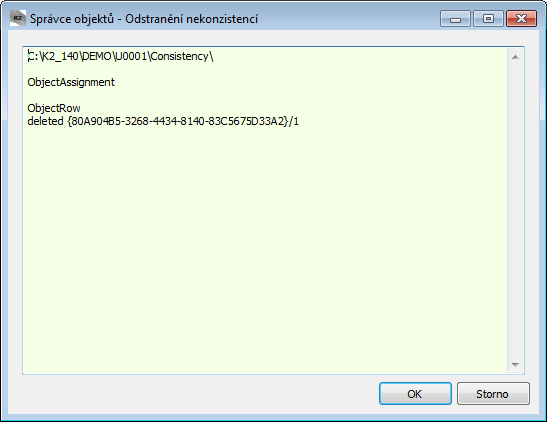
Picture: Remove inconsistencies - the log of found problems
Conversion rules
The Conversion rules button serves for editing the contents of {MainPath}\AlterFields.xml file. Conversion rules enables to define a couple of identifiers <old ProgName, new ProgName> for classes of data modules. File can be actualised either by Object manager editor in or by copying. These information can be used by Initialization function for an automatic correction of some invalid objects. The classes TxFilter/Selections and TxGridColumns/Columns as are supported.
Conversion rules enables to correct some objects automatically in case that it is really possible to replace one identifier by the other.
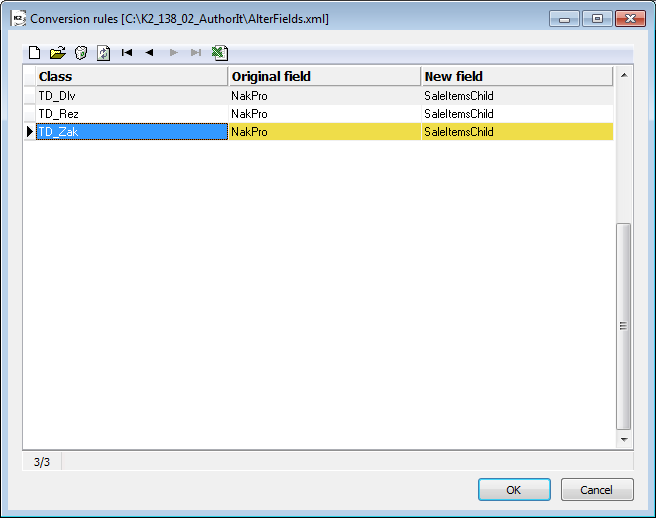
Picture: Conversion rules - AlterFields.xml file exists
AlterFields.xml factory file exists and contains the list of renamed and conversioned fields, which can be replaced freely. AlterFields.xml file contains serialised TxAlterFields collection. Each item of TxAlterField class contains these properties:
DataMClass: string - DM class, which concerns OldFields and NewFields fields. If it makes sense, even class of abstract ancestor (e.g. TDPrask) can be used.
OldFields: string - the original field, which has been renamed. Value can include one identifier or more separated from each other by means of semicolons.
NewFields: string - new field. Value can include one identifier or more separated from each other by means of semicolons. Value must define valid field, otherwise upon an attempt of replacement the exception will appear.
Example
TD_DoNP_P: NakPro -> SaleItemsChild
TD_DoNP_P: NakPro -> PurchaseItemsChild
Export
The function exports all objects that are currently loaded into the memory. You can limit the list of loaded objects by using the Filter button.
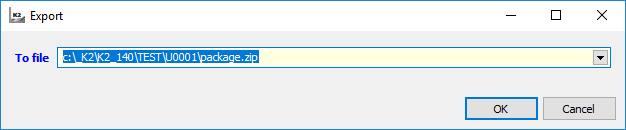
Picture: Export
Import
The function imports the objects from the file.
Picture: Import
|
|
|
Set Internet connection
Set Internet connection function is important for setting the connection to internet (e.g. Web services, import of exchange list) in case you use proxy server.
Function runs from a tree menu Administrator - System - set internet connection.
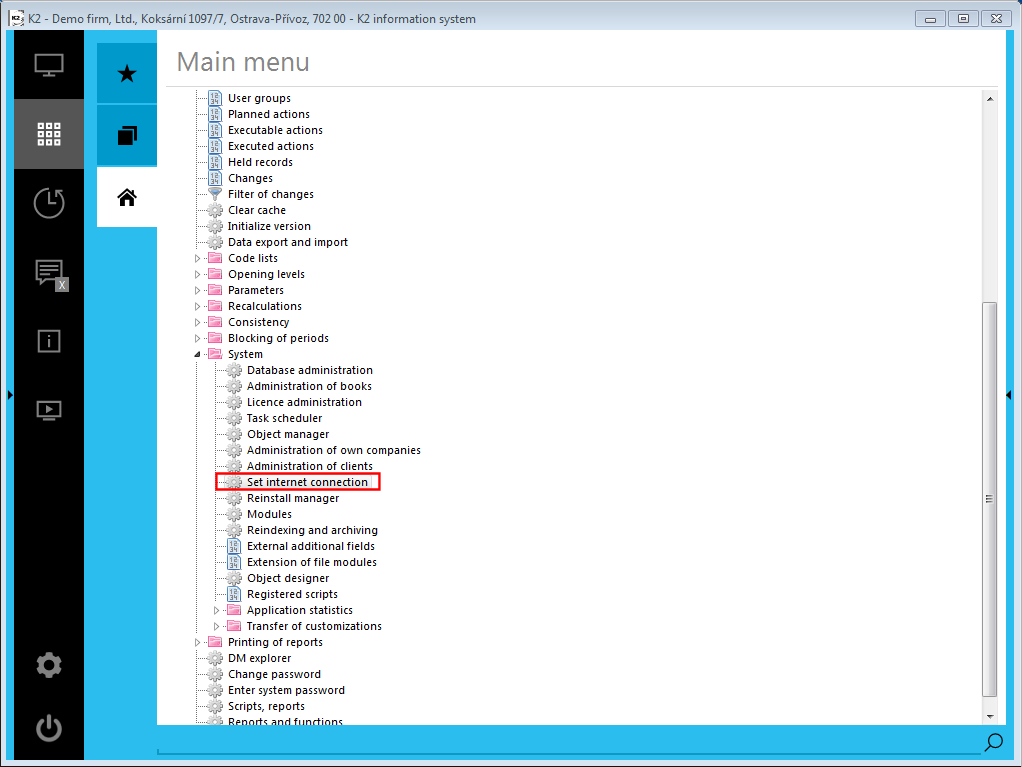
Picture: Tree menu - Set Internet connection
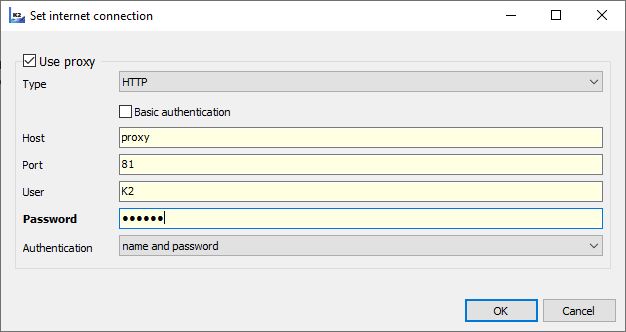
Picture: Form Set Internet connection - proxy
Select communication protocol with proxy server into Type field: (You can find "HTTP", "SOCKS 4", "SOCKS 4A" or "SOCKS 5" definitions of particular types here on http://en.wikipedia.org/wiki/SOCKS). Authentication field in proxy server enables to select if you use the name and password (value "name and password") for logging or no (value " without authentication").
SOCKS in any variant cannot be used for web services. Web services are: Creditcheck, Octopus, Reliability of VAT payer, PPL and other, for which you can use "THTTPRIO".
|
|
|
Reinstall manager
Reinstall manager is important to secure your K2 system re-installation. Manager is places in a tree menu in Administrator - folder System. For the work with Reinstall manager it is important a user has set the Service action right.
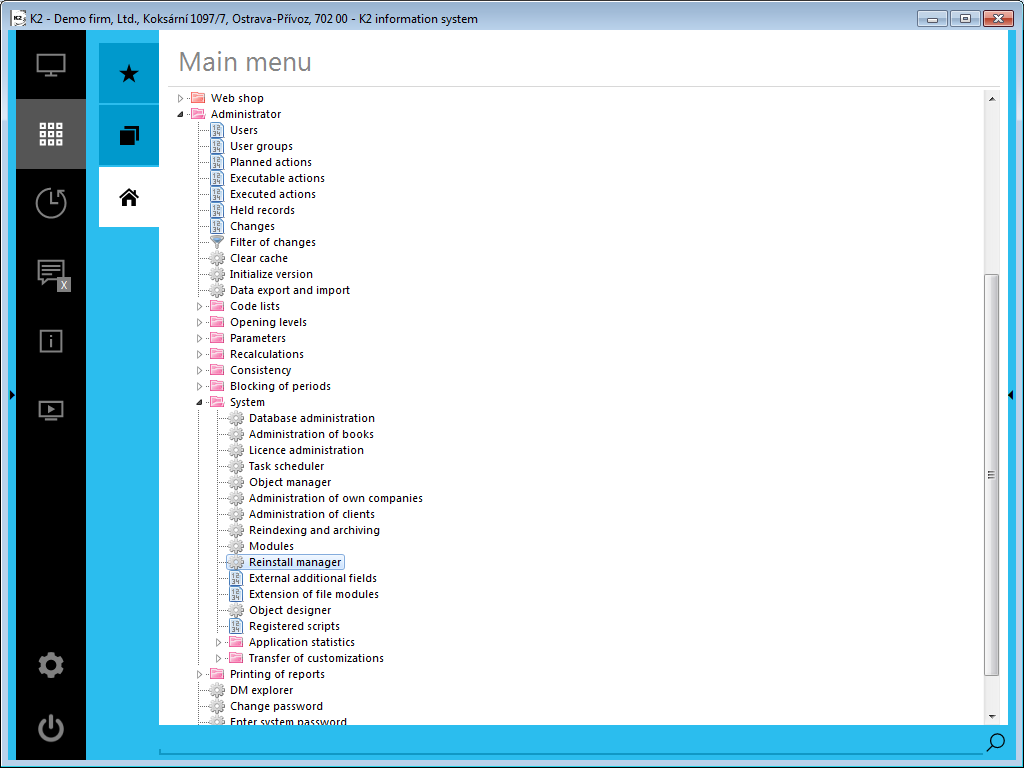
Picture: Administrator - Reinstall manager
Reinstall manager form will be displayed after its running.
Picture: Reinstall manager
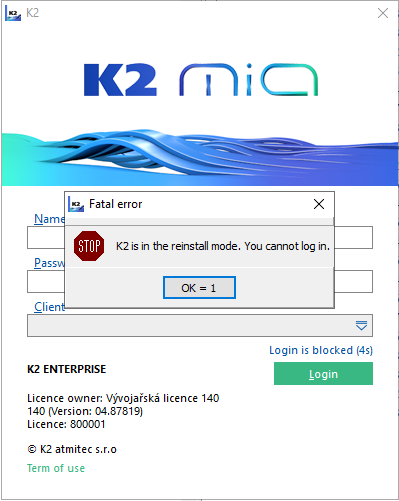
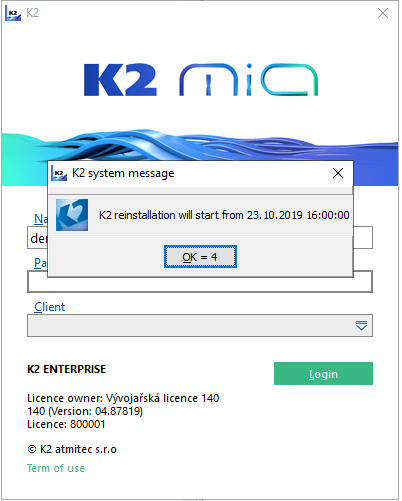
Checked field Login prohibited prevents any user from login into K2 IS. It ensures that re-installation is not interrupted by any user from K2 IS. Just the user, who set the field, can sign into K2 IS. Login prohibited from field enables to set from what time the users cannot login. If login time is before prohibited time, the report that from that time is not able to log into K2 IS, is displayed. This report can be set in Login message field. The abbreviation of current login user, who makes the setting in Reinstall manager, will be added into the User field.
Picture: Login window K2 IS - Login prohibited checked field
Picture: Login window - after you fill the field Login prohibited from
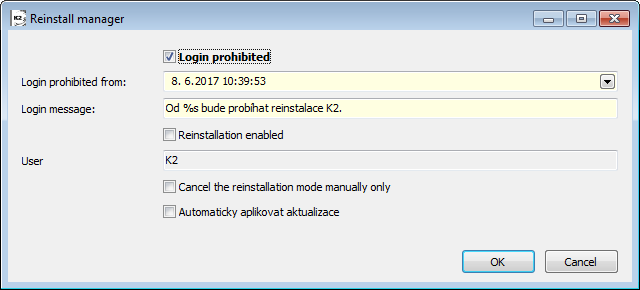
The moment the field Login prohibited is checked, it is possible to make active even the field Reinstallation enabled. Thus the user confirms that reinstallation can pass off. To check this field, all users must be logged out of the K2 IS.
If someone is logged in K2, this field cannot be checked and the text "Some users are still logged in K2." appears in the Reasons for not checking the box field.
Picture: Reinstall manager
If this field has not been checked (e.g. in case another user than a user who set reinstall manager will reinstall), during re-installation a report will be displayed, see picture below.
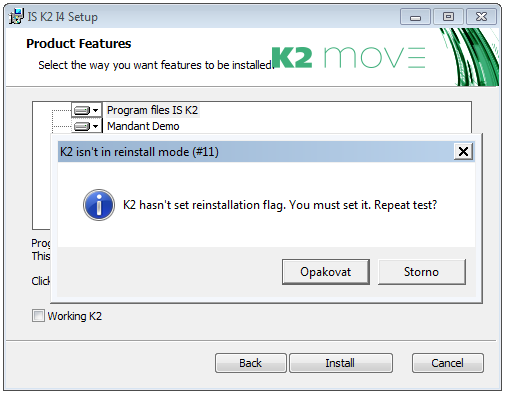
Picture: Control report about reinstallation
The user cannot continue in reinstallation without checking the flag of reinstallation in K2 IS. Press Repeat button after you set the flag. Reinstallation will then continue.
During reinstallation one more report can appear. In case in K2 system a signed user has remained.
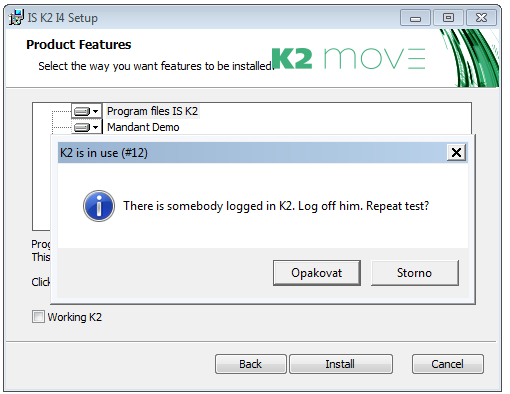
Picture: Report about signed user in K2
If you ensure all users signing off, press the button Repeat. Reinstallation continues.
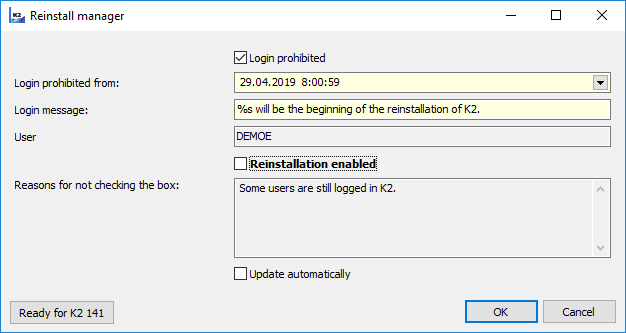
On the form Reinstall manager is then the checking field Apply actualization automatically.
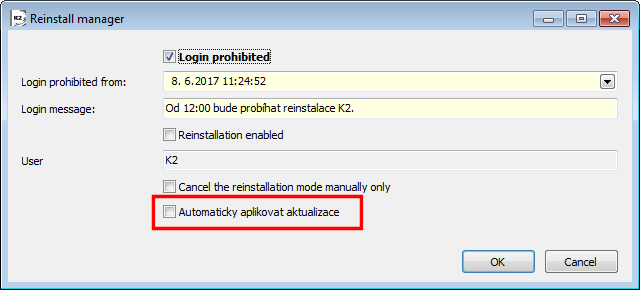
Picture: Reinstall manager
Checked field means that upon K2 installation available actualisations have been installed. Actualisations have been released after installed version release and the user cannot bother with them later on.
If it is necessary before reinstallation from lower version to do some actions, extra button Ready for "particular version", which contains needed actualisations, will appear in Reinstall manager.
Attention: After re-installation is completed, the K2 still remains in reinstall mode and you cannot log in. The user who has made the setting in Reinstall Manager has to log into the K2 IS after the re-installation and clear the Login prohibited check box in the Reinstall Manager. Then it is possible to log into the K2 IS under any user.
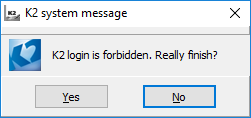
Note: As long as the K2 is in the reinstall mode, the user, who has set the reinstall mode, is warned about this fact during closing the K2 by the message "K2 login is forbidden. Really finish?". If the user selects Yes, K2 will exit, if No, the user remains logged on.
Picture: K2 system message when closing K2
|
|
|
Modules
The Modules book is used for writing all the inputs to the individual modules. The book displays the date of input, number of module, its name (description), number of licence, number of inputs to the module, (it records the presence of every user that takes longer than 1 minute) and in the Difference column the concrete value is displayed at the moment when the user enters the module for which he/she does not dispose of the licence. The records in the book can be sorted according to the date of entry or number of module.

Picture: Modules book
|
|
|
Reindexing and archiving of changes in accounting documents
Reindexing and archiving are connected with evidence of history of accounting documents. Upon re-accounting of the first document the changed accounting document is being filled into text file "UDLOG.TXT", which has been placed in a company file in "DATA" file. Structure of entry is done on the base of the definition in file "UDLOG.INI" from company file. History of accounting documents changes can be visible also in K2 in accounting journal on "A" page.

Picture: Form Reindexing and Archiving
Fields Description:
Archiving |
The contents of "UDLOG.TXT" file will be moved into the file "UDrrmmdd.TXT" ('rr' - year 'mm' - month, 'dd' - day, when it is archived) and "UDLOG.TXT" file will be empty. |
Reindexing |
You need to have the link for the right position in the text file called "UDLOG.TXT" to have the right display of changed acc.document on "A" page of acc. journal. If the position does not meet, re-indexation starts to run. It means finding out the right link into text file. |
Current file |
Current file is "UDLOG.TXT". If you check this field, this file will be preset into the field called Accounting documents. If you do not check this field, you can even enter archive file into Accounting documents field. Data will be added into after archive file has been found. |
|
|
|
External Additional Fields
This function enables to add a new field to the heading of each module. Except for the table, it is possible to add field to any module page. Before adding the field to the module, it is necessary to define it in the book External Data Fields (activated from tree menu – selection menu Administrator – System)
The fields can be added to a random page of a module apart from 0th page. On the 0th page the field can be displayed by adding a column with a program field name. In the field you can set a value or a text that can be inserted manually (it is not calculated field). It is recommended to consult these issues with a consultant of the K2 atmitec company before starting work with data fields.
|
|
|
Creation of additional field
External additional fields are defined in the External additional fields book (the Administrator - System - External additional fields tree menu). Create a new record by pressing Ins key and fill the fields on the 1st page.
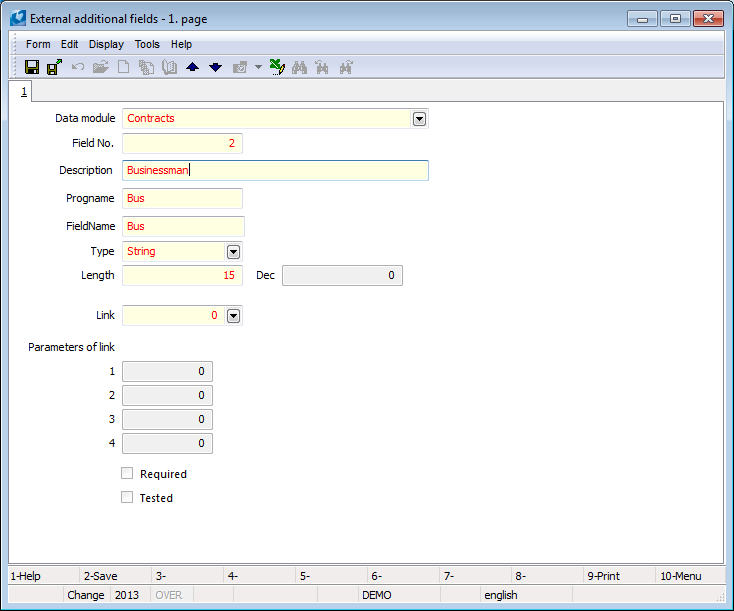
Picture: External additional fields - 1st page
Fields Description:
Data module |
From the Registered modules book select the data module into that you want to insert a new field (Articles, Suppl./Cust. etc.). |
Field No. |
The number is set manually. It is a number in the interval from "0" to "99" for every data module. The value has to be unique. |
Description |
The field random description. |
Progname |
The name of the column that is possible to add to the 0th page of a module. |
FieldName |
The name of a program field (a default heading in tables). |
Type |
A supported type of field select from a code list (string, time, ...). |
Length |
A length of field (maximally 66 characters in one row). |
Dec |
Number of decimal places that are defined at the type, e. g. for the decimal number type. |
|
|
|
Procedure for inserting a new field
After saving a new record in the External additional fields book you can execute the inserting a new field to an appropriate data module. In the Browse mode in this defined module select the Form editing option that you can ran from the Tools module menu. By this way you enter the From editing mode:
- After pressing the right mouse button on a tab of page select the Pages option and the number of page where you want to insert this field.
- From the Components from select the xEdit function
 (third button from the left hand side). After pressing the left mouse button a new field will be inserted to the place of this form. (It is possible to customize the field, e. g. to extend, to shift, but only in the Editing form mode.)

Picture: The Components form
- In the next form Object Inspector you can find the ProgField field where you can write the name of a program field.
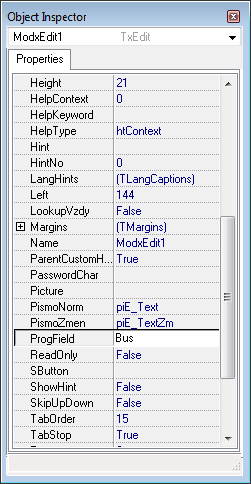
Picture: The Object Inspector form
- For the naming field is necessary to insert a next edit field from the Components form - the LineLabel icon
 :
:- Further press the left mouse button next to the inserted field.
- In the Object inspector form find the Caption field and write a required text that can be displayed in front of this field (a name of this field).
- Close the form by the checkmark in the window close box.
- The query, if you really want to save the modification of the form, will be displayed. However after pressing OK button the inserted fields will not be displayed automatically in the form. For its displaying it is necessary to close the program and to log in to the K2 IS again.
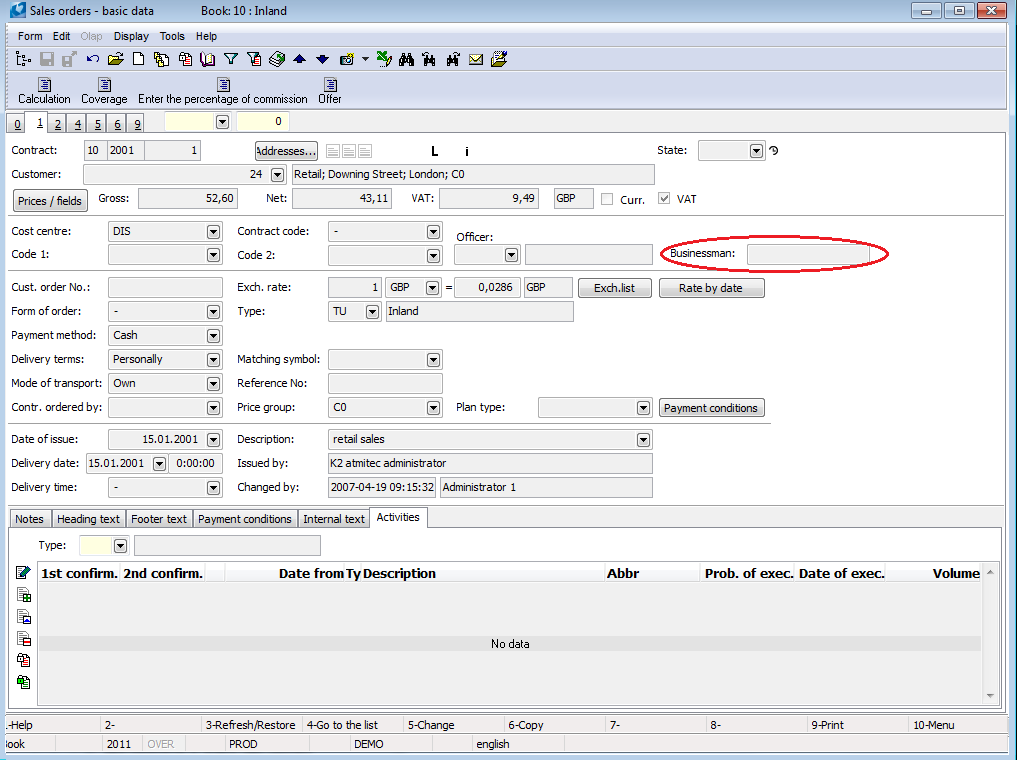
Picture: The new inserted external additional field - 1st page of Sales order
On the 0th page you can display a new field by adding a new column. Its name will correspond to entered name in the External additional field book in the FieldName field.
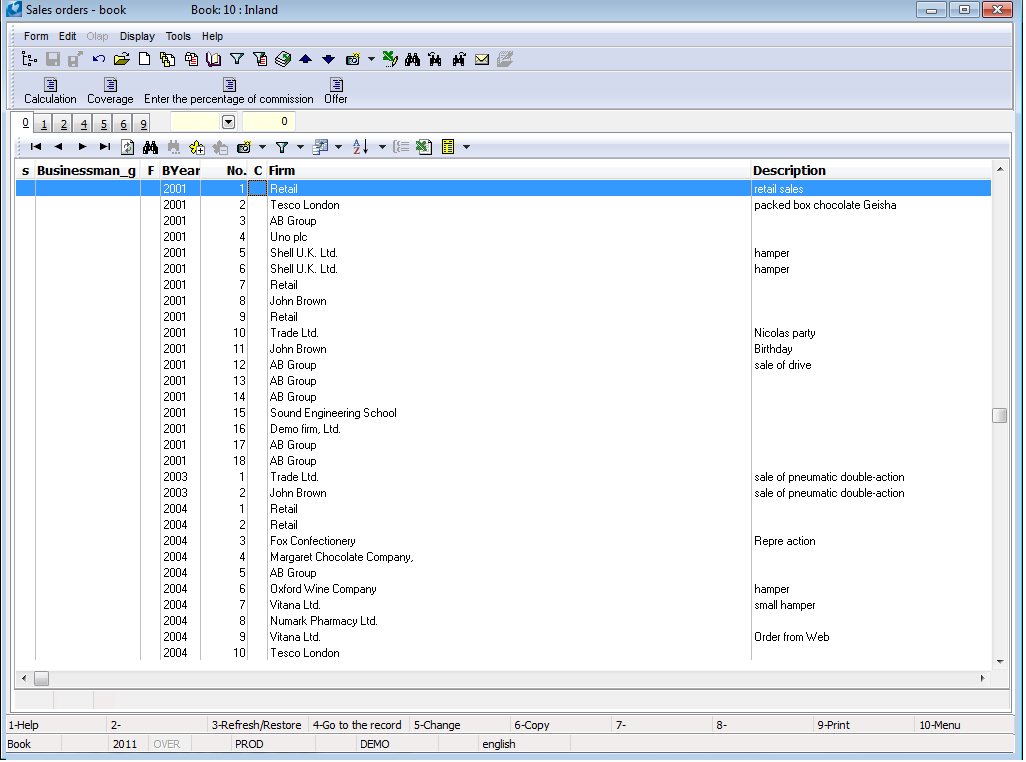
Picture: Adding a column of a new data field on the 0th page
The inserted data field will be kept after re-installation too and it is not possible to delete it in the form. Because of this it is necessary to provide treatment of the work with external data fields by the rights in the Administrator - Users module (on the 5th page of the Users Administrator - General - External additional fields). Data fields are saved in the company directory in the Form_0 subdirectory. The one option, how to delete data fields, is just from this directory.
|
|
|
Application statistics
Application statistics enable you to monitor numbers of runs of monitoring actions. A monitoring action can be any transaction, computer action, script or a report. It is possible to monitor how intensive is the use of particular function or system customization. E.g. it is possible to hold all running scripts and reports and better to prepare for an actualisation for a new version. It can be statistically used for increasing the efficiency of investment into the system.
By means of dashboards you can see who and when the function was used in evaluation.
By using the application statistics at the same time you agree with sending the particular sample of anonymously statistical data (without identification of users) into K2 atmitec company. In those data there are no specific or even delicate information, just statistical information about usage of particular functions. These data are then used for optimalization of K2 applications or services connected with them.
|
|
|
Administration of application statistics
The setting of the Application statistics module is defined in the Administration of application statistics. The function is added in Administrator - System - Application statistics - Administration of application statistics tree menu and is accessible just to users with Statistics settings (Administration - General).
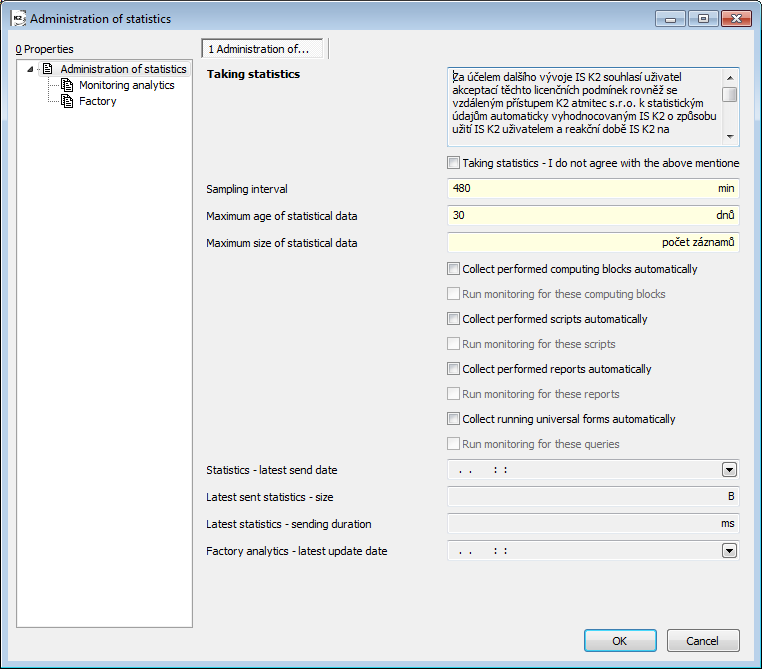
Picture: Administrator - System - Administration of application statistics - folder Administration of statistics
Fields Description:
Taking statistics - I do not agree with the above mentioned terms and conditions |
Unchecked field means that K2, which is set as production, collects statistic information and sends anonymous data in K2 atmitec. In administration of task scheduler a new planned task "Send statistics" will be created and it will send it into K2 atmitec. By default it is set for Saturday. Without the task scheduler, you can run K2.exe with the FUNKCE=779 parameter to send the statistics or ensure the regular running by Task scheduler Windows. Just fabric statistics will be monitored without any other settings. |
Sampling interval |
An interval, after that the statistics are saved from the memory into the database. The value 480 min is set by default. |
Other two fields are important for reduction of the statistics data size. Data can be limited by the time and number of records.
Maximum age of statistical data |
Statistics, which set number of days are surpassed of, will be deleted. |
Maximum size of statistical data |
If the set size of collected statistical data are surpassed, the oldest records will be deleted. |
Standard fabric group for statistics monitoring is set for module monitoring across the whole K2 IS. You can monitor other functions in IS K2 except this group as well. These check boxes are important.
Selected fields description:
Collect performed computing blocks automatically |
Checked field means that you will collect all computing blocks, i.e. not just factory ones. |
Collect performed scripts automatically |
Checked field means that you will collect all performed scripts, i.e. not just factory ones. |
Run monitoring for these scripts |
The checked field means that all the performed scripts will be monitored, i.e. all the scripts will be monitored in Browser of statistics. These scripts are important for the internal purposes and are not sent into K2 atmitec. |
Collect performed reports automatically |
Checked field means that you will collect all performed reports, i.e. not just factory ones. |
Run monitoring for these reports |
The checked field means that all the performed reports will be monitored, i.e. all the reports will be monitored in Browser of statistics. These reports are important only for the internal purposes and are not sent into K2 atmitec. |
Running universal forms are offered into analytics automatically |
Checked field means that you will collect all performed universal form, i.e. not just factory ones. |
Run monitoring for these queries |
Checked field means that you will monitor all performed universal forms, i.e. all universal forms will be monitored in Statistics monitoring. These universal forms are important only for the internal purposes and are not sent into K2 atmitec. |
Other four fields give the information about the last planned action "Send statistics".
Statistics - latest sent date |
The date and time, when the latest task scheduler was performed . |
Size - latest sent statistics |
Statistics size, which was sent into K2 atmitec last time. |
Sending duration - latest statistics |
Duration, when the scheduled task ran for sending statistics. |
Factory analytics- latest update date |
Date and time of the last factory analytics update. The update occurs when you run a scheduled task "Sending statistic". |
Monitored analytics
Within the Monitoring analytics tab, the performed actions are included in the particular tabs Transactions, Computing block, Scripts, Reports and Uniform.
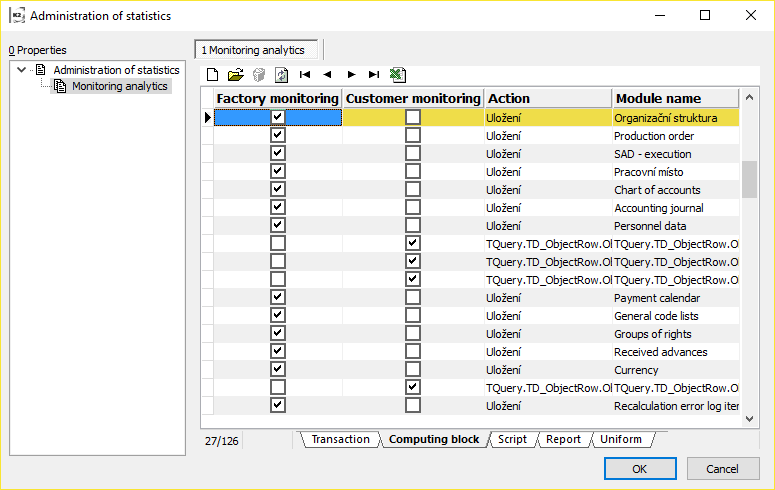
Picture: Administrator - System - Administration of application statistics - the Monitoring analytics tab
Transaction |
Database file of operations when either all operations or no of them will be executed. |
Computing block |
A block of operations that logically belong together and create one step in the K2, e.g. saving document, run selection, run filter etc. |
Script |
|
Report |
|
Uniform |
|
You can monitor either all of them (by checking the appropriate field on Administration of statistics tab) or just the selected ones. If you want to monitor just some actions, check the field in Factory monitoring column on the appropriate line or press the  Factory monitoring field on the appropriate record on the Administration of statistics - Monitored analytics. Those signed actions will be monitored in Local statistics monitoring. Factory monitoring field is checked by the programme.
Picture: Setting of Computing block for the Customer monitoring
The Delete statistics... button is used to delete all collected local application statistics and analytics for monitoring.
|
|
|
Browser of outgoing statistics
The list of anonymous groups of application statistics, which are sent to K2 atmitec, is places in tree menu in Administrator - System - Application statistics - Browser of outgoing statistics.
Display of Browser of outgoing statistics is conditioned by the right Setting of statistics (Administrator - General).
|
|
|
Browser of local statistics
The list of application statistics, which are monitored just by K2 atmitec, is places in tree menu in Administrator - System - Application statistics - Browser of outgoing statistics.
Display of Browser of local statistics is conditioned by the right Setting of statistics (Administrator - General).
Books called Browser of outgoing statistics and Browser of local statistics are important just for the check, or the export to excel. OLAP and dashboards work for evaluation of local statistics.
|
|
|
Dashboards
The cube in OLAP works for evaluation of application statistics. By means of OLAP parameters it is necessary to start it up, see documentation Evaluation and Analytical services, the chapter Application statistics cube.
Defined dashboards, which are available in the file SupportFiles\Dashboards\ApplicationStatistics.XML in K2 address, work for evaluation. Import of dashboards is closely described in documentation Evaluation and Analytical services, the chapter Dashboard export and import.
By means of set dashboards you can e.g. evaluate, which functions are used the most, whose users or contact persons are the most active and which functions are used the most frequently and when the function was used etc.
Dashboard 1) Function statistics
Dashboard Function statistics displays the number of ten most used functions in K2 IS. Functions can be filtered according to their types and time periods, when they were used. Upon this function selection (by mouse), the using in time and using by particular K2 users are displayed in the lower part of a dashboard.
Dashboard 2) Function statistics - users
Dashboard Function statistics - users displays the number of used functions for 15 most active users in K2 IS. Functions can be filtered according to their types and time periods, when they were used. Upon a user selection (by mouse), particular functions and their number of usage for particular user will be displayed in the lower part of a dashboard.
Dashboard 3) Function statistics - contact persons
Dashboard Function statistics - contact persons displays the number of used functions for 15 most active users in K2 IS. Functions can be filtered according to their types and time periods, when they were used. Upon user selection (by mouse), particular functions and their number of usage for particular user will be displayed in the lower part of a dashboard.
|
|
|
Not used scripts and records
This function is important to generate the list of all not used scripts and reports.
It is suitable to make a registration of scripts and records before you run it.
Open the book Scripts and records and press F9 to run the book of reports. Then press Ins key and the list of scripts and records will be displayed. You can run script registration by means of Alt+F3 keys. Now you can run the Not used scripts and reports function.
|
|
|
Transfer of customization
Transfer of customization is consisted of two functions: Export of customizations to file and Import of customization from file. The right Service actions (Administrator - General - Service actions) is necessary for the work with these functions.
Functions called Export of customizations to file and Import of customization from file work with .zip file, where all customer modifications of K2 except for data enables to transfer scripts and reports, form modifications, registered scripts, files of task scheduler, extended file modules, INI files, views, configurations of coverage, external additional fields and notes.
|
|
|
Export customizations to file
The function is in tree menu in Administrator - System - Transfer customizations - Export customizations to file and is accessible just to a user with the right Service actions (Administrator - General - Service actions).

Picture: Function Export customizations to file
An offer, where you sign the modification you want to save, will be displayed after running the function.
Fields Description:
File path |
Selection of way, where you should save the file called RestorePackage.zip with selected modifications. |
|
|
|
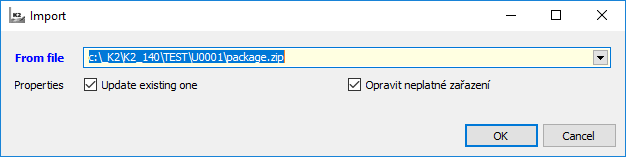
Import customizations from file
The function is included in tree menu in Administrator - System - Transfer of customizations - Import customizations from file and is accessible just to a user with the right Service actions (Administrator - General - Service actions).
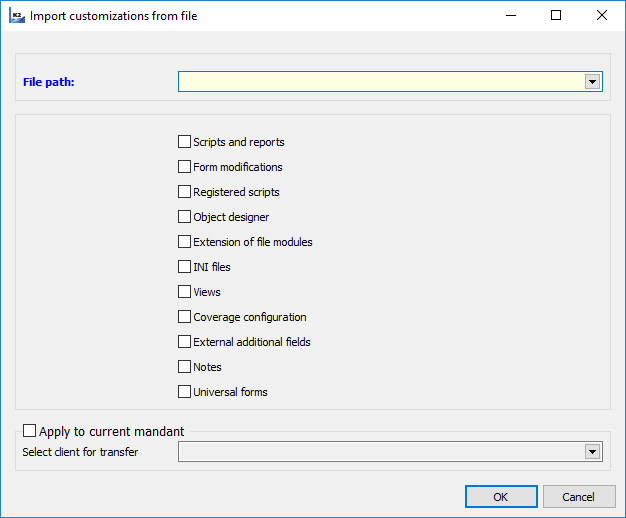
Picture: Function Import customizations from file
An offer, where you sign which modifications from loaded .zip file you want to transfer to K2 IS, will be displayed after running of function. After loading the .zip file, all of the possibilities that have been ticked when exporting are automatically checked.
Fields Description:
Path to file |
Select the path, which the .zip file for import should be loaded from. |
||
Apply to current client |
If this option is checked, all extensions and settings (forms, RF_Firm.pas, extension of file modules, etc.) from the selected client in the Select client for transfer field will be applied to the current client in the running K2. If this option is not checked, the folders and files will be created according to the source K2. |
||
|
Select client for transfer |
Selection of the client whose extensions and settings are to be applied to the current client. |
|
|
|
|
Partial K2 update
Function Partial K2 update works for saving the corrections or new corrections into K2 IS without necessity of a new version installation. Concerning actualization of legislative changes, which are solved by means of scripts or reports.
The function is accessible from the tree menu Administrator - System - Actualization of K2 or by creating the button Other - Partial K2 update on desktop, folder Favourite. The right Service actions(Administrator - General - Service actions) is necessary for the work with these functions.
The form, where available actualizations are displayed automatically, will be displayed after you run this function. In case there is an empty form, no actualization is available for this version. Suitable records for K2 actualization are signed by stars automatically.
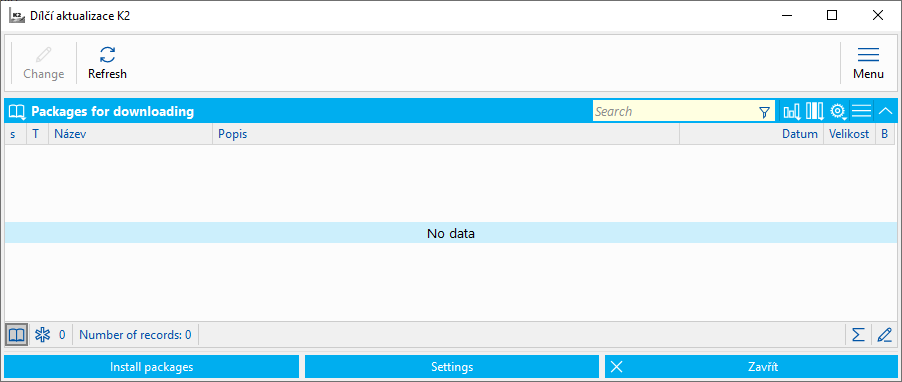
Picture: Partial K2 update form
You can install the signed records by pressing the button Install packet. To sign or sign off is able to do by means of Ctrl+Space and Shift+Enter.
Before the first installation of actualizations it is suitable to set, which kind of legislative you want to get the list of actualizations. You can do it by means of Settings button.
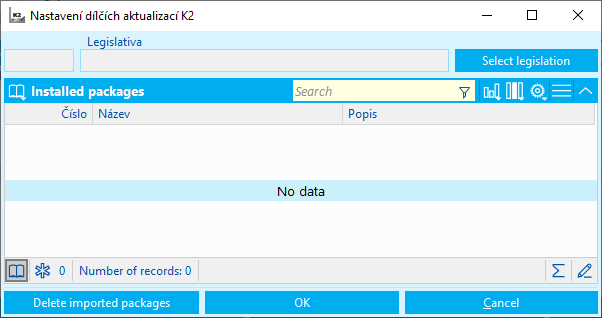
Picture: Partial K2 update setting form
The list of installed actualizations, which have been installed on particular K2, is available in setting as well. You can delete the list, not proper actualizations, which have been installed in K2, by means of Delete actualizations button. Then they are available for installation and you can install them again.
The choice Apply actualizations automatically has been added to reinstall manager. It can assure that available actualizations, which have been issued after a new version publishing, will be installed immediately upon K2 installation. The user cannot bother with them.
Picture: Reinstall manager
The function Partial K2 update uses web services and you need a connection to internet.
|
|
|
Fulltext keys setting
Fulltext keys setting is important for additional definition of keys over tables similar as indexes adding in extended file modules.
Some standard keys are possible to define by means of CreateFullTextIndexes.pas script, which defined indexes over some standard tables.
These keys are then available to create fulltext conditions in selections.
After you run the function of no. 778, you can define fulltext keys. The list of tables, where keys already have been defined, displays. User can insert definition for a new table or change the already existed setting.
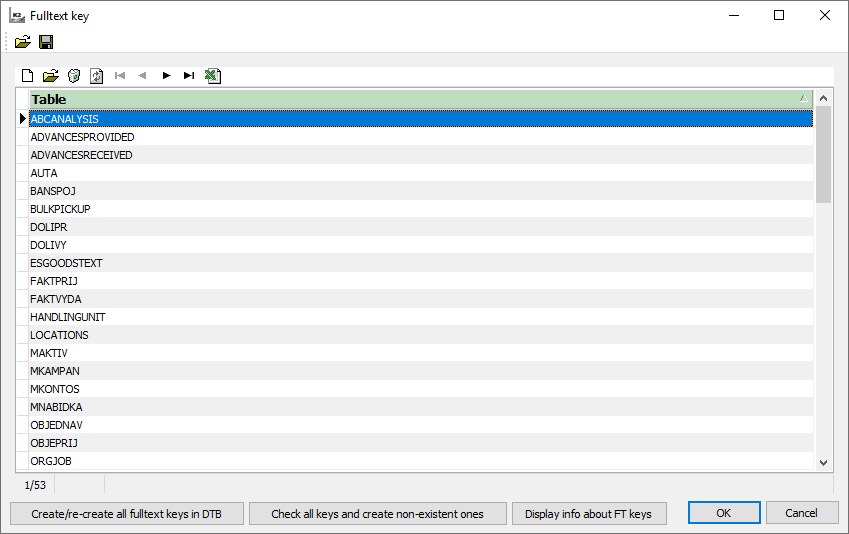
Picture: The list of Fulltext keys setting
It is necessary to choose table and unique one-element key to define a new fulltext key.

Picture: Fulltext keys setting
Fields' Description:
For a table |
The table, which fulltext key will be defined for |
Based on unique one-element index |
Unique one-element, preferably base on a number |
In another step you can define fields, which are able to be connected to fulltext keys. System offers permitted fields of string, widestring, clob, xml and dynstring types.
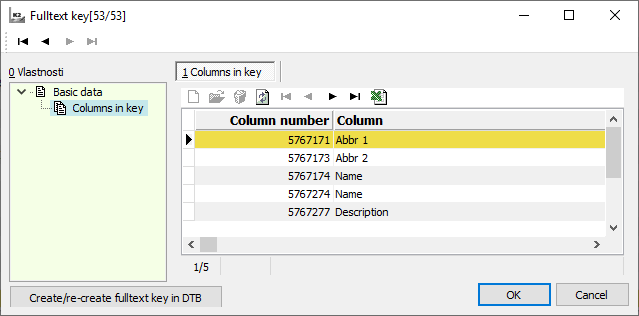
Picture: Fields setting of fulltext keys
|
|
|
Reinstallation
If text fields are changed or cancelled during conversions, the full-text key is automatically cancelled to avoid errors during the execution of conversion SQL queries. After the conversion is complete, the version initialization is run. The initialization tries to recover the cancelled full-text keys by definition in K2: Administrator - set fulltext keys, function 778.
Fulltext key recovery can be a time-consuming operation that is performed on the SQL Server background. Keys are therefore available for quering only after the operation is over in the background.
If an error, that can be caused by missing fields in the fulltext or by changing the primary key of the table, occurs during the restoration, the error is written into the log in the SetupLogs\repairfulltext_(client).log. file. The mentioned incorrect fulltext keys need to be checked and corrected, see the chapter Fulltext keys setting.