Invoices Out
The book of Invoices Out is used for issuing invoices to customers and for their record. In this book it is possible to issue both bound invoices from the set Sales Orders and unassigned invoices without a Sales Order (the unassigned documents). The invoices serve as tax documents in the Accounting. At the same time, the evaluation of article sales and a customer withdrawal of goods from invoices, and it is always done so according to the Invoice Date.
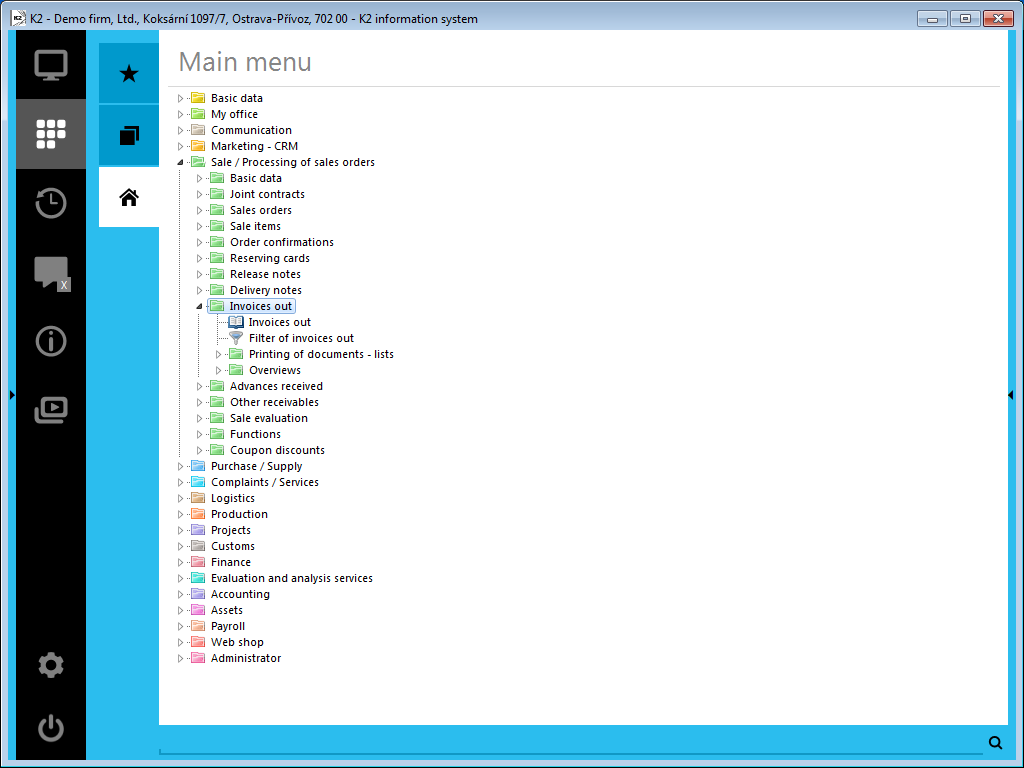
Picture: The opened menu of the Sale / Processing of Sales Orders - Invoices Out module
Book of Invoices Out
On the individual pages of the Invoices, we may find the items that are very similar to one another in their function in both types of Invoices (Invoices Out and Invoices In) . The same principle is valid for the design of particular pages and for the character of the information displayed on them.
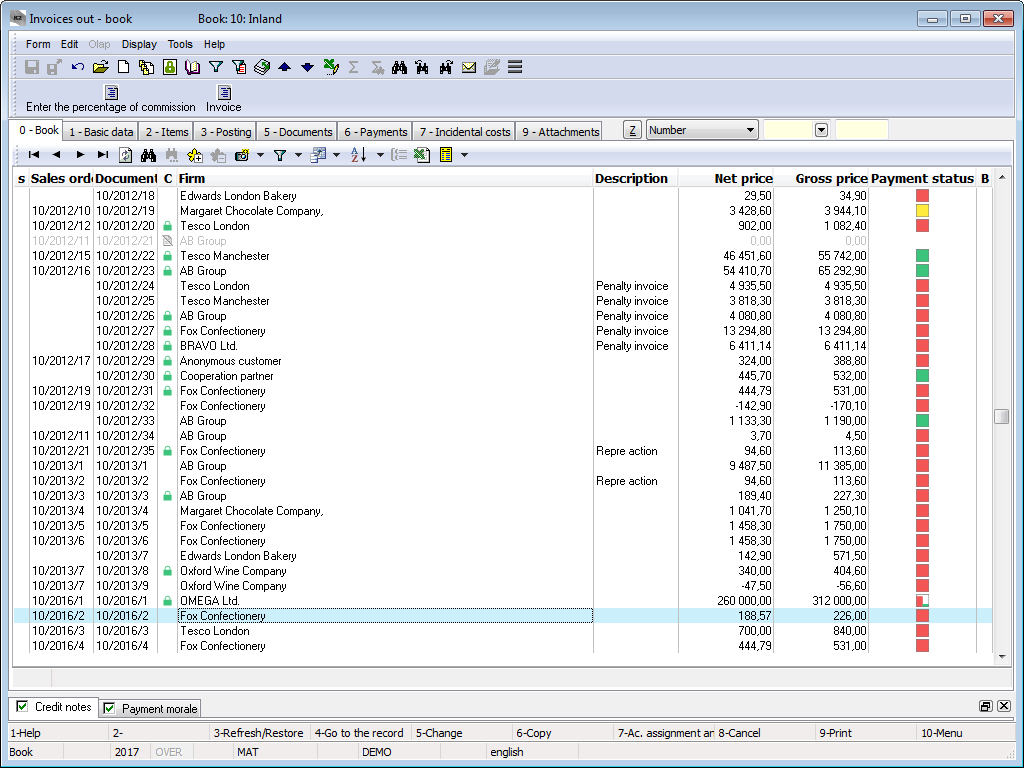
Picture: The Book of Invoices Out
The meaning of the graphic symbols of payments on Invoices Out
![]() unpaid prior to maturity
unpaid prior to maturity
![]() not paid off prior to maturity
not paid off prior to maturity
![]() unpaid after maturity
unpaid after maturity
![]() not paid off after maturity
not paid off after maturity
![]() unpaid after x days after maturity
unpaid after x days after maturity
![]() not paid off after x days after maturity
not paid off after x days after maturity
![]() overpaid
overpaid
![]() paid
paid
Basic Data (1st page)
The first page of invoices is used to display identification and basic invoice data and some other information such as payment method, shipping method, date of issue etc.
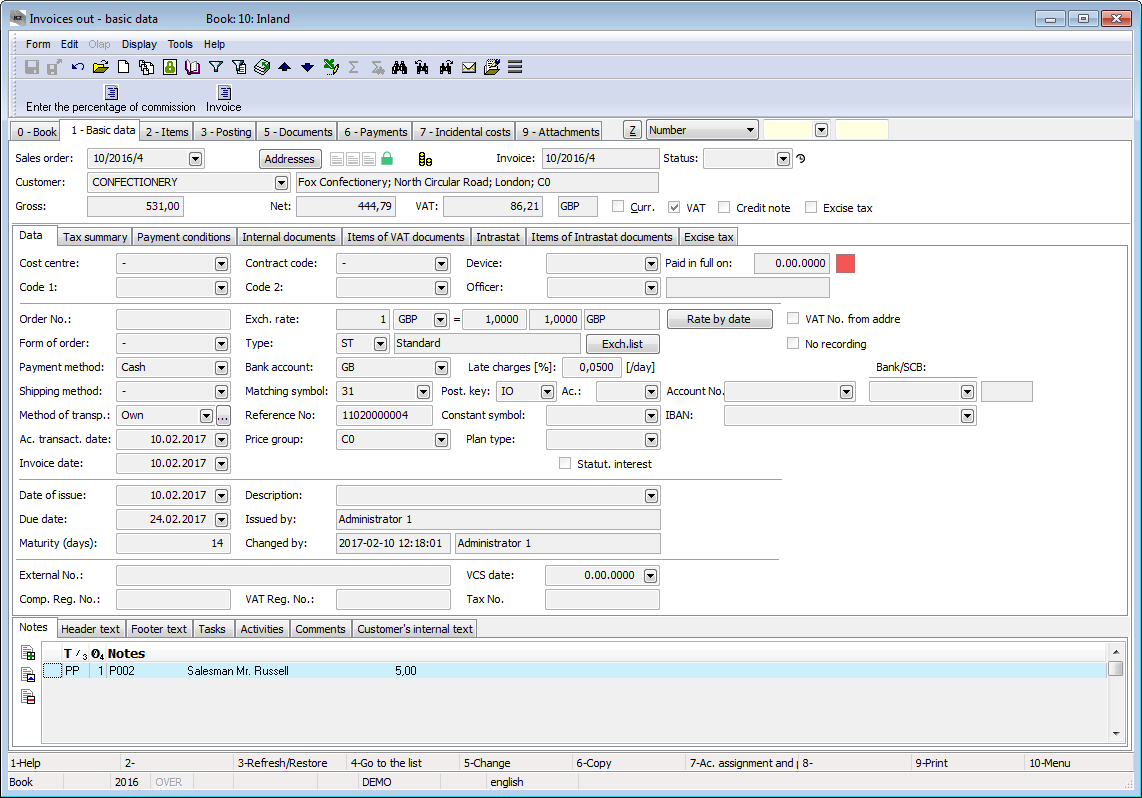
Picture: Invoices Out - 1st page
Field description:
Sales Order |
The number of the Sales Order that the Invoice is linked with. If the invoice has been issued as a free document, this field is empty. Note: Before we create an Invoice, we determine whether the document is linked or free by means of the wizard. It is not possible to change a Sales Order in the Change mode any more. |
Addresses |
The button to display an addressee or the superior company. For further information, see the Addressee chapter. |
Invoice |
The book, business year, and the number of an Invoice. |
Status |
The field for selecting from a code list that enables filtering of documents according to the selected status. |
Customer |
A business partner name that is inserted by selecting from the Suppl./Cust. book. In the case of a new partner, you can insert a new Supplier/Customer card into this book with the Inskey (eventually with the F6 key - insert according to the indicated specimen), edit (by pressing the F5 key) or only browse a card (by pressing the F4 key). |
Prices |
The amount for which the Invoice has been issued. Stated in this row is the Gross price, Net price, and also the amount of VAT. |
Currency |
The flag indicates that the Invoice is issued in a foreign currency. |
VAT |
When the field is checked, it is a common invoice for which value added tax is paid. |
Credit Note |
If the field is checked, it is a Credit note. |
Excise Tax |
If the field is checked, an excise tax will be calculated on the Invoice. |
Substitute Payment Mode |
The option defines whether a Sales Order is in the substitute payment mode. |
It is possible to assign random types and kinds of notes to the Invoices; eventually, you can use the Header Text or the Footer Text. Closer description of work with notes is stated in the the Basic Code Lists and Supporting K2 Modules – Notes chapter. The Internal Customer Text tab serves to display the customer's internal text. There are also the Tasks and Activities tabs. Closer description of work with the folders is stated in the Tasks - Document Folder and Activities - Document Folder chapters.
The payment conditions can be displayed in the Payment Conditions tab.
The basic data of the Invoice Out header are divided into several tabs.
The Data tab contains basic information about the document header.
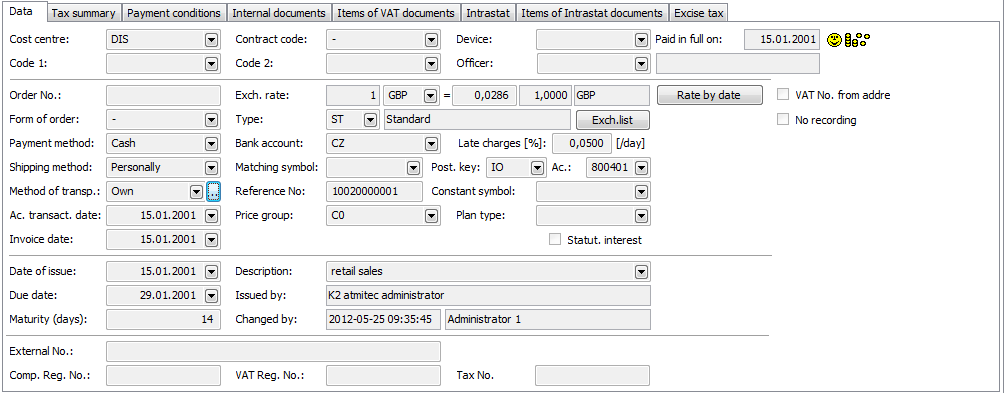
Picture: Data - Invoice Out (page 1)
Field description:
Cost Centre |
Again, this is filled in from the selection menu of cost centres. |
Contract Code |
It is a numeric or text data used to sort activities of the company. |
Paid in Full On |
The date of the actual Invoice payment. |
Device |
A reference to the Device book. It is copied from a Sales Order into the subordinate documents. |
Code 1, Code 2, Officer |
The fields enable user identification, and eventually a link to the Officers book. Further description is stated in the Basic Code Lists - Code 1, Code 2, Officer chapter. |
Order No. |
A manually entered order number. |
Form of Order |
The way the order for goods has been made. |
Payment Method |
The method of paying the invoice. Note: The payment method can influence the Invoice rounding. For further description, see the Rounding of Domestic Invoices Depending on the Payment Method methodology. |
Method of Transport |
Method of transport of goods. The button Note: For the needs of Intrastat, a Mode of transport can be assigned to each method of transport. |
Accounting Transaction Date |
Acc. trans. date enters into the Accounting. You can change the date on an Invoice Out according to the confirmation date of a Release Note by pressing Shift+F2 in the Change mode. |
Invoice Date |
An Invoice Date enters the VAT Return. If the Invoice Date is zero, the document does not enter the VAT Return. |
External Number |
External number (60-character text). |
Comp. Reg. No. |
Comp. Reg. No. of a customer. If it is not defined here, the Comp. Reg. No. from the Customer card is applied. |
VAT Reg. No. |
VAT Reg. No. of a customer. If it is not defined here, the VAT Reg. No. from a Customer card is applied. |
Tax No. |
Tax number of a customer. If it is not entered, the tax No. from a Customer card is applied. |
Maturity (days) |
Number of maturity days. The number of days that is pre-defined in the Client Parameters (the Administrator module), or eventually from the Suppl./Cust. card, is entered automatically. |
Exchange Rate |
The document currency and the exch. rate for recalculation to the domestic currency. The rate valid to the date of issue is selected. If the Invoice Exch. Rate According to Acc. Trans. Date option is checked in the Client Paramaters, an exch. rate to the acc. trans. date is filled in. This field cannot be edited any more after you pay and reprice this document. |
Exchange Rate According to Date |
This button enters an exchange rate from the exchange list that is valid to the date depending on the Exchange Rate According to the Date of Accounting Transaction parameter. |
Exchange List |
This button opens the preview of an exchange list of the given currency and sets the cursor on the rate valid on the date of issue of the Invoice. |
Type |
Tax type determines into which line of the VAT Return the Invoice will be entered. |
Bank Account |
The bank account of "your" company, where the payment for an Invoice is to be sent. If the Uniform Bank Connection for IO client parameter is on, the bank account from the customer in the own company is entered, otherwise the bank account set in the Suppl./Cust. card is entered. |
Late Charges (%) |
The percentage of penalty from delay for each day of late payment from the due date - it is filled from the Suppl./Cust. card. It the Statutory interest field is checked, the Late charges is filled from the Statutory interest table. |
Matching Symbol |
This field serves for setting the matching symbol definition of the accounting documents (see the Accounting - Matching Symbols chapter). |
Posting Key |
Selecting a Posting Key (by selecting it from the selection menu) determines the way how the created Invoice will be posted. Posting Keys are set in the Accounting - Posting Keys module. On the 1st page of the Book of Sale, it is possible to set the Posting Key that will be automatically entered into this field. |
Account |
The field is automatically filled in by the Account in the Book of Sale. If it is not filled in in the book, the Receivables Account from the 1st page of the Suppl./Cust. card is entered. |
The Account Number, Bank/SCB, IBAN |
The customer bank account number. It is possible to choose the account entered in the Customer card (it is not filled in automatically) or enter the value manually. |
Reference Number |
A Reference Number of an Invoice - it can be created automatically according to the settings in the Books of Sale. It must be unique - the program will alert you to any duplicate of a Reference No. |
Constant Symbol |
A Constant Symbol that is completed by the selection from the menu. |
Specific Symbol |
A Specific Symbol for the payment. |
Price Group |
The price group of the Invoice header according to which the selling prices are determined. This price group is pasted into particular Invoice items. |
Plan Type |
A plan type that is defined in the Book of Sale is entered into this field by default (see the Basic Code Lists and Supporting K2 Modules - Plan Type chapter). The plan type serves for classification of the documents. |
Date of Issue |
The date of issue of an Invoice. The current date is automatically filled into this field. In case of need, it is possible to overwrite the date by another date. |
Due Date |
The due date of an Invoice. According to the settings in the Derive Due Date from Accounting Trans. Date client parameter, the Due date is automatically entered by adding the number of Maturity Days to the value of the Date of Issue field or to the Acc. Trans. Date field. If the Floating Maturity is checked on the Suppl./Cust. card in the Payment Conditions tab, the Due date is filled in according to the Month Shift and Days From The Beginning of Month values. |
Control Statement Date |
A date of Control Statement. It is necessary to be filled only if it differs from the Invoice Date. |
Statutory Interest |
A check mark that determines whether the Late charges will be calculated by the contract or by law. |
Description |
A closer specification of the Invoice (the purpose for which it has been issued …) can be added into this field either manually, or by selecting from the selection menu. |
VAT No. From Addressee |
For the VAT return, VAT Reg. No. is taken from the invoice address (if the invoice address is filled in). |
Do Not Record |
The Invoice amount will not be added to the customer's turnovers displayed on the 2nd page of the Suppl./Cust. card if this field is checked. Simultaneously, the confirmation of the Invoice with this checked field does not influence the value of the Last Price field on the Article card, Date of the Last price field and Date of the last purchase field. The Invoice will also not be added into the credit on the 1st page of the Suppl./Cust. card when confirmation. |
Issued By |
The name of the employee who has issued the Invoice. |
Changed By |
The date and name of the employee who made the last change of the Invoice. |
In the upper part of the Tax summary tab are the prices of an Invoice without the deduction of Advances. The displayed Gross, Net and VAT values show an Invoice amount without the deducted Advances.
There is a table of the price recapitulation of the Invoice under this information.
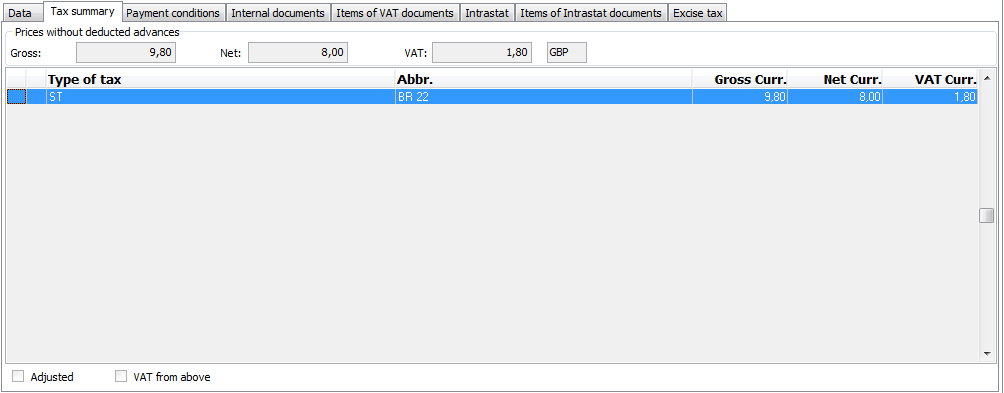
Picture: Tax Summary - Invoice Out (1st page)
It displays the VAT documents items, in which the Invoice is entered.
Picture: Invoice Out - 1st page with items of VAT documents
Internal documents in which an Invoice is stated in the header of an internal document in the Document field are displayed.
Picture: Invoice Out - 1st page - Internal Documents tab
The tab serves to enter data which are important for reporting Intrastat.
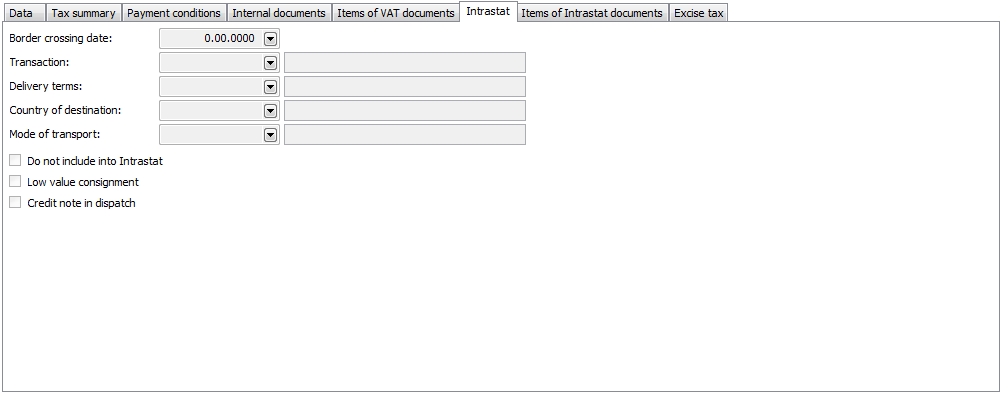
Picture: Invoice Out - 1st page - Intrastat tab
Border Crossing Date |
Decision date for input of an invoice to Intrastat. It is filled with an invoice date. If the Border Crossing Date According to Invoice Date Client parameter is checked, then it is filled with this date. |
Transaction |
Type of transaction of an invoice. |
Delivery Terms |
Delivery terms for an invoice. |
Country of Destination |
A country of destination for an invoice. It may be filled in if the country of destination is different than the country in the customer address (eventually in the delivery address, if entered). |
Mode of Transport |
Mode of transport for an invoice. It may be filled in if the Mode of Transport is not entered in the Method of Transport code list. |
Do Not Include into Intrastat |
The checked field ensures that the document does not enter Intrastat (even if it should enter there according to other conditions). |
Low Value Consignment |
Data about the individual consignment of the dispatched goods, invoice value of which does not exceed 200 EUR,can be characterized summarily as a Low Value Consignment under the common article code "99500000". Checking the flag will run a check of whether the invoice satisfies the conditions for a Low Value Consignment. If the invoice does not satisfy the conditions, the items in Intrastat will be loaded separately. |
Credit Note in Dispatch |
The checked field ensures that the item of the Invoice Out with the negative quantity will get into Intrastat - Dispatches. If the field is not checked, the given item will enter into Intrastat - Arrivals. Note: It is appropriate to use it if a company reports only Intrastat - Dispatches. |
It displays Intrastat document items, in which the given Invoice Out is entered.
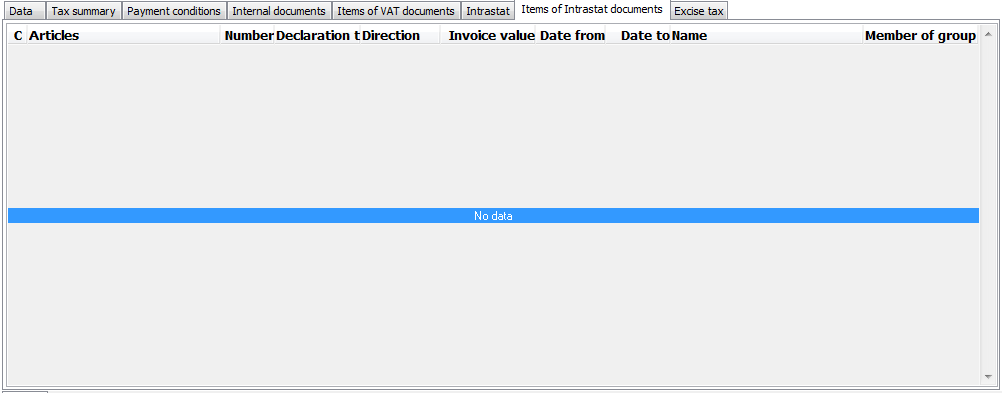
Picture: An Invoice Out - 1st page with the items of Intrastat documents
Recapitulation of the Excise tax is displayed.
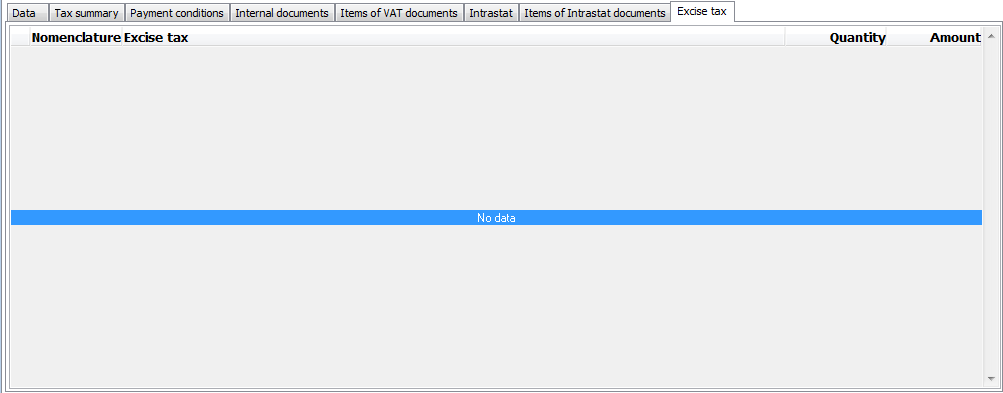
Picture: Invoice Out - 1st page - Excise Tax
Items (2nd Page)
On the second page of Invoices, you can find an overview of particular items that the Invoice is issued for. Insert a new item in the Change mode or when creating a New Record by pressing Ins. If you issue an unassigned document, the Sale item form is displayed, into which you select a required article and enter the required data. If you issue an assigned document, select the items from the Header Items book after pressing Ins. All the items that are sorted to the appropriate Sales Order are stated there; however, no Invoice has been issued for them yet.
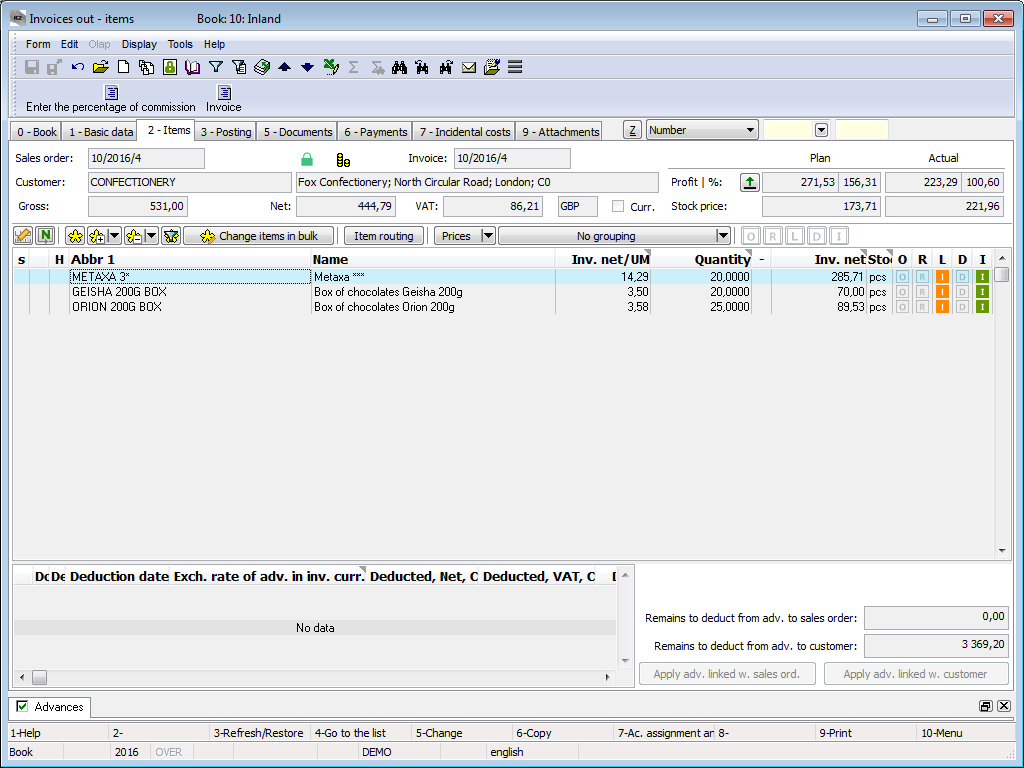
Picture: Invoices Out - 2nd page
The Sale Item form can also be activated by pressing the Enter key over the particular Invoice Out items either in the Change mode or in the Browse mode. In addition, the Change mode allows you to edit the data about invoiced prices, quantities, you can set the codes, etc.
In the heading of the document, you can display the data about the planned and the actual profit and margin of a document. See further description in the Profit, Margin and Stock Price chapter.
Values in the document items, including discounts, can be adjusted in bulk with the Bulk Change of Items button in the Change mode. For further description of this function, see the Bulk Edit Document Items and Purchase and Sale Items chapters.
In the lower part of the 2nd page of an Invoice, a list of deducted Advances is displayed, and on the right part, the amounts which you can deduct (the amounts are stated in the currency of the Invoice) is displayed. In the Change mode, the buttons for deducting Advances are accessible.
Description of Selected Fields:
Deduct Adv. Linked w. Sales Order |
Pressing the buttons will open the options for deducting an Advance to a Sales Order to which the Invoice is linked. |
Deduct Adv. Linked w. Customer |
Pressing the buttons will open the options for deducting an Advance to a Customer. |
Remains to Be Deducted from Adv. to Sales Order |
Amount of the paid Advances to a Sales Order that has not been deducted on an Invoice yet. |
Remains to Be Deducted from Adv. to Customer |
Amount of the paid Advances to a Customer that has not been deducted on an Invoice yet. |
Further description is stated in the Deducting an Advance Received on an Invoice Out chapter.
Assignment (3rd page)
The 3rd page, that is visually split into two parts, is used for posting Invoices. In the upper part are the individual items of an Invoice. The deducted Advances are displayed below. The lower part serves for the posting of the document.
Note: Closer description of the posting and account assignment is stated in the Accounting - Account Assignment and Settlement chapter.
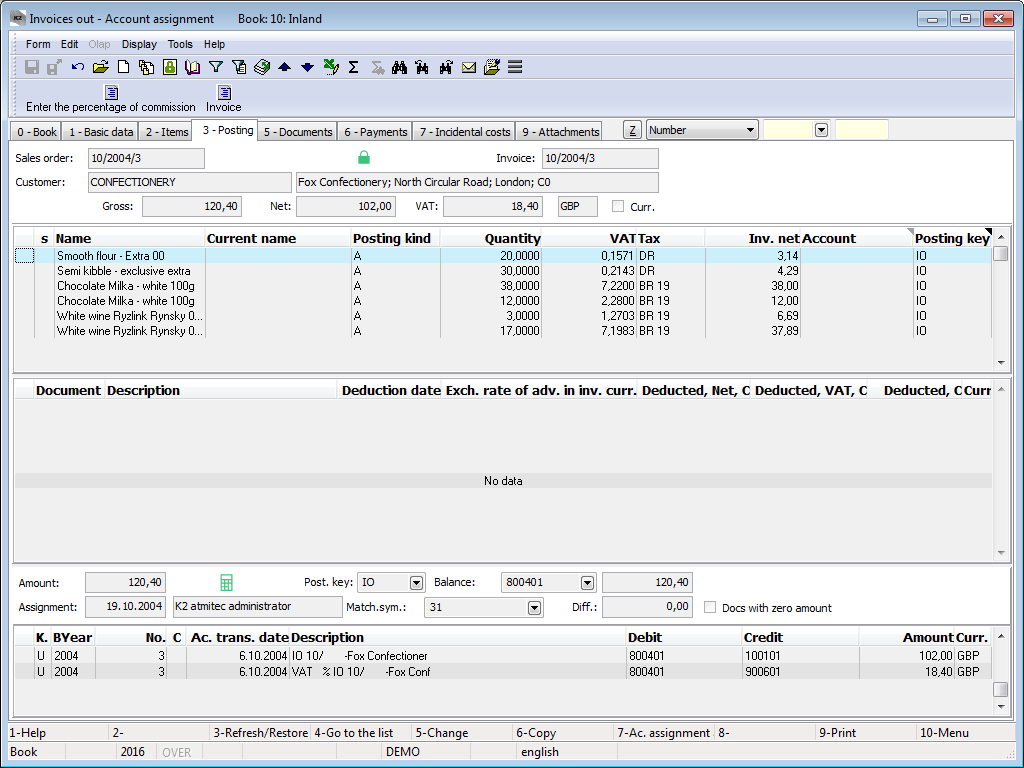
Picture: Invoices Out - 3rd page
Documents (5th Page)
There is a list of all documents that are linked with this Invoice through a superior document (a Sales order) on the 5th page of an Invoice Out. You can move between the individual documents by pressing Ctrl and the initial letter of the document simultaneously. It is also possible to display the selected document by pressing the Enter key.
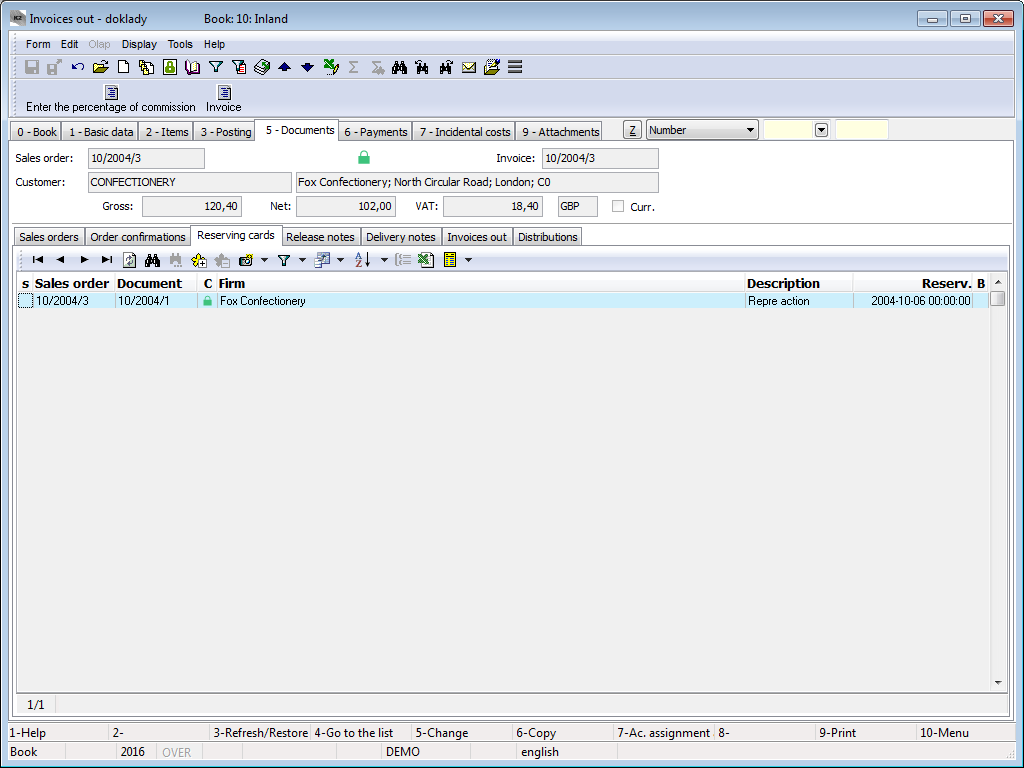
Picture: Invoices Out - 5th page with the open Reserving Cards tab
Payments (6th page)
On 6th page of an Invoice, the user can monitor the matters related to the state of the invoice payment, such as whether the Invoice has been settled in full or only in part, the due date, the delay, the penalty, or the information about the individual payments (the lower part of the screen). This page is displayed only in Browse mode (it is not accessible in Change mode or in New document).
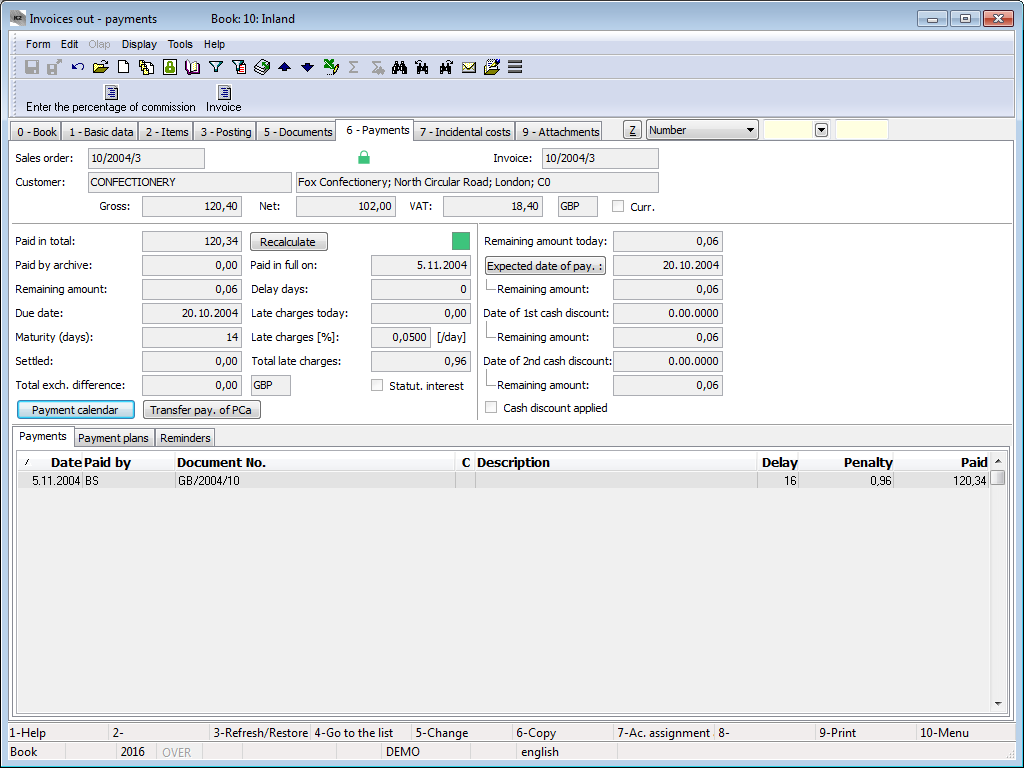
Picture: Invoices Out - 6th page
Field description:
Paid In Total |
The total amount that has already been paid. |
Paid by Archive |
The amount paid by the documents, which have been already moved to an archive. |
Remaining Amount |
The amount that remains to be paid. |
Due Date |
The due date of an Invoice. |
Number of Maturity Days |
The number of maturity days in which the Invoice should be paid. |
Settled |
The amount that has been paid by banker's orders. |
Total Exch. Difference |
The total amount of an exch. difference expressed in numbers to the Invoice. |
Recalculation |
The Recalculate button recalculates the payments for the Invoice. The recalculation can also be run by using the Ctrl + F3 key combination on the 6th page of an Invoice. If there is an exclamation mark next to the button, the payments on the 6th page are not counted correctly - it is necessary to run the payments recalculation. |
Paid in Full On |
The real date of the Invoice payment. |
Number of Days Delayed |
The delay of payment in days. |
Charge Delay Today |
Total charge from delay. |
Late Charges |
Contractual late charges specified in % per each day of the delay. |
Total Late Charges |
The amount of late charges calculated from the entered percentage and the delay days on the date of payment. |
Statutory Interest |
If this field is checked, the interest provided by law will be added to the Invoice. |
Remaining Amount Today |
The amount which remains to be paid on the current date. |
Date of First Discount |
Date of the first discount according to the payment conditions entered on the 1st page of the Invoice. If no payment conditions are defined, this date is identical to the due date. The amount indicated in the field below is an amount to be paid to this date. |
Date of Second Discount |
Date of the second discount according to the payment conditions entered on the 1st page of the Invoice. If no payment conditions are defined, this date is identical to the due date. The amount indicated in the field below is an amount to be paid to this date. |
Discount Applied |
The field serves for marking documents which fulfilled conditions of discount and a discount has already been applied on them. The field cannot be edited by the user. |
Planned Payment Date |
The planned date of payment. The due date reflected by the delay from the Customer card at the date of document issue is automatically filled in. It is possible to change it. |
Expected Payment Date |
Expected payment date reflected by the current delay from the Customer card. The field cannot be edited. |
Priority |
Used to set the priority for a payment. |
Payment Status |
A payment status that can be used to suspense a payment or completely block it. The payment status can take the values of Allowed, Suspended, or Blocked. You cannot add payments with the Suspended or Blocked payment status to a banker's order. |
Do Not Include To Financial Management |
If this option is checked, the document does not appear in the Financial Management module. |
Note: If a rounding error is defined in the Client Parameters, then if the Amount in the Remaining Amount field (on the 6th page of an Invoice) is less than the entered rounding error, the Invoices are indicated as paid.
The bottom part of the 6th page is divided into 3 tabs:
- Payments,
- Payment Plans,
- Reminders.
In the Payments tab there are displayed individual payments of an Invoice. After pressing the Enter key in the Browse mode on a specific payment, the 2nd page of a Bank Statement, a Cash Voucher or an Internal Document, eventually of a Banker's order, by which the payment has been executed, will be displayed. In the Cash Voucher, the light indicator will be positioned on the item that corresponds to the Invoice payment.
You can insert items that will indicate the plans of the Payment Calendar, by means of the Ins key in the Payments Plans tab in the Change mode (switch into the Change mode directly on 6th page). Define a date, currency and an amount that you want to pay at each Plan. Created plans are displayed on 2nd page of Payment Calendar at the same time. Simultaneously, if you create items in the upper window of 2nd page of Payment Calendar, the plans will be also displayed on 6th page of Invoice in this tab.

Picture: The form for creating a Plan of the Payment Calendar
In the Reminders tab, individual Reminders that have been issued on an Invoice are displayed. With the Ctrl+Enter keys, you can switch into the Books of Reminders, the light indicator will be positioned on a specific Reminder.
Payment of invoices can be done not only in the Finance module by means of banker's orders, bank statements and cash vouchers, but you can also use the automatic invoice payment directly on invoices out (in). This function can be activated by the following ways:
- The Automatic payment by cash register function can be run on the 6th page of the Invoice by means of Shift+F2 key combination. After pressing the key combination, the Automatic Payment form is called up and after filling in the form data, the current document will be paid by cash voucher.
- The Automatic payment by internal document function can be run on the 6th page of the Invoice by means of Shift+F3 key combination. After pressing the key combination, the Automatic Payment form is called up and after filling in the form data, the current document will be paid by internal document.
- Run through the module Menu Form - Bulk actions - Payment by cash register. In this case it is possible to activate the bulk payment of invoices either in the table of invoices (if invoices are indicated by asterisks) or in container.
- Run through the module Menu Form - Bulk actions - Payment by internal document. In this case, it is possible to activate the bulk payment of Invoices either in the table of Invoices (if Invoices are indicated by asterisks), or in the container.
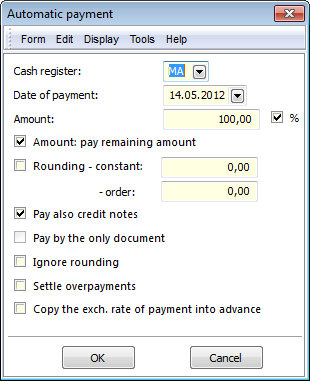
Picture: The Automatic Payment form - Shift+F2
Field description:
Cash Register |
Selection of a Cash Register (from the Books of Cash Register table) from which the payment will be executed. |
Date of Payment |
The date of the payment. |
Amount |
The amount to be paid. Into this field, the user can type in either the amount in the invoiced currency, or in percentage of a partial payment (e.g. to pay 20% of the total Invoice amount). If we pay multiple Invoices in bulk by entering the amount (not %), documents with a negative remaining amount are excluded from the payment (they will be shown in the error message). |
Amount - Remaining Amount |
The option for paying the remaining amount (it is used for Invoices that have already been partially paid). This option can be combined with the previous one, when it is possible to pay for example only 50 % of the remaining amount. |
Round Payment Amount to Whole Units |
This rounds the payment amount to integer units. |
Pay Also Credit Notes |
If an Invoice is issued as a credit note, then it is not possible to pay the Invoice without checking this flag. |
With One Document |
This option is available in the automatic payment, which is run on more Invoices via bulk action. If you check that option, the selected Invoices will be paid with only one document. Otherwise, a single Cash Voucher will be issued for every Invoice. |
Settle Overpayments |
The option to settle unpaid penny balance. If it is checked, the documents' "Pay Off" amount of which is less (or equal) than the rounding error will be paid off. |
Set Exchange Rate of Advance Acc. to Payment |
This option is used for payments of Advances in a foreign currency - it will set an exch. rate according to the Advance payment on the paid Advance (no exchange differences should arise when Advances are paid). |
Note: If the documents are marked with an asterisk, the function pays the documents from the last asterisk. If the documents are in the container, the function pays documents from the first document.
The form of automatic payment by an internal document is similar, and you can also set the Document Currency (i.e. the currency of the internal document).
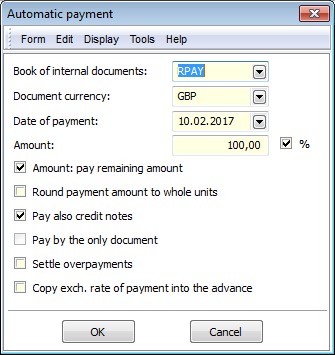
Picture: The form of automatic payment by an internal document
External Documents (9th page)
External documents and references to documents may be assigned onto the 9th page within the K2 IS. Further description of work with external documents is stated in the chapter Basic Code Lists and Supporting K2 Modules – 9th Page.
Functions of the Invoices Out Module Menu
Bulk actions can be run on the records marked with asterisks or on the records in container.
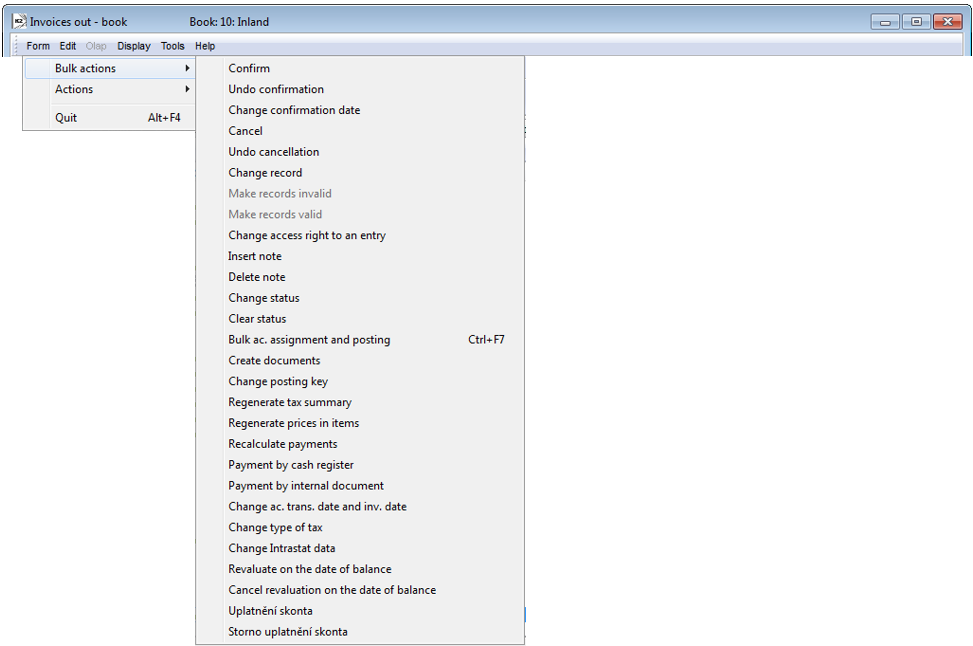
Picture: Functions of the Invoices Out module menu
Description of actions:
Payment Recalculations |
The function for mass recalculation of Invoice Out payments. |
Payment by Cash Register |
This performs an automatic payment of Invoices by the Cash Register. Further description is provided in the Invoice Payment - Automatic Payment by Cash Register and Internal Document chapter. |
Payment by Internal Document
|
This performs an automatic payment of Invoices by internal document. Further description is provided in the Invoice Payment - Automatic Payment by Cash Register and Internal Document chapter. In this context, the Not Paid Off and Overpaid Documents filter is set. After activating this filter, enter the accounting trans. date, from which you want to select the documents, and the range of the Remaining Amount field (e.g. from -1 to 1). The created filter will contain the 'not paid off' or 'overpaid' documents, which can be paid by an internal document in bulk after marking them with an asterisk. |
Change Acc. Trans. Date and Invoice Date |
The function enables to change the following data in unconfirmed invoices:
The VAT and Gross amounts will be recalculated after changing the VAT rate. If there is an unconfirmed Order Confirmation or a Delivery Note on an item, the amounts on these documents will also be changed. |
Change Type of Tax |
The function for bulk change of the tax type. The change will be reflected in the document header and in the Tax Summary. |
Change Intrastat Data |
Executes the change of records related to Intrastat (see the Intrastat tab on the 1st page of an Invoice Out). The user who wants to make the bulk change has to have the Change Intrastat Documents right or the Bulk Change of Invoices right. |
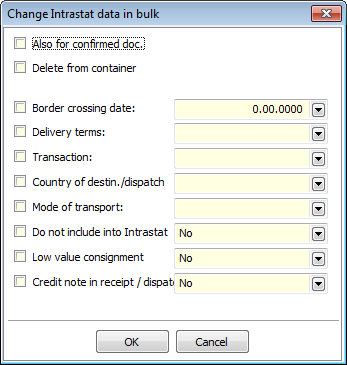
Picture: The form for changing the Intrastat records
Field description:
Also For Confirmed Documents |
Changes will be made to the confirmed documents too. Note: If the field is not checked and the change of records is to be done on the documents that contain the confirmed document, an error message warning us about the confirmed document will show. |
Delete from Container |
After the changes are made, the container is emptied. |
Border Crossing Date |
The value that is inserted into the Border crossing date field in an invoice. |
Delivery Terms |
The value that is inserted into the Delivery Terms field in an Invoice. |
Transaction |
The value that is inserted into the Transaction field in an Invoice. |
Country of Destin./Dispatch |
The value that is inserted into the Country of Destin. field (if the bulk change has been run on the Invoice Out). The value that is inserted into the Country of dispatch field (in the case, that the bulk change has been run on the Invoice In). |
Do Not Include into Intrastat |
Yes - the flag in the Do Not include into Intrastat field on the Invoice will be checked; No - the field will not be checked. |
Low Value Consignment |
Yes - the flag in the Low Value Consignment field on the Invoice will be checked; No - the field will not be checked. |
Credit Note in Receipt / Dispatch |
Yes - the flag in the Credit Note in Dispatch field is checked (if the bulk change has been run on the Invoice Out). Yes - the flag in the Credit Note in Receipt field is checked (if the bulk change has been run on the Invoice In). |
Description of Other Actions:
Revaluation to the Date of Balance |
This revaluates Invoices on the date of balance by an internal document. Closer description is in the Accounting - Revaluation to the Date of Balance. |
Cancel Revaluation to the Date of Balance |
It cancels the revaluation to the date of balance. Closer description is provided in the Accounting - Revaluation to the Date of Balance. |
Functions over Invoices Out
Description of functions:
Alt+F6 |
Transfer payments by the cash register (the book and Browse mode). |
Ctrl+F3 |
On the 6th page in Browse mode, this key combination runs the recalculation of the payments to the invoice. |
Ctrl+F6 |
Transfer payments by the cash register (the book and Browse mode). |
Shift+F2 |
It activates the form to change invoice date (in the book and on the 1st page in Browsemode). It is executable on credit notes only. On the 6th page in Browse mode, it activates the function for the automatic invoice payment by the cash register. |
Shift+F3 |
On the 6th page in Browse mode, it activates the function for the automatic invoice payment by internal document. |
Shift+F5 |
It opens the form for reminder creation in the book. |
Ctrl+Shift+Alt+F5 |
On the 6th page in Browse mode, it calls the form Change payment by archive. |
Ctrl+Shift+F8 |
It opens the form to create a new Service Sheet on the 2nd page in Browse mode. It is necessary to set up the Complaint / Services module for this functionality. |
F5 |
If you press the key on 6th page of an invoice, the document will be switched to the Change mode. It is possible to insert payment plans in Change mode. The key works on a confirmed document as well as an unconfirmed document. |
Ctrl+Alt+F5 |
The function enables to choose the document Status. |
Cancel Invoices (F8)
If an Invoice has already been saved (the number has been assigned to it), it cannot be deleted by any procedure. You can cancel it by pressing the F8 key. A cancelled Invoice remains in the database with the same data, only the flag of cancellation has been assigned to it. It is thus always possible to find out the amount for which it has been issued, and its content. A cancelled Invoice cannot be changed any more, just like in the case of confirmation. By pressing the F8 key again, an authorized person can undo the cancellation of the Invoice. The procedure is the same as when you undo the confirmation.
If a document with allocated incidental costs is cancelled, these incidental costs are automatically deleted. This means that such a document cannot be cancelled if the user does not have the right to allocate incidental costs or the incidental costs are allocated into the item of a Receipt Card, which is in the blocked period.
If an Invoice has been created by mistake and it is not desirable for the it to behave as a cancelled Invoice in the table of Invoices, it is possible to link it to an other Order Confirmation by using Matching - Alt+F5, and use the created number for an other Invoice.
Transfer of Invoice Payments Alt+F6 (Ctrl+F6)
The Transfer of Invoice Payments enables the user to transfer the payments from one Invoice to another. The transfer will be processed by a Cash Voucher.
This function can be activated in the Browse mode by pressing Alt+F6 (Ctrl+F6). The Transfer Invoice Payments form will be displayed.
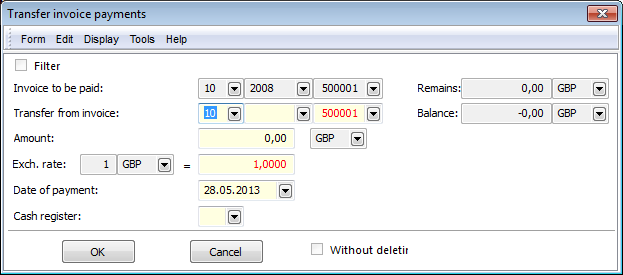
Picture: The Transfer of Invoice Payments - Alt+F6 (Ctrl+F6) form
Field description:
Settled Invoice |
The book, number, and the business year of the current Invoice (the Invoice that the payment is transferred to). |
Remaining Amount |
The remaining amount that is to be paid on the current Invoice. It is only displayed on the form. |
Transfer From Invoice |
The field for the invoice selection that the transfer of payment is to be executed from. |
Remaining Amount |
The remaining amount that is to be paid on the current invoice. It is only displayed on the form. |
Amount |
The invoice amount that is to be transferred between the invoices. The Amount, which paid this Invoice, is set by default (the amount that is entered in the To pay field). |
Date of Payment |
The date of the payment. |
Cash Register |
Selection of the Cash Register (from the table of Books of Cash Register) by which the payment is to be executed. |
After the transfer is finished, a Cash Voucher will be created (in the Cash Register that was selected in the form), where two items are created with the same amounts but opposite signs. This Cash Voucher is confirmed automatically if the Confirm Automatically field is checked on the 2nd page in the definition of Cash Registers.
The rounding of domestic Invoices depends on the Payment Method
It is possible to set the rounding which depends on the Payment Method for Invoices Out in the domestic currency. You can set the rounding in the Payment Method code list, which is displayed in the Browse mode over an Invoice Out. Enter the value into the Constant field, which should be added to or deducted from the rounding number before the rounding itself (enables to round up or down). The value that is to be rounded can be entered into the Order field.
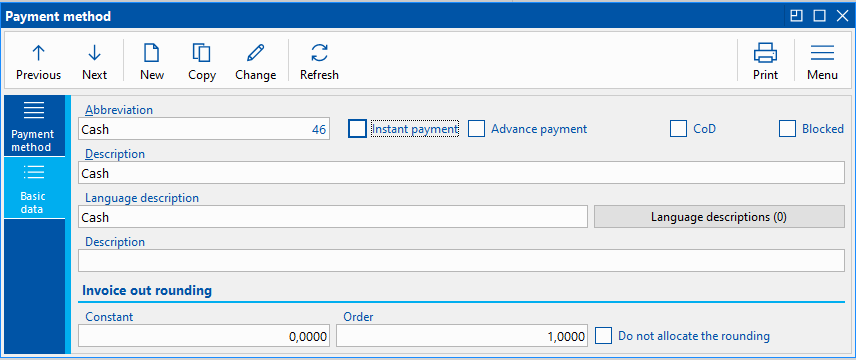
Picture: The Setting of Rounding in Payment Method form
If you set the rounding by the picture, the rounding will be for integer units.
The rounding is processed upon creating an Invoice Out, where the payment method is set, or upon changing the payment method, where it must be a domestic Invoice (the option Currency is not checked), where the Adjusted option is not checked (in the Tax Summary folder). If the Do Not Allocate the Rounding field is off, the rounding difference will be allocated into the Net values and one VAT rate. (This concerns the invoices with the Acc. Trans. Date higher than or equal to the 2019 VAT Legislative - New Method of Calculation From in the Client Parameters. In the case of Invoices with an older date, the rounding difference will always be allocated.)
The Do Not Allocate The Rounding field should always be activated on those payment methods that have the rounding set to integer units and that represent a payment in cash.
Credit Notes
This function ensures that credit notes are created to the invoice items and to advances and their mutual interconnections. The solution is based on the new invoice being created to the original invoice, or rather to their items. The new invoice (credit note) should contain one or two items depending on whether it deals with amount or price corrections. The function also enables to create the credit notes to more invoices all at once, or just stock documents.
You can create a credit note to an Advance that has been already paid and has not been deducted. A new Advance (credit note) will be created to the original Advance with the negative value (in the case of Advance it always deals with the price correction).
The function for credit note processing is possible to be run over the particular Invoice Out, Advance Received, Invoice In or Advance Provided. If you run the function from the page 0, it is necessary to mark those records which you want to work with with the stars ,or you need to insert the invoices into the container. The function can be run by the script Credit Notes, which you can run from the tree menu Finance - Credit Notes.
Correction of Quantity
Example: A Sales Order is created for goods of the value of 377,59 EUR without VAT. The Invoice has been issued on the items of this Sales Order, and the Articles have been physically delivered from the warehouse (a Release Note has been created). 20 pcs of "Metaxa" Article is the one of the items of the Sales Order. The net price of the Metaxa is 9,40 EUR / 1pc (11,28 EUR VAT included). 10 pcs of this article are defective and the customer wants to return them. It is also necessary to create a Credit Note for 10pcs of the article "Metaxa".
Activate the Credit Note function over the Advance for which you want to issue the Credit Note. An initial form of the function will be displayed.
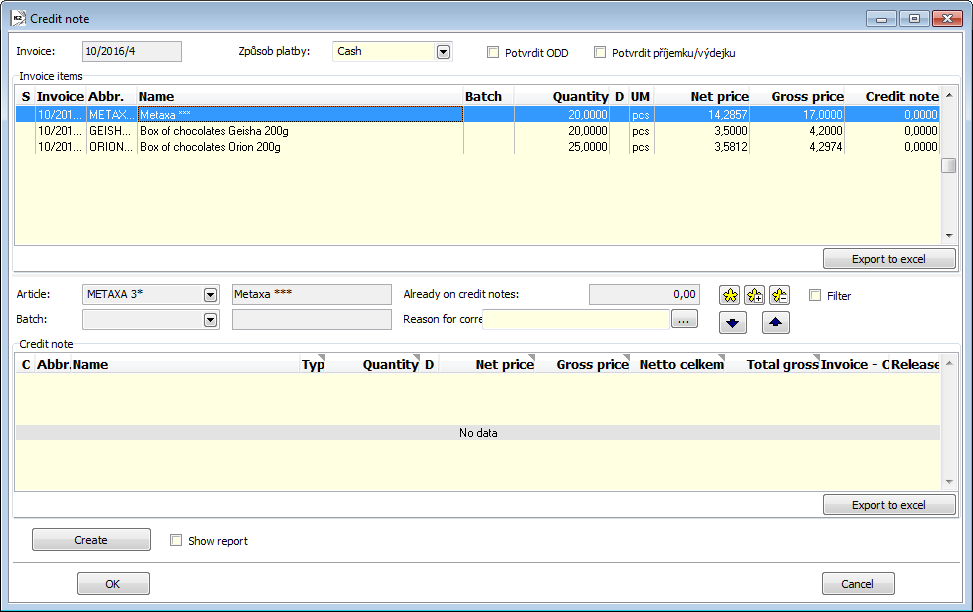
Picture: The Credit Note form
Field description:
Invoice |
The number of the Invoice that is being processed now. |
Payment Method |
Payment Method, which is added to a new Invoice - CN. |
Confirm CN |
The check for when you want to confirm a new Invoice - CN. |
Confirm Receipt Card/Release Note |
The check for when you want to confirm a Receipt Card/Release Note - CN. |
Invoice Items |
In this window, all the items of the Invoice are displayed. |
Articles |
The abbreviation and a name of the Article from the Invoice item. |
Batch |
The abbreviation and a description of the Batch from the Invoice Item. |
Already on Credit Notes |
Number of pieces that has been already credited on this item of this Invoice. |
Filter |
If the field is checked, only the Credit Notes that are related to the Invoice Item which the light indicator is positioned on, are displayed in the lower part of the form. If the field is not checked, the already created Credit Notes to all Invoice Items are displayed here. |
Reason of Correction |
The field to define the reason of the correction. You can edit it, select a reason from the code list, or insert a new record into the code list. |
Credit Note |
Work in this field with the selected Invoice items when you create Credit Notes. Furthermore, the already existing Credit Notes to a selected Invoice or to its items are displayed here as well. |
Discount |
After you press the button, the items from the Credit Note window will be reduced of the entered percentage. |
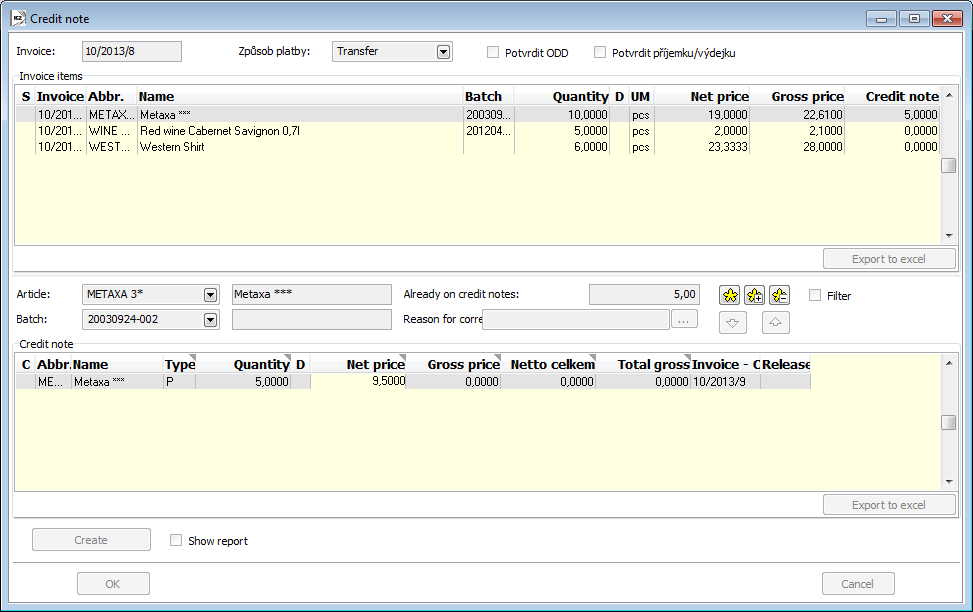
The customer returns 10 pcs of the "Metaxa" article. The work with this item follows. In the upper part of this form, mark the item that you want to credit with an asterisk. Indicate it by pressing the Shift+Enter keys or by means of the standard icons with the asterisks in the form. Move the indicated items form the upper part of the form into the bottom part of the window by means of the button with arrows. You can also edit the selected items in the lower part of this form.
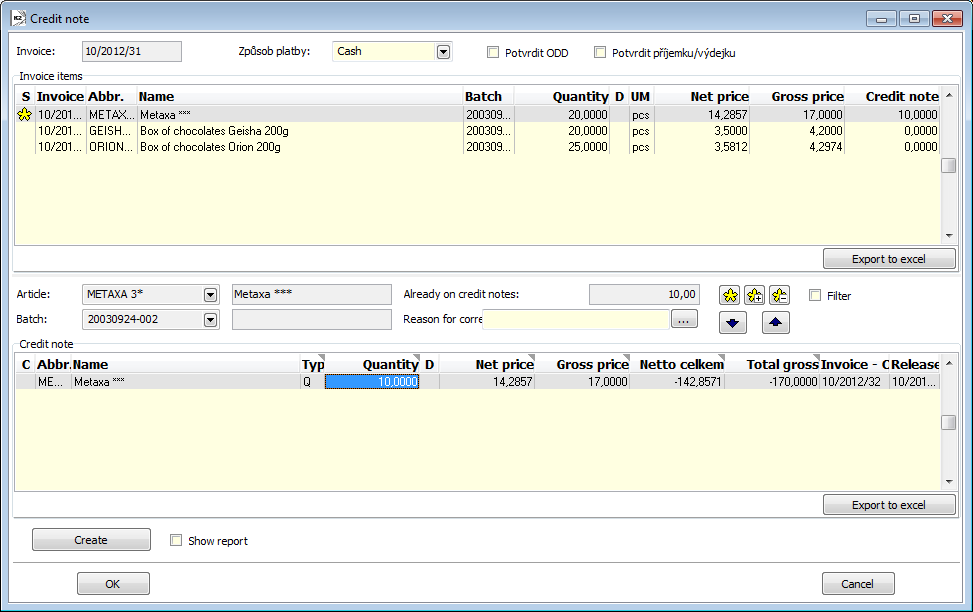
Picture: The Credit Note form with the credited item - corrected quantity
Define the number of pieces of credited Articles in the
Quantity column. If you create a Credit Note to correct the price, the Net Price and the Gross Price columns are used to define a new price of the Article. You can edit these columns with the Enter key.If you correct the quantity, change only the
Quantity column. Here you can specify the number of pieces that have been returned by the customer, i.e. 10 pcs of the "Metaxa" article. Save the Credit Note by pressing the Create button. Save the document by pressing the OK button. You can close the form this way as well.A new Invoice and a Release Note with one negative item have been created by this script. The identical negative item is also inserted into the original Sales Order automatically.
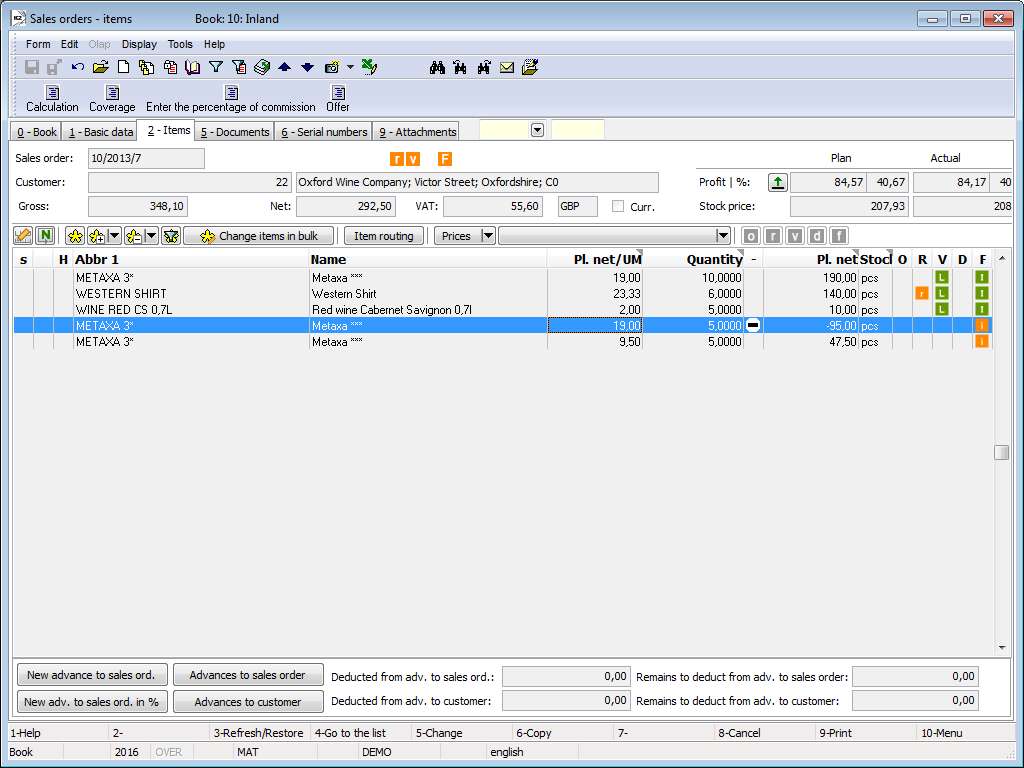
By creating a new Credit Note, the negative item of -10 x 9,40 EUR has been inserted into the Sales Order. The Net Price has been reduced by 94,02 EUR.
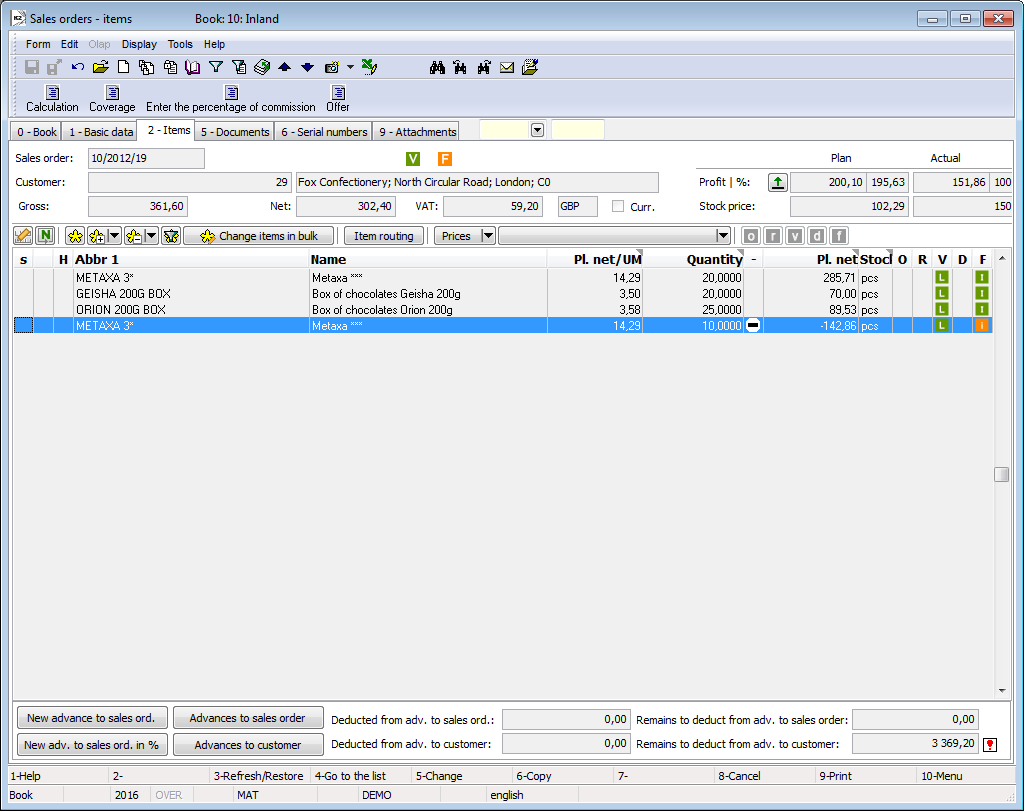
Picture: The Sales Order with a negative item - correcting the quantity
After you create a Credit Note, you can print the new Invoice by a standard report called
Invoice Out. If the TaxCreditNoteConfirmation parameter is set to "Yes" on the Invoice, the Confirmation of receipt of a Credit Note attachment is printed together with the Invoice . 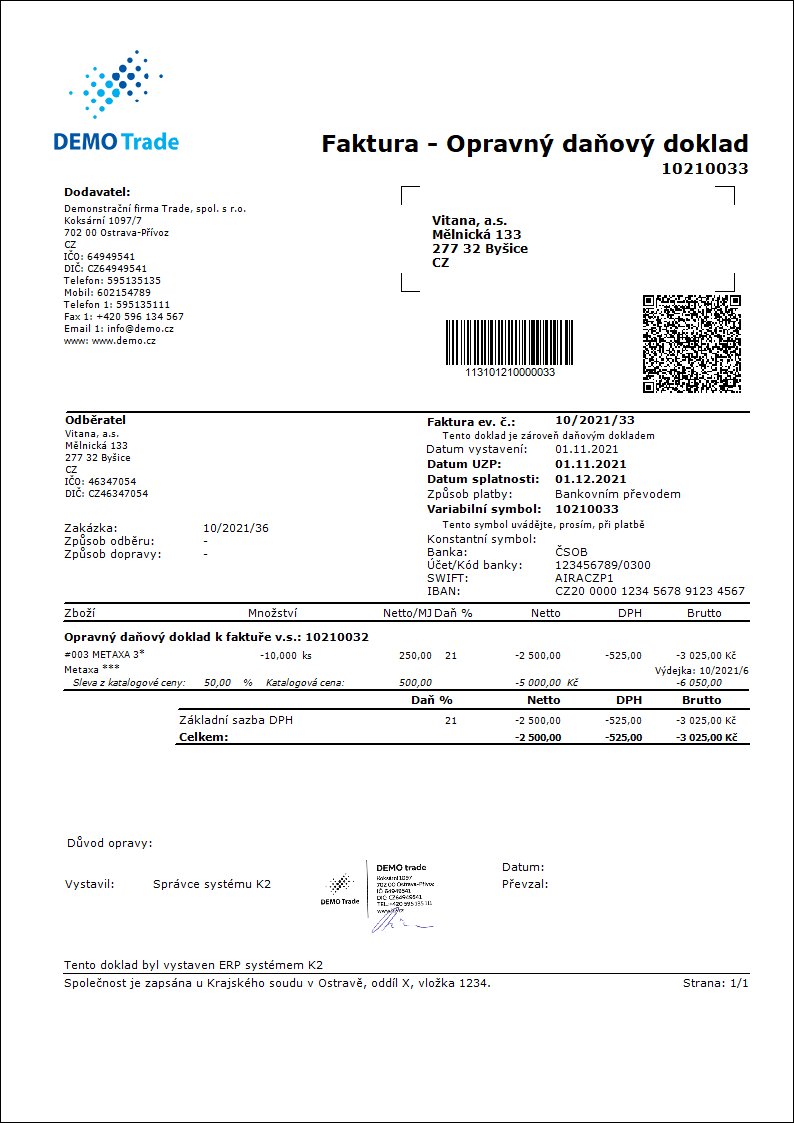
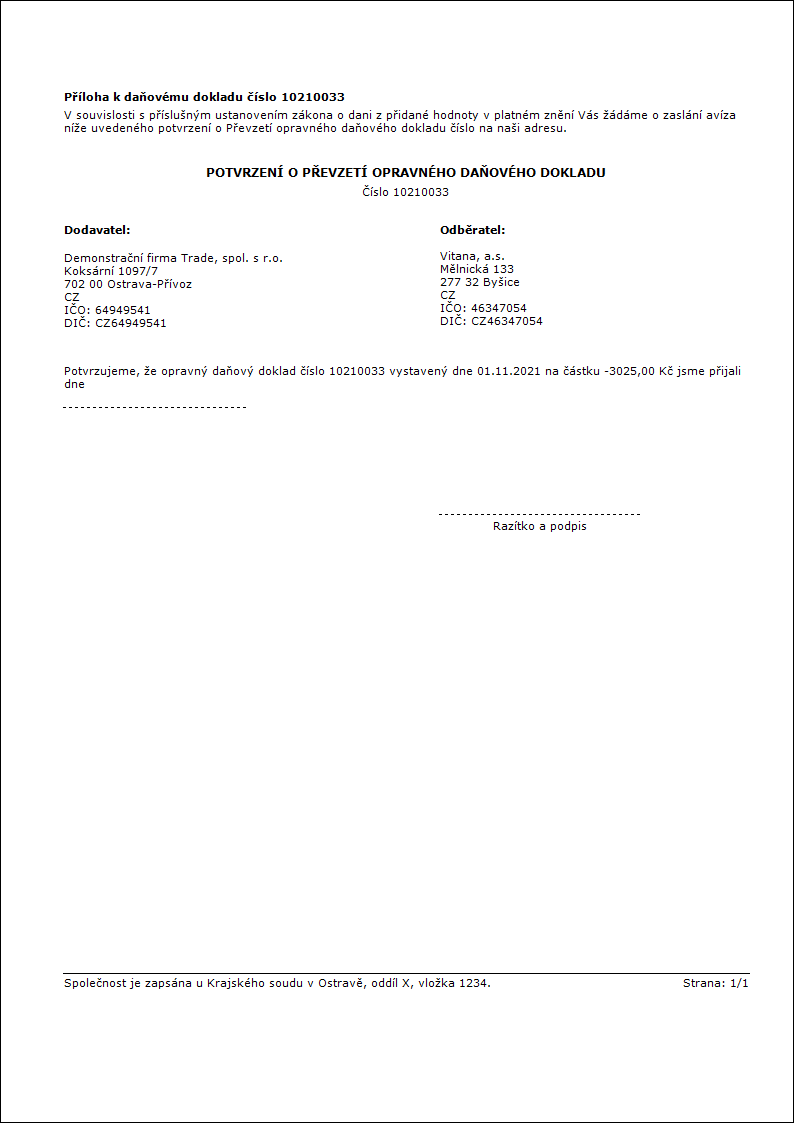
Note:
If you need to correct either the amount or price, enter a new price in the lower part of the form (if the parameter
EnterRebate = "Yes", enter the discount) - the Type on item will change to "C" automatically, and you can change them back to "M".If you create a Credit Note for the item whose Article card is invalid, a notice will appear after you approve the form: "Invalid Article cards are on the created Credit Note ...". After the announcement is approved, the Corrective tax document is created for this article".
Correction of Price
Example: A Sales Order is created for the goods of the value of 361,05 EUR without VAT. The Invoice has been issued on the items of this Sales Order, and the Articles have been physically delivered from the warehouse (a Release Note has been created). 10 pcs of the "Metaxa" Article is one of the items of the Sales Order. The net price of the Metaxa is 15,04 EUR/1pc (18,05 EUR VAT included). The customer requests a discount for 5 pieces of these defective articles. New Net price of this article is 7,52 EUR. It is also necessary to create a Credit Note for 5pcs of the "Metaxa" article.
Indicate the article in the form of creating the Credit Note and move the item by means of the buttons with arrows into the bottom window. Correct the price, because it is necessary to edit not only the Quantity column, but also one of the Net price, Gross price, Total Net price, Total Gross price columns. Determine a new price of the article in these columns.
Picture: The Credit Notes - correcting price
New price is defined for 7,52 EUR/unit without VAT, so it is necessary to fill in the
Net price column. Fill in the number of pieces of the suitable article into the Quantity column. "C" (correcting the price) letter is automatically inserted into the Type column.The Invoice (Credit Note) is created by the script. The Invoice contains one negative item with the original price (-5pcs x 15,04 EUR) and one positive item with a new price (5pcs x 7,52 EUR). Both of these items are inserted into the original Sales Order and they decrease its value this way. In case of price correction, the articles are not returned physically, therefore the Release Note is not created.
Picture: Sales Order - correcting price
In case you want to create 100% price credit note, just change Type to "C" and let the price Null.
If you want to enter a discount instead of a new price, set the parameter
EnterRabate to "Yes"before you run the Credit Note function.If you want to discount the articles by some percentage, enter the percentage discount into the initial form and press the button
Discount - the Net price in items selected in the Credit Note window will be recalculated.Create Credit Notes in bulk
If you want to create a Credit Note to more Invoices at once, the Invoices must meet the following conditions:
- they have been issued to the same company,
- they have set the identical type of tax in header,
- they have set the Currency checkbox identically, and if the Currency checkbox is checked on all Invoices, it must be an identical currency,
- if the CreateNewCommission parameter is set to "No", all the Invoices must be issued in an identical book,
- if the Invoices are not issued in an identical book, the Allow Multi-docs/Allow Adding Superior Document From Other Book client parameter must be set to "Yes".
If the Invoices do not meet some of the conditions mentioned above, the function shows you the reason why it is not possible to run it and it will end itself. If the Invoices meet all of the mentioned conditions, the initial form of the function for creating a Credit Note will appear, in which you indicate the quantity or the price that you want to credit. How to indicate the quantity is mentioned above.
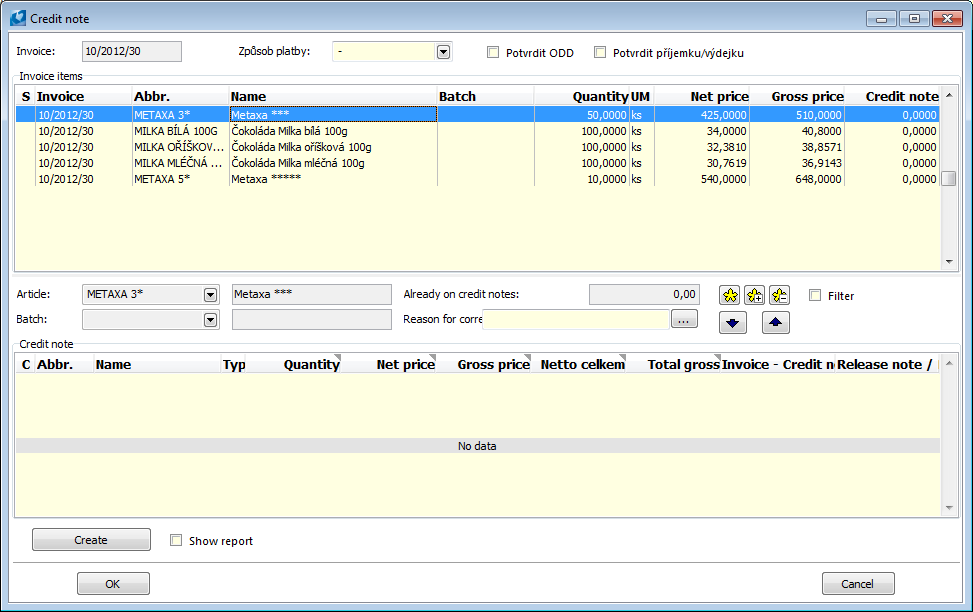
Picture The Credit Note form
If you confirm the form, a new Invoice is created. When creating Credit Notes in bulk to more Invoices at once, the fields that have been taken into the Credit Note from the original Invoice will be taken as follows:
- if the Invoices indicated with asterisks are processed, and the light indicator has been positioned on an other (not indicated) Invoice when activating the script, the header data will be taken from the first indicated Invoice. Otherwise, the header data will be taken from a record on which the light indicator has been positioned when activating the script,
- if a Credit Note is created in a foreign currency to one Invoice, the exchange rate will be entered from the original Invoice (the same as before). If a Credit Note is created to more Invoices, the exchange rate will be entered into the Credit Note from an Exchange list that has been valid to the 1st of January of the current year - foreign exchange centre (if there is not an exchange rate to the 1st of January in the Exchange list, the nearest preceding one is taken).
The Invoice from which the fields are taken for the new Invoice is stated in the header of the form in the 'Invoice' field. A supplement of the "VS" type is inserted into the item of a newly created document. One supplement is created for each original Invoice, from which a Credit Note is created. A reference number of an original Invoice is inserted into the description, and the number of the original invoice in the Book/BusinessYear/Number format is saved into a long text. It is possible to set what will be printed by the ShowFormerInvoice parameter in the Invoice Out print report (VF_DOK01.AM).
A newly created Invoice is linked with all Invoices from whose items the Credit Note has been issued through the 9th page.
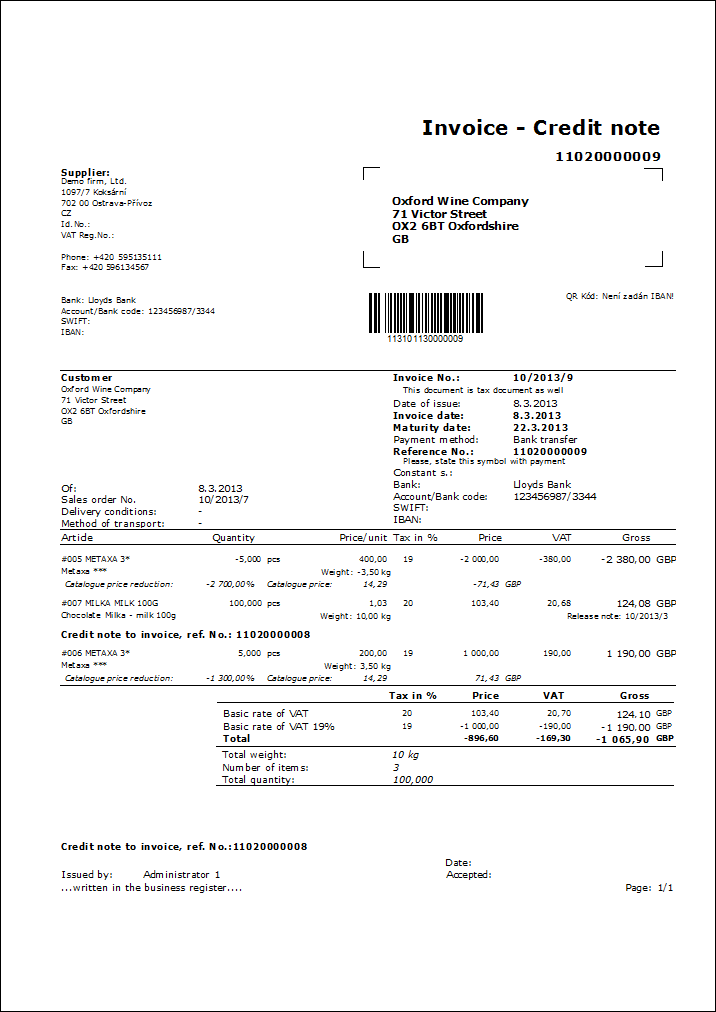
Create Stock Documents Only
By means of the Credit Notes function (FA_DOB.pas), it is also possible to create only the stock documents. In connection with that, the CreateInvoice parameter (create Invoices) has been created. This parameter enables to suppress the creation of new Invoices. If the CreateInvoice parameter is set to "No", you can check the Display Report checkbox in the initial form. Otherwise, it works the same way.
If the CreateInvoice parameter is set to "No", only stock documents will be created. The reference to the original Invoices is inserted on the 9th page of the stock documents (the same as on an Invoice - Credit Note). The references to the already created stock documents are inserted on the 9th page of the original Invoices (Relation type = "Credit Note").
If you want to create the Invoices later, you can use the Sale Items (Purchase Items) standard K2 tool. Here you can select the "Unbilled Credited Items" pre-defined filter that displays the items of the Sales Orders, to which an already credited and confirmed Release Note is existing, and which have not been invoiced yet (an Invoice does not exist).
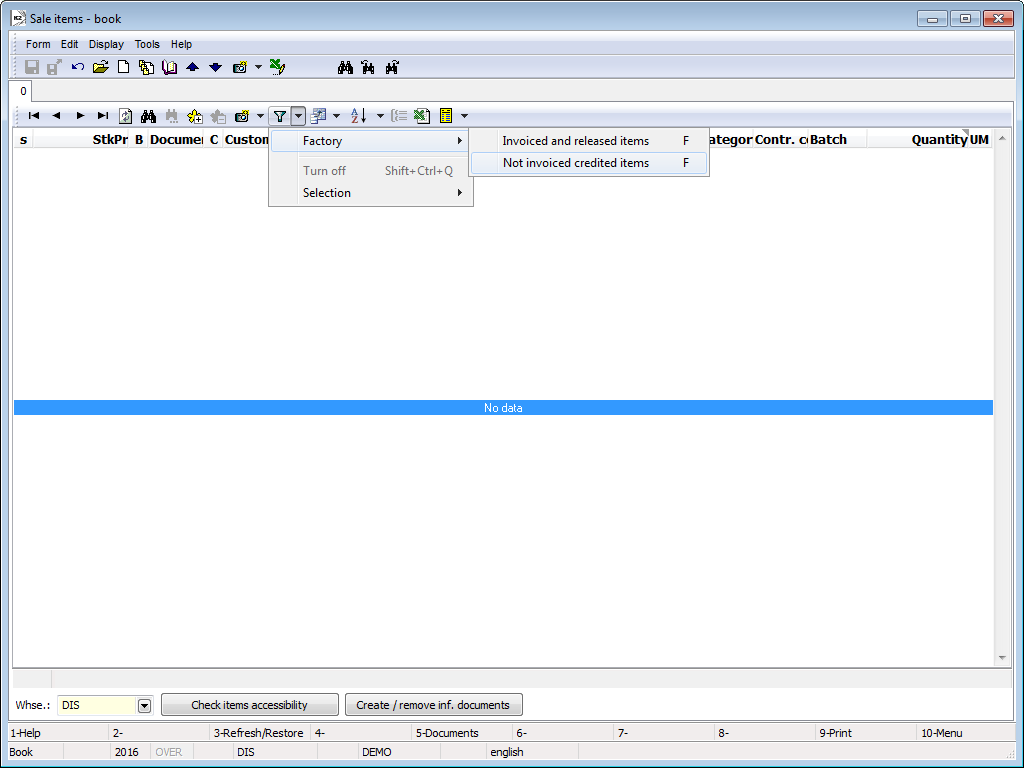
Picture: A list of pre-defined filters
After you run the selected filter, a form where you can select a customer for whom you want to create the Credited Invoice from a Release Note is displayed.

Picture: The form for selection the Customer in the "Unbilled credited items" filter
A list of all credited items of the Sales Order is displayed. It is for a selected customer, to whom a confirmed Release Note exists and no Invoice exists.
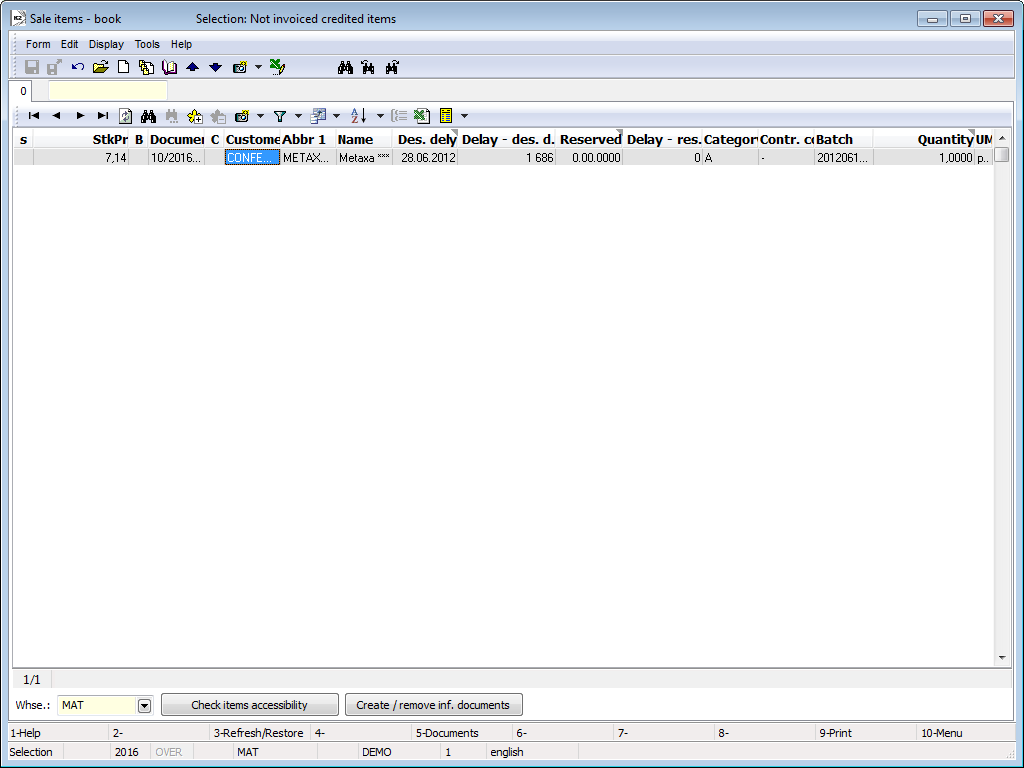
Picture: List of all credited items for a selected customer
After that, just indicate with asterisks the items to which you want to create an Invoice - Credit Note, then press the F5 key (Create Documents), and check that you want to create an Invoice in the form. It is also suitable to check the option to Create Documents Container, so to avoid searching for the Invoice, and press the OK button.
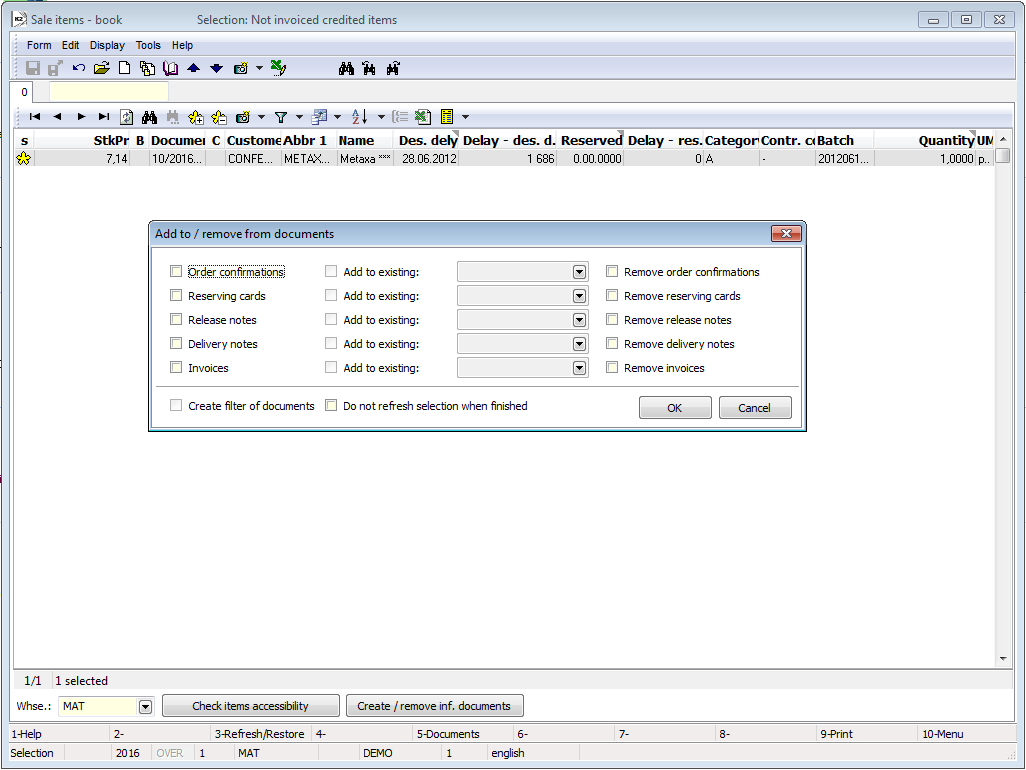
Picture: Create Invoices from Sale Items
In the Book of Invoices Out, just activate the filter where the credited Invoice is created. It is necessary to check the Credit Note flag in the Invoice and confirm and print the Invoice.
Posting
Correction of Price
Invoice Out |
311/604 311/343 |
10pcs x ?€189,89 |
?€1 898,89 ?€379 ,78 |
Invoice Out (Credit Note) |
311/604 311/343 |
-5pcs x ?€189,89 |
-?€949 ,44 -?€189,89 |
|
311/604 311/343 |
5pcs x ?€75,96 |
?€379 ,78 ?€?75,98 |
Correction of Quantity
Invoice In |
111/321 343/321 |
10pcs x ?€189,89 |
?€1 898,89 ?€379 ,78 |
Invoice In (Credit Note) |
111/321 343/321 |
-5pcs x ?€189,89 |
-?€949 ,44 -?€189,89 |
Credit Notes
Process No.: EXP014 |
Script Id: FEXP017 |
File: FA_DOB.PAS |
Script description: This function ensures that tax documents are created to the invoice items and to advances and their mutual interconnections. It is possible to use it in bulk to more invoices and to create only the stock doc. The solution is based on the new invoice being created to the original invoice, or rather to their items. The new invoice (Credit Note) should contain one or two items depending on whether it deals with amount or price corrections. |
||
Address in the tree: [Finance] [Credit Notes] |
||
Script parameters:
AccDate_VF - Accounting transaction date of an Invoice Out - CRN. |
ArticleFilter - No Yes - just the items from the article container will be displayed in an initial form. |
BorderCrossingDate - A Border crossing date that will be completed into the items. |
ConfirmInvoice - No Yes - a newly created invoice (Credit Note) and an advance (Credit Note) will be confirmed. |
ConfirmNewCommission - No Yes - if the parameter CreateNewCommission = Yes and its subordinate documents are confirmed, a newly created Sales Order will be confirmed as well. |
ConfirmRel - No Yes - a newly created Receipt Card/Release Note will be confirmed as well. |
ContractCode_VY - The abbreviation of a contract code of a newly created Release Note. |
CopyBatch_RP - Yes Yes - the batch from an original Receipt Card will be inserted into a Credit Note Receipt Card. No - the oldest batch with availability will be inserted into a Credit Note Receipt Card. |
CopyLocation_RP - Yes Yes - the location from an original Receipt Card will be inserted into a Credit Note Receipt Card. No - the location will not be inserted into a Credit Note Receipt Card. |
CorrTaxTypes - No Yes - the type of tax will be changed on a newly created Invoice (usage for the Slovak legislative). |
CreatedDocuments The parameter is necessary for an internal programme usage. |
CreateFreeInvoice - No Yes - a free Invoice will be created in case of price credit note. |
CreateInvoice - Yes No - a new invoice - credit note is not created. It is used if you want to create only the stock documents. |
CreateNewCommission - No The parameter is useful for Invoices Out and In only. Yes - a new Sales Order/Purchase Order is created as well. Items are not included in the original Sales Order/Purchase Order; No - a new Sales Order/Purchase Order is not created. |
CreateStockDoc - Yes Yes - creates a Receipt Card/Release Note to an Invoice. |
CopyPaymentCondition - Yes No - does not copy the payment conditions into a new Invoice - Credit Note. |
DateOfIssue_VF - Date of issue of an Invoice Out - CRN. |
EmptyInvoiceDate - No Yes - adds the null invoice date into a new Invoice. |
EnterRebate - No Yes - enters the discount on an item in price credit note; No - enters a new price of an item. |
IgnoreReceiptPrice_VY - No Yes - set the Ignore option to the income price when you value the sliding price or value by batches on the Release Note. |
IncidentalCost - Yes Yes - the items of price credit note will be marked as an Incidental Cost on the Invoice In. |
InvoicePostingKey Posting key abbreviation of an Invoice - Credit Note. |
LinkForOriginalInvoice - No Yes - the link to the original document will be inserted into items and to the 9th page of the created CRN. (Useful for repeated price credit notes.) |
Location_VF The internal number of Location for credited Release Notes. |
Messages - Yes Yes - after you agree on the initial form and the message, a query will appear. No - no query or message will display. |
NameOfReasonToDescr - No Yes - the reason of correction will be inserted into the Description of an Invoice - CRN (if a new one has been created). If the reason is saved into the code list, the Name from the code list will be inserted into the Description. |
NewAdvanceBook_PZ The setting of Books of Sale, where advances - CRNs will be created. |
NewAdvanceBook_VZ The setting of Books of Purchase, where advances - CRNs will be created. |
NewCommissionBook_PF The setting of Books of Purchase, where CRNs will be created. |
NewCommissionBook_VF The setting of Books of sale, where CRNs will be created. |
NewDocStatus The abbreviation of a Status that will be filled into newly created documents. |
NoInteractive - No Yes - a credit note will be created to all Invoice items without the form displaying. |
NoInteractiveXml The parameter is necessary for an internal programme usage. |
NoIntrastat - No Yes - the option 'Do not include to Intrastat' will be checked on an Invoice. |
OriginalStockPrice_VY - No Yes - the stock price from the original Release Note will be inserted into the Release Note in the case of a quantity credit note. |
PrintReport - No The parameter to pre-set the checkbox "Display the report". It is possible to display the report, even though the parameter "NoInteractive" is set to "Yes". |
ReasonForCorrection The parameter to pre-set the reason of correction - displayed in the Initial form. |
ReasonForCorrectionRequired - No Will require to fill in the reason for correction. Yes - if no reason for correction is created, a Credit Note will not be created. |
ReportNumber The parameter to enter the number of print report in F9 (to print the report with the set parameters). |
ReportPath_PF The parameter to print a special report of an Invoice In. It is necessary to enter the whole path to the saved report. |
ReportPath_PZ The parameter to print a special report of an Advance Received. It is necessary to enter the whole path to the saved report. |
ReportPath_VF The parameter to print a special report of an Invoice Out. It is necessary to enter the whole path to the saved report. |
ReportPath_VZ The parameter to print a special report of an Advance Provided. It is necessary to enter the whole path to the saved report. |
ShowOnlyToCreditNote - No Yes - only the items that can be credited will be displayed in the initial form. |
Stock_PF - 0 The parameter sets the stock number, where the Receipt Cards are being created. |
Stock_VF - 0 The parameter sets the stock number, where the Release Notes are being created. |
StockDocPostingKey - The abbreviation of the posting key of a Receipt Card / Release Note. |
Credit Notes in Preview Pane
We can display Credit Notes in the preview pane on pages 0 and 2 of Invoices. If a Credit Note is created to an Invoice, it will appear in the Invoice preview pane.
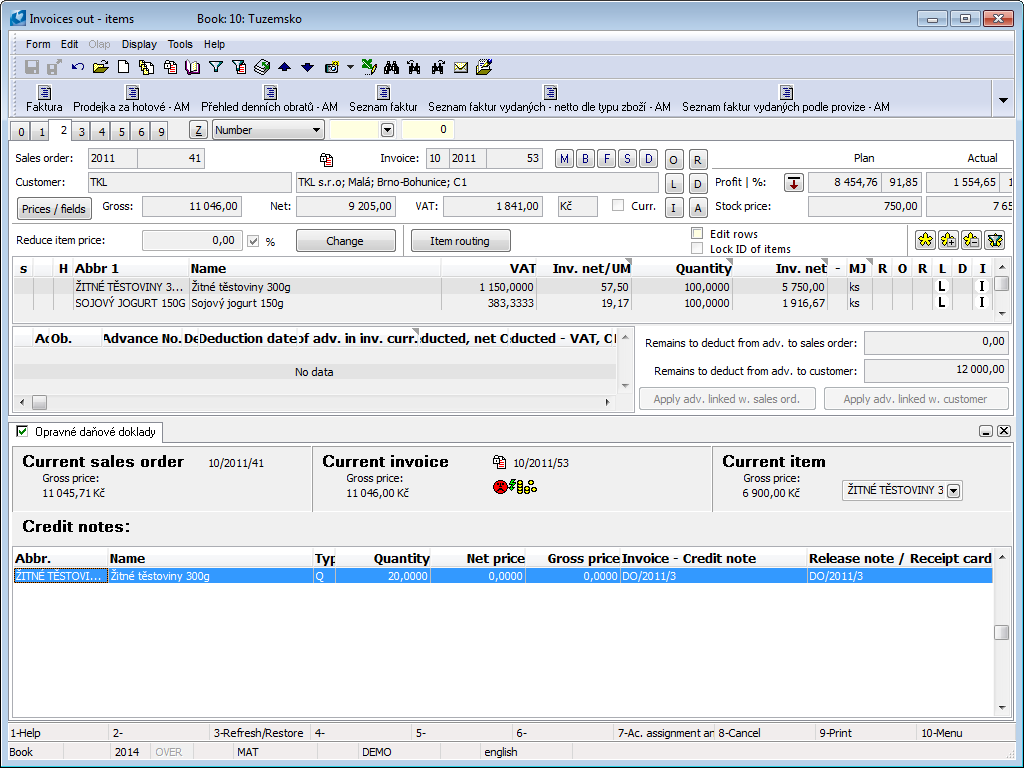
Picture: The Credit Notes Preview Pane
In the preview pane, the item of a newly created Credit Note is displayed. There is the letter M in the Type column. This means that the Note has been created with the correction of quantity. Double clicking the reference in the preview pane in the Invoice - Credit Note column will show the details of the Invoice (Credit Note), and the light indicator will be set on the particular item of this document. The detail of a created stock document maybe displayed by double clicking the record in the Release Note/Receipt Card column.
If you cannot see the preview pane, check whether you have the Display Preview Pane parameter activated.
If we have the parameter for displaying the preview pane active and the pane still does not show, it is necessary to set the scripts:
Go to the the Book of Invoices Out and open Preview Definition in the Display tab in the main menu. The Preview Reports and Forms window will appear. Press the Insert key for inserting a new record - the Reports book will open. Close the window. The 1st page in the window for a newly inserted report will appear. In its upper part, click on the yellow folder for opening files. In the database system, select the script called "FA_ItemConn_Form_Page0.PAS" and set on these parameters:
- Preview_PageNames with the value "STRANA0"
- Preview_GridName with the value "FGRID0"
In order to display the preview pane also on the second page, include the "FA_ItemConn_Form_Page2.PAS" script into the preview with the parameters:
- Preview_PageNames with the value "STRANA2"
- Preview_GridName with the value "FGRID21".
This procedure must be repeated again everywhere we wish to have the Credit Notes preview pane displayed, i.e. also in Invoices Out and Invoices In.
The "FA_ItemConn_Form_Page0.PAS" script is used also for the zero and second page of Advances Received and Advances Provided. Setting the page 0 is the same as with Invoices Out. To display the preview pane on the 2nd page of an Advance, we must set the following parameters:
- Preview_PageNames with the value "STRANA2"
- Preview_GridName with the value "FGRID0".
Invoices export into ISDOC format
Process No.: ZAK015 |
Script Id: FZAK040 |
File: FAV_ExportXML.pas |
Script description: The script enables the export of invoices out into ISDOC format, which is structured the "*.XML" file. Deducted advances are exported as well. |
||
Address in the tree: |
||
Script parameters:
Path - C:\ Set the way, where the file(s) should be exported. |
PaymentsInCash Set the value for payment in cash (divided by semicolon). |
TransferToAccount Set the value for Transfer payment (divided by semicolon). |
NonTaxedType - N An Abbreviation of a Tax type in the K2 for a type Not to assort into the Returns. |
PaymentsByCheck The parameter for a payment method - Payment by check (divided by semicolon). |
DocSupplementType - ALL Type of documents that will be exported from the 9th page of invoice (divided by semicolon in the parameter). |
OnlyConfirmed - Yes The parameter says, if just the confirmed invoices are exported. |
PaymentsByCreditCard The parameter for a payment method - Payment by credit card (divided by semicolon). |
AccountsBetweenPartners The parameter for a payment method - Accounts between partners (divided by semicolon). |
AlternativeItemDescription - No Yes - the name from invoice will be added into the item's description. |
DeliveryNoteType - 1 The link from the Invoice item: 1 - Delivery Note; 2 - Release Note. |
GenerateOnlyISDOCFile - No Yes - generates just the ISDOC file. |
PrimarySellersItemIdField Name of field with the primary identifier of an item. |
SecondarySellersItemIdField Name of field with the second identifier of an item. |
TertiarySellersItemIdField Name of field with the third identifier of an item |
AddNoteToDoc After the export, the note about executed export is inserted into the document. |
The user should set some parameters to have them right before he/she runs the script. They are:
- TransferToAccount - the user defines here the abbreviation used for the transfer method of payment.
- PaymentsInCash - the user defines here the abbreviation used for the method of payment in cash.
- DocSupplementType - defines the types of documents on the 9th page of invoice, which are exported together with the particular invoice.
- Path - the parameter for the link, where the exported file will be saved.
The script loads the information about the own company from the Client parameters. The RegisterIdentificationType/Preformatted (the identification of a doc. issuer) element is filled by the text from client of OP type from supplement.
Documents, which should be by this function exported, must be marked with the star. If the user runs the script from different page than from 0 page, then just this particular documents will be loaded into this form. Deducted advances are exported as well.
The form with two tables will be displayed after you run this script. Loaded documents, i.e. those, which the user has marked with the star, will be displayed in the upper part of this document. In the lower part are the documents from the 9th page of these documents. These documents are loaded according to the settings of the DocSupplementType parameter. By means of the Document button, the user can always switch from the form into the 1st page of a particular exported invoice where the light indicator is stated.
If the document has not been exported yet, it is marked by the asterisk and has no other flag. In case it has been already exported, it has a flag ![]() . It is possible to export the already exported document once again. You need to mark it to be exported again.
. It is possible to export the already exported document once again. You need to mark it to be exported again.
Just those document, which are marked with the sign, will be exported. One of possible supplements can be the document (e.g. PDF, DOC), which preset the preview of an invoice. By means of the Mark as Preview button, the service can mark this supplement and thereby declare it as an invoice preview in the exported file. The Display button opens and displays the supplements of an exported invoice directly from the Invoice Export form.
Picture: Invoice export form
If the user marks all required documents and supplements, he/ she can export them by means of OK button. The files including the supplements will be exported into the file with ISDOCX suppl. Location of an exported file will be able to be set by means of PATH parameter.
Each file in ISDOCX format always contains one document and an unlimited number of supplements, i.e. a new file will be created to each document which the user exports.
The user can open and browse the ISDOC files by means of ISDOCReader program. This program is available to be downloaded on the web pages www.isdoc.cz and is distributed together with the K2 informational system and is saved into the K2\SupportFiles\Lang5 file.
 next to the Method of transport field is mainly related to eshop. If there is an article where the